Breath@work - Change your Breath, Change your Life
W0 Rr82 St
1. ATENCION: Este soporte KIT TOP no es compatible con el equipamiento original de maletas de BMW.
BMW R850R / R1150R ‘02
W0RR82ST
ATTENTION: This KIT TOP rack is not compatible with the original equipment for BMW cases.
ATTENTION: Ce support KIT TOP n’est pas compatible avec l’équipement original de valises BMW.
ACHTUNG: Die Stützen KIT TOP sind nicht kompatibel mit der originalen Kofferausstattung von BMW.
ATTENZIONE: Questo supporto KIT TOP non è compatibile con l’apparecchiatura originale di valigie di BMW.
Consejo para un correcto montaje del kit: no apretar los tornillos del todo hasta asegurarse que el kit esté correctamente colocado y alinea-
do. En caso de montar los soportes KIT TOP (W0RR82ST) y su moto ya posee el KIT FULL (W0RR82SF) montado, deberá desmontar éste
y colocar primero los soportes KIT TOP (W0RR82ST). Nota: cuatro distanciadores Ø16Ø9X16 de los soportes KIT FULL quedan anulados.
Suggestion for a correct kit assembly: Do not tighten the screws before ensuring that the KIT is correctly positioned and aligned. When
mounting the KIT TOP brackets (W0RR82ST) and if your motorbike is already fitted with KIT FULL (W0RR82SF) you should dismount KIT
FULL and first position the brackets for KIT TOP (W0RR82ST). Note: four KIT FULL bracket distancers Ø16Ø9X16 are cancelled.
Conseil pour un montage correct du kit: Ne pas serrer les vis complètement avant d’être sûr que le KIT est correctement placé et ajusté.
En cas de montage des supports KIT TOP (W0RR82ST) et votre moto a déjà le KIT FULL (W0RR82SF) installé, vous devrez le démonter
et placer d’abord les supports KIT TOP (W0RR82ST). Remarque: quatre entretoises Ø16Ø9X16 des supports KIT FULL seront annulées.
Ratschlag für die korrekte montage des kits: Die Schrauben nicht ganz anziehen, bevor das KIT nicht richtig angebracht und ausgerichtet
ist. Sollen die Stützen KIT TOP (W0RR82ST) montiert werden und hat Ihr Motorrad schon das KIT FULL (W0RR82SF) installiert, müssen
Sie dieses abbauen und zuerst die Stützen KIT TOP (W0RR82ST) anbringen. Hinweis: vier Abstandhalter Ø16Ø9X16 der Stützen KIT
FULL werden nicht mehr benötigt.
KIT TOPMASTER
Consigli per un corretto montaggio del kit: Non stringere del tutto le viti fin tanto non si è sicuri che il kit è collocato correttamente e alli-
neato. Nel caso di montare i supporti KIT TOP (W0RR82ST), e se la sua moto possiede già il KIT FULL (W0RR82SF) montato, dovrà
smontare questo e collocare prima i supporti KIT TOP (W0RR82ST). Nota: quattro distanziatori Ø16Ø9X16 dei supporti KIT FULL restano
annullati.
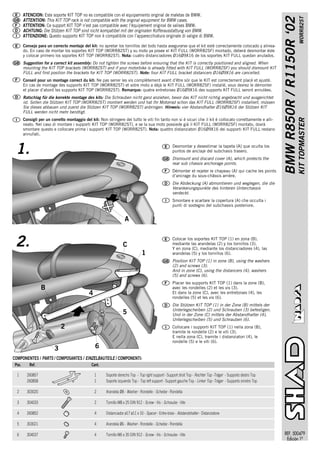
1. Desmontar y desestimar la tapeta (A) que oculta los
puntos de anclaje del subchasis trasero.
Dismount and discard cover (A), which protects the
rear sub chassis anchorage points.
Démonter et rejeter le chapeau (A) qui cache les points
d’ancrage du sous-châssis arrière.
Die Abdeckung (A) abmontieren und weglegen, die die
Verankerungspunkte des hinteren Unterchassis
verdeckt.
Smontare e scartare la copertura (A) che occulta i
punti di sostegno del subchassis posteriore.
A
2. C
Colocar los soportes KIT TOP (1) en zona (B),
mediante las arandelas (2) y los tornillos (3).
Y en zona (C), mediante los distanciadores (4), las
1 arandelas (5) y los tornillos (6).
Position KIT TOP (1) in zone (B), using the washers
(2) and screws (3).
And in zone (C), using the distancers (4), washers
(5) and screws (6).
Placer les supports KIT TOP (1) dans la zone (B),
B avec les rondelles (2) et les vis (3).
4 Et dans la zone (C), avec les entretoises (4), les
rondelles (5) et les vis (6).
Die Stützen KIT TOP (1) in der Zone (B) mittels der
Unterlegscheiben (2) und Schrauben (3) befestigen.
5 Und in der Zone (C) mittels der Abstandhalter (4),
Unterlegscheiben (5) und Schrauben (6).
2 Collocare i supporti KIT TOP (1) nella zona (B),
tramite le rondelle (2) e le viti (3).
E nella zona (C), tramite i distanziatori (4), le
rondelle (5) e le viti (6).
3 6
COMPONENTES / PARTS / COMPOSANTES / EINZELBAUTEILE / COMPONENTI:
Pos. Ref. Cant.
1 260857 1 Soporte derecho Top - Top right support - Support droit Top - Rechter Top -Träger - Supporto destro Top
260858 1 Soporte izquierdo Top - Top left support - Support gauche Top - Linker Top -Träger - Supporto sinistro Top
2 303020 2 Arandela Ø8 - Washer - Rondelle - Scheibe - Rondella
3 304033 2 Tornillo M8 x 25 DIN 912 - Screw - Vis - Schraube - Vite
4 260852 4 Distanciador ø17 ø11 x 10 - Spacer - Entre-toise - Abstandshalter - Distanziatore
5 303021 4 Arandela Ø6 - Washer - Rondelle - Scheibe - Rondella
6 304037 4 Tornillo M6 x 35 DIN 912 - Screw - Vis - Schraube - Vite REF. 500479
Edición 1ª