Beginners Guide to TikTok for Search - Rachel Pearson - We are Tilt __ Bright...
Y0 Tm59 St - Yamaha T Max
1. CONSEJO PARA UN CORRECTO MONTAJE DEL KIT: No apretar los tornillos del todo hasta asegurarse que el KIT esté correctamente colocado y alineado.
YAMAHA T-MAX 500 ‘09
Y0TM59ST
PROPER KIT ASSEMBLY: Do not fully tighten the screws until it is ensured that the KIT is correctly attached and aligned.
CONSEIL POUR UN MONTAGE CORRECT DU KIT: Ne pas serrer les vis complètement jusqu’à s’être assuré que le KIT est correctement placé et aligné.
RATGEBER FÜR EINE KORREKTE MONTAGE DES KIT: Ziehen Sie die Schrauben nicht ganz fest, bevor Sie sich nicht vergewissert haben, daß der
Bausatz korrekt eingestellt und ausgerichtet ist.
CONSIGLI PER UN CORRETTO MONTAGGIO DEL KIT: Non stringere del tutto le viti finché non si è controllato che il Kit è situato e allineato correttamente.
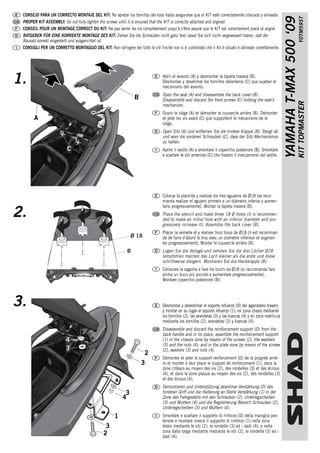
1. Abrir el asiento (A) y desmontar la tapeta trasera (B).
Desmontar y desetimar los tornillos delanteros (C) que sujetan el
mecanismo del asiento.
Open the seat (A) and disassemble the back cover (B).
B Disassemble and discard the front screws (C) holding the seat’s
KIT TOPMASTER
mechanism.
Ouvrir le siège (A) et démonter le couvercle arrière (B). Démonter
A et jeter les vis avant (C) que supportent le mécanisme de le
siège.
Open Sitz (A) und entfernen Sie die hintere Klappe (B). Steigt ab
und wies die vorderen Schrauben (C), dass der Sitz Mechanismus
zu halten.
C Aprire il sedile (A) e smontare il coperchio posteriore (B). Smontare
e scartare le viti anteriore (C) che fissano il meccanismo dal sedile.
Colocar la plantilla y realizar los tres agujeros de Ø18 (se reco-
mienta realizar el agujero primero a un diámetro inferior y aumen-
tarlo progresivamente). Montar la tapeta trasera (B).
2. Place the stencil and make three 18 Ø holes (it is recommen-
ded to make an initial hole with an inferior diameter and pro-
gressively increase it). Assemble the back cover (B).
Placer la semelle et y réaliser trois trous de Ø18 (il est recomman-
Ø 18 dé de faire d’abord le trou avec un diamètre inferieur et augmen-
ter progressivement). Monter le couvercle arrière (B).
B Legen Sie die Vorlage und nehmen Sie die drei Löcher Ø18
(empfohlen machen das Loch kleiner als die erste und diese
schrittweise steigern. Montieren Sie die Heckklappe (B).
Collocare la sagoma e fare tre buchi da Ø18 (si raccomanda fare
prima un buco più piccolo e aumentare progressivamente).
Montare coperchio posteriore (B).
3. Desmontar y desestimar el soporte refuerzo (D) del agarradero trasero
y montar en su lugar el soporte refuerzo (1), en zona chasis mediante
los tornillos (2), las arandelas (3) y las tuercas (4) y en zona matrícula
mediante los tornillos (2), arandelas (3) y tuercas (4).
Disassemble and discard the reinforcement support (D) from the
back handle and in its place, assemble the reinforcement support
4 (1) in the chassis zone by means of the screws (2), the washers
(3) and the nuts (4); and in the plate zone by means of the screws
3 (2), washers (3) and nuts (4).
2
Démonter et jeter le support renforcement (D) de la poignée arriè-
3 re et monter à leur place le support de renforcement (1), dans la
zone châssis au moyen des vis (2), des rondelles (3) et des écrous
(4), et dans la zone plaque au moyen des vis (2), des rondelles (3)
et des écrous (4).
Demontieren und Unterstützung desetimar Verstärkung (D) des
3 hinteren Griff und die Halterung an Stelle Verstärkung (1) in der
4 Zone des Fahrgestells mit den Schrauben (2), Unterlegscheiben
(3) und Muttern (4) und die Registrierung Bereich Schrauben (2),
Unterlegscheiben (3) und Muttern (4).
1 Smontare e scartare il supporto di rinforzo (D) della maniglia pos-
teriore e montare invece il supporto di rinforzo (1) nella zona
3 telaio mediante le viti (2), le rondelle (3) ed i dadi (4); e nella
zona dalla targa mediante mediante le viti (2), le rondelle (3) ed i
2 dadi (4).
2. YAMAHA T-MAX 500 ‘09 4. 7 Montar el soporte KIT TOP (5) en zona central superior mediante
Y0TM59ST
el distanciador (6), el tornillo (7) y la arandela (8) y en zona
8 superior delantera mediante los distanciadores (9), los tornillos
10 (10) y arandelas (8).
Assemble the KIT TOP support (5) in the upper central zone by
means of the spacer (6), the screw (7) and the washer (8); and
5 in the upper front zone by means of the spacers (9), the screws
8 (10) and the washers (8).
6 Monter le support KIT TOP (5) dans la zone centrale supérieure
au moyen de l’ entretoise (6), le vis (7) et la rondelle (8) et dans
9 la zone supérieur avant au moyen des entretoises (9), des vis
(10) et des rondelles (8).
TOP KIT die Halterung (5) im oberen mittleren Bereich durch
den Abstandhalter (6), die Schraube (7) und Scheibe (8) und
oben und vorne mit den Abstandshaltern (9), Schrauben (10)
und Unterlegscheiben (8).
KIT TOPMASTER
Montare il supporto KIT TOP (5) nella zona superiore centrale
mediante i distanziatori (6), le viti (7) e la rondella (8), e nella
zona superiore anteriore mediante i distanziatori (9), le viti 11) e le
rondelle (8).
5. Por último en zona inferior fijarlo al soporte refuerzo (1) median-
te los tornillos (11), las arandelas (8) y las tuercas (12). Cerrar el
A asiento delantero (A).
Last, attach it to the reinforcement support (1) in the lower zone
by means of the screws (11), the washers (8) and the nuts (12).
Close the back seat (A).
Finalement, dans la zone inferieur fixer au support renforcement
(1), au moyen des vis (11), des rondelles (8) et des écrous (12).
Fermer le siège avant (A).
11
Schließlich im Tretlager fix Verstärkung (1) durch Schrauben
8 (11), Unterlegscheiben (8) und Muttern (12). Schließen Sie die
vordere Sitzbank (A).
1 5 Per ultimo, nella zona inferiore fissarlo al supporto di rinforzo (1),
mediante le viti (11), le rondelle (8) ed i dadi (12). Chiudere il
sedile anteriore (A).
8
12
COMPONENTES / PARTS / COMPOSANTES / EINZELBAUTEILE / COMPONENTI:
Pos. Ref. Cant.
1 261266 1 Soporte refuerzo - Reinforcement support - Support renforcement - Tretlager fix Verstärkung - Supporto di rinforzo
2 304057 6 Tornillo M6 x 25 DIN 912 - Screw - Vis - Schraube - Vite
3 303017 12 Arandela Ø18 x Ø6 - Washer - Rondelle - Scheibe - Rondella
4 302021 6 Tuerca M6 autoblocante - Self-blocking Nut M6 - Écrou M6 autobloquant - Selbstanziehende Mutter M6 - Bullone M6 autobloccante
5 261263 1 KIT TOPMASTER
6 260213 1 Distanciador Ø16 Ø9 x 12 - Spacer - Entre-toise - Abstandshalter - Distanziatore
7 304039 1 Tornillo M8x40 DIN 7380 - Screw - Vis - Schraube - Vite
8 303020 7 Arandela Ø8 - Washer - Rondelle - Scheibe - Rondella
9 261265 2 Distanciador Ø16 Ø9 x 53 - Spacer - Entre-toise - Abstandshalter - Distanziatore
10 304173 2 Tornillo M8x75 DIN 7380 - Screw - Vis - Schraube - Vite
11 304028 2 Tornillo M8x25 DIN 7380 - Screw - Vis - Schraube - Vite
REF. 500479 12 302024 2 Tuerca M8 autoblocante - Self-blocking Nut M8 - Écrou M8 autobloquant - Selbstanziehende Mutter M8 - Bullone M8 autobloccante
Edición 1ª