Schiller at 1 ekg machines user_manual
•
4 gefällt mir•8,378 views

Schiller at 1 ekg machines user_manual http://cardiologyforless.com/EKG-Machines/

Empfohlen
Weitere ähnliche Inhalte
Was ist angesagt?
Was ist angesagt? (19)
Andere mochten auch
Ähnlich wie Schiller at 1 ekg machines user_manual
Ähnlich wie Schiller at 1 ekg machines user_manual (20)
Mehr von Discount Cardiology
Schiller at 1 ekg machines user_manual
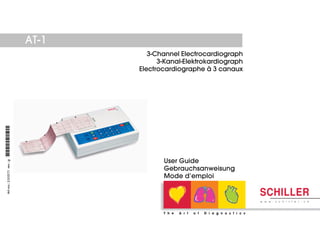
- 1. AT-1 Art.-no.:2.510171rev.:g*2.510171* 3-Channel Electrocardiograph 3-Kanal-Elektrokardiograph Electrocardiographe à 3 canaux User Guide Gebrauchsanweisung Mode d’emploi
- 3. ENGLISHDEUTSCHENGLISHDEUTSCHFRANÇAISFRANÇAIS AT-1 3-Channel Electrocardiograph 3-Kanal-Elektrokardiograph Electrocardiographe à 3 canaux AT-1 3-Channel Electrocardiograph 3-Kanal-Elektrokardiograph Electrocardiographe à 3 canaux
- 4. AAAAATTTTT-1 User Guide - English-1 User Guide - English-1 User Guide - English-1 User Guide - English-1 User Guide - English AAAAATTTTT-1Gebrauchsanweisung -Deutsch-1Gebrauchsanweisung -Deutsch-1Gebrauchsanweisung -Deutsch-1Gebrauchsanweisung -Deutsch-1Gebrauchsanweisung -Deutsch Mode d'emploi pour l’AMode d'emploi pour l’AMode d'emploi pour l’AMode d'emploi pour l’AMode d'emploi pour l’ATTTTT-1 - F-1 - F-1 - F-1 - F-1 - Françaisrançaisrançaisrançaisrançais Article Number 2.510171gArticle Number 2.510171gArticle Number 2.510171gArticle Number 2.510171gArticle Number 2.510171g a Sept. 1995, b Jun. 1999, c Feb. 2000, d Feb. 2001, e Jan. 2002 f Aug. 2004, g Nov. 2005 Associated Document Guide to the SCHILLER Interpretation and Measurement Program E/ D/ F Article Number 2.510179 SCHILLER AG Altgasse 68 CH - 6341 Baar, Switzerland Phone: ++ 41 41 766 42 42 Fax: ++ 41 41 761 08 80 www.schiller.ch AAAAATTTTT-1User Guide - English-1User Guide - English-1User Guide - English-1User Guide - English-1User Guide - English AAAAATTTTT-1 Gebrauchsanweisung -Deutsch-1 Gebrauchsanweisung -Deutsch-1 Gebrauchsanweisung -Deutsch-1 Gebrauchsanweisung -Deutsch-1 Gebrauchsanweisung -Deutsch Mode d'emploi pour l’AMode d'emploi pour l’AMode d'emploi pour l’AMode d'emploi pour l’AMode d'emploi pour l’ATTTTT-1 - F-1 - F-1 - F-1 - F-1 - Françaisrançaisrançaisrançaisrançais Article Number 2.510171 gArticle Number 2.510171 gArticle Number 2.510171 gArticle Number 2.510171 gArticle Number 2.510171 g a Sept. 1995, b Jun. 1999, c Feb. 2000, d Feb. 2001, e Jan. 2002 f Aug. 2004, g Nov.2005 Associated Document Guide to the SCHILLER Interpretation and Measurement Program E/ D/ F Article Number 2.510179 SCHILLER AG Altgasse 68 CH - 6341 Baar, Switzerland Phone: ++ 41 41 766 42 42 Fax: ++ 41 41 761 08 80 www.schiller.ch
- 5. ENGLISHDEUTSCHENGLISHDEUTSCHFRANÇAISFRANÇAIS Where to Obtain SerWhere to Obtain SerWhere to Obtain SerWhere to Obtain SerWhere to Obtain Service and Sales Advicevice and Sales Advicevice and Sales Advicevice and Sales Advicevice and Sales Advice Kundendienst und VKundendienst und VKundendienst und VKundendienst und VKundendienst und Verkerkerkerkerkaufs-/Beratungsstellenaufs-/Beratungsstellenaufs-/Beratungsstellenaufs-/Beratungsstellenaufs-/Beratungsstellen Coordonnées de nos serCoordonnées de nos serCoordonnées de nos serCoordonnées de nos serCoordonnées de nos services d’assistance technique et commercialevices d’assistance technique et commercialevices d’assistance technique et commercialevices d’assistance technique et commercialevices d’assistance technique et commerciale The SCHILLER sales and service centre network is worldwide. For the address of your local distributor, contact your nearest SCHILLER subsidiary. In case of difficulty a complete list of all distributors and subsidiaries is provided on our internet site: http://www.schiller.ch SCHILLER besitzt ein weltweites Netz von Kundendienst-, Verkaufs- und Beratungsstellen. Fragen Sie bei der nächsten SCHILLER- Niederlassung nach Ihrer lokalen Vertretung. Eine vollständige Liste aller Vertreter und Niederlassungen finden Sie auf unserer Internet-Site: http://www.schiller.ch SCHILLER entretient un réseau international composé de services clients, de services commerciaux et d’agences de conseil. Pour obtenir les coordonnées de votre représentant local, veuillez vous adresser à la filiale SCHILLER la plus proche de votre domicile. Vous trouverez une liste complète de tou(te)s les représentants et filiales sur notre http://www.schiller.ch Where to Obtain SerWhere to Obtain SerWhere to Obtain SerWhere to Obtain SerWhere to Obtain Service and Sales Advicevice and Sales Advicevice and Sales Advicevice and Sales Advicevice and Sales Advice Kundendienst und VKundendienst und VKundendienst und VKundendienst und VKundendienst und Verkerkerkerkerkaufs-/Beratungsstellenaufs-/Beratungsstellenaufs-/Beratungsstellenaufs-/Beratungsstellenaufs-/Beratungsstellen Coordonnées de nos serCoordonnées de nos serCoordonnées de nos serCoordonnées de nos serCoordonnées de nos services d’assistance technique et commercialevices d’assistance technique et commercialevices d’assistance technique et commercialevices d’assistance technique et commercialevices d’assistance technique et commerciale The SCHILLER sales and service centre network is worldwide. For the address of your local distributor, contact your nearest SCHILLER subsidiary. In case of difficulty a complete list of all distributors and subsidiaries is provided on our internet site: http://www.schiller.ch SCHILLER besitzt ein weltweites Netz von Kundendienst-, Verkaufs- und Beratungsstellen. Fragen Sie bei der nächsten SCHILLER- Niederlassung nach Ihrer lokalen Vertretung. Eine vollständige Liste aller Vertreter und Niederlassungen finden Sie auf unserer Internet-Site: http://www.schiller.ch SCHILLER entretient un réseau international composé de services clients, de services commerciaux et d’agences de conseil. Pour obtenir les coordonnées de votre représentant local, veuillez vous adresser à la filiale SCHILLER la plus proche de votre domicile. Vous trouverez une liste complète de tou(te)s les représentants et filiales sur notre http://www.schiller.ch
- 8. ii ii Important Information iv Safety Information vii Short Form Instructions 1 Introduction 3 Modes of Operation 4 Automatic Mode 4 a. without external printer connected or printer switched off 4 b. with external printer connected and switched on 4 Modes of Operation 5 Manual Mode 5 Automatic Mode 6 a. without external printer connected or printer switched off 6 b. with external printer 7 Manual Mode 8 Location & Power 10 Switching On and Off 11 Keyboard 13 Settings 14 Default Settings 17 Language 18 Filters 19 Baseline Filter 19 Important Information iv Safety Information vii Short Form Instructions 1 Introduction 3 Modes of Operation 4 Automatic Mode 4 a. without external printer connected or printer switched off 4 b. with external printer connected and switched on 4 Modes of Operation 5 Manual Mode 5 Automatic Mode 6 a. without external printer connected or printer switched off 6 b. with external printer 7 Manual Mode 8 Location & Power 10 Switching On and Off 11 Keyboard 13 Settings 14 Default Settings 17 Language 18 Filters 19 Baseline Filter 19
- 9. iii iii ENGLISHENGLISH Mains Filter 20 Myogram Filter 21 Defining Lead Sequence & Printout 22 Acoustic QRS Indication 24 Time / Date 24 Automatic Mode (ECG) Settings, Internal Printer 26 Automatic Mode (ECG) Settings, External Printer 30 Automatic Mode (ECG) Settings 34 Service Printout 36 Installing Software Options 38 Patient Cable Connections 39 Settings in Automatic Mode 41 Patient Data Field 41 Measurements 42 Heart Rate (HR) 42 Intervals 42 Electrical Axes 43 Care & Maintenance 48 Replacing the Recording Paper 50 Thermal Paper Handling 52 Trouble Shooting 53 Technical Data 55 Mains Filter 20 Myogram Filter 21 Defining Lead Sequence & Printout 22 Acoustic QRS Indication 24 Time / Date 24 Automatic Mode (ECG) Settings, Internal Printer 26 Automatic Mode (ECG) Settings, External Printer 30 Automatic Mode (ECG) Settings 34 Service Printout 36 Installing Software Options 38 Patient Cable Connections 39 Settings in Automatic Mode 41 Patient Data Field 41 Measurements 42 Heart Rate (HR) 42 Intervals 42 Electrical Axes 43 Care & Maintenance 48 Replacing the Recording Paper 50 Thermal Paper Handling 52 Trouble Shooting 53 Technical Data 55
- 10. iv iv Disposal Instructions and Battery Care Battery Care and Disposal Instructions ° DO NOT DISPOSE OF THE BATTERY BY FIRE OR INCINERATOR - DANGER OF EXPLOSION ° DO NOT ATTEMPT TO RECHARGE THE BATTERY - DANGER OF EXPLOSION ° DO NOT OPEN THE BATTERY CASING - DANGER OF ACID BURN Only dispose of the battery in official recycling centres or municipally approved areas. Alternatively, used batteries can be returned to SCHILLER AG for disposal. Unit Disposal Instructions Units no longer required can be returned to SCHILLER AG for disposal. Alternatively dispose of the unit in municipally ap- proved recycling centres. This equipment has been tested and found to comply with the limits for a class A digital device, pursuant to both Part 15 of the FCC (Federal Communications Commission) Rules and the radio interference regulations of the Canadian Department of Communications. These limits are designed to provide reasonable protec- tion against harmful interference when the equipment is operated in a commercial environment. This equip- ment generates, uses and can radiate radio frequency energy and, if not installed and used in accordance with this instruction manual, may cause harmful interference to radio communications. Operation of this equip- ment in a residential area is likely to cause harmful interference in which case the user will be required to correct the interference at his own expense. Disposal Instructions and Battery Care Battery Care and Disposal Instructions ° DO NOT DISPOSE OF THE BATTERY BY FIRE OR INCINERATOR - DANGER OF EXPLOSION ° DO NOT ATTEMPT TO RECHARGE THE BATTERY - DANGER OF EXPLOSION ° DO NOT OPEN THE BATTERY CASING - DANGER OF ACID BURN Only dispose of the battery in official recycling centres or municipally approved areas. Alternatively, used batteries can be returned to SCHILLER AG for disposal. Unit Disposal Instructions Units no longer required can be returned to SCHILLER AG for disposal. Alternatively dispose of the unit in municipally ap- proved recycling centres. This equipment has been tested and found to comply with the limits for a class A digital device, pursuant to both Part 15 of the FCC (Federal Communications Commission) Rules and the radio interference regulations of the Canadian Department of Communications. These limits are designed to provide reasonable protec- tion against harmful interference when the equipment is operated in a commercial environment. This equip- ment generates, uses and can radiate radio frequency energy and, if not installed and used in accordance with this instruction manual, may cause harmful interference to radio communications. Operation of this equip- ment in a residential area is likely to cause harmful interference in which case the user will be required to correct the interference at his own expense. Important Information Important Information
- 11. v v ENGLISHENGLISH Power Supply The mains connection is on the rear of the unit. The power supply voltage is set by the factory for 100-115V (nom. 110V) or 220-240V (nom. 230V) working. The setting is indicated by the indented metal strip on the fuse panel. Contact your dealer if the voltage needs to be changed. The mains indicator lamp on the keyboard is always lit when the unit is connected to the mains supply. The unit can either be operated from the mains supply or from the built-in rechargeable battery. Changing a Mains Fuse If it is necessary to change a fuse, always replace with the correct rating i.e. 2x200mAT for 230V, or 2x315mAT for 110V. To change a fuse press the two retaining lugs on the side of the fuse panel (situated below the mains connec- tor on the back panel). Remove the fuse panel and replace the fuse(s). Click back the fuse panel. Power Supply The mains connection is on the rear of the unit. The power supply voltage is set by the factory for 100-115V (nom. 110V) or 220-240V (nom. 230V) working. The setting is indicated by the indented metal strip on the fuse panel. Contact your dealer if the voltage needs to be changed. The mains indicator lamp on the keyboard is always lit when the unit is connected to the mains supply. The unit can either be operated from the mains supply or from the built-in rechargeable battery. Changing a Mains Fuse If it is necessary to change a fuse, always replace with the correct rating i.e. 2x200mAT for 230V, or 2x315mAT for 110V. To change a fuse press the two retaining lugs on the side of the fuse panel (situated below the mains connec- tor on the back panel). Remove the fuse panel and replace the fuse(s). Click back the fuse panel. Important Information Important Information
- 12. vi vi Terms of Warranty The SCHILLER AT-1 is warranted against defects in material and manufacture for the duration of one year (as from date of purchase). Excluded from this guarantee is damage caused by an accident or as a result of improper handling. The warranty entitles free replacement of the defective part. Any liability for subsequent damage is excluded. The warranty is void if unauthorized or unqualified persons attempt to make repairs. In case of a defect, contact your dealer or the manufacturer. The manufacturer can only be held responsible for the safety, reliability, and performance of the apparatus if: * assembly operations, extensions, readjustments, modifications, or repairs are carried out by persons authorized by him, and * the AT-1 and approved attached equipment are used in accordance with the manufacturers instructions. THERE ARE NO EXPRESS OR IMPLIED WARRANTIES WHICH EXTEND BEYOND THE WARRANTIES HEREINABOVE SET FORTH. SCHILLER MAKES NO WARRANTY OF MERCHANTABILITY OR FITNESS FOR A PARTICULAR PURPOSE WITH RESPECT TO THE PRODUCT OR PARTS THEREOF. About this Handbook The philosophy of SCHILLER is one of continuous improvement. Our aim is to provide the user with the most up-to-date information and the latest technological developments. Your suggestions and comments are welcome on all SCHILLER documentation. Please contact the SCHILLER Technical Documentation Department. PHYSICIAN‘S RESPONSIBILITY THE AT-1 ELECTROCARDIOGRAPH IS PROVIDED FOR THE EXCLUSIVE USE OF QUALIFIED PHYSICIANS OR PERSONNEL UNDER THEIR DIRECT SUPERVISION. THE NUMERICAL AND GRAPHICAL RESULTS FROM A RECORDING MUST BE EXAMINED WITH RESPECT TO THE PATIENTS OVERALL CLINICAL CONDITION. THE RECORDING PREPARATION QUALITY AND THE GENERAL RECORDED DATA QUALITY, WHICH COULD EFFECT THE REPORT DATA ACCURACY, MUST ALSO BE TAKEN INTO ACCOUNT. IT IS THE PHYSICIANS RESPONSIBILITY TO MAKE THE DIAGNOSIS OR TO OBTAIN EXPERT OPINION ON THE RESULTS, AND TO INSTITUTE CORRECT TREATMENT IF INDICATED. FEDERAL LAW IN THE USA RESTRICTS THIS DEVICE TO SALE BY OR ON THE ORDER OF A PHYSICIAN NOTES Terms of Warranty The SCHILLER AT-1 / AT-1 smartprint is warranted against defects in material and manufacture for the duration of one year (as from date of purchase). Excluded from this guarantee is damage caused by an accident or as a result of improper handling. The warranty entitles free replacement of the defective part. Any liability for subsequent damage is excluded. The warranty is void if unauthorized or unqualified persons attempt to make repairs. In case of a defect, contact your dealer or the manufacturer. The manufacturer can only be held responsible for the safety, reliability, and performance of the apparatus if: * assembly operations, extensions, readjustments, modifications, or repairs are carried out by persons authorized by him, and * the AT-1 / AT-1 smartprint and approved attached equipment are used in accordance with the manufacturers instructions. THERE ARE NO EXPRESS OR IMPLIED WARRANTIES WHICH EXTEND BEYOND THE WARRANTIES HEREINABOVE SET FORTH. SCHILLER MAKES NO WARRANTY OF MERCHANTABILITY OR FITNESS FOR A PARTICULAR PURPOSE WITH RESPECT TO THE PRODUCT OR PARTS THEREOF. About this Handbook The philosophy of SCHILLER is one of continuous improvement. Our aim is to provide the user with the most up-to-date information and the latest technological developments. Your suggestions and comments are welcome on all SCHILLER documentation. Please contact the SCHILLER Technical Documentation Department. PHYSICIAN‘S RESPONSIBILITY THE AT-1 / AT-1 SMARTPRINT ELECTROCARDIOGRAPH IS PROVIDED FOR THE EXCLUSIVE USE OF QUALIFIED PHYSICIANS OR PERSONNEL UNDER THEIR DIRECT SUPERVISION. THE NUMERICAL AND GRAPHICAL RESULTS FROM A RECORDING MUST BE EXAMINED WITH RESPECT TO THE PATIENTS OVERALL CLINICAL CONDITION. THE RECORDING PREPARATION QUALITY AND THE GENERAL RECORDED DATA QUALITY, WHICH COULD EFFECT THE REPORT DATA ACCURACY, MUST ALSO BE TAKEN INTO ACCOUNT. IT IS THE PHYSICIANS RESPONSIBILITY TO MAKE THE DIAGNOSIS OR TO OBTAIN EXPERT OPINION ON THE RESULTS, AND TO INSTITUTE CORRECT TREATMENT IF INDICATED. FEDERAL LAW IN THE USA RESTRICTS THIS DEVICE TO SALE BY OR ON THE ORDER OF A PHYSICIAN Important Information Important Information
- 13. vii vii ENGLISHENGLISH DO NOT USE SOLVENT CLEANERS. THIS UNIT COMPLIES WITH EMC REGULATIONS FOR MEDICAL PRODUCTS WHICH AFFORDS PROTECTION AGAINST EMISSIONS AND ELECTRICAL INTERFERENCE. HOWEVER SPECIAL CARE MUST BE EXERCISED WHEN THE UNIT IS USED WITH HIGH FREQUENCY EQUIPMENT. BEFORE USING THE UNIT, ENSURE THAT AN INTRODUCTION REGARDING THE UNIT FUNCTIONS AND THE SAFETY PRECAUTIONS HAS BEEN PROVIDED BY A PRODUCT REPRESENTATIVE. CAUTIONS SWITCH THE UNIT OFF BEFORE CLEANING AND DISCONNECT FROM THE MAINS. THE DEVICE MUST ONLY BE OPERATED USING BATTERY POWER IF THE EARTH CONNECTION IS SUSPECT OR IF THE MAINS LEAD IS DAMAGED OR SUSPECTED OF BEING DAMAGED. USE ONLY ACCESSORIES AND OTHER PARTS RECOMMENDED OR SUPPLIED BY SCHILLER AG. USE OF OTHER THAN RECOM- MENDED OR SUPPLIED PARTS MAY RESULT IN INJURY INACCURATE INFORMATION AND / OR DAMAGE TO THE UNIT. IT MUST BE ENSURED THAT NEITHER THE PATIENT NOR THE ELECTRODES (INCLUDING THE NEUTRAL ELECTRODE) COME INTO CONTACT WITH OTHER PERSONS OR CONDUCTING OBJECTS (EVEN IF THESE ARE EARTHED). THERE IS NO DANGER WHEN USING THE ECG UNIT FOR A PACEMAKER PATIENT OR WITH SIMULTANEOUS USE OF OTHER ELECTRI- CAL STIMULATION EQUIPMENT. HOWEVER, THE STIMULATION UNITS SHOULD ONLY BE USED AT A SUFFICIENT DISTANCE FROM THE ELECTRODES. IN CASE OF DOUBT, THE PATIENT SHOULD BE DISCONNECTED FROM THE RECORDER. IF SEVERAL UNITS ARE COUPLED THERE IS A DANGER OF SUMMATION OF LEAKAGE CURRENTS. WHEN OPERATING SEVERAL DEVICES FOR MEDICAL AND NON-MEDICAL APPLICATION DO NOT USE ANY EXTENSION CABLES OR DISTRIBUTION BOXES FOR THE CONNECTION. EARTH MUST BE CONNECTED WHEN THE EXTERNAL PRINTER IS USED. NOTES DO NOT USE SOLVENT CLEANERS. THIS UNIT COMPLIES WITH EMC REGULATIONS FOR MEDICAL PRODUCTS WHICH AFFORDS PROTECTION AGAINST EMISSIONS AND ELECTRICAL INTERFERENCE. HOWEVER SPECIAL CARE MUST BE EXERCISED WHEN THE UNIT IS USED WITH HIGH FREQUENCY EQUIPMENT. BEFORE USING THE UNIT, ENSURE THAT AN INTRODUCTION REGARDING THE UNIT FUNCTIONS AND THE SAFETY PRECAUTIONS HAS BEEN PROVIDED BY A PRODUCT REPRESENTATIVE. CAUTIONS SWITCH THE UNIT OFF BEFORE CLEANING AND DISCONNECT FROM THE MAINS. THE DEVICE MUST ONLY BE OPERATED USING BATTERY POWER IF THE EARTH CONNECTION IS SUSPECT OR IF THE MAINS LEAD IS DAMAGED OR SUSPECTED OF BEING DAMAGED. USE ONLY ACCESSORIES AND OTHER PARTS RECOMMENDED OR SUPPLIED BY SCHILLER AG. USE OF OTHER THAN RECOM- MENDED OR SUPPLIED PARTS MAY RESULT IN INJURY INACCURATE INFORMATION AND / OR DAMAGE TO THE UNIT. IT MUST BE ENSURED THAT NEITHER THE PATIENT NOR THE ELECTRODES (INCLUDING THE NEUTRAL ELECTRODE) COME INTO CONTACT WITH OTHER PERSONS OR CONDUCTING OBJECTS (EVEN IF THESE ARE EARTHED). THERE IS NO DANGER WHEN USING THE ECG UNIT FOR A PACEMAKER PATIENT OR WITH SIMULTANEOUS USE OF OTHER ELECTRI- CAL STIMULATION EQUIPMENT. HOWEVER, THE STIMULATION UNITS SHOULD ONLY BE USED AT A SUFFICIENT DISTANCE FROM THE ELECTRODES. IN CASE OF DOUBT, THE PATIENT SHOULD BE DISCONNECTED FROM THE RECORDER. IF SEVERAL UNITS ARE COUPLED THERE IS A DANGER OF SUMMATION OF LEAKAGE CURRENTS. WHEN OPERATING SEVERAL DEVICES FOR MEDICAL AND NON-MEDICAL APPLICATION DO NOT USE ANY EXTENSION CABLES OR DISTRIBUTION BOXES FOR THE CONNECTION. EARTH MUST BE CONNECTED WHEN THE EXTERNAL PRINTER IS USED. Safety Information Safety Information
- 14. viii viii WARNINGS TO PREVENT ELECTRIC SHOCK DO NOT DISASSEMBLE THE UNIT. NO SERVICEABLE PARTS INSIDE. REFER SERVICING TO QUALIFIED PERSONNEL ONLY. DO NOT USE THIS UNIT IN AREAS WHERE THERE IS ANY DANGER OF EXPLOSION OR THE PRESENCE OF FLAMMABLE GASES SUCH AS ANAESTHETIC AGENTS. THIS PRODUCT IS NOT DESIGNED FOR STERILE USE. THIS PRODUCT IS NOT DESIGNED FOR OUTDOOR USE. DO NOT, UNDER ANY CIRCUMSTANCES, IMMERSE THE UNIT OR CABLE ASSEMBLIES IN LIQUID. DO NOT USE HIGH TEMPERATURE STERILISATION PROCESSES (SUCH AS AUTOCLAVING). DO NOT USE E-BEAM OR GAMMA RADIATION STERILISATION. THIS UNIT IS CF CLASSIFIED ACCORDING TO IEC EN 60601-1. THIS MEANS THAT THE PATIENT CONNECTION IS FULLY ISOLATED AND DEFIBRILLATION PROTECTED. SCHILLER CAN ONLY GUARANTEE PROTECTION AGAINST DEFIBRILLATION VOLTAGE HOWEVER, WHEN THE ORIGINAL SCHILLER PATIENT CABLE IS USED. DO NOT TOUCH THE CASING DURING DEFIBRILLATION. IF THE PATIENT CABLE SHOULD BECOME DEFECTIVE AFTER DEFIBRILLATION, LEAD OFF WILL BE DISPLAYED AND AN ACOUSTIC ALARM GIVEN. WARNINGS TO PREVENT ELECTRIC SHOCK DO NOT DISASSEMBLE THE UNIT. NO SERVICEABLE PARTS INSIDE. REFER SERVICING TO QUALIFIED PERSONNEL ONLY. DO NOT USE THIS UNIT IN AREAS WHERE THERE IS ANY DANGER OF EXPLOSION OR THE PRESENCE OF FLAMMABLE GASES SUCH AS ANAESTHETIC AGENTS. THIS PRODUCT IS NOT DESIGNED FOR STERILE USE. THIS PRODUCT IS NOT DESIGNED FOR OUTDOOR USE. DO NOT, UNDER ANY CIRCUMSTANCES, IMMERSE THE UNIT OR CABLE ASSEMBLIES IN LIQUID. DO NOT USE HIGH TEMPERATURE STERILISATION PROCESSES (SUCH AS AUTOCLAVING). DO NOT USE E-BEAM OR GAMMA RADIATION STERILISATION. THIS UNIT IS CF CLASSIFIED ACCORDING TO IEC EN 60601-1. THIS MEANS THAT THE PATIENT CONNECTION IS FULLY ISOLATED AND DEFIBRILLATION PROTECTED. SCHILLER CAN ONLY GUARANTEE PROTECTION AGAINST DEFIBRILLATION VOLTAGE HOWEVER, WHEN THE ORIGINAL SCHILLER PATIENT CABLE IS USED. DO NOT TOUCH THE CASING DURING DEFIBRILLATION. IF THE PATIENT CABLE SHOULD BECOME DEFECTIVE AFTER DEFIBRILLATION, LEAD OFF WILL BE DISPLAYED AND AN ACOUSTIC ALARM GIVEN. Safety Information Safety Information
- 15. 1 AT-1 User Guide Art. No. 2.510171 g 1AT-1 User Guide Art. No. 2.510171 g ENGLISHENGLISH AAAAATTTTT-1-1-1-1-1 ShorShorShorShorShort Ft Ft Ft Ft Form Instructionsorm Instructionsorm Instructionsorm Instructionsorm Instructions Automatic ECG Recording with external printer connected and switched on: Prepare skin, hook up patient. Switch unit on, press ON Press AUTO to record and print externally with external printer NOT connected or switched off: To record and print on internal printer: Prepare skin, hook up patient. For AUTO Format 1 press For Auto Format 2 press and then Press COPY for additional copies. Manual ECG Recording (internal printer only) Prepare skin, hook up patient. Switch unit on, press ON Press MAN START Change lead group with Press STOP to stop the printout. Electrode hook-up check Press for print-out of electrode dc offsets. Best results are obtained when the electrode voltage readings (right column) are between +50mV and -50mV. Filter On/Off Press to switch the (Myogram) filter On / Off. System Configuration Press to print system settings. AAAAATTTTT-1-1-1-1-1 ShorShorShorShorShort Ft Ft Ft Ft Form Instructionsorm Instructionsorm Instructionsorm Instructionsorm Instructions Automatic ECG Recording with external printer connected and switched on: Prepare skin, hook up patient. Switch unit on, press ON Press AUTO to record and print externally with external printer NOT connected or switched off: To record and print on internal printer: Prepare skin, hook up patient. For AUTO Format 1 press For Auto Format 2 press and then Press COPY for additional copies. Manual ECG Recording (internal printer only) Prepare skin, hook up patient. Switch unit on, press ON Press MAN START Change lead group with Press STOP to stop the printout. Electrode hook-up check Press for print-out of electrode dc offsets. Best results are obtained when the electrode voltage readings (right column) are between +50mV and -50mV. Filter On/Off Press to switch the (Myogram) filter On / Off. System Configuration Press to print system settings.
- 17. 3 AT-1 User Guide Art. No. 2.510171 g 3AT-1 User Guide Art. No. 2.510171 g ENGLISHENGLISH IntroductionIntroductionIntroductionIntroductionIntroduction NOTE:NOTE:NOTE:NOTE:NOTE: The only difference between AThe only difference between AThe only difference between AThe only difference between AThe only difference between ATTTTT-1 and A-1 and A-1 and A-1 and A-1 and ATTTTT-1 smar-1 smar-1 smar-1 smar-1 smartprint is that Atprint is that Atprint is that Atprint is that Atprint is that ATTTTT-1-1-1-1-1 smarsmarsmarsmarsmartprint has a connector for an external ink-jet printertprint has a connector for an external ink-jet printertprint has a connector for an external ink-jet printertprint has a connector for an external ink-jet printertprint has a connector for an external ink-jet printer, which, which, which, which, which makes it possible to generate printouts in A4 size.makes it possible to generate printouts in A4 size.makes it possible to generate printouts in A4 size.makes it possible to generate printouts in A4 size.makes it possible to generate printouts in A4 size. The ECG unit is a 3-channel ECG recorder with all (12) ECG signals simultaneously processed to provide instant ECG recordings. Three automatic recording modes - two for the internal printer and one for the external printer - can be individually preset to enable one button ECG recording of preferred print formats. Individual lamps are provided to give power, paper error, filter, lead group and lead off indications. In addition, any detected disturbance (i.e. loose electrode or end of paper), gives an audible alarm and the corresponding indicator lamp flashes. The ECG unit includes the following features: • Low weight and compact dimensions • Printout from integrated quality thermal printer - OR - from external A4 inkjet printer • Built-in rechargeable battery for mains-independent use - 2 hours normal use on one battery charge • Simple one key operation for main functions • Automatic or manual recording modes • Selectable printing formats - external and internal printer • Choice of 10 languages (AT-1) and 9 languages (AT-1 smartprint) for printing. • Interpretation program option (including measurements) for children and adults IntroductionIntroductionIntroductionIntroductionIntroduction NOTE:NOTE:NOTE:NOTE:NOTE: The only difference between AThe only difference between AThe only difference between AThe only difference between AThe only difference between ATTTTT-1 and A-1 and A-1 and A-1 and A-1 and ATTTTT-1 smar-1 smar-1 smar-1 smar-1 smartprint is that Atprint is that Atprint is that Atprint is that Atprint is that ATTTTT-1-1-1-1-1 smarsmarsmarsmarsmartprint has a connector for an external ink-jet printertprint has a connector for an external ink-jet printertprint has a connector for an external ink-jet printertprint has a connector for an external ink-jet printertprint has a connector for an external ink-jet printer, which, which, which, which, which makes it possible to generate printouts in A4 size.makes it possible to generate printouts in A4 size.makes it possible to generate printouts in A4 size.makes it possible to generate printouts in A4 size.makes it possible to generate printouts in A4 size. The ECG unit is a 3-channel ECG recorder with all (12) ECG signals simultaneously processed to provide instant ECG recordings. Three automatic recording modes - two for the internal printer and one for the external printer - can be individually preset to enable one button ECG recording of preferred print formats. Individual lamps are provided to give power, paper error, filter, lead group and lead off indications. In addition, any detected disturbance (i.e. loose electrode or end of paper), gives an audible alarm and the corresponding indicator lamp flashes. The ECG unit includes the following features: • Low weight and compact dimensions • Printout from integrated quality thermal printer - OR - from external A4 inkjet printer • Built-in rechargeable battery for mains-independent use - 2 hours normal use on one battery charge • Simple one key operation for main functions • Automatic or manual recording modes • Selectable printing formats - external and internal printer • Choice of 10 languages (AT-1) and 9 languages (AT-1 smartprint) for printing. • Interpretation program option (including measurements) for children and adults
- 18. 4 4 Modes of OperationModes of OperationModes of OperationModes of OperationModes of Operation Automatic Mode a. without external printer connected or printer switched off Automatic Mode provides a printout giving 10 seconds of ECG recording of all 12 leads with a choice of 2 different formats (only for S version). The following can be programmed freely for each of the 2 formats before recording: • Lead Format • Chart Speed • With the optional interpretation program installed it is also possible to select the measurement table, average cycles with optional markings and interpretation statements for the printout. For further information see paragraph `Automatic Mode (ECG) Settings` on page 26. b. with external printer connected and switched on Only one Automatic Mode format possible. Other details as above. For further information see paragraph `Automatic Mode (ECG) Settings` on page 30. Modes of OperationModes of OperationModes of OperationModes of OperationModes of Operation Automatic Mode a. without external printer connected or printer switched off Automatic Mode provides a printout giving 10 seconds of ECG recording of all 12 leads with a choice of 2 different formats (only for S version). The following can be programmed freely for each of the 2 formats before recording: • Lead Format • Chart Speed • With the optional interpretation program installed it is also possible to select the measurement table, average cycles with optional markings and interpretation statements for the printout. For further information see paragraph `Automatic Mode (ECG) Settings` on page 26. b. with external printer connected and switched on Only one Automatic Mode format possible. Other details as above. For further information see paragraph `Automatic Mode (ECG) Settings` on page 30.
- 19. 5 AT-1 User Guide Art. No. 2.510171 g 5AT-1 User Guide Art. No. 2.510171 g ENGLISHENGLISH Modes of OperationModes of OperationModes of OperationModes of OperationModes of Operation Manual Mode Manual Mode provides a real-time printout of 3 selected leads and is only possible on the internal thermal printer. The following can be freely selected before or during recording: • Lead Group • Chart Speed • Sensitivity • Myogram Filter For further information see paragraph `Manual Mode` on page 8. Modes of OperationModes of OperationModes of OperationModes of OperationModes of Operation Manual Mode Manual Mode provides a real-time printout of 3 selected leads and is only possible on the internal thermal printer. The following can be freely selected before or during recording: • Lead Group • Chart Speed • Sensitivity • Myogram Filter For further information see paragraph `Manual Mode` on page 8.
- 20. 6 6 Automatic ModeAutomatic ModeAutomatic ModeAutomatic ModeAutomatic Mode a. without external printer connected or printer switched off In automatic modeautomatic modeautomatic modeautomatic modeautomatic mode, a full 12-lead ECG is printed in one of two predefined formats with selectable sensitivity. These formats (see Settings) are selected by the user to suit his specific needs and requirements. When the AUTO GAIN key is pressed before recording in automatic mode, the unit detects very large waveform amplitudes and sets the sensitivity for the extremity and/or precordial leads accordingly to reduce the overlapping of traces. To start the automatic ECG recording in Format 1, press the AUTO START key: To start the automatic recording in Format 2, press the ALT key followed by the AUTO START key: + Depending upon which option is included, the printout gives the following: • ECG recording of all leads in either Standard or Cabrera format according to selection • Sensitivity • Heart Rate Automatic ModeAutomatic ModeAutomatic ModeAutomatic ModeAutomatic Mode a. without external printer connected or printer switched off In automatic modeautomatic modeautomatic modeautomatic modeautomatic mode, a full 12-lead ECG is printed in one of two predefined formats with selectable sensitivity. These formats (see Settings) are selected by the user to suit his specific needs and requirements. When the AUTO GAIN key is pressed before recording in automatic mode, the unit detects very large waveform amplitudes and sets the sensitivity for the extremity and/or precordial leads accordingly to reduce the overlapping of traces. To start the automatic ECG recording in Format 1, press the AUTO START key: To start the automatic recording in Format 2, press the ALT key followed by the AUTO START key: + Depending upon which option is included, the printout gives the following: • ECG recording of all leads in either Standard or Cabrera format according to selection • Sensitivity • Heart Rate
- 21. 7 AT-1 User Guide Art. No. 2.510171 g 7AT-1 User Guide Art. No. 2.510171 g ENGLISHENGLISH Automatic ModeAutomatic ModeAutomatic ModeAutomatic ModeAutomatic Mode • Speed • Filter Settings • Interpretation statements (with option C) • Average Cycles (with options M, C) • Intervals (with options M, C) • Axes (with options M, C) • Detailed Measurement Table (with options M, C) To obtain an extra printout of the ECG recording in Format 1, simply press the COPY key: To obtain an extra printout of the second format, press the ALT key followed by the COPY key: - Note: The Auto mode settings for the two formats are detailed in the paragraph entitled ' Automatic Mode (ECG) Settings` on page 26. b. with external printer With the external printer connected and switched on, only one Auto Mode format (selectable) is available. TTTTTo staro staro staro staro start the automatic ECG recording in Automatic Mode, press the AUTO STt the automatic ECG recording in Automatic Mode, press the AUTO STt the automatic ECG recording in Automatic Mode, press the AUTO STt the automatic ECG recording in Automatic Mode, press the AUTO STt the automatic ECG recording in Automatic Mode, press the AUTO START kART kART kART kART key:ey:ey:ey:ey: For further information see paragraph `Automatic Mode (ECG) Settings` on page 30. Automatic ModeAutomatic ModeAutomatic ModeAutomatic ModeAutomatic Mode • Speed • Filter Settings • Interpretation statements (with option C) • Average Cycles (with options M, C) • Intervals (with options M, C) • Axes (with options M, C) • Detailed Measurement Table (with options M, C) To obtain an extra printout of the ECG recording in Format 1, simply press the COPY key: To obtain an extra printout of the second format, press the ALT key followed by the COPY key: - Note: The Auto mode settings for the two formats are detailed in the paragraph entitled ' Automatic Mode (ECG) Settings` on page 26. b. with external printer With the external printer connected and switched on, only one Auto Mode format (selectable) is available. TTTTTo staro staro staro staro start the automatic ECG recording in Automatic Mode, press the AUTO STt the automatic ECG recording in Automatic Mode, press the AUTO STt the automatic ECG recording in Automatic Mode, press the AUTO STt the automatic ECG recording in Automatic Mode, press the AUTO STt the automatic ECG recording in Automatic Mode, press the AUTO START kART kART kART kART key:ey:ey:ey:ey: For further information see paragraph `Automatic Mode (ECG) Settings` on page 30.
- 22. 8 8 Manual ModeManual ModeManual ModeManual ModeManual Mode Manual modeManual modeManual modeManual modeManual mode provides a real-time ECG printout of 3 selected leads with full control of parameter selection. This is only possible on the internal thermal printer. To start the manual recording of a real-time ECG, press the MAN START Printout key To stop the manual recording (printout) press the STOP key The printout provides you with the following: • Three (selected) leads with lead identification. • On the lower edge, the chart speed and filter settings (if on). • At the top, the heart rate as current average of 4 beats, trace sensitivity. The following can be freely chosen during or before the recording: Lead Group by means of the LEAD FORWARD and LEAD BACKWARD key Manual ModeManual ModeManual ModeManual ModeManual Mode Manual modeManual modeManual modeManual modeManual mode provides a real-time ECG printout of 3 selected leads with full control of parameter selection. This is only possible on the internal thermal printer. To start the manual recording of a real-time ECG, press the MAN START Printout key To stop the manual recording (printout) press the STOP key The printout provides you with the following: • Three (selected) leads with lead identification. • On the lower edge, the chart speed and filter settings (if on). • At the top, the heart rate as current average of 4 beats, trace sensitivity. The following can be freely chosen during or before the recording: Lead Group by means of the LEAD FORWARD and LEAD BACKWARD key
- 23. 9 AT-1 User Guide Art. No. 2.510171 g 9AT-1 User Guide Art. No. 2.510171 g ENGLISHENGLISH Manual ModeManual ModeManual ModeManual ModeManual Mode The following lead groups are selectable: • I, II, III aVR, aVL, aVF (Cabrera: aVL, I, -aVR / II, aVF, III) • V1, V2, V3 / V4, V5, V6 Chart Speed Select speed 5, 25 or 50 mm/s by means of the SPEED keys: Sensitivity Select 5, 10 or 20 mm/mV by means of the SENSITIVITY keys: Myogram Filter Switch the filter ON or OFF with the FILTER key: 25 Hz or 35 Hz is displayed on the bottom line of the printout when the filter is switched on. Recentering To re-centre the ECG traces, press the 1mV key Manual ModeManual ModeManual ModeManual ModeManual Mode The following lead groups are selectable: • I, II, III aVR, aVL, aVF (Cabrera: aVL, I, -aVR / II, aVF, III) • V1, V2, V3 / V4, V5, V6 Chart Speed Select speed 5, 25 or 50 mm/s by means of the SPEED keys: Sensitivity Select 5, 10 or 20 mm/mV by means of the SENSITIVITY keys: Myogram Filter Switch the filter ON or OFF with the FILTER key: 25 Hz or 35 Hz is displayed on the bottom line of the printout when the filter is switched on. Recentering To re-centre the ECG traces, press the 1mV key
- 24. 10 10 LLLLLocation & Pocation & Pocation & Pocation & Pocation & Powerowerowerowerower Location Do not keep or operate the apparatus in a wet, moist, or dusty environment. Also, avoid exposure to direct sunlight or heat from other sources. Do not allow the unit to come into contact with acidic vapours or liquids, as such contact may cause irreparable damage. The unit should not be placed near X-ray or diathermy units, large transformers or motors. The unit must be placed on a flat surface and must not be operated in areas where there is any danger of explosion. Power Supply The mains connection is on the rear of the unit. The mains indicator lamp on the keyboard is always lit when the unit is connected to the mains supply. The unit can either be operated from the mains supply or from the built-in rechargeable battery. The power source is indicated by the respective indicator lamp. When battery capacity is limited, the battery symbol flashes on and off. To recharge the battery, connect the apparatus to the mains supply by means of the supplied power cable. A totally discharged battery needs less than 15 hours to be fully recharged (60% in less than 3 hours, 90% in less than 7 hours). A fully charged battery gives approximately 2 hours of normal use. The unit can remain connected to the mains supply without any danger of damage to either the battery or the unit. LLLLLocation & Pocation & Pocation & Pocation & Pocation & Powerowerowerowerower Location Do not keep or operate the apparatus in a wet, moist, or dusty environment. Also, avoid exposure to direct sunlight or heat from other sources. Do not allow the unit to come into contact with acidic vapours or liquids, as such contact may cause irreparable damage. The unit should not be placed near X-ray or diathermy units, large transformers or motors. The unit must be placed on a flat surface and must not be operated in areas where there is any danger of explosion. Power Supply The mains connection is on the rear of the unit. The mains indicator lamp on the keyboard is always lit when the unit is connected to the mains supply. The unit can either be operated from the mains supply or from the built-in rechargeable battery. The power source is indicated by the respective indicator lamp. When battery capacity is limited, the battery symbol flashes on and off. To recharge the battery, connect the apparatus to the mains supply by means of the supplied power cable. A totally discharged battery needs less than 15 hours to be fully recharged (60% in less than 3 hours, 90% in less than 7 hours). A fully charged battery gives approximately 2 hours of normal use. The unit can remain connected to the mains supply without any danger of damage to either the battery or the unit.
- 25. 11 AT-1 User Guide Art. No. 2.510171 g 11AT-1 User Guide Art. No. 2.510171 g ENGLISHENGLISH Switching On and OffSwitching On and OffSwitching On and OffSwitching On and OffSwitching On and Off The AT-1 is switched on with the green ON key and off by means of the red OFF key The unit is automatically switched off after 5 minutes (30 seconds if battery capacity is limited) if no key is pressed and the patient cable is not connected. Potential Equalisation If the AT-1 is used in conjunction with other patient connected equipment, we recommend that the potential equalisation stud on the rear of the unit is connected to the building common ground with the yellow/green ground cable (Part-no. 2.310005). When working from an emergency vehicle, the vehicle common ground can be used. WARNING !WARNING !WARNING !WARNING !WARNING ! THE UNIT MUST BE GROUNDED WHEN THE EXTERNAL PRINTER IS CONNECTED. Switching On and OffSwitching On and OffSwitching On and OffSwitching On and OffSwitching On and Off The AT-1 is switched on with the green ON key and off by means of the red OFF key The unit is automatically switched off after 5 minutes (30 seconds if battery capacity is limited) if no key is pressed and the patient cable is not connected. Potential Equalisation If the AT-1 is used in conjunction with other patient connected equipment, we recommend that the potential equalisation stud on the rear of the unit is connected to the building common ground with the yellow/green ground cable (Part-no. 2.310005). When working from an emergency vehicle, the vehicle common ground can be used. WARNING !WARNING !WARNING !WARNING !WARNING ! THE UNIT MUST BE GROUNDED WHEN THE EXTERNAL PRINTER IS CONNECTED.
- 27. 13 AT-1 User Guide Art. No. 2.510171 g 13AT-1 User Guide Art. No. 2.510171 g ENGLISHENGLISH KKKKKeyboardeyboardeyboardeyboardeyboard KKKKKeyboardeyboardeyboardeyboardeyboard
- 28. 14 14 SettingsSettingsSettingsSettingsSettings Each parameter is set by means of a code. This code comprises a combination of keys starting with the ALALALALALTTTTT key followed by two or three numbers. The setting is confirmed with the STOPSTOPSTOPSTOPSTOP key. As soon as the ALALALALALTTTTT key is pressed, the keyboard is dedicated to the programming function. Note: The Alternative (ALT) function is only active for 4 seconds. If a programming key is not pressed within 4 seconds, the unit reverts to standard mode. The ALT key must again be pressed to activate the programming mode. The setting is remembered and the keyboard released for other functions when the STOPSTOPSTOPSTOPSTOP key is pressed. Once a setting has been confirmed, it is stored in the memory even when the unit is switched off. Example If you want to set the language on your ECG unit to English, the key sequence given in the table (see page 18), is ALALALALALT - 0 - 2 - 2 - STOPT - 0 - 2 - 2 - STOPT - 0 - 2 - 2 - STOPT - 0 - 2 - 2 - STOPT - 0 - 2 - 2 - STOP..... On the following pages the programmable parameters and the programming sequences are described in detail. SettingsSettingsSettingsSettingsSettings Each parameter is set by means of a code. This code comprises a combination of keys starting with the ALALALALALTTTTT key followed by two or three numbers. The setting is confirmed with the STOPSTOPSTOPSTOPSTOP key. As soon as the ALALALALALTTTTT key is pressed, the keyboard is dedicated to the programming function. Note: The Alternative (ALT) function is only active for 4 seconds. If a programming key is not pressed within 4 seconds, the unit reverts to standard mode. The ALT key must again be pressed to activate the programming mode. The setting is remembered and the keyboard released for other functions when the STOPSTOPSTOPSTOPSTOP key is pressed. Once a setting has been confirmed, it is stored in the memory even when the unit is switched off. Example If you want to set the language on your ECG unit to English, the key sequence given in the table (see page 18), is ALALALALALT - 0 - 2 - 2 - STOPT - 0 - 2 - 2 - STOPT - 0 - 2 - 2 - STOPT - 0 - 2 - 2 - STOPT - 0 - 2 - 2 - STOP..... On the following pages the programmable parameters and the programming sequences are described in detail.
- 29. 15 AT-1 User Guide Art. No. 2.510171 g 15AT-1 User Guide Art. No. 2.510171 g ENGLISHENGLISH Settings (cont.)Settings (cont.)Settings (cont.)Settings (cont.)Settings (cont.) The defined formats and settings for your unit can be checked as follows: ALALALALALT - 0 - 1 - any numberT - 0 - 1 - any numberT - 0 - 1 - any numberT - 0 - 1 - any numberT - 0 - 1 - any number A printout of the defined settings will be produced and gives the following information, depending on the installed software. Unit designationUnit designationUnit designationUnit designationUnit designation Software version, Software option installed (C = Interpretation) and interpretation version Serial numberSerial numberSerial numberSerial numberSerial number Serial number of the unit Settings (cont.)Settings (cont.)Settings (cont.)Settings (cont.)Settings (cont.) The defined formats and settings for your unit can be checked as follows: ALALALALALT - 0 - 1 - any numberT - 0 - 1 - any numberT - 0 - 1 - any numberT - 0 - 1 - any numberT - 0 - 1 - any number A printout of the defined settings will be produced and gives the following information, depending on the installed software. Unit designationUnit designationUnit designationUnit designationUnit designation Software version, Software option installed (C = Interpretation) and interpretation version Serial numberSerial numberSerial numberSerial numberSerial number Serial number of the unit
- 30. 16 16 Settings (cont.)Settings (cont.)Settings (cont.)Settings (cont.)Settings (cont.) LeadsLeadsLeadsLeadsLeads Standard (S) or Cabrera (C) ECG FormatECG FormatECG FormatECG FormatECG Format Long (ooo), Short (o) or Suppressed (-) M ECGM ECGM ECGM ECGM ECG Average cycles as defined in auto ECG recording setup (e.g. 4 * 3 (25 mm/s) + 2) MeasurementsMeasurementsMeasurementsMeasurementsMeasurements Enabled (+) or Suppressed (-) MarksMarksMarksMarksMarks Enabled (+) or Suppressed (-) Interpretationnterpretationnterpretationnterpretationnterpretation Enabled (+) or Suppressed (-) Selected Rhythm leadsSelected Rhythm leadsSelected Rhythm leadsSelected Rhythm leadsSelected Rhythm leads Leads selected for R1 and R2 Automatic CenteringAutomatic CenteringAutomatic CenteringAutomatic CenteringAutomatic Centering Enabled (+) or Suppressed (-) Paper typePaper typePaper typePaper typePaper type Z-folded Printout of signalsPrintout of signalsPrintout of signalsPrintout of signalsPrintout of signals Sequential or Simultaneous Baseline FilterBaseline FilterBaseline FilterBaseline FilterBaseline Filter 0.05, 0.15 or 0.30 Hz Mains FilterMains FilterMains FilterMains FilterMains Filter 50, 60 Hz or OFF (-) Myogram FilterMyogram FilterMyogram FilterMyogram FilterMyogram Filter 25 or 35 Hz, ON (+) or OFF (-) Interpretation settings:Interpretation settings:Interpretation settings:Interpretation settings:Interpretation settings: N/A:+/- ‘normal/abnormal’ is written (+) or suppressed (-) U:+/- ‘unconfirmed report’ is written (+) or suppressed (-) A30:+/- patient age is assumed to be < 30 (-) or >30 (+) S: +/- low (-) or high (+) sensitivity Settings (cont.)Settings (cont.)Settings (cont.)Settings (cont.)Settings (cont.) LeadsLeadsLeadsLeadsLeads Standard (S) or Cabrera (C) ECG FormatECG FormatECG FormatECG FormatECG Format Long (ooo), Short (o) or Suppressed (-) M ECGM ECGM ECGM ECGM ECG Average cycles as defined in auto ECG recording setup (e.g. 4 * 3 (25 mm/s) + 2) MeasurementsMeasurementsMeasurementsMeasurementsMeasurements Enabled (+) or Suppressed (-) MarksMarksMarksMarksMarks Enabled (+) or Suppressed (-) Interpretationnterpretationnterpretationnterpretationnterpretation Enabled (+) or Suppressed (-) Selected Rhythm leadsSelected Rhythm leadsSelected Rhythm leadsSelected Rhythm leadsSelected Rhythm leads Leads selected for R1 and R2 Automatic CenteringAutomatic CenteringAutomatic CenteringAutomatic CenteringAutomatic Centering Enabled (+) or Suppressed (-) Paper typePaper typePaper typePaper typePaper type Z-folded Printout of signalsPrintout of signalsPrintout of signalsPrintout of signalsPrintout of signals Sequential or Simultaneous Baseline FilterBaseline FilterBaseline FilterBaseline FilterBaseline Filter 0.05, 0.15 or 0.30 Hz Mains FilterMains FilterMains FilterMains FilterMains Filter 50, 60 Hz or OFF (-) Myogram FilterMyogram FilterMyogram FilterMyogram FilterMyogram Filter 25 or 35 Hz, ON (+) or OFF (-) Interpretation settings:Interpretation settings:Interpretation settings:Interpretation settings:Interpretation settings: N/A:+/- ‘normal/abnormal’ is written (+) or suppressed (-) U:+/- ‘unconfirmed report’ is written (+) or suppressed (-) A30:+/- patient age is assumed to be < 30 (-) or >30 (+) S: +/- low (-) or high (+) sensitivity
- 31. 17 AT-1 User Guide Art. No. 2.510171 g 17AT-1 User Guide Art. No. 2.510171 g ENGLISHENGLISH Settings (cont.)Settings (cont.)Settings (cont.)Settings (cont.)Settings (cont.) Default Settings To reset the unit to the basic default settings, proceed as follows: ALALALALALT - 0 - 6 - 6T - 0 - 6 - 6T - 0 - 6 - 6T - 0 - 6 - 6T - 0 - 6 - 6 SETTINGS S = STANDARD M = MEASUREMENTS C = WITH INTERPRETATION LANGUAGE AS SET AS SET AS SET LEADS STANDARD (S) STANDARD (S) STANDARD (S) AUTO FORMAT 1 ECG: 25MM/S, SHORT (O) ECG : 25MM/S, SHORT (O) ECG : 25MM/S, SHORT (O) M ECG :6*2 (50MM/S + 1) M ECG: 6*2 (50MM/S + 1) PATIENT DATA FORM ENABLED + MEASUREMENTS: SUPRESSED (-) MEASUREMENTS: SUPRESSED (-) MARKS: ENABLED (+) MARKS: ENABLED (+) INTERPRETATION: ENABLED (+) AUTO FORMAT 2 ECG: 25MM/S, LONG (OOO) ECG : 25MM/S, LONG (OOO) ECG : 25MM/S, LONG (OOO) M ECG: -- M ECG: NONE PATIENT DATA FORM ENABLED + MEASUREMENTS: SUPRESSED (-) MEASUREMENTS: SUPRESSED (-) MARKS: ENABLED (+) MARKS: ENABLED (+) INTERPRETATION: DISABLED (-) RHYTHM LEADS V1, II V1, II AUTOM. CENTERING ENABLED (+) ENABLED (+) ENABLED (+) PAPER Z - FOLD Z - FOLD Z - FOLD PRINTOUT OF SIGNALS SEQUENTIAL SEQUENTIAL SEQUENTIAL BASELINE FILTER SETTING 0.05HZ 0.05HZ 0.05HZ MAINS FILTER SETTINGS 50HZ (60HZ) 50HZ (60HZ) 50HZ (60HZ) MYOGRAM FILTER SETTING 35HZ, OFF (-) 35HZ, OFF (-) 35HZ, OFF (-) INTERPRETATION SETTINGS N/A: SUPRESSED (-) U: ENABLED (+) A30: UNDER THIRTY (-) S: LOW (-) EXTERNAL PRINTER ECG: 25MM/S, SHORT (O) ECG : 25MM/S, SHORT (O) ECG : 25MM/S, SHORT (O) M ECG: 6*2 (50MM/S) + 2 M ECG: 6*2 (50MM/S) + 2 PATIENT DATA FORM ENABLED + MEASUREMENTS: SUPRESSED (-) MEASUREMENTS: SUPRESSED (-) MARKS: ENABLED (+) MARKS: ENABLED (+) INTERPRETATION: ENABLED (+) Settings (cont.)Settings (cont.)Settings (cont.)Settings (cont.)Settings (cont.) Default Settings To reset the unit to the basic default settings, proceed as follows: ALALALALALT - 0 - 6 - 6T - 0 - 6 - 6T - 0 - 6 - 6T - 0 - 6 - 6T - 0 - 6 - 6 SETTINGS S = STANDARD M = MEASUREMENTS C = WITH INTERPRETATION LANGUAGE AS SET AS SET AS SET LEADS STANDARD (S) STANDARD (S) STANDARD (S) AUTO FORMAT 1 ECG: 25MM/S, SHORT (O) ECG : 25MM/S, SHORT (O) ECG : 25MM/S, SHORT (O) M ECG :6*2 (50MM/S + 1) M ECG: 6*2 (50MM/S + 1) PATIENT DATA FORM ENABLED + MEASUREMENTS: SUPRESSED (-) MEASUREMENTS: SUPRESSED (-) MARKS: ENABLED (+) MARKS: ENABLED (+) INTERPRETATION: ENABLED (+) AUTO FORMAT 2 ECG: 25MM/S, LONG (OOO) ECG : 25MM/S, LONG (OOO) ECG : 25MM/S, LONG (OOO) M ECG: -- M ECG: NONE PATIENT DATA FORM ENABLED + MEASUREMENTS: SUPRESSED (-) MEASUREMENTS: SUPRESSED (-) MARKS: ENABLED (+) MARKS: ENABLED (+) INTERPRETATION: DISABLED (-) RHYTHM LEADS V1, II V1, II AUTOM. CENTERING ENABLED (+) ENABLED (+) ENABLED (+) PAPER Z - FOLD Z - FOLD Z - FOLD PRINTOUT OF SIGNALS SEQUENTIAL SEQUENTIAL SEQUENTIAL BASELINE FILTER SETTING 0.05HZ 0.05HZ 0.05HZ MAINS FILTER SETTINGS 50HZ (60HZ) 50HZ (60HZ) 50HZ (60HZ) MYOGRAM FILTER SETTING 35HZ, OFF (-) 35HZ, OFF (-) 35HZ, OFF (-) INTERPRETATION SETTINGS N/A: SUPRESSED (-) U: ENABLED (+) A30: UNDER THIRTY (-) S: LOW (-) EXTERNAL PRINTER ECG: 25MM/S, SHORT (O) ECG : 25MM/S, SHORT (O) ECG : 25MM/S, SHORT (O) M ECG: 6*2 (50MM/S) + 2 M ECG: 6*2 (50MM/S) + 2 PATIENT DATA FORM ENABLED + MEASUREMENTS: SUPRESSED (-) MEASUREMENTS: SUPRESSED (-) MARKS: ENABLED (+) MARKS: ENABLED (+) INTERPRETATION: ENABLED (+)
- 32. 18 18 Settings (cont.)Settings (cont.)Settings (cont.)Settings (cont.)Settings (cont.) Language The language is selected as follows: Language Selection AT-1 Entry Key Sequence Language Confirm ALT 0 2 1 German Press STOP key 2 English 3 French 4 Swedish 5 American 6 Italian 7 Spanish 8 Portugese 9 Dutch 0 Russian Language Selection AT-1 smartprint Entry Key Sequence Language Confirm ALT 0 2 1 German Press STOP key 2 English 3 French 4 Swedish 5 American 6 Italian 7 Spanish 8 Portugese 9 Dutch Confirm the selection by pressing Note: The difference between English and American is the mains filter setting - English = 50Hz; American = 60Hz and the physical units. Settings (cont.)Settings (cont.)Settings (cont.)Settings (cont.)Settings (cont.) Language The language is selected as follows: Language Selection AT-1 Entry Key Sequence Language Confirm ALT 0 2 1 German Press STOP key 2 English 3 French 4 Swedish 5 American 6 Italian 7 Spanish 8 Portugese 9 Dutch 0 Russian Language Selection AT-1 smartprint Entry Key Sequence Language Confirm ALT 0 2 1 German Press STOP key 2 English 3 French 4 Swedish 5 American 6 Italian 7 Spanish 8 Portugese 9 Dutch Confirm the selection by pressing Note: The difference between English and American is the mains filter setting - English = 50Hz; American = 60Hz and the physical units.
- 33. 19 AT-1 User Guide Art. No. 2.510171 g 19AT-1 User Guide Art. No. 2.510171 g ENGLISHENGLISH Settings (cont.)Settings (cont.)Settings (cont.)Settings (cont.)Settings (cont.) Filters There are three different filters which can be set individually as follows: • Baseline filter • Mains filter • Myogram filter Baseline Filter The digital Baseline filterBaseline filterBaseline filterBaseline filterBaseline filter suppresses excessive baseline drifts. The setting options are as follows: Baseline Filter Entry Key Sequence Filter Setting Confirm ALT 5 0 0.05 Hz (default) Press STOP key1 0.15 Hz 3 0.30 Hz Settings (cont.)Settings (cont.)Settings (cont.)Settings (cont.)Settings (cont.) Filters There are three different filters which can be set individually as follows: • Baseline filter • Mains filter • Myogram filter Baseline Filter The digital Baseline filterBaseline filterBaseline filterBaseline filterBaseline filter suppresses excessive baseline drifts. The setting options are as follows: Baseline Filter Entry Key Sequence Filter Setting Confirm ALT 5 0 0.05 Hz (default) Press STOP key1 0.15 Hz 3 0.30 Hz
- 34. 20 20 Settings (cont.)Settings (cont.)Settings (cont.)Settings (cont.)Settings (cont.) Confirm the selection by pressing Note: The set value is the lower limit of the frequency range and is normally set to 0.05 Hz. The settings 0.15 and 0.30 Hz should only be used when absolutely necessary, as the possibility exists that they could affect the original ECG signal, especially the ST segments. Mains Filter The Mains filterMains filterMains filterMains filterMains filter is an adaptive digital interference filter designed to suppress AC interference without attenuating or distorting the ECG. Set the mains filter in accordance with the frequency of your local mains supply as follows: Mains Filter Entry Key Sequence Filter Setting Confirm ALT 8 5 Mains Filter 50 Hz Press STOP key 6 Mains Filter 60 Hz 9 Mains Filter Off Settings (cont.)Settings (cont.)Settings (cont.)Settings (cont.)Settings (cont.) Confirm the selection by pressing Note: The set value is the lower limit of the frequency range and is normally set to 0.05 Hz. The settings 0.15 and 0.30 Hz should only be used when absolutely necessary, as the possibility exists that they could affect the original ECG signal, especially the ST segments. Mains Filter The Mains filterMains filterMains filterMains filterMains filter is an adaptive digital interference filter designed to suppress AC interference without attenuating or distorting the ECG. Set the mains filter in accordance with the frequency of your local mains supply as follows: Mains Filter Entry Key Sequence Filter Setting Confirm ALT 8 5 Mains Filter 50 Hz Press STOP key 6 Mains Filter 60 Hz 9 Mains Filter Off
- 35. 21 AT-1 User Guide Art. No. 2.510171 g 21AT-1 User Guide Art. No. 2.510171 g ENGLISHENGLISH Settings (cont.)Settings (cont.)Settings (cont.)Settings (cont.)Settings (cont.) Myogram Filter The Myogram filterMyogram filterMyogram filterMyogram filterMyogram filter suppresses disturbances caused by strong muscle tremor. The set value will be the new upper limit of the frequency range as soon as the FILFILFILFILFILTERTERTERTERTER key is pressed on or programmed as default when the unit is switched on. When the Myogram filter is on, the value, i.e. 35 Hz is displayed on the bottom line of the printout. Myogram Filter Entry Key Sequence Setting Confirm ALT 8 2 Myogram Filter 25 Hz Press STOP key 3 Myogram Filter 35 Hz 1 Myogram Filter active when the unit is first switched on (marked on printout with +) 8 Myogram Filter off when the unit is first switched on (marked on printout with -) Confirm the selection by pressing the STOPSTOPSTOPSTOPSTOP key The myogram filter is switched on and off manually with the FILFILFILFILFILTER KEYTER KEYTER KEYTER KEYTER KEY Note: An ECG recorded in auto mode is stored unfiltered. It is therefore possible to print the stored ECG either with or without passing the myogram filter. Filter ON is indicated in the bottom information line of the printout. When the FILTERFILTERFILTERFILTERFILTER key is pressed again, the filter is switched off and the `35 Hz` indication on the bottom information line of the printout is removed. The cutoff frequency of the myogram filter is set to either 25 or 35 Hz. Settings (cont.)Settings (cont.)Settings (cont.)Settings (cont.)Settings (cont.) Myogram Filter The Myogram filterMyogram filterMyogram filterMyogram filterMyogram filter suppresses disturbances caused by strong muscle tremor. The set value will be the new upper limit of the frequency range as soon as the FILFILFILFILFILTERTERTERTERTER key is pressed on or programmed as default when the unit is switched on. When the Myogram filter is on, the value, i.e. 35 Hz is displayed on the bottom line of the printout. Myogram Filter Entry Key Sequence Setting Confirm ALT 8 2 Myogram Filter 25 Hz Press STOP key 3 Myogram Filter 35 Hz 1 Myogram Filter active when the unit is first switched on (marked on printout with +) 8 Myogram Filter off when the unit is first switched on (marked on printout with -) Confirm the selection by pressing the STOPSTOPSTOPSTOPSTOP key The myogram filter is switched on and off manually with the FILFILFILFILFILTER KEYTER KEYTER KEYTER KEYTER KEY Note: An ECG recorded in auto mode is stored unfiltered. It is therefore possible to print the stored ECG either with or without passing the myogram filter. Filter ON is indicated in the bottom information line of the printout. When the FILTERFILTERFILTERFILTERFILTER key is pressed again, the filter is switched off and the `35 Hz` indication on the bottom information line of the printout is removed. The cutoff frequency of the myogram filter is set to either 25 or 35 Hz.
- 36. 22 22 Settings (cont.)Settings (cont.)Settings (cont.)Settings (cont.)Settings (cont.) Defining Lead Sequence & Printout The required settings can be selected as follows: Sequences, Print & Auto-centering Entry Key Sequence Definition Confirm ALT 7 1 Standard Lead Sequence Press STOP key 2 Cabrera Lead Sequence 3 Simultaneous Print 4 Sequential Print 5 Auto-centering ON 6 Auto-centering OFF 7 Z-fold paper Confirm the selection by pressing the STOP key Settings (cont.)Settings (cont.)Settings (cont.)Settings (cont.)Settings (cont.) Defining Lead Sequence & Printout The required settings can be selected as follows: Sequences, Print & Auto-centering Entry Key Sequence Definition Confirm ALT 7 1 Standard Lead Sequence Press STOP key 2 Cabrera Lead Sequence 3 Simultaneous Print 4 Sequential Print 5 Auto-centering ON 6 Auto-centering OFF 7 Z-fold paper Confirm the selection by pressing the STOP key
- 37. 23 AT-1 User Guide Art. No. 2.510171 g 23AT-1 User Guide Art. No. 2.510171 g ENGLISHENGLISH Settings (cont.)Settings (cont.)Settings (cont.)Settings (cont.)Settings (cont.) The selectable printout forms are: SimultaneousSimultaneousSimultaneousSimultaneousSimultaneous All ECG leads are printed in the same time segment (in automatic mode only). SequentialSequentialSequentialSequentialSequential Each group is a contiguous time segment of approximately 2.5 or 5 seconds (in automatic mode only). Auto-Centering ONAuto-Centering ONAuto-Centering ONAuto-Centering ONAuto-Centering ON All ECG traces are centred dynamically for optimal use of paper width. Auto-Centering OFFAuto-Centering OFFAuto-Centering OFFAuto-Centering OFFAuto-Centering OFF ECG traces are set to a fixed baseline position and may possibly overlap. The Standard and Cabrera lead groups available for the AT-1 / AT-1smartprint are: Lead Groups Standard Cabrera I aVR V1 V4 aVL II V1 V4 II aVL V2 V5 I aVF V2 V5 III aVF V3 V6 -aVR III V3 V6 Settings (cont.)Settings (cont.)Settings (cont.)Settings (cont.)Settings (cont.) The selectable printout forms are: SimultaneousSimultaneousSimultaneousSimultaneousSimultaneous All ECG leads are printed in the same time segment (in automatic mode only). SequentialSequentialSequentialSequentialSequential Each group is a contiguous time segment of approximately 2.5 or 5 seconds (in automatic mode only). Auto-Centering ONAuto-Centering ONAuto-Centering ONAuto-Centering ONAuto-Centering ON All ECG traces are centred dynamically for optimal use of paper width. Auto-Centering OFFAuto-Centering OFFAuto-Centering OFFAuto-Centering OFFAuto-Centering OFF ECG traces are set to a fixed baseline position and may possibly overlap. The Standard and Cabrera lead groups available for the AT-1 / AT-1smartprint are: Lead Groups Standard Cabrera I aVR V1 V4 aVL II V1 V4 II aVL V2 V5 I aVF V2 V5 III aVF V3 V6 -aVR III V3 V6
- 38. 24 24 Settings (cont.)Settings (cont.)Settings (cont.)Settings (cont.)Settings (cont.) Acoustic QRS Indication The acoustic QRS beep can be switched on or off at any time by pressing the QRS BEEP key. Time / Date The required settings can be selected as follows: Setting the Time and Date Key Sequence Enter Data Confirmation Time ALT 0 5 1 HHMMSS beep Date ALT 0 5 2 DDMMYY beep Seasonal Time Variation Time change Key Sequence Wintertime to Summertime (+1Hr) ALT 0 5 4 Summertime to Wintertime (-1Hr) ALT 0 5 5 Settings (cont.)Settings (cont.)Settings (cont.)Settings (cont.)Settings (cont.) Acoustic QRS Indication The acoustic QRS beep can be switched on or off at any time by pressing the QRS BEEP key. Time / Date The required settings can be selected as follows: Setting the Time and Date Key Sequence Enter Data Confirmation Time ALT 0 5 1 HHMMSS beep Date ALT 0 5 2 DDMMYY beep Seasonal Time Variation Time change Key Sequence Wintertime to Summertime (+1Hr) ALT 0 5 4 Summertime to Wintertime (-1Hr) ALT 0 5 5
- 39. 25 AT-1 User Guide Art. No. 2.510171 g 25AT-1 User Guide Art. No. 2.510171 g ENGLISHENGLISH Settings (cont.)Settings (cont.)Settings (cont.)Settings (cont.)Settings (cont.) Note: If the battery has been disconnected for more than half an hour, the clock oscillator must be restarted before setting the time. To do this the following key sequence must be pressed: ALALALALALT - 0 - 5 - 9T - 0 - 5 - 9T - 0 - 5 - 9T - 0 - 5 - 9T - 0 - 5 - 9 This will start the oscillator and the time can be set. Note: The time and date only appear on the AUTO printout from the external printer. Settings (cont.)Settings (cont.)Settings (cont.)Settings (cont.)Settings (cont.) Note: If the battery has been disconnected for more than half an hour, the clock oscillator must be restarted before setting the time. To do this the following key sequence must be pressed: ALALALALALT - 0 - 5 - 9T - 0 - 5 - 9T - 0 - 5 - 9T - 0 - 5 - 9T - 0 - 5 - 9 This will start the oscillator and the time can be set. Note: The time and date only appear on the AUTO printout from the external printer.
- 40. 26 26 Automatic Mode (ECG) Settings, Internal PrinterAutomatic Mode (ECG) Settings, Internal PrinterAutomatic Mode (ECG) Settings, Internal PrinterAutomatic Mode (ECG) Settings, Internal PrinterAutomatic Mode (ECG) Settings, Internal Printer Two separate Auto formats can be defined for the internal printer in the AT-1/AT-1smartprint. When defining auto format 1 the key sequence ALALALALALT - 1T - 1T - 1T - 1T - 1 precedes the setting. When defining auto format 2 the key sequence ALALALALALT - 2T - 2T - 2T - 2T - 2 precedes the setting. The automatic mode formats are detailed on the following pages. The ECG format is set as follows: ECG Format Internal Printer Entry Key Sequence Printout Confirm ALT 1 or 2 1 5 No leads printed Press STOP key 6 Leads are printed in short form (3 sheets) 7 Leads are printed in long form (6 sheets) 8 Chart Speed 25mm/s 9 Chart Speed 50mm/s Automatic Mode (ECG) Settings, Internal PrinterAutomatic Mode (ECG) Settings, Internal PrinterAutomatic Mode (ECG) Settings, Internal PrinterAutomatic Mode (ECG) Settings, Internal PrinterAutomatic Mode (ECG) Settings, Internal Printer Two separate Auto formats can be defined for the internal printer in the AT-1/AT-1smartprint. When defining auto format 1 the key sequence ALALALALALT - 1T - 1T - 1T - 1T - 1 precedes the setting. When defining auto format 2 the key sequence ALALALALALT - 2T - 2T - 2T - 2T - 2 precedes the setting. The automatic mode formats are detailed on the following pages. The ECG format is set as follows: ECG Format Internal Printer Entry Key Sequence Printout Confirm ALT 1 or 2 1 5 No leads printed Press STOP key 6 Leads are printed in short form (3 sheets) 7 Leads are printed in long form (6 sheets) 8 Chart Speed 25mm/s 9 Chart Speed 50mm/s
- 41. 27 AT-1 User Guide Art. No. 2.510171 g 27AT-1 User Guide Art. No. 2.510171 g ENGLISHENGLISH Automatic Mode (ECG) Settings, Internal PrinterAutomatic Mode (ECG) Settings, Internal PrinterAutomatic Mode (ECG) Settings, Internal PrinterAutomatic Mode (ECG) Settings, Internal PrinterAutomatic Mode (ECG) Settings, Internal Printer Average Cycles The Average cycles are defined as follows: Note: Lead selection for the rhythm lead(s) is defined on page 35 Average Cycles (interpretation option only) Internal printer Entry Key Sequence Printout Confirm ALT 1 or 2 2 5 No average lead cycles are printed Press STOP key 6 4 x 3 (25 mm/s). The average complexes are printed in 4 groups of three leads at a chart speed of 25mm/s 7 4 x 3 (50 mm/s). The average complexes are printed in 4 groups of three leads at a chart speed of 50mm/s 8 6 x 2 (50 mm/s) + 1 rhythm lead (25mm/s). The average complexes are printed in 6 groups of two leads at a chart speed of 50mm/s 9 12 x 1 (25 mm/s) + 2 rhythm leads (25mm/s). The average complexes are printed out for all 12 leads at a chart speed of 50mm/s Automatic Mode (ECG) Settings, Internal PrinterAutomatic Mode (ECG) Settings, Internal PrinterAutomatic Mode (ECG) Settings, Internal PrinterAutomatic Mode (ECG) Settings, Internal PrinterAutomatic Mode (ECG) Settings, Internal Printer Average Cycles The Average cycles are defined as follows: Note: Lead selection for the rhythm lead(s) is defined on page 35 Average Cycles (interpretation option only) Internal printer Entry Key Sequence Printout Confirm ALT 1 or 2 2 5 No average lead cycles are printed Press STOP key 6 4 x 3 (25 mm/s). The average complexes are printed in 4 groups of three leads at a chart speed of 25mm/s 7 4 x 3 (50 mm/s). The average complexes are printed in 4 groups of three leads at a chart speed of 50mm/s 8 6 x 2 (50 mm/s) + 1 rhythm lead (25mm/s). The average complexes are printed in 6 groups of two leads at a chart speed of 50mm/s 9 12 x 1 (25 mm/s) + 2 rhythm leads (25mm/s). The average complexes are printed out for all 12 leads at a chart speed of 50mm/s
- 42. 28 28 Automatic Mode (ECG) Settings, Internal Printer (cont.)Automatic Mode (ECG) Settings, Internal Printer (cont.)Automatic Mode (ECG) Settings, Internal Printer (cont.)Automatic Mode (ECG) Settings, Internal Printer (cont.)Automatic Mode (ECG) Settings, Internal Printer (cont.) Measurements and Markings (M and C versions only) To define the measurements and markings proceed as follows: Measurements (M and C Options Only) Internal printer Entry Key Sequence Printout Confirm ALT 1 or 2 3 5 Detailed table of measurement results omitted - however, the values of electrical axes, intervals, and heart rate are not suppressed. Press STOP key 6 Detailed table of measurement results is printed 7 Reference markings are omitted 8 Reference markings (beginning and end of P wave and QRS, and end of T wave) are added to the ECG average cycles Automatic Mode (ECG) Settings, Internal Printer (cont.)Automatic Mode (ECG) Settings, Internal Printer (cont.)Automatic Mode (ECG) Settings, Internal Printer (cont.)Automatic Mode (ECG) Settings, Internal Printer (cont.)Automatic Mode (ECG) Settings, Internal Printer (cont.) Measurements and Markings (M and C versions only) To define the measurements and markings proceed as follows: Measurements (M and C Options Only) Internal printer Entry Key Sequence Printout Confirm ALT 1 or 2 3 5 Detailed table of measurement results omitted - however, the values of electrical axes, intervals, and heart rate are not suppressed. Press STOP key 6 Detailed table of measurement results is printed 7 Reference markings are omitted 8 Reference markings (beginning and end of P wave and QRS, and end of T wave) are added to the ECG average cycles
- 43. 29 AT-1 User Guide Art. No. 2.510171 g 29AT-1 User Guide Art. No. 2.510171 g ENGLISHENGLISH Automatic Mode (ECG) Settings, Internal Printer (cont.)Automatic Mode (ECG) Settings, Internal Printer (cont.)Automatic Mode (ECG) Settings, Internal Printer (cont.)Automatic Mode (ECG) Settings, Internal Printer (cont.)Automatic Mode (ECG) Settings, Internal Printer (cont.) Interpretation (C version only) To print or suppress interpretation statements on the printout proceed as follows: Interpretation (Interpretation Option Only) Internal printer Entry Key Sequence Printout Confirm ALT 1 or 2 4 5 Interpretation is omitted Press STOP key 6 Interpretation is printed Confirm the selection by pressing the STOP key Full details of the interpretation option are given in the SCHILLER ECG Measurement and Interpretation booklet (art. No. 2.510179). Automatic Mode (ECG) Settings, Internal Printer (cont.)Automatic Mode (ECG) Settings, Internal Printer (cont.)Automatic Mode (ECG) Settings, Internal Printer (cont.)Automatic Mode (ECG) Settings, Internal Printer (cont.)Automatic Mode (ECG) Settings, Internal Printer (cont.) Interpretation (C version only) To print or suppress interpretation statements on the printout proceed as follows: Interpretation (Interpretation Option Only) Internal printer Entry Key Sequence Printout Confirm ALT 1 or 2 4 5 Interpretation is omitted Press STOP key 6 Interpretation is printed Confirm the selection by pressing the STOP key Full details of the interpretation option are given in the SCHILLER ECG Measurement and Interpretation booklet (art. No. 2.510179).
- 44. 30 30 Automatic Mode (ECG) Settings, External PrinterAutomatic Mode (ECG) Settings, External PrinterAutomatic Mode (ECG) Settings, External PrinterAutomatic Mode (ECG) Settings, External PrinterAutomatic Mode (ECG) Settings, External Printer One Auto format can be defined for the external printer in the AT-1smartprint. When defining the auto format the key sequence ALALALALALT - 9T - 9T - 9T - 9T - 9 precedes the setting. The automatic mode format is detailed on the following pages. The ECG format is set as follows: ECG Format External printer Entry Key Sequence Printout Confirm ALT 9 1 1 1 page A4 with 12 leads at 25mm/s (1x12) Press STOP key 2 One page with the first 8 leads printed for 5s and the last 4 leads printed for 10s 5 No leads printed 6 1 page A4 with 12 leads printed in short form (2x6) 7 2 pages A4 each with 6 leads printed in long form (6 + 6) 8 Chart Speed 25mm/s 9 Chart Speed 50mm/s 0 1 page A4 with 4 groups of 3 leads (4x3) at 25mm/s + 1 rhythm (25mm/s) Automatic Mode (ECG) Settings, External PrinterAutomatic Mode (ECG) Settings, External PrinterAutomatic Mode (ECG) Settings, External PrinterAutomatic Mode (ECG) Settings, External PrinterAutomatic Mode (ECG) Settings, External Printer One Auto format can be defined for the external printer in the AT-1smartprint. When defining the auto format the key sequence ALALALALALT - 9T - 9T - 9T - 9T - 9 precedes the setting. The automatic mode format is detailed on the following pages. The ECG format is set as follows: ECG Format External printer Entry Key Sequence Printout Confirm ALT 9 1 1 1 page A4 with 12 leads at 25mm/s (1x12) Press STOP key 2 One page with the first 8 leads printed for 5s and the last 4 leads printed for 10s 5 No leads printed 6 1 page A4 with 12 leads printed in short form (2x6) 7 2 pages A4 each with 6 leads printed in long form (6 + 6) 8 Chart Speed 25mm/s 9 Chart Speed 50mm/s 0 1 page A4 with 4 groups of 3 leads (4x3) at 25mm/s + 1 rhythm (25mm/s)
- 45. 31 AT-1 User Guide Art. No. 2.510171 g 31AT-1 User Guide Art. No. 2.510171 g ENGLISHENGLISH Automatic Mode (ECG) Settings, External PrinterAutomatic Mode (ECG) Settings, External PrinterAutomatic Mode (ECG) Settings, External PrinterAutomatic Mode (ECG) Settings, External PrinterAutomatic Mode (ECG) Settings, External Printer Average Cycles The Average cycles are defined as follows: Note: Lead selection for the rhythm lead(s) is defined on page 35 Average Cycles (interpretation option only) External printer Entry Key Sequence Printout Confirm ALT 9 2 5 No average lead cycles are printed Press STOP key 6 4 x 3 (25 mm/s) + 2 rhythm leads (25mm/s). The average complexes are printed in 4 groups of three leads at a chart speed of 25mm/s 7 4 x 3 (50 mm/s) + 2 rhythm leads (25mm/s). The average complexes are printed in 4 groups of three leads at a chart speed of 50mm/s 8 6 x 2 (50 mm/s) + 2 rhythm leads (25mm/s). The average complexes are printed in 6 groups of two leads at a chart speed of 50mm/s 9 12 x 1 lead (25mm/s) + 2 rhythm leads (25mm/s) Automatic Mode (ECG) Settings, External PrinterAutomatic Mode (ECG) Settings, External PrinterAutomatic Mode (ECG) Settings, External PrinterAutomatic Mode (ECG) Settings, External PrinterAutomatic Mode (ECG) Settings, External Printer Average Cycles The Average cycles are defined as follows: Note: Lead selection for the rhythm lead(s) is defined on page 35 Average Cycles (interpretation option only) External printer Entry Key Sequence Printout Confirm ALT 9 2 5 No average lead cycles are printed Press STOP key 6 4 x 3 (25 mm/s) + 2 rhythm leads (25mm/s). The average complexes are printed in 4 groups of three leads at a chart speed of 25mm/s 7 4 x 3 (50 mm/s) + 2 rhythm leads (25mm/s). The average complexes are printed in 4 groups of three leads at a chart speed of 50mm/s 8 6 x 2 (50 mm/s) + 2 rhythm leads (25mm/s). The average complexes are printed in 6 groups of two leads at a chart speed of 50mm/s 9 12 x 1 lead (25mm/s) + 2 rhythm leads (25mm/s)
- 46. 32 32 Automatic Mode (ECG) Settings, External Printer (cont.)Automatic Mode (ECG) Settings, External Printer (cont.)Automatic Mode (ECG) Settings, External Printer (cont.)Automatic Mode (ECG) Settings, External Printer (cont.)Automatic Mode (ECG) Settings, External Printer (cont.) Measurements and Markings (M and C versions only) To define the measurements and markings proceed as follows: Measurements (M and C Options Only) External printer Entry Key Sequence Printout Confirm ALT 9 3 5 Detailed table of measurement results omitted - however, the values of electrical axes, intervals, and heart rate are not suppressed. Press STOP key 6 Detailed table of measurement results is printed 7 Reference markings are omitted 8 Reference markings (beginning and end of P wave and QRS, and end of T wave) are added to the ECG average cycles Automatic Mode (ECG) Settings, External Printer (cont.)Automatic Mode (ECG) Settings, External Printer (cont.)Automatic Mode (ECG) Settings, External Printer (cont.)Automatic Mode (ECG) Settings, External Printer (cont.)Automatic Mode (ECG) Settings, External Printer (cont.) Measurements and Markings (M and C versions only) To define the measurements and markings proceed as follows: Measurements (M and C Options Only) External printer Entry Key Sequence Printout Confirm ALT 9 3 5 Detailed table of measurement results omitted - however, the values of electrical axes, intervals, and heart rate are not suppressed. Press STOP key 6 Detailed table of measurement results is printed 7 Reference markings are omitted 8 Reference markings (beginning and end of P wave and QRS, and end of T wave) are added to the ECG average cycles
- 47. 33 AT-1 User Guide Art. No. 2.510171 g 33AT-1 User Guide Art. No. 2.510171 g ENGLISHENGLISH Automatic Mode (ECG) Settings, External Printer (cont.)Automatic Mode (ECG) Settings, External Printer (cont.)Automatic Mode (ECG) Settings, External Printer (cont.)Automatic Mode (ECG) Settings, External Printer (cont.)Automatic Mode (ECG) Settings, External Printer (cont.) Interpretation (C version only) To print or suppress interpretation statements on the printout proceed as follows: Interpretation (Interpretation Option Only) External printer Entry Key Sequence Printout Confirm ALT 9 4 5 Interpretation is omitted Press STOP key 6 Interpretation is printed Confirm the selection by pressing the STOP key Full details of the interpretation option are given in the SCHILLER ECG Measurement and Interpretation booklet (art. No. 2.510179). Automatic Mode (ECG) Settings, External Printer (cont.)Automatic Mode (ECG) Settings, External Printer (cont.)Automatic Mode (ECG) Settings, External Printer (cont.)Automatic Mode (ECG) Settings, External Printer (cont.)Automatic Mode (ECG) Settings, External Printer (cont.) Interpretation (C version only) To print or suppress interpretation statements on the printout proceed as follows: Interpretation (Interpretation Option Only) External printer Entry Key Sequence Printout Confirm ALT 9 4 5 Interpretation is omitted Press STOP key 6 Interpretation is printed Confirm the selection by pressing the STOP key Full details of the interpretation option are given in the SCHILLER ECG Measurement and Interpretation booklet (art. No. 2.510179).
- 48. 34 34 Automatic Mode (ECG) SettingsAutomatic Mode (ECG) SettingsAutomatic Mode (ECG) SettingsAutomatic Mode (ECG) SettingsAutomatic Mode (ECG) Settings Interpretation Settings (C version only) The interpretation settings enable the user to determine whether or not certain comments will be added to the interpretation statements on the ECG printout. Furthermore, the patient’s age can be defined (<30 or >30) and if low or high sensitivity should be applied. Low sensitivity will suppress certain non-specific and less important ECG diagnosis; this may be advisable when carrying out ECGs for screening. Interpretation Settings Entry Key Sequence Setting Confirm ALT 6 1 "Normal" / "Abnormal" is not printed Press STOP key 2 "Normal" / "Abnormal" is printed 3 "Unconfirmed report" is not printed 4 "Unconfirmed report" is printed 5 Patient age assumed to be < 30 6 Patient age assumed to be > 30 7 Low sensitivity 8 High sensitivity Automatic Mode (ECG) SettingsAutomatic Mode (ECG) SettingsAutomatic Mode (ECG) SettingsAutomatic Mode (ECG) SettingsAutomatic Mode (ECG) Settings Interpretation Settings (C version only) The interpretation settings enable the user to determine whether or not certain comments will be added to the interpretation statements on the ECG printout. Furthermore, the patient’s age can be defined (<30 or >30) and if low or high sensitivity should be applied. Low sensitivity will suppress certain non-specific and less important ECG diagnosis; this may be advisable when carrying out ECGs for screening. Interpretation Settings Entry Key Sequence Setting Confirm ALT 6 1 "Normal" / "Abnormal" is not printed Press STOP key 2 "Normal" / "Abnormal" is printed 3 "Unconfirmed report" is not printed 4 "Unconfirmed report" is printed 5 Patient age assumed to be < 30 6 Patient age assumed to be > 30 7 Low sensitivity 8 High sensitivity
- 49. 35 AT-1 User Guide Art. No. 2.510171 g 35AT-1 User Guide Art. No. 2.510171 g ENGLISHENGLISH Automatic Mode (ECG) Settings (cont.)Automatic Mode (ECG) Settings (cont.)Automatic Mode (ECG) Settings (cont.)Automatic Mode (ECG) Settings (cont.)Automatic Mode (ECG) Settings (cont.) Selecting Rhythm Leads The rhythm leads are printed out as defined. Two separate rhythm leads can be selected. The following formats can be set: Rhythm Leads (interpretation option only) Entry Key Sequence Setup Format ALT 3 Define rhythm lead one 4 Define rhythm lead two The 2 rhythm leads are defined as follows: Extremity Leads Entry Key Sequence Lead Confirm ALT 3 or 4 8 1 I Press STOP key 2 II 3 III 4 aVR 5 aVL 6 aVF Precordial Leads Entry Key Sequence Lead Confirm ALT 3 or 4 9 1 V1 Press STOP key 2 V2 3 V3 4 V4 5 V5 6 V6 Confirm the selection by pressing the STOP key Extremity Leads Entry Key Sequence Lead Confirm ALT 3 or 4 8 1 I Press STOP key 2 II 3 III 4 aVR 5 aVL 6 aVF Precordial Leads Entry Key Sequence Lead Confirm ALT 3 or 4 9 1 V1 Press STOP key 2 V2 3 V3 4 V4 5 V5 6 V6 Confirm the selection by pressing the STOP key Automatic Mode (ECG) Settings (cont.)Automatic Mode (ECG) Settings (cont.)Automatic Mode (ECG) Settings (cont.)Automatic Mode (ECG) Settings (cont.)Automatic Mode (ECG) Settings (cont.) Selecting Rhythm Leads The rhythm leads are printed out as defined. Two separate rhythm leads can be selected. The following formats can be set: Rhythm Leads (interpretation option only) Entry Key Sequence Setup Format ALT 3 Define rhythm lead one 4 Define rhythm lead two The 2 rhythm leads are defined as follows:
- 50. 36 36 Service PrintoutService PrintoutService PrintoutService PrintoutService Printout The service printout provides information about the patient cable and electrodes and gives the values of certain reference voltages and important internal offset values. These values are for information only. To obtain the service printout press ALALALALALT - 0 - 3 - 3T - 0 - 3 - 3T - 0 - 3 - 3T - 0 - 3 - 3T - 0 - 3 - 3 ECG Reference Voltage This provides measurements and setting facilities for the reference voltage used for accurate measurement of ECG signals Service PrintoutService PrintoutService PrintoutService PrintoutService Printout The service printout provides information about the patient cable and electrodes and gives the values of certain reference voltages and important internal offset values. These values are for information only. To obtain the service printout press ALALALALALT - 0 - 3 - 3T - 0 - 3 - 3T - 0 - 3 - 3T - 0 - 3 - 3T - 0 - 3 - 3 ECG Reference Voltage This provides measurements and setting facilities for the reference voltage used for accurate measurement of ECG signals
- 51. 37 AT-1 User Guide Art. No. 2.510171 g 37AT-1 User Guide Art. No. 2.510171 g ENGLISHENGLISH Service PrintoutService PrintoutService PrintoutService PrintoutService Printout • Uref + This gives the value of the reference voltage used in the multiplexer circuit on the ECG Amplifier. The value of the reference voltage is 2000 mV ±20 mV. • Uref - This is a negative reference voltage used on the ECG Amplifier board. The value of this voltage should be -2000 mV ±20 mV. • Udif This is the sum of the two reference values above (Uref+and Uref-). This value must be 4000 mV ± 20 mV. • Uoff This is the value of the offset voltage on the multiplexer circuit. This value should be between + 150 mV and - 150 mV. • Calib This value is the Udif value divided by 4. The nominal value is 1000 ±5 mV. Electrode dc offset This gives the voltage drop in the patient cable and can indicate any faults in the patient cable or patient electrode. The value given is the dc voltage between the left leg electrode and all other electrodes. The measurements obtained will indicate any cable short circuits or open circuits. The measured voltage value will depend on where the electrodes are connected. The voltage readings that can be expected are as follows: • With patient connected: ± 100mV • With patient simulator connected: ± 20 mV. This will depend on the patient simulator used and must be taken as a flexible measurement. • With all electrodes shorted together: ± 20 mV • No patient cable connected: -350 to -450mV TPH TEMP This is the measured ambient temperature that the processor uses to correct print quality. This reading should be ambient temperature ± 5o . EPROM This is the checksum for the EPROM. Its value varies from one software version to another. Service PrintoutService PrintoutService PrintoutService PrintoutService Printout • Uref + This gives the value of the reference voltage used in the multiplexer circuit on the ECG Amplifier. The value of the reference voltage is 2000 mV ±20 mV. • Uref - This is a negative reference voltage used on the ECG Amplifier board. The value of this voltage should be -2000 mV ±20 mV. • Udif This is the sum of the two reference values above (Uref+and Uref-). This value must be 4000 mV ± 20 mV. • Uoff This is the value of the offset voltage on the multiplexer circuit. This value should be between + 150 mV and - 150 mV. • Calib This value is the Udif value divided by 4. The nominal value is 1000 ±5 mV. Electrode dc offset This gives the voltage drop in the patient cable and can indicate any faults in the patient cable or patient electrode. The value given is the dc voltage between the left leg electrode and all other electrodes. The measurements obtained will indicate any cable short circuits or open circuits. The measured voltage value will depend on where the electrodes are connected. The voltage readings that can be expected are as follows: • With patient connected: ± 100mV • With patient simulator connected: ± 20 mV. This will depend on the patient simulator used and must be taken as a flexible measurement. • With all electrodes shorted together: ± 20 mV • No patient cable connected: -350 to -450mV TPH TEMP This is the measured ambient temperature that the processor uses to correct print quality. This reading should be ambient temperature ± 5o . EPROM This is the checksum for the EPROM. Its value varies from one software version to another.
- 52. 38 38 Installing Software OptionsInstalling Software OptionsInstalling Software OptionsInstalling Software OptionsInstalling Software Options To upgrade the ECG unit, for example from standard to M version, type the following: ALALALALALT - 0 - 4 -T - 0 - 4 -T - 0 - 4 -T - 0 - 4 -T - 0 - 4 - followed by the upgrade code (obtainable from SCHILLER). Acceptance of the code is indicated by a series of beeps. CAUTIONCAUTIONCAUTIONCAUTIONCAUTION MORE THAN 10 UNSUCCESSFUL ATTEMPTS TO ENTER THE CODE BLOCKS THE UNIT. Installing Software OptionsInstalling Software OptionsInstalling Software OptionsInstalling Software OptionsInstalling Software Options To upgrade the ECG unit, for example from standard to M version, type the following: ALALALALALT - 0 - 4 -T - 0 - 4 -T - 0 - 4 -T - 0 - 4 -T - 0 - 4 - followed by the upgrade code (obtainable from SCHILLER). Acceptance of the code is indicated by a series of beeps. CAUTIONCAUTIONCAUTIONCAUTIONCAUTION MORE THAN 10 UNSUCCESSFUL ATTEMPTS TO ENTER THE CODE BLOCKS THE UNIT.
- 53. 39 AT-1 User Guide Art. No. 2.510171 g 39AT-1 User Guide Art. No. 2.510171 g ENGLISHENGLISH PPPPPatient Cable Connectionsatient Cable Connectionsatient Cable Connectionsatient Cable Connectionsatient Cable Connections 1. Ensure that the patient is warm and relaxed. 2. Shave electrode area before cleaning. 3. Thoroughly clean the area with alcohol. 4. Place the C4 electrode first - in the fifth intercostal space on midclavicular line. Then place: • C1 in fourth intercostal space at the right sternal border • C2 in fourth intercostal space at the left sternal border • C3 between, and equidistant to, C4 and C2 • C6 on left midaxillary line on the same level as C4 • C5 between, and equidistant to, C4 and C6 The electrode placements shown on the following page are labelled with the colours according to IEC requirements. The equivalent AHA colours are given on the following table. The accessory kit of the electrocardiograph includes a 10-lead patient cable. This cable is plugged into the patient cable socket on the right-hand side of the unit and secured with the two screws. The ECG unit is CF rated. The patient connection is fully isolated and defibrillation protected. Protection against defibrillation voltage is however only ensured, if the original SCHILLER patient cable (Part-no. 2.400070 / USA: 2.400071) is used. Make sure that during ECG recording neither the patient nor the conducting parts of the patient connection or the electrodes (including the neutral electrode) come into contact with other persons or conducting objects (even if these are earthed). The quality of the ECG is dependent on the preparation and the resistance between the skin and the electrode. To ensure a good quality ECG and minimise the skin/electrode resistance, remember the following points: PPPPPatient Cable Connectionsatient Cable Connectionsatient Cable Connectionsatient Cable Connectionsatient Cable Connections The accessory kit of the electrocardiograph includes a 10-lead patient cable. This cable is plugged into the patient cable socket on the right-hand side of the unit and secured with the two screws. The ECG unit is CF rated. The patient connection is fully isolated and defibrillation protected. Protection against defibrillation voltage is however only ensured, if the original SCHILLER patient cable (Part-no. 2.400070 / USA: 2.400071) is used. Make sure that during ECG recording neither the patient nor the conducting parts of the patient connection or the electrodes (including the neutral electrode) come into contact with other persons or conducting objects (even if these are earthed). The quality of the ECG is dependent on the preparation and the resistance between the skin and the electrode. To ensure a good quality ECG and minimise the skin/electrode resistance, remember the following points: 1. Ensure that the patient is warm and relaxed. 2. Shave electrode area before cleaning. 3. Thoroughly clean the area with alcohol. 4. Place the C4 electrode first - in the fifth intercostal space on midclavicular line. Then place: • C1 in fourth intercostal space at the right sternal border • C2 in fourth intercostal space at the left sternal border • C3 between, and equidistant to, C4 and C2 • C6 on left midaxillary line on the same level as C4 • C5 between, and equidistant to, C4 and C6 The electrode placements shown on the following page are labelled with the colours according to IEC requirements. The equivalent AHA colours are given on the following table.
- 54. 40 40 PPPPPatient Cable Connectionsatient Cable Connectionsatient Cable Connectionsatient Cable Connectionsatient Cable Connections IECIECIECIECIEC AHAAHAAHAAHAAHA N Black RL Green R Red RA White C1 White/Red V1 Brown/Red C2 White/Yellow V2 Brown/Yellow C3 White/Green V3 Brown/Green C4 White/Brown V4 Brown/Blue C5 White/Black V5 Brown/ Orange C6 White/Violet V6 Brown/Violet L Yellow LA Black F Green LL Red Standard LStandard LStandard LStandard LStandard Leadseadseadseadseads PPPPPatient Cable Connectionsatient Cable Connectionsatient Cable Connectionsatient Cable Connectionsatient Cable Connections IECIECIECIECIEC AHAAHAAHAAHAAHA N Black RL Green R Red RA White C1 White/Red V1 Brown/Red C2 White/Yellow V2 Brown/Yellow C3 White/Green V3 Brown/Green C4 White/Brown V4 Brown/Blue C5 White/Black V5 Brown/Orange C6 White/Violet V6 Brown/Violet L Yellow LA Black F Green LL Red Standard LStandard LStandard LStandard LStandard Leadseadseadseadseads
- 55. 41 AT-1 User Guide Art. No. 2.510171 g 41AT-1 User Guide Art. No. 2.510171 g ENGLISHENGLISH Settings in Automatic ModeSettings in Automatic ModeSettings in Automatic ModeSettings in Automatic ModeSettings in Automatic Mode Patient Data Field A patient data field can be included on the auto mode printout for manual insertion of name and age etc. Auto Format 1 ALALALALALT - 1 - 4T - 1 - 4T - 1 - 4T - 1 - 4T - 1 - 4 . Auto Format 2 ALALALALALT - 2 - 4T - 2 - 4T - 2 - 4T - 2 - 4T - 2 - 4 . then key `55555` Patient data field omitted. `66666` Patient data field printed. Confirm the selection by pressing the STOPSTOPSTOPSTOPSTOP key . Settings in Automatic ModeSettings in Automatic ModeSettings in Automatic ModeSettings in Automatic ModeSettings in Automatic Mode Patient Data Field A patient data field can be included on the auto mode printout for manual insertion of name and age etc. Auto Format 1 ALALALALALT - 1 - 4T - 1 - 4T - 1 - 4T - 1 - 4T - 1 - 4 . Auto Format 2 ALALALALALT - 2 - 4T - 2 - 4T - 2 - 4T - 2 - 4T - 2 - 4 . then key `55555` Patient data field omitted. `66666` Patient data field printed. Confirm the selection by pressing the STOPSTOPSTOPSTOPSTOP key .
- 56. 42 42 MeasurementsMeasurementsMeasurementsMeasurementsMeasurements Note: This section gives the measurements that are calculated by the ECG unit software. Heart Rate (HR) Average heart rate (HRHRHRHRHR) calculated on the basis of the entire 10 second recording and shown as the number of beats per minute. Intervals ParameterParameterParameterParameterParameter DescriptionDescriptionDescriptionDescriptionDescription RR Average time interval between two consecutive QRS complexes. P Duration of the P wave (of averaged ECG complexes) PQ P-Q interval: the period of time between the beginning of the P wave and the beginning of the QRS complex (of averaged ECG complexes) QRS The duration of the QRS complex from the beginning of the Q wave to the end of the S wave (of averaged ECG complexes) QT Interval between the beginning of the QRS (beginning of ventricular depolarisation) and the end of the T wave (end of repolarisation phase) (of averaged ECG complexes) QTC Normalised QT interval. As the QT interval is dependent on the heart rate, it is often converted to the normalised QTC interval i.e. the QT the patient would show at a heart rate of 60 / min. Usually, the QTC amounts to 390 + 40 ms. The conversion is according to Bazetts` formula : QTC = QT x 1000 RR MeasurementsMeasurementsMeasurementsMeasurementsMeasurements Note: This section gives the measurements that are calculated by the AT-1/AT-1smartprint software. Heart Rate (HR) Average heart rate (HRHRHRHRHR) calculated on the basis of the entire 10 second recording and shown as the number of beats per minute. Intervals ParameterParameterParameterParameterParameter DescriptionDescriptionDescriptionDescriptionDescription RR Average time interval between two consecutive QRS complexes. P Duration of the P wave (of averaged ECG complexes) PQ P-Q interval: the period of time between the beginning of the P wave and the beginning of the QRS complex (of averaged ECG complexes) QRS The duration of the QRS complex from the beginning of the Q wave to the end of the S wave (of averaged ECG complexes) QT Interval between the beginning of the QRS (beginning of ventricular depolarisation) and the end of the T wave (end of repolarisation phase) (of averaged ECG complexes) QTC Normalised QT interval. As the QT interval is dependent on the heart rate, it is often converted to the normalised QTC interval i.e. the QT the patient would show at a heart rate of 60 / min. Usually, the QTC amounts to 390 + 40 ms. The conversion is according to Bazetts` formula : QTC = QT x 1000 RR
- 57. 43 AT-1 User Guide Art. No. 2.510171 g 43AT-1 User Guide Art. No. 2.510171 g ENGLISHENGLISH MeasurementsMeasurementsMeasurementsMeasurementsMeasurements Electrical Axes The electrical axes of the heart are determined separately for the P, QRS and T waves. They indicate the main spreading direction of the electrical vector in the frontal plane. I aVF 40o 1.82 (lead I Q+R+S+R`+S`) aVF I 1.51 (lead aVF Q+R+S+R`+S`) -90 -180 o o MeasurementsMeasurementsMeasurementsMeasurementsMeasurements Electrical Axes The electrical axes of the heart are determined separately for the P, QRS and T waves. They indicate the main spreading direction of the electrical vector in the frontal plane. I aVF 40o 1.82 (lead I Q+R+S+R`+S`) aVF I 1.51 (lead aVF Q+R+S+R`+S`) -90 -180 o o
- 58. 44 44 MeasurementsMeasurementsMeasurementsMeasurementsMeasurements Vector of lead I (Q, R, S and R', S') = (-0.24Q) + 2.6R + (-0.55S) + 0.02R' + (-0.01S') I II Vector of lead aVF (Q, R, S and R', S') = (-0.25Q) + 2.41R + (-0.66S) + 0.02R' + (-0.01S') aVF The SCHILLER measurement program calculates the axes on the basis of the maximum deflection of the relevant waves in leads I and aVF. The following formula is used for the calculation: MeasurementsMeasurementsMeasurementsMeasurementsMeasurements Vector of lead I (Q, R, S and R', S') = (-0.24Q) + 2.6R + (-0.55S) + 0.02R' + (-0.01S') I II Vector of lead aVF (Q, R, S and R', S') = (-0.25Q) + 2.41R + (-0.66S) + 0.02R' + (-0.01S') aVF The SCHILLER measurement program calculates the axes on the basis of the maximum deflection of the relevant waves in leads I and aVF. The following formula is used for the calculation:
- 59. 45 AT-1 User Guide Art. No. 2.510171 g 45AT-1 User Guide Art. No. 2.510171 g ENGLISHENGLISH MeasurementsMeasurementsMeasurementsMeasurementsMeasurements Note: Large discrepancies may be found between two measurements with faint P and T waves. Also breathing and the position of the patient (recumbent / standing) can result in changes in the electrical axes. MeasurementsMeasurementsMeasurementsMeasurementsMeasurements Note: Large discrepancies may be found between two measurements with faint P and T waves. Also breathing and the position of the patient (recumbent / standing) can result in changes in the electrical axes.