Weitere ähnliche Inhalte
Ähnlich wie meta-tutorial-adobe-bridge
Ähnlich wie meta-tutorial-adobe-bridge (20)
Mehr von tutorialsruby (20)
Kürzlich hochgeladen (20)
meta-tutorial-adobe-bridge
- 1. ADOBE BRIDGE
This page includes basic instructions for embedding metadata in digital images using Adobe Bridge. Follow these
steps and when you send an image file out into the world, your caption, keywords, location information and more
can travel with it.
The File Info dialogue box in Adobe Creative Suite applications includes IPTC Core metadata fields. With these
fields, you can add copyright and contact information, as well as caption, keywords and location. Adobe provides
a couple of ways for Creative Suite users to embed metadata in images. You can enter it directly into the
metadata panel within Bridge, or even open the File Info feature directly from within Bridge. This direct writing of
the metadata is important, since when using Bridge, you can change the descriptive information for a JPEG
image without subjecting it to an additional round of compression.
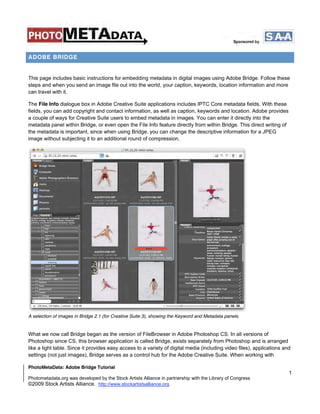
A selection of images in Bridge 2.1 (for Creative Suite 3), showing the Keyword and Metadata panels.
What we now call Bridge began as the version of FileBrowser in Adobe Photoshop CS. In all versions of
Photoshop since CS, this browser application is called Bridge, exists separately from Photoshop and is arranged
like a light table. Since it provides easy access to a variety of digital media (including video files), applications and
settings (not just images), Bridge serves as a control hub for the Adobe Creative Suite. When working with
PhotoMetaData: Adobe Bridge Tutorial
1
Photometadata.org was developed by the Stock Artists Alliance in partnership with the Library of Congress
©2009 Stock Artists Alliance. http://www.stockartistsalliance.org
- 2. photographs, you can view image thumbnails, delete the images you don’t like and add descriptive information, so
you can find them again later. In addition, you can apply or copy Camera Raw settings, and search for images
based on a wide variety of metadata.
The Bridge version that ships with Creative Suite 4 applications includes an expanded set of features and in
certain ways resembles some cataloging programs. Since various Adobe Creative Suite products include Bridge,
photographers just starting out tend to use it for editing, organizing and embedding metadata in their images.
Those with an itch for speed may move on to other applications, but it is useful to understand how Bridge works,
since you are likely to use it at some point for accessing images.
To add metadata to files, first select a file by clicking on it. Depending on the "view" you may have to click on a
tab labeled "Metadata" to see the various fields. In the default view for Metadata Focused, you can enter
information in the appropriate fields in the metadata pane, which is located under the Metadata tab in the top right
corner of Bridge. The Metadata panel is visible in two CS4 standard workspaces: Essentials and Metadata. In the
Metadata workspace, the "Metadata" panel is on the left side of the workspace, and in the Essentials view it is on
the right.
You can select and tag multiple files simultaneously. And note that after entering information in the Metadata
panel, you must save it to the files by clicking the checkmark icon at the bottom of that panel.
In CS4, after entering the information, you must save it by clicking the checkmark icon at the bottom of the
dialogue to Apply the info.
Entering information into the Description field within the Metadata panel of Bridge 2.1 (for CS3).
PhotoMetaData: Adobe Bridge Tutorial
2
Photometadata.org was developed by the Stock Artists Alliance in partnership with the Library of Congress
©2009 Stock Artists Alliance. http://www.stockartistsalliance.org
- 3. One of Bridge's biggest advantages is its tight integration with other Adobe applications.
By right-clicking or (on a Mac) control-clicking on an image and choosing File Info, or accessing File Info under
the File menu, we see the same metadata fields within the same dialogue we as when selecting File Info in Adobe
Photoshop CS through CS4 - except for one difference: The Bridge version of File Info allows you append or
change the metadata in a JPEG file without recompressing the image.
After selecting an image you can right-click or (on a Mac) control-click on an image and choose File Info.
PhotoMetaData: Adobe Bridge Tutorial
3
Photometadata.org was developed by the Stock Artists Alliance in partnership with the Library of Congress
©2009 Stock Artists Alliance. http://www.stockartistsalliance.org
- 4. Tags entered in Bridge translate into IPTC Core tags when the File>File Info command is selected in Bridge or Adobe
Photoshop CS3 and CS4 (the applications share a common dialogue box).
PhotoMetaData: Adobe Bridge Tutorial
4
Photometadata.org was developed by the Stock Artists Alliance in partnership with the Library of Congress
©2009 Stock Artists Alliance. http://www.stockartistsalliance.org
- 5. SETTING PREFERENCES FOR METADATA
You can minimize the size of your metadata panel in Bridge by modifying the preferences to turn off fields you
don't intend to fill. First, open the preferences dialogue using one of three methods: Select the icon in the top
corner of the metadata panel and choose Preferences from the pull down menu; choose Preferences from the
Bridge menu on a Mac or from the Edit menu on a Windows system; or use the Command (Mac) or Control
(Windows) plus K hotkey combination.
PhotoMetaData: Adobe Bridge Tutorial
5
Photometadata.org was developed by the Stock Artists Alliance in partnership with the Library of Congress
©2009 Stock Artists Alliance. http://www.stockartistsalliance.org
- 6. You can change the selection of fields visible in the Bridge's Metadata panel with the metadata preferences dialogue, checking
or unchecking the various boxes.
Next, go down the list and check or uncheck the fields you plan to fill or want displayed. Since the IPTC Core set
encompasses nearly all fields in the IPTC (IIM or "legacy") schema, you may wish to only check those within
the IPTC Core.
As a starting point, you might include Creator (author/photographer), Copyright, Source, Description (the
detailed caption), as well as Location (building name or street address), City, State/Province, Country and
Country Code. Keywords can really help when seeking one of those "needle in a haystack" images. Putting the
actual filename of the image into the Title field will make it easy to find the image later, even if someone
downloads the image and changes the name of the file to something they expect will be easy to recall, such as
"fuzzy kitty."
For details on intended uses for these fields, see the Guide to Photo Metadata Fields or download the IPTC
User's guide.
PhotoMetaData: Adobe Bridge Tutorial
6
Photometadata.org was developed by the Stock Artists Alliance in partnership with the Library of Congress
©2009 Stock Artists Alliance. http://www.stockartistsalliance.org
- 7. Unless you really need to know the camera you used or its exposure settings, you may want to toggle off the
Camera Data, or Exif, fields (you can still enable them later if you need access to that information).
Once you have limited the number of visible fields, data entry might seem less daunting.
One of Bridge's most powerful features is that it allows adding metadata to a single image, a selection or an entire
folder at once.
Let's start with a single image. After writing your caption, use the mouse to move your cursor into the next field.
But you'll quickly learn it's much easier to use the TAB key to advance to the next field. (Shift + Tab will move to
the previous field.)
When entering your metadata, click the checkmark at the lower right of the metadata panel to confirm your
entries and embed them in the file. If you don't click the checkmark and try to click away from the selected
image(s), a dialogue will appear, asking whether to apply the changes.
For groups of images, many (sometimes all) metadata fields will be identical, making it much more efficient to
embed this information simultaneously into all images of a selection or folder. Select a contiguous series of
related images by clicking on the first image, then holding the Shift key down while clicking on the last image of
the series (as images are selected, their borders turn a lighter gray). Select groups of non-contiguous images by
Command/Control clicking on each additional image.
After a few tries, this will become second nature. Labeling your images this way ensures caption information is
never lost, since it travels with the file itself.
PhotoMetaData: Adobe Bridge Tutorial
7
Photometadata.org was developed by the Stock Artists Alliance in partnership with the Library of Congress
©2009 Stock Artists Alliance. http://www.stockartistsalliance.org
- 8. COLOR LABELS
Some of the viewing panes within Bridge allow you to see both color labels and star ratings. Rating and ranking
your images helps note the very best images within a set. It can quickly separate "record" shots from those you
might feature in your portfolio or final project. You can set Star Ratings for an image or group of images using the
Command/Control, plus the 1 through 5 keys.
In order to properly exchange the color label values, you must set the preferences for Labels to be the same
as in your other applications, such as Lightroom and Photo Mechanic, that store this XMP value. Some
applications, such as iView Media Pro and Expression Media, do not use this information.
Again, open the Preferences dialogue under the appropriate menu item, or use the Command/Control, plus K hot
key combo:
PhotoMetaData: Adobe Bridge Tutorial
8
Photometadata.org was developed by the Stock Artists Alliance in partnership with the Library of Congress
©2009 Stock Artists Alliance. http://www.stockartistsalliance.org
- 9. Depending on your involvement with keywording, you may also set up your Bridge Keyword preferences (shown
below) to automatically apply the parent keywords within a keyword hierarchy. Bridge 2.1 (CS3) or later allows
you to create or import a hierarchical keyword catalog with broad terms, such as "animals," that can narrow down
to specific terms, such as breeds of dogs or birds. If you also use Adobe Lightroom, you'll want to check the box
to "Read Hierarchical Keywords" so keyword information entered in Lightroom displays properly in Bridge.
PhotoMetaData: Adobe Bridge Tutorial
9
Photometadata.org was developed by the Stock Artists Alliance in partnership with the Library of Congress
©2009 Stock Artists Alliance. http://www.stockartistsalliance.org
- 10. Default settings for the Cache tab/panel in Bridge for CS4. There may be some instances where you must purge all cached
thumbnails and previews. But first try using the F5 "refresh" option before resorting to this measure.
PhotoMetaData: Adobe Bridge Tutorial
10
Photometadata.org was developed by the Stock Artists Alliance in partnership with the Library of Congress
©2009 Stock Artists Alliance. http://www.stockartistsalliance.org
- 11. While Adobe Bridge is considered an image browser, the Bridge cache improves performance when returning to
the same folder of images. Metadata, previews and thumbnails are stored in this cache so they don't need to be
created each time you visit that folder. This same cache helps search and find files you have previously browsed,
but have not yet viewed in Bridge. Bridge is not the same as cataloging applications, since its changes to
metadata are immediately written to the original file (or its XMP sidecar for RAW formats). If you reopen a folder in
Bridge, it will automatically re-read the metadata from the files when the modification dates are later than those in
the cached record.
Setting preferences for pane views
For Bridge 2.1 (CS3):
From the Window menu, choose Workspace and then Reset to Default Workspace. Next, choose
Command/Control F4 to see the Metadata Focus view, where the lower left displays a Metadata panel.
Or simply choose the Metadata Panel option from the Window menu, which will pull the Metadata panel to the
foreground.
For Bridge 3.0.0 (for Creative Suite 4):
From the Window menu item, choose Workspace and then Reset Workspace or Reset Standard Workspaces.
You can then choose Command/Control F3 for the Metadata focus view.
PhotoMetaData: Adobe Bridge Tutorial
11
Photometadata.org was developed by the Stock Artists Alliance in partnership with the Library of Congress
©2009 Stock Artists Alliance. http://www.stockartistsalliance.org
- 12. CREATING OR EDITING METADATA TEMPLATES
When entering the same information again and again, think about using metadata templates. A metadata
template is nothing more than a collection of specific metadata fields saved as one or more presets. If you want
to add your name, copyright and contact information to a number of images, there is no reason to enter it more
than once. In addition, templates ensure you enter this "boilerplate" information consistently.
In Bridge, you can access and use metadata templates several ways. If you have existing templates (saved as
XMP files in the Metadata Templates folder), you can apply these to a selection of images using Bridge as easily
as you would to a single file in Photoshop. You always have the option to Append or Replace the metadata in the
existing files, as explained below.
To create a metadata template, go to the Tools menu, and choose Create Metadata Template.
If you have of an existing template with many of the values you need, you may find it easier to use the Edit
Metadata Template option. Choosing either Edit or Create will open the Metadata Template dialogue shown
below. The options are the same when you choose to Edit or Create Templates.
PhotoMetaData: Adobe Bridge Tutorial
12
Photometadata.org was developed by the Stock Artists Alliance in partnership with the Library of Congress
©2009 Stock Artists Alliance. http://www.stockartistsalliance.org
- 13. When you first open the Create Metadata Template dialogue, all the various metadata properties may only be
visible as a single item. Also note at the bottom of the dialogue that only checked properties will be added or
changed in this template. If you click on the arrow at the left side of any of the metadata groupings, it will expand
to show the full range of fields, such IPTC Core shown below.
PhotoMetaData: Adobe Bridge Tutorial
13
Photometadata.org was developed by the Stock Artists Alliance in partnership with the Library of Congress
©2009 Stock Artists Alliance. http://www.stockartistsalliance.org
- 14. Be sure to to give a meaningful name to the file before you save your template, so you can find it again. If you
don't, you will create, or overwrite, a file called "Untitled."
NOTE: By default, the IPTC Core values are hidden below the top-level listing. Click on the right-pointing arrow to
reveal the fields below. As you click to the left of each field name, a checkmark will appear, indicating it is to be
part of the template. Fill in the values you want included in the template you create, name the template and click
the Save button. You might create a template that includes just your contact information (name, address, phone,
email, web) and copyright notice with the current year. It's also possible to save metadata from any image with
this fluid dialogue.
PhotoMetaData: Adobe Bridge Tutorial
14
Photometadata.org was developed by the Stock Artists Alliance in partnership with the Library of Congress
©2009 Stock Artists Alliance. http://www.stockartistsalliance.org
- 15. Cautionary Note on Creating Metadata Templates
If creating, or even editing, an existing Bridge metadata template, be sure no images are selected in your
preview pane. If not, Bridge may save some fields you hadn’t intended to your metadata template. Some users
have reported anomalies, such as fields emptied, when applying templates intended to add information. It’s also
possible with some early versions of Bridge to inadvertently embed the camera data or Adobe Camera Raw
settings.
There is one known bug within Bridge's template editor. Be sure to click out of each field before saving the
template, or risk not having that field's entry included in the template.
While it might seem more appropriate to name the template as a first step, this bug makes it to name the template
as last step before saving. Another workaround is to click in the template name field before before clicking Save.
Only fields shown and checked in Bridge's template editor dialogue will be saved in the template. Existing-but-
empty fields delete metadata properties. The delete behavior is a feature; not saving the text you typed into the
template is a bug.
There is no option in the Metadata Template Editor to add the Copyright Status value available in Photoshop's
File Info dialogue. Since Copyright Status is not an IPTC Core field, and it is only seen within Adobe Creative
Suite applications, it may not concern you. But if want this included in your metadata template, it is possible to
manually edit the XMP text file of the template with a plain-text editor.
APPLYING A METADATA TEMPLATE TO A SELECTION OF IMAGES.
It is simple to add metadata automatically to a group of images, large or small. In Bridge, you can select a single
file, all files in a folder, or a selection of images within a folder, then apply a metadata template to all in one
operation.
First, select all images you want to label with Metadata. Then choose the Append or Replace option from the
Tools menu, along with the template you wish to apply.
PhotoMetaData: Adobe Bridge Tutorial
15
Photometadata.org was developed by the Stock Artists Alliance in partnership with the Library of Congress
©2009 Stock Artists Alliance. http://www.stockartistsalliance.org
- 16. About Append and Replace
Append will add values from the template to fields that are empty. Existing information is not replaced.
Replace adds values from the template to empty fields AND replaces existing values in fields.
Once you have selected the option to Append or Replace and chosen a specific template, Bridge will apply this
metadata template to all images you selected, as soon as you release the mouse button.
Some photographers focus on just adding the most basic, critical metadata before Raw processing, to
protect their images as soon as they are ingested into a computer. Since this information hardly ever
changes, you can reuse this such a template for many types of assignments. Once you understand how, it's easy
to make additional templates and expand that first wave of metadata to include information such as keywords,
rankings, and client and job names.
You can also use Adobe Photo Downloader to apply a metadata template when importing images from a memory
card to your computer. From the File menu, choose Get Photos from Camera ... to access this feature. If you want
Bridge to always open this downloading feature, check the box next to "When a Camera is Connected, Launch
Adobe Photo Downloader," located in the General tab of Bridge's Preferences.
Hanging on to your Hard work.
Having spent all this time entering information into your images' metadata fields, you'll probably want to make
sure it stays there. That's why it's unfortunate that Photoshop’s “Save for Web” function can undo your efforts.
Photographers have long used this feature to prepare images for websites. Sadly, many photographers don't
understand this feature can easily strip files of vital metadata and contact information. See the section for
Web Designers in the UPDIG Photographer guide for details on how to protect yourself and educate others about
how easy they can accidentally remove metadata.
SUMMARY.
Adobe Bridge is more compact and configurable than Photoshop File Info for adding and editing photo metadata.
If working on a single screen or laptop, you might find it easier to write captions in Bridge, since you can see a
thumbnail or preview of the image unobscured by the File Info dialogue.
You can easily show or hide the metadata panel, and moving from image to image will quickly show whether each
has embedded metadata.
In addition, Bridge (2.1 for CS3, or later) has a Keywords panel, in which you can view or create a controlled
vocabulary of hierarchical keywords. You can enter Keywords in File Info dialogue of Photoshop and other
Creative Suite applications, or within Bridge. However, you will only see this long list of keywords when viewing
images in Adobe Bridge. These terms visually represent their broad-to-narrow relationship, and they aren't visible
in the File Info dialogue.
PhotoMetaData: Adobe Bridge Tutorial
16
Photometadata.org was developed by the Stock Artists Alliance in partnership with the Library of Congress
©2009 Stock Artists Alliance. http://www.stockartistsalliance.org
- 17. One of the advantages of using Bridge is the Keyword panel. This feature allows you to import or construct a list
of terms arranged with narrower terms located beneath broader.
PhotoMetaData: Adobe Bridge Tutorial
17
Photometadata.org was developed by the Stock Artists Alliance in partnership with the Library of Congress
©2009 Stock Artists Alliance. http://www.stockartistsalliance.org