Obstacle Avoidance Robot
•
51 gefällt mir•11,860 views

This document describes a student robotics project. The project involves building a robot that can sense obstacles using IR sensors, avoid obstacles autonomously, and resume its path. The robot is controlled by an AVR ATmega16 microcontroller. It uses an IR sensor to detect obstacles and an L293D motor driver and DC motors for movement. When an obstacle is detected, the microcontroller diverts the robot left or right to avoid the obstacle before resuming its forward motion. The project aims to create a mobile robot that can navigate independently within certain limitations.

Empfohlen
Weitere ähnliche Inhalte
Was ist angesagt?
Was ist angesagt? (20)
Ähnlich wie Obstacle Avoidance Robot
Ähnlich wie Obstacle Avoidance Robot (20)
Kürzlich hochgeladen
Kürzlich hochgeladen (20)
Obstacle Avoidance Robot
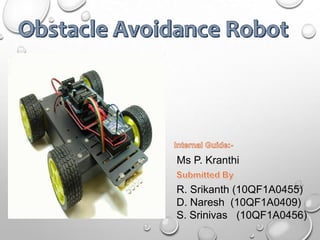
- 1. R. Srikanth (10QF1A0455) D. Naresh (10QF1A0409) S. Srinivas (10QF1A0456) Ms P. Kranthi
- 2. The word robotics is used to collectively define a field in engineering that covers the mimicking of various human characteristics. It must be able to perform certain tasks we set for it. The desired task must be achieved within some given limitations. It may be human controlled or automatic. What is “Robotics”?
- 3. Mobile robots perform various ways of tasks to serve humans No human guidance is required This sort of project is very much useful in the industries where the automated supervision is required Why Robotics?
- 4. In this project our robot senses any obstacle in its path, avoids it and resumes its running Involves the pre- computation of an obstacle-free path which a controller guides the robot Our Robot:-
- 5. IR Sensor(Transmitter and receiver) AVR Atmega16 Microcontroller L293D Driver IC Motor Buzzer COMPONENTS:-
- 8. (IR) sensors based on reflected amplitude of the surrounding objects Non-linear and depends on the reflectance characteristics of the object surface IR sensors able to accurately measure distances with reduced response times IR Sensors:-
- 9. What is a Microcontroller? A microcontroller (MCU/μC) is a small computer on a single IC consisting internally of a relatively simple CPU, clock, timers, I/O ports, and memory. It can be programmed to control numerous other electronic devices using its on chip peripherals. AVR Atmega16 Microcontroller:-
- 10. They are fast. Executes most of the instructions in single execution cycle. 4 times faster than PIC Consume less power Can be operated in different power saving modes. Why ATMEGA?
- 11. ATmega Features:- 16 KB Flash memory 1 KB of SRAM Up to 16 MHz clock Four 8-bit I/O ports ADC, Timers, Serial Interface etc. 40 pin DIP, operates at 5V
- 12. Flash: Flash memory to store the program written. Flash memory is non-volatile i.e., it retains the program even if the power is cut- off. EEPROM: This is also a non- volatile memory used to store data like values of certain variables. SRAM: Static Random Access Memory, this is the volatile memory of microcontroller i.e. data is lost as soon as power is turned off. ATmega MEMORY:-
- 13. Step1: Initialization of I/O ports. Step2: Set Direction as Forward/ Backward/ Left/ Right. Step3: check if any obstacle is detected according to that change the motion of Robot. If no then Robot will goes in forward direction. Step4: Wait for some time. Step5: go to step 3 to repeat the process. Step7: Wait for some time. Step 8: End ALGORITHM
- 14. FLOW CHART:-
- 15. The L293D is a quadruple half H-bridge bidirectional motor driver IC Can drive current of up to 600mA with voltage range of 4.5 to 36 volts Drive small DC-Geared motors, bipolar stepper motor L293D Driver IC
- 16. Free running torque & current are ideally zero Increased load implies, increased torque, current drawn & power consumption Power supplied by a motor is the product of output shaft's rotational velocity & torque Can run in both directions D.C Geared Motor:-
- 17. Whenever robot senses any obstacle automatically diverts its position to left or right and follows the path without human guidance. The programming of the microcontroller is easy. It is a low cost circuit Advantages:-
- 18. It is time consuming project. It is use for short distance only. It is not recommended to keep the range very long because this would cause the ROBOT to keep moving forward and backward as it senses any obstacle, even far away from it. It is not in human control Disadvantages:-
- 19. Adding a Camera Use as a fire fighting robot Future Scope Of This Project:-
Hinweis der Redaktion
- Animated text flying in by letter(Basic)To reproduce the text effects on this slide, do the following:On the Home tab, in theSlides group, click Layout, and then click Blank.On the Insert tab, in the Text group, click Text Box, and then on the slide, drag to draw the text box. Enter text in the text box, select the text, and then on the Home tab, in the Font group, select Corbel from the Font list, enter 50 in the Font Size list, and click Bold.On the Home tab, in the Paragraph group, click Center to center the text.Select the text box. Under Drawing Tools, on the Format tab, in the WordArt Styles, click on the Format Text Effects: Text Box dialog box launcher. In the Format Text Effects dialog box, in the left pane, click Text Fill. In the Text Fill pane, select Solid Fill, and in the Color list, select Olive Green, Accent 3 (first row, seventh option from the left).Also in the Format Text Effects dialog box, in the left pane, click 3-D Format. In the 3-D Format pane, do the following:Under Bevel, do the following:In the Top list, under Bevel, select Angle (second row, first option from the left). In Top, under Width, enter 1.5 pt. In Top, under Height, enter1.5 pt.Under Depth, in the Color list, select Automatic, and in the Depth text box, enter 2.5ptUnder Contour, in the Color list, select Olive Green, Accent 3 (first row, seventh option from the left).Under Surface, do the following:In the Material list, under Translucent, select Powder (first option from the left).In the Lighting list, under Special, select Flat (first option from the left).In the Angle box, enter 315°.On the slide, select the text box, and then on the Home tab, in the Drawing group, click Arrange, and then under Position Objects, point to Align, and do the following:Click Align to Slide.Click Align Middle.Click Align Center.To reproduce the animation effects on this slide, do the following:On the slide, select the text box and then on the Animations tab, in the Animation group, click the More arrow on the Animation Effects Gallery, and under Entrance, click Fly In. To modify the effect, on the Animations tab, do the following: In the Timing group, do the following:In the Start list, select WithPrevious.In the Durations list, select 00.50.In the Animation group, click Effect Options and under Direction, click From Left.In the Advanced Animation group, click Animation Pane. Then in the Animation Pane, do the following:Click the arrow next to the fly-in effect and click Effect Options.In the Fly In dialog box, on the Effects tab, under Enhancements, in the AnimateText box, select ByLetters.Under Enhancements, in the % delay between letters box, enter 6.In the Advanced Animation group, click AddAnimation, then under Exit, select FlyOut. To modify the effect, on the Animations tab, do the following: In the Timing group, do the following:In the Start list, select AfterPrevious.In the Durations list, select 00.50.In the Delay list, select 01.50.In the Animation group, click Effect Options and under Direction, click To Right.In the Advanced Animation group, click Animation Pane. Then in the Animation Pane, do the following:Click the arrow next to the fly-in effect and click Effect Options.In the Fly Out dialog box, on the Effects tab, under Enhancements, in the AnimateText box, select ByLetters.Under Enhancements, in the % delay between letters box, enter 6.Select the fly out exit effect, and under Modify: Fly Out, do the following:In the Start list, select AfterPrevious. In the Direction list, select ToRight. In the Speed list, select Fast. Click the arrow next to the fly out exit effect, and select Effect Options. In the FlyOut dialog box, do the following:On the Effect tab, in the Animate Text list, select By Letters. Also on the Effect tab, in the % delay between letters box, enter 6.On the Timing tab, in the Delay box, enter 1.5.To reproduce the background on this slide, do the following: Right-click the slide background area, and then click Format Background. In the Format Background dialog box, click Fill in the left pane, select Gradient fill in the Fill pane, and then do the following:In the Type list, select Radial.Click the button next to Direction, and then click From Center (third option from the left).Under Gradient stops, click Add or Remove until two stops appear on the slider, then customize the gradient stops as follows:Select Stop 1 from the slider, and then do the following:In the Position box, enter 0%.Click the button next to Color, and then click Black, Text 1, Lighter 50% (second row, second option from the left).Select Stop 2 from the slider, and then do the following: In the Position box, enter 100%.Click the button next to Color, and then click Black, Text 1 (first row, second option from the left).
- Animated text flying in by letter(Basic)To reproduce the text effects on this slide, do the following:On the Home tab, in theSlides group, click Layout, and then click Blank.On the Insert tab, in the Text group, click Text Box, and then on the slide, drag to draw the text box. Enter text in the text box, select the text, and then on the Home tab, in the Font group, select Corbel from the Font list, enter 50 in the Font Size list, and click Bold.On the Home tab, in the Paragraph group, click Center to center the text.Select the text box. Under Drawing Tools, on the Format tab, in the WordArt Styles, click on the Format Text Effects: Text Box dialog box launcher. In the Format Text Effects dialog box, in the left pane, click Text Fill. In the Text Fill pane, select Solid Fill, and in the Color list, select Olive Green, Accent 3 (first row, seventh option from the left).Also in the Format Text Effects dialog box, in the left pane, click 3-D Format. In the 3-D Format pane, do the following:Under Bevel, do the following:In the Top list, under Bevel, select Angle (second row, first option from the left). In Top, under Width, enter 1.5 pt. In Top, under Height, enter1.5 pt.Under Depth, in the Color list, select Automatic, and in the Depth text box, enter 2.5ptUnder Contour, in the Color list, select Olive Green, Accent 3 (first row, seventh option from the left).Under Surface, do the following:In the Material list, under Translucent, select Powder (first option from the left).In the Lighting list, under Special, select Flat (first option from the left).In the Angle box, enter 315°.On the slide, select the text box, and then on the Home tab, in the Drawing group, click Arrange, and then under Position Objects, point to Align, and do the following:Click Align to Slide.Click Align Middle.Click Align Center.To reproduce the animation effects on this slide, do the following:On the slide, select the text box and then on the Animations tab, in the Animation group, click the More arrow on the Animation Effects Gallery, and under Entrance, click Fly In. To modify the effect, on the Animations tab, do the following: In the Timing group, do the following:In the Start list, select WithPrevious.In the Durations list, select 00.50.In the Animation group, click Effect Options and under Direction, click From Left.In the Advanced Animation group, click Animation Pane. Then in the Animation Pane, do the following:Click the arrow next to the fly-in effect and click Effect Options.In the Fly In dialog box, on the Effects tab, under Enhancements, in the AnimateText box, select ByLetters.Under Enhancements, in the % delay between letters box, enter 6.In the Advanced Animation group, click AddAnimation, then under Exit, select FlyOut. To modify the effect, on the Animations tab, do the following: In the Timing group, do the following:In the Start list, select AfterPrevious.In the Durations list, select 00.50.In the Delay list, select 01.50.In the Animation group, click Effect Options and under Direction, click To Right.In the Advanced Animation group, click Animation Pane. Then in the Animation Pane, do the following:Click the arrow next to the fly-in effect and click Effect Options.In the Fly Out dialog box, on the Effects tab, under Enhancements, in the AnimateText box, select ByLetters.Under Enhancements, in the % delay between letters box, enter 6.Select the fly out exit effect, and under Modify: Fly Out, do the following:In the Start list, select AfterPrevious. In the Direction list, select ToRight. In the Speed list, select Fast. Click the arrow next to the fly out exit effect, and select Effect Options. In the FlyOut dialog box, do the following:On the Effect tab, in the Animate Text list, select By Letters. Also on the Effect tab, in the % delay between letters box, enter 6.On the Timing tab, in the Delay box, enter 1.5.To reproduce the background on this slide, do the following: Right-click the slide background area, and then click Format Background. In the Format Background dialog box, click Fill in the left pane, select Gradient fill in the Fill pane, and then do the following:In the Type list, select Radial.Click the button next to Direction, and then click From Center (third option from the left).Under Gradient stops, click Add or Remove until two stops appear on the slider, then customize the gradient stops as follows:Select Stop 1 from the slider, and then do the following:In the Position box, enter 0%.Click the button next to Color, and then click Black, Text 1, Lighter 50% (second row, second option from the left).Select Stop 2 from the slider, and then do the following: In the Position box, enter 100%.Click the button next to Color, and then click Black, Text 1 (first row, second option from the left).
- Animated text flying in by letter(Basic)To reproduce the text effects on this slide, do the following:On the Home tab, in theSlides group, click Layout, and then click Blank.On the Insert tab, in the Text group, click Text Box, and then on the slide, drag to draw the text box. Enter text in the text box, select the text, and then on the Home tab, in the Font group, select Corbel from the Font list, enter 50 in the Font Size list, and click Bold.On the Home tab, in the Paragraph group, click Center to center the text.Select the text box. Under Drawing Tools, on the Format tab, in the WordArt Styles, click on the Format Text Effects: Text Box dialog box launcher. In the Format Text Effects dialog box, in the left pane, click Text Fill. In the Text Fill pane, select Solid Fill, and in the Color list, select Olive Green, Accent 3 (first row, seventh option from the left).Also in the Format Text Effects dialog box, in the left pane, click 3-D Format. In the 3-D Format pane, do the following:Under Bevel, do the following:In the Top list, under Bevel, select Angle (second row, first option from the left). In Top, under Width, enter 1.5 pt. In Top, under Height, enter1.5 pt.Under Depth, in the Color list, select Automatic, and in the Depth text box, enter 2.5ptUnder Contour, in the Color list, select Olive Green, Accent 3 (first row, seventh option from the left).Under Surface, do the following:In the Material list, under Translucent, select Powder (first option from the left).In the Lighting list, under Special, select Flat (first option from the left).In the Angle box, enter 315°.On the slide, select the text box, and then on the Home tab, in the Drawing group, click Arrange, and then under Position Objects, point to Align, and do the following:Click Align to Slide.Click Align Middle.Click Align Center.To reproduce the animation effects on this slide, do the following:On the slide, select the text box and then on the Animations tab, in the Animation group, click the More arrow on the Animation Effects Gallery, and under Entrance, click Fly In. To modify the effect, on the Animations tab, do the following: In the Timing group, do the following:In the Start list, select WithPrevious.In the Durations list, select 00.50.In the Animation group, click Effect Options and under Direction, click From Left.In the Advanced Animation group, click Animation Pane. Then in the Animation Pane, do the following:Click the arrow next to the fly-in effect and click Effect Options.In the Fly In dialog box, on the Effects tab, under Enhancements, in the AnimateText box, select ByLetters.Under Enhancements, in the % delay between letters box, enter 6.In the Advanced Animation group, click AddAnimation, then under Exit, select FlyOut. To modify the effect, on the Animations tab, do the following: In the Timing group, do the following:In the Start list, select AfterPrevious.In the Durations list, select 00.50.In the Delay list, select 01.50.In the Animation group, click Effect Options and under Direction, click To Right.In the Advanced Animation group, click Animation Pane. Then in the Animation Pane, do the following:Click the arrow next to the fly-in effect and click Effect Options.In the Fly Out dialog box, on the Effects tab, under Enhancements, in the AnimateText box, select ByLetters.Under Enhancements, in the % delay between letters box, enter 6.Select the fly out exit effect, and under Modify: Fly Out, do the following:In the Start list, select AfterPrevious. In the Direction list, select ToRight. In the Speed list, select Fast. Click the arrow next to the fly out exit effect, and select Effect Options. In the FlyOut dialog box, do the following:On the Effect tab, in the Animate Text list, select By Letters. Also on the Effect tab, in the % delay between letters box, enter 6.On the Timing tab, in the Delay box, enter 1.5.To reproduce the background on this slide, do the following: Right-click the slide background area, and then click Format Background. In the Format Background dialog box, click Fill in the left pane, select Gradient fill in the Fill pane, and then do the following:In the Type list, select Radial.Click the button next to Direction, and then click From Center (third option from the left).Under Gradient stops, click Add or Remove until two stops appear on the slider, then customize the gradient stops as follows:Select Stop 1 from the slider, and then do the following:In the Position box, enter 0%.Click the button next to Color, and then click Black, Text 1, Lighter 50% (second row, second option from the left).Select Stop 2 from the slider, and then do the following: In the Position box, enter 100%.Click the button next to Color, and then click Black, Text 1 (first row, second option from the left).
- Animated text flying in by letter(Basic)To reproduce the text effects on this slide, do the following:On the Home tab, in theSlides group, click Layout, and then click Blank.On the Insert tab, in the Text group, click Text Box, and then on the slide, drag to draw the text box. Enter text in the text box, select the text, and then on the Home tab, in the Font group, select Corbel from the Font list, enter 50 in the Font Size list, and click Bold.On the Home tab, in the Paragraph group, click Center to center the text.Select the text box. Under Drawing Tools, on the Format tab, in the WordArt Styles, click on the Format Text Effects: Text Box dialog box launcher. In the Format Text Effects dialog box, in the left pane, click Text Fill. In the Text Fill pane, select Solid Fill, and in the Color list, select Olive Green, Accent 3 (first row, seventh option from the left).Also in the Format Text Effects dialog box, in the left pane, click 3-D Format. In the 3-D Format pane, do the following:Under Bevel, do the following:In the Top list, under Bevel, select Angle (second row, first option from the left). In Top, under Width, enter 1.5 pt. In Top, under Height, enter1.5 pt.Under Depth, in the Color list, select Automatic, and in the Depth text box, enter 2.5ptUnder Contour, in the Color list, select Olive Green, Accent 3 (first row, seventh option from the left).Under Surface, do the following:In the Material list, under Translucent, select Powder (first option from the left).In the Lighting list, under Special, select Flat (first option from the left).In the Angle box, enter 315°.On the slide, select the text box, and then on the Home tab, in the Drawing group, click Arrange, and then under Position Objects, point to Align, and do the following:Click Align to Slide.Click Align Middle.Click Align Center.To reproduce the animation effects on this slide, do the following:On the slide, select the text box and then on the Animations tab, in the Animation group, click the More arrow on the Animation Effects Gallery, and under Entrance, click Fly In. To modify the effect, on the Animations tab, do the following: In the Timing group, do the following:In the Start list, select WithPrevious.In the Durations list, select 00.50.In the Animation group, click Effect Options and under Direction, click From Left.In the Advanced Animation group, click Animation Pane. Then in the Animation Pane, do the following:Click the arrow next to the fly-in effect and click Effect Options.In the Fly In dialog box, on the Effects tab, under Enhancements, in the AnimateText box, select ByLetters.Under Enhancements, in the % delay between letters box, enter 6.In the Advanced Animation group, click AddAnimation, then under Exit, select FlyOut. To modify the effect, on the Animations tab, do the following: In the Timing group, do the following:In the Start list, select AfterPrevious.In the Durations list, select 00.50.In the Delay list, select 01.50.In the Animation group, click Effect Options and under Direction, click To Right.In the Advanced Animation group, click Animation Pane. Then in the Animation Pane, do the following:Click the arrow next to the fly-in effect and click Effect Options.In the Fly Out dialog box, on the Effects tab, under Enhancements, in the AnimateText box, select ByLetters.Under Enhancements, in the % delay between letters box, enter 6.Select the fly out exit effect, and under Modify: Fly Out, do the following:In the Start list, select AfterPrevious. In the Direction list, select ToRight. In the Speed list, select Fast. Click the arrow next to the fly out exit effect, and select Effect Options. In the FlyOut dialog box, do the following:On the Effect tab, in the Animate Text list, select By Letters. Also on the Effect tab, in the % delay between letters box, enter 6.On the Timing tab, in the Delay box, enter 1.5.To reproduce the background on this slide, do the following: Right-click the slide background area, and then click Format Background. In the Format Background dialog box, click Fill in the left pane, select Gradient fill in the Fill pane, and then do the following:In the Type list, select Radial.Click the button next to Direction, and then click From Center (third option from the left).Under Gradient stops, click Add or Remove until two stops appear on the slider, then customize the gradient stops as follows:Select Stop 1 from the slider, and then do the following:In the Position box, enter 0%.Click the button next to Color, and then click Black, Text 1, Lighter 50% (second row, second option from the left).Select Stop 2 from the slider, and then do the following: In the Position box, enter 100%.Click the button next to Color, and then click Black, Text 1 (first row, second option from the left).
- Animated text flying in by letter(Basic)To reproduce the text effects on this slide, do the following:On the Home tab, in theSlides group, click Layout, and then click Blank.On the Insert tab, in the Text group, click Text Box, and then on the slide, drag to draw the text box. Enter text in the text box, select the text, and then on the Home tab, in the Font group, select Corbel from the Font list, enter 50 in the Font Size list, and click Bold.On the Home tab, in the Paragraph group, click Center to center the text.Select the text box. Under Drawing Tools, on the Format tab, in the WordArt Styles, click on the Format Text Effects: Text Box dialog box launcher. In the Format Text Effects dialog box, in the left pane, click Text Fill. In the Text Fill pane, select Solid Fill, and in the Color list, select Olive Green, Accent 3 (first row, seventh option from the left).Also in the Format Text Effects dialog box, in the left pane, click 3-D Format. In the 3-D Format pane, do the following:Under Bevel, do the following:In the Top list, under Bevel, select Angle (second row, first option from the left). In Top, under Width, enter 1.5 pt. In Top, under Height, enter1.5 pt.Under Depth, in the Color list, select Automatic, and in the Depth text box, enter 2.5ptUnder Contour, in the Color list, select Olive Green, Accent 3 (first row, seventh option from the left).Under Surface, do the following:In the Material list, under Translucent, select Powder (first option from the left).In the Lighting list, under Special, select Flat (first option from the left).In the Angle box, enter 315°.On the slide, select the text box, and then on the Home tab, in the Drawing group, click Arrange, and then under Position Objects, point to Align, and do the following:Click Align to Slide.Click Align Middle.Click Align Center.To reproduce the animation effects on this slide, do the following:On the slide, select the text box and then on the Animations tab, in the Animation group, click the More arrow on the Animation Effects Gallery, and under Entrance, click Fly In. To modify the effect, on the Animations tab, do the following: In the Timing group, do the following:In the Start list, select WithPrevious.In the Durations list, select 00.50.In the Animation group, click Effect Options and under Direction, click From Left.In the Advanced Animation group, click Animation Pane. Then in the Animation Pane, do the following:Click the arrow next to the fly-in effect and click Effect Options.In the Fly In dialog box, on the Effects tab, under Enhancements, in the AnimateText box, select ByLetters.Under Enhancements, in the % delay between letters box, enter 6.In the Advanced Animation group, click AddAnimation, then under Exit, select FlyOut. To modify the effect, on the Animations tab, do the following: In the Timing group, do the following:In the Start list, select AfterPrevious.In the Durations list, select 00.50.In the Delay list, select 01.50.In the Animation group, click Effect Options and under Direction, click To Right.In the Advanced Animation group, click Animation Pane. Then in the Animation Pane, do the following:Click the arrow next to the fly-in effect and click Effect Options.In the Fly Out dialog box, on the Effects tab, under Enhancements, in the AnimateText box, select ByLetters.Under Enhancements, in the % delay between letters box, enter 6.Select the fly out exit effect, and under Modify: Fly Out, do the following:In the Start list, select AfterPrevious. In the Direction list, select ToRight. In the Speed list, select Fast. Click the arrow next to the fly out exit effect, and select Effect Options. In the FlyOut dialog box, do the following:On the Effect tab, in the Animate Text list, select By Letters. Also on the Effect tab, in the % delay between letters box, enter 6.On the Timing tab, in the Delay box, enter 1.5.To reproduce the background on this slide, do the following: Right-click the slide background area, and then click Format Background. In the Format Background dialog box, click Fill in the left pane, select Gradient fill in the Fill pane, and then do the following:In the Type list, select Radial.Click the button next to Direction, and then click From Center (third option from the left).Under Gradient stops, click Add or Remove until two stops appear on the slider, then customize the gradient stops as follows:Select Stop 1 from the slider, and then do the following:In the Position box, enter 0%.Click the button next to Color, and then click Black, Text 1, Lighter 50% (second row, second option from the left).Select Stop 2 from the slider, and then do the following: In the Position box, enter 100%.Click the button next to Color, and then click Black, Text 1 (first row, second option from the left).
- Animated text flying in by letter(Basic)To reproduce the text effects on this slide, do the following:On the Home tab, in theSlides group, click Layout, and then click Blank.On the Insert tab, in the Text group, click Text Box, and then on the slide, drag to draw the text box. Enter text in the text box, select the text, and then on the Home tab, in the Font group, select Corbel from the Font list, enter 50 in the Font Size list, and click Bold.On the Home tab, in the Paragraph group, click Center to center the text.Select the text box. Under Drawing Tools, on the Format tab, in the WordArt Styles, click on the Format Text Effects: Text Box dialog box launcher. In the Format Text Effects dialog box, in the left pane, click Text Fill. In the Text Fill pane, select Solid Fill, and in the Color list, select Olive Green, Accent 3 (first row, seventh option from the left).Also in the Format Text Effects dialog box, in the left pane, click 3-D Format. In the 3-D Format pane, do the following:Under Bevel, do the following:In the Top list, under Bevel, select Angle (second row, first option from the left). In Top, under Width, enter 1.5 pt. In Top, under Height, enter1.5 pt.Under Depth, in the Color list, select Automatic, and in the Depth text box, enter 2.5ptUnder Contour, in the Color list, select Olive Green, Accent 3 (first row, seventh option from the left).Under Surface, do the following:In the Material list, under Translucent, select Powder (first option from the left).In the Lighting list, under Special, select Flat (first option from the left).In the Angle box, enter 315°.On the slide, select the text box, and then on the Home tab, in the Drawing group, click Arrange, and then under Position Objects, point to Align, and do the following:Click Align to Slide.Click Align Middle.Click Align Center.To reproduce the animation effects on this slide, do the following:On the slide, select the text box and then on the Animations tab, in the Animation group, click the More arrow on the Animation Effects Gallery, and under Entrance, click Fly In. To modify the effect, on the Animations tab, do the following: In the Timing group, do the following:In the Start list, select WithPrevious.In the Durations list, select 00.50.In the Animation group, click Effect Options and under Direction, click From Left.In the Advanced Animation group, click Animation Pane. Then in the Animation Pane, do the following:Click the arrow next to the fly-in effect and click Effect Options.In the Fly In dialog box, on the Effects tab, under Enhancements, in the AnimateText box, select ByLetters.Under Enhancements, in the % delay between letters box, enter 6.In the Advanced Animation group, click AddAnimation, then under Exit, select FlyOut. To modify the effect, on the Animations tab, do the following: In the Timing group, do the following:In the Start list, select AfterPrevious.In the Durations list, select 00.50.In the Delay list, select 01.50.In the Animation group, click Effect Options and under Direction, click To Right.In the Advanced Animation group, click Animation Pane. Then in the Animation Pane, do the following:Click the arrow next to the fly-in effect and click Effect Options.In the Fly Out dialog box, on the Effects tab, under Enhancements, in the AnimateText box, select ByLetters.Under Enhancements, in the % delay between letters box, enter 6.Select the fly out exit effect, and under Modify: Fly Out, do the following:In the Start list, select AfterPrevious. In the Direction list, select ToRight. In the Speed list, select Fast. Click the arrow next to the fly out exit effect, and select Effect Options. In the FlyOut dialog box, do the following:On the Effect tab, in the Animate Text list, select By Letters. Also on the Effect tab, in the % delay between letters box, enter 6.On the Timing tab, in the Delay box, enter 1.5.To reproduce the background on this slide, do the following: Right-click the slide background area, and then click Format Background. In the Format Background dialog box, click Fill in the left pane, select Gradient fill in the Fill pane, and then do the following:In the Type list, select Radial.Click the button next to Direction, and then click From Center (third option from the left).Under Gradient stops, click Add or Remove until two stops appear on the slider, then customize the gradient stops as follows:Select Stop 1 from the slider, and then do the following:In the Position box, enter 0%.Click the button next to Color, and then click Black, Text 1, Lighter 50% (second row, second option from the left).Select Stop 2 from the slider, and then do the following: In the Position box, enter 100%.Click the button next to Color, and then click Black, Text 1 (first row, second option from the left).
- Animated text flying in by letter(Basic)To reproduce the text effects on this slide, do the following:On the Home tab, in theSlides group, click Layout, and then click Blank.On the Insert tab, in the Text group, click Text Box, and then on the slide, drag to draw the text box. Enter text in the text box, select the text, and then on the Home tab, in the Font group, select Corbel from the Font list, enter 50 in the Font Size list, and click Bold.On the Home tab, in the Paragraph group, click Center to center the text.Select the text box. Under Drawing Tools, on the Format tab, in the WordArt Styles, click on the Format Text Effects: Text Box dialog box launcher. In the Format Text Effects dialog box, in the left pane, click Text Fill. In the Text Fill pane, select Solid Fill, and in the Color list, select Olive Green, Accent 3 (first row, seventh option from the left).Also in the Format Text Effects dialog box, in the left pane, click 3-D Format. In the 3-D Format pane, do the following:Under Bevel, do the following:In the Top list, under Bevel, select Angle (second row, first option from the left). In Top, under Width, enter 1.5 pt. In Top, under Height, enter1.5 pt.Under Depth, in the Color list, select Automatic, and in the Depth text box, enter 2.5ptUnder Contour, in the Color list, select Olive Green, Accent 3 (first row, seventh option from the left).Under Surface, do the following:In the Material list, under Translucent, select Powder (first option from the left).In the Lighting list, under Special, select Flat (first option from the left).In the Angle box, enter 315°.On the slide, select the text box, and then on the Home tab, in the Drawing group, click Arrange, and then under Position Objects, point to Align, and do the following:Click Align to Slide.Click Align Middle.Click Align Center.To reproduce the animation effects on this slide, do the following:On the slide, select the text box and then on the Animations tab, in the Animation group, click the More arrow on the Animation Effects Gallery, and under Entrance, click Fly In. To modify the effect, on the Animations tab, do the following: In the Timing group, do the following:In the Start list, select WithPrevious.In the Durations list, select 00.50.In the Animation group, click Effect Options and under Direction, click From Left.In the Advanced Animation group, click Animation Pane. Then in the Animation Pane, do the following:Click the arrow next to the fly-in effect and click Effect Options.In the Fly In dialog box, on the Effects tab, under Enhancements, in the AnimateText box, select ByLetters.Under Enhancements, in the % delay between letters box, enter 6.In the Advanced Animation group, click AddAnimation, then under Exit, select FlyOut. To modify the effect, on the Animations tab, do the following: In the Timing group, do the following:In the Start list, select AfterPrevious.In the Durations list, select 00.50.In the Delay list, select 01.50.In the Animation group, click Effect Options and under Direction, click To Right.In the Advanced Animation group, click Animation Pane. Then in the Animation Pane, do the following:Click the arrow next to the fly-in effect and click Effect Options.In the Fly Out dialog box, on the Effects tab, under Enhancements, in the AnimateText box, select ByLetters.Under Enhancements, in the % delay between letters box, enter 6.Select the fly out exit effect, and under Modify: Fly Out, do the following:In the Start list, select AfterPrevious. In the Direction list, select ToRight. In the Speed list, select Fast. Click the arrow next to the fly out exit effect, and select Effect Options. In the FlyOut dialog box, do the following:On the Effect tab, in the Animate Text list, select By Letters. Also on the Effect tab, in the % delay between letters box, enter 6.On the Timing tab, in the Delay box, enter 1.5.To reproduce the background on this slide, do the following: Right-click the slide background area, and then click Format Background. In the Format Background dialog box, click Fill in the left pane, select Gradient fill in the Fill pane, and then do the following:In the Type list, select Radial.Click the button next to Direction, and then click From Center (third option from the left).Under Gradient stops, click Add or Remove until two stops appear on the slider, then customize the gradient stops as follows:Select Stop 1 from the slider, and then do the following:In the Position box, enter 0%.Click the button next to Color, and then click Black, Text 1, Lighter 50% (second row, second option from the left).Select Stop 2 from the slider, and then do the following: In the Position box, enter 100%.Click the button next to Color, and then click Black, Text 1 (first row, second option from the left).
- Animated text flying in by letter(Basic)To reproduce the text effects on this slide, do the following:On the Home tab, in theSlides group, click Layout, and then click Blank.On the Insert tab, in the Text group, click Text Box, and then on the slide, drag to draw the text box. Enter text in the text box, select the text, and then on the Home tab, in the Font group, select Corbel from the Font list, enter 50 in the Font Size list, and click Bold.On the Home tab, in the Paragraph group, click Center to center the text.Select the text box. Under Drawing Tools, on the Format tab, in the WordArt Styles, click on the Format Text Effects: Text Box dialog box launcher. In the Format Text Effects dialog box, in the left pane, click Text Fill. In the Text Fill pane, select Solid Fill, and in the Color list, select Olive Green, Accent 3 (first row, seventh option from the left).Also in the Format Text Effects dialog box, in the left pane, click 3-D Format. In the 3-D Format pane, do the following:Under Bevel, do the following:In the Top list, under Bevel, select Angle (second row, first option from the left). In Top, under Width, enter 1.5 pt. In Top, under Height, enter1.5 pt.Under Depth, in the Color list, select Automatic, and in the Depth text box, enter 2.5ptUnder Contour, in the Color list, select Olive Green, Accent 3 (first row, seventh option from the left).Under Surface, do the following:In the Material list, under Translucent, select Powder (first option from the left).In the Lighting list, under Special, select Flat (first option from the left).In the Angle box, enter 315°.On the slide, select the text box, and then on the Home tab, in the Drawing group, click Arrange, and then under Position Objects, point to Align, and do the following:Click Align to Slide.Click Align Middle.Click Align Center.To reproduce the animation effects on this slide, do the following:On the slide, select the text box and then on the Animations tab, in the Animation group, click the More arrow on the Animation Effects Gallery, and under Entrance, click Fly In. To modify the effect, on the Animations tab, do the following: In the Timing group, do the following:In the Start list, select WithPrevious.In the Durations list, select 00.50.In the Animation group, click Effect Options and under Direction, click From Left.In the Advanced Animation group, click Animation Pane. Then in the Animation Pane, do the following:Click the arrow next to the fly-in effect and click Effect Options.In the Fly In dialog box, on the Effects tab, under Enhancements, in the AnimateText box, select ByLetters.Under Enhancements, in the % delay between letters box, enter 6.In the Advanced Animation group, click AddAnimation, then under Exit, select FlyOut. To modify the effect, on the Animations tab, do the following: In the Timing group, do the following:In the Start list, select AfterPrevious.In the Durations list, select 00.50.In the Delay list, select 01.50.In the Animation group, click Effect Options and under Direction, click To Right.In the Advanced Animation group, click Animation Pane. Then in the Animation Pane, do the following:Click the arrow next to the fly-in effect and click Effect Options.In the Fly Out dialog box, on the Effects tab, under Enhancements, in the AnimateText box, select ByLetters.Under Enhancements, in the % delay between letters box, enter 6.Select the fly out exit effect, and under Modify: Fly Out, do the following:In the Start list, select AfterPrevious. In the Direction list, select ToRight. In the Speed list, select Fast. Click the arrow next to the fly out exit effect, and select Effect Options. In the FlyOut dialog box, do the following:On the Effect tab, in the Animate Text list, select By Letters. Also on the Effect tab, in the % delay between letters box, enter 6.On the Timing tab, in the Delay box, enter 1.5.To reproduce the background on this slide, do the following: Right-click the slide background area, and then click Format Background. In the Format Background dialog box, click Fill in the left pane, select Gradient fill in the Fill pane, and then do the following:In the Type list, select Radial.Click the button next to Direction, and then click From Center (third option from the left).Under Gradient stops, click Add or Remove until two stops appear on the slider, then customize the gradient stops as follows:Select Stop 1 from the slider, and then do the following:In the Position box, enter 0%.Click the button next to Color, and then click Black, Text 1, Lighter 50% (second row, second option from the left).Select Stop 2 from the slider, and then do the following: In the Position box, enter 100%.Click the button next to Color, and then click Black, Text 1 (first row, second option from the left).
- Animated text flying in by letter(Basic)To reproduce the text effects on this slide, do the following:On the Home tab, in theSlides group, click Layout, and then click Blank.On the Insert tab, in the Text group, click Text Box, and then on the slide, drag to draw the text box. Enter text in the text box, select the text, and then on the Home tab, in the Font group, select Corbel from the Font list, enter 50 in the Font Size list, and click Bold.On the Home tab, in the Paragraph group, click Center to center the text.Select the text box. Under Drawing Tools, on the Format tab, in the WordArt Styles, click on the Format Text Effects: Text Box dialog box launcher. In the Format Text Effects dialog box, in the left pane, click Text Fill. In the Text Fill pane, select Solid Fill, and in the Color list, select Olive Green, Accent 3 (first row, seventh option from the left).Also in the Format Text Effects dialog box, in the left pane, click 3-D Format. In the 3-D Format pane, do the following:Under Bevel, do the following:In the Top list, under Bevel, select Angle (second row, first option from the left). In Top, under Width, enter 1.5 pt. In Top, under Height, enter1.5 pt.Under Depth, in the Color list, select Automatic, and in the Depth text box, enter 2.5ptUnder Contour, in the Color list, select Olive Green, Accent 3 (first row, seventh option from the left).Under Surface, do the following:In the Material list, under Translucent, select Powder (first option from the left).In the Lighting list, under Special, select Flat (first option from the left).In the Angle box, enter 315°.On the slide, select the text box, and then on the Home tab, in the Drawing group, click Arrange, and then under Position Objects, point to Align, and do the following:Click Align to Slide.Click Align Middle.Click Align Center.To reproduce the animation effects on this slide, do the following:On the slide, select the text box and then on the Animations tab, in the Animation group, click the More arrow on the Animation Effects Gallery, and under Entrance, click Fly In. To modify the effect, on the Animations tab, do the following: In the Timing group, do the following:In the Start list, select WithPrevious.In the Durations list, select 00.50.In the Animation group, click Effect Options and under Direction, click From Left.In the Advanced Animation group, click Animation Pane. Then in the Animation Pane, do the following:Click the arrow next to the fly-in effect and click Effect Options.In the Fly In dialog box, on the Effects tab, under Enhancements, in the AnimateText box, select ByLetters.Under Enhancements, in the % delay between letters box, enter 6.In the Advanced Animation group, click AddAnimation, then under Exit, select FlyOut. To modify the effect, on the Animations tab, do the following: In the Timing group, do the following:In the Start list, select AfterPrevious.In the Durations list, select 00.50.In the Delay list, select 01.50.In the Animation group, click Effect Options and under Direction, click To Right.In the Advanced Animation group, click Animation Pane. Then in the Animation Pane, do the following:Click the arrow next to the fly-in effect and click Effect Options.In the Fly Out dialog box, on the Effects tab, under Enhancements, in the AnimateText box, select ByLetters.Under Enhancements, in the % delay between letters box, enter 6.Select the fly out exit effect, and under Modify: Fly Out, do the following:In the Start list, select AfterPrevious. In the Direction list, select ToRight. In the Speed list, select Fast. Click the arrow next to the fly out exit effect, and select Effect Options. In the FlyOut dialog box, do the following:On the Effect tab, in the Animate Text list, select By Letters. Also on the Effect tab, in the % delay between letters box, enter 6.On the Timing tab, in the Delay box, enter 1.5.To reproduce the background on this slide, do the following: Right-click the slide background area, and then click Format Background. In the Format Background dialog box, click Fill in the left pane, select Gradient fill in the Fill pane, and then do the following:In the Type list, select Radial.Click the button next to Direction, and then click From Center (third option from the left).Under Gradient stops, click Add or Remove until two stops appear on the slider, then customize the gradient stops as follows:Select Stop 1 from the slider, and then do the following:In the Position box, enter 0%.Click the button next to Color, and then click Black, Text 1, Lighter 50% (second row, second option from the left).Select Stop 2 from the slider, and then do the following: In the Position box, enter 100%.Click the button next to Color, and then click Black, Text 1 (first row, second option from the left).
- Animated text flying in by letter(Basic)To reproduce the text effects on this slide, do the following:On the Home tab, in theSlides group, click Layout, and then click Blank.On the Insert tab, in the Text group, click Text Box, and then on the slide, drag to draw the text box. Enter text in the text box, select the text, and then on the Home tab, in the Font group, select Corbel from the Font list, enter 50 in the Font Size list, and click Bold.On the Home tab, in the Paragraph group, click Center to center the text.Select the text box. Under Drawing Tools, on the Format tab, in the WordArt Styles, click on the Format Text Effects: Text Box dialog box launcher. In the Format Text Effects dialog box, in the left pane, click Text Fill. In the Text Fill pane, select Solid Fill, and in the Color list, select Olive Green, Accent 3 (first row, seventh option from the left).Also in the Format Text Effects dialog box, in the left pane, click 3-D Format. In the 3-D Format pane, do the following:Under Bevel, do the following:In the Top list, under Bevel, select Angle (second row, first option from the left). In Top, under Width, enter 1.5 pt. In Top, under Height, enter1.5 pt.Under Depth, in the Color list, select Automatic, and in the Depth text box, enter 2.5ptUnder Contour, in the Color list, select Olive Green, Accent 3 (first row, seventh option from the left).Under Surface, do the following:In the Material list, under Translucent, select Powder (first option from the left).In the Lighting list, under Special, select Flat (first option from the left).In the Angle box, enter 315°.On the slide, select the text box, and then on the Home tab, in the Drawing group, click Arrange, and then under Position Objects, point to Align, and do the following:Click Align to Slide.Click Align Middle.Click Align Center.To reproduce the animation effects on this slide, do the following:On the slide, select the text box and then on the Animations tab, in the Animation group, click the More arrow on the Animation Effects Gallery, and under Entrance, click Fly In. To modify the effect, on the Animations tab, do the following: In the Timing group, do the following:In the Start list, select WithPrevious.In the Durations list, select 00.50.In the Animation group, click Effect Options and under Direction, click From Left.In the Advanced Animation group, click Animation Pane. Then in the Animation Pane, do the following:Click the arrow next to the fly-in effect and click Effect Options.In the Fly In dialog box, on the Effects tab, under Enhancements, in the AnimateText box, select ByLetters.Under Enhancements, in the % delay between letters box, enter 6.In the Advanced Animation group, click AddAnimation, then under Exit, select FlyOut. To modify the effect, on the Animations tab, do the following: In the Timing group, do the following:In the Start list, select AfterPrevious.In the Durations list, select 00.50.In the Delay list, select 01.50.In the Animation group, click Effect Options and under Direction, click To Right.In the Advanced Animation group, click Animation Pane. Then in the Animation Pane, do the following:Click the arrow next to the fly-in effect and click Effect Options.In the Fly Out dialog box, on the Effects tab, under Enhancements, in the AnimateText box, select ByLetters.Under Enhancements, in the % delay between letters box, enter 6.Select the fly out exit effect, and under Modify: Fly Out, do the following:In the Start list, select AfterPrevious. In the Direction list, select ToRight. In the Speed list, select Fast. Click the arrow next to the fly out exit effect, and select Effect Options. In the FlyOut dialog box, do the following:On the Effect tab, in the Animate Text list, select By Letters. Also on the Effect tab, in the % delay between letters box, enter 6.On the Timing tab, in the Delay box, enter 1.5.To reproduce the background on this slide, do the following: Right-click the slide background area, and then click Format Background. In the Format Background dialog box, click Fill in the left pane, select Gradient fill in the Fill pane, and then do the following:In the Type list, select Radial.Click the button next to Direction, and then click From Center (third option from the left).Under Gradient stops, click Add or Remove until two stops appear on the slider, then customize the gradient stops as follows:Select Stop 1 from the slider, and then do the following:In the Position box, enter 0%.Click the button next to Color, and then click Black, Text 1, Lighter 50% (second row, second option from the left).Select Stop 2 from the slider, and then do the following: In the Position box, enter 100%.Click the button next to Color, and then click Black, Text 1 (first row, second option from the left).
- Animated text flying in by letter(Basic)To reproduce the text effects on this slide, do the following:On the Home tab, in theSlides group, click Layout, and then click Blank.On the Insert tab, in the Text group, click Text Box, and then on the slide, drag to draw the text box. Enter text in the text box, select the text, and then on the Home tab, in the Font group, select Corbel from the Font list, enter 50 in the Font Size list, and click Bold.On the Home tab, in the Paragraph group, click Center to center the text.Select the text box. Under Drawing Tools, on the Format tab, in the WordArt Styles, click on the Format Text Effects: Text Box dialog box launcher. In the Format Text Effects dialog box, in the left pane, click Text Fill. In the Text Fill pane, select Solid Fill, and in the Color list, select Olive Green, Accent 3 (first row, seventh option from the left).Also in the Format Text Effects dialog box, in the left pane, click 3-D Format. In the 3-D Format pane, do the following:Under Bevel, do the following:In the Top list, under Bevel, select Angle (second row, first option from the left). In Top, under Width, enter 1.5 pt. In Top, under Height, enter1.5 pt.Under Depth, in the Color list, select Automatic, and in the Depth text box, enter 2.5ptUnder Contour, in the Color list, select Olive Green, Accent 3 (first row, seventh option from the left).Under Surface, do the following:In the Material list, under Translucent, select Powder (first option from the left).In the Lighting list, under Special, select Flat (first option from the left).In the Angle box, enter 315°.On the slide, select the text box, and then on the Home tab, in the Drawing group, click Arrange, and then under Position Objects, point to Align, and do the following:Click Align to Slide.Click Align Middle.Click Align Center.To reproduce the animation effects on this slide, do the following:On the slide, select the text box and then on the Animations tab, in the Animation group, click the More arrow on the Animation Effects Gallery, and under Entrance, click Fly In. To modify the effect, on the Animations tab, do the following: In the Timing group, do the following:In the Start list, select WithPrevious.In the Durations list, select 00.50.In the Animation group, click Effect Options and under Direction, click From Left.In the Advanced Animation group, click Animation Pane. Then in the Animation Pane, do the following:Click the arrow next to the fly-in effect and click Effect Options.In the Fly In dialog box, on the Effects tab, under Enhancements, in the AnimateText box, select ByLetters.Under Enhancements, in the % delay between letters box, enter 6.In the Advanced Animation group, click AddAnimation, then under Exit, select FlyOut. To modify the effect, on the Animations tab, do the following: In the Timing group, do the following:In the Start list, select AfterPrevious.In the Durations list, select 00.50.In the Delay list, select 01.50.In the Animation group, click Effect Options and under Direction, click To Right.In the Advanced Animation group, click Animation Pane. Then in the Animation Pane, do the following:Click the arrow next to the fly-in effect and click Effect Options.In the Fly Out dialog box, on the Effects tab, under Enhancements, in the AnimateText box, select ByLetters.Under Enhancements, in the % delay between letters box, enter 6.Select the fly out exit effect, and under Modify: Fly Out, do the following:In the Start list, select AfterPrevious. In the Direction list, select ToRight. In the Speed list, select Fast. Click the arrow next to the fly out exit effect, and select Effect Options. In the FlyOut dialog box, do the following:On the Effect tab, in the Animate Text list, select By Letters. Also on the Effect tab, in the % delay between letters box, enter 6.On the Timing tab, in the Delay box, enter 1.5.To reproduce the background on this slide, do the following: Right-click the slide background area, and then click Format Background. In the Format Background dialog box, click Fill in the left pane, select Gradient fill in the Fill pane, and then do the following:In the Type list, select Radial.Click the button next to Direction, and then click From Center (third option from the left).Under Gradient stops, click Add or Remove until two stops appear on the slider, then customize the gradient stops as follows:Select Stop 1 from the slider, and then do the following:In the Position box, enter 0%.Click the button next to Color, and then click Black, Text 1, Lighter 50% (second row, second option from the left).Select Stop 2 from the slider, and then do the following: In the Position box, enter 100%.Click the button next to Color, and then click Black, Text 1 (first row, second option from the left).
- Animated text flying in by letter(Basic)To reproduce the text effects on this slide, do the following:On the Home tab, in theSlides group, click Layout, and then click Blank.On the Insert tab, in the Text group, click Text Box, and then on the slide, drag to draw the text box. Enter text in the text box, select the text, and then on the Home tab, in the Font group, select Corbel from the Font list, enter 50 in the Font Size list, and click Bold.On the Home tab, in the Paragraph group, click Center to center the text.Select the text box. Under Drawing Tools, on the Format tab, in the WordArt Styles, click on the Format Text Effects: Text Box dialog box launcher. In the Format Text Effects dialog box, in the left pane, click Text Fill. In the Text Fill pane, select Solid Fill, and in the Color list, select Olive Green, Accent 3 (first row, seventh option from the left).Also in the Format Text Effects dialog box, in the left pane, click 3-D Format. In the 3-D Format pane, do the following:Under Bevel, do the following:In the Top list, under Bevel, select Angle (second row, first option from the left). In Top, under Width, enter 1.5 pt. In Top, under Height, enter1.5 pt.Under Depth, in the Color list, select Automatic, and in the Depth text box, enter 2.5ptUnder Contour, in the Color list, select Olive Green, Accent 3 (first row, seventh option from the left).Under Surface, do the following:In the Material list, under Translucent, select Powder (first option from the left).In the Lighting list, under Special, select Flat (first option from the left).In the Angle box, enter 315°.On the slide, select the text box, and then on the Home tab, in the Drawing group, click Arrange, and then under Position Objects, point to Align, and do the following:Click Align to Slide.Click Align Middle.Click Align Center.To reproduce the animation effects on this slide, do the following:On the slide, select the text box and then on the Animations tab, in the Animation group, click the More arrow on the Animation Effects Gallery, and under Entrance, click Fly In. To modify the effect, on the Animations tab, do the following: In the Timing group, do the following:In the Start list, select WithPrevious.In the Durations list, select 00.50.In the Animation group, click Effect Options and under Direction, click From Left.In the Advanced Animation group, click Animation Pane. Then in the Animation Pane, do the following:Click the arrow next to the fly-in effect and click Effect Options.In the Fly In dialog box, on the Effects tab, under Enhancements, in the AnimateText box, select ByLetters.Under Enhancements, in the % delay between letters box, enter 6.In the Advanced Animation group, click AddAnimation, then under Exit, select FlyOut. To modify the effect, on the Animations tab, do the following: In the Timing group, do the following:In the Start list, select AfterPrevious.In the Durations list, select 00.50.In the Delay list, select 01.50.In the Animation group, click Effect Options and under Direction, click To Right.In the Advanced Animation group, click Animation Pane. Then in the Animation Pane, do the following:Click the arrow next to the fly-in effect and click Effect Options.In the Fly Out dialog box, on the Effects tab, under Enhancements, in the AnimateText box, select ByLetters.Under Enhancements, in the % delay between letters box, enter 6.Select the fly out exit effect, and under Modify: Fly Out, do the following:In the Start list, select AfterPrevious. In the Direction list, select ToRight. In the Speed list, select Fast. Click the arrow next to the fly out exit effect, and select Effect Options. In the FlyOut dialog box, do the following:On the Effect tab, in the Animate Text list, select By Letters. Also on the Effect tab, in the % delay between letters box, enter 6.On the Timing tab, in the Delay box, enter 1.5.To reproduce the background on this slide, do the following: Right-click the slide background area, and then click Format Background. In the Format Background dialog box, click Fill in the left pane, select Gradient fill in the Fill pane, and then do the following:In the Type list, select Radial.Click the button next to Direction, and then click From Center (third option from the left).Under Gradient stops, click Add or Remove until two stops appear on the slider, then customize the gradient stops as follows:Select Stop 1 from the slider, and then do the following:In the Position box, enter 0%.Click the button next to Color, and then click Black, Text 1, Lighter 50% (second row, second option from the left).Select Stop 2 from the slider, and then do the following: In the Position box, enter 100%.Click the button next to Color, and then click Black, Text 1 (first row, second option from the left).
- Animated text flying in by letter(Basic)To reproduce the text effects on this slide, do the following:On the Home tab, in theSlides group, click Layout, and then click Blank.On the Insert tab, in the Text group, click Text Box, and then on the slide, drag to draw the text box. Enter text in the text box, select the text, and then on the Home tab, in the Font group, select Corbel from the Font list, enter 50 in the Font Size list, and click Bold.On the Home tab, in the Paragraph group, click Center to center the text.Select the text box. Under Drawing Tools, on the Format tab, in the WordArt Styles, click on the Format Text Effects: Text Box dialog box launcher. In the Format Text Effects dialog box, in the left pane, click Text Fill. In the Text Fill pane, select Solid Fill, and in the Color list, select Olive Green, Accent 3 (first row, seventh option from the left).Also in the Format Text Effects dialog box, in the left pane, click 3-D Format. In the 3-D Format pane, do the following:Under Bevel, do the following:In the Top list, under Bevel, select Angle (second row, first option from the left). In Top, under Width, enter 1.5 pt. In Top, under Height, enter1.5 pt.Under Depth, in the Color list, select Automatic, and in the Depth text box, enter 2.5ptUnder Contour, in the Color list, select Olive Green, Accent 3 (first row, seventh option from the left).Under Surface, do the following:In the Material list, under Translucent, select Powder (first option from the left).In the Lighting list, under Special, select Flat (first option from the left).In the Angle box, enter 315°.On the slide, select the text box, and then on the Home tab, in the Drawing group, click Arrange, and then under Position Objects, point to Align, and do the following:Click Align to Slide.Click Align Middle.Click Align Center.To reproduce the animation effects on this slide, do the following:On the slide, select the text box and then on the Animations tab, in the Animation group, click the More arrow on the Animation Effects Gallery, and under Entrance, click Fly In. To modify the effect, on the Animations tab, do the following: In the Timing group, do the following:In the Start list, select WithPrevious.In the Durations list, select 00.50.In the Animation group, click Effect Options and under Direction, click From Left.In the Advanced Animation group, click Animation Pane. Then in the Animation Pane, do the following:Click the arrow next to the fly-in effect and click Effect Options.In the Fly In dialog box, on the Effects tab, under Enhancements, in the AnimateText box, select ByLetters.Under Enhancements, in the % delay between letters box, enter 6.In the Advanced Animation group, click AddAnimation, then under Exit, select FlyOut. To modify the effect, on the Animations tab, do the following: In the Timing group, do the following:In the Start list, select AfterPrevious.In the Durations list, select 00.50.In the Delay list, select 01.50.In the Animation group, click Effect Options and under Direction, click To Right.In the Advanced Animation group, click Animation Pane. Then in the Animation Pane, do the following:Click the arrow next to the fly-in effect and click Effect Options.In the Fly Out dialog box, on the Effects tab, under Enhancements, in the AnimateText box, select ByLetters.Under Enhancements, in the % delay between letters box, enter 6.Select the fly out exit effect, and under Modify: Fly Out, do the following:In the Start list, select AfterPrevious. In the Direction list, select ToRight. In the Speed list, select Fast. Click the arrow next to the fly out exit effect, and select Effect Options. In the FlyOut dialog box, do the following:On the Effect tab, in the Animate Text list, select By Letters. Also on the Effect tab, in the % delay between letters box, enter 6.On the Timing tab, in the Delay box, enter 1.5.To reproduce the background on this slide, do the following: Right-click the slide background area, and then click Format Background. In the Format Background dialog box, click Fill in the left pane, select Gradient fill in the Fill pane, and then do the following:In the Type list, select Radial.Click the button next to Direction, and then click From Center (third option from the left).Under Gradient stops, click Add or Remove until two stops appear on the slider, then customize the gradient stops as follows:Select Stop 1 from the slider, and then do the following:In the Position box, enter 0%.Click the button next to Color, and then click Black, Text 1, Lighter 50% (second row, second option from the left).Select Stop 2 from the slider, and then do the following: In the Position box, enter 100%.Click the button next to Color, and then click Black, Text 1 (first row, second option from the left).
- Animated text flying in by letter(Basic)To reproduce the text effects on this slide, do the following:On the Home tab, in theSlides group, click Layout, and then click Blank.On the Insert tab, in the Text group, click Text Box, and then on the slide, drag to draw the text box. Enter text in the text box, select the text, and then on the Home tab, in the Font group, select Corbel from the Font list, enter 50 in the Font Size list, and click Bold.On the Home tab, in the Paragraph group, click Center to center the text.Select the text box. Under Drawing Tools, on the Format tab, in the WordArt Styles, click on the Format Text Effects: Text Box dialog box launcher. In the Format Text Effects dialog box, in the left pane, click Text Fill. In the Text Fill pane, select Solid Fill, and in the Color list, select Olive Green, Accent 3 (first row, seventh option from the left).Also in the Format Text Effects dialog box, in the left pane, click 3-D Format. In the 3-D Format pane, do the following:Under Bevel, do the following:In the Top list, under Bevel, select Angle (second row, first option from the left). In Top, under Width, enter 1.5 pt. In Top, under Height, enter1.5 pt.Under Depth, in the Color list, select Automatic, and in the Depth text box, enter 2.5ptUnder Contour, in the Color list, select Olive Green, Accent 3 (first row, seventh option from the left).Under Surface, do the following:In the Material list, under Translucent, select Powder (first option from the left).In the Lighting list, under Special, select Flat (first option from the left).In the Angle box, enter 315°.On the slide, select the text box, and then on the Home tab, in the Drawing group, click Arrange, and then under Position Objects, point to Align, and do the following:Click Align to Slide.Click Align Middle.Click Align Center.To reproduce the animation effects on this slide, do the following:On the slide, select the text box and then on the Animations tab, in the Animation group, click the More arrow on the Animation Effects Gallery, and under Entrance, click Fly In. To modify the effect, on the Animations tab, do the following: In the Timing group, do the following:In the Start list, select WithPrevious.In the Durations list, select 00.50.In the Animation group, click Effect Options and under Direction, click From Left.In the Advanced Animation group, click Animation Pane. Then in the Animation Pane, do the following:Click the arrow next to the fly-in effect and click Effect Options.In the Fly In dialog box, on the Effects tab, under Enhancements, in the AnimateText box, select ByLetters.Under Enhancements, in the % delay between letters box, enter 6.In the Advanced Animation group, click AddAnimation, then under Exit, select FlyOut. To modify the effect, on the Animations tab, do the following: In the Timing group, do the following:In the Start list, select AfterPrevious.In the Durations list, select 00.50.In the Delay list, select 01.50.In the Animation group, click Effect Options and under Direction, click To Right.In the Advanced Animation group, click Animation Pane. Then in the Animation Pane, do the following:Click the arrow next to the fly-in effect and click Effect Options.In the Fly Out dialog box, on the Effects tab, under Enhancements, in the AnimateText box, select ByLetters.Under Enhancements, in the % delay between letters box, enter 6.Select the fly out exit effect, and under Modify: Fly Out, do the following:In the Start list, select AfterPrevious. In the Direction list, select ToRight. In the Speed list, select Fast. Click the arrow next to the fly out exit effect, and select Effect Options. In the FlyOut dialog box, do the following:On the Effect tab, in the Animate Text list, select By Letters. Also on the Effect tab, in the % delay between letters box, enter 6.On the Timing tab, in the Delay box, enter 1.5.To reproduce the background on this slide, do the following: Right-click the slide background area, and then click Format Background. In the Format Background dialog box, click Fill in the left pane, select Gradient fill in the Fill pane, and then do the following:In the Type list, select Radial.Click the button next to Direction, and then click From Center (third option from the left).Under Gradient stops, click Add or Remove until two stops appear on the slider, then customize the gradient stops as follows:Select Stop 1 from the slider, and then do the following:In the Position box, enter 0%.Click the button next to Color, and then click Black, Text 1, Lighter 50% (second row, second option from the left).Select Stop 2 from the slider, and then do the following: In the Position box, enter 100%.Click the button next to Color, and then click Black, Text 1 (first row, second option from the left).
- Animated text flying in by letter(Basic)To reproduce the text effects on this slide, do the following:On the Home tab, in theSlides group, click Layout, and then click Blank.On the Insert tab, in the Text group, click Text Box, and then on the slide, drag to draw the text box. Enter text in the text box, select the text, and then on the Home tab, in the Font group, select Corbel from the Font list, enter 50 in the Font Size list, and click Bold.On the Home tab, in the Paragraph group, click Center to center the text.Select the text box. Under Drawing Tools, on the Format tab, in the WordArt Styles, click on the Format Text Effects: Text Box dialog box launcher. In the Format Text Effects dialog box, in the left pane, click Text Fill. In the Text Fill pane, select Solid Fill, and in the Color list, select Olive Green, Accent 3 (first row, seventh option from the left).Also in the Format Text Effects dialog box, in the left pane, click 3-D Format. In the 3-D Format pane, do the following:Under Bevel, do the following:In the Top list, under Bevel, select Angle (second row, first option from the left). In Top, under Width, enter 1.5 pt. In Top, under Height, enter1.5 pt.Under Depth, in the Color list, select Automatic, and in the Depth text box, enter 2.5ptUnder Contour, in the Color list, select Olive Green, Accent 3 (first row, seventh option from the left).Under Surface, do the following:In the Material list, under Translucent, select Powder (first option from the left).In the Lighting list, under Special, select Flat (first option from the left).In the Angle box, enter 315°.On the slide, select the text box, and then on the Home tab, in the Drawing group, click Arrange, and then under Position Objects, point to Align, and do the following:Click Align to Slide.Click Align Middle.Click Align Center.To reproduce the animation effects on this slide, do the following:On the slide, select the text box and then on the Animations tab, in the Animation group, click the More arrow on the Animation Effects Gallery, and under Entrance, click Fly In. To modify the effect, on the Animations tab, do the following: In the Timing group, do the following:In the Start list, select WithPrevious.In the Durations list, select 00.50.In the Animation group, click Effect Options and under Direction, click From Left.In the Advanced Animation group, click Animation Pane. Then in the Animation Pane, do the following:Click the arrow next to the fly-in effect and click Effect Options.In the Fly In dialog box, on the Effects tab, under Enhancements, in the AnimateText box, select ByLetters.Under Enhancements, in the % delay between letters box, enter 6.In the Advanced Animation group, click AddAnimation, then under Exit, select FlyOut. To modify the effect, on the Animations tab, do the following: In the Timing group, do the following:In the Start list, select AfterPrevious.In the Durations list, select 00.50.In the Delay list, select 01.50.In the Animation group, click Effect Options and under Direction, click To Right.In the Advanced Animation group, click Animation Pane. Then in the Animation Pane, do the following:Click the arrow next to the fly-in effect and click Effect Options.In the Fly Out dialog box, on the Effects tab, under Enhancements, in the AnimateText box, select ByLetters.Under Enhancements, in the % delay between letters box, enter 6.Select the fly out exit effect, and under Modify: Fly Out, do the following:In the Start list, select AfterPrevious. In the Direction list, select ToRight. In the Speed list, select Fast. Click the arrow next to the fly out exit effect, and select Effect Options. In the FlyOut dialog box, do the following:On the Effect tab, in the Animate Text list, select By Letters. Also on the Effect tab, in the % delay between letters box, enter 6.On the Timing tab, in the Delay box, enter 1.5.To reproduce the background on this slide, do the following: Right-click the slide background area, and then click Format Background. In the Format Background dialog box, click Fill in the left pane, select Gradient fill in the Fill pane, and then do the following:In the Type list, select Radial.Click the button next to Direction, and then click From Center (third option from the left).Under Gradient stops, click Add or Remove until two stops appear on the slider, then customize the gradient stops as follows:Select Stop 1 from the slider, and then do the following:In the Position box, enter 0%.Click the button next to Color, and then click Black, Text 1, Lighter 50% (second row, second option from the left).Select Stop 2 from the slider, and then do the following: In the Position box, enter 100%.Click the button next to Color, and then click Black, Text 1 (first row, second option from the left).
- Animated text flying in by letter(Basic)To reproduce the text effects on this slide, do the following:On the Home tab, in theSlides group, click Layout, and then click Blank.On the Insert tab, in the Text group, click Text Box, and then on the slide, drag to draw the text box. Enter text in the text box, select the text, and then on the Home tab, in the Font group, select Corbel from the Font list, enter 50 in the Font Size list, and click Bold.On the Home tab, in the Paragraph group, click Center to center the text.Select the text box. Under Drawing Tools, on the Format tab, in the WordArt Styles, click on the Format Text Effects: Text Box dialog box launcher. In the Format Text Effects dialog box, in the left pane, click Text Fill. In the Text Fill pane, select Solid Fill, and in the Color list, select Olive Green, Accent 3 (first row, seventh option from the left).Also in the Format Text Effects dialog box, in the left pane, click 3-D Format. In the 3-D Format pane, do the following:Under Bevel, do the following:In the Top list, under Bevel, select Angle (second row, first option from the left). In Top, under Width, enter 1.5 pt. In Top, under Height, enter1.5 pt.Under Depth, in the Color list, select Automatic, and in the Depth text box, enter 2.5ptUnder Contour, in the Color list, select Olive Green, Accent 3 (first row, seventh option from the left).Under Surface, do the following:In the Material list, under Translucent, select Powder (first option from the left).In the Lighting list, under Special, select Flat (first option from the left).In the Angle box, enter 315°.On the slide, select the text box, and then on the Home tab, in the Drawing group, click Arrange, and then under Position Objects, point to Align, and do the following:Click Align to Slide.Click Align Middle.Click Align Center.To reproduce the animation effects on this slide, do the following:On the slide, select the text box and then on the Animations tab, in the Animation group, click the More arrow on the Animation Effects Gallery, and under Entrance, click Fly In. To modify the effect, on the Animations tab, do the following: In the Timing group, do the following:In the Start list, select WithPrevious.In the Durations list, select 00.50.In the Animation group, click Effect Options and under Direction, click From Left.In the Advanced Animation group, click Animation Pane. Then in the Animation Pane, do the following:Click the arrow next to the fly-in effect and click Effect Options.In the Fly In dialog box, on the Effects tab, under Enhancements, in the AnimateText box, select ByLetters.Under Enhancements, in the % delay between letters box, enter 6.In the Advanced Animation group, click AddAnimation, then under Exit, select FlyOut. To modify the effect, on the Animations tab, do the following: In the Timing group, do the following:In the Start list, select AfterPrevious.In the Durations list, select 00.50.In the Delay list, select 01.50.In the Animation group, click Effect Options and under Direction, click To Right.In the Advanced Animation group, click Animation Pane. Then in the Animation Pane, do the following:Click the arrow next to the fly-in effect and click Effect Options.In the Fly Out dialog box, on the Effects tab, under Enhancements, in the AnimateText box, select ByLetters.Under Enhancements, in the % delay between letters box, enter 6.Select the fly out exit effect, and under Modify: Fly Out, do the following:In the Start list, select AfterPrevious. In the Direction list, select ToRight. In the Speed list, select Fast. Click the arrow next to the fly out exit effect, and select Effect Options. In the FlyOut dialog box, do the following:On the Effect tab, in the Animate Text list, select By Letters. Also on the Effect tab, in the % delay between letters box, enter 6.On the Timing tab, in the Delay box, enter 1.5.To reproduce the background on this slide, do the following: Right-click the slide background area, and then click Format Background. In the Format Background dialog box, click Fill in the left pane, select Gradient fill in the Fill pane, and then do the following:In the Type list, select Radial.Click the button next to Direction, and then click From Center (third option from the left).Under Gradient stops, click Add or Remove until two stops appear on the slider, then customize the gradient stops as follows:Select Stop 1 from the slider, and then do the following:In the Position box, enter 0%.Click the button next to Color, and then click Black, Text 1, Lighter 50% (second row, second option from the left).Select Stop 2 from the slider, and then do the following: In the Position box, enter 100%.Click the button next to Color, and then click Black, Text 1 (first row, second option from the left).
- Animated text flying in by letter(Basic)To reproduce the text effects on this slide, do the following:On the Home tab, in theSlides group, click Layout, and then click Blank.On the Insert tab, in the Text group, click Text Box, and then on the slide, drag to draw the text box. Enter text in the text box, select the text, and then on the Home tab, in the Font group, select Corbel from the Font list, enter 50 in the Font Size list, and click Bold.On the Home tab, in the Paragraph group, click Center to center the text.Select the text box. Under Drawing Tools, on the Format tab, in the WordArt Styles, click on the Format Text Effects: Text Box dialog box launcher. In the Format Text Effects dialog box, in the left pane, click Text Fill. In the Text Fill pane, select Solid Fill, and in the Color list, select Olive Green, Accent 3 (first row, seventh option from the left).Also in the Format Text Effects dialog box, in the left pane, click 3-D Format. In the 3-D Format pane, do the following:Under Bevel, do the following:In the Top list, under Bevel, select Angle (second row, first option from the left). In Top, under Width, enter 1.5 pt. In Top, under Height, enter1.5 pt.Under Depth, in the Color list, select Automatic, and in the Depth text box, enter 2.5ptUnder Contour, in the Color list, select Olive Green, Accent 3 (first row, seventh option from the left).Under Surface, do the following:In the Material list, under Translucent, select Powder (first option from the left).In the Lighting list, under Special, select Flat (first option from the left).In the Angle box, enter 315°.On the slide, select the text box, and then on the Home tab, in the Drawing group, click Arrange, and then under Position Objects, point to Align, and do the following:Click Align to Slide.Click Align Middle.Click Align Center.To reproduce the animation effects on this slide, do the following:On the slide, select the text box and then on the Animations tab, in the Animation group, click the More arrow on the Animation Effects Gallery, and under Entrance, click Fly In. To modify the effect, on the Animations tab, do the following: In the Timing group, do the following:In the Start list, select WithPrevious.In the Durations list, select 00.50.In the Animation group, click Effect Options and under Direction, click From Left.In the Advanced Animation group, click Animation Pane. Then in the Animation Pane, do the following:Click the arrow next to the fly-in effect and click Effect Options.In the Fly In dialog box, on the Effects tab, under Enhancements, in the AnimateText box, select ByLetters.Under Enhancements, in the % delay between letters box, enter 6.In the Advanced Animation group, click AddAnimation, then under Exit, select FlyOut. To modify the effect, on the Animations tab, do the following: In the Timing group, do the following:In the Start list, select AfterPrevious.In the Durations list, select 00.50.In the Delay list, select 01.50.In the Animation group, click Effect Options and under Direction, click To Right.In the Advanced Animation group, click Animation Pane. Then in the Animation Pane, do the following:Click the arrow next to the fly-in effect and click Effect Options.In the Fly Out dialog box, on the Effects tab, under Enhancements, in the AnimateText box, select ByLetters.Under Enhancements, in the % delay between letters box, enter 6.Select the fly out exit effect, and under Modify: Fly Out, do the following:In the Start list, select AfterPrevious. In the Direction list, select ToRight. In the Speed list, select Fast. Click the arrow next to the fly out exit effect, and select Effect Options. In the FlyOut dialog box, do the following:On the Effect tab, in the Animate Text list, select By Letters. Also on the Effect tab, in the % delay between letters box, enter 6.On the Timing tab, in the Delay box, enter 1.5.To reproduce the background on this slide, do the following: Right-click the slide background area, and then click Format Background. In the Format Background dialog box, click Fill in the left pane, select Gradient fill in the Fill pane, and then do the following:In the Type list, select Radial.Click the button next to Direction, and then click From Center (third option from the left).Under Gradient stops, click Add or Remove until two stops appear on the slider, then customize the gradient stops as follows:Select Stop 1 from the slider, and then do the following:In the Position box, enter 0%.Click the button next to Color, and then click Black, Text 1, Lighter 50% (second row, second option from the left).Select Stop 2 from the slider, and then do the following: In the Position box, enter 100%.Click the button next to Color, and then click Black, Text 1 (first row, second option from the left).