1. DC Motors and Generators
Revised: April 12, 2013 1 of 20
EXPERIMENT DC Machine
DC Motors and Generators 1800RPM
OBJECTIVE
This experiment explores all the possible design connections of a DC machine. Also studied are
the performance and control characteristics of these configurations. The method of testing to derive the
equivalent circuit of a given design is demonstrated.
REFERENCES
1. “Electric Machinery”, Fourth Edition, Fitzgerald, Kingsley, and Umans, McGraw-Hill Book
Company, 1983, Chapters 2, 3 and 5.
2. “Electromechanical Energy Conversion”, Brown and Hamilton, MacMillan Publishing Company,
1984, Chapters 2 and 5.
3. “Electric Machines, Steady-State Theory and Dynamic Performance,” Sarma, M. S., Wm. C.
Brown Publishers, 1985, Chapters 5 and 9.
BACKGROUND INFORMATION
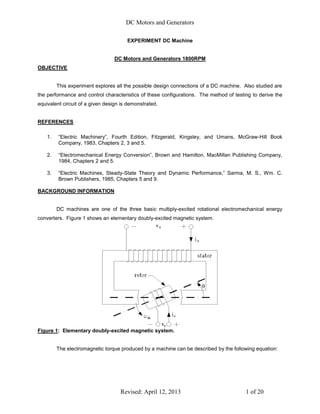
DC machines are one of the three basic multiply-excited rotational electromechanical energy
converters. Figure 1 shows an elementary doubly-excited magnetic system.
Figure 1: Elementary doubly-excited magnetic system.
The electromagnetic torque produced by a machine can be described by the following equation:
2. DC Motors and Generators
Revised: April 12, 2013 2 of 20
2
1
Tdev iS
2
ii
dL
RS
SS
d
2
1
d
dLsR
d
dL
i RR
R
2
N – m
(4.1)
If the machine is to produce a continuous torque, one of the windings must provide for current switching.
This current switching establishes a moving flux field which the machine rotor essentially “chases”. The
typical DC machine has a stator-mounted field winding which produces a flux that is stationary in space.
The armature winding is located on the machine rotor, and the armature coils are terminated with copper
bars that form segment of a commutator. The commutator is supplied armature current through a set of
graphite brushes that ride on the commutator surface. As the rotor turns, successive commutator
segments enter and leave the brush contact zone, thereby switching the current from one armature coil to
the next. Figures 2 through 5 illustrate the general construction of DC machines and the commutator.
Figure 2: Schematic diagram of a DC machine.
3. DC Motors and Generators
Revised: April 12, 2013 3 of 20
Figure 3: Cross-section of a DC machine showing the commutator.
Figure 4: A single-coil elementary commutator system.
From Figure 2, it is evident that keeping the fields 90 electrical degrees displaced causes each of
the fields to “see” an essentially constant air gap. Therefore, Eq. 4.1 reduces to
4. DC Motors and Generators
Revised: April 12, 2013 4 of 20
d
dL
iiT
SR
RSdev
N – m
(4.2)
iiT RSdev
sin N – m
(4.3)
It should now be evident that the 90 electrical degree displacement causes the machine to produce the
maximum possible torque.
When both the field and armature circuits are excited, the rotor will begin to turn. As the rotor
turns, the armature windings are moving through the flux created by the field windings. This action
causes a voltage to be induced in the armature windings as described by Faraday’s Law. The induced
voltage acts to counteract the voltage that is producing the armature current and is, therefore, called the
back EMF of the motor.
The magnitude of the back EMF is proportional to the number of turns in the armature winding and the
time-rate-of-change of the field flux as seen by the armature winding. If steady-state operation is
assumed, the time-rate-of-change of the flux is just the product of the rotor velocity and the flux
magnitude. An additional simplification is made by recognizing that the magnitude of the field flux is
essentially proportional to the field current. Thus, the back EMF can be described as
E = IK fm volts
(4.4)
Where: E = back EMF, volts
K = a constant representing armature winding geometry, H
m
= rotor velocity, Rad/sec.
I f
= field current, amperes
The armature circuit contains windings which have resistance. Therefore, the steady-state armature
circuit is normally modeled as a voltage source in series with a resistance as shown in Figure 7. Since
the model is for the steady-state, the inductances are not included.
5. DC Motors and Generators
Revised: April 12, 2013 5 of 20
Figure 7: Model of armature circuit.
DC motors are described by the method used to excite the field. The four most common methods
are: separately-excited, shunt-connected, series-connected, and compound. The separately-excited
machine has no physical connection between the field and armature windings. Each circuit is excited
from its own power supply. A shunt-connected machine has the field circuit connected in parallel with the
armature circuit. Both circuits have the same total voltage drop across them. The series-connected
machine has the field circuit in electrical series with the armature circuit. Both circuits share the same
current. A compound machine contains two independent field circuits. One field circuit is connected in
series with the armature circuit, and the other field circuit is connected to shunt either the armature circuit
or the series combination of series field and armature circuits. The former is called a “short” shunt, and
the latter is called a “long” shunt. Figure 8 shows the various connections.
6. DC Motors and Generators
Revised: April 12, 2013 6 of 20
Figure 4-8: DC motor connections.
The symbols used in Figure 8 are:
V T
= motor terminal voltage
I fld
= field current
Ia
= armature current
Rfld
= field resistance
Ra
= armature resistance
E = motor back EMF
V EXC
= excitation voltage
The torque produced by a DC motor is described as the ratio of output power to mechanical rotor
speed. The output power is
7. DC Motors and Generators
Revised: April 12, 2013 7 of 20
POUT
= EI a
(4.5)
hence, the output torque is
m
a
m
OUT EIPT
(4.6)
Combining Eq. 4.6 with Eq. 4.4 yields
IKI
IIK
af
m
afm
T
(4.7)
Eq. 4.7 compares to Eq. 4.2 when we realize that the current I f
is analogous to the stator current iS
,
current Ia
is analogous to the rotor current iR
, and the constant K is analogous to the derivative of
inductance with respect to position.
The different winding connections shown in Figure 8 produce different speed vs. torque
characteristics. Figure 9 shows typical curves for three of the connections.
8. DC Motors and Generators
Revised: April 12, 2013 8 of 20
Figure 9: Typical speed vs. load characteristics for DC motors.
The fourth connection, separately-excited, can be made to respond like any of the other three by
proper control of the excitation voltage. For the cumulative compound machine shown in the figure, both
the series and shunt field produce flux in the same orientation. The differential compound machine is
connected so the series and shunt fields are in magnetic opposition. Eq. 4.6 shows that the armature
current is a good measure of the torque load on the motor.
A question that often arises is how the torque forces produced by the motor are neutralized, or
equally opposed. The basic concept, from Newtonian mechanics, is that for every force there is an equal
and opposite force that brings the entire system into equilibrium. A primary force (torque) is created by
the magnetic field interaction in the air gap of the motor and transmitted to the load. The balancing force
is caused by the motor stator (frame) interacting with its mountings, perhaps the floor of a room. Thus,
the system is neutralized by an object of great mass.
The DC motor creates torque from electrical excitation of two magnetic circuits, the field and the
armature. If the process is partially reversed by electrically exciting the stator mounted field and providing
torque from an external prime-mover, the machine becomes a generator. As the prime-mover spins the
armature circuit through the magnetic field, a voltage is created in the armature circuit. The generated
9. DC Motors and Generators
Revised: April 12, 2013 9 of 20
voltage is described by Eq. 4.4. A schematic diagram of a separately excited DC generator looks
identical to Figure 8 (a), but the armature current Ia
is reversed.
As with the DC motor, the shaft torque of the DC generator is countered by a force created at the
stator mounting point. If the stator mounting is through a measurement device such as a strain gauge,
the force that counteracts the shaft torque can be measured. A DC generator mounted in this fashion is
called a dynamometer. A dynamometer equipped with a speed measuring device (tachometer) can be
used to determine the power output of any type of rotating prime-mover.
To this point, we have assumed that the DC machine is a linear device; such is not the case. The
influence of magnetic saturation can be seen by observing the no-load terminal voltage of the separately
excited DC generator at different excitation levels. At high levels of excitation (large I f
), the field
magnetic circuit becomes saturated and the voltage generated per ampere of exciting current tends to
decrease. Figure 10 shows a typical curve.
Figure 10: No-load terminal voltage versus field current for a separately-excited generator at rated
speed.
10. DC Motors and Generators
Revised: April 12, 2013 10 of 20
THE TEST SET-UP
The DC machine to be tested and the dynamometer have already been placed on the bench and
mechanically coupled. On the right-hand end of the dynamometer is a clamp which locks the rotor and
stator. This lock is used when measuring the locked-rotor torque of the test machine. Observe how the
lock is installed so it may be properly replaced when the time arrives.
Force required to counteract the shaft torque is measured by the strain gauge that connects the
overhanging arm to the dynamometer stator. The strain gauge is connected through a cable (follow it) to
a gray box on top of the bench. This box contains A/D converter, digital display, and assorted drivers.
The display indicates torque in Newton-meters. Be sure to set the torque meter to zero before each
measurement.
The dynamometer acts as a generator when it is being used to load a motor. The dynamometer
armature is loaded by the resistor bank. All switches should be in the center “off” position for no-load
tests. To load the dynamometer, move all the switches to “up” position.
Speed measurements are made with a tachometer. On the bench is a portable digital
tachometer. It’s the little blue box that has RPM on the front. Attached to the box is a cable with an
optical head at the remote end. This head contains a light source and an optical receiver. On the large
pulley connected to the dynamometer you’ll find a piece of reflective tape. When the light source is aimed
at the pulley, a small amount of light is reflected back each time the tape crosses the beam. The
reflected light causes an electrical pulse from the receiver. The blue box times the pulses, converts them
to RPM, and displays the speed.
CAUTION – Do not look into the light source. It is very intense and will hurt your Eyes!!!!
The efficiency of the coupling system is, in very good approximation, 96 percent.
Figure 12 illustrates the faceplates of the Dynamometer and figure 11 shows the connections of the DC
motor, there are two shunt fields wired internally in series.
11. DC Motors and Generators
Revised: April 12, 2013 11 of 20
DC
DC
Ra
Rfld1
E
Vt
F1
F4
A1
A2
Ia
Armature
Current
Ifld
Field
Current
Motor
Current
Back EMF
Terminal
voltage
Yellow
Blue
Red
Black
DC Supply
F2
F3
Rfld2
Shunt Field Armature
Figure 11 DC motor connections
Note: To reverse the direction of the motor you must reverse the ether the Field or the Armature
connection but not both.
12. DC Motors and Generators
Revised: April 12, 2013 12 of 20
Figure 12 Dynamometer face plate
13. DC Motors and Generators
Revised: April 12, 2013 13 of 20
SUGGESTED PROCEDURE
Be sure to make all connections as shown in the figures. Variations might cause erroneous data.
Before proceeding, make sure you have read the Test-Setup-Section.
DC
DC E
Ra
Rfld
DC supply
#2
F1
F4
A1
A2
Vt
V
A
Iarm
Vt
Figure 13 Shunt Configuration DC Motor
Part 1a: Connect the dc motor in the shunt configuration (figure 13) Note: To reverse the
direction of the motor you must reverse the ether the Field or the Armature connection but
not both. With the dynamometer locked, adjust the motor terminal voltage (Vt) power supply (#2)
until the motor armature current is 3.4 amperes: Caution the terminal voltage will be less than
15Vdc. This is the rated armature current for the machine. Record the torque, armature current and
terminal voltage in table 1. The terminal voltage and armature current values obtained during the
locked-rotor test are used to determine the armature resistance of the machine.
Table 1: Locked Rotor armature resistance Vt<15Vdc
Iarm Vt (Varm) Torque
3.4A
Ra = Varm/Iarm = _________________________
Make sure power is turned off before removing the lock.
1b: Remove the dynamometer lock. Wire the dynamometer circuit below (figure 14). Adjust the motor
power supply (#2) until the terminal voltage (Vt) is 90Vdc, no load dynamometer (dynamometer field
voltage = 0Vdc). Record in table 2 the armature current (Iarm), motor speed (RPM), torque reading
(windage and friction of the dynamometer).
14. DC Motors and Generators
Revised: April 12, 2013 14 of 20
Table 2: No load
Vt (Varm) Iarm Torque RPM
90Vdc
DC
DC
Dynamometer
shunt field
DC supply
#3
E
Generated
Voltage
Resistor
load bank
Ra
Armature 1
Armature 2
Shunt 1
Shunt 2
Figure 14 Dynamometer
1c: Place all the dynamometer load switches in the up position. Increase the voltage to the
dynamometer field and adjust the motor terminal voltage to 90Vdc and the motor armature current is 3.4
amperes. This is the rated load point for the motor. Record in table 3 the torque, speed, motor terminal
voltage, motor armature current, dynamometer output voltage, and dynamometer output current.
Table 3: Rated Load Point Shunt Motor circuit in figure 13.
Vt (Varm) Iarm Torque RPM
90Vdc 3.4A
15. DC Motors and Generators
Revised: April 12, 2013 15 of 20
1d: You are now going to record a few points for the speed vs. torque curve. Place all the dynamometer
load switches in the up position. The motor terminal voltage must be adjusted so it remains constant
during this test. Set the Rated Load Point of the motor from part 1c. Then adjust the dynamometer until
the motor is 20% overloaded; 3.4 amperes armature current. Record in table 4 the torque and speed.
Now, check a few points below the rated load. (Ranging from 4.0 to 2.5 in 0.3 A increments).
Table 4: Speed vs. torque shunt configuration of Figure 13.
Vt const Iarm Torque RPM
90Vdc 3.4A
4.0A
3.7A
3.4A
3.1A
2.8A
2.5A
Part 2a: Connect the separately-excited configuration shown in Figure 15. Adjust the motor
field supply (#3) to 90 volts and record in table 5 the field voltage and field current. These
two values are needed to determine the shunt field resistance seen in the equivalent
circuit of the shunt DC configuration. Vt = 0V
16. DC Motors and Generators
Revised: April 12, 2013 16 of 20
DCDC
DC
A
A
V
V
DC Supply
#3
DC supply
#2
Ra
Field
supply
Armature
Supply
E
Shunt field
Armature
F1
F4
A1
A2
Iarm Ifld
Varm
Vfld
Rfld
Figure 15 Separately excited Motor configuration
Table 5: Shunt Field Resistance circuit of figure 15.
Vt or Varm Vfld Ifld RPM Dyno
0V 90V 0 RPM
Rshunt = Vfld/Ifld = ________________
2b: Circuit figure 15 in adjust the motor field supply (#3) until the field current is 0.3 amperes.
Adjust the motor terminal voltage (DC supply #2) to obtain rated speed (2000RPM) Investigate
the effect of the motor field current with a constant motor armature voltage (Vt) on the motor
performance at no load by filling-up the table 6 below. Note: torque will be small.
17. DC Motors and Generators
Revised: April 12, 2013 17 of 20
Table 6: Circuit of figure 15. Vt ≈ 90Vdc
No Load, Separately excited
Vt Ifld Torque RPM Dyno Iarm
Const Vt
Var Ifld
0.30A 2000 rpm
0.275A
0.25A
2c. Lock the dynamometer and investigate the effect of the motor field current with a constant
motor armature voltage on the starting torque. The motor armature voltage will be small
less than 15Vdc. Adjust the armature voltage (#2) to obtain an armature current of 3.4A.
Maintain the armature voltage constant. Do not exceed amperes armature current of
4.0A. Fill-up the table 7 below.
Table 7: Field Current VS Starting Torque
Locked Rotor Circuit of figure 15. Vt <15Vdc
Vt Ifld Torque Iarm
Const Vt
Var Ifld
0.30A 3.4A
0.25A
0.20A
2d. Make sure power is turned off before removing the lock.
Unlock the dynamometer. In the circuit adjusts the motor field supply (#3) until the field current
is 0.3 amperes. Adjust the motor armature voltage Vt (#2) to 90Vdc. Investigate the effect of
the motor terminal voltage with a constant motor field current on the motor performance by
filling-up the table 8 below.
Table 8: Circuit of figure 15.
No Load
Vt Ifld Torque RPM Dyno Iarm
Const Ifld
Var Vt
90 V 0.30A
80 V 0.30A
70 V 0.30A
18. DC Motors and Generators
Revised: April 12, 2013 18 of 20
2e: Lock the dynamometer and investigate the effect of the motor armature voltage with a constant motor
field current on the starting torque. Do not exceed 3.5 amperes armature current. Fill-up the table 9
below. Use Vt*0.67 for row 2, use Vt*33 for row 3.
Table 9: Armature Voltage VS Starting Torque
Locked Rotor Circuit of figure 15. Vt < 20Vdc
Vt Ifld Torque Iarm
Const Ifld
Var Vt
0.30A 3.4A
0.30A
0.30A
Part 3a. Make sure power is turned off before removing the lock.
Unlock the dynamometer and connect the separately-excited generator configuration shown in Figure
16. Set the dynamometer field rheostat to the mid-point, adjust the dynamometer supply so the
dynamometer runs at 2000 RPM and maintain this speed. With no load on the generator, increase the
generator field supply in 20 volt steps until it reaches 120 volts. Record the generator field current, the
generator terminal voltage and the torque, also calculate K at each step in table 10. The terminal voltage
and field current data points will yield the curve shown in Figure 10 plot this table for your report.
DC
DC
DC
A
V
V
DC Supply
#3
DC supply
#2
Ra
Field
supply
Dyno
Supply
E
Shunt field
motor Armature
motor
F1
F4
A1
A2
Ifld
Varm
Vfld
Rfld
DC
Dynamometer
wired as a motor
Ra
E
Shunt
Field
Field
Rheostat
Armature
1
2
1
2
2
1
Figure 16 Separately excited generator configuration
19. DC Motors and Generators
Revised: April 12, 2013 19 of 20
Table 10: Field Current Vs Generated Voltage at rated speed
No Load Magnetization Curve
Vfld Ifld Vt Torque RPM K
20
40
60
80
100
120
K = E/(ωm Ifld) =___________________
3b: Adjust the dynamometer speed (DC supply #2) to 2000 RPM with no load on the generator.
Set the generator field voltage to 90V (DC supply #3).
3c: By adjusting the dynamometer voltage, investigate the effect of speed changes on the
generator output voltage by recording data in table 11 below as the speed is varied in steps.
Plot this table 11 for your report. After completing this section, reinstall the lock on the
dynamometer and clean up the bench for the next lab class.
Table 11: Speed VS Generated Voltage
No Load
Vfld Ifld Vt RPM Dyno
90V 2000
90V 1800
90V 1600
90V 1400
90V 1200
90V 1000
20. DC Motors and Generators
Revised: April 12, 2013 20 of 20
REPORT Things to keep in mind as you complete the experiment.
1. Use the data from the locked-rotor tests in Parts 1a find the armature resistance of the machine.
From the field test in Part 2a find the shunt field resistance. From the no-load test in Part 3a table
10 to find average value of k for the machine.
Ra=_______________ Rshunt=______________ k=________________
Explain the procedure used to find the values in terms of the model of each machine setup.
2. Draw speed vs. torque curves for the shunt motor. Relate these performance curves to the
general theory of multiply-excited rotating energy converters. Should magnetic saturation be
considered for the performance and why?
3. Explain the generator performance observed in Part 3 in terms of general energy conversion
theory. Is magnetic saturation a factor in the performance, how does it affect the performance?
Plot table 5 and table 6 and explain the plots.