SPSS GUIDE
•
2 gefällt mir•2,133 views

This guide provides an introduction to using SPSS 14. It includes instructions on starting SPSS, defining variables, entering data, computing new variables, selecting data subsets, and running basic statistical procedures such as frequencies, descriptives, and exploring normality. Key steps covered are creating variables in the Variable View window, entering data in the Data View window, using the Compute function to calculate a new "age" variable, selecting cases where age is less than 30, and analyzing the normality of a variable distribution through histograms, normal Q-Q plots, and Kolmogorov-Smirnov and Shapiro-Wilk tests of normality.

Empfohlen
Weitere ähnliche Inhalte
Was ist angesagt?
Was ist angesagt? (18)
Andere mochten auch
Andere mochten auch (17)
Ähnlich wie SPSS GUIDE
Ähnlich wie SPSS GUIDE (20)
Mehr von Siti Mastura
Mehr von Siti Mastura (20)
Kürzlich hochgeladen
Kürzlich hochgeladen (20)
SPSS GUIDE
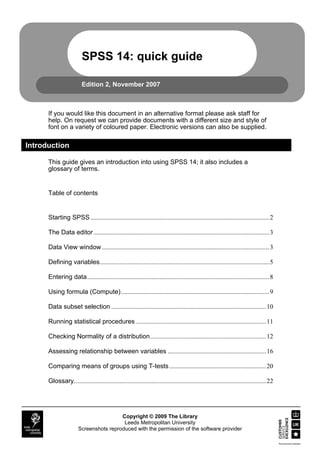
- 1. SPSS 14: quick guide Edition 2, November 2007 If you would like this document in an alternative format please ask staff for help. On request we can provide documents with a different size and style of font on a variety of coloured paper. Electronic versions can also be supplied. Introduction This guide gives an introduction into using SPSS 14; it also includes a glossary of terms. Table of contents Starting SPSS ...............................................................................................................2 The Data editor .............................................................................................................3 Data View window........................................................................................................3 Defining variables.........................................................................................................5 Entering data.................................................................................................................8 Using formula (Compute)............................................................................................9 Data subset selection ................................................................................................10 Running statistical procedures .................................................................................11 Checking Normality of a distribution........................................................................12 Assessing relationship between variables .............................................................16 Comparing means of groups using T-tests ............................................................20 Glossary.......................................................................................................................22 Copyright © 2009 The Library Leeds Metropolitan University Screenshots reproduced with the permission of the software provider
- 2. Starting SPSS To start SPSS, select: Start Programs Statistics SPSS 14.0 for Windows Figure 1: SPSS 14.0 If the above pop-up dialogue box appears, select “Type in data”, then click OK to close the dialogue box. In the future, you may use this pop-up dialogue to open an existing data or to run the tutorial. The Data editor window is the default window when you run SPSS, it consists of two windows: Data View and the Variable View windows, each window can be accessible by clicking on tabs at the bottom of the screen. Figure 1 Data View tab Figure 2: Data Editor Window Variable View tab 2 libraryonline.leedsmet.ac.uk
- 3. The Data editor Data View window Click on Data View tab at the bottom of the screen to open the “Data view” window. The window is simply a grid with rows and columns which display the content of a data file (Fig 3). Figure 3: Data View Window • Each row represents a case (one individual’s data) • Each column represents a variable whose name should appear at the top of the column. • The intersection between a row and a column is known as a cell. Each cell contains the score of a particular case on one particular variable. Note: It is good practice to define all variables first before entering data. Variable View window Click on Variable View tab at the bottom of the screen to open the “Variable view” window. The Variable View window (Fig 4) is also a simple grid of rows and columns. This is where you define the structures of all your variables. libraryonline.leedsmet.ac.uk 3
- 4. Figure 4: Variable View Window There are ten fixed columns in the Variable View, they are: Name: is what you want the variable to be called. SPSS has rules for variable names such as variable names are limited to eight characters; variable names should always begin with a letter and should never include a full stop or space. Type: is the kind of information SPPS should expect for the variable. Variables come in different types, including Numeric, String, Currency, Date…etc but the ones that you will probably use the most are Numeric or String (text). Width: The maximum number of characters to be entered for the variable. Decimals column: This is where you specify how many decimal places you would like SPSS to store for a variable. Label: A full description of the variable name. These descriptions are often longer versions of variable names. Labels can be up to 256 characters long. These labels are used in your outputs to identify the different variables. Values labels: Provide a method for mapping your variable values to string labels. It is mainly used for categorical variable. For example, if you have a variable called “Gender”, there are two acceptable values for that variable: Female or Male. You can assign a code for each category, f for Female and m for Male or 1 for Female and 2 for Male. 4 libraryonline.leedsmet.ac.uk
- 5. Missing value: It is important to define missing values; this will help you in your data analysis. For example, you may want to distinguish data missing because a respondent refused to answer from data missing because the question did not apply to the respondent. Columns: Use this to adjust the width of the Data Editor columns, note that if the actual width of a value is wider than the column, asterisks are displayed in the Data View. Align: To change the alignment of the value in the column (left, right or centre) Measure: You can specify the level of measurement of the variable as scale, ordinal or nominal∗. Defining variables As an exercise, consider the following data to be the result of a small survey which you may wish to examine using SPSS. Id Gender Date of Birth 1 Female 12/02/1987 2 Female 24/05/1963 3 Male 12/08/1985 4 Male 07/12/1975 5 Female 14/02/1978 6 Male 03/07/1982 * see glossary libraryonline.leedsmet.ac.uk 5
- 6. Figure 5: Variable View Window Creating the first variable: id 1. Start SPSS and open the Variable View window. 2. Type in the variable name “id” then pres tab key to move to the next column. 3. Leave Type and Width columns to their default values. 4. Set Decimals to 0 5. In Label column, type in “Student number” 6. Leave the other columns (Values, Missing…) to their default values. 7. Move to second row to create the second variable. Creating the second variable: gender 1. In Name column, type in “gender”. 2. In Type column click on the button to open a dialogue box (Fig 6) Figure 6: Dialogue Box 6 libraryonline.leedsmet.ac.uk
- 7. 3. Select String and change the number of characters to 1 4. Click on OK to close the dialogue box. 5. In Label column, type in “Gender” 6. In Values column, click on to open Values Labels dialogue box (Fig 7) 7. In Value Labels dialogue box, enter Value=f and Label=Female Figure 7: Labels Dialogue box 8. Click on Add button 9. Enter Value=m and Label=Male 10. Click on Add button once again then click on OK to close the dialogue box. 11. Leave the rest of the columns to their default values. Creating the third variable: dbirth (date of birth) 1. In Name column, type in dbirth 2. In Type column, click on to open the Variable Type dialogue box (Fig 8). Figure 8: Variable Type Dialogue Box 3. Select Date then click OK to close the dialogue box. 4. In Label column, type in “Date of Birth”. 5. Leave the other columns to their default values. libraryonline.leedsmet.ac.uk 7
- 8. Entering data Now that you have created your variables, you can switch to Data View window and start entering your first set of data. 1. Open the Data View window. 2. Type in the following data Figure 9: Data View Window 3. Save your file under the name Myfirstdata, SPSS will automatically add the extension .sav to the file name. 8 libraryonline.leedsmet.ac.uk
- 9. Using formula (Compute) Once you have entered your data, you may wish to use formula to create new variables. To practice this, we will create a new variable called “age” which will be calculated from the value of date of birth. 1. Open the data you saved under the name Myfirstdata.sav 2. From the main menu click on Transform Compute, this will open a dialogue box (Fig 10). Figure 10: Compute Dialogue Box Age = Current date – Date of birth SPSS has a set of functions which allow users to perform calculations on dates. DATEDIFF(date1,date2,”unit”) is the function you need to use to calculate the difference between two dates. The function DATEDIFF requires three parameters: date1 is the final date, date2 is the initial date, unit is the unit of measurement of the difference, unit can be in “years” or in “months” 3. In Compute dialogue box, type age as Target variable 4. In the Numeric expression area, type in the following formula: DATEDIFF($TIME,dbirth,”years”) 5. Click OK to execute compute procedure. Note: SPSS uses the date and time system on your computer and stores the current date and time in the variable $TIME libraryonline.leedsmet.ac.uk 9
- 10. Your dataset should look like the following: 6. Data subset selection Figure 11: Compute Dataset Data subset selection For some analyses, you may need to select a subgroup from your sample. For example, in the previous example, you may want to perform your analyses only on students who are under thirty. 1. Open the file Myfirstdata.sav, Make sure you have the Data View active 2. Click on Data Select Cases, this will open a dialogue box (Fig 12) Figure 12: Dialogue Box 3. Select “if condition is satisfied” then click on If… button Figure 13: Dialogue Box criteria 10 libraryonline.leedsmet.ac.uk
- 11. 4. In the condition area, type in age<30 5. Click on Continue to close the dialogue box 6. Click OK to run the procedure Your data set should resemble to the following Figure 14: Data Set The unselected cases are displayed in the data editor with diagonal line across the case numbers. Any statistical procedures that we perform from this point would only be performed on the active cases. To turn the filter off, select the following options: 1. Chose Data Select Cases 2. Select All Cases (radio button) 3. Click OK Running statistical procedures Frequencies To practice running Frequencies procedure, we will use a sample data file called “Employee data.sav” which can be found in C:/Program Files/SPSS. 1. Open the file “Employee data.sav” 2. From the main menu, select Analyze Descriptive Statistics Frequencies 3. On the left hand pane, select the variable Gender. 4. Click on the arrow in the middle to transfer the selected variable to the right pane. 5. Click on Charts buttons then select Bar chart radio button 6. Click on Continue to close the Charts dialogue box 7. Click on OK to run the procedure. libraryonline.leedsmet.ac.uk 11
- 12. Descriptive statistics With Descriptives menu, you can generate common statistical measures such as mean, maximum and minimum values, standard deviation, variance, range and sum for continuous variables. We will use the variable Salary for this practice. 1. Open the SPSS data file “Employee data.sav” 2. Click on Analyze Descriptive Statistics Descriptives. 3. Select the variable Current salary from the list on the left pane then click on the arrow in the middle to transfer the selected variable to the right pane. 4. Click on Options button to open the Descriptives:Options dialogue box. 5. Select the descriptives that you want to produce: Mean, Maximum, Minimum, standard deviation. 6. Click on Continue button to close the dialogue box 7. Click on OK to run the procedure. Checking Normality of a distribution A Normal distribution is a statistical distribution in which data are represented graphically by a symmetrical bell-shaped curve, with the highest frequency in the middle and smaller frequencies towards the edges. Checking the Normality of the distribution of a variable is very important because many statistical tests require the normality as a prerequisite. There are several ways in which you can use SPSS to assess the normality of a distribution: • The simplest method of assessing normality is by producing a histogram. The most important things to look at are the symmetry and the peak of the histogram. A normal distribution should be represented by a bell-shaped curve. • Another method of assessing the normality of a distribution is by producing the Normal probability plot, P-P or Q-Q plot. For a Normal distribution, the probability plot should show a linear relationship. • It is also possible to use Kolmogorov-Smirnov test if your sample size is greater than 50 or Shapiro-Wilk test if sample size is smaller than 50. What you need to check on the table is the Sig. value. The convention is that a Sig. value greater than 0.05 indicates normality of the distribution 12 libraryonline.leedsmet.ac.uk
- 13. For our practice, we will use data from the SPSS data file “Employee data.sav”, to assess whether the variable Current salary is normally distributed. 1. Open SPSS data file “Employee data.sav” 2. Click on Analyze Descriptives Statistics Explore Figure 15: Explore Variable 3. Select and move the variable Current Salary to the Dependent list area. 4. Click on Plots button to open Explore:Plots dialogue box (Fig 16). Figure 16: Explore: Plots dialogue box 5. On the above dialogue box, make sure to select the options Histogram and Normality plots with tests options. 6. Click on Continue to close the dialogue box. 7. Click on OK to run procedure. 8. In the output; we are particularly interested in checking the Tests of Normality table, the Histogram and the Normal Q-Q plot. libraryonline.leedsmet.ac.uk 13
- 14. Tests of Normality a Kolmogorov-Smirnov Shapiro-Wilk Statistic df Sig. Statistic df Sig. Current Salary .208 474 .000 .771 474 .000 a. Lilliefors Significance Correction Tests of Normality a Kolmogorov-Smirnov Shapiro-Wilk Statistic df Sig. Statistic df Sig. Current Salary .208 474 .000 .771 474 .000 a. Lilliefors Significance Correction Figure 17: Table results Histogram 120 100 80 Frequency 60 Figure 2 40 20 Mean =$34,419.57 Std. Dev. =$17,075.661 0 N =474 $25,000 $50,000 $75,000 $100,000 $125,000 Current Salary Figure 18: Histogram Results Normal Q-Q Plot of Current Salary 3 2 Expected Normal 1 0 -1 -2 -3 0 30,000 60,000 90,000 120,000 Observed Value Figure 19: Plot of Results 14 libraryonline.leedsmet.ac.uk
- 15. Interpretation of the output: The tests of Normality table (Fig 17): What you need to check on the Tests of Normality table is the value of the Sig. column. In general, a Sig. value less or equal to 0.05 is considered good evidence that the data set is not normally distributed. SPSS produces two Sig. values, the first is for the Kolmogorov-Smirnov test, the second is the Shapiro-Wilk’s test. The advice from SPSS is to use the latter test when sample sizes are small (n < 50). Since our sample size is greater than 50 (n=474 >50), we will use the result from the Kolmogorov-Smirnov column which gives us a Sig. value equal to .000<0.05 We can therefore conclude that the variable Current Salary is not normally distributed. Histogram and probability plot (Fig 18, 19) The above result is confirmed by the histogram and the normal probability plot, the histogram does not present a symmetrical distribution, it has a long tail towards the right. On the Normal Q-Q plot, the graph does not show a linear relationship between the observed values and the expected values from a normal distribution. On a normal distribution, these values should fall more or less in a straight line. libraryonline.leedsmet.ac.uk 15
- 16. Assessing relationship between variables Scatterplot One way to assess whether there is a relationship between two variables is to look at a Scatterplot of the Data. It is good idea to plot the relationship before performing correlation analysis. Scatterplot helps in checking some of the assumptions for correlation analysis. It also gives you a better idea of the relation between your variables. 1. Open SPSS data file “Employee data.sav” 2. From the main menu, chose Graphs Scatter/Dot 3. In the Scatter/Dot dialogue box (Fig 20), chose Simple Scatter Figure 20: Scatter/Dot dialogue Box 4. Click on Define button. Figure 21: Simple Scatterplot 5. From the list on the left pane, move the variable Beginning Salary to Y Axis area by using the arrow in the middle. 6. Move the variable Educational Level to the X Axis area. 7. Click on OK to run the procedure. 16 libraryonline.leedsmet.ac.uk
- 17. $80,000 $60,000 Beginning Salary $40,000 $20,000 $0 9 12 15 18 21 Educational Level (years) Figure 22: Results of Simple Scatter Correlation Correlation analysis is used for assessing the relationship between two continuous variables. With SPSS, Pearson correlation coefficient can be calculated to determine the strength and the direction of the relationship between two variables. Pearson correlation coefficient (r) can take values from -1 to +1. The size of the absolute value of the coefficient indicates the strength of the relationship, the sign (+ or -) indicates the direction. To run correlation procedure, 1. Click on Analyze Correlate Bivariate # Figure 23: Correlation Dialogue Box libraryonline.leedsmet.ac.uk 17
- 18. 2. Move variables that you want to use for the correlation analysis to the right pane. 3. Make sure to check the tick box for Pearson correlation coefficients. 4. Click OK button to generate the correlation table. Running Crosstabs (with Chi-square test) Crosstabs are particularly useful in hypothesis testing; it is one of the most common ways of looking at relationship between two categorical variables. For this practice, we will use a SPSS sample file called “1991 US General survey.sav”. For this survey, we are interested in checking if the two variables ‘General happiness’ and ‘Is life exciting’ are related. 1. Open the file “1991 US General survey.sav”, you can find this file in the SPSS folder C:/Program files/SPSS 2. Click on Analyze Descriptives Statistics Crosstabs 3. Select the variable General happiness[happy] and move it to the Row(s) area 4. Select the variable Is life exciting or dull[life] and move it to the Columns() area 5. Click on Statistics button Figure 24: Crosstabs Dialogue Box 6. Select Chi-square option then click on Continue button to close the dialogue box. 7. Click on Cells button to open Crosstabs:Cell Display dialogue box (Fig 25) 18 libraryonline.leedsmet.ac.uk
- 19. Figure 25: Cell Display Dialogue Box 8. In Percentages area, select Column 9. Click on Continue button to close dialogue box. 10. Click OK to run Crosstabs procedure Interpretation of the outputs General Happiness * Is Life Exciting or Dull Crosstabulation Is Life Exciting or Dull Exciting Routine Dull Total General Very Happy Count 195 98 2 295 Happiness % within Is Life 44.9% 19.7% 5.0% 30.4% Exciting or Dull Pretty Happy Count 218 338 12 568 % within Is Life 50.2% 68.0% 30.0% 58.5% Exciting or Dull Not Too Happy Count 21 61 26 108 % within Is Life 4.8% 12.3% 65.0% 11.1% Exciting or Dull Total Count Figure 3 434 497 40 971 % within Is Life 100.0% 100.0% 100.0% 100.0% Exciting or Dull Figure 26: Results libraryonline.leedsmet.ac.uk 19
- 20. By comparing the three columns Exciting, Routine and Dull, we can see that there is an apparent pattern of frequencies across the nine categories (Fig 26). People who have higher level of general happiness find life more exciting than those in lower categories. To check if this result is statistically significant, we need to examine the Chi- square test table (Fig 27). Chi-Square Tests Asymp. Sig. Value df (2-sided) Pearson Chi-Square 196.023a 4 .000 Likelihood Ratio 148.923 4 .000 Linear-by-Linear 125.487 1 .000 Association N of Valid Cases 971 a. 1 cells (11.1%) have expected count less than 5. The minimum expected count is 4.45. Figure 27: Test Table The probability of this result to occur by chance only is given by the Sig. value of Pearson Chi-square. The convention is that If the significance (Sig.) is less than or equal to 0.05, then the variables are significantly related, if the significance is greater than 0.05, then the variables are not significantly related. On the above Chi-Square tests table, the value of the significance is .000<0.05, we can therefore confirm that the relationship between the two variables is statistically significant. Comparing means of groups using T-tests A t-test compares the difference between two means of different groups to determine whether that difference is statistically significant. There are three types of t-tests: one-sample, independent-samples, and paired-samples. One sample t-test compares the mean of one sample to a fixed estimate. A significant result indicates that the group's mean differs from the fixed value. Example: a researcher may want to check whether the average IQ score for a group of students differs from 100. Independent sample T-test compares the means of two independent groups. Example: To evaluate whether there is a significant difference in average salaries between men and women in a company. 20 libraryonline.leedsmet.ac.uk
- 21. Paired sample T-test: this t-test evaluates two groups that are related to each other. Example: Researcher may want to compare the average blood counts of the same group of patients before and after receiving a specific treatment. These three types of t-tests are accessible through the menu: Analyze Compare Means… Figure 28: T-tests Menu Window Interpreting the outputs Look at the value of Sig. and interpret the result: • If the value the significance Sig. (or p) is less or equal to 0.05 then you can conclude that the two groups are significantly different. • If the value of the significance Sig. (or p) is greater than 0.05 then you can conclude that the difference between the means is not significant. libraryonline.leedsmet.ac.uk 21
- 22. Glossary Categorical variable: Consists of data that can be grouped by specific categories (also known as qualitative variables). Categorical variables may have categories that are naturally ordered (ordinal variables) or have no natural order (nominal variables). Mean: the mean is the arithmetic average of a set of numbers. Median: The median is the middle of a distribution: half the scores are above the median and half are below the median. Mode: is the value that has the highest frequency. Normal distribution: Statistical distribution in which data are represented by a symmetrical bell-shaped curve, with the highest frequency in the middle and smaller frequencies towards the edges. Nominal variable: Type of categorical variable that describes a name, label or category with no natural order. Non-parametric test: Non-Parametric tests are often used in place of their parametric counterparts when certain assumptions about the underlying population are not met. E.g. chi-square is a non parametric test. Ordinal variable: A type of categorical variable: an ordinal variable is one that has a natural ordering of its possible values, but the distances between the values are undefined. Parametric test: a test that requires a parametric assumption, such as normality e.g. t-tests are parametric tests. Quartiles: Quartiles (1st, 2nd and 3rd) divide the observations into four equal parts. The second quartile is also known as the median. Scale: Data measured on an interval or ratio scale, where the data values indicate both the order of values and the distance between values. Also referred to as quantitative or continuous data. 22 libraryonline.leedsmet.ac.uk
- 23. Feedback Does this document tell you what you want to know? Comments can be sent via the customer comments form found on Library Online. Please include details of the document title. libraryonline.leedsmet.ac.uk 23