WebLogic Performance on SOLARIS SPARC Servers
•Als PPT, PDF herunterladen•
0 gefällt mir•1,736 views

My presentation and Live DEMO at "Oracle Hardware Solutions Event". Demonstrated live Java Server Loader (JSL) on Solaris Sparc T5-2 Server and did performance tests (CPU, Memory, Network Socket) instantly at session duration. Artifacts: Java Server Loader (JSL) WLSDM (WebLogic Smart Dashboard and Monitoring) Oracle WebLogic (12.2.1) Oracle Solaris 11.3 Java 1.8_071

Empfohlen
Empfohlen
Weitere ähnliche Inhalte
Was ist angesagt?
Was ist angesagt? (20)
Andere mochten auch
Andere mochten auch (16)
Ähnlich wie WebLogic Performance on SOLARIS SPARC Servers
Ähnlich wie WebLogic Performance on SOLARIS SPARC Servers (20)
Kürzlich hochgeladen
Kürzlich hochgeladen (20)
WebLogic Performance on SOLARIS SPARC Servers
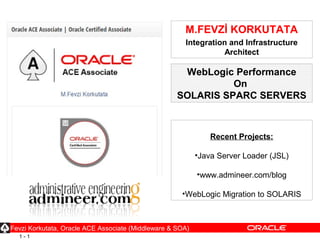
- 1. 1 - 1 M.FEVZİ KORKUTATA Integration and Infrastructure Architect Recent Projects: •Java Server Loader (JSL) •www.admineer.com/blog •WebLogic Migration to SOLARIS Fevzi Korkutata, Oracle ACE Associate (Middleware & SOA) WebLogic Performance On SOLARIS SPARC SERVERS
- 2. 1 - 2 Agenda 1. About Java Server Loader (JSL) 2. WebLogic Performance on Oracle Solaris SPARC Server T5-2 (T7/M7 Comming Soon ) 3. WebLogic LOAD Test on T5-2 Server by using JSL – CPU – Memory – Network Socket (Client HTTP Request) 1. Live DEMO on T5-2 Server (CPU, Memory, Socket) 2. Summary Fevzi Korkutata, Oracle ACE Associate (Middleware & SOA)
- 3. 1 - 3 Java Server Loader (JSL) • Java Server Loader = Java Server Killer – Hardware CPU «Performance / Load / Stress» Tests – Hardware Memory «Performance / Load / Stress» Tests – Database «Performance / Load / Stress» Tests by using JDBC or JNDI – Hardware Disk (I/O) «Performance / Load / Stress» Tests – Network(Client Socket Request) «Performance / Load / Stress» Tests Fevzi Korkutata, Oracle ACE Associate (Middleware & SOA)
- 4. 1 - 4 Java Server Loader (JSL) Fevzi Korkutata, Oracle ACE Associate (Middleware & SOA)
- 5. 1 - 5 Solaris and WebLogic • WebLogic AS: 12c (12.2.1) (Last Version) • SOLARIS OS: Oracle Solaris 11.3 SPARC (Last Version) – Empty Default Domain JVM Start Duration: 16 seconds Production Domain Admin Server – Tuned Empty Domain JVM Start Duration: 10-14 seconds Production Domain Admin Server Fevzi Korkutata, Oracle ACE Associate (Middleware & SOA)
- 6. 1 - 6 Hardware and Software Configurations Peripherals and Systems Version / Edition / Feature Operating System Oracle Solaris 11.3 SPARC Application Server Oracle WebLogic 12c (12.2.1) Java (JDK) Java 1.8_071 (jdk1.8.0_71) SERVER (Hardware) ORCL,SPARC-T5-2 Total Physical Processor 2 Total Core 31 Total Thread (Per Core) 8 Total Virtual CPU (vCPU) 248 Processor Speed 3600 MHz (3.60 GHz) Memory 251904 MB (=246 GB) Fevzi Korkutata, Oracle ACE Associate (Middleware & SOA)
- 7. 1 - 7 Solaris & WebLogic Tuning • Java Security URANDOM update – dev/urandom dev/./urandom • WebLogic ThreadPool Tuning – -Dweblogic.threadpool.MinPoolSize=1024 • Solaris OS Limits: Fevzi Korkutata, Oracle ACE Associate (Middleware & SOA)
- 8. 1 - 8 JSL CPU Performance Test • 248 Thread Count (Fixed Load Test) • RESULT: 5.2 TPS (Thread Per Second) Fevzi Korkutata, Oracle ACE Associate (Middleware & SOA)
- 9. 1 - 9 JSL CPU Performance Test • 248 Thread Count (Fixed LoadTest) • 100% CPU Usage Fevzi Korkutata, Oracle ACE Associate (Middleware & SOA)
- 10. 1 - 10 JSL MEMORY Performance Test • 216 GB JVM Memory (WebLogic Managed Server) -Xms216G -Xmx216G -Xss1024m Fevzi Korkutata, Oracle ACE Associate (Middleware & SOA)
- 11. 1 - 11 JSL Socket (Network Client Request) Performance Test • 248 Thread Count (Fixed Load Test) • Execution Method: Fixed - Execution Time: 3sec • RESULT: 51.1 TPS (Thread Per Second) Fevzi Korkutata, Oracle ACE Associate (Middleware & SOA)
- 12. 1 - 12 Importance of Solaris & WebLogic Tuning BEFORE Fevzi Korkutata, Oracle ACE Associate (Middleware & SOA)
- 13. 1 - 13 Solaris & WebLogic Tuning Önemi AFTER Fevzi Korkutata, Oracle ACE Associate (Middleware & SOA)
- 14. 1 - 14 JSL LIVE DEMO • http://jsl.admineercloud.com:65526/JavaServerLoader/ (Local DNS: Accessing to CLOUD T5-2) • JSL CPU DEMO – 248 Thread (Fixed) • JSL Network Socket Demo – 248 Thread (Fixed) – Sleep Time: 1 – Webpage URL: http://192.168.10.181:7703/JavaServerLoader/socket.stucker – Execution Time: 1 Fevzi Korkutata, Oracle ACE Associate (Middleware & SOA)
- 15. 1 - 15 SUMMARY • Configure SOLARIS «Native I/O» for SPARC; when migrating/moving from x86/64 LINUX and LD_LIBRARY_PATH • If the application server and deployed application tuned well, it is possible to achive a remarkable PERFORMANCE on SOLARIS SPARC servers. • SOLARIS OS percentage would be increase for Middleware Administrators daily operations very SOON • Seriously consider SOLARIS/SPARC/T5/T7/M7 technologies when embarking to a new project for hardware/software choices. Fevzi Korkutata, Oracle ACE Associate (Middleware & SOA)
- 16. 1 - 16 THANKS Q / A Fevzi Korkutata, Oracle ACE Associate (Middleware & SOA) For your IT Hardware POC’s contact to me, we can test hardware remotely by using JSL (Java Server Loader).
Hinweis der Redaktion
- Rows of monitors fading into the background (Intermediate) To reproduce the shape effects on this slide, do the following: On the Home tab, in the Slides group, click Layout, and then click Blank. On the Home tab, in the Drawing group, click Shapes, and then under Basic Shapes click Rounded Rectangle (second option from the left). On the slide, drag to draw a rectangle. Drag the yellow diamond adjustment handle to the left to decrease the amount of rounding on the corners of the rectangle. Select the rectangle. Under Drawing Tools, on the Format tab, in the Size group, do the following: In the Shape Height box, enter 1.38”. In the Shape Width box, enter 1.75”. Also under Drawing Tools, on the Format tab, in the Shape Styles group, click the Format Shape dialog box launcher. In the Format Shape dialog box, click Fill in the left pane, select Solid fill in the Fill pane, and then do the following: Click the button next to Color, click More Colors, and then in the Colors dialog box, on the Custom tab, enter values for Red: 54, Green: 65, Blue: 118. In the Transparency box, enter 45%. Also in the Format Shape dialog box, click Line Color in the left pane, and then in the Line Color pane select No line. Also in the Format Shape dialog box, click 3-D Format in the left pane. In the 3-D Format pane, under Bevel, click the button next to Top, and then under Bevel click Relaxed Inset (first row, second option from the left). Next to Top, in the Width box, enter 6 pt, and in the Height box, enter 6 pt. Also in the Format Shape dialog box, click Reflection in the left pane. In the Reflection pane, click the button next to Presets, and then under Reflection Variations click Tight Reflection, touching (first row, first option from the left). On the Home tab, in the Clipboard group, click the arrow under Paste, and then click Duplicate. Repeat this process to create a total of five rectangles. On the Home tab, in the Drawing group, click Arrange, point to Align, and then do the following: Click Align to Slide. Click Align Middle. Click Distribute Horizontally. On the Home tab, in the Drawing group, click Arrange, and then click Group. Select the group. On the Home tab, in the bottom right corner of the Drawing group, click the Format Shape dialog box launcher. In the Format Shape dialog box, click 3-D Rotation in the left pane. In the 3-D Rotation pane, click the button next to Presets, and then under Perspective, click Perspective Below (first row, fourth option from the left). Select the group. On the Home tab, in the Clipboard group, click the arrow to the right of Copy, and then click Duplicate. On the slide, drag the second group above the first group. Under Drawing Tools, on the Format tab, in the bottom right corner of the Size group, click the Size and Position dialog box launcher. In the Format Shape dialog box, click Size in the left pane. In the Size pane, under Scale, do the following: Select Lock aspect ratio. In the Height box, enter 85%. Also in the Format Shape dialog box, click Fill in the left pane. In the Fill pane, select Solid fill, and then in the Transparency box, enter 55%. Select the second group. On the Home tab, in the Clipboard group, click the arrow to the right of Copy, and then click Duplicate. On the slide, drag the third group above the second group. Under Drawing Tools, on the Format tab, in the bottom right corner of the Size group, click the Size and Position dialog box launcher. In the Format Shape dialog box, click Size in the left pane. In the Size pane, under Scale, do the following: Select Lock aspect ratio. In the Height box, enter 85%. On the Home tab, in the bottom right corner of the Drawing group, click the Format Shape dialog box launcher. In the Format Shape dialog box, click Fill in the left pane. In the Fill pane, select Solid fill, and then in the Transparency box, enter 65%. Select the third group. On the Home tab, in the Clipboard group, click the arrow to the right of Copy, and then click Duplicate. On the slide, drag the fourth group above the third group. Under Drawing Tools, on the Format tab, in the bottom right corner of the Size group, click the Size and Position dialog box launcher. In the Format Shape dialog box, click Size in the left pane. In the Size pane, under Scale, do the following: Select Lock aspect ratio. In the Height box, enter 85%. Also in the Format Shape dialog box, click Fill in the left pane. In the Fill pane, select Solid fill, and then in the Transparency box, enter 75%. Select the fourth group. On the Home tab, in the Clipboard group, click the arrow to the right of Copy, and then click Duplicate. On the slide, drag the fifth group above the fourth group. Under Drawing Tools, on the Format tab, in the bottom right corner of the Size group, click the Size and Position dialog box launcher. In the Format Shape dialog box, click Size in the left pane. In the Size pane, under Scale, do the following: Select Lock aspect ratio. In the Height box, enter 85%. Also in the Format Shape dialog box, click Fill in the left pane. In the Fill pane, select Solid fill, and then in the Transparency box, enter 85%. Select the fifth group. On the Home tab, in the Clipboard group, click the arrow to the right of Copy, and then click Duplicate. On the slide, drag the sixth group above the fifth group. Under Drawing Tools, on the Format tab, in the bottom right corner of the Size group, click the Size and Position dialog box launcher. In the Format Shape dialog box, click Size in the left pane. In the Size pane, under Scale, do the following: Select Lock aspect ratio. In the Height box, enter 85%. Also in the Format Shape dialog box, click Fill in the left pane. In the Fill pane, select Solid fill, and then in the Transparency box, enter 95%. Using the ruler as a guide, drag the groups into rows on the slide so that the top and bottom margins are approximately 1.75”. On the View tab, in the Show/Hide group, clear Ruler. Press CTRL-A to select all of the groups. On the Home tab, in the Drawing group, click Arrange, point to Align, and then do the following: Click Align Selected Objects. Click Distribute Vertically. Click Align to Slide. Click Align Center. On the Home tab, in the Drawing group, click Arrange, and then click Group. On the Home tab, in the Drawing group, click Arrange, point to Align, and then do the following: Point to Align, and then click Align to Slide. Point to Align, and then click Align Middle. Point to Align, and then click Align Center. To reproduce the background effects on this slide, do the following: On the Design tab, in the Background group, click Background Styles, and then click Format Background. In the Format Background dialog box, click Fill in the left pane, select Gradient fill in the Fill pane, and then do the following: In the Type list, select Radial. Click the button next to Direction, and then click From Center (third option from the left). Under Gradient stops, click Add gradient stops or Remove gradient stops until three stops appear in the slider. Also under Gradient stops, customize the gradient stops as follows: Select the first stop in the slider, and then do the following: In the Position box, enter 33%. Click the button next to Color, and then under Theme Colors click White, Background 1 (first row, first option from the left). In the Transparency box, enter 0%. Select the next stop in the slider, and then do the following: In the Position box, enter 67%. Click the button next to Color, click More Colors, and then in the Colors dialog box, on the Custom tab, enter values for Red: 228, Green: 233, Blue: 236. In the Transparency box, enter 0%. Select the last stop in the slider, and then do the following: In the Position box, enter 100%. Click the button next to Color, click More Colors, and then in the Colors dialog box, on the Custom tab, enter values for Red: 178, Green: 186, Blue: 210. In the Transparency box, enter 0%.
- After completion of the course, you have the basic information and technical understanding of the SOA concepts, SOA implementation, and how SOA helps to solve the business and IT challenges in your organization.
- After completion of the course, you have the basic information and technical understanding of the SOA concepts, SOA implementation, and how SOA helps to solve the business and IT challenges in your organization.
- After completion of the course, you have the basic information and technical understanding of the SOA concepts, SOA implementation, and how SOA helps to solve the business and IT challenges in your organization.
- After completion of the course, you have the basic information and technical understanding of the SOA concepts, SOA implementation, and how SOA helps to solve the business and IT challenges in your organization.
- After completion of the course, you have the basic information and technical understanding of the SOA concepts, SOA implementation, and how SOA helps to solve the business and IT challenges in your organization.
- After completion of the course, you have the basic information and technical understanding of the SOA concepts, SOA implementation, and how SOA helps to solve the business and IT challenges in your organization.
- After completion of the course, you have the basic information and technical understanding of the SOA concepts, SOA implementation, and how SOA helps to solve the business and IT challenges in your organization.
- After completion of the course, you have the basic information and technical understanding of the SOA concepts, SOA implementation, and how SOA helps to solve the business and IT challenges in your organization.
- After completion of the course, you have the basic information and technical understanding of the SOA concepts, SOA implementation, and how SOA helps to solve the business and IT challenges in your organization.
- After completion of the course, you have the basic information and technical understanding of the SOA concepts, SOA implementation, and how SOA helps to solve the business and IT challenges in your organization.
- After completion of the course, you have the basic information and technical understanding of the SOA concepts, SOA implementation, and how SOA helps to solve the business and IT challenges in your organization.
- After completion of the course, you have the basic information and technical understanding of the SOA concepts, SOA implementation, and how SOA helps to solve the business and IT challenges in your organization.
- After completion of the course, you have the basic information and technical understanding of the SOA concepts, SOA implementation, and how SOA helps to solve the business and IT challenges in your organization.
- After completion of the course, you have the basic information and technical understanding of the SOA concepts, SOA implementation, and how SOA helps to solve the business and IT challenges in your organization.
- After completion of the course, you have the basic information and technical understanding of the SOA concepts, SOA implementation, and how SOA helps to solve the business and IT challenges in your organization.