SlideShare ist ein Scribd-Unternehmen logo
1 von 2
Downloaden Sie, um offline zu lesen
Water Sensor
user manual
The water sensor is an intelligent Z-Wave
accessory aimed to prevent floods, water
damage by accurately detecting and
notifying you when there is a presence or
absence of water.
1.	 Position the product on a flat surface
1 meter from the floor.
2.	 On a flat surface, position and use the
sticky pad to hold the prongs in place to
detect the presence or absence of water.
(see the images for reference).
Press the latch on the water sensor and
remove the back.
3.	 Screw or use the double-side sticky
pads to secure the back in place.
4.	 Use a compatible app or controller to
add/search for the water sensor.
5.	 Remove the clear battery protectors
and press the Z-Wave button on the device.
(A red LED should appear as the accessory
is paired).
6.	 Add/name the water sensor.
7.	 Close the sensor by placing the front
of the product onto the back which is fixed
in place.
8.	 The red LED will be present as the
sensor performs its configuration. The setup
is now complete. The sensor will now deliver
accurate detection of water levels.
Whats Included:
1 x Water Sensor (white)
2 x screws
2 x AAA batteries
1 x sticky pads (waterproof)
4 x sticky pads
Warning
Do not dispose of electrical appliances as
unsorted municipal waste, use separate
collection facilities. Contact your local
government for information regarding the
collection systems available.
The product warranty information and the
return policy can be found online at
www.getfoxx.com
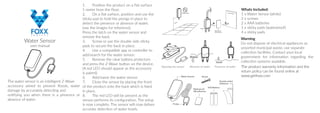
Presence of waterAbsence of waterOpening the sensor
FR: Placez le produit sur une surface plane de
1 mètre du sol.
Position et utilisez le pavé collant pour
maintenir les dents en place. (Voir les images
de référence).
Appuyez sur le loquet situé sur le capteur
d’eau et enlever le dos.
Visser ou utiliser les touches collantes
double-face pour fixer le dos en place.
Utilisez l’application ou contrôleur compatible
pour ajouter / recherche pour le capteur de
l’eau.
Retirez les protecteurs de la batterie claires et
appuyez sur le bouton Z-Wave sur l’appareil.
(Une LED rouge doit apparaître tel paires).
Ajouter / nommer le capteur d’eau.
Placer la face avant du produit sur le dos qui
est fixé en place.
La LED rouge sera présent que le capteur
effectue sa configuration
IT: Posizionare il prodotto su una superficie
piana 1 metro dal pavimento.
Posizione e utilizzare il pad appiccicoso per
tenere le punte in posizione. (Vedi le immagini
per riferimento).
Premere il fermo sul sensore acqua e
rimuovere la parte posteriore.
Vite o utilizzare i cuscinetti adesivi doppio lato
per fissare il suo posto.
Utilizzare l’applicazione o controller com-
patibile per aggiungere / ricerca del sensore
dell’acqua.
Rimuovere i protettori della batteria chiare e
premere il tasto Z-Wave sul dispositivo. (A LED
rosso dovrebbe apparire come coppie).
Aggiungere / nome al sensore dell’acqua.
Posizionamento del frontale del prodotto sul
retro che è fissato in posizione.
Il LED rosso sarà presente il sensore esegue la
sua configurazione.
DE: Positionieren Sie das Produkt auf eine
ebene Fläche 1m über dem Boden.
Position und verwenden Sie die klebrige
Auflage, um die Zinken in Position zu halten.
(Siehe die Bilder als Referenz).
Drücken Sie die Verriegelung an der
Wassersensor und entfernen Sie die Rückseite.
Schraube oder das doppelseitige Haftnotizen,
um die Rückseite zu befestigen.
Verwenden Sie die kompatiblen App oder
Controller / Suche nach dem Wasser-Sensor
hinzuzufügen.
Entfernen Sie die Batterieprotektoren und
drücken Sie die Z-Wave-Taste am Gerät. (Eine
rote LED sollte, wie es Paaren angezeigt).
Hinzufügen / benennen Sie den Wassersensor.
Anordnen der Vorderseite des Geräts, auf der
Rückseite, die an Ort und Stelle fixiert
Die rote LED vorhanden sein als der Sensor
führt seine Konfiguration.
ES: Coloque el producto en una superficie
plana 1 metro desde el suelo.
Posición y utilizar la almohadilla adhesiva para
mantener los dientes en su lugar. (Ver las
imágenes de referencia).
Presione el pestillo de la sonda de agua y
quitar la parte de atrás.
Atornille o utilizar las almohadillas adhesivas de
doble cara para fijar el nuevo en su lugar.
Utilice la aplicación o controlador compatible
para agregar / búsqueda del sensor de agua.
Retire los protectores de baterías claras y pulse
el botón Z-Wave en el dispositivo. (Un LED
rojo debería aparecer ya que las parejas).
Añadir / nombrar el sensor de agua.
La colocación de la parte frontal del producto
en la parte posterior que se fija en su lugar.
El LED rojo estará presente como el sensor
realiza su configuración.

Weitere ähnliche Inhalte

Mehr von Domotica daVinci

Manual de usuario Dongle Zigbee 3.0 Sonoff
Manual de usuario Dongle Zigbee 3.0 SonoffManual de usuario Dongle Zigbee 3.0 Sonoff
Manual de usuario Dongle Zigbee 3.0 SonoffDomotica daVinci
 
2Channel Dimmer Module Zigbee NetPlus Manual
2Channel Dimmer Module Zigbee NetPlus Manual2Channel Dimmer Module Zigbee NetPlus Manual
2Channel Dimmer Module Zigbee NetPlus ManualDomotica daVinci
 
Shelly Qubini Dry Contact Module Z-Wave Manual
Shelly Qubini Dry Contact Module Z-Wave ManualShelly Qubini Dry Contact Module Z-Wave Manual
Shelly Qubini Dry Contact Module Z-Wave ManualDomotica daVinci
 
Zi-Stick UBS Dongle ZIgbee from Aeotec manual
Zi-Stick UBS Dongle ZIgbee from  Aeotec manualZi-Stick UBS Dongle ZIgbee from  Aeotec manual
Zi-Stick UBS Dongle ZIgbee from Aeotec manualDomotica daVinci
 
Manual controlador de pared Zigbee quatro battery.pdf
Manual controlador de pared Zigbee quatro battery.pdfManual controlador de pared Zigbee quatro battery.pdf
Manual controlador de pared Zigbee quatro battery.pdfDomotica daVinci
 
MOES-User-Manual AL23-211223-MHUB-MS.pdf
MOES-User-Manual AL23-211223-MHUB-MS.pdfMOES-User-Manual AL23-211223-MHUB-MS.pdf
MOES-User-Manual AL23-211223-MHUB-MS.pdfDomotica daVinci
 
Tete thermostatique Zigbee MOES BRT-100 V2.pdf
Tete thermostatique Zigbee MOES BRT-100 V2.pdfTete thermostatique Zigbee MOES BRT-100 V2.pdf
Tete thermostatique Zigbee MOES BRT-100 V2.pdfDomotica daVinci
 
Cherubini Meta Z-Wave Double Switch A510083-84-90
Cherubini Meta Z-Wave Double Switch A510083-84-90Cherubini Meta Z-Wave Double Switch A510083-84-90
Cherubini Meta Z-Wave Double Switch A510083-84-90Domotica daVinci
 
Cherubini Meta Z-Wave Smart Plug Manual A510068
Cherubini Meta Z-Wave Smart Plug Manual A510068Cherubini Meta Z-Wave Smart Plug Manual A510068
Cherubini Meta Z-Wave Smart Plug Manual A510068Domotica daVinci
 
Wave_Shutter_user_guide_multilang_print_V3.pdf
Wave_Shutter_user_guide_multilang_print_V3.pdfWave_Shutter_user_guide_multilang_print_V3.pdf
Wave_Shutter_user_guide_multilang_print_V3.pdfDomotica daVinci
 
Quinto Z-Wave Heltun_HE-RS01_User_Manual_B9AH.pdf
Quinto Z-Wave Heltun_HE-RS01_User_Manual_B9AH.pdfQuinto Z-Wave Heltun_HE-RS01_User_Manual_B9AH.pdf
Quinto Z-Wave Heltun_HE-RS01_User_Manual_B9AH.pdfDomotica daVinci
 
Z-Wave Fan coil Thermostat Heltun_HE-HT01_User_Manual.pdf
Z-Wave Fan coil Thermostat Heltun_HE-HT01_User_Manual.pdfZ-Wave Fan coil Thermostat Heltun_HE-HT01_User_Manual.pdf
Z-Wave Fan coil Thermostat Heltun_HE-HT01_User_Manual.pdfDomotica daVinci
 
Manual Eurotronic Thermostatic Valve Comry Z-Wave
Manual Eurotronic Thermostatic Valve Comry Z-WaveManual Eurotronic Thermostatic Valve Comry Z-Wave
Manual Eurotronic Thermostatic Valve Comry Z-WaveDomotica daVinci
 
Manual sensor Zigbee 3.0 MOES ZSS-X-PIRL-C
Manual  sensor Zigbee 3.0 MOES ZSS-X-PIRL-CManual  sensor Zigbee 3.0 MOES ZSS-X-PIRL-C
Manual sensor Zigbee 3.0 MOES ZSS-X-PIRL-CDomotica daVinci
 
zigbee motion sensor user manual NAS-PD07B2.pdf
zigbee motion sensor user manual NAS-PD07B2.pdfzigbee motion sensor user manual NAS-PD07B2.pdf
zigbee motion sensor user manual NAS-PD07B2.pdfDomotica daVinci
 
Range extender 7 - Aeotec - Manual
Range extender 7 - Aeotec - Manual   Range extender 7 - Aeotec - Manual
Range extender 7 - Aeotec - Manual Domotica daVinci
 
Aeotec Multisensor 7 Manual
Aeotec Multisensor 7 ManualAeotec Multisensor 7 Manual
Aeotec Multisensor 7 ManualDomotica daVinci
 
wiDom Smart Roller Shutter Z-Wave Plus Module Manual
wiDom Smart Roller Shutter Z-Wave Plus Module ManualwiDom Smart Roller Shutter Z-Wave Plus Module Manual
wiDom Smart Roller Shutter Z-Wave Plus Module ManualDomotica daVinci
 

Mehr von Domotica daVinci (20)

Manual de usuario Dongle Zigbee 3.0 Sonoff
Manual de usuario Dongle Zigbee 3.0 SonoffManual de usuario Dongle Zigbee 3.0 Sonoff
Manual de usuario Dongle Zigbee 3.0 Sonoff
 
2Channel Dimmer Module Zigbee NetPlus Manual
2Channel Dimmer Module Zigbee NetPlus Manual2Channel Dimmer Module Zigbee NetPlus Manual
2Channel Dimmer Module Zigbee NetPlus Manual
 
Shelly Qubini Dry Contact Module Z-Wave Manual
Shelly Qubini Dry Contact Module Z-Wave ManualShelly Qubini Dry Contact Module Z-Wave Manual
Shelly Qubini Dry Contact Module Z-Wave Manual
 
Zi-Stick UBS Dongle ZIgbee from Aeotec manual
Zi-Stick UBS Dongle ZIgbee from  Aeotec manualZi-Stick UBS Dongle ZIgbee from  Aeotec manual
Zi-Stick UBS Dongle ZIgbee from Aeotec manual
 
Manual controlador de pared Zigbee quatro battery.pdf
Manual controlador de pared Zigbee quatro battery.pdfManual controlador de pared Zigbee quatro battery.pdf
Manual controlador de pared Zigbee quatro battery.pdf
 
MOES-User-Manual AL23-211223-MHUB-MS.pdf
MOES-User-Manual AL23-211223-MHUB-MS.pdfMOES-User-Manual AL23-211223-MHUB-MS.pdf
MOES-User-Manual AL23-211223-MHUB-MS.pdf
 
Tete thermostatique Zigbee MOES BRT-100 V2.pdf
Tete thermostatique Zigbee MOES BRT-100 V2.pdfTete thermostatique Zigbee MOES BRT-100 V2.pdf
Tete thermostatique Zigbee MOES BRT-100 V2.pdf
 
Cherubini Meta Z-Wave Double Switch A510083-84-90
Cherubini Meta Z-Wave Double Switch A510083-84-90Cherubini Meta Z-Wave Double Switch A510083-84-90
Cherubini Meta Z-Wave Double Switch A510083-84-90
 
Cherubini Meta Z-Wave Smart Plug Manual A510068
Cherubini Meta Z-Wave Smart Plug Manual A510068Cherubini Meta Z-Wave Smart Plug Manual A510068
Cherubini Meta Z-Wave Smart Plug Manual A510068
 
Wave_Shutter_user_guide_multilang_print_V3.pdf
Wave_Shutter_user_guide_multilang_print_V3.pdfWave_Shutter_user_guide_multilang_print_V3.pdf
Wave_Shutter_user_guide_multilang_print_V3.pdf
 
Quinto Z-Wave Heltun_HE-RS01_User_Manual_B9AH.pdf
Quinto Z-Wave Heltun_HE-RS01_User_Manual_B9AH.pdfQuinto Z-Wave Heltun_HE-RS01_User_Manual_B9AH.pdf
Quinto Z-Wave Heltun_HE-RS01_User_Manual_B9AH.pdf
 
Z-Wave Fan coil Thermostat Heltun_HE-HT01_User_Manual.pdf
Z-Wave Fan coil Thermostat Heltun_HE-HT01_User_Manual.pdfZ-Wave Fan coil Thermostat Heltun_HE-HT01_User_Manual.pdf
Z-Wave Fan coil Thermostat Heltun_HE-HT01_User_Manual.pdf
 
Manual Eurotronic Thermostatic Valve Comry Z-Wave
Manual Eurotronic Thermostatic Valve Comry Z-WaveManual Eurotronic Thermostatic Valve Comry Z-Wave
Manual Eurotronic Thermostatic Valve Comry Z-Wave
 
Manual sensor Zigbee 3.0 MOES ZSS-X-PIRL-C
Manual  sensor Zigbee 3.0 MOES ZSS-X-PIRL-CManual  sensor Zigbee 3.0 MOES ZSS-X-PIRL-C
Manual sensor Zigbee 3.0 MOES ZSS-X-PIRL-C
 
zigbee motion sensor user manual NAS-PD07B2.pdf
zigbee motion sensor user manual NAS-PD07B2.pdfzigbee motion sensor user manual NAS-PD07B2.pdf
zigbee motion sensor user manual NAS-PD07B2.pdf
 
Range extender 7 - Aeotec - Manual
Range extender 7 - Aeotec - Manual   Range extender 7 - Aeotec - Manual
Range extender 7 - Aeotec - Manual
 
Aeotec Multisensor 7 Manual
Aeotec Multisensor 7 ManualAeotec Multisensor 7 Manual
Aeotec Multisensor 7 Manual
 
Z stick 7 user guide
Z stick 7 user guideZ stick 7 user guide
Z stick 7 user guide
 
ESB 200 H-Tronic Manual
ESB 200 H-Tronic ManualESB 200 H-Tronic Manual
ESB 200 H-Tronic Manual
 
wiDom Smart Roller Shutter Z-Wave Plus Module Manual
wiDom Smart Roller Shutter Z-Wave Plus Module ManualwiDom Smart Roller Shutter Z-Wave Plus Module Manual
wiDom Smart Roller Shutter Z-Wave Plus Module Manual
 

Flood Sensor Foxx Manual

  • 1. Water Sensor user manual The water sensor is an intelligent Z-Wave accessory aimed to prevent floods, water damage by accurately detecting and notifying you when there is a presence or absence of water. 1. Position the product on a flat surface 1 meter from the floor. 2. On a flat surface, position and use the sticky pad to hold the prongs in place to detect the presence or absence of water. (see the images for reference). Press the latch on the water sensor and remove the back. 3. Screw or use the double-side sticky pads to secure the back in place. 4. Use a compatible app or controller to add/search for the water sensor. 5. Remove the clear battery protectors and press the Z-Wave button on the device. (A red LED should appear as the accessory is paired). 6. Add/name the water sensor. 7. Close the sensor by placing the front of the product onto the back which is fixed in place. 8. The red LED will be present as the sensor performs its configuration. The setup is now complete. The sensor will now deliver accurate detection of water levels. Whats Included: 1 x Water Sensor (white) 2 x screws 2 x AAA batteries 1 x sticky pads (waterproof) 4 x sticky pads Warning Do not dispose of electrical appliances as unsorted municipal waste, use separate collection facilities. Contact your local government for information regarding the collection systems available. The product warranty information and the return policy can be found online at www.getfoxx.com Presence of waterAbsence of waterOpening the sensor
  • 2. FR: Placez le produit sur une surface plane de 1 mètre du sol. Position et utilisez le pavé collant pour maintenir les dents en place. (Voir les images de référence). Appuyez sur le loquet situé sur le capteur d’eau et enlever le dos. Visser ou utiliser les touches collantes double-face pour fixer le dos en place. Utilisez l’application ou contrôleur compatible pour ajouter / recherche pour le capteur de l’eau. Retirez les protecteurs de la batterie claires et appuyez sur le bouton Z-Wave sur l’appareil. (Une LED rouge doit apparaître tel paires). Ajouter / nommer le capteur d’eau. Placer la face avant du produit sur le dos qui est fixé en place. La LED rouge sera présent que le capteur effectue sa configuration IT: Posizionare il prodotto su una superficie piana 1 metro dal pavimento. Posizione e utilizzare il pad appiccicoso per tenere le punte in posizione. (Vedi le immagini per riferimento). Premere il fermo sul sensore acqua e rimuovere la parte posteriore. Vite o utilizzare i cuscinetti adesivi doppio lato per fissare il suo posto. Utilizzare l’applicazione o controller com- patibile per aggiungere / ricerca del sensore dell’acqua. Rimuovere i protettori della batteria chiare e premere il tasto Z-Wave sul dispositivo. (A LED rosso dovrebbe apparire come coppie). Aggiungere / nome al sensore dell’acqua. Posizionamento del frontale del prodotto sul retro che è fissato in posizione. Il LED rosso sarà presente il sensore esegue la sua configurazione. DE: Positionieren Sie das Produkt auf eine ebene Fläche 1m über dem Boden. Position und verwenden Sie die klebrige Auflage, um die Zinken in Position zu halten. (Siehe die Bilder als Referenz). Drücken Sie die Verriegelung an der Wassersensor und entfernen Sie die Rückseite. Schraube oder das doppelseitige Haftnotizen, um die Rückseite zu befestigen. Verwenden Sie die kompatiblen App oder Controller / Suche nach dem Wasser-Sensor hinzuzufügen. Entfernen Sie die Batterieprotektoren und drücken Sie die Z-Wave-Taste am Gerät. (Eine rote LED sollte, wie es Paaren angezeigt). Hinzufügen / benennen Sie den Wassersensor. Anordnen der Vorderseite des Geräts, auf der Rückseite, die an Ort und Stelle fixiert Die rote LED vorhanden sein als der Sensor führt seine Konfiguration. ES: Coloque el producto en una superficie plana 1 metro desde el suelo. Posición y utilizar la almohadilla adhesiva para mantener los dientes en su lugar. (Ver las imágenes de referencia). Presione el pestillo de la sonda de agua y quitar la parte de atrás. Atornille o utilizar las almohadillas adhesivas de doble cara para fijar el nuevo en su lugar. Utilice la aplicación o controlador compatible para agregar / búsqueda del sensor de agua. Retire los protectores de baterías claras y pulse el botón Z-Wave en el dispositivo. (Un LED rojo debería aparecer ya que las parejas). Añadir / nombrar el sensor de agua. La colocación de la parte frontal del producto en la parte posterior que se fija en su lugar. El LED rojo estará presente como el sensor realiza su configuración.