SlideShare ist ein Scribd-Unternehmen logo
1 von 9
Photoshop Screenshots

                          In this screenshot I placed the image for cover page in
                          Photoshop


                         In this screenshot I placed the masthead as image in
                         Photoshop


                          In this screenshot I added effects to make masthead
                          stand out I added bevel emboss, stroke, inner shadow,
                          inner glow, outer glow and drop shadow.


                        In this screenshot I created the main cover line adding
                        artist name, I selected the font nueva std as it is bold and
                        eye catching and made the colour of the main cover line
                        red to match the lipstick.


                          In this screenshot I added to the main cover line with a
                          similar font but a bigger size and different colour.
In this screenshot I added the last line to the main
cover line in the same colour as the masthead but the
same font as the lines before.


In this screenshot I created a text box in the left third
for the first cover line.


 In this screenshot the subheading of the cover line
 was in the font of Nueva STD and it made it the colour
 red as the colour scheme of my front page is red and
 white.


 In this screenshot I added the rest of the cover line
 with the same font but a different colour which is
 white. I made it bold however the word “darkest” is
 in italics so it stands out.


   In this screenshot I drew another text box on the
   right third for another cover line.
In this screenshot I added the first half of the cover line
                                               which was still in the font Nueva STD and the colour
                                               was still red following the colour scheme.


                                                  In this screenshot I added the second half of the
                                                  cover line which is also an artist name therefore it is
                                                  bigger than the subheading also the colour is white.


                                       In this screenshot I have added the last of the cover line which
                                       has the exact same font size and colour as the first half of the
                                       cover line.


In this screenshot I selecting the ellipse shape for the flash on the cover page.


                                               In this screenshot I am adding a stroke to the flash
                                               which is the colour red and I’ve selected the size of the
                                               stroke to be “32”.
In this screenshot I added a fill to the shape
   which was the colour white.


    In this screenshot I added effects to the shape
    to make it stand out. I added the same effects I
    added to the masthead,I added bevel emboss,
    stroke, inner shadow, inner glow, outer glow
    and drop shadow.


    In this screenshot I added a text box inside the
    shape.


In this screenshot I added the text box and I
transformed it by rotating it.


 In this screenshot the textbox in the shape has
 been rotated.
In this screenshot I added another text box
to the stroke of the shape.


In this screenshot I have added text in the
colour white to the stroke.


 In this screenshot I duplicated the layer to
 create circular effect around the shape, I
 duplicated the layer ten times


  In this screenshot I have completed the
  flash by adding a text border to the stroke.
In this screenshot I have drawn a text box for
the next cover line.


  In this screenshot I have added my next
  cover line making it the same font Nueva STD
  and the colour is all red.


 In this screenshot I have used the ellipse tool
 to add a bullet point.


  In this screenshot I have added a fill to the
  shape which is the colour white to go with
  colour scheme.


In this screenshot I will duplicate this layer 3
times to create three bullet points.
In this screen shot I have duplicated the
layer three times which now has created
three bullet points.


In this screenshot I have drawn a textbox
near the bullet point.


 In this screenshot I have added text in
 caps locks next to the bullet point.


  In this screenshot I have added a text
  box next to the second bullet point.
In this screenshot I have added text
              in caps locks next to the bullet point.


             In this screenshot I have added a text
             box next to the third bullet point.


     In this screenshot I have added text in caps
     locks next to the bullet point.


In this screenshot I added a text box underneath
the screenshot to complete the cover line.
In this screenshot I have added cover lines in white
                                          using the font colour tool.


In this screenshot I used the text tool                                                    to
add my last cover line.


                                               In this screenshot I have added my last cover
                                               line in red and white.


                                          In this screen shot I have added the barcode and
                                          using the transparency tool to make the bar code
                                          fade.

Weitere ähnliche Inhalte

Ähnlich wie Front cover Photoshop screenshots

Contents page screenshot
Contents page screenshotContents page screenshot
Contents page screenshotasmediaf12
 
Photoshop process
Photoshop processPhotoshop process
Photoshop processasmediae15
 
My Photoshop skills
My Photoshop skillsMy Photoshop skills
My Photoshop skillsRumaana264
 
Production Experiments
Production ExperimentsProduction Experiments
Production ExperimentsShaniceYates
 
Poster production diary
Poster production diaryPoster production diary
Poster production diaryaaronmc165
 
Making my magazine cover
Making my magazine coverMaking my magazine cover
Making my magazine coverowenlandon
 
Poster production diary
Poster production diaryPoster production diary
Poster production diaryaaronmc165
 
Poster production diary
Poster production diaryPoster production diary
Poster production diaryaaronmc165
 
6. Production Reflection (visual)
6. Production Reflection (visual)6. Production Reflection (visual)
6. Production Reflection (visual)TamzinTwose
 
Production process of film poster
Production process of film posterProduction process of film poster
Production process of film posterEmzzino
 
Images taken and editing
Images taken and editingImages taken and editing
Images taken and editingJakeMason94
 
Horror poster and magazine- step by step
Horror poster and magazine- step by stepHorror poster and magazine- step by step
Horror poster and magazine- step by stepnicole2095
 
Evidence of manipulation of images
Evidence of manipulation of imagesEvidence of manipulation of images
Evidence of manipulation of imagesfaiza bibi
 
How I Made My Music Magazine Double Page Spread
How I Made My Music Magazine Double Page SpreadHow I Made My Music Magazine Double Page Spread
How I Made My Music Magazine Double Page SpreadAmy Harriss
 
evidence of work.pptx
evidence of work.pptxevidence of work.pptx
evidence of work.pptxMrsGainsford
 
Double page spread production log
Double page spread   production logDouble page spread   production log
Double page spread production logChezInspireMe
 
6. FMP Production Reflection Part 1
6. FMP Production Reflection Part 16. FMP Production Reflection Part 1
6. FMP Production Reflection Part 1TamzinTwose
 
Printscreens contents 2 x
Printscreens contents 2 xPrintscreens contents 2 x
Printscreens contents 2 xshanwa-lton
 

Ähnlich wie Front cover Photoshop screenshots (20)

Contents page screenshot
Contents page screenshotContents page screenshot
Contents page screenshot
 
Photoshop process
Photoshop processPhotoshop process
Photoshop process
 
My Photoshop skills
My Photoshop skillsMy Photoshop skills
My Photoshop skills
 
Production Experiments
Production ExperimentsProduction Experiments
Production Experiments
 
Poster production diary
Poster production diaryPoster production diary
Poster production diary
 
Making my magazine cover
Making my magazine coverMaking my magazine cover
Making my magazine cover
 
Poster production diary
Poster production diaryPoster production diary
Poster production diary
 
Poster production diary
Poster production diaryPoster production diary
Poster production diary
 
Screen grabs contents page
Screen grabs contents page Screen grabs contents page
Screen grabs contents page
 
6. Production Reflection (visual)
6. Production Reflection (visual)6. Production Reflection (visual)
6. Production Reflection (visual)
 
Production process of film poster
Production process of film posterProduction process of film poster
Production process of film poster
 
Images taken and editing
Images taken and editingImages taken and editing
Images taken and editing
 
Horror poster and magazine- step by step
Horror poster and magazine- step by stepHorror poster and magazine- step by step
Horror poster and magazine- step by step
 
Evidence of manipulation of images
Evidence of manipulation of imagesEvidence of manipulation of images
Evidence of manipulation of images
 
How I Made My Music Magazine Double Page Spread
How I Made My Music Magazine Double Page SpreadHow I Made My Music Magazine Double Page Spread
How I Made My Music Magazine Double Page Spread
 
evidence of work.pptx
evidence of work.pptxevidence of work.pptx
evidence of work.pptx
 
Double page spread production log
Double page spread   production logDouble page spread   production log
Double page spread production log
 
Production Cover
Production CoverProduction Cover
Production Cover
 
6. FMP Production Reflection Part 1
6. FMP Production Reflection Part 16. FMP Production Reflection Part 1
6. FMP Production Reflection Part 1
 
Printscreens contents 2 x
Printscreens contents 2 xPrintscreens contents 2 x
Printscreens contents 2 x
 

Mehr von asmediaf12

Evaluation Question 1
Evaluation Question 1Evaluation Question 1
Evaluation Question 1asmediaf12
 
Evaluation Question 3
Evaluation Question 3Evaluation Question 3
Evaluation Question 3asmediaf12
 
Evaluation Question 3
Evaluation Question 3Evaluation Question 3
Evaluation Question 3asmediaf12
 
Evaluation Question 3
Evaluation Question 3Evaluation Question 3
Evaluation Question 3asmediaf12
 
Professional interviews and why we chose them
Professional interviews and why we chose themProfessional interviews and why we chose them
Professional interviews and why we chose themasmediaf12
 
Professional interviews and why we chose them
Professional interviews and why we chose themProfessional interviews and why we chose them
Professional interviews and why we chose themasmediaf12
 
Questionnaire Results
Questionnaire Results Questionnaire Results
Questionnaire Results asmediaf12
 
Email research
Email researchEmail research
Email researchasmediaf12
 
Analysis of Double Page Spread-Radio Times
Analysis of Double Page Spread-Radio TimesAnalysis of Double Page Spread-Radio Times
Analysis of Double Page Spread-Radio Timesasmediaf12
 
Target audience
Target audienceTarget audience
Target audienceasmediaf12
 
Catfish, Too Poor for Posh School and MBFRGW
Catfish, Too Poor for Posh School and MBFRGWCatfish, Too Poor for Posh School and MBFRGW
Catfish, Too Poor for Posh School and MBFRGWasmediaf12
 
How has our research helped us towards our documentary
How has our research helped us towards our documentaryHow has our research helped us towards our documentary
How has our research helped us towards our documentaryasmediaf12
 
Final proposal
Final proposalFinal proposal
Final proposalasmediaf12
 
Questionnaire Results
Questionnaire ResultsQuestionnaire Results
Questionnaire Resultsasmediaf12
 
What is social networking
What is social networkingWhat is social networking
What is social networkingasmediaf12
 
Evalutation Q1
Evalutation Q1Evalutation Q1
Evalutation Q1asmediaf12
 

Mehr von asmediaf12 (20)

Evaluation Question 1
Evaluation Question 1Evaluation Question 1
Evaluation Question 1
 
Evaluation Question 3
Evaluation Question 3Evaluation Question 3
Evaluation Question 3
 
Evaluation Question 3
Evaluation Question 3Evaluation Question 3
Evaluation Question 3
 
Evaluation Question 3
Evaluation Question 3Evaluation Question 3
Evaluation Question 3
 
Professional interviews and why we chose them
Professional interviews and why we chose themProfessional interviews and why we chose them
Professional interviews and why we chose them
 
Professional interviews and why we chose them
Professional interviews and why we chose themProfessional interviews and why we chose them
Professional interviews and why we chose them
 
Questionnaire Results
Questionnaire Results Questionnaire Results
Questionnaire Results
 
Email research
Email researchEmail research
Email research
 
Analysis of Double Page Spread-Radio Times
Analysis of Double Page Spread-Radio TimesAnalysis of Double Page Spread-Radio Times
Analysis of Double Page Spread-Radio Times
 
Target audience
Target audienceTarget audience
Target audience
 
Catfish, Too Poor for Posh School and MBFRGW
Catfish, Too Poor for Posh School and MBFRGWCatfish, Too Poor for Posh School and MBFRGW
Catfish, Too Poor for Posh School and MBFRGW
 
How has our research helped us towards our documentary
How has our research helped us towards our documentaryHow has our research helped us towards our documentary
How has our research helped us towards our documentary
 
Final proposal
Final proposalFinal proposal
Final proposal
 
Questionnaire Results
Questionnaire ResultsQuestionnaire Results
Questionnaire Results
 
What is social networking
What is social networkingWhat is social networking
What is social networking
 
Question five
Question fiveQuestion five
Question five
 
Task 2
Task 2Task 2
Task 2
 
Evaluation Q1
Evaluation Q1Evaluation Q1
Evaluation Q1
 
Evaluation Q6
Evaluation Q6Evaluation Q6
Evaluation Q6
 
Evalutation Q1
Evalutation Q1Evalutation Q1
Evalutation Q1
 

Front cover Photoshop screenshots

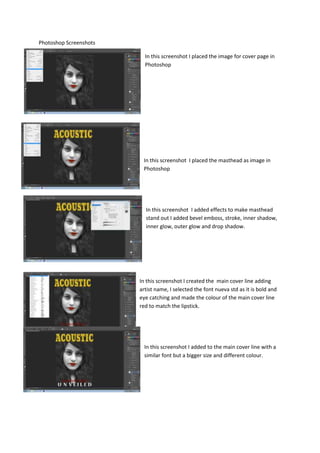
  • 1. Photoshop Screenshots In this screenshot I placed the image for cover page in Photoshop In this screenshot I placed the masthead as image in Photoshop In this screenshot I added effects to make masthead stand out I added bevel emboss, stroke, inner shadow, inner glow, outer glow and drop shadow. In this screenshot I created the main cover line adding artist name, I selected the font nueva std as it is bold and eye catching and made the colour of the main cover line red to match the lipstick. In this screenshot I added to the main cover line with a similar font but a bigger size and different colour.
  • 2. In this screenshot I added the last line to the main cover line in the same colour as the masthead but the same font as the lines before. In this screenshot I created a text box in the left third for the first cover line. In this screenshot the subheading of the cover line was in the font of Nueva STD and it made it the colour red as the colour scheme of my front page is red and white. In this screenshot I added the rest of the cover line with the same font but a different colour which is white. I made it bold however the word “darkest” is in italics so it stands out. In this screenshot I drew another text box on the right third for another cover line.
  • 3. In this screenshot I added the first half of the cover line which was still in the font Nueva STD and the colour was still red following the colour scheme. In this screenshot I added the second half of the cover line which is also an artist name therefore it is bigger than the subheading also the colour is white. In this screenshot I have added the last of the cover line which has the exact same font size and colour as the first half of the cover line. In this screenshot I selecting the ellipse shape for the flash on the cover page. In this screenshot I am adding a stroke to the flash which is the colour red and I’ve selected the size of the stroke to be “32”.
  • 4. In this screenshot I added a fill to the shape which was the colour white. In this screenshot I added effects to the shape to make it stand out. I added the same effects I added to the masthead,I added bevel emboss, stroke, inner shadow, inner glow, outer glow and drop shadow. In this screenshot I added a text box inside the shape. In this screenshot I added the text box and I transformed it by rotating it. In this screenshot the textbox in the shape has been rotated.
  • 5. In this screenshot I added another text box to the stroke of the shape. In this screenshot I have added text in the colour white to the stroke. In this screenshot I duplicated the layer to create circular effect around the shape, I duplicated the layer ten times In this screenshot I have completed the flash by adding a text border to the stroke.
  • 6. In this screenshot I have drawn a text box for the next cover line. In this screenshot I have added my next cover line making it the same font Nueva STD and the colour is all red. In this screenshot I have used the ellipse tool to add a bullet point. In this screenshot I have added a fill to the shape which is the colour white to go with colour scheme. In this screenshot I will duplicate this layer 3 times to create three bullet points.
  • 7. In this screen shot I have duplicated the layer three times which now has created three bullet points. In this screenshot I have drawn a textbox near the bullet point. In this screenshot I have added text in caps locks next to the bullet point. In this screenshot I have added a text box next to the second bullet point.
  • 8. In this screenshot I have added text in caps locks next to the bullet point. In this screenshot I have added a text box next to the third bullet point. In this screenshot I have added text in caps locks next to the bullet point. In this screenshot I added a text box underneath the screenshot to complete the cover line.
  • 9. In this screenshot I have added cover lines in white using the font colour tool. In this screenshot I used the text tool to add my last cover line. In this screenshot I have added my last cover line in red and white. In this screen shot I have added the barcode and using the transparency tool to make the bar code fade.