
Empfohlen
Weitere ähnliche Inhalte
Was ist angesagt?
Was ist angesagt? (14)
Andere mochten auch
Andere mochten auch (12)
Ähnlich wie Premiere Elements 9 Analysis
Ähnlich wie Premiere Elements 9 Analysis (20)
Kürzlich hochgeladen
Kürzlich hochgeladen (20)
Premiere Elements 9 Analysis
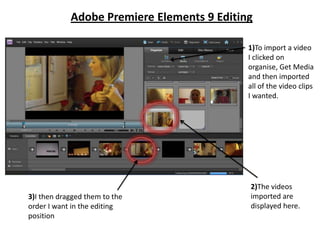
- 1. Adobe Premiere Elements 9 Editing 1)To import a video I clicked on organise, Get Media and then imported all of the video clips I wanted. 2)The videos 3)I then dragged them to the imported are order I want in the editing displayed here. position
- 2. To import an image, I followed the same format as importing a video file. After choosing the image of a black screen, I then dragged it to the position in the film where I wanted it to feature.
- 3. I created this template of the certificate shot, similar to that of the template provided BBFC, and edited it on publisher and paint by making the features more professional and adding the title PULSE. I then imported it as an image to the Premiere Elements 9 video editing software.
- 4. For example, here I wanted the black screen to last longer than the video. So I imported a black background and placed it next to the video clip in the sequence. I could then choose the duration of the screen without affecting the video clip of our title PULSE.
- 5. Here is another example where I imported a video followed by an image. This is the establishing shot of our film and towards the end of the clip it cut too quickly to the next scene. Therefore there was not enough time to acknowledge the girl’s house. 1)I print screened this still 2)I then dragged and pasted the from the film and imported image here. This meant that the it as an image. house could be more established and recognised by the audience.
- 6. There are a variety of ways to edit when using Adobe Premiere Elements 9... By importing the clips and changing to ‘Timeline’ I can see and edit the different layers of footage and sound. I moved the curser to the position I want the film to play at.
- 7. Three ways to edit the same footage... 2) Showing the two clips 1) Using ‘sceneline’ I allowed me to see what moved the curser to the position I wanted to cut position I wanted to cut. the scene at. 3) This method allowed me to see clearly the part of the footage I was cutting. This was a more intricate and precise way of editing the scene.
- 8. When filming this scene, the background noise of the street was too distracting. Therefore, I decided to cut out the layer of sound and just keep the footage of the establishing shot playing silently.
- 9. After watching the film through, I realised that this part of the trains approaching lasted too long. I was reluctant to cut part of the scene as I thought it worked effectively and would disrupt the motion. Instead, I right clicked on the icon of the footage, clicked ‘time stretch’ and increased the speed at which this part of the film will play.
- 10. This shot of the train leaving the station was effective but quite long. When editing this scene, I decided to add another layer of sound over the The music ends abruptly as this video and audio present in the shot. scene ends create a sense of reality This layer of eerie music adds to the in the next shot. atmosphere and creates a build up on tension.
- 11. The main edit that I used throughout was some footage I filmed of a train passing by. Lucy and I decided that this quick, sharp footage would be an ideal cut between the narratives. These train shots are featured throughout the film when the plot cuts between the two narratives.
- 12. I created the ident and credits in the format provided by the editing system. Initially, I attempted to import the credits as an image created on publisher but decided that this approach was easier and would give a more professional effect. 1)I clicked on organise, add titles and then chose the motion version that I wanted. I chose the one which was most iconic of credits rolling up the screen. 2)I then chose the text font, style and size. 3) This is where I typed the text that I wanted to feature.