SlideShare ist ein Scribd-Unternehmen logo
1 von 5
Downloaden Sie, um offline zu lesen
SERENDIPITY
Instruction Manual
Serendipity Models: SL, CSL
© C-MORE Systems 1993-2008
C-MORE Systems
Voice - 703-361-2663
Fax - 703-361-5881
e-mail - sales@cmore.com
web - www.cmore.com CMS-IS-SL-041608
Congratulations! You are now the owner of the most advanced reflex sighting system available. You have displayed excellent judge-
ment in your purchase, and you will be rewarded with unparalleled performance. Use it with pride, but please familiarize yourself with
the system first.
PLEASE read instructions before operating or installing this sighting system.
Page 1 of 5
1.Beam Splitter Lens
2.Elevation Adjustment Screw
3.Battery Cover
4.Diode Cover
5.Diode Module
6.Intensity Switch
7.Windage Guide Pin
8.Elevation Locking Screw
9.Windage Adjustment Screw
10.Windage Locking Screw
11.Mounting Screw Holes
12.Mounting Pads
13.Mounting Legs
1
234
56
7
8
9
10
11
13
12
PACKAGE CONTENTS
Models - SL, CSL (Polymer Bodies)
Qty 1 - Instruction Manual
Qty 1 - Serendipity Mounting Instructions
Qty 1 - Serendipity Red Dot Sight
Qty 1 - Hardware Pack = (1) Hex Wrench 1/16, (1) Hex Wrench 5/64, (2) Extra Cover Screws,
Qty 1 - Mounting Screw Pack = (8) Mounting Screws 5-40 x .330” (6 required, 2 extra)
INTENSITY SWITCHES
C-MORE sighting systems are available with two switch styles, standard and click adjustable. The standard is a dial rheostat switch
with a continuous adjustment through the wide intensity range. The click adjustable switch has 12 positions. The first position is off
and the second and third are for night vision (low / high) and are not visible. Positions 4 - 12 are the visible intensity settings giving
you a wide range of adjustment for any lighting condition.
INTENSITY ADJUSTMENT
The intensity of the dot needs to be adjusted to the lighting condition in the operating area. The dot should appear bright but not glar-
ing. For example, outside in bright sunlight you will most likely use the brightest setting, while at dawn or dusk, or indoors you will
need to use one of the lower settings. The first two positions on the click switch are extremely dim and can only be seen through a
Night Vision device.
INSTALLATION
The Serendipity was originally designed to attach to 1911 style handguns for competition shooting
by drilling and tapping the frame and mounting the sight directly via the integral mount.
The mounting legs allow for a maximum slide width of .950” (A).
The mounting legs allow for a maximum slide height of 1” (B).
The mounting pads can be machined to accomodate frame widths
between .750” and 1” (C).
B
A
C
1. Before mounting the sight, you must remove the front and rear iron sights from your slide.
2. With the firearm together and iron sights removed, slip the sight over the front of the slide.
Make sure the lens is toward the front and the switch toward the rear. It may be necessary to
spread the mounting pads apart in order to slide them over the dust cover.
3A) The top of the mounting pads should be parallel to the slide / dust cover. The clearance
between the bottom of the slide and the top of the mounting pads should be a minimum of .010" -
.020" or about the thickness of a business card. Make sure the slide does not contact the mount-
ing pads when cycled.
3. The mounting holes are countersunk for our specially made 5-40 mounting screws. NOTE! If
oversized mounting screws are used, the mounting holes will not be covered under warranty.
Since the mount is designed to be a drill and tap guide, you will need to clamp the sight to the
dust cover in the exact position desired for mounting. The suggested position is as follows:
3B) Horizontally, the mounting pads should be positioned just
in front of the slide stop. You may want to align the tail of the
sight with the rear edge of the slide. Whichever position you
choose, you need to make sure the rear mounting hole on
each side will be drilled into the dust cover and NOT the
frame rail / bridge area.
Page 2 of 5
STOP!!
Make sure your firearm is unloaded and the magazine and ammunition has been
removed before proceeding!
Slide
Mounting
Pad
Clamp
Clearance
Dust Cover
Frame Rail
Bridge
5. Carefully remove the slide assembly from the frame, mak-
ing sure not to move the sight from its clamped position. DO
NOT drill the frame without removing the slide assembly.
Also, check to be sure you are not going to drill into the
frame rail / bridge area.
4. Clamp the sight with moderate pressure in the desired
position, leaving the front and rear mounting holes on each
side exposed. Now center the tail of the sight from left to
right over the slide as viewed from the rear of the firearm
and firmly clamp in position.
3D) Please check for frame serial numbers before you drill. The BATF frowns on holes drilled through serial numbers. Determine
where yours are before you drill the frame.
Page 3 of 5
6. With the sight clamped in position, drill the front and rear
mounting holes on each side using a #39 drill. Then tap the
four holes you just drilled with a 5-40 tap and carefully
install the mounting screws with the 5/64 allen wrench.
Snug the four mounting screws and remove the clamp.
Now repeat the drilling and tapping for the two remaining
mounting holes.
7. Remove the mounting screws and remove the sight from the frame. Now clearance drill the
mounting holes in the sight with a .125" (1/8") drill or reamer.
3C) The tail of the sight needs to be centered over the rear
of slide. Also, make sure there is adequate clearance
between the top of the slide and the underside of the sight.
The slide should not contact the sight when cycled.
ZEROING
STOP! Before sighting in, read and follow ALL manufacturer's precautions and safety instructions for handling your firearm. BE SAFE!
Know the NRA's rules for safe gun handling.
ADJUSTMENT NOTES:
1) The windage and elevation adjustment screws both have locking screws which must be loosened before the sight can be adjusted.
Failure to do so could result in damage to the sight.
2) The adjustment screws are extremely sensitive, especially the elevation screw. You will only need to turn them slightly to change
your point of impact.
3) The adjustment screws are tight to turn. This is normal. Make sure to use a screwdriver that fits the slot correctly and make sure
the locking screws are loose before attempting to make adjustments.
4) Elevation: Clockwise moves point of impact up.
5) Windage: Clockwise moves point of impact right.
6) Remember to loosen the locking screws before making an adjustment and lock the locking screws after each adjustment.
7) When making final adjustments, tune the elevation first and lock it down, then repeat for the windage.
ZEROING PROCEDURE:
1) Turn the sight on and adjust the brightness to suit the lighting condition.
2) Shoot a 3 shot group at a target 10 yards away to get on paper.
3) Loosen the locking screws and adjust the windage and elevation so your group is centered and 2 to 3 inches low.
4) Since the sight can only be zeroed for one distance, zero for the farthest distance you will shoot with this firearm.
5) Shoot a 3 shot group at the final distance you determined in step 4.
6) Adjust the windage and elevation until zero is achieved. Page 4 of 5
9. The mounting screws must be trimmed flush with the inside of
the dust cover. This can be accomplished with a Dremmel after the
sight is installed, or you can trim them to size before Step 8.
Care must be taken not to overheat the screws while trimming.
Overheating can weaken the strength of the Loctite and cause dam-
age to the mounting pads.
After trimming some prefer to use cold blue on the screws.
10. IMPORTANT! It is necessary to let the Loctite cure for 24 hours
before using the sight. Damage could result from mounting screws
backing out if you do not observe the curing time for the Loctite.
11. Reassemble the firearm and check for proper slide
function.
8. Degrease the mounting screws and the tapped holes in the dust cover. Install the sight using
Loctite 271 or 2760 (red) on the threads of the mounting screws. DO NOT use excessive force in
tightening the mounting screws. Over torquing them can fracture the mounting pads. Moderately
snug is sufficient.
Optional: Step 9 can be done before Step 8 if needed.
Trimmed
Not Trimmed
BATTERY REPLACEMENT
The 3 volt lithium battery (Duracell DL1/3N or Energizer 2L76) is located in the battery compartment on the top of the sight. You will
need to remove the battery cover which is the larger of the covers. Using the hex wrench provided, remove the two flat head hex
screws and the cover. Place the hex wrench in the groove in the front side of the battery compartment to elevate the battery and facili-
tate its removal. Make sure the orange rubber shims behind the battery contacts don't fall out. Note the polarity of the battery and
install the new one with the same orientation (negative to left). Replace the battery cover and reinstall screws.
DO NOT OVERTIGHTEN!
DIODE MODULE REPLACEMENT
Diode Modules are available in 6 different sizes and are color coded on the bottom of each module:
2 moa (red), 4 moa (green), 6 moa (blue), 8 moa (yellow), 12 moa (orange), 16 moa (purple).
REMOVAL
You will need to remove the diode cover which is the smaller of the two covers on the top of the sight. Using the hex wrench provid-
ed, remove the two flat head hex screws and the cover. It may be helpful to remove the battery cover as well. Using a pair of pliers,
grasp the diode module on the sides and pull straight up. This will unplug the module from its socket. You may want to use a cloth on
the diode module before grasping to prevent scratching.
INSTALLATION
With the diode module facing the lens, insert the module into its socket paying special attention that the 8 pins on the module align
with the 8 sockets. Push the module straight down until the retaining shelf is flush with the top of the sight surface. Replace the diode
cover and reinstall the screws. DO NOT OVERTIGHTEN! Moderately snug is sufficient. It will be necessary to check your zero and
fine tune if needed.
WARRANTY
This product is warranted against original defects in material and/or manufacturing for one year. This warranty is void if the unit has
been abused, disassembled, or modified/tampered with in any way from its original configuration.
This warranty does not apply to defects caused by normal wear and tear, improper
handling, incorrect installation, accidents, alterations/modifications to the original
configuration, repairs made by unauthorized parties, aftermarket accessories, or
abnormal use. Due to the fragile nature of glass, the lens is specifically excluded
from warranty coverage.
This warranty is limited to the original purchaser and is not transferable.
Pat. No. 5,369,888 Pat. No. 5,383,278 Other U.S. & Foreign Patents Pending.
MAINTENANCE
The sight does not require any special maintenance other than keeping it clean and making sure everything is tight.
Doing the following after each shooting session, will ensure the sight a long life.
1) Clean the sight. Use a soft clean cloth to wipe down the sight body (Not the Lens) and remove powder residue.
2) Clean the lens. The hard coated glass lens is very durable, but periodic cleaning is necessary. Use a clean gauze, facial or lens tis-
sue and any commercial glass cleaner or soap and water. Dust, dirt and powder residue can be very abrasive, so a thorough rinsing
before wiping will help to protect from scratching while cleaning.
3) Clean the diode. Powder residue will build up around the hole were the light is emitted. This can make the dot appear distorted.
The best way to combat this is to blow off the face of the diode with compressed air after shooting.
You can use canned air for cleaning computer keyboards.
4) Check the mounting. Check to make sure the sight is mounted securely. DO NOT OVERTIGHTEN!
5) Check the locking screws. Check to make sure the locking screws are tight. DO NOT OVERTIGHTEN!
6) Check the Guide Pin. The Guide Pin is next to the Elevation Lock Screw on the right side of the sight. It is not an adjustment
scew. The Windage Block slides on this pin when windage adjustments are made. The pin simply screws in until tight. Make sure it
has not loosened and tighten if necessary. DO NOT OVERTIGHTEN!
Page 5 of 5

Weitere ähnliche Inhalte

Ähnlich wie Instruction Manual C-MORE Serendipity | Optics Trade

Instruction Manual C-MORE Slideride | Optics Trade
Instruction Manual C-MORE Slideride | Optics TradeInstruction Manual C-MORE Slideride | Optics Trade
Instruction Manual C-MORE Slideride | Optics TradeOptics-Trade
 
Instruction Manual C-MORE Tactical | Optics Trade
Instruction Manual C-MORE Tactical | Optics TradeInstruction Manual C-MORE Tactical | Optics Trade
Instruction Manual C-MORE Tactical | Optics TradeOptics-Trade
 
Instruction Manual C-MORE Railway | Optics Trade
Instruction Manual C-MORE Railway | Optics TradeInstruction Manual C-MORE Railway | Optics Trade
Instruction Manual C-MORE Railway | Optics TradeOptics-Trade
 
Instruction Manual C-MORE Scout | Optics Trade
Instruction Manual C-MORE Scout | Optics TradeInstruction Manual C-MORE Scout | Optics Trade
Instruction Manual C-MORE Scout | Optics TradeOptics-Trade
 
Mounting Instructions | C-More Serendipity Red Dot Sights | Optics Trade
Mounting Instructions | C-More Serendipity Red Dot Sights | Optics TradeMounting Instructions | C-More Serendipity Red Dot Sights | Optics Trade
Mounting Instructions | C-More Serendipity Red Dot Sights | Optics TradeOptics-Trade
 
Instruction Manual C-MORE Serendipity Mounting | Optics Trade
Instruction Manual C-MORE Serendipity Mounting | Optics TradeInstruction Manual C-MORE Serendipity Mounting | Optics Trade
Instruction Manual C-MORE Serendipity Mounting | Optics TradeOptics-Trade
 
Cds Installation Guide | Leupold | Optics Trade
Cds Installation Guide | Leupold | Optics TradeCds Installation Guide | Leupold | Optics Trade
Cds Installation Guide | Leupold | Optics TradeOptics-Trade
 
Instructions VORTEX SPITFIRE 3x Prismscope | Optics Trade
Instructions VORTEX SPITFIRE 3x Prismscope | Optics TradeInstructions VORTEX SPITFIRE 3x Prismscope | Optics Trade
Instructions VORTEX SPITFIRE 3x Prismscope | Optics TradeOptics-Trade
 
Instructions | Vortex Spitfire AR Red Dot | Optics Trade
Instructions | Vortex Spitfire AR Red Dot | Optics TradeInstructions | Vortex Spitfire AR Red Dot | Optics Trade
Instructions | Vortex Spitfire AR Red Dot | Optics TradeOptics-Trade
 
Instruction Manual | EO Tech 1-6x24 | Optics Trade
Instruction Manual | EO Tech 1-6x24 | Optics TradeInstruction Manual | EO Tech 1-6x24 | Optics Trade
Instruction Manual | EO Tech 1-6x24 | Optics TradeOptics-Trade
 
Instruction Manual | EO Tech 3.5-18x50 | Optics Trade
Instruction Manual | EO Tech 3.5-18x50 | Optics TradeInstruction Manual | EO Tech 3.5-18x50 | Optics Trade
Instruction Manual | EO Tech 3.5-18x50 | Optics TradeOptics-Trade
 
Instruction Manual | Primary Arms SLX-1XP
Instruction Manual | Primary Arms SLX-1XPInstruction Manual | Primary Arms SLX-1XP
Instruction Manual | Primary Arms SLX-1XPOptics-Trade
 
Zero Compromise Optic Operator's Manual 2019 | Optics Trade
Zero Compromise Optic Operator's Manual 2019 | Optics TradeZero Compromise Optic Operator's Manual 2019 | Optics Trade
Zero Compromise Optic Operator's Manual 2019 | Optics TradeOptics-Trade
 
Instruction Manual | Bushnell Elite Tactical 3.5-21x50 DMR3 | Optics Trade
Instruction Manual | Bushnell Elite Tactical 3.5-21x50 DMR3 | Optics TradeInstruction Manual | Bushnell Elite Tactical 3.5-21x50 DMR3 | Optics Trade
Instruction Manual | Bushnell Elite Tactical 3.5-21x50 DMR3 | Optics TradeOptics-Trade
 
Instruction Manual | EO Tech 2.5-10x FFP | Optics Trade
Instruction Manual | EO Tech 2.5-10x FFP | Optics TradeInstruction Manual | EO Tech 2.5-10x FFP | Optics Trade
Instruction Manual | EO Tech 2.5-10x FFP | Optics TradeOptics-Trade
 
Instructions VORTEX RAZOR Red Dot | Optics Trade
Instructions VORTEX RAZOR Red Dot | Optics TradeInstructions VORTEX RAZOR Red Dot | Optics Trade
Instructions VORTEX RAZOR Red Dot | Optics TradeOptics-Trade
 
Instruction Manual | C-More C3 Riflescopes | Optics Trade
Instruction Manual | C-More C3 Riflescopes | Optics TradeInstruction Manual | C-More C3 Riflescopes | Optics Trade
Instruction Manual | C-More C3 Riflescopes | Optics TradeOptics-Trade
 
Instruction manual | Falcon M18 | Optics Trade
Instruction manual | Falcon M18 | Optics TradeInstruction manual | Falcon M18 | Optics Trade
Instruction manual | Falcon M18 | Optics TradeOptics-Trade
 
Zerocompromiseoptics instruction manual_2020
Zerocompromiseoptics instruction manual_2020Zerocompromiseoptics instruction manual_2020
Zerocompromiseoptics instruction manual_2020Optics-Trade
 
Instructions VORTEX SPITFIRE 1x Prism Scope | Optics Trade
Instructions VORTEX SPITFIRE 1x Prism Scope | Optics TradeInstructions VORTEX SPITFIRE 1x Prism Scope | Optics Trade
Instructions VORTEX SPITFIRE 1x Prism Scope | Optics TradeOptics-Trade
 

Ähnlich wie Instruction Manual C-MORE Serendipity | Optics Trade (20)

Instruction Manual C-MORE Slideride | Optics Trade
Instruction Manual C-MORE Slideride | Optics TradeInstruction Manual C-MORE Slideride | Optics Trade
Instruction Manual C-MORE Slideride | Optics Trade
 
Instruction Manual C-MORE Tactical | Optics Trade
Instruction Manual C-MORE Tactical | Optics TradeInstruction Manual C-MORE Tactical | Optics Trade
Instruction Manual C-MORE Tactical | Optics Trade
 
Instruction Manual C-MORE Railway | Optics Trade
Instruction Manual C-MORE Railway | Optics TradeInstruction Manual C-MORE Railway | Optics Trade
Instruction Manual C-MORE Railway | Optics Trade
 
Instruction Manual C-MORE Scout | Optics Trade
Instruction Manual C-MORE Scout | Optics TradeInstruction Manual C-MORE Scout | Optics Trade
Instruction Manual C-MORE Scout | Optics Trade
 
Mounting Instructions | C-More Serendipity Red Dot Sights | Optics Trade
Mounting Instructions | C-More Serendipity Red Dot Sights | Optics TradeMounting Instructions | C-More Serendipity Red Dot Sights | Optics Trade
Mounting Instructions | C-More Serendipity Red Dot Sights | Optics Trade
 
Instruction Manual C-MORE Serendipity Mounting | Optics Trade
Instruction Manual C-MORE Serendipity Mounting | Optics TradeInstruction Manual C-MORE Serendipity Mounting | Optics Trade
Instruction Manual C-MORE Serendipity Mounting | Optics Trade
 
Cds Installation Guide | Leupold | Optics Trade
Cds Installation Guide | Leupold | Optics TradeCds Installation Guide | Leupold | Optics Trade
Cds Installation Guide | Leupold | Optics Trade
 
Instructions VORTEX SPITFIRE 3x Prismscope | Optics Trade
Instructions VORTEX SPITFIRE 3x Prismscope | Optics TradeInstructions VORTEX SPITFIRE 3x Prismscope | Optics Trade
Instructions VORTEX SPITFIRE 3x Prismscope | Optics Trade
 
Instructions | Vortex Spitfire AR Red Dot | Optics Trade
Instructions | Vortex Spitfire AR Red Dot | Optics TradeInstructions | Vortex Spitfire AR Red Dot | Optics Trade
Instructions | Vortex Spitfire AR Red Dot | Optics Trade
 
Instruction Manual | EO Tech 1-6x24 | Optics Trade
Instruction Manual | EO Tech 1-6x24 | Optics TradeInstruction Manual | EO Tech 1-6x24 | Optics Trade
Instruction Manual | EO Tech 1-6x24 | Optics Trade
 
Instruction Manual | EO Tech 3.5-18x50 | Optics Trade
Instruction Manual | EO Tech 3.5-18x50 | Optics TradeInstruction Manual | EO Tech 3.5-18x50 | Optics Trade
Instruction Manual | EO Tech 3.5-18x50 | Optics Trade
 
Instruction Manual | Primary Arms SLX-1XP
Instruction Manual | Primary Arms SLX-1XPInstruction Manual | Primary Arms SLX-1XP
Instruction Manual | Primary Arms SLX-1XP
 
Zero Compromise Optic Operator's Manual 2019 | Optics Trade
Zero Compromise Optic Operator's Manual 2019 | Optics TradeZero Compromise Optic Operator's Manual 2019 | Optics Trade
Zero Compromise Optic Operator's Manual 2019 | Optics Trade
 
Instruction Manual | Bushnell Elite Tactical 3.5-21x50 DMR3 | Optics Trade
Instruction Manual | Bushnell Elite Tactical 3.5-21x50 DMR3 | Optics TradeInstruction Manual | Bushnell Elite Tactical 3.5-21x50 DMR3 | Optics Trade
Instruction Manual | Bushnell Elite Tactical 3.5-21x50 DMR3 | Optics Trade
 
Instruction Manual | EO Tech 2.5-10x FFP | Optics Trade
Instruction Manual | EO Tech 2.5-10x FFP | Optics TradeInstruction Manual | EO Tech 2.5-10x FFP | Optics Trade
Instruction Manual | EO Tech 2.5-10x FFP | Optics Trade
 
Instructions VORTEX RAZOR Red Dot | Optics Trade
Instructions VORTEX RAZOR Red Dot | Optics TradeInstructions VORTEX RAZOR Red Dot | Optics Trade
Instructions VORTEX RAZOR Red Dot | Optics Trade
 
Instruction Manual | C-More C3 Riflescopes | Optics Trade
Instruction Manual | C-More C3 Riflescopes | Optics TradeInstruction Manual | C-More C3 Riflescopes | Optics Trade
Instruction Manual | C-More C3 Riflescopes | Optics Trade
 
Instruction manual | Falcon M18 | Optics Trade
Instruction manual | Falcon M18 | Optics TradeInstruction manual | Falcon M18 | Optics Trade
Instruction manual | Falcon M18 | Optics Trade
 
Zerocompromiseoptics instruction manual_2020
Zerocompromiseoptics instruction manual_2020Zerocompromiseoptics instruction manual_2020
Zerocompromiseoptics instruction manual_2020
 
Instructions VORTEX SPITFIRE 1x Prism Scope | Optics Trade
Instructions VORTEX SPITFIRE 1x Prism Scope | Optics TradeInstructions VORTEX SPITFIRE 1x Prism Scope | Optics Trade
Instructions VORTEX SPITFIRE 1x Prism Scope | Optics Trade
 

Mehr von Optics-Trade

Technical Data | Sig Sauer Easy6 BDX 1-6x24 | Optics Trade
Technical Data | Sig Sauer Easy6 BDX 1-6x24 | Optics TradeTechnical Data | Sig Sauer Easy6 BDX 1-6x24 | Optics Trade
Technical Data | Sig Sauer Easy6 BDX 1-6x24 | Optics TradeOptics-Trade
 
Technical Data | ThermTec Wild 650L | Optics Trade
Technical Data | ThermTec Wild 650L | Optics TradeTechnical Data | ThermTec Wild 650L | Optics Trade
Technical Data | ThermTec Wild 650L | Optics TradeOptics-Trade
 
Technical Data | ThermTec Wild 635L | Optics Trade
Technical Data | ThermTec Wild 635L | Optics TradeTechnical Data | ThermTec Wild 635L | Optics Trade
Technical Data | ThermTec Wild 635L | Optics TradeOptics-Trade
 
Technical Data | ThermTec Wild 650 | Optics Trade
Technical Data | ThermTec Wild 650 | Optics TradeTechnical Data | ThermTec Wild 650 | Optics Trade
Technical Data | ThermTec Wild 650 | Optics TradeOptics-Trade
 
Technical Data | ThermTec Wild 635 | Optics Trade
Technical Data | ThermTec Wild 635 | Optics TradeTechnical Data | ThermTec Wild 635 | Optics Trade
Technical Data | ThermTec Wild 635 | Optics TradeOptics-Trade
 
Technical Data | ThermTec Wild 335 | Optics Trade
Technical Data | ThermTec Wild 335 | Optics TradeTechnical Data | ThermTec Wild 335 | Optics Trade
Technical Data | ThermTec Wild 335 | Optics TradeOptics-Trade
 
Technical Data | ThermTec Wild 325 | Optics Trade
Technical Data | ThermTec Wild 325 | Optics TradeTechnical Data | ThermTec Wild 325 | Optics Trade
Technical Data | ThermTec Wild 325 | Optics TradeOptics-Trade
 
Instruction Manual | ThermTec Wild Thermal Monoculars | Optics Trade
Instruction Manual | ThermTec Wild Thermal Monoculars | Optics TradeInstruction Manual | ThermTec Wild Thermal Monoculars | Optics Trade
Instruction Manual | ThermTec Wild Thermal Monoculars | Optics TradeOptics-Trade
 
Technical Data | ThermTec Hunt 335 | Optics Trade
Technical Data | ThermTec Hunt 335 | Optics TradeTechnical Data | ThermTec Hunt 335 | Optics Trade
Technical Data | ThermTec Hunt 335 | Optics TradeOptics-Trade
 
Instruction Manual | ThermTec Hunt Thermal Clip-On Series | Optics Trade
Instruction Manual | ThermTec Hunt Thermal Clip-On Series | Optics TradeInstruction Manual | ThermTec Hunt Thermal Clip-On Series | Optics Trade
Instruction Manual | ThermTec Hunt Thermal Clip-On Series | Optics TradeOptics-Trade
 
Instruction Manual | Steiner eRanger LRF 10x42 | Optics Trade
Instruction Manual | Steiner eRanger LRF 10x42 | Optics TradeInstruction Manual | Steiner eRanger LRF 10x42 | Optics Trade
Instruction Manual | Steiner eRanger LRF 10x42 | Optics TradeOptics-Trade
 
Flyer | Guide DN Series Handheld Digital Binoculars | Optics Trade
Flyer | Guide DN Series Handheld Digital Binoculars | Optics TradeFlyer | Guide DN Series Handheld Digital Binoculars | Optics Trade
Flyer | Guide DN Series Handheld Digital Binoculars | Optics TradeOptics-Trade
 
Quick Start Guide | Guide TB Series | Optics Trade
Quick Start Guide | Guide TB Series | Optics TradeQuick Start Guide | Guide TB Series | Optics Trade
Quick Start Guide | Guide TB Series | Optics TradeOptics-Trade
 
Instruction Manual | Pard FD1 Digital NV Front Attachment | Optics Trade
Instruction Manual | Pard FD1 Digital NV Front Attachment | Optics TradeInstruction Manual | Pard FD1 Digital NV Front Attachment | Optics Trade
Instruction Manual | Pard FD1 Digital NV Front Attachment | Optics TradeOptics-Trade
 
Instruction Manual | EOTech Vudu X 2-12x40 | Optics Trade
Instruction Manual | EOTech Vudu X 2-12x40 | Optics TradeInstruction Manual | EOTech Vudu X 2-12x40 | Optics Trade
Instruction Manual | EOTech Vudu X 2-12x40 | Optics TradeOptics-Trade
 
Instruction Manual | EOTech Vudu X 1-6x24 | Optics Trade
Instruction Manual | EOTech Vudu X 1-6x24 | Optics TradeInstruction Manual | EOTech Vudu X 1-6x24 | Optics Trade
Instruction Manual | EOTech Vudu X 1-6x24 | Optics TradeOptics-Trade
 
Instruction Manual | Nightforce CFS 6-36x50 F1 | Optics Trade
Instruction Manual | Nightforce CFS 6-36x50 F1 | Optics TradeInstruction Manual | Nightforce CFS 6-36x50 F1 | Optics Trade
Instruction Manual | Nightforce CFS 6-36x50 F1 | Optics TradeOptics-Trade
 
Instruction Manual | Athlon Cronus Tactical G2 ED 7-42x60 | Optics Trade
Instruction Manual | Athlon Cronus Tactical G2 ED 7-42x60 | Optics TradeInstruction Manual | Athlon Cronus Tactical G2 ED 7-42x60 | Optics Trade
Instruction Manual | Athlon Cronus Tactical G2 ED 7-42x60 | Optics TradeOptics-Trade
 
Insrtuction Manual | Swarovski CL Companion Habicht | Optics Trade
Insrtuction Manual | Swarovski CL Companion Habicht | Optics TradeInsrtuction Manual | Swarovski CL Companion Habicht | Optics Trade
Insrtuction Manual | Swarovski CL Companion Habicht | Optics TradeOptics-Trade
 
Technical Data | Swarovski CL Companion Habicht | Optics Trade
Technical Data | Swarovski CL Companion Habicht | Optics TradeTechnical Data | Swarovski CL Companion Habicht | Optics Trade
Technical Data | Swarovski CL Companion Habicht | Optics TradeOptics-Trade
 

Mehr von Optics-Trade (20)

Technical Data | Sig Sauer Easy6 BDX 1-6x24 | Optics Trade
Technical Data | Sig Sauer Easy6 BDX 1-6x24 | Optics TradeTechnical Data | Sig Sauer Easy6 BDX 1-6x24 | Optics Trade
Technical Data | Sig Sauer Easy6 BDX 1-6x24 | Optics Trade
 
Technical Data | ThermTec Wild 650L | Optics Trade
Technical Data | ThermTec Wild 650L | Optics TradeTechnical Data | ThermTec Wild 650L | Optics Trade
Technical Data | ThermTec Wild 650L | Optics Trade
 
Technical Data | ThermTec Wild 635L | Optics Trade
Technical Data | ThermTec Wild 635L | Optics TradeTechnical Data | ThermTec Wild 635L | Optics Trade
Technical Data | ThermTec Wild 635L | Optics Trade
 
Technical Data | ThermTec Wild 650 | Optics Trade
Technical Data | ThermTec Wild 650 | Optics TradeTechnical Data | ThermTec Wild 650 | Optics Trade
Technical Data | ThermTec Wild 650 | Optics Trade
 
Technical Data | ThermTec Wild 635 | Optics Trade
Technical Data | ThermTec Wild 635 | Optics TradeTechnical Data | ThermTec Wild 635 | Optics Trade
Technical Data | ThermTec Wild 635 | Optics Trade
 
Technical Data | ThermTec Wild 335 | Optics Trade
Technical Data | ThermTec Wild 335 | Optics TradeTechnical Data | ThermTec Wild 335 | Optics Trade
Technical Data | ThermTec Wild 335 | Optics Trade
 
Technical Data | ThermTec Wild 325 | Optics Trade
Technical Data | ThermTec Wild 325 | Optics TradeTechnical Data | ThermTec Wild 325 | Optics Trade
Technical Data | ThermTec Wild 325 | Optics Trade
 
Instruction Manual | ThermTec Wild Thermal Monoculars | Optics Trade
Instruction Manual | ThermTec Wild Thermal Monoculars | Optics TradeInstruction Manual | ThermTec Wild Thermal Monoculars | Optics Trade
Instruction Manual | ThermTec Wild Thermal Monoculars | Optics Trade
 
Technical Data | ThermTec Hunt 335 | Optics Trade
Technical Data | ThermTec Hunt 335 | Optics TradeTechnical Data | ThermTec Hunt 335 | Optics Trade
Technical Data | ThermTec Hunt 335 | Optics Trade
 
Instruction Manual | ThermTec Hunt Thermal Clip-On Series | Optics Trade
Instruction Manual | ThermTec Hunt Thermal Clip-On Series | Optics TradeInstruction Manual | ThermTec Hunt Thermal Clip-On Series | Optics Trade
Instruction Manual | ThermTec Hunt Thermal Clip-On Series | Optics Trade
 
Instruction Manual | Steiner eRanger LRF 10x42 | Optics Trade
Instruction Manual | Steiner eRanger LRF 10x42 | Optics TradeInstruction Manual | Steiner eRanger LRF 10x42 | Optics Trade
Instruction Manual | Steiner eRanger LRF 10x42 | Optics Trade
 
Flyer | Guide DN Series Handheld Digital Binoculars | Optics Trade
Flyer | Guide DN Series Handheld Digital Binoculars | Optics TradeFlyer | Guide DN Series Handheld Digital Binoculars | Optics Trade
Flyer | Guide DN Series Handheld Digital Binoculars | Optics Trade
 
Quick Start Guide | Guide TB Series | Optics Trade
Quick Start Guide | Guide TB Series | Optics TradeQuick Start Guide | Guide TB Series | Optics Trade
Quick Start Guide | Guide TB Series | Optics Trade
 
Instruction Manual | Pard FD1 Digital NV Front Attachment | Optics Trade
Instruction Manual | Pard FD1 Digital NV Front Attachment | Optics TradeInstruction Manual | Pard FD1 Digital NV Front Attachment | Optics Trade
Instruction Manual | Pard FD1 Digital NV Front Attachment | Optics Trade
 
Instruction Manual | EOTech Vudu X 2-12x40 | Optics Trade
Instruction Manual | EOTech Vudu X 2-12x40 | Optics TradeInstruction Manual | EOTech Vudu X 2-12x40 | Optics Trade
Instruction Manual | EOTech Vudu X 2-12x40 | Optics Trade
 
Instruction Manual | EOTech Vudu X 1-6x24 | Optics Trade
Instruction Manual | EOTech Vudu X 1-6x24 | Optics TradeInstruction Manual | EOTech Vudu X 1-6x24 | Optics Trade
Instruction Manual | EOTech Vudu X 1-6x24 | Optics Trade
 
Instruction Manual | Nightforce CFS 6-36x50 F1 | Optics Trade
Instruction Manual | Nightforce CFS 6-36x50 F1 | Optics TradeInstruction Manual | Nightforce CFS 6-36x50 F1 | Optics Trade
Instruction Manual | Nightforce CFS 6-36x50 F1 | Optics Trade
 
Instruction Manual | Athlon Cronus Tactical G2 ED 7-42x60 | Optics Trade
Instruction Manual | Athlon Cronus Tactical G2 ED 7-42x60 | Optics TradeInstruction Manual | Athlon Cronus Tactical G2 ED 7-42x60 | Optics Trade
Instruction Manual | Athlon Cronus Tactical G2 ED 7-42x60 | Optics Trade
 
Insrtuction Manual | Swarovski CL Companion Habicht | Optics Trade
Insrtuction Manual | Swarovski CL Companion Habicht | Optics TradeInsrtuction Manual | Swarovski CL Companion Habicht | Optics Trade
Insrtuction Manual | Swarovski CL Companion Habicht | Optics Trade
 
Technical Data | Swarovski CL Companion Habicht | Optics Trade
Technical Data | Swarovski CL Companion Habicht | Optics TradeTechnical Data | Swarovski CL Companion Habicht | Optics Trade
Technical Data | Swarovski CL Companion Habicht | Optics Trade
 

Kürzlich hochgeladen

From Event to Action: Accelerate Your Decision Making with Real-Time Automation
From Event to Action: Accelerate Your Decision Making with Real-Time AutomationFrom Event to Action: Accelerate Your Decision Making with Real-Time Automation
From Event to Action: Accelerate Your Decision Making with Real-Time AutomationSafe Software
 
Strategies for Landing an Oracle DBA Job as a Fresher
Strategies for Landing an Oracle DBA Job as a FresherStrategies for Landing an Oracle DBA Job as a Fresher
Strategies for Landing an Oracle DBA Job as a FresherRemote DBA Services
 
A Domino Admins Adventures (Engage 2024)
A Domino Admins Adventures (Engage 2024)A Domino Admins Adventures (Engage 2024)
A Domino Admins Adventures (Engage 2024)Gabriella Davis
 
08448380779 Call Girls In Friends Colony Women Seeking Men
08448380779 Call Girls In Friends Colony Women Seeking Men08448380779 Call Girls In Friends Colony Women Seeking Men
08448380779 Call Girls In Friends Colony Women Seeking MenDelhi Call girls
 
How to Troubleshoot Apps for the Modern Connected Worker
How to Troubleshoot Apps for the Modern Connected WorkerHow to Troubleshoot Apps for the Modern Connected Worker
How to Troubleshoot Apps for the Modern Connected WorkerThousandEyes
 
Tech Trends Report 2024 Future Today Institute.pdf
Tech Trends Report 2024 Future Today Institute.pdfTech Trends Report 2024 Future Today Institute.pdf
Tech Trends Report 2024 Future Today Institute.pdfhans926745
 
Understanding Discord NSFW Servers A Guide for Responsible Users.pdf
Understanding Discord NSFW Servers A Guide for Responsible Users.pdfUnderstanding Discord NSFW Servers A Guide for Responsible Users.pdf
Understanding Discord NSFW Servers A Guide for Responsible Users.pdfUK Journal
 
IAC 2024 - IA Fast Track to Search Focused AI Solutions
IAC 2024 - IA Fast Track to Search Focused AI SolutionsIAC 2024 - IA Fast Track to Search Focused AI Solutions
IAC 2024 - IA Fast Track to Search Focused AI SolutionsEnterprise Knowledge
 
[2024]Digital Global Overview Report 2024 Meltwater.pdf
[2024]Digital Global Overview Report 2024 Meltwater.pdf[2024]Digital Global Overview Report 2024 Meltwater.pdf
[2024]Digital Global Overview Report 2024 Meltwater.pdfhans926745
 
Boost Fertility New Invention Ups Success Rates.pdf
Boost Fertility New Invention Ups Success Rates.pdfBoost Fertility New Invention Ups Success Rates.pdf
Boost Fertility New Invention Ups Success Rates.pdfsudhanshuwaghmare1
 
Histor y of HAM Radio presentation slide
Histor y of HAM Radio presentation slideHistor y of HAM Radio presentation slide
Histor y of HAM Radio presentation slidevu2urc
 
Finology Group – Insurtech Innovation Award 2024
Finology Group – Insurtech Innovation Award 2024Finology Group – Insurtech Innovation Award 2024
Finology Group – Insurtech Innovation Award 2024The Digital Insurer
 
Automating Google Workspace (GWS) & more with Apps Script
Automating Google Workspace (GWS) & more with Apps ScriptAutomating Google Workspace (GWS) & more with Apps Script
Automating Google Workspace (GWS) & more with Apps Scriptwesley chun
 
Data Cloud, More than a CDP by Matt Robison
Data Cloud, More than a CDP by Matt RobisonData Cloud, More than a CDP by Matt Robison
Data Cloud, More than a CDP by Matt RobisonAnna Loughnan Colquhoun
 
TrustArc Webinar - Stay Ahead of US State Data Privacy Law Developments
TrustArc Webinar - Stay Ahead of US State Data Privacy Law DevelopmentsTrustArc Webinar - Stay Ahead of US State Data Privacy Law Developments
TrustArc Webinar - Stay Ahead of US State Data Privacy Law DevelopmentsTrustArc
 
Strategize a Smooth Tenant-to-tenant Migration and Copilot Takeoff
Strategize a Smooth Tenant-to-tenant Migration and Copilot TakeoffStrategize a Smooth Tenant-to-tenant Migration and Copilot Takeoff
Strategize a Smooth Tenant-to-tenant Migration and Copilot Takeoffsammart93
 
The 7 Things I Know About Cyber Security After 25 Years | April 2024
The 7 Things I Know About Cyber Security After 25 Years | April 2024The 7 Things I Know About Cyber Security After 25 Years | April 2024
The 7 Things I Know About Cyber Security After 25 Years | April 2024Rafal Los
 
Driving Behavioral Change for Information Management through Data-Driven Gree...
Driving Behavioral Change for Information Management through Data-Driven Gree...Driving Behavioral Change for Information Management through Data-Driven Gree...
Driving Behavioral Change for Information Management through Data-Driven Gree...Enterprise Knowledge
 
How to Troubleshoot Apps for the Modern Connected Worker
How to Troubleshoot Apps for the Modern Connected WorkerHow to Troubleshoot Apps for the Modern Connected Worker
How to Troubleshoot Apps for the Modern Connected WorkerThousandEyes
 
How to convert PDF to text with Nanonets
How to convert PDF to text with NanonetsHow to convert PDF to text with Nanonets
How to convert PDF to text with Nanonetsnaman860154
 

Kürzlich hochgeladen (20)

From Event to Action: Accelerate Your Decision Making with Real-Time Automation
From Event to Action: Accelerate Your Decision Making with Real-Time AutomationFrom Event to Action: Accelerate Your Decision Making with Real-Time Automation
From Event to Action: Accelerate Your Decision Making with Real-Time Automation
 
Strategies for Landing an Oracle DBA Job as a Fresher
Strategies for Landing an Oracle DBA Job as a FresherStrategies for Landing an Oracle DBA Job as a Fresher
Strategies for Landing an Oracle DBA Job as a Fresher
 
A Domino Admins Adventures (Engage 2024)
A Domino Admins Adventures (Engage 2024)A Domino Admins Adventures (Engage 2024)
A Domino Admins Adventures (Engage 2024)
 
08448380779 Call Girls In Friends Colony Women Seeking Men
08448380779 Call Girls In Friends Colony Women Seeking Men08448380779 Call Girls In Friends Colony Women Seeking Men
08448380779 Call Girls In Friends Colony Women Seeking Men
 
How to Troubleshoot Apps for the Modern Connected Worker
How to Troubleshoot Apps for the Modern Connected WorkerHow to Troubleshoot Apps for the Modern Connected Worker
How to Troubleshoot Apps for the Modern Connected Worker
 
Tech Trends Report 2024 Future Today Institute.pdf
Tech Trends Report 2024 Future Today Institute.pdfTech Trends Report 2024 Future Today Institute.pdf
Tech Trends Report 2024 Future Today Institute.pdf
 
Understanding Discord NSFW Servers A Guide for Responsible Users.pdf
Understanding Discord NSFW Servers A Guide for Responsible Users.pdfUnderstanding Discord NSFW Servers A Guide for Responsible Users.pdf
Understanding Discord NSFW Servers A Guide for Responsible Users.pdf
 
IAC 2024 - IA Fast Track to Search Focused AI Solutions
IAC 2024 - IA Fast Track to Search Focused AI SolutionsIAC 2024 - IA Fast Track to Search Focused AI Solutions
IAC 2024 - IA Fast Track to Search Focused AI Solutions
 
[2024]Digital Global Overview Report 2024 Meltwater.pdf
[2024]Digital Global Overview Report 2024 Meltwater.pdf[2024]Digital Global Overview Report 2024 Meltwater.pdf
[2024]Digital Global Overview Report 2024 Meltwater.pdf
 
Boost Fertility New Invention Ups Success Rates.pdf
Boost Fertility New Invention Ups Success Rates.pdfBoost Fertility New Invention Ups Success Rates.pdf
Boost Fertility New Invention Ups Success Rates.pdf
 
Histor y of HAM Radio presentation slide
Histor y of HAM Radio presentation slideHistor y of HAM Radio presentation slide
Histor y of HAM Radio presentation slide
 
Finology Group – Insurtech Innovation Award 2024
Finology Group – Insurtech Innovation Award 2024Finology Group – Insurtech Innovation Award 2024
Finology Group – Insurtech Innovation Award 2024
 
Automating Google Workspace (GWS) & more with Apps Script
Automating Google Workspace (GWS) & more with Apps ScriptAutomating Google Workspace (GWS) & more with Apps Script
Automating Google Workspace (GWS) & more with Apps Script
 
Data Cloud, More than a CDP by Matt Robison
Data Cloud, More than a CDP by Matt RobisonData Cloud, More than a CDP by Matt Robison
Data Cloud, More than a CDP by Matt Robison
 
TrustArc Webinar - Stay Ahead of US State Data Privacy Law Developments
TrustArc Webinar - Stay Ahead of US State Data Privacy Law DevelopmentsTrustArc Webinar - Stay Ahead of US State Data Privacy Law Developments
TrustArc Webinar - Stay Ahead of US State Data Privacy Law Developments
 
Strategize a Smooth Tenant-to-tenant Migration and Copilot Takeoff
Strategize a Smooth Tenant-to-tenant Migration and Copilot TakeoffStrategize a Smooth Tenant-to-tenant Migration and Copilot Takeoff
Strategize a Smooth Tenant-to-tenant Migration and Copilot Takeoff
 
The 7 Things I Know About Cyber Security After 25 Years | April 2024
The 7 Things I Know About Cyber Security After 25 Years | April 2024The 7 Things I Know About Cyber Security After 25 Years | April 2024
The 7 Things I Know About Cyber Security After 25 Years | April 2024
 
Driving Behavioral Change for Information Management through Data-Driven Gree...
Driving Behavioral Change for Information Management through Data-Driven Gree...Driving Behavioral Change for Information Management through Data-Driven Gree...
Driving Behavioral Change for Information Management through Data-Driven Gree...
 
How to Troubleshoot Apps for the Modern Connected Worker
How to Troubleshoot Apps for the Modern Connected WorkerHow to Troubleshoot Apps for the Modern Connected Worker
How to Troubleshoot Apps for the Modern Connected Worker
 
How to convert PDF to text with Nanonets
How to convert PDF to text with NanonetsHow to convert PDF to text with Nanonets
How to convert PDF to text with Nanonets
 

Instruction Manual C-MORE Serendipity | Optics Trade

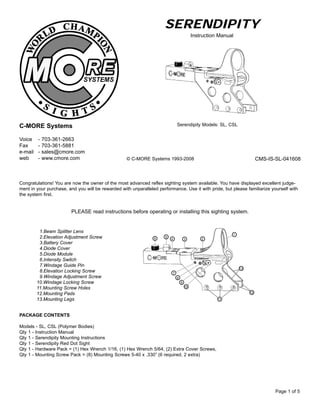
  • 1. SERENDIPITY Instruction Manual Serendipity Models: SL, CSL © C-MORE Systems 1993-2008 C-MORE Systems Voice - 703-361-2663 Fax - 703-361-5881 e-mail - sales@cmore.com web - www.cmore.com CMS-IS-SL-041608 Congratulations! You are now the owner of the most advanced reflex sighting system available. You have displayed excellent judge- ment in your purchase, and you will be rewarded with unparalleled performance. Use it with pride, but please familiarize yourself with the system first. PLEASE read instructions before operating or installing this sighting system. Page 1 of 5 1.Beam Splitter Lens 2.Elevation Adjustment Screw 3.Battery Cover 4.Diode Cover 5.Diode Module 6.Intensity Switch 7.Windage Guide Pin 8.Elevation Locking Screw 9.Windage Adjustment Screw 10.Windage Locking Screw 11.Mounting Screw Holes 12.Mounting Pads 13.Mounting Legs 1 234 56 7 8 9 10 11 13 12 PACKAGE CONTENTS Models - SL, CSL (Polymer Bodies) Qty 1 - Instruction Manual Qty 1 - Serendipity Mounting Instructions Qty 1 - Serendipity Red Dot Sight Qty 1 - Hardware Pack = (1) Hex Wrench 1/16, (1) Hex Wrench 5/64, (2) Extra Cover Screws, Qty 1 - Mounting Screw Pack = (8) Mounting Screws 5-40 x .330” (6 required, 2 extra)
  • 2. INTENSITY SWITCHES C-MORE sighting systems are available with two switch styles, standard and click adjustable. The standard is a dial rheostat switch with a continuous adjustment through the wide intensity range. The click adjustable switch has 12 positions. The first position is off and the second and third are for night vision (low / high) and are not visible. Positions 4 - 12 are the visible intensity settings giving you a wide range of adjustment for any lighting condition. INTENSITY ADJUSTMENT The intensity of the dot needs to be adjusted to the lighting condition in the operating area. The dot should appear bright but not glar- ing. For example, outside in bright sunlight you will most likely use the brightest setting, while at dawn or dusk, or indoors you will need to use one of the lower settings. The first two positions on the click switch are extremely dim and can only be seen through a Night Vision device. INSTALLATION The Serendipity was originally designed to attach to 1911 style handguns for competition shooting by drilling and tapping the frame and mounting the sight directly via the integral mount. The mounting legs allow for a maximum slide width of .950” (A). The mounting legs allow for a maximum slide height of 1” (B). The mounting pads can be machined to accomodate frame widths between .750” and 1” (C). B A C 1. Before mounting the sight, you must remove the front and rear iron sights from your slide. 2. With the firearm together and iron sights removed, slip the sight over the front of the slide. Make sure the lens is toward the front and the switch toward the rear. It may be necessary to spread the mounting pads apart in order to slide them over the dust cover. 3A) The top of the mounting pads should be parallel to the slide / dust cover. The clearance between the bottom of the slide and the top of the mounting pads should be a minimum of .010" - .020" or about the thickness of a business card. Make sure the slide does not contact the mount- ing pads when cycled. 3. The mounting holes are countersunk for our specially made 5-40 mounting screws. NOTE! If oversized mounting screws are used, the mounting holes will not be covered under warranty. Since the mount is designed to be a drill and tap guide, you will need to clamp the sight to the dust cover in the exact position desired for mounting. The suggested position is as follows: 3B) Horizontally, the mounting pads should be positioned just in front of the slide stop. You may want to align the tail of the sight with the rear edge of the slide. Whichever position you choose, you need to make sure the rear mounting hole on each side will be drilled into the dust cover and NOT the frame rail / bridge area. Page 2 of 5 STOP!! Make sure your firearm is unloaded and the magazine and ammunition has been removed before proceeding! Slide Mounting Pad Clamp Clearance Dust Cover Frame Rail Bridge
  • 3. 5. Carefully remove the slide assembly from the frame, mak- ing sure not to move the sight from its clamped position. DO NOT drill the frame without removing the slide assembly. Also, check to be sure you are not going to drill into the frame rail / bridge area. 4. Clamp the sight with moderate pressure in the desired position, leaving the front and rear mounting holes on each side exposed. Now center the tail of the sight from left to right over the slide as viewed from the rear of the firearm and firmly clamp in position. 3D) Please check for frame serial numbers before you drill. The BATF frowns on holes drilled through serial numbers. Determine where yours are before you drill the frame. Page 3 of 5 6. With the sight clamped in position, drill the front and rear mounting holes on each side using a #39 drill. Then tap the four holes you just drilled with a 5-40 tap and carefully install the mounting screws with the 5/64 allen wrench. Snug the four mounting screws and remove the clamp. Now repeat the drilling and tapping for the two remaining mounting holes. 7. Remove the mounting screws and remove the sight from the frame. Now clearance drill the mounting holes in the sight with a .125" (1/8") drill or reamer. 3C) The tail of the sight needs to be centered over the rear of slide. Also, make sure there is adequate clearance between the top of the slide and the underside of the sight. The slide should not contact the sight when cycled.
  • 4. ZEROING STOP! Before sighting in, read and follow ALL manufacturer's precautions and safety instructions for handling your firearm. BE SAFE! Know the NRA's rules for safe gun handling. ADJUSTMENT NOTES: 1) The windage and elevation adjustment screws both have locking screws which must be loosened before the sight can be adjusted. Failure to do so could result in damage to the sight. 2) The adjustment screws are extremely sensitive, especially the elevation screw. You will only need to turn them slightly to change your point of impact. 3) The adjustment screws are tight to turn. This is normal. Make sure to use a screwdriver that fits the slot correctly and make sure the locking screws are loose before attempting to make adjustments. 4) Elevation: Clockwise moves point of impact up. 5) Windage: Clockwise moves point of impact right. 6) Remember to loosen the locking screws before making an adjustment and lock the locking screws after each adjustment. 7) When making final adjustments, tune the elevation first and lock it down, then repeat for the windage. ZEROING PROCEDURE: 1) Turn the sight on and adjust the brightness to suit the lighting condition. 2) Shoot a 3 shot group at a target 10 yards away to get on paper. 3) Loosen the locking screws and adjust the windage and elevation so your group is centered and 2 to 3 inches low. 4) Since the sight can only be zeroed for one distance, zero for the farthest distance you will shoot with this firearm. 5) Shoot a 3 shot group at the final distance you determined in step 4. 6) Adjust the windage and elevation until zero is achieved. Page 4 of 5 9. The mounting screws must be trimmed flush with the inside of the dust cover. This can be accomplished with a Dremmel after the sight is installed, or you can trim them to size before Step 8. Care must be taken not to overheat the screws while trimming. Overheating can weaken the strength of the Loctite and cause dam- age to the mounting pads. After trimming some prefer to use cold blue on the screws. 10. IMPORTANT! It is necessary to let the Loctite cure for 24 hours before using the sight. Damage could result from mounting screws backing out if you do not observe the curing time for the Loctite. 11. Reassemble the firearm and check for proper slide function. 8. Degrease the mounting screws and the tapped holes in the dust cover. Install the sight using Loctite 271 or 2760 (red) on the threads of the mounting screws. DO NOT use excessive force in tightening the mounting screws. Over torquing them can fracture the mounting pads. Moderately snug is sufficient. Optional: Step 9 can be done before Step 8 if needed. Trimmed Not Trimmed
  • 5. BATTERY REPLACEMENT The 3 volt lithium battery (Duracell DL1/3N or Energizer 2L76) is located in the battery compartment on the top of the sight. You will need to remove the battery cover which is the larger of the covers. Using the hex wrench provided, remove the two flat head hex screws and the cover. Place the hex wrench in the groove in the front side of the battery compartment to elevate the battery and facili- tate its removal. Make sure the orange rubber shims behind the battery contacts don't fall out. Note the polarity of the battery and install the new one with the same orientation (negative to left). Replace the battery cover and reinstall screws. DO NOT OVERTIGHTEN! DIODE MODULE REPLACEMENT Diode Modules are available in 6 different sizes and are color coded on the bottom of each module: 2 moa (red), 4 moa (green), 6 moa (blue), 8 moa (yellow), 12 moa (orange), 16 moa (purple). REMOVAL You will need to remove the diode cover which is the smaller of the two covers on the top of the sight. Using the hex wrench provid- ed, remove the two flat head hex screws and the cover. It may be helpful to remove the battery cover as well. Using a pair of pliers, grasp the diode module on the sides and pull straight up. This will unplug the module from its socket. You may want to use a cloth on the diode module before grasping to prevent scratching. INSTALLATION With the diode module facing the lens, insert the module into its socket paying special attention that the 8 pins on the module align with the 8 sockets. Push the module straight down until the retaining shelf is flush with the top of the sight surface. Replace the diode cover and reinstall the screws. DO NOT OVERTIGHTEN! Moderately snug is sufficient. It will be necessary to check your zero and fine tune if needed. WARRANTY This product is warranted against original defects in material and/or manufacturing for one year. This warranty is void if the unit has been abused, disassembled, or modified/tampered with in any way from its original configuration. This warranty does not apply to defects caused by normal wear and tear, improper handling, incorrect installation, accidents, alterations/modifications to the original configuration, repairs made by unauthorized parties, aftermarket accessories, or abnormal use. Due to the fragile nature of glass, the lens is specifically excluded from warranty coverage. This warranty is limited to the original purchaser and is not transferable. Pat. No. 5,369,888 Pat. No. 5,383,278 Other U.S. & Foreign Patents Pending. MAINTENANCE The sight does not require any special maintenance other than keeping it clean and making sure everything is tight. Doing the following after each shooting session, will ensure the sight a long life. 1) Clean the sight. Use a soft clean cloth to wipe down the sight body (Not the Lens) and remove powder residue. 2) Clean the lens. The hard coated glass lens is very durable, but periodic cleaning is necessary. Use a clean gauze, facial or lens tis- sue and any commercial glass cleaner or soap and water. Dust, dirt and powder residue can be very abrasive, so a thorough rinsing before wiping will help to protect from scratching while cleaning. 3) Clean the diode. Powder residue will build up around the hole were the light is emitted. This can make the dot appear distorted. The best way to combat this is to blow off the face of the diode with compressed air after shooting. You can use canned air for cleaning computer keyboards. 4) Check the mounting. Check to make sure the sight is mounted securely. DO NOT OVERTIGHTEN! 5) Check the locking screws. Check to make sure the locking screws are tight. DO NOT OVERTIGHTEN! 6) Check the Guide Pin. The Guide Pin is next to the Elevation Lock Screw on the right side of the sight. It is not an adjustment scew. The Windage Block slides on this pin when windage adjustments are made. The pin simply screws in until tight. Make sure it has not loosened and tighten if necessary. DO NOT OVERTIGHTEN! Page 5 of 5