SlideShare ist ein Scribd-Unternehmen logo
1 von 5
Downloaden Sie, um offline zu lesen
NomadicqFabriMural™
NomadicqDisplay®
NomadicqFabriMural™
NomadicqDisplay®
ma
dic
qD
ispla
y
North
America
1
800
732
9395
Ireland/E
urope
353
98
66011
ma
dic
qD
ispla
y
North
America
1
800
732
9395
Ireland/E
urope
353
98
66011
Revised: 13.01.06 North America: 800.732.9395 • Europe: +353.98.66011
Set-Up Instructions
Revised: 13.01.06 North America: 800.732.9395 • Europe: +353.98.66011
Set-Up Instructions
Handle frame at hubs. Pull open the frame and
lock it by pushing the hubs together. Secure the
manual locks at the interior hubs of the frame.
Place frame flat on the ground. Attach graphic
to one corner then align it to the remainder of
the frame.
Raise frame in an upright position. If your display includes lights: tilt the frame forward
so you can access the hubs on the top side. Then
attach light clamp to the hub, tightening the bolt
from the front side.
If your display includes endcaps: fold the
wings towards the rear of the frame and fix
them to the clips provided.
If your display is 2 sided: turn the frame over
and attach back graphic in the same way.
WARNING! Remove manual locks before collapsing frame.
NomadicqFabriMural™
NomadicqDisplay®
NomadicqFabriMural™
NomadicqDisplay®
ma
dic
qD
ispla
y
North
America
1
800
732
9395
Ireland/E
urope
353
98
66011
ma
dic
qD
ispla
y
North
America
1
800
732
9395
Ireland/E
urope
353
98
66011
Überarbeitet: 13.01.06 Nord-Amerika: 800.732.9395 • Europa: +353.98.66011
Montage-Anleitung
Überarbeitet: 13.01.06 Nord-Amerika: 800.732.9395 • Europa: +353.98.66011
Montage-Anleitung
Fassen Sie den Rahmen an den Gelenkmittelpunkten an.
Ziehen Sie den Rahmen auseinander und verriegeln Sie ihn,
indem Sie die Naben zusammendrücken. Sichern Sie die
manuellen Verschlüsse an den innen liegenden Naben des
Rahmens.
Legen Sie den Rahmen flach auf den Boden.
Zuerst befestigen Sie die Grafik an einer Ecke
und dann bringen Sie die Grafik am restlichen
Rahmen an.
Richten Sie den Rahmen auf. Für Displays mit Beleuchtung: Neigen Sie den
Rahmen so weit nach vorne, dass Sie die Vertiefung
an der oberen Kante erreichen. Stecken Sie nun die
Klammer der Beleuchtungs-Halterung in die Vertiefung
und befestigen Sie den Bolzen an der Vorderseite.
Für Displays mit Endkappen: Falten Sie die
Seitenflügel nach hinten um und befestigen
Sie den Stoff mit den mitgelieferten Klammern.
Für 2-seitige Displays: Wenden Sie den
Rahmen und befestigen Sie die Stoffgrafik auf
der Rückseite wie zuvor beschrieben.
ACHTUNG: Entfernen Sie die manuellen Verschlüsse bevor
Sie den Rahmen zusammenklappen!
ACHTUNG: Entfernen Sie die manuellen Verschlüsse bevor
Sie den Rahmen zusammenklappen!
Fassen Sie den Rahmen an den Gelenkmittelpunkten an.
Ziehen Sie den Rahmen auseinander und verriegeln Sie ihn,
indem Sie die Naben zusammendrücken. Sichern Sie die
manuellen Verschlüsse an den innen liegenden Naben des
Rahmens.
Legen Sie den Rahmen flach auf den Boden.
Zuerst befestigen Sie die Grafik an einer Ecke
und dann bringen Sie die Grafik am restlichen
Rahmen an.
Richten Sie den Rahmen auf. Für Displays mit Beleuchtung: Neigen Sie den
Rahmen so weit nach vorne, dass Sie die Vertiefung
an der oberen Kante erreichen. Stecken Sie nun die
Klammer der Beleuchtungs-Halterung in die Vertiefung
und befestigen Sie den Bolzen an der Vorderseite.
Für Displays mit Endkappen: Falten Sie die
Seitenflügel nach hinten um und befestigen
Sie den Stoff mit den mitgelieferten Klammern.
Für 2-seitige Displays: Wenden Sie den
Rahmen und befestigen Sie die Stoffgrafik auf
der Rückseite wie zuvor beschrieben.
NomadicqFabriMural™
NomadicqDisplay®
NomadicqFabriMural™
NomadicqDisplay®
ma
dic
qD
ispla
y
North
America
1
800
732
9395
Ireland/E
urope
353
98
66011
ma
dic
qD
ispla
y
North
America
1
800
732
9395
Ireland/E
urope
353
98
66011
Révisé: 13.01.06 Amérique du Nord: 800.732.9395 • Europe: +353.98.66011
Instructions de montage
Révisé: 13.01.06 Amérique du Nord: 800.732.9395 • Europe: +353.98.66011
Instructions de montage
Saisissez la structure par les moyeux et bloquez-la
serrant les moyeux l’un contre l’autre. Bloquez les
verrous manuels sur les moyeux intérieurs de la structure.
Placez la structure à plat sur le sol. Fixez le
graphique sur un coin puis alignez-le sur le
reste de la structure.
Hissez la structure en position verticale. Si votre stand possède des luminaires : basculez la
structure vers l’avant afin d’accéder aux moyeux
placés sur le dessus. Puis fixez le crampon de la
lampe au moyeu en serrant le boulon par l’avant.
Si votre stand possède des embouts, pliez
les ailes vers l’arrière de la structure et fixez-
les aux crampons prévus à cet effet.
Si votre stand est à double face : retournez la
structure et fixez le graphique au verso de la
même manière.
AVERTISSEMENT !
Otez les verrous manuels avant de faire tomber la structure.
AVERTISSEMENT !
Otez les verrous manuels avant de faire tomber la structure.
NomadicqFabriMural™
NomadicqDisplay®
NomadicqFabriMural™
NomadicqDisplay®
ma
dic
qD
ispla
y
North
America
1
800
732
9395
Ireland/E
urope
353
98
66011
ma
dic
qD
ispla
y
North
America
1
800
732
9395
Ireland/E
urope
353
98
66011
Revisione: 13.01.06 Stati Uniti: 800.732.9395 • Europa: +353.98.66011
Istruzioni per il montaggio
Revisione: 13.01.06 Stati Uniti: 800.732.9395 • Europa: +353.98.66011
Istruzioni per il montaggio
Impugnare la parte centrale del telaio. Tirare per aprire
il telaio e chiuderlo spingendo sulle parti centrali.
Fissare le chiusure manuali nella parte interna del telaio.
Allungate il telaio per terra. Attaccate la parte
grafica ad un angolo e allineatela in seguito al
resto del telaio.
Alzate il telaio in posizione verticale. Se il vostro espositore ha delle luci: inclinate
il telaio in avanti per poter accedere alle parti
centrali della parte superiore. Quindi attaccate il
morsetto della luce alla parte centrale, avvitando
il perno dalla parte anteriore.
Se il vostro espositore comprende rivestimenti:
piegare le ali verso il retro del telaio e fissarle
con i morsetti in dotazione.
Se il vostro espositore presenta parti grafiche
su entrambi i lati: rovesciare il telaio e applicare
la parte grafica posteriore allo stesso modo.
Impugnare la parte centrale del telaio. Tirare per aprire
il telaio e chiuderlo spingendo sulle parti centrali.
Fissare le chiusure manuali nella parte interna del telaio.
Allungate il telaio per terra. Attaccate la parte
grafica ad un angolo e allineatela in seguito al
resto del telaio.
Alzate il telaio in posizione verticale. Se il vostro espositore ha delle luci: inclinate
il telaio in avanti per poter accedere alle parti
centrali della parte superiore. Quindi attaccate il
morsetto della luce alla parte centrale, avvitando
il perno dalla parte anteriore.
Se il vostro espositore comprende rivesti-
menti: piegare le ali verso il retro del telaio e
fissarle con i morsetti in dotazione.
Se il vostro espositore presenta parti grafiche su
entrambi i lati: rovesciare il telaio e applicare la
parte grafica posteriore allo stesso modo.
ATTENZIONE!
Rimuovere le chiusure manuali prima di ripiegare il telaio.
ATTENZIONE!
Rimuovere le chiusure manuali prima di ripiegare il telaio.
NomadicqFabriMural™
NomadicqDisplay®
NomadicqFabriMural™
NomadicqDisplay®
ma
dic
qD
ispla
y
North
America
1
800
732
9395
Ireland/E
urope
353
98
66011
ma
dic
qD
ispla
y
North
America
1
800
732
9395
Ireland/E
urope
353
98
66011
Revisada : 13.01.06 Norteamérica: 800.732.9395 • Europa: +353.98.66011
Instrucciones de instalación
Revisada : 13.01.06 Norteamérica: 800.732.9395 • Europa: +353.98.66011
Instrucciones de instalación
Estructura de manijas en piezas centrales. Tire para
abrir la estructura y ciérrela empujando a la vez las
piezas centrales. Asegure los cierres manuales en las
piezas centrales interiores de la estructura..
Coloque la estructura horizontalmente en el
suelo. Enganche el cartel en una esquina y
después alinéelo con el resto de la estructura.
Levante la estructura a una posición vertical. Si su sistema expositor incluye luces: incline la
estructura hacia delante para poder acceder a
las piezas centrales de la parte superior. Después,
fije la pinza de la luz a la parte central, apretando
el perno desde la parte delantera.
Si su sistema expositor incluye cubiertas de
remate: doble las alas hacia la parte posterior de
la estructura y fíjelas a los clips proporcionados.
Si su sistema expositor es de doble cara: gire la
estructura y fije los carteles posteriores de la
misma forma.
ADVERTENCIA
Retire los cierres manuales antes de plegar la estructura.
ADVERTENCIA
Retire los cierres manuales antes de plegar la estructura.

Weitere ähnliche Inhalte

Andere mochten auch

Nomadic Display Set Up HangTen
Nomadic Display Set Up HangTenNomadic Display Set Up HangTen
Nomadic Display Set Up HangTenNomadic Display
 
Oig 14 19-dec13 report on eb5 program
Oig 14 19-dec13 report on eb5 programOig 14 19-dec13 report on eb5 program
Oig 14 19-dec13 report on eb5 programJames Lavigne
 
Nomadic Display Instand Instructions
Nomadic Display Instand InstructionsNomadic Display Instand Instructions
Nomadic Display Instand InstructionsNomadic Display
 
New living and working
New living and workingNew living and working
New living and workingJames Lavigne
 
Xss 101 by-sai-shanthan
Xss 101 by-sai-shanthanXss 101 by-sai-shanthan
Xss 101 by-sai-shanthanRaghunath G
 
UGA Guest Lecture: Social Media 101
UGA Guest Lecture: Social Media 101UGA Guest Lecture: Social Media 101
UGA Guest Lecture: Social Media 101steffan
 
Seh based exploitation
Seh based exploitationSeh based exploitation
Seh based exploitationRaghunath G
 
Mobile application security 101
Mobile application security 101Mobile application security 101
Mobile application security 101Raghunath G
 
8800117436 Projects in Haridwar in MARVELLA CITY
8800117436 Projects in Haridwar in MARVELLA CITY8800117436 Projects in Haridwar in MARVELLA CITY
8800117436 Projects in Haridwar in MARVELLA CITYMarvella city
 
World Cup! Young Germany Guest Blogging
World Cup! Young Germany Guest BloggingWorld Cup! Young Germany Guest Blogging
World Cup! Young Germany Guest Bloggingsteffan
 
Null July - OWTF - Bharadwaj Machiraju
Null July - OWTF - Bharadwaj MachirajuNull July - OWTF - Bharadwaj Machiraju
Null July - OWTF - Bharadwaj MachirajuRaghunath G
 
Buying a business in florida
Buying  a business in floridaBuying  a business in florida
Buying a business in floridaJames Lavigne
 
So you want to retire in florida 1997 far
So you want to retire in florida 1997 farSo you want to retire in florida 1997 far
So you want to retire in florida 1997 farJames Lavigne
 
Securitynewsbytes april2015-150418153901-conversion-gate01
Securitynewsbytes april2015-150418153901-conversion-gate01Securitynewsbytes april2015-150418153901-conversion-gate01
Securitynewsbytes april2015-150418153901-conversion-gate01Raghunath G
 
88001174636 Marvella city in haridwar
88001174636 Marvella city in haridwar 88001174636 Marvella city in haridwar
88001174636 Marvella city in haridwar Marvella city
 

Andere mochten auch (16)

Nomadic Display Set Up HangTen
Nomadic Display Set Up HangTenNomadic Display Set Up HangTen
Nomadic Display Set Up HangTen
 
Oig 14 19-dec13 report on eb5 program
Oig 14 19-dec13 report on eb5 programOig 14 19-dec13 report on eb5 program
Oig 14 19-dec13 report on eb5 program
 
Nomadic Display Instand Instructions
Nomadic Display Instand InstructionsNomadic Display Instand Instructions
Nomadic Display Instand Instructions
 
New living and working
New living and workingNew living and working
New living and working
 
Null dec 2014
Null dec 2014Null dec 2014
Null dec 2014
 
Xss 101 by-sai-shanthan
Xss 101 by-sai-shanthanXss 101 by-sai-shanthan
Xss 101 by-sai-shanthan
 
UGA Guest Lecture: Social Media 101
UGA Guest Lecture: Social Media 101UGA Guest Lecture: Social Media 101
UGA Guest Lecture: Social Media 101
 
Seh based exploitation
Seh based exploitationSeh based exploitation
Seh based exploitation
 
Mobile application security 101
Mobile application security 101Mobile application security 101
Mobile application security 101
 
8800117436 Projects in Haridwar in MARVELLA CITY
8800117436 Projects in Haridwar in MARVELLA CITY8800117436 Projects in Haridwar in MARVELLA CITY
8800117436 Projects in Haridwar in MARVELLA CITY
 
World Cup! Young Germany Guest Blogging
World Cup! Young Germany Guest BloggingWorld Cup! Young Germany Guest Blogging
World Cup! Young Germany Guest Blogging
 
Null July - OWTF - Bharadwaj Machiraju
Null July - OWTF - Bharadwaj MachirajuNull July - OWTF - Bharadwaj Machiraju
Null July - OWTF - Bharadwaj Machiraju
 
Buying a business in florida
Buying  a business in floridaBuying  a business in florida
Buying a business in florida
 
So you want to retire in florida 1997 far
So you want to retire in florida 1997 farSo you want to retire in florida 1997 far
So you want to retire in florida 1997 far
 
Securitynewsbytes april2015-150418153901-conversion-gate01
Securitynewsbytes april2015-150418153901-conversion-gate01Securitynewsbytes april2015-150418153901-conversion-gate01
Securitynewsbytes april2015-150418153901-conversion-gate01
 
88001174636 Marvella city in haridwar
88001174636 Marvella city in haridwar 88001174636 Marvella city in haridwar
88001174636 Marvella city in haridwar
 

Nomadic Display Setup Fabri Mural

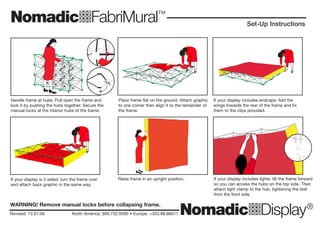
  • 1. NomadicqFabriMural™ NomadicqDisplay® NomadicqFabriMural™ NomadicqDisplay® ma dic qD ispla y North America 1 800 732 9395 Ireland/E urope 353 98 66011 ma dic qD ispla y North America 1 800 732 9395 Ireland/E urope 353 98 66011 Revised: 13.01.06 North America: 800.732.9395 • Europe: +353.98.66011 Set-Up Instructions Revised: 13.01.06 North America: 800.732.9395 • Europe: +353.98.66011 Set-Up Instructions Handle frame at hubs. Pull open the frame and lock it by pushing the hubs together. Secure the manual locks at the interior hubs of the frame. Place frame flat on the ground. Attach graphic to one corner then align it to the remainder of the frame. Raise frame in an upright position. If your display includes lights: tilt the frame forward so you can access the hubs on the top side. Then attach light clamp to the hub, tightening the bolt from the front side. If your display includes endcaps: fold the wings towards the rear of the frame and fix them to the clips provided. If your display is 2 sided: turn the frame over and attach back graphic in the same way. Handle frame at hubs. Pull open the frame and lock it by pushing the hubs together. Secure the manual locks at the interior hubs of the frame. Place frame flat on the ground. Attach graphic to one corner then align it to the remainder of the frame. Raise frame in an upright position. If your display includes lights: tilt the frame forward so you can access the hubs on the top side. Then attach light clamp to the hub, tightening the bolt from the front side. If your display includes endcaps: fold the wings towards the rear of the frame and fix them to the clips provided. If your display is 2 sided: turn the frame over and attach back graphic in the same way. WARNING! Remove manual locks before collapsing frame. WARNING! Remove manual locks before collapsing frame.
  • 2. NomadicqFabriMural™ NomadicqDisplay® NomadicqFabriMural™ NomadicqDisplay® ma dic qD ispla y North America 1 800 732 9395 Ireland/E urope 353 98 66011 ma dic qD ispla y North America 1 800 732 9395 Ireland/E urope 353 98 66011 Überarbeitet: 13.01.06 Nord-Amerika: 800.732.9395 • Europa: +353.98.66011 Montage-Anleitung Überarbeitet: 13.01.06 Nord-Amerika: 800.732.9395 • Europa: +353.98.66011 Montage-Anleitung Fassen Sie den Rahmen an den Gelenkmittelpunkten an. Ziehen Sie den Rahmen auseinander und verriegeln Sie ihn, indem Sie die Naben zusammendrücken. Sichern Sie die manuellen Verschlüsse an den innen liegenden Naben des Rahmens. Legen Sie den Rahmen flach auf den Boden. Zuerst befestigen Sie die Grafik an einer Ecke und dann bringen Sie die Grafik am restlichen Rahmen an. Richten Sie den Rahmen auf. Für Displays mit Beleuchtung: Neigen Sie den Rahmen so weit nach vorne, dass Sie die Vertiefung an der oberen Kante erreichen. Stecken Sie nun die Klammer der Beleuchtungs-Halterung in die Vertiefung und befestigen Sie den Bolzen an der Vorderseite. Für Displays mit Endkappen: Falten Sie die Seitenflügel nach hinten um und befestigen Sie den Stoff mit den mitgelieferten Klammern. Für 2-seitige Displays: Wenden Sie den Rahmen und befestigen Sie die Stoffgrafik auf der Rückseite wie zuvor beschrieben. ACHTUNG: Entfernen Sie die manuellen Verschlüsse bevor Sie den Rahmen zusammenklappen! ACHTUNG: Entfernen Sie die manuellen Verschlüsse bevor Sie den Rahmen zusammenklappen! Fassen Sie den Rahmen an den Gelenkmittelpunkten an. Ziehen Sie den Rahmen auseinander und verriegeln Sie ihn, indem Sie die Naben zusammendrücken. Sichern Sie die manuellen Verschlüsse an den innen liegenden Naben des Rahmens. Legen Sie den Rahmen flach auf den Boden. Zuerst befestigen Sie die Grafik an einer Ecke und dann bringen Sie die Grafik am restlichen Rahmen an. Richten Sie den Rahmen auf. Für Displays mit Beleuchtung: Neigen Sie den Rahmen so weit nach vorne, dass Sie die Vertiefung an der oberen Kante erreichen. Stecken Sie nun die Klammer der Beleuchtungs-Halterung in die Vertiefung und befestigen Sie den Bolzen an der Vorderseite. Für Displays mit Endkappen: Falten Sie die Seitenflügel nach hinten um und befestigen Sie den Stoff mit den mitgelieferten Klammern. Für 2-seitige Displays: Wenden Sie den Rahmen und befestigen Sie die Stoffgrafik auf der Rückseite wie zuvor beschrieben.
  • 3. NomadicqFabriMural™ NomadicqDisplay® NomadicqFabriMural™ NomadicqDisplay® ma dic qD ispla y North America 1 800 732 9395 Ireland/E urope 353 98 66011 ma dic qD ispla y North America 1 800 732 9395 Ireland/E urope 353 98 66011 Révisé: 13.01.06 Amérique du Nord: 800.732.9395 • Europe: +353.98.66011 Instructions de montage Révisé: 13.01.06 Amérique du Nord: 800.732.9395 • Europe: +353.98.66011 Instructions de montage Saisissez la structure par les moyeux et bloquez-la serrant les moyeux l’un contre l’autre. Bloquez les verrous manuels sur les moyeux intérieurs de la structure. Placez la structure à plat sur le sol. Fixez le graphique sur un coin puis alignez-le sur le reste de la structure. Hissez la structure en position verticale. Si votre stand possède des luminaires : basculez la structure vers l’avant afin d’accéder aux moyeux placés sur le dessus. Puis fixez le crampon de la lampe au moyeu en serrant le boulon par l’avant. Si votre stand possède des embouts, pliez les ailes vers l’arrière de la structure et fixez- les aux crampons prévus à cet effet. Si votre stand est à double face : retournez la structure et fixez le graphique au verso de la même manière. Saisissez la structure par les moyeux et bloquez-la serrant les moyeux l’un contre l’autre. Bloquez les verrous manuels sur les moyeux intérieurs de la structure. Placez la structure à plat sur le sol. Fixez le graphique sur un coin puis alignez-le sur le reste de la structure. Hissez la structure en position verticale. Si votre stand possède des luminaires : basculez la structure vers l’avant afin d’accéder aux moyeux placés sur le dessus. Puis fixez le crampon de la lampe au moyeu en serrant le boulon par l’avant. Si votre stand possède des embouts, pliez les ailes vers l’arrière de la structure et fixez- les aux crampons prévus à cet effet. Si votre stand est à double face : retournez la structure et fixez le graphique au verso de la même manière. AVERTISSEMENT ! Otez les verrous manuels avant de faire tomber la structure. AVERTISSEMENT ! Otez les verrous manuels avant de faire tomber la structure.
  • 4. NomadicqFabriMural™ NomadicqDisplay® NomadicqFabriMural™ NomadicqDisplay® ma dic qD ispla y North America 1 800 732 9395 Ireland/E urope 353 98 66011 ma dic qD ispla y North America 1 800 732 9395 Ireland/E urope 353 98 66011 Revisione: 13.01.06 Stati Uniti: 800.732.9395 • Europa: +353.98.66011 Istruzioni per il montaggio Revisione: 13.01.06 Stati Uniti: 800.732.9395 • Europa: +353.98.66011 Istruzioni per il montaggio Impugnare la parte centrale del telaio. Tirare per aprire il telaio e chiuderlo spingendo sulle parti centrali. Fissare le chiusure manuali nella parte interna del telaio. Allungate il telaio per terra. Attaccate la parte grafica ad un angolo e allineatela in seguito al resto del telaio. Alzate il telaio in posizione verticale. Se il vostro espositore ha delle luci: inclinate il telaio in avanti per poter accedere alle parti centrali della parte superiore. Quindi attaccate il morsetto della luce alla parte centrale, avvitando il perno dalla parte anteriore. Se il vostro espositore comprende rivestimenti: piegare le ali verso il retro del telaio e fissarle con i morsetti in dotazione. Se il vostro espositore presenta parti grafiche su entrambi i lati: rovesciare il telaio e applicare la parte grafica posteriore allo stesso modo. Impugnare la parte centrale del telaio. Tirare per aprire il telaio e chiuderlo spingendo sulle parti centrali. Fissare le chiusure manuali nella parte interna del telaio. Allungate il telaio per terra. Attaccate la parte grafica ad un angolo e allineatela in seguito al resto del telaio. Alzate il telaio in posizione verticale. Se il vostro espositore ha delle luci: inclinate il telaio in avanti per poter accedere alle parti centrali della parte superiore. Quindi attaccate il morsetto della luce alla parte centrale, avvitando il perno dalla parte anteriore. Se il vostro espositore comprende rivesti- menti: piegare le ali verso il retro del telaio e fissarle con i morsetti in dotazione. Se il vostro espositore presenta parti grafiche su entrambi i lati: rovesciare il telaio e applicare la parte grafica posteriore allo stesso modo. ATTENZIONE! Rimuovere le chiusure manuali prima di ripiegare il telaio. ATTENZIONE! Rimuovere le chiusure manuali prima di ripiegare il telaio.
  • 5. NomadicqFabriMural™ NomadicqDisplay® NomadicqFabriMural™ NomadicqDisplay® ma dic qD ispla y North America 1 800 732 9395 Ireland/E urope 353 98 66011 ma dic qD ispla y North America 1 800 732 9395 Ireland/E urope 353 98 66011 Revisada : 13.01.06 Norteamérica: 800.732.9395 • Europa: +353.98.66011 Instrucciones de instalación Revisada : 13.01.06 Norteamérica: 800.732.9395 • Europa: +353.98.66011 Instrucciones de instalación Estructura de manijas en piezas centrales. Tire para abrir la estructura y ciérrela empujando a la vez las piezas centrales. Asegure los cierres manuales en las piezas centrales interiores de la estructura.. Coloque la estructura horizontalmente en el suelo. Enganche el cartel en una esquina y después alinéelo con el resto de la estructura. Levante la estructura a una posición vertical. Si su sistema expositor incluye luces: incline la estructura hacia delante para poder acceder a las piezas centrales de la parte superior. Después, fije la pinza de la luz a la parte central, apretando el perno desde la parte delantera. Si su sistema expositor incluye cubiertas de remate: doble las alas hacia la parte posterior de la estructura y fíjelas a los clips proporcionados. Si su sistema expositor es de doble cara: gire la estructura y fije los carteles posteriores de la misma forma. Estructura de manijas en piezas centrales. Tire para abrir la estructura y ciérrela empujando a la vez las piezas centrales. Asegure los cierres manuales en las piezas centrales interiores de la estructura.. Coloque la estructura horizontalmente en el suelo. Enganche el cartel en una esquina y después alinéelo con el resto de la estructura. Levante la estructura a una posición vertical. Si su sistema expositor incluye luces: incline la estructura hacia delante para poder acceder a las piezas centrales de la parte superior. Después, fije la pinza de la luz a la parte central, apretando el perno desde la parte delantera. Si su sistema expositor incluye cubiertas de remate: doble las alas hacia la parte posterior de la estructura y fíjelas a los clips proporcionados. Si su sistema expositor es de doble cara: gire la estructura y fije los carteles posteriores de la misma forma. ADVERTENCIA Retire los cierres manuales antes de plegar la estructura. ADVERTENCIA Retire los cierres manuales antes de plegar la estructura.