Nomadic Display Set Up HangTen
•
0 gefällt mir•255 views

Nomadic's set-up instructions for our HangTen displays.

Empfohlen
Empfohlen
Weitere ähnliche Inhalte
Andere mochten auch
Andere mochten auch (17)
Nomadic Display Set Up HangTen
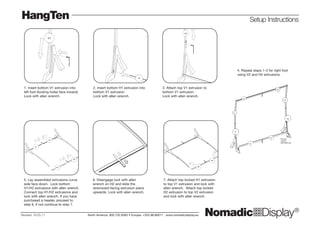
- 1. NomadicqDisplay® H1 V1 H2 V1 H1 H2 V2 V2 Put foot cover in with black cap V1 H2 H1 H1 H2 H1 V1 H2 H1 Bottom H1 Bottom H2 HangTen North America: 800.732.9395 • Europe: +353.98.66011 . www.nomadicdisplay.euRevised: 16.05.11 Setup Instructions 3. Attach top V1 extrusion to bottom V1 extrusion. Lock with allen wrench. 4. Repeat steps 1-3 for right foot using V2 and H2 extrusions. 5. Lay assembled extrusions curve side face down. Lock bottom H1/H2 extrusions with allen wrench. Connect top H1/H2 extrusions and lock with allen wrench. If you have purchased a header, proceed to step 6, if not continue to step 7. 2. Insert bottom H1 extrusion into bottom V1 extrusion. Lock with allen wrench. 1. Insert bottom V1 extrusion into left foot (locking holes face inward). Lock with allen wrench. 6. Disengage lock with allen wrench on H2 and slide the downward-facing extrusion piece upwards. Lock with allen wrench. 7. Attach top locked H1 extrusion to top V1 extrusion and lock with allen wrench. Attach top locked H2 extrusion to top V2 extrusion and lock with allen wrench.
- 2. NomadicqDisplay® HangTen North America: 800.732.9395 • Europe: +353.98.66011 . www.nomadicdisplay.euRevised: 16.05.11 Graphic Attachment 11. Slide the graphic edge into the grooved frame. 12. Press left edge of fabric graphic onto Velcro® , pull taut as you press right edge of fabric graphic along Velcro. 10. Insert lower corners of fabric graphic into horizontal groove along the bottom H1/H2 extrusion. 9. Slide the graphic edge into the grooved frame. 8. Lift assembled frame into upright position. Insert top corners of fabric graphic to horizontal groove along the top H1/H2 extrusion. If you find it difficult to reach the top of the unit simply lay the unit on its backside to make installation easier. *always use white gloves (included in kit) when handling fabric graphic panel.*
- 3. NomadicqDisplay® H1 V1 H2 V1 H1 H2 V2 V2 Put foot cover in with black cap V1 H2 H1 H1 H2 H1 V1 H2 H1 Bottom H1 Bottom H2 HangTen Nord-Amerika: 800.732.9395 • Europa: +353.98.66011 www.nomadicdisplay.deÜberarbeitet Deutsch: 16.05.11 Aufbau-Anleitung 3. Obere V1-Extrusion an unterer V1-Extrusion befestigen. Mit einem Inbusschlüssel festschrauben. 4. Die Schritte 1-3 für den rechten Fuß mit den V2- und H2-Extrusionen wiederholen. 5. Die montierte Extrusionskurve mit der Seitenfläche nach unten hinlegen. Die unteren H1/H2-Extrusionen mit einem Inbusschlüssel festschrauben. Die oberen H1/H2-Extrusionen verbinden und mit Inbusschlüssel festschrauben. Wenn Sie einen Header erworben haben, fahren Sie fort mit Schritt 6, andernfalls mit Schritt 7. 2. Die untere H1-Extrusion in die untere V1-Extrusion einsetzen. Mit einem Inbusschlüssel festschrauben. 1. Die untere V1-Extrusion in den linken Fuß einsetzen (die Verriegelungsbohrungen zeigen nach innen). Mit einem Inbusschlüssel festschrauben. 6. Lösen Sie mit dem Inbusschlüssel die Verriegelung an H2 und schieben Sie das nach unten zeigende Extrusionsstück nach oben. Mit einem Inbusschlüssel festschrauben. 7. Obere verriegelte H1-Extrusion an oberer V1-Extrusion befestigen und mit Inbusschlüssel festschrauben. Obere verriegelte H2-Extrusion an oberer V2-Extrusion befestigen und mit Inbusschlüssel festschrauben.
- 4. NomadicqDisplay® HangTen 11. Die Kanten der Grafik in den genuteten Rahmen einsetzen. 12. Die linke Kante der Stoffgrafik auf das Klettband drücken, und straff ziehen, während Sie die rechte Kante der Stoffgrafik auf das Klettband drücken. 10. Die unteren Ecken der Stoffgrafik in die horizontale Nut an der unteren H1/H2-Extrusion einsetzen. 9. Die Kanten der Grafik in den genuteten Rahmen einsetzen. 8. Den montierten Rahmen in aufrechte Position bringen. Die oberen Ecken der Stoffgrafik in die horizontale Nut an der oberen H1/H2-Extrusion einsetzen. Wenn es Schwierigkeiten macht, das Oberteil der Einheit zu erreichen, legen Sie das Display einfach auf den Rücken, um die Installation zu vereinfachen. *Verwenden Sie immer weiße Handschuhe (im Set enthalten), wenn Sie mit einem Spannstoffpaneel arbeiten.* Anbringen der Grafik Nord-Amerika: 800.732.9395 • Europa: +353.98.66011 www.nomadicdisplay.deÜberarbeitet Deutsch: 16.05.11
- 5. NomadicqDisplay® H1 V1 H2 V1 H1 H2 V2 V2 Put foot cover in with black cap V1 H2 H1 H1 H2 H1 V1 H2 H1 Bottom H1 Bottom H2 HangTen Amérique du Nord: 800.732.9395 • Europe: +353.98.66011 www.nomadicdisplay.frRévisé Français: 16.05.11 Instructions de montage 3. Fixer l’extrusion supérieure V1 sur l’extrusion inférieure V1. Bloquer à l’aide d’une clé Allen. 4. Répéter les étapes 1-3 pour le pied droit en utilisant les extrusions V2 et H2. 5. Coucher les extrusions assemblées côté incurvé en bas. Bloquer les extrusions inférieures H1/H2 à l’aide d’une clé Allen. Raccorder les extrusions supérieures H1/H2 et bloquer à l’aide d’une clé Allen. Si vous avez fait l’acquisition d’un surmontoir, passer à l’étape 6, sinon, poursuivre à l’étape 7. 2. Insérer l’extrusion inférieure H1 dans l’extrusion inférieure V1. Bloquer à l’aide d’une clé Allen. 1. Insérer l’extrusion inférieure V1 dans le pied gauche (orifices de blocage vers l’intérieur). Bloquer à l’aide d’une clé Allen. 6. Libérer le verrouillage avec une clé Allen sur H2 et faire coulisser vers le haut la pièce d’extrusion orientée vers le bas. Bloquer à l’aide d’une clé Allen. 7. Fixer l’extrusion supérieure bloquée H1 sur l’extrusion supérieure V1 et bloquer à l’aide d’une clé Allen. Fixer l’extrusion supérieure bloquée H2 sur l’extrusion supérieure V2 et bloquer à l’aide d’une clé Allen.
- 6. NomadicqDisplay® HangTen Amérique du Nord: 800.732.9395 • Europe: +353.98.66011 www.nomadicdisplay.frRévisé Français: 16.05.11 Fixation du visuel 11. Glisser le bord du visuel dans la structure à rainure. 12. Appuyer le bord gauche du visuel en tissu sur le Velcro® , tendre en appuyant le bord droit du visuel en tissu le long du Velcro. 10. Insérer les angles inférieurs du visuel en tissu dans la rainure horizontale le long de l’extrusion inférieure H1/H2. 9. Glisser le bord du visuel dans la structure à rainure. 8. Soulever la structure assemblée en position verticale. Insérer les angles supérieurs du visuel en tissu dans la rainure horizontale le long de l’extrusion supérieure H1/H2. Si vous éprouvez des difficultés à atteindre le sommet de l’unité, la coucher simplement à l’envers pour faciliter l’installation *toujours utiliser les gants blancs (inclus dans le kit) lors de la manipulation du panneau à visuel en tissu.*
- 7. NomadicqDisplay® H1 V1 H2 V1 H1 H2 V2 V2 Put foot cover in with black cap V1 H2 H1 H1 H2 H1 V1 H2 H1 Bottom H1 Bottom H2 HangTen Stati Uniti: 800.732.9395 • Europa: +353.98.66011 www.nomadicdisplay.itRevisione Italiano: 16.05.11 Istruzioni di montaggio 3. Unire l’estrusione superiore V1 all’estrusione inferiore V1. Stringere con chiave allen. 4. Ripetere fasi 1-3 per piede sinistro utilizzando le estrusioni V2 e H2. 5. Posizionare le estrusioni assemblate con il lato curvo verso il basso. Stringere le estrusioni inferiori H1/H2 con chiave allen. Collegare le estrusioni H1/H2 e stringere con chiave allen. Se avete acquistato una testata, procedere alla fase 6, altrimenti continuare con la fase 7. 2. Inserire l’estrusione inferiore H1 nell’estrusione inferiore V1. Stringere con chiave allen. 1. Inserire l’estrusione inferiore V1 nel piede sinistro ((fori di fissaggio con parte frontale verso l’interno). Stringere con chiave allen. 6. Disinserire il blocco con chiave allen su H2 e far scorrere verso l’alto l’estrusione (con fronte verso il basso). Stringere con chiave allen. 7. Unire l’estrusione superiore bloccata H1 all’estrusione superiore V1 e stringere con chiave allen. Unire l’estrusione superiore bloccata H2 all’estrusione superiore V2 e stringere con chiave allen.
- 8. NomadicqDisplay® HangTen 11. Far scorrere l’estremità della parte grafica nella struttura scanalata. 12. Premere l’estremità sinistra della parte grafica in tessuto sul Velcro® tendere premendo l’estremità destra della parte grafica in tessuto lungo il Velcro. 10. Inserire gli angoli inferiori della parte grafica in tessuto nella scanalatura orizzontale lungo l’estrusione inferiore H1/H2. 9. Far scorrere l’estremità della parte grafica nella struttura scanalata. 8. Sollevare la struttura assemblata in posizione verticale. Inserire gli angoli superiori di parte grafica in tessuto nella scanalatura orizzontale lungo l’estrusione superiore H1/H2. Se vi risulta difficile raggiungere la parte superiore dell’unità, posizionate semplicemente la struttura sul lato posteriore per rendere più semplice l’installazione. *utilizzate sempre guanti bianchi (inclusi nel kit) durante la manipolazione di pannelli grafici in tessuto.* Stati Uniti: 800.732.9395 • Europa: +353.98.66011 www.nomadicdisplay.itRevisione Italiano: 16.05.11 Parte Grafica
- 9. NomadicqDisplay® H1 V1 H2 V1 H1 H2 V2 V2 Put foot cover in with black cap V1 H2 H1 H1 H2 H1 V1 H2 H1 Bottom H1 Bottom H2 HangTen Norteamérica: 800.732.9395 • Europa: +353.98.66011 www.nomadicdisplay.esRevisado para Español: 16.05.11 Instrucciones de montaje 3. Sujete la extrusión V1 posterior a la extrusión V1 inferior. Apriétela con la llave Allen. 4. Repita los pasos 1-3 con el pie derecho utilizando las extrusiones V2 y H2. 5. Coloque boca abajo el lado curvo de las extrusiones montadas. Apriete las extrusiones H1/H2 inferiores con una llave Allen. Conecte las extru- siones H1/H2 superiores y apriételas con una llave Allen. Si ha comprado una cabecera, siga el paso 6; si no la ha comprado, vaya al paso 7. 2. Introduzca la extrusión H1 inferior en la extrusión V1 inferior. Apriétela con la llave Allen. 1. Introduzca la extrusión V1 inferior en el pie izquierdo (con los orificios de cierre mirando hacia dentro). Apriétela con la llave Allen. 6. Libere el seguro con una llave Allen en H2 y deslice hacia arriba la pieza de extrusión que está orientada hacia abajo. Apriete con la llave Allen. 7. Sujete la extrusión H1 superior cerrada a la extrusión V1 superior y apriétela con la llave Allen. Sujete la extrusión H2 superior cerrada a la extrusión V2 superior y apriétela con la llave Allen. Coloque la tapa del pie con el terminal negro
- 10. NomadicqDisplay® HangTen 11. Encaje el borde gráfico en la estructura ranurada. 12. Pegue el borde izquierdo del gráfico de tela en el Velcro® y ténselo mientras hace lo mismo con el borde derecho. 10. Inserte las esquinas inferiores del gráfico de tela en la ranura horizontal a lo largo de la extrusión H1/H2 inferior. 9. Encaje el borde gráfico en la estructura ranurada. 8. Levante la estructura montada en posición vertical. Inserte las esquinas superiores del gráfico de tela en la ranura horizontal a lo largo de la extrusión H1/H2 superior. Si tiene problemas para llegar a la parte superior de la unidad, coloque la unidad boca arriba para facilitar la instalación. *utilice siempre guantes blancos (incluidos en el kit) para manipular el panel gráfico de tela.* Norteamérica: 800.732.9395 • Europa: +353.98.66011 www.nomadicdisplay.esRevisado para Español: 16.05.11 Elemento gráfico