SlideShare ist ein Scribd-Unternehmen logo
1 von 47
Downloaden Sie, um offline zu lesen
Department of Electronics & Communication Engineering 1
PULSE COUNTER USING AT89C4051
1. Introduction
Pulse counter are widely used in our day-to-day life. Almost all museums and theatres have a
visitor counter installed at the entry/exit to measure the visitor traffic. In industries, counting
is done for production control. Market tests too are performed by counting the sold goods.
2. Circuit Schematic
Figure 1: Circuit schematic of pulse counter
3. Components Used
 Semiconductors
 IC1 - AT89C4051 microcontroller
 IC2 - MAX232 RS-232 driver
 IC3 - 7805, 5V regulator
 D1-D4 - 1N4007 rectifier diode
 LED1, LED2 - 5mm LED
 LCD - 16-character × 2-line
 Resistors (all ¼-watt, ±5% carbon)
 R1 - 10-kilo-ohm
Department of Electronics & Communication Engineering 2
 R2, R3 - 330-ohm
 R4 - 33-ohm
 Capacitors
 C1 - 1000μF, 25V electrolytic
 C2 - 0.1μF ceramic disk
 C3 - 10μF, 16V electrolytic
 C4, C5 - 33pF ceramic disk
 C6-C10 - 1μF, 16V electrolytic
 Miscellaneous
 X1 - 230V AC primary to 9V,500mA secondary transformer
 S1 - Push-to-on switch
 XTAL - 11.0592MHz crystal
 9-pin D-type female COM port connector
 Heat-sink
4. Hardware Description
All the major components that have been used in the project are described below.
4.1. Microcontroller AT89C4051
The AT89C4051 is a low-voltage, high-performance CMOS 8-bit microcontroller with
4K bytes of Flash programmable and erasable read-only memory. The device is
manufactured using Atmel‟s high-density 2on-volatile memory technology and is
compatible with the industry-standard MCS-51 instruction set. By combining a versatile
8-bit CPU with Flash on a monolithic chip, the Atmel AT89C4051 is a powerful
microcontroller which provides a highly-flexible and cost-effective solution to many
embedded control applications.
The AT89C4051 provides the following standard features: 4K bytes of Flash, 128 bytes
of RAM, 15 I/O lines, two 16-bit timer/counters, a five-vector, two-level interrupt
architecture, a full duplex serial port, a precision analog comparator, on-chip oscillator
and clock circuitry. In addition, the AT89C4051 is designed with static logic for
operation down to zero frequency and supports two software-selectable power saving
modes. The Idle Mode stops the CPU while allowing the RAM, timer/counters, serial port
Department of Electronics & Communication Engineering 3
and interrupt system to continue functioning. The power-down mode saves the RAM
contents but freezes the oscillator disabling all other chip functions until the next
hardware reset.
Salient Features
 Compatible with MCS®51 Products
 4K Bytes of Reprogrammable Flash Memory
 Endurance: 1,000 Write/Erase Cycles
 2.7V to 6V Operating Range
 Fully Static Operation: 0 Hz to 24 MHz
 Two-level Program Memory Lock
 128 x 8-bit Internal RAM
 15 Programmable I/O Lines
 Two 16-bit Timer/Counters
 Six Interrupt Sources
 Programmable Serial UART Channel
 Direct LED Drive Outputs
 On-chip Analog Comparator
 Low-power Idle and Power-down Modes
 Brown-out Detection
 Power-On Reset (POR)
 Green (Pb/Halide-free/RoHS Compliant) Packaging
Figure 2. Pin configuration of AT89C4051
Department of Electronics & Communication Engineering 4
Figure 3. Internal block diagram of AT89C4051
4.2. IC MAX232
The MAX232 device is a dual driver/receiver that includes a capacitive voltage generator
to supply EIA-232 voltage levels from a single 5-V supply. Each receiver converts EIA-
232 inputs to 5-V TTL/CMOS levels. These receivers have a typical threshold of 1.3 V
and a typical hysteresis of 0.5 V, and can accept ±30-V inputs. Each driver converts
TTL/CMOS input levels into EIA-232 levels. The driver, receiver, and voltage-generator
functions are available as cells in the Texas Instruments library. The MAX232 is
characterized for operation from 0°C to 70°C. The MAX232I is characterized for
operation from –40°C to 85°C.
Department of Electronics & Communication Engineering 5
Salient Features
 Operates With Single 5-V Power Supply
 Lin BiCMOS Process Technology
 Two Drivers and Two Receivers
 ±30-V Input Levels
 Low Supply Current . . . 8 mA Typical
 Meets or Exceeds TIA/EIA-232-F and ITU Recommendation V.28
 Designed to be Interchangeable With Maxim MAX232
 ESD Protection Exceeds 2000 V Per MIL-STD-883, Method 3015
 Package Options Include Plastic Small-Outline (D, DW) Packages and Standard
Plastic (N) DIPs.
Figure 4. Pin configuration of MAX 232
Department of Electronics & Communication Engineering 6
Applications
This IC can be used in battery-powered systems, terminals, modems and computers.
4.3. IC 7805
The MC78XX/LM78XX/MC78XXA series of three terminal positive regulators are
available in the TO-220/D-PAK package and with several fixed output voltages, making
them useful in a wide range of applications. Each type employs internal current limiting,
thermal shut down and safe operating area protection, making it essentially indestructible.
If adequate heat sinking is provided, they can deliver over 1A output current. Although
designed primarily as fixed voltage regulators, these devices can be used with external
components to obtain adjustable voltages and currents. . The most commonly used ones
are 7805 and 7812. 7805 gives fixed 5V DC voltage if input voltage is in (7.5V,20V). We
can see the heat sink above the voltage regulator.
Salient Features
 Output Current up to 1A
 Output Voltages of 5, 6, 8, 9, 10, 12, 15, 18, 24V
 Thermal Overload Protection
 Short Circuit Protection
 Output Transistor Safe Operating Area Protection
Figure 5.Internal block diagram of IC 7805
Department of Electronics & Communication Engineering 7
Figure 6. Picture of voltage regulator IC 7805
The description of the above numbered pins are 1-input, 2-ground, 3-output.The electrical
connection of this IC in the circuit is given below.
Figure 7. The electrical connection of IC 7805
The above diagram show how to use 7805 voltage regulator. In this we can see that
coupling capacitors are used for good regulation. But there is no need for it in normal
case. But if we are using 7805 in analog circuit you should use capacitor, otherwise the
noise in the output voltage will be high.
4.4.LCD – 16-character × 2-line
A 16 Character x 2 Line LCD Modules are very common these days, and are quite simple
to work with, as all the logic required to run them is on board.
Department of Electronics & Communication Engineering 8
Figure 8. Schematic of LCD – 16-character × 2-line display
Above is the quite simple schematic. The LCD panel‟s Enable and Register Select is connected to the
Control Port. The Control Port is an open collector / open drain output. While most Parallel Ports have
internal pull-up resistors, there are a few which don‟t. Therefore by incorporating the two 10K
external pull up resistors, the circuit is more portable for a wider range of computers, some of which
may have no internal pull up resistors.
We make no effort to place the Data bus into reverse direction. Therefore we hard wire the R/W line
of the LCD panel, into write mode. This will cause no bus conflicts on the data lines. As a result we
cannot read back the LCD‟s internal Busy Flag which tells us if the LCD has accepted and finished
processing the last instruction. This problem is overcome by inserting known delays into our program.
The 10k Potentiometer controls the contrast of the LCD panel. Nothing fancy here. As with all the
examples, I‟ve left the power supply out. You can use a bench power supply set to 5v or use a
onboard +5 regulator. Remember a few de-coupling capacitors, especially if you have trouble with the
circuit working properly.
The 2 line x 16 character LCD modules are available from a wide range of manufacturers and should
all be compatible with the HD44780.
Figure 9. The image of a LCD- 16-character × 2-line display
Department of Electronics & Communication Engineering 9
4.5.Crystal 11.05 MHz
Description
 Industry standard leaded package
 Resistance welded, hermetically sealed in an inert atmosphere, glass to metal
seals on leads
General Specifications
 Load Capacitance (CL): 10pF to 75pF or Series
 Drive Level: 1mW max
 Ageing: ±3ppm typ per year at 25°C
 Shunt Capacitance (C0): 7pF max
 Standard frequency tolerances and stabilities of ±5ppm, ±10ppm, ±15ppm,
±20ppm, ±30ppm, ±50ppm, ±100ppm
 Operating temperature ranges from 0 to 50°C, –10 to 60°C , –20 to 70°C, –30
to 80°C , –40 to 85°C, –55 to 105°C and –55 to 125°C
 Storage temperature range between –55 to 125°C
 Environmental Shock: 981m/s2, 6ms, 3 times in each of 3 mutually
perpendicular planes
 Vibration: 10Hz-60MHz, 0.75mm amplitude, 60Hz-500Hz, 98.1m/s2,
30mins in 3 mutually perpendicular planes
Figure 10. The picture of a crystal
Department of Electronics & Communication Engineering 10
4.6.Power Supply
Power supply can be defined as electronic equipment, which is a stable source of D.C.
power for electronic circuits. There are many types of power supply. Most are designed to
convert high voltage AC mains electricity to a suitable low voltage supply for electronic
circuits and other devices. A power supply can by broken down into a series of blocks,
each of which performs a particular function.
For example a 5V regulated supply.
Figure 11. Block diagram of a regulated power supply system
The figure given below shows the output voltage waveform of a step-down transformer.
Figure 12. Output voltage waveform of step-down transformer
Transformers convert AC electricity from one voltage to another with little loss of
power. Transformers work only with AC and this is one of the reasons why mains
electricity is AC.
Step-up transformers increase voltage, step-down transformers reduce voltage. Most
power supplies use a step-down transformer to reduce the dangerously high mains
voltage (230V in India) to a safer low voltage.
The input coil is called the primary and the output coil is called the secondary. There is
no electrical connection between the two coils, instead they are linked by an alternating
magnetic field created in the soft-iron core of the transformer. The two lines in the
middle of the circuit symbol represent the core.
Department of Electronics & Communication Engineering 11
Transformers waste very little power so the power out is (almost) equal to the power in.
Note that as voltage is stepped down current is stepped up.
The ratio of the number of turns on each coil, called the turns ratio, determines the ratio
of the voltages. A step-down transformer has a large number of turns on its primary
(input) coil which is connected to the high voltage mains supply, and a small number of
turns on its secondary (output) coil to give a low output voltage.
The low voltage AC output is suitable for lamps, heaters and special AC motors. It is not
suitable for electronic circuits unless they include a rectifier and a smoothing capacitor.
The smooth DC output has a small ripple. It is suitable for most electronic circuits.
Figure 13. Output voltage waveform after the use of bridge rectifier circuit
A bridge rectifier can be made using four individual diodes, but it is also available in
special packages containing the four diodes required. It is called a full-wave rectifier
because it uses all the AC wave (both positive and negative sections). 1.4V is used up in
the bridge rectifier because each diode uses 0.7V when conducting and there are always
two diodes conducting. Bridge rectifiers are rated by the maximum current they can pass
and the maximum reverse voltage they can withstand (this must be at least three times
the supply RMS voltage so the rectifier can withstand the peak voltages). Smoothing is
performed by a large value electrolytic capacitor connected across the DC supply to act
as a reservoir, supplying current to the output when the varying DC voltage from the
rectifier is falling. The capacitor charges quickly near the peak of the varying DC, and
then discharges as it supplies current to the output. Note that smoothing significantly
increases the average DC voltage to almost the peak value (1.4 × RMS value). For
example 6V RMS AC is rectified to full wave DC of about 4.6V RMS (1.4V is lost in the
bridge rectifier), with smoothing this increases to almost the peak value giving
1.4 × 4.6 = 6.4V smooth DC. Smoothing is not perfect due to the capacitor voltage
falling a little as it discharges, giving a small ripple voltage. For many circuits a ripple
Department of Electronics & Communication Engineering 12
which is 10% of the supply voltage is satisfactory and the equation below gives the
required value for the smoothing capacitor. A larger capacitor will give less ripple.
Smoothing capacitor for 10% ripple, C = (5*I0) / (VS * f).
Where,
I0 = output current from the supply
VS = supply voltage (peak value of unsmoothed DC)
f = frequency of the AC supply (50Hz in India)
The figure 14 given below shows the process of capacitor charging and discharging
along with the voltage waveform. Figure 16 shows the resultant output voltage
waveform that is fed to the electronic circuits for dc operation.
Figure 14. Voltage waveform showing capacitor charging and discharging
Figure 15. Output waveform after the use of capacitors for smoothing
The smooth DC output has a small ripple. It is suitable for most electronic circuits.
Department of Electronics & Communication Engineering 13
Figure 16. Output voltage waveform after the use of voltage regulator IC 78XX series
4.7.Capacitors
A capacitor (formerly known as condenser) is a device for storing electric charge. The
forms of practical capacitors vary widely, but all contain at least two conductors separated
by a non-conductor. A capacitor is a passive electronic component consisting of a pair of
conductors separated by a dielectric (insulator). When there is a potential difference
(voltage) across the conductors, a static electric field develops across the dielectric,
causing positive charge to collect on one plate and negative charge on the other plate.
Energy is stored in the electrostatic field.
Figure 17. Images of various types of available capacitors
4.7.1. Capacitor Colour Codes
Generally, the actual values of Capacitance, Voltage or Tolerance are marked
onto the body of the capacitors in the form of alphanumeric characters. However,
when the value of the capacitance is of a decimal value problems arise with the
marking of a "Decimal Point" as it could easily not be noticed resulting in a
misreading of the actual value. Instead letters such as p (pico) or n (nano) are
used in place of the decimal point to identify its position and the weight of the
number. For example, a capacitor can be labelled as, n47 = 0.47nF, 4n7 = 4.7nF
or 47n = 47nF. Also, sometimes capacitors are marked with the capital letter K to
signify a value of one thousand pico-Farads, so for example, a capacitor with the
markings of 100K would be 100 x 1000pF or 100nF.
Department of Electronics & Communication Engineering 14
To reduce the confusion regarding letters, numbers and decimal points, an
International colour coding scheme was developed many years ago as a simple
way of identifying capacitor values and tolerances. It consists of coloured bands
(in spectral order) known commonly as the Capacitor Colour Code system and
whose meanings are illustrated below:
Table 1. Capacitor Colour Code
Colour
Digit
A
Digit
B
Multiplier
D
Tolerance
(T) > 10pf
Tolerance
(T) < 10pf
Temperature
Coefficient
(TC)
Black 0 0 x1 ± 20% ± 2.0pF
Brown 1 1 x10 ± 1% ± 0.1pF -33x10-6
Red 2 2 x100 ± 2% ± 0.25pF -75x10-6
Orange 3 3 x1,000 ± 3% -150x10-6
Yellow 4 4 x10,000 ± 4% -220x10-6
Green 5 5 x100,000 ± 5% ± 0.5pF -330x10-6
Blue 6 6 x1,000,000 -470x10-6
Violet 7 7 -750x10-6
Grey 8 8 x0.01 +80%,-20%
White 9 9 x0.1 ± 10% ± 1.0pF
Gold x0.1 ± 5%
Silver x0.01 ± 10%
Capacitor Voltage Reference
 Type J - Dipped Tantalum Capacitors.
 Type K - Mica Capacitors.
 Type L - Polyester/Polystyrene Capacitors.
 Type M - Electrolytic 4 Band Capacitors.
 Type N - Electrolytic 3 Band Capacitors.
Department of Electronics & Communication Engineering 15
Table 2. Capacitor Voltage Colour Code Table
Colour
Voltage Rating
Type J Type K Type L Type M Type N
Black 4 100 10 10
Brown 6 200 100 1.6
Red 10 300 250 4 35
Orange 15 400 40
Yellow 20 500 400 6.3 6
Green 25 600 16 15
Blue 35 700 630 20
Violet 50 800
Grey 900 25 25
White 3 1000 2.5 3
Gold 2000
Silver
An example of the use of capacitor colour codes is given as:
Metalized Polyester Capacitors
Figure 18. Example 1 of capacitor colour code
Department of Electronics & Communication Engineering 16
Disc & Ceramic Capacitors
Figure 19. Example 2 of capacitor colour code
The Capacitor Colour Code system was used for many years on unpolarised
polyester and mica moulded capacitors. This system of colour coding is now
obsolete but there are still many “old” capacitors around. Nowadays, small
capacitors such as film or disk types conform to the BS1852 Standard and its new
replacement, BS EN 60062, were the colours have been replaced by a letter or
number coded system. The code consists of 2 or 3 numbers and an optional
tolerance letter code to identify the tolerance. Where a two number code is used
the value of the capacitor only is given in picofarads, for example, 47 = 47 pF and
100 = 100pF etc. A three letter code consists of the two value digits and a
multiplier much like the resistor colour codes in the resistors section. For
example, the digits 471 = 47*10 = 470pF. Three digit codes are often
accompanied by an additional tolerance letter code as given below.
Table 3. Capacitor Tolerance Letter Codes Table
Letter B C D F G J K M Z
Tolerance
C <10pF ±pF 0.1 0.25 0.5 1 2
C >10pF ±% 0.5 1 2 5 10 20 +80-20
Consider the capacitor below:
The capacitor on the left is of a ceramic disc type capacitor that has the
code 473J printed onto its body. Then the 4 = 1st
digit, the 7 = 2nd
digit,
the 3 is the multiplier in pico-Farads, pF and the letter J is the tolerance
and this translates to:
47pF * 1,000 (3 zero's) = 47,000 pF , 47nF or 0.047 uF
the J indicates a tolerance of +/- 5%
Department of Electronics & Communication Engineering 17
Then by just using numbers and letters as codes on the body of the capacitor we
can easily determine the value of its capacitance either in Pico-farad's, Nano-
farads or Micro-farads and a list of these "international" codes is given in the
following table along with their equivalent capacitances.
Table 4. Capacitor Letter Codes Table
Picofarad
(pF)
Nanofarad
(nF)
Microfarad
(uF)
Code
Picofarad
(pF)
Nanofarad
(nF)
Microfarad
(uF)
Code
10 0.01 0.00001 100 4700 4.7 0.0047 472
15 0.015 0.000015 150 5000 5.0 0.005 502
22 0.022 0.000022 220 5600 5.6 0.0056 562
33 0.033 0.000033 330 6800 6.8 0.0068 682
47 0.047 0.000047 470 10000 10 0.01 103
100 0.1 0.0001 101 15000 15 0.015 153
120 0.12 0.00012 121 22000 22 0.022 223
130 0.13 0.00013 131 33000 33 0.033 333
150 0.15 0.00015 151 47000 47 0.047 473
180 0.18 0.00018 181 68000 68 0.068 683
220 0.22 0.00022 221 100000 100 0.1 104
330 0.33 0.00033 331 150000 150 0.15 154
470 0.47 0.00047 471 200000 200 0.2 254
560 0.56 0.00056 561 220000 220 0.22 224
680 0.68 0.00068 681 330000 330 0.33 334
750 0.75 0.00075 751 470000 470 0.47 474
820 0.82 0.00082 821 680000 680 0.68 684
1000 1.0 0.001 102 1000000 1000 1.0 105
1500 1.5 0.0015 152 1500000 1500 1.5 155
2000 2.0 0.002 202 2000000 2000 2.0 205
2200 2.2 0.0022 222 2200000 2200 2.2 225
Department of Electronics & Communication Engineering 18
Figure 20. Image of an electrolytic capacitor
4.8.Diodes and LEDs
Diodes are two terminal devices which conduct electricity in one direction. Current flows
from anode to cathode when the diode is forward biased. In a normal forward biased
diode, energy is dissipated as heat in the junction, but in LED's energy dissipated as
visible light. In robotics we use normal diodes as freewheeling diodes or to make power
supply. LED's are of two types - IR led and normal LED. IR LED emits Infra Red
radiations while normal LED emit visible light. So first talk about a normal diode. Mostly
we us 1N4001 or 1N4007 as freewheeling diodes for motors or relays, sometimes in H-
bridge also.
Figure 21. Image of a diode and it’s logical symbol
The main specification of LED are its current rating=20mA, typical cut in voltage=2V,
life time=2lakh hours, max. voltage is around 4.5V. There are different colour LED's
depending on the semi conducting material. LED has two leads- cathode and anode. They
are identified by the length of the lead. Cathode lead is of lesser length. But I have seen
some LED's with manufacturing defect having cathode lead longer. So in order to identify
the cathode of the LED see the figure below. In that you can see that cathode is of broader
filament.I got some white LED's of cathode of small filament. So this convention can be
right or wrong. Check LED in both ways to see that LED is good. Don't connect LED to
Vcc. Suppose if you connect the output of 7805 directly to an LED then the voltage
Department of Electronics & Communication Engineering 19
output of 7805 reduces to 3.85V from 5.02 voltage output of 7805( I checked it with a
white LED producing green light). So when you connect LED to the output of any IC
connect a series resistor with it. The brightness of LED is controlled by the series
resistance. If you want a good brightness use R=100,150Ω. If you want a medium light
series resistance=330Ω. The maximum value of 470ohm can be inserted for a small light.
Figure 22. Image of LED
Figure 23. Identification of cathode and anode of LED
4.9.Resistors
A resistor is a two-terminal passive electronic component which implements electrical
resistance as a circuit element. Resistors are common elements of electrical networks and
electronic circuits and are ubiquitous in most electronic equipment. Practical resistors can
be made of various compounds and films, as well as resistance wire (wire made of a high-
resistivity alloy, such as nickel-chrome). Resistors are also implemented within integrated
circuits, particularly analog devices, and can also be integrated into hybrid and printed
circuits. The electrical functionality of a resistor is specified by its resistance: common
commercial resistors are manufactured over a range of more than 9 orders of magnitude.
Practical resistors are also specified as having a maximum power rating which must
exceed the anticipated power dissipation of that resistor in a particular circuit: this is
mainly of concern in power electronics applications. Resistors with higher power ratings
are physically larger and may require heat sinking. In a high voltage circuit, attention
must sometimes be paid to the rated maximum working voltage of the resistor.
Department of Electronics & Communication Engineering 20
Figure 24. Picture of resistors
A common element in electronic devices is a three-terminal resistor with a continuously
adjustable tapping point controlled by rotation of a shaft or knob. These variable resistors
are known as potentiometers when all three terminals are present, since they act as a
continuously adjustable voltage divider. An example of this in this project is the
brightness control of the LCD display.
4.9.1. Colour Code of Resistor
Most axial resistors use a pattern of colored stripes to indicate resistance.
Four-band identification is the most commonly used color-coding scheme
on resistors. It consists of four colored bands that are painted around the
body of the resistor. The first two bands encode the first two significant
digits of the resistance value, the third is a power-of-ten multiplier or
number-of-zeroes, and the fourth is the tolerance accuracy, or acceptable
error, of the value. The first three bands are equally spaced along the
resistor; the spacing to the fourth band is wider. Sometimes a fifth band
identifies the thermal coefficient, but this must be distinguished from the
true 5-color system, with 3 significant digits.
For example, green-blue-yellow-red is 56×104
Ω = 560 kΩ ± 2%. An
easier description can be as followed: the first band, green, has a value of 5
and the second band, blue, has a value of 6, and is counted as 56. The third
band, yellow, has a value of 104
, which adds four 0's to the end, creating
560,000 Ω at ±2% tolerance accuracy. 560,000 Ω changes to 560 kΩ ±2%
(as a kilo- is 103
).
Each color corresponds to a certain digit, progressing from darker to
lighter colors, as shown in the chart below.
Department of Electronics & Communication Engineering 21
Table 5. Colour code of resistors
Color 1st
band 2nd
band 3rd
band (multiplier) 4th
band (tolerance) Temp. Coefficient
Black 0 0 ×100
Brown 1 1 ×101
±1% (F) 100 ppm
Red 2 2 ×10²
±2% (G) 50 ppm
Orange 3 3 ×10³
15 ppm
Yellow 4 4 ×10⁴
25 ppm
Green 5 5 ×10⁵
±0.5% (D)
Blue 6 6 ×10⁶
±0.25% (C)
Violet 7 7 ×10⁷
±0.1% (B)
Gray 8 8 ×10⁸
±0.05% (A)
White 9 9 ×10⁹
Gold ×10−1
±5% (J)
Silver ×10−2
±10% (K)
None ±20% (M)
5. Working of the Pulse Counter Circuit
A pulse counter could be roughly divided into three parts: a pulse source, an electronic device
that counts, stores and prepares outputs, and a display to show the accumulated count.
This pulse counter is based on Atmel AT89C4051 microcontroller. TTL-logic-compatible
pulses generated by the source are fed to the counter for counting. The AT89C4051 is a low-
voltage, high-performance, 8-bit microcontroller with 4 kB of Flash programmable and
erasable read-only memory, 128 bytes of RAM, 15 input/ output (I/O) lines, two 16-bit
timers/ counters, a five-vector, two-level interrupt architecture, a full-duplex serial port, a
precision analogue comparator, on-chip oscillator and clock circuitry.
System clock plays a significant role in operation of the microcontroller. An 11.0592MHz
quartz crystal provides basic clock to the microcontroller (IC1) at its pins 4 and 5. Power-on
reset is provided by electrolytic capacitor C3 and resistor R1. Switch S1 is used for manual
reset.
Port pin P3.5 receives the input pulse and the count is displayed on the LCD as well as hyper
terminal of the PC. Pulse reception is indicated by LED2, which is connected to port pin P3.7
of the microcontroller. Port pins P1.0 through P1.7 of the microcontroller are connected to
data pins D0 through D7 of the LCD, respectively. Port pins P3.4, P3.3 and P3.2 are
connected to register-select RS, read-write R/W and enable E of the LCD, respectively.
The data is sent to the LCD in ASCII format for display. Only the commands are sent in hex
form to the LCD. Register-select RS signal is used to distinguish between data (RS=1) and
Department of Electronics & Communication Engineering 22
command (RS=0). Using preset VR1; you can control the contrast of the LCD. Resistor R4
limits the current through backlight of the LCD.
Port pin P3.1 of the microcontroller is used to interface with the PC‟s hyper terminal through
RS-232 interface MAX232 IC (IC2). The microcontroller provides a transmit channel for
serial data transfer. Transmit data pin (TXD) is specified at port pin P3.1. The microcontroller
is connected to TIN (pin 11) of MAX232. TOUT (pin 14) of IC2 is connected to pin 2 of the
COM port connector. The signals provided on these pins are TTL-level and must be boosted
and inverted through a MAX232 converter to comply with RS- 232 standard.
The MAX232 has two internal charge pumps that convert +5V into ±10V (unloaded) for RS-
232 driver operation. The first converter uses capacitor C8 to double the +5V input to +10V
on capacitor C10 at pin 2. The second converter uses capacitor C7 to invert +10V to -10V on
capacitor C6 at pin 6.
All the serial communication is controlled through special-function register SCON. This
register contains mode-selection bits, ninth data bit for transmit and receive (TB8 and RB8),
and serial-port interrupt bits (TI and RI). Serial communication requires standard baud rate.
Timer-1 is configured in auto-reload mode to generate baud rate. The baud rate is determined
as:
Baud rate = ((2SMOD
× Oscillator frequency)/ (32×12× (256 - TH1))
The 230V, 50Hz AC mains is stepped down by transformer X1 to deliver a secondary output
of 9V, 500 mA. The transformer output is rectified by a full-wave rectifier comprising diodes
D1 through D4, filtered by capacitor C1 and regulated by IC 7805 (IC3). Capacitor C2
bypasses the ripples present in the regulated supply. LED1 acts as the power indicator and R2
limits the current through LED1.
6. Terms Associated with the Project
There are certain terms which requires a proper understanding for full understanding of the
project. These terms are described below.
6.1.RS-232 Standard
Before large-scale integration (LSI) UART integrated circuits were common, a
minicomputer or microcomputer would have a serial port made of multiple small-scale
integrated circuits to implement shift registers, logic gates, counters, and all the other
logic for a serial port. The 9 pin DE-9 connector was used by most IBM-compatible PCs
since the IBM PC AT, and has been standardized as TIA-574. More recently, modular
connectors have been used.
Department of Electronics & Communication Engineering 23
In telecommunications, RS-232 (Recommended Standard 232) is the traditional name for
a series of standards for serial binary single-ended data and control signals connecting
between a DTE (Data Terminal Equipment) and a DCE (Data Circuit-terminating
Equipment). It is commonly used in computer serial ports. The standard defines the
electrical characteristics and timing of signals, the meaning of signals, and the physical
size and pin out of connectors. The current version of the standard is TIA-232-F Interface
Between Data Terminal Equipment and Data Circuit-Terminating Equipment Employing
Serial Binary Data Interchange, issued in 1997. Communication as defined in the RS232
standard is an asynchronous serial communication method. The word serial means, that
the information is sent one bit at a time. Asynchronous tells us that the information is not
sent in predefined time slots. Data transfer can start at any given time and it is the task of
the receiver to detect when a message starts and ends.
Figure 25. Description of the pins of COM port
Department of Electronics & Communication Engineering 24
Salient Features
 The RS232 standard describes a communication method where information is
sent bit by bit on a physical channel. The information must be broken up in data
words. The length of a data word is variable. On PC's a length between 5 and 8
bits can be selected. This length is the netto information length of each word.
 Data bits are sent with a predefined frequency, the baud rate. Both the transmitter
and receiver must be programmed to use the same bit frequency.
 RS232 defines an asynchronous type of communication. This means, that sending
of a data word can start on each moment. If starting at each moment is possible,
this can pose some problems for the receiver to know which is the first bit to
receive. To overcome this problem, each data word is started with an attention
bit. This attention bit, also known as the start bit, is always identified by the
space line level. Because the line is in mark state when idle, the start bit is easily
recognized by the receiver.
 Directly following the start bit, the data bits are sent. A bit value 1 causes the line
to go in mark state; the bit value 0 is represented by a space. The least significant
bit is always the first bit sent.
 Suppose that the receiver has missed the start bit because of noise on the
transmission line. This causes garbled date to reach the receiver. A mechanism
must be present to resynchronize the communication. To do this, framing is
introduced. Framing means, that all the data bits and parity bit are contained in a
frame of start and stop bits. The period of time lying between the start and stop
bits is a constant defined by the baud rate and number of data and parity bits. The
start bit has always space value, the stop bit always mark value. If the receiver
detects a value other than mark when the stop bit should be present on the line, it
knows that there is a synchronization failure.
 The maximum baud rate defined is 20 kbps. With current devices like the
16550A UART, maximum speeds of 1.5 Mbps are allowed.
 The signal level of the RS232 pins can have two states. A high bit, or mark state
is identified by a negative voltage and a low bit or space state uses a positive
value. In mark state the transmitter voltage ranges from -5 to -15V and the
receiver voltage ranges from -3 to -25V. In the space state the transmitter voltage
ranges +5 to +15 V and the receiver voltage ranges from +3 to +25V.
 The maximum cable length is 50 feet, or the cable length equal to a capacitance
of 2500 pF.
Department of Electronics & Communication Engineering 25
Table 6. Details of the pin configuration of COMPort
Name of Signal Abbreviation Purpose Origin DE-9
Pin
Data Terminal
Ready
DTR Tells DCE that DTE is ready to be
connected.
DTE 4
Data Carrier
Detect
DCD Tells DTE that DCE is connected to
telephone line.
DCE 1
Data Set Ready DSR Tells DTE that DCE is ready to
receive commands or data.
DCE 6
Ring Indicator RI Tells DTE that DCE has detected a
ring signal on the telephone line.
DCE 9
Request To
Send
RTS Tells DCE to prepare to accept data
from DTE.
DTE 7
Clear To Send CTS Acknowledge RTS and allows DTE
to transmit.
DCE 8
Transmitted
Data
TxD Carries data from DTE to DCE. DTE 3
Received Data RxD Carries data from DCE to DTE. DCE 2
Ground GND Common return for other
connections.
COMMON 5
6.2. TTL Standard
Before the advent of VLSI devices, TTL integrated circuits were a standard method of
construction for the processors of mini-computer and mainframe processors; such as
the DEC VAX and Data General Eclipse, and for equipment such as machine tool
numerical controls, printers and video display terminals. As microprocessors became
more functional, TTL devices became important for "glue logic" applications, such as fast
bus drivers on a motherboard, which tie together the function blocks realized in VLSI
elements.
Salient Features
 Logic high input voltage is the minimum voltage that an input of a TTL
digital IC is guaranteed to recognize as Logic "1". Its minimum value is 2.0
V.
 Logic low input voltage is the maximum voltage that an input of a TTL
digital IC is guaranteed to recognize as Logic "0". Its minimum value is 0.8V.
 Logic high output voltage is the minimum voltage that an output of a TTL
digital IC is guaranteed to deliver as Logic "1". Its minimum value is 2.4V.
Department of Electronics & Communication Engineering 26
 Logic low output voltage is the maximum voltage that an output of a TTL
digital IC is guaranteed to deliver as Logic "0". Its minimum value is 0.4V.
 Logic high input current is the minimum amount of current needed by an
input of a TTL digital IC to stay at Logic "1". It‟s minimum value is 50 µA
min. when Vcc=Max; Vin = 2.7V
 Logic low input current is the maximum amount of current that the input of a
TTL digital IC can sink to stay at Logic "0". Its minimum value is -1.6 mA
max. when Vcc=max; Vin = 0.5V.
 Output short circuit current is the amount of current that a short-circuited
TTL digital output exhibits or can handle. Its value is -40 mA min., -65 mA
typ., -100 mA max. when Vcc=max; Vout = 0V.
 Supply current is the Vcc supply current exhibited by a TTL IC. Its value is
30 mA min., 50 mA max. when Vcc=max.
6.3. Interrupt Architecture
The first step in exploring the interrupt architecture is defining an overall model of the
hardware, kernel, OAL and thread interactions during an interrupt. The following
diagram is an overall picture of these different levels of responsibility and the transitions
that cause changes of state.
Figure 26. Interrupt architecture model
The diagram represents the major transitions during an interrupt with time increasing to
the right of the diagram. The bottom most layer of the diagram is the hardware and the
state of the interrupt controller. The next layer is the kernel interactions during interrupt
servicing. The OAL describes the board support package (BSP) responsibilities. The top
most layer represents the application or driver thread interactions needed to service an
interrupt. The diagram represents the interactions during a single interrupt.
The activity starts with an interrupt represented by the line at the left most section of the
chart. An exception is generated causing the kernel ISR vector to be loaded onto the
Department of Electronics & Communication Engineering 27
processor. The kernel ISR interacts with the hardware disabling all equal and lower
priority interrupts on all processors except for the ARM and Strong ARM architectures.
The kernel then vectors to the OAL ISR that has been registered for that particular
interrupt. The OAL ISR then can either directly handle the interrupt or can use
NKCallIntChain to walk a list of installed ISRs. The main ISR or any of the installed
ISRs then performs any work and returns the mapped interrupt called SYSINTR for that
device. If the ISR determines that its associated device is not causing the interrupt the
ISR returns SYSINTR_CHAIN, which causes NKCallIntChain( ) to walk the ISR list to
the next interrupt in the chain. The ISRs are called in the order that they were installed
creating a priority on the calling list.
Once the single ISR or its associated chain of ISRs has been called the return values can
be one of the following that is given in table below.
Table 6. Various Return Values
Return Value Action
SYSINTR_NOP Interrupt is not associated with any registered ISR for a device.
Kernel enables all other interrupts.
SYSINTR Interrupt is associated with a known registered ISR and device.
SYSINTR_RESCHED Interrupt was the result of a timer expiration requesting an OS
reschedule.
The SYSINTR return value is of highest interest to our discussion. Upon completion of
the ISR the kernel re-enables all interrupts on the processor except for the identified
interrupt. The kernel then signals the event that has been associated with the SYSINTR
value.
The IST of a driver or application is then able to run assuming that it is the highest
priority thread that is ready to run. The IST communicates with the associated device and
reads any necessary data from the device completing its interrupt interaction. The IST
then signals its completion with a call to InterruptDone( ) with the associated SYSINTR
value.
The kernel, upon receiving the InterruptDone for the SYSINTR value, then re-enables
the designated interrupt. This is the first point at which another interrupt for this device
can be received.
7. Modifications Introduced in the circuit
There was no output in the display of the LCD when all the connections were made
according to the circuit schematic as is given above. So certain modifications were
introduced in the circuit and then there was proper display on the LCD screen. What we did
is we interchanged the pin connections of the microcontroller pins 8 and 6 that were
interfacing the LCD with each other and then there was the display on the screen. The reason
behind this is pin 6 of microcontroller is an interrupt pin and pin 8 of the microcontroller is a
timer pin. The Enable signal of the microcontroller enables the LCD and prepares it to accept
any kind of input from data to instructions in HEX code. Thus Enable signal is actually an
interrupt signal and not a timer signal and hence the connection of the LCD Enable pin
should be done with pin 6 of the microcontroller. The pin 8 of the microcontroller gives a
timer output and since RS (Register Select) signal is a timing signal the RS pin of the LCD
panel should be connected with the timer pin (pin 8) of the microcontroller. This above
Department of Electronics & Communication Engineering 28
explanation justifies the change in connection and the reason why there was output on the
LCD panel when the interchange of the pin connection was done. The changed schematic
diagram is given below. The schematic is drawn in Express PCB software. The figure given
below shows the screen image of the schematic that was drawn.
Figure 27: Modified circuit schematic of the pulse counter
8. Circuit Layout
The optimized path of the circuit is first obtained in Express PCB from the Express Schematic
and the black and white printout of that is taken on a photo paper. The paper is then placed on
the copper PCB and pressed with hot iron for nearly 5 minutes in order to get its imprint on
the PCB. The copper PCB is then dipped into ferrous chloride (FeCl3) solution for nearly 5 to
8 minutes. The ferrous chloride solution acts as an etching solution and it etches copper from
Department of Electronics & Communication Engineering 29
that position of the PCB which is devoid of the imprint. The imprint of the layout obtained on
the photo paper is shown below.
Figure 28. The layout details of the circuit
9. Softwares Used
Various softwares have been used while making this project. Express PCB, which is a CAD
software is used to prepare the circuit schematic and the layout of the circuit, while the Keil
Compiler have been used to compile and debug the Embedded C code for the microcontroller
and then generate the mnemonics in the assembly language for every line of the program and
then generate the HEX code of the program which will be burnt in the microcontroller. The
softwares used have been discussed in detail below.
9.1. Express PCB
Express PCB is a very easy to use Windows application for laying out printed circuit
boards. This is a CAD software for designing circuit boards. The version of the software
that we used for our project is 7.0.0.2.
Department of Electronics & Communication Engineering 30
With the help of Express PCB we can first draw the schematic of the circuit and then we
can design its layout. Express PCB allows us to build the circuits in three different layers
namely, Silkscreen layer, Top copper layer, Bottom copper layer. We have used top
copper layer to build the majority of the circuit and at places we have used bottom copper
layer, though during integration in the hardware we have integrated the top copper layer
only for simplicity and the bottom copper layer connections have been made with the help
of jumper wires.
Note: Express PCB defaults the coordinates in inches.
Below are given few of the screen shots that were taken while working with the project.
Figure 29. Selection of components in Express PCB
Department of Electronics & Communication Engineering 31
Figure 30. Circuit schematic in Express PCB
9.2.Keil Compiler
The Keil Software 8051 development tools listed below are programs you use to compile
your C code, assemble your assembly source files, link and locate object modules and
libraries, create HEX files, and debug your target program. μVision2 for Windows™ is an
Integrated Development Environment that combines project management, source code
editing, and program debugging in one single, powerful environment. The C51 ANSI
Optimizing C Cross Compiler creates relocatable object modules from your C source
code. The A51 Macro Assembler creates relocatable object modules from the 8051
assembly source code. The BL51 Linker/Locator combines relocatable object modules
created by the C51 Compiler and the A51 Assembler into absolute object modules. The
LIB51 Library Manager combines object modules into libraries that may be used by the
Department of Electronics & Communication Engineering 32
linker. The OH51 Object-HEX Converter creates Intel HEX files from absolute object
modules.
The version of this software that has been used in this project is uVision2 Version
2.32.
Source files are created by the μVision2 IDE and are passed to the C51 Compiler or A51
assembler. The compiler and assembler process source files and create relocatable object
files. The Keil C51 Compiler is a full ANSI implementation of the C programming
language that supports all standard features of the C language. In addition, numerous
features for direct support of the 8051 architecture have been added.
The Keil A51 macro assembler supports the complete instruction set of the 8051 and all
derivatives.
Below are given few of the screen shots that were taken while working in this project.
Figure 31. The selection of the microcontroller AT89C4051 for which the coding will
be written in the Keil editor
Department of Electronics & Communication Engineering 33
Figure 32. The code written in the Keil compiler editor
Figure 33. The target window 1 for which device the code is developed
Department of Electronics & Communication Engineering 34
Figure 34. The target window 2 for which device the code is developed
Debugging is a methodical process of finding and reducing the number of bugs, or defects, in
a computer program or a piece of electronic hardware, thus making it behave as expected.
Debugging tends to be harder when various subsystems are tightly coupled, as changes in one
may cause bugs to emerge in another.
Figure 35. The debugged program along with the generated HEX Code
Department of Electronics & Communication Engineering 35
The Disassembly Window shows the program execution in assembly code, or intermixing
the source code with the assembly code (device dependent). Lines of code are marked as
follows in the left side-bar:
No Code - Lines with no code are marked with a light gray block.
Unexecuted Code - Unexecuted lines (instructions) are marked with a dark gray block.
Executed Code - Fully-executed lines (instructions) are marked with a green block.
Branch Condition True - A cyan (blue) block indicates that the condition for this branch
instruction has only been true and the branch was always taken.
Branch Condition False - An orange block indicates that the condition for this branch
instruction has never been true and the branch was never taken.
A green block on a branch instruction indicates that both the true and false conditions have
occurred.
Figure 36. The code along with the Mnemonics for every line
Department of Electronics & Communication Engineering 36
Figure 37. The disassembly window
In computer science, a memory map is a structure of data (which usually resides in memory
itself) that indicates how memory is laid out. Memory maps can have a different meaning in
different parts of the operating system.
In the boot process a memory map is passed on from the firmware in order to instruct an
operating system kernelabout memory layout. It contains the information regarding the size of
total memory, any reserved regions and may also provide other details specific to the
architecture.
In virtual memory implementations and memory management units, a memory map refers
page tables ,which store the mapping between a certain process's virtual memory layout and
how that space relates to physical memory addresses.
In native debugger programs, a memory map refers to the mapping between loaded
executable/library files and memory regions. These memory maps are used to resolve
memory addresses (such as function pointers) to actual symbols.
Department of Electronics & Communication Engineering 37
Figure 38. The memory map of every line of the code
10. The Embedded C Program
#include<reg51.h>
#define LCD P1
unsigned int Count,d1,d2,d3,d4,x1,x2,x3,x4;
sbit Pulse =P3^5;
sbit LED =P3^7;
sbit rs =P3^4;
sbit rw =P3^3;
sbit en =P3^2;
void LCDInit ();
void lcdcmd (unsigned char);
void lcdwrt (unsigned char);
void Delay (unsigned int);
void Convert (unsigned int);
void SerialTx (unsigned char);
Department of Electronics & Communication Engineering 38
void main(void)
{
unsigned char z,Display;
unsigned char code str1[]="PULSE COUNTER ";
unsigned char code str2[]="Design By";
unsigned char code str3[]="NAVYA ";
unsigned char code str4[]="DHAVASKAR ";
unsigned char code str5[]="PULSE:0000 ";
P0=0xFF;
P1=0xFF;
P2=0xFF;
P3=0xFF;
IE=0x00;
Count=0x00;
///////SERIALIZATION DATA///////
TMOD =0x20;
TH1 =0xFD;
SCON =0x50;
TR1 =1;
LED =0x00;
LCDInit();
for(z=0;z<16;z++)
{
Display=str1[z];
lcdwrt(display);
Delay(1);
SerialTx(Display);
Delay(1);
}
SerialTx('r');
SerialTx('n');
lcdcmd(0x00);
for(z=0;z<16;z++)
{
Display=str2[z];
lcdwrt(Display);
Delay(1);
Department of Electronics & Communication Engineering 39
SerialTx(Display);
Delay(1);
}
Delay(200);
SerialTx('r');
SerialTx('n');
lcdcmd(0x01);
Delay(1);
for(z=0;z<16;z++)
{
Display=str3[z];
lcdwrt(Display);
Delay(1);
SerialTx(Display);
Delay(1);
}
SerialTx('r');
Serialtx('n');
lcdcmd(0xC0);
for(z=0;z<16;z++)
{
Display=str4[z];
lcdwrt(Display);
Delay(1);
SerialTx(Display);
Delay(1);
}
Delay(200);
SerialTx('r');
SerialTx('n');
lcdcmd(0x01);
Delay(1);
lcdcmd(0xC0);
for(z=0;z<16;z++)
{
Display=str5[z];
lcdwrt(Display);
Delay(1);
SerialTx(Display);
Delay(1);
}
Delay(70);
SerialTx('r');
Serialtx('n');
while(1)
{
LED=1;
Delay(30);
if(Pulse==0)
{
Count=Count+1;
Convert(Count);
if(Count==9999)
Department of Electronics & Communication Engineering 40
Count=0x00;
}
}
}
Void Convert(unsigned int value)
{
x1=value/10;
d1=value%10;
x2=x1/10;
d2=x1%10;
x3=x2/10;
d3=x2%10;
d4=x3%10;
d1=d1|0x30;
d2=d2|0x30;
d3=d3|0x30;
d4=d4|0x30;
lcdcmd(0xC7);
lcdwrt(d4);
lcdwrt(d3);
lcdwrt(d2);
lcdwrt(d1);
Delay(1);
SerialTx(d4);
SerialTx(d3);
SerialTx(d2);
SerialTx(d1);
Delay(1);
SerialTx('r');
SerialTx('n');
LED=0;
Delay(30);
}
void LCDInit()
{
lcdcmd(0x38);
Delay(10);
lcdcmd(0x0E);
Delay(10);
lcdcmd(0x01);
Delay(10);
lcdcmd(0x0C);
Delay(10);
lcdcmd(0x80);
Delay(10);
return;
}
void lcdcmd(unsigned char value)
{
LCD=value;
rs=0;
rw=0;
Department of Electronics & Communication Engineering 41
en=1;
Delay(1);
en=0;
return;
}
void lcdwrt(unsigned char value)
{
LCD=value;
rs=1;
rw=0;
en=1;
Delay(1);
en=0;
return;
}
void SerialTx(unsigned char value)
{
SBUF=value;
while(T1==0);
T1=0;
}
void Delay(unsigned int x)
{
unsigned int i,j;
for(i=0;i<=x;i++)
for(j=0;j<=500;j++);
}
11. COM Port Output:
The output of the circuit i.e., the number of pulses those are counted are seen in the LCD
display fitted along with the circuit board. With the help of „D‟ type female connector we can
latch the output of the circuit with the COM 1 port of the CPU (Central Processing Unit) of
our computer and then we can see the output of our circuit in the hyper terminal of the
computer screen. With the help of this we can monitor the output of the circuit from our
computer thereby reducing our stress of monitoring the output in the LCD panel only.
HyperACCESS is the name for a number of successive computer communications software,
made by Hilgraeve. It was the first software product from Hilgraeve, and it was initially
designed to let 8-bit Heath computers communicate over a modem. In 1995 Hilgraeve
licensed a low-end version of HyperACCESS, known as HyperTerminal (essentially a "Lite"
version) to Microsoft for use in their set of communications utilities. It was initially bundled
with Windows 95, and subsequently all versions of Windows up to and including Windows
XP. Windows Vista and Windows 7 do not include HyperTerminal, though the commercial
Department of Electronics & Communication Engineering 42
products HyperTerminal Private Edition and HyperACCESS support all versions of Windows
up to and including Windows 7.
Figure 39. Steps to go to the Connection Description dialogue box
HyperTerminal is an application you can use in order to connect your computer to other
remote systems. These systems include other computers, bulletin board systems, servers,
Telnet sites, and online services. However, you would need a modem, an Ethernet connection,
or a null modem cable before you can use HyperTerminal.
Though using HyperTerminal with a BBS to access information on remote computers is a
practice that has become less common with the availability of the World Wide Web,
HyperTerminal is still a useful means of configuring and testing your modem or examining
your connection with other sites.
HyperTerminal records the messages passed to and from the computer or service on the other
end of your connection. Therefore, it can serve as a valuable troubleshooting tool when
setting up and using your modem. To make sure that our modem is connected properly or to
view our modem's settings, we can send commands through HyperTerminal and check the
results. HyperTerminal has scroll functionality that allows you to look at received text that
has scrolled off the screen.
Department of Electronics & Communication Engineering 43
Figure 40. The Connection Description dialogue box
We can use HyperTerminal to transfer large files from a computer onto your portable
computer using a serial port rather than going through the process of setting up your portable
computer on a network.
Figure 41. Selction of the COMPort
Department of Electronics & Communication Engineering 44
We can use HyperTerminal to help debug source code from a remote terminal. We can also
use HyperTerminal to communicate with older character-based computers.
Figure 42. The COM1 properties dialogue box
HyperTerminal is designed to be an easy-to-use tool and is not meant to replace other full-
feature tools available on the market. We can use HyperTerminal to perform the specific tasks
described above, but do not attempt to use HyperTerminal for more complex communication
needs.
Department of Electronics & Communication Engineering 45
Figure 43. The hyper terminal window showing the output
Department of Electronics & Communication Engineering 46
Conclusion
From the above discussion we can conclude that the pulse counter that we have
developed can be used for industrial automation which in turn can reduce the human
workforce and thus increase the profit and reliability of the organisation. The various
softwares that have been used in this project gave us hands on experience on them.
We learnt how to fabricate a circuit in single sided copper PCB and how to design two
layer copper layout, even though we have used only one layer copper layout for our
project for simplicity.
Department of Electronics & Communication Engineering 47
REFERENCES
 Electronics For You, Oct, 2010.
 www.keil.com, Keil Compiler.
 www.expresspcb.com, Express PCB.
 www.atmel.com/literature, Datasheet of AT89C4051.
 www.fairchildsemi.com, Datasheet of MC78XX.
 Texas Instruments, Datasheet of MAX232.
 www.omega.com, RS-232 Standard.
 www.iqdfrequencyproducts.com, Datasheet of HC49 Crystals.
 www.silabs.com/MCU, Interrupt Architecture.
 www.electronics-tutorials.ws/capacitor/cap_5.html, Capacitor colour codes.
 www.en.wikipedia.org, General information about components.
 Beyond Logic, April 12th
,2011, Interfacing Example- 16 Character * 2 Line LCD.
 www.microsoftsto.112.2o7.net, Interrupt Architecture.
 www.siliconfareast.com/ttl.htm, TTL Standards.

Weitere ähnliche Inhalte

Was ist angesagt?

Was ist angesagt? (20)

Electrical Distribution Systems: Syllabus
Electrical Distribution Systems: SyllabusElectrical Distribution Systems: Syllabus
Electrical Distribution Systems: Syllabus
 
Prepaid energy meter with gsm interface
Prepaid energy meter with gsm interfacePrepaid energy meter with gsm interface
Prepaid energy meter with gsm interface
 
Lecture 09 transmission lines
Lecture 09   transmission linesLecture 09   transmission lines
Lecture 09 transmission lines
 
Neutral grounding
Neutral groundingNeutral grounding
Neutral grounding
 
130935887 areva-kvfg-r8559 c
130935887 areva-kvfg-r8559 c130935887 areva-kvfg-r8559 c
130935887 areva-kvfg-r8559 c
 
wiring Part 3: wires & cables
wiring Part 3: wires & cableswiring Part 3: wires & cables
wiring Part 3: wires & cables
 
7SR11 Overcurrent Relay
7SR11 Overcurrent Relay7SR11 Overcurrent Relay
7SR11 Overcurrent Relay
 
Plc based automatic water filling system
Plc based automatic water filling systemPlc based automatic water filling system
Plc based automatic water filling system
 
Elastimold - Cable Connectors, Joints, Terminations Catalogue
Elastimold - Cable Connectors, Joints, Terminations CatalogueElastimold - Cable Connectors, Joints, Terminations Catalogue
Elastimold - Cable Connectors, Joints, Terminations Catalogue
 
Types of Cable.PPT
Types of Cable.PPTTypes of Cable.PPT
Types of Cable.PPT
 
switchboards
switchboardsswitchboards
switchboards
 
7SR10 Overcurrent Relay
7SR10 Overcurrent Relay7SR10 Overcurrent Relay
7SR10 Overcurrent Relay
 
Ac dc converter
Ac  dc converterAc  dc converter
Ac dc converter
 
Protection settings calculation
Protection settings calculationProtection settings calculation
Protection settings calculation
 
re ram.pptx
re ram.pptxre ram.pptx
re ram.pptx
 
Power system earthing
Power system earthingPower system earthing
Power system earthing
 
Inductance and capacitance
 Inductance and capacitance Inductance and capacitance
Inductance and capacitance
 
Shadow alarm
Shadow alarm Shadow alarm
Shadow alarm
 
witricity
witricitywitricity
witricity
 
Basic electrical
Basic electricalBasic electrical
Basic electrical
 

Andere mochten auch

Variable power supply with digital control with seven segments display
Variable power supply with digital control with seven segments displayVariable power supply with digital control with seven segments display
Variable power supply with digital control with seven segments displaypoornima college of engg. jaipur
 
Variable power supply
Variable power supplyVariable power supply
Variable power supplyTeksify
 
DIGITAL VOLTMETER USING 8051 MICROCONTROLLER
DIGITAL VOLTMETER USING 8051 MICROCONTROLLERDIGITAL VOLTMETER USING 8051 MICROCONTROLLER
DIGITAL VOLTMETER USING 8051 MICROCONTROLLERChirag Lakhani
 
Variable Regulated Power Supply
Variable Regulated Power SupplyVariable Regulated Power Supply
Variable Regulated Power SupplyBhanu Bhawesh
 
mechanical, electronics, electrical engineering Project list for B.E./M.E./DI...
mechanical, electronics, electrical engineering Project list for B.E./M.E./DI...mechanical, electronics, electrical engineering Project list for B.E./M.E./DI...
mechanical, electronics, electrical engineering Project list for B.E./M.E./DI...shree samarth innovations
 
seminar presentation on high speed train
 seminar presentation on high speed train seminar presentation on high speed train
seminar presentation on high speed trainmechanical Singh
 

Andere mochten auch (8)

Variable power supply with digital control with seven segments display
Variable power supply with digital control with seven segments displayVariable power supply with digital control with seven segments display
Variable power supply with digital control with seven segments display
 
Variable power supply
Variable power supplyVariable power supply
Variable power supply
 
DIGITAL VOLTMETER USING 8051 MICROCONTROLLER
DIGITAL VOLTMETER USING 8051 MICROCONTROLLERDIGITAL VOLTMETER USING 8051 MICROCONTROLLER
DIGITAL VOLTMETER USING 8051 MICROCONTROLLER
 
Variable Regulated Power Supply
Variable Regulated Power SupplyVariable Regulated Power Supply
Variable Regulated Power Supply
 
mechanical, electronics, electrical engineering Project list for B.E./M.E./DI...
mechanical, electronics, electrical engineering Project list for B.E./M.E./DI...mechanical, electronics, electrical engineering Project list for B.E./M.E./DI...
mechanical, electronics, electrical engineering Project list for B.E./M.E./DI...
 
Bullet train
Bullet trainBullet train
Bullet train
 
seminar presentation on high speed train
 seminar presentation on high speed train seminar presentation on high speed train
seminar presentation on high speed train
 
Slideshare ppt
Slideshare pptSlideshare ppt
Slideshare ppt
 

Ähnlich wie 5 FINAL PROJECT REPORT

AUTOMATIC WIRELESS POWER GRID CONTROL
AUTOMATIC WIRELESS POWER GRID CONTROLAUTOMATIC WIRELESS POWER GRID CONTROL
AUTOMATIC WIRELESS POWER GRID CONTROLshiv kapil
 
Cockpit White Box
Cockpit White BoxCockpit White Box
Cockpit White Boxncct
 
CONTROLLING HOME APPLIANCES USING REMOTE(1)
CONTROLLING HOME APPLIANCES USING REMOTE(1)CONTROLLING HOME APPLIANCES USING REMOTE(1)
CONTROLLING HOME APPLIANCES USING REMOTE(1)Ambar Gupta
 
INTELLIGENT HELMET FOR COAL MINERS
INTELLIGENT HELMET FOR COAL MINERSINTELLIGENT HELMET FOR COAL MINERS
INTELLIGENT HELMET FOR COAL MINERSARUN P S
 
INTERRUPT DRIVEN MULTIPLEXED 7 SEGMENT DIGITAL CLOCK
INTERRUPT DRIVEN MULTIPLEXED 7 SEGMENT DIGITAL CLOCKINTERRUPT DRIVEN MULTIPLEXED 7 SEGMENT DIGITAL CLOCK
INTERRUPT DRIVEN MULTIPLEXED 7 SEGMENT DIGITAL CLOCKSantanu Chatterjee
 
IRJET - Monitoring and Protection of Distribution Transformer using GSM Module
IRJET - Monitoring and Protection of Distribution Transformer using GSM ModuleIRJET - Monitoring and Protection of Distribution Transformer using GSM Module
IRJET - Monitoring and Protection of Distribution Transformer using GSM ModuleIRJET Journal
 
Speed Control of DC motor using AT89C52 IC
Speed Control of DC motor using AT89C52 ICSpeed Control of DC motor using AT89C52 IC
Speed Control of DC motor using AT89C52 ICDisha Modi
 
Automatic power factor controller by microcontroller
Automatic power factor controller by microcontrollerAutomatic power factor controller by microcontroller
Automatic power factor controller by microcontrollerSanket Shitole
 
IRJET- IoT based Industrial Automation
IRJET-  	  IoT based Industrial AutomationIRJET-  	  IoT based Industrial Automation
IRJET- IoT based Industrial AutomationIRJET Journal
 
under grund fault ppt (1).pptx
under grund fault ppt (1).pptxunder grund fault ppt (1).pptx
under grund fault ppt (1).pptxPoojaG86
 
Steper Motor Control Through Wireless
Steper Motor Control Through WirelessSteper Motor Control Through Wireless
Steper Motor Control Through WirelessPawan Bahuguna
 
b658014a-3762-420f-b315-8d2d0576e752-150428010626-conversion-gate02.pdf
b658014a-3762-420f-b315-8d2d0576e752-150428010626-conversion-gate02.pdfb658014a-3762-420f-b315-8d2d0576e752-150428010626-conversion-gate02.pdf
b658014a-3762-420f-b315-8d2d0576e752-150428010626-conversion-gate02.pdfPARSHOTTAMRAJ
 
ELECTRICAL ENGINEERING PROJECT
ELECTRICAL ENGINEERING PROJECTELECTRICAL ENGINEERING PROJECT
ELECTRICAL ENGINEERING PROJECTvasav2204
 
electrical engineering project
electrical engineering projectelectrical engineering project
electrical engineering projectvasav2204
 
IRJET- Monitoring and Protection of Distribution Transformer using GSM Module
IRJET- Monitoring and Protection of Distribution Transformer using GSM ModuleIRJET- Monitoring and Protection of Distribution Transformer using GSM Module
IRJET- Monitoring and Protection of Distribution Transformer using GSM ModuleIRJET Journal
 

Ähnlich wie 5 FINAL PROJECT REPORT (20)

AUTOMATIC WIRELESS POWER GRID CONTROL
AUTOMATIC WIRELESS POWER GRID CONTROLAUTOMATIC WIRELESS POWER GRID CONTROL
AUTOMATIC WIRELESS POWER GRID CONTROL
 
Cockpit White Box
Cockpit White BoxCockpit White Box
Cockpit White Box
 
Speed control of motor
Speed control of motorSpeed control of motor
Speed control of motor
 
CONTROLLING HOME APPLIANCES USING REMOTE(1)
CONTROLLING HOME APPLIANCES USING REMOTE(1)CONTROLLING HOME APPLIANCES USING REMOTE(1)
CONTROLLING HOME APPLIANCES USING REMOTE(1)
 
INTELLIGENT HELMET FOR COAL MINERS
INTELLIGENT HELMET FOR COAL MINERSINTELLIGENT HELMET FOR COAL MINERS
INTELLIGENT HELMET FOR COAL MINERS
 
INTERRUPT DRIVEN MULTIPLEXED 7 SEGMENT DIGITAL CLOCK
INTERRUPT DRIVEN MULTIPLEXED 7 SEGMENT DIGITAL CLOCKINTERRUPT DRIVEN MULTIPLEXED 7 SEGMENT DIGITAL CLOCK
INTERRUPT DRIVEN MULTIPLEXED 7 SEGMENT DIGITAL CLOCK
 
Badal sharma
Badal sharmaBadal sharma
Badal sharma
 
Automatic irrigation system
Automatic irrigation systemAutomatic irrigation system
Automatic irrigation system
 
IRJET - Monitoring and Protection of Distribution Transformer using GSM Module
IRJET - Monitoring and Protection of Distribution Transformer using GSM ModuleIRJET - Monitoring and Protection of Distribution Transformer using GSM Module
IRJET - Monitoring and Protection of Distribution Transformer using GSM Module
 
Speed Control of DC motor using AT89C52 IC
Speed Control of DC motor using AT89C52 ICSpeed Control of DC motor using AT89C52 IC
Speed Control of DC motor using AT89C52 IC
 
Automatic power factor controller by microcontroller
Automatic power factor controller by microcontrollerAutomatic power factor controller by microcontroller
Automatic power factor controller by microcontroller
 
IRJET- IoT based Industrial Automation
IRJET-  	  IoT based Industrial AutomationIRJET-  	  IoT based Industrial Automation
IRJET- IoT based Industrial Automation
 
under grund fault ppt (1).pptx
under grund fault ppt (1).pptxunder grund fault ppt (1).pptx
under grund fault ppt (1).pptx
 
Steper Motor Control Through Wireless
Steper Motor Control Through WirelessSteper Motor Control Through Wireless
Steper Motor Control Through Wireless
 
b658014a-3762-420f-b315-8d2d0576e752-150428010626-conversion-gate02.pdf
b658014a-3762-420f-b315-8d2d0576e752-150428010626-conversion-gate02.pdfb658014a-3762-420f-b315-8d2d0576e752-150428010626-conversion-gate02.pdf
b658014a-3762-420f-b315-8d2d0576e752-150428010626-conversion-gate02.pdf
 
Presentation
PresentationPresentation
Presentation
 
ELECTRICAL ENGINEERING PROJECT
ELECTRICAL ENGINEERING PROJECTELECTRICAL ENGINEERING PROJECT
ELECTRICAL ENGINEERING PROJECT
 
electrical engineering project
electrical engineering projectelectrical engineering project
electrical engineering project
 
IRJET- Monitoring and Protection of Distribution Transformer using GSM Module
IRJET- Monitoring and Protection of Distribution Transformer using GSM ModuleIRJET- Monitoring and Protection of Distribution Transformer using GSM Module
IRJET- Monitoring and Protection of Distribution Transformer using GSM Module
 
Ge8808 led datasheet
Ge8808 led datasheetGe8808 led datasheet
Ge8808 led datasheet
 

5 FINAL PROJECT REPORT

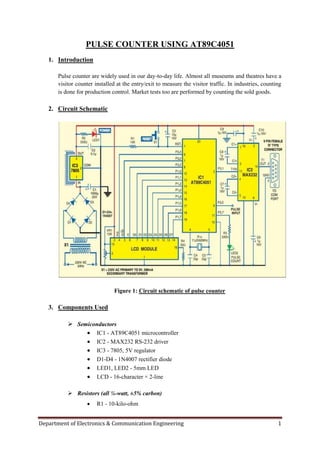
  • 1. Department of Electronics & Communication Engineering 1 PULSE COUNTER USING AT89C4051 1. Introduction Pulse counter are widely used in our day-to-day life. Almost all museums and theatres have a visitor counter installed at the entry/exit to measure the visitor traffic. In industries, counting is done for production control. Market tests too are performed by counting the sold goods. 2. Circuit Schematic Figure 1: Circuit schematic of pulse counter 3. Components Used  Semiconductors  IC1 - AT89C4051 microcontroller  IC2 - MAX232 RS-232 driver  IC3 - 7805, 5V regulator  D1-D4 - 1N4007 rectifier diode  LED1, LED2 - 5mm LED  LCD - 16-character × 2-line  Resistors (all ¼-watt, ±5% carbon)  R1 - 10-kilo-ohm
  • 2. Department of Electronics & Communication Engineering 2  R2, R3 - 330-ohm  R4 - 33-ohm  Capacitors  C1 - 1000μF, 25V electrolytic  C2 - 0.1μF ceramic disk  C3 - 10μF, 16V electrolytic  C4, C5 - 33pF ceramic disk  C6-C10 - 1μF, 16V electrolytic  Miscellaneous  X1 - 230V AC primary to 9V,500mA secondary transformer  S1 - Push-to-on switch  XTAL - 11.0592MHz crystal  9-pin D-type female COM port connector  Heat-sink 4. Hardware Description All the major components that have been used in the project are described below. 4.1. Microcontroller AT89C4051 The AT89C4051 is a low-voltage, high-performance CMOS 8-bit microcontroller with 4K bytes of Flash programmable and erasable read-only memory. The device is manufactured using Atmel‟s high-density 2on-volatile memory technology and is compatible with the industry-standard MCS-51 instruction set. By combining a versatile 8-bit CPU with Flash on a monolithic chip, the Atmel AT89C4051 is a powerful microcontroller which provides a highly-flexible and cost-effective solution to many embedded control applications. The AT89C4051 provides the following standard features: 4K bytes of Flash, 128 bytes of RAM, 15 I/O lines, two 16-bit timer/counters, a five-vector, two-level interrupt architecture, a full duplex serial port, a precision analog comparator, on-chip oscillator and clock circuitry. In addition, the AT89C4051 is designed with static logic for operation down to zero frequency and supports two software-selectable power saving modes. The Idle Mode stops the CPU while allowing the RAM, timer/counters, serial port
  • 3. Department of Electronics & Communication Engineering 3 and interrupt system to continue functioning. The power-down mode saves the RAM contents but freezes the oscillator disabling all other chip functions until the next hardware reset. Salient Features  Compatible with MCS®51 Products  4K Bytes of Reprogrammable Flash Memory  Endurance: 1,000 Write/Erase Cycles  2.7V to 6V Operating Range  Fully Static Operation: 0 Hz to 24 MHz  Two-level Program Memory Lock  128 x 8-bit Internal RAM  15 Programmable I/O Lines  Two 16-bit Timer/Counters  Six Interrupt Sources  Programmable Serial UART Channel  Direct LED Drive Outputs  On-chip Analog Comparator  Low-power Idle and Power-down Modes  Brown-out Detection  Power-On Reset (POR)  Green (Pb/Halide-free/RoHS Compliant) Packaging Figure 2. Pin configuration of AT89C4051
  • 4. Department of Electronics & Communication Engineering 4 Figure 3. Internal block diagram of AT89C4051 4.2. IC MAX232 The MAX232 device is a dual driver/receiver that includes a capacitive voltage generator to supply EIA-232 voltage levels from a single 5-V supply. Each receiver converts EIA- 232 inputs to 5-V TTL/CMOS levels. These receivers have a typical threshold of 1.3 V and a typical hysteresis of 0.5 V, and can accept ±30-V inputs. Each driver converts TTL/CMOS input levels into EIA-232 levels. The driver, receiver, and voltage-generator functions are available as cells in the Texas Instruments library. The MAX232 is characterized for operation from 0°C to 70°C. The MAX232I is characterized for operation from –40°C to 85°C.
  • 5. Department of Electronics & Communication Engineering 5 Salient Features  Operates With Single 5-V Power Supply  Lin BiCMOS Process Technology  Two Drivers and Two Receivers  ±30-V Input Levels  Low Supply Current . . . 8 mA Typical  Meets or Exceeds TIA/EIA-232-F and ITU Recommendation V.28  Designed to be Interchangeable With Maxim MAX232  ESD Protection Exceeds 2000 V Per MIL-STD-883, Method 3015  Package Options Include Plastic Small-Outline (D, DW) Packages and Standard Plastic (N) DIPs. Figure 4. Pin configuration of MAX 232
  • 6. Department of Electronics & Communication Engineering 6 Applications This IC can be used in battery-powered systems, terminals, modems and computers. 4.3. IC 7805 The MC78XX/LM78XX/MC78XXA series of three terminal positive regulators are available in the TO-220/D-PAK package and with several fixed output voltages, making them useful in a wide range of applications. Each type employs internal current limiting, thermal shut down and safe operating area protection, making it essentially indestructible. If adequate heat sinking is provided, they can deliver over 1A output current. Although designed primarily as fixed voltage regulators, these devices can be used with external components to obtain adjustable voltages and currents. . The most commonly used ones are 7805 and 7812. 7805 gives fixed 5V DC voltage if input voltage is in (7.5V,20V). We can see the heat sink above the voltage regulator. Salient Features  Output Current up to 1A  Output Voltages of 5, 6, 8, 9, 10, 12, 15, 18, 24V  Thermal Overload Protection  Short Circuit Protection  Output Transistor Safe Operating Area Protection Figure 5.Internal block diagram of IC 7805
  • 7. Department of Electronics & Communication Engineering 7 Figure 6. Picture of voltage regulator IC 7805 The description of the above numbered pins are 1-input, 2-ground, 3-output.The electrical connection of this IC in the circuit is given below. Figure 7. The electrical connection of IC 7805 The above diagram show how to use 7805 voltage regulator. In this we can see that coupling capacitors are used for good regulation. But there is no need for it in normal case. But if we are using 7805 in analog circuit you should use capacitor, otherwise the noise in the output voltage will be high. 4.4.LCD – 16-character × 2-line A 16 Character x 2 Line LCD Modules are very common these days, and are quite simple to work with, as all the logic required to run them is on board.
  • 8. Department of Electronics & Communication Engineering 8 Figure 8. Schematic of LCD – 16-character × 2-line display Above is the quite simple schematic. The LCD panel‟s Enable and Register Select is connected to the Control Port. The Control Port is an open collector / open drain output. While most Parallel Ports have internal pull-up resistors, there are a few which don‟t. Therefore by incorporating the two 10K external pull up resistors, the circuit is more portable for a wider range of computers, some of which may have no internal pull up resistors. We make no effort to place the Data bus into reverse direction. Therefore we hard wire the R/W line of the LCD panel, into write mode. This will cause no bus conflicts on the data lines. As a result we cannot read back the LCD‟s internal Busy Flag which tells us if the LCD has accepted and finished processing the last instruction. This problem is overcome by inserting known delays into our program. The 10k Potentiometer controls the contrast of the LCD panel. Nothing fancy here. As with all the examples, I‟ve left the power supply out. You can use a bench power supply set to 5v or use a onboard +5 regulator. Remember a few de-coupling capacitors, especially if you have trouble with the circuit working properly. The 2 line x 16 character LCD modules are available from a wide range of manufacturers and should all be compatible with the HD44780. Figure 9. The image of a LCD- 16-character × 2-line display
  • 9. Department of Electronics & Communication Engineering 9 4.5.Crystal 11.05 MHz Description  Industry standard leaded package  Resistance welded, hermetically sealed in an inert atmosphere, glass to metal seals on leads General Specifications  Load Capacitance (CL): 10pF to 75pF or Series  Drive Level: 1mW max  Ageing: ±3ppm typ per year at 25°C  Shunt Capacitance (C0): 7pF max  Standard frequency tolerances and stabilities of ±5ppm, ±10ppm, ±15ppm, ±20ppm, ±30ppm, ±50ppm, ±100ppm  Operating temperature ranges from 0 to 50°C, –10 to 60°C , –20 to 70°C, –30 to 80°C , –40 to 85°C, –55 to 105°C and –55 to 125°C  Storage temperature range between –55 to 125°C  Environmental Shock: 981m/s2, 6ms, 3 times in each of 3 mutually perpendicular planes  Vibration: 10Hz-60MHz, 0.75mm amplitude, 60Hz-500Hz, 98.1m/s2, 30mins in 3 mutually perpendicular planes Figure 10. The picture of a crystal
  • 10. Department of Electronics & Communication Engineering 10 4.6.Power Supply Power supply can be defined as electronic equipment, which is a stable source of D.C. power for electronic circuits. There are many types of power supply. Most are designed to convert high voltage AC mains electricity to a suitable low voltage supply for electronic circuits and other devices. A power supply can by broken down into a series of blocks, each of which performs a particular function. For example a 5V regulated supply. Figure 11. Block diagram of a regulated power supply system The figure given below shows the output voltage waveform of a step-down transformer. Figure 12. Output voltage waveform of step-down transformer Transformers convert AC electricity from one voltage to another with little loss of power. Transformers work only with AC and this is one of the reasons why mains electricity is AC. Step-up transformers increase voltage, step-down transformers reduce voltage. Most power supplies use a step-down transformer to reduce the dangerously high mains voltage (230V in India) to a safer low voltage. The input coil is called the primary and the output coil is called the secondary. There is no electrical connection between the two coils, instead they are linked by an alternating magnetic field created in the soft-iron core of the transformer. The two lines in the middle of the circuit symbol represent the core.
  • 11. Department of Electronics & Communication Engineering 11 Transformers waste very little power so the power out is (almost) equal to the power in. Note that as voltage is stepped down current is stepped up. The ratio of the number of turns on each coil, called the turns ratio, determines the ratio of the voltages. A step-down transformer has a large number of turns on its primary (input) coil which is connected to the high voltage mains supply, and a small number of turns on its secondary (output) coil to give a low output voltage. The low voltage AC output is suitable for lamps, heaters and special AC motors. It is not suitable for electronic circuits unless they include a rectifier and a smoothing capacitor. The smooth DC output has a small ripple. It is suitable for most electronic circuits. Figure 13. Output voltage waveform after the use of bridge rectifier circuit A bridge rectifier can be made using four individual diodes, but it is also available in special packages containing the four diodes required. It is called a full-wave rectifier because it uses all the AC wave (both positive and negative sections). 1.4V is used up in the bridge rectifier because each diode uses 0.7V when conducting and there are always two diodes conducting. Bridge rectifiers are rated by the maximum current they can pass and the maximum reverse voltage they can withstand (this must be at least three times the supply RMS voltage so the rectifier can withstand the peak voltages). Smoothing is performed by a large value electrolytic capacitor connected across the DC supply to act as a reservoir, supplying current to the output when the varying DC voltage from the rectifier is falling. The capacitor charges quickly near the peak of the varying DC, and then discharges as it supplies current to the output. Note that smoothing significantly increases the average DC voltage to almost the peak value (1.4 × RMS value). For example 6V RMS AC is rectified to full wave DC of about 4.6V RMS (1.4V is lost in the bridge rectifier), with smoothing this increases to almost the peak value giving 1.4 × 4.6 = 6.4V smooth DC. Smoothing is not perfect due to the capacitor voltage falling a little as it discharges, giving a small ripple voltage. For many circuits a ripple
  • 12. Department of Electronics & Communication Engineering 12 which is 10% of the supply voltage is satisfactory and the equation below gives the required value for the smoothing capacitor. A larger capacitor will give less ripple. Smoothing capacitor for 10% ripple, C = (5*I0) / (VS * f). Where, I0 = output current from the supply VS = supply voltage (peak value of unsmoothed DC) f = frequency of the AC supply (50Hz in India) The figure 14 given below shows the process of capacitor charging and discharging along with the voltage waveform. Figure 16 shows the resultant output voltage waveform that is fed to the electronic circuits for dc operation. Figure 14. Voltage waveform showing capacitor charging and discharging Figure 15. Output waveform after the use of capacitors for smoothing The smooth DC output has a small ripple. It is suitable for most electronic circuits.
  • 13. Department of Electronics & Communication Engineering 13 Figure 16. Output voltage waveform after the use of voltage regulator IC 78XX series 4.7.Capacitors A capacitor (formerly known as condenser) is a device for storing electric charge. The forms of practical capacitors vary widely, but all contain at least two conductors separated by a non-conductor. A capacitor is a passive electronic component consisting of a pair of conductors separated by a dielectric (insulator). When there is a potential difference (voltage) across the conductors, a static electric field develops across the dielectric, causing positive charge to collect on one plate and negative charge on the other plate. Energy is stored in the electrostatic field. Figure 17. Images of various types of available capacitors 4.7.1. Capacitor Colour Codes Generally, the actual values of Capacitance, Voltage or Tolerance are marked onto the body of the capacitors in the form of alphanumeric characters. However, when the value of the capacitance is of a decimal value problems arise with the marking of a "Decimal Point" as it could easily not be noticed resulting in a misreading of the actual value. Instead letters such as p (pico) or n (nano) are used in place of the decimal point to identify its position and the weight of the number. For example, a capacitor can be labelled as, n47 = 0.47nF, 4n7 = 4.7nF or 47n = 47nF. Also, sometimes capacitors are marked with the capital letter K to signify a value of one thousand pico-Farads, so for example, a capacitor with the markings of 100K would be 100 x 1000pF or 100nF.
  • 14. Department of Electronics & Communication Engineering 14 To reduce the confusion regarding letters, numbers and decimal points, an International colour coding scheme was developed many years ago as a simple way of identifying capacitor values and tolerances. It consists of coloured bands (in spectral order) known commonly as the Capacitor Colour Code system and whose meanings are illustrated below: Table 1. Capacitor Colour Code Colour Digit A Digit B Multiplier D Tolerance (T) > 10pf Tolerance (T) < 10pf Temperature Coefficient (TC) Black 0 0 x1 ± 20% ± 2.0pF Brown 1 1 x10 ± 1% ± 0.1pF -33x10-6 Red 2 2 x100 ± 2% ± 0.25pF -75x10-6 Orange 3 3 x1,000 ± 3% -150x10-6 Yellow 4 4 x10,000 ± 4% -220x10-6 Green 5 5 x100,000 ± 5% ± 0.5pF -330x10-6 Blue 6 6 x1,000,000 -470x10-6 Violet 7 7 -750x10-6 Grey 8 8 x0.01 +80%,-20% White 9 9 x0.1 ± 10% ± 1.0pF Gold x0.1 ± 5% Silver x0.01 ± 10% Capacitor Voltage Reference  Type J - Dipped Tantalum Capacitors.  Type K - Mica Capacitors.  Type L - Polyester/Polystyrene Capacitors.  Type M - Electrolytic 4 Band Capacitors.  Type N - Electrolytic 3 Band Capacitors.
  • 15. Department of Electronics & Communication Engineering 15 Table 2. Capacitor Voltage Colour Code Table Colour Voltage Rating Type J Type K Type L Type M Type N Black 4 100 10 10 Brown 6 200 100 1.6 Red 10 300 250 4 35 Orange 15 400 40 Yellow 20 500 400 6.3 6 Green 25 600 16 15 Blue 35 700 630 20 Violet 50 800 Grey 900 25 25 White 3 1000 2.5 3 Gold 2000 Silver An example of the use of capacitor colour codes is given as: Metalized Polyester Capacitors Figure 18. Example 1 of capacitor colour code
  • 16. Department of Electronics & Communication Engineering 16 Disc & Ceramic Capacitors Figure 19. Example 2 of capacitor colour code The Capacitor Colour Code system was used for many years on unpolarised polyester and mica moulded capacitors. This system of colour coding is now obsolete but there are still many “old” capacitors around. Nowadays, small capacitors such as film or disk types conform to the BS1852 Standard and its new replacement, BS EN 60062, were the colours have been replaced by a letter or number coded system. The code consists of 2 or 3 numbers and an optional tolerance letter code to identify the tolerance. Where a two number code is used the value of the capacitor only is given in picofarads, for example, 47 = 47 pF and 100 = 100pF etc. A three letter code consists of the two value digits and a multiplier much like the resistor colour codes in the resistors section. For example, the digits 471 = 47*10 = 470pF. Three digit codes are often accompanied by an additional tolerance letter code as given below. Table 3. Capacitor Tolerance Letter Codes Table Letter B C D F G J K M Z Tolerance C <10pF ±pF 0.1 0.25 0.5 1 2 C >10pF ±% 0.5 1 2 5 10 20 +80-20 Consider the capacitor below: The capacitor on the left is of a ceramic disc type capacitor that has the code 473J printed onto its body. Then the 4 = 1st digit, the 7 = 2nd digit, the 3 is the multiplier in pico-Farads, pF and the letter J is the tolerance and this translates to: 47pF * 1,000 (3 zero's) = 47,000 pF , 47nF or 0.047 uF the J indicates a tolerance of +/- 5%
  • 17. Department of Electronics & Communication Engineering 17 Then by just using numbers and letters as codes on the body of the capacitor we can easily determine the value of its capacitance either in Pico-farad's, Nano- farads or Micro-farads and a list of these "international" codes is given in the following table along with their equivalent capacitances. Table 4. Capacitor Letter Codes Table Picofarad (pF) Nanofarad (nF) Microfarad (uF) Code Picofarad (pF) Nanofarad (nF) Microfarad (uF) Code 10 0.01 0.00001 100 4700 4.7 0.0047 472 15 0.015 0.000015 150 5000 5.0 0.005 502 22 0.022 0.000022 220 5600 5.6 0.0056 562 33 0.033 0.000033 330 6800 6.8 0.0068 682 47 0.047 0.000047 470 10000 10 0.01 103 100 0.1 0.0001 101 15000 15 0.015 153 120 0.12 0.00012 121 22000 22 0.022 223 130 0.13 0.00013 131 33000 33 0.033 333 150 0.15 0.00015 151 47000 47 0.047 473 180 0.18 0.00018 181 68000 68 0.068 683 220 0.22 0.00022 221 100000 100 0.1 104 330 0.33 0.00033 331 150000 150 0.15 154 470 0.47 0.00047 471 200000 200 0.2 254 560 0.56 0.00056 561 220000 220 0.22 224 680 0.68 0.00068 681 330000 330 0.33 334 750 0.75 0.00075 751 470000 470 0.47 474 820 0.82 0.00082 821 680000 680 0.68 684 1000 1.0 0.001 102 1000000 1000 1.0 105 1500 1.5 0.0015 152 1500000 1500 1.5 155 2000 2.0 0.002 202 2000000 2000 2.0 205 2200 2.2 0.0022 222 2200000 2200 2.2 225
  • 18. Department of Electronics & Communication Engineering 18 Figure 20. Image of an electrolytic capacitor 4.8.Diodes and LEDs Diodes are two terminal devices which conduct electricity in one direction. Current flows from anode to cathode when the diode is forward biased. In a normal forward biased diode, energy is dissipated as heat in the junction, but in LED's energy dissipated as visible light. In robotics we use normal diodes as freewheeling diodes or to make power supply. LED's are of two types - IR led and normal LED. IR LED emits Infra Red radiations while normal LED emit visible light. So first talk about a normal diode. Mostly we us 1N4001 or 1N4007 as freewheeling diodes for motors or relays, sometimes in H- bridge also. Figure 21. Image of a diode and it’s logical symbol The main specification of LED are its current rating=20mA, typical cut in voltage=2V, life time=2lakh hours, max. voltage is around 4.5V. There are different colour LED's depending on the semi conducting material. LED has two leads- cathode and anode. They are identified by the length of the lead. Cathode lead is of lesser length. But I have seen some LED's with manufacturing defect having cathode lead longer. So in order to identify the cathode of the LED see the figure below. In that you can see that cathode is of broader filament.I got some white LED's of cathode of small filament. So this convention can be right or wrong. Check LED in both ways to see that LED is good. Don't connect LED to Vcc. Suppose if you connect the output of 7805 directly to an LED then the voltage
  • 19. Department of Electronics & Communication Engineering 19 output of 7805 reduces to 3.85V from 5.02 voltage output of 7805( I checked it with a white LED producing green light). So when you connect LED to the output of any IC connect a series resistor with it. The brightness of LED is controlled by the series resistance. If you want a good brightness use R=100,150Ω. If you want a medium light series resistance=330Ω. The maximum value of 470ohm can be inserted for a small light. Figure 22. Image of LED Figure 23. Identification of cathode and anode of LED 4.9.Resistors A resistor is a two-terminal passive electronic component which implements electrical resistance as a circuit element. Resistors are common elements of electrical networks and electronic circuits and are ubiquitous in most electronic equipment. Practical resistors can be made of various compounds and films, as well as resistance wire (wire made of a high- resistivity alloy, such as nickel-chrome). Resistors are also implemented within integrated circuits, particularly analog devices, and can also be integrated into hybrid and printed circuits. The electrical functionality of a resistor is specified by its resistance: common commercial resistors are manufactured over a range of more than 9 orders of magnitude. Practical resistors are also specified as having a maximum power rating which must exceed the anticipated power dissipation of that resistor in a particular circuit: this is mainly of concern in power electronics applications. Resistors with higher power ratings are physically larger and may require heat sinking. In a high voltage circuit, attention must sometimes be paid to the rated maximum working voltage of the resistor.
  • 20. Department of Electronics & Communication Engineering 20 Figure 24. Picture of resistors A common element in electronic devices is a three-terminal resistor with a continuously adjustable tapping point controlled by rotation of a shaft or knob. These variable resistors are known as potentiometers when all three terminals are present, since they act as a continuously adjustable voltage divider. An example of this in this project is the brightness control of the LCD display. 4.9.1. Colour Code of Resistor Most axial resistors use a pattern of colored stripes to indicate resistance. Four-band identification is the most commonly used color-coding scheme on resistors. It consists of four colored bands that are painted around the body of the resistor. The first two bands encode the first two significant digits of the resistance value, the third is a power-of-ten multiplier or number-of-zeroes, and the fourth is the tolerance accuracy, or acceptable error, of the value. The first three bands are equally spaced along the resistor; the spacing to the fourth band is wider. Sometimes a fifth band identifies the thermal coefficient, but this must be distinguished from the true 5-color system, with 3 significant digits. For example, green-blue-yellow-red is 56×104 Ω = 560 kΩ ± 2%. An easier description can be as followed: the first band, green, has a value of 5 and the second band, blue, has a value of 6, and is counted as 56. The third band, yellow, has a value of 104 , which adds four 0's to the end, creating 560,000 Ω at ±2% tolerance accuracy. 560,000 Ω changes to 560 kΩ ±2% (as a kilo- is 103 ). Each color corresponds to a certain digit, progressing from darker to lighter colors, as shown in the chart below.
  • 21. Department of Electronics & Communication Engineering 21 Table 5. Colour code of resistors Color 1st band 2nd band 3rd band (multiplier) 4th band (tolerance) Temp. Coefficient Black 0 0 ×100 Brown 1 1 ×101 ±1% (F) 100 ppm Red 2 2 ×10² ±2% (G) 50 ppm Orange 3 3 ×10³ 15 ppm Yellow 4 4 ×10⁴ 25 ppm Green 5 5 ×10⁵ ±0.5% (D) Blue 6 6 ×10⁶ ±0.25% (C) Violet 7 7 ×10⁷ ±0.1% (B) Gray 8 8 ×10⁸ ±0.05% (A) White 9 9 ×10⁹ Gold ×10−1 ±5% (J) Silver ×10−2 ±10% (K) None ±20% (M) 5. Working of the Pulse Counter Circuit A pulse counter could be roughly divided into three parts: a pulse source, an electronic device that counts, stores and prepares outputs, and a display to show the accumulated count. This pulse counter is based on Atmel AT89C4051 microcontroller. TTL-logic-compatible pulses generated by the source are fed to the counter for counting. The AT89C4051 is a low- voltage, high-performance, 8-bit microcontroller with 4 kB of Flash programmable and erasable read-only memory, 128 bytes of RAM, 15 input/ output (I/O) lines, two 16-bit timers/ counters, a five-vector, two-level interrupt architecture, a full-duplex serial port, a precision analogue comparator, on-chip oscillator and clock circuitry. System clock plays a significant role in operation of the microcontroller. An 11.0592MHz quartz crystal provides basic clock to the microcontroller (IC1) at its pins 4 and 5. Power-on reset is provided by electrolytic capacitor C3 and resistor R1. Switch S1 is used for manual reset. Port pin P3.5 receives the input pulse and the count is displayed on the LCD as well as hyper terminal of the PC. Pulse reception is indicated by LED2, which is connected to port pin P3.7 of the microcontroller. Port pins P1.0 through P1.7 of the microcontroller are connected to data pins D0 through D7 of the LCD, respectively. Port pins P3.4, P3.3 and P3.2 are connected to register-select RS, read-write R/W and enable E of the LCD, respectively. The data is sent to the LCD in ASCII format for display. Only the commands are sent in hex form to the LCD. Register-select RS signal is used to distinguish between data (RS=1) and
  • 22. Department of Electronics & Communication Engineering 22 command (RS=0). Using preset VR1; you can control the contrast of the LCD. Resistor R4 limits the current through backlight of the LCD. Port pin P3.1 of the microcontroller is used to interface with the PC‟s hyper terminal through RS-232 interface MAX232 IC (IC2). The microcontroller provides a transmit channel for serial data transfer. Transmit data pin (TXD) is specified at port pin P3.1. The microcontroller is connected to TIN (pin 11) of MAX232. TOUT (pin 14) of IC2 is connected to pin 2 of the COM port connector. The signals provided on these pins are TTL-level and must be boosted and inverted through a MAX232 converter to comply with RS- 232 standard. The MAX232 has two internal charge pumps that convert +5V into ±10V (unloaded) for RS- 232 driver operation. The first converter uses capacitor C8 to double the +5V input to +10V on capacitor C10 at pin 2. The second converter uses capacitor C7 to invert +10V to -10V on capacitor C6 at pin 6. All the serial communication is controlled through special-function register SCON. This register contains mode-selection bits, ninth data bit for transmit and receive (TB8 and RB8), and serial-port interrupt bits (TI and RI). Serial communication requires standard baud rate. Timer-1 is configured in auto-reload mode to generate baud rate. The baud rate is determined as: Baud rate = ((2SMOD × Oscillator frequency)/ (32×12× (256 - TH1)) The 230V, 50Hz AC mains is stepped down by transformer X1 to deliver a secondary output of 9V, 500 mA. The transformer output is rectified by a full-wave rectifier comprising diodes D1 through D4, filtered by capacitor C1 and regulated by IC 7805 (IC3). Capacitor C2 bypasses the ripples present in the regulated supply. LED1 acts as the power indicator and R2 limits the current through LED1. 6. Terms Associated with the Project There are certain terms which requires a proper understanding for full understanding of the project. These terms are described below. 6.1.RS-232 Standard Before large-scale integration (LSI) UART integrated circuits were common, a minicomputer or microcomputer would have a serial port made of multiple small-scale integrated circuits to implement shift registers, logic gates, counters, and all the other logic for a serial port. The 9 pin DE-9 connector was used by most IBM-compatible PCs since the IBM PC AT, and has been standardized as TIA-574. More recently, modular connectors have been used.
  • 23. Department of Electronics & Communication Engineering 23 In telecommunications, RS-232 (Recommended Standard 232) is the traditional name for a series of standards for serial binary single-ended data and control signals connecting between a DTE (Data Terminal Equipment) and a DCE (Data Circuit-terminating Equipment). It is commonly used in computer serial ports. The standard defines the electrical characteristics and timing of signals, the meaning of signals, and the physical size and pin out of connectors. The current version of the standard is TIA-232-F Interface Between Data Terminal Equipment and Data Circuit-Terminating Equipment Employing Serial Binary Data Interchange, issued in 1997. Communication as defined in the RS232 standard is an asynchronous serial communication method. The word serial means, that the information is sent one bit at a time. Asynchronous tells us that the information is not sent in predefined time slots. Data transfer can start at any given time and it is the task of the receiver to detect when a message starts and ends. Figure 25. Description of the pins of COM port
  • 24. Department of Electronics & Communication Engineering 24 Salient Features  The RS232 standard describes a communication method where information is sent bit by bit on a physical channel. The information must be broken up in data words. The length of a data word is variable. On PC's a length between 5 and 8 bits can be selected. This length is the netto information length of each word.  Data bits are sent with a predefined frequency, the baud rate. Both the transmitter and receiver must be programmed to use the same bit frequency.  RS232 defines an asynchronous type of communication. This means, that sending of a data word can start on each moment. If starting at each moment is possible, this can pose some problems for the receiver to know which is the first bit to receive. To overcome this problem, each data word is started with an attention bit. This attention bit, also known as the start bit, is always identified by the space line level. Because the line is in mark state when idle, the start bit is easily recognized by the receiver.  Directly following the start bit, the data bits are sent. A bit value 1 causes the line to go in mark state; the bit value 0 is represented by a space. The least significant bit is always the first bit sent.  Suppose that the receiver has missed the start bit because of noise on the transmission line. This causes garbled date to reach the receiver. A mechanism must be present to resynchronize the communication. To do this, framing is introduced. Framing means, that all the data bits and parity bit are contained in a frame of start and stop bits. The period of time lying between the start and stop bits is a constant defined by the baud rate and number of data and parity bits. The start bit has always space value, the stop bit always mark value. If the receiver detects a value other than mark when the stop bit should be present on the line, it knows that there is a synchronization failure.  The maximum baud rate defined is 20 kbps. With current devices like the 16550A UART, maximum speeds of 1.5 Mbps are allowed.  The signal level of the RS232 pins can have two states. A high bit, or mark state is identified by a negative voltage and a low bit or space state uses a positive value. In mark state the transmitter voltage ranges from -5 to -15V and the receiver voltage ranges from -3 to -25V. In the space state the transmitter voltage ranges +5 to +15 V and the receiver voltage ranges from +3 to +25V.  The maximum cable length is 50 feet, or the cable length equal to a capacitance of 2500 pF.
  • 25. Department of Electronics & Communication Engineering 25 Table 6. Details of the pin configuration of COMPort Name of Signal Abbreviation Purpose Origin DE-9 Pin Data Terminal Ready DTR Tells DCE that DTE is ready to be connected. DTE 4 Data Carrier Detect DCD Tells DTE that DCE is connected to telephone line. DCE 1 Data Set Ready DSR Tells DTE that DCE is ready to receive commands or data. DCE 6 Ring Indicator RI Tells DTE that DCE has detected a ring signal on the telephone line. DCE 9 Request To Send RTS Tells DCE to prepare to accept data from DTE. DTE 7 Clear To Send CTS Acknowledge RTS and allows DTE to transmit. DCE 8 Transmitted Data TxD Carries data from DTE to DCE. DTE 3 Received Data RxD Carries data from DCE to DTE. DCE 2 Ground GND Common return for other connections. COMMON 5 6.2. TTL Standard Before the advent of VLSI devices, TTL integrated circuits were a standard method of construction for the processors of mini-computer and mainframe processors; such as the DEC VAX and Data General Eclipse, and for equipment such as machine tool numerical controls, printers and video display terminals. As microprocessors became more functional, TTL devices became important for "glue logic" applications, such as fast bus drivers on a motherboard, which tie together the function blocks realized in VLSI elements. Salient Features  Logic high input voltage is the minimum voltage that an input of a TTL digital IC is guaranteed to recognize as Logic "1". Its minimum value is 2.0 V.  Logic low input voltage is the maximum voltage that an input of a TTL digital IC is guaranteed to recognize as Logic "0". Its minimum value is 0.8V.  Logic high output voltage is the minimum voltage that an output of a TTL digital IC is guaranteed to deliver as Logic "1". Its minimum value is 2.4V.
  • 26. Department of Electronics & Communication Engineering 26  Logic low output voltage is the maximum voltage that an output of a TTL digital IC is guaranteed to deliver as Logic "0". Its minimum value is 0.4V.  Logic high input current is the minimum amount of current needed by an input of a TTL digital IC to stay at Logic "1". It‟s minimum value is 50 µA min. when Vcc=Max; Vin = 2.7V  Logic low input current is the maximum amount of current that the input of a TTL digital IC can sink to stay at Logic "0". Its minimum value is -1.6 mA max. when Vcc=max; Vin = 0.5V.  Output short circuit current is the amount of current that a short-circuited TTL digital output exhibits or can handle. Its value is -40 mA min., -65 mA typ., -100 mA max. when Vcc=max; Vout = 0V.  Supply current is the Vcc supply current exhibited by a TTL IC. Its value is 30 mA min., 50 mA max. when Vcc=max. 6.3. Interrupt Architecture The first step in exploring the interrupt architecture is defining an overall model of the hardware, kernel, OAL and thread interactions during an interrupt. The following diagram is an overall picture of these different levels of responsibility and the transitions that cause changes of state. Figure 26. Interrupt architecture model The diagram represents the major transitions during an interrupt with time increasing to the right of the diagram. The bottom most layer of the diagram is the hardware and the state of the interrupt controller. The next layer is the kernel interactions during interrupt servicing. The OAL describes the board support package (BSP) responsibilities. The top most layer represents the application or driver thread interactions needed to service an interrupt. The diagram represents the interactions during a single interrupt. The activity starts with an interrupt represented by the line at the left most section of the chart. An exception is generated causing the kernel ISR vector to be loaded onto the
  • 27. Department of Electronics & Communication Engineering 27 processor. The kernel ISR interacts with the hardware disabling all equal and lower priority interrupts on all processors except for the ARM and Strong ARM architectures. The kernel then vectors to the OAL ISR that has been registered for that particular interrupt. The OAL ISR then can either directly handle the interrupt or can use NKCallIntChain to walk a list of installed ISRs. The main ISR or any of the installed ISRs then performs any work and returns the mapped interrupt called SYSINTR for that device. If the ISR determines that its associated device is not causing the interrupt the ISR returns SYSINTR_CHAIN, which causes NKCallIntChain( ) to walk the ISR list to the next interrupt in the chain. The ISRs are called in the order that they were installed creating a priority on the calling list. Once the single ISR or its associated chain of ISRs has been called the return values can be one of the following that is given in table below. Table 6. Various Return Values Return Value Action SYSINTR_NOP Interrupt is not associated with any registered ISR for a device. Kernel enables all other interrupts. SYSINTR Interrupt is associated with a known registered ISR and device. SYSINTR_RESCHED Interrupt was the result of a timer expiration requesting an OS reschedule. The SYSINTR return value is of highest interest to our discussion. Upon completion of the ISR the kernel re-enables all interrupts on the processor except for the identified interrupt. The kernel then signals the event that has been associated with the SYSINTR value. The IST of a driver or application is then able to run assuming that it is the highest priority thread that is ready to run. The IST communicates with the associated device and reads any necessary data from the device completing its interrupt interaction. The IST then signals its completion with a call to InterruptDone( ) with the associated SYSINTR value. The kernel, upon receiving the InterruptDone for the SYSINTR value, then re-enables the designated interrupt. This is the first point at which another interrupt for this device can be received. 7. Modifications Introduced in the circuit There was no output in the display of the LCD when all the connections were made according to the circuit schematic as is given above. So certain modifications were introduced in the circuit and then there was proper display on the LCD screen. What we did is we interchanged the pin connections of the microcontroller pins 8 and 6 that were interfacing the LCD with each other and then there was the display on the screen. The reason behind this is pin 6 of microcontroller is an interrupt pin and pin 8 of the microcontroller is a timer pin. The Enable signal of the microcontroller enables the LCD and prepares it to accept any kind of input from data to instructions in HEX code. Thus Enable signal is actually an interrupt signal and not a timer signal and hence the connection of the LCD Enable pin should be done with pin 6 of the microcontroller. The pin 8 of the microcontroller gives a timer output and since RS (Register Select) signal is a timing signal the RS pin of the LCD panel should be connected with the timer pin (pin 8) of the microcontroller. This above
  • 28. Department of Electronics & Communication Engineering 28 explanation justifies the change in connection and the reason why there was output on the LCD panel when the interchange of the pin connection was done. The changed schematic diagram is given below. The schematic is drawn in Express PCB software. The figure given below shows the screen image of the schematic that was drawn. Figure 27: Modified circuit schematic of the pulse counter 8. Circuit Layout The optimized path of the circuit is first obtained in Express PCB from the Express Schematic and the black and white printout of that is taken on a photo paper. The paper is then placed on the copper PCB and pressed with hot iron for nearly 5 minutes in order to get its imprint on the PCB. The copper PCB is then dipped into ferrous chloride (FeCl3) solution for nearly 5 to 8 minutes. The ferrous chloride solution acts as an etching solution and it etches copper from
  • 29. Department of Electronics & Communication Engineering 29 that position of the PCB which is devoid of the imprint. The imprint of the layout obtained on the photo paper is shown below. Figure 28. The layout details of the circuit 9. Softwares Used Various softwares have been used while making this project. Express PCB, which is a CAD software is used to prepare the circuit schematic and the layout of the circuit, while the Keil Compiler have been used to compile and debug the Embedded C code for the microcontroller and then generate the mnemonics in the assembly language for every line of the program and then generate the HEX code of the program which will be burnt in the microcontroller. The softwares used have been discussed in detail below. 9.1. Express PCB Express PCB is a very easy to use Windows application for laying out printed circuit boards. This is a CAD software for designing circuit boards. The version of the software that we used for our project is 7.0.0.2.
  • 30. Department of Electronics & Communication Engineering 30 With the help of Express PCB we can first draw the schematic of the circuit and then we can design its layout. Express PCB allows us to build the circuits in three different layers namely, Silkscreen layer, Top copper layer, Bottom copper layer. We have used top copper layer to build the majority of the circuit and at places we have used bottom copper layer, though during integration in the hardware we have integrated the top copper layer only for simplicity and the bottom copper layer connections have been made with the help of jumper wires. Note: Express PCB defaults the coordinates in inches. Below are given few of the screen shots that were taken while working with the project. Figure 29. Selection of components in Express PCB
  • 31. Department of Electronics & Communication Engineering 31 Figure 30. Circuit schematic in Express PCB 9.2.Keil Compiler The Keil Software 8051 development tools listed below are programs you use to compile your C code, assemble your assembly source files, link and locate object modules and libraries, create HEX files, and debug your target program. μVision2 for Windows™ is an Integrated Development Environment that combines project management, source code editing, and program debugging in one single, powerful environment. The C51 ANSI Optimizing C Cross Compiler creates relocatable object modules from your C source code. The A51 Macro Assembler creates relocatable object modules from the 8051 assembly source code. The BL51 Linker/Locator combines relocatable object modules created by the C51 Compiler and the A51 Assembler into absolute object modules. The LIB51 Library Manager combines object modules into libraries that may be used by the
  • 32. Department of Electronics & Communication Engineering 32 linker. The OH51 Object-HEX Converter creates Intel HEX files from absolute object modules. The version of this software that has been used in this project is uVision2 Version 2.32. Source files are created by the μVision2 IDE and are passed to the C51 Compiler or A51 assembler. The compiler and assembler process source files and create relocatable object files. The Keil C51 Compiler is a full ANSI implementation of the C programming language that supports all standard features of the C language. In addition, numerous features for direct support of the 8051 architecture have been added. The Keil A51 macro assembler supports the complete instruction set of the 8051 and all derivatives. Below are given few of the screen shots that were taken while working in this project. Figure 31. The selection of the microcontroller AT89C4051 for which the coding will be written in the Keil editor
  • 33. Department of Electronics & Communication Engineering 33 Figure 32. The code written in the Keil compiler editor Figure 33. The target window 1 for which device the code is developed
  • 34. Department of Electronics & Communication Engineering 34 Figure 34. The target window 2 for which device the code is developed Debugging is a methodical process of finding and reducing the number of bugs, or defects, in a computer program or a piece of electronic hardware, thus making it behave as expected. Debugging tends to be harder when various subsystems are tightly coupled, as changes in one may cause bugs to emerge in another. Figure 35. The debugged program along with the generated HEX Code
  • 35. Department of Electronics & Communication Engineering 35 The Disassembly Window shows the program execution in assembly code, or intermixing the source code with the assembly code (device dependent). Lines of code are marked as follows in the left side-bar: No Code - Lines with no code are marked with a light gray block. Unexecuted Code - Unexecuted lines (instructions) are marked with a dark gray block. Executed Code - Fully-executed lines (instructions) are marked with a green block. Branch Condition True - A cyan (blue) block indicates that the condition for this branch instruction has only been true and the branch was always taken. Branch Condition False - An orange block indicates that the condition for this branch instruction has never been true and the branch was never taken. A green block on a branch instruction indicates that both the true and false conditions have occurred. Figure 36. The code along with the Mnemonics for every line
  • 36. Department of Electronics & Communication Engineering 36 Figure 37. The disassembly window In computer science, a memory map is a structure of data (which usually resides in memory itself) that indicates how memory is laid out. Memory maps can have a different meaning in different parts of the operating system. In the boot process a memory map is passed on from the firmware in order to instruct an operating system kernelabout memory layout. It contains the information regarding the size of total memory, any reserved regions and may also provide other details specific to the architecture. In virtual memory implementations and memory management units, a memory map refers page tables ,which store the mapping between a certain process's virtual memory layout and how that space relates to physical memory addresses. In native debugger programs, a memory map refers to the mapping between loaded executable/library files and memory regions. These memory maps are used to resolve memory addresses (such as function pointers) to actual symbols.
  • 37. Department of Electronics & Communication Engineering 37 Figure 38. The memory map of every line of the code 10. The Embedded C Program #include<reg51.h> #define LCD P1 unsigned int Count,d1,d2,d3,d4,x1,x2,x3,x4; sbit Pulse =P3^5; sbit LED =P3^7; sbit rs =P3^4; sbit rw =P3^3; sbit en =P3^2; void LCDInit (); void lcdcmd (unsigned char); void lcdwrt (unsigned char); void Delay (unsigned int); void Convert (unsigned int); void SerialTx (unsigned char);
  • 38. Department of Electronics & Communication Engineering 38 void main(void) { unsigned char z,Display; unsigned char code str1[]="PULSE COUNTER "; unsigned char code str2[]="Design By"; unsigned char code str3[]="NAVYA "; unsigned char code str4[]="DHAVASKAR "; unsigned char code str5[]="PULSE:0000 "; P0=0xFF; P1=0xFF; P2=0xFF; P3=0xFF; IE=0x00; Count=0x00; ///////SERIALIZATION DATA/////// TMOD =0x20; TH1 =0xFD; SCON =0x50; TR1 =1; LED =0x00; LCDInit(); for(z=0;z<16;z++) { Display=str1[z]; lcdwrt(display); Delay(1); SerialTx(Display); Delay(1); } SerialTx('r'); SerialTx('n'); lcdcmd(0x00); for(z=0;z<16;z++) { Display=str2[z]; lcdwrt(Display); Delay(1);
  • 39. Department of Electronics & Communication Engineering 39 SerialTx(Display); Delay(1); } Delay(200); SerialTx('r'); SerialTx('n'); lcdcmd(0x01); Delay(1); for(z=0;z<16;z++) { Display=str3[z]; lcdwrt(Display); Delay(1); SerialTx(Display); Delay(1); } SerialTx('r'); Serialtx('n'); lcdcmd(0xC0); for(z=0;z<16;z++) { Display=str4[z]; lcdwrt(Display); Delay(1); SerialTx(Display); Delay(1); } Delay(200); SerialTx('r'); SerialTx('n'); lcdcmd(0x01); Delay(1); lcdcmd(0xC0); for(z=0;z<16;z++) { Display=str5[z]; lcdwrt(Display); Delay(1); SerialTx(Display); Delay(1); } Delay(70); SerialTx('r'); Serialtx('n'); while(1) { LED=1; Delay(30); if(Pulse==0) { Count=Count+1; Convert(Count); if(Count==9999)
  • 40. Department of Electronics & Communication Engineering 40 Count=0x00; } } } Void Convert(unsigned int value) { x1=value/10; d1=value%10; x2=x1/10; d2=x1%10; x3=x2/10; d3=x2%10; d4=x3%10; d1=d1|0x30; d2=d2|0x30; d3=d3|0x30; d4=d4|0x30; lcdcmd(0xC7); lcdwrt(d4); lcdwrt(d3); lcdwrt(d2); lcdwrt(d1); Delay(1); SerialTx(d4); SerialTx(d3); SerialTx(d2); SerialTx(d1); Delay(1); SerialTx('r'); SerialTx('n'); LED=0; Delay(30); } void LCDInit() { lcdcmd(0x38); Delay(10); lcdcmd(0x0E); Delay(10); lcdcmd(0x01); Delay(10); lcdcmd(0x0C); Delay(10); lcdcmd(0x80); Delay(10); return; } void lcdcmd(unsigned char value) { LCD=value; rs=0; rw=0;
  • 41. Department of Electronics & Communication Engineering 41 en=1; Delay(1); en=0; return; } void lcdwrt(unsigned char value) { LCD=value; rs=1; rw=0; en=1; Delay(1); en=0; return; } void SerialTx(unsigned char value) { SBUF=value; while(T1==0); T1=0; } void Delay(unsigned int x) { unsigned int i,j; for(i=0;i<=x;i++) for(j=0;j<=500;j++); } 11. COM Port Output: The output of the circuit i.e., the number of pulses those are counted are seen in the LCD display fitted along with the circuit board. With the help of „D‟ type female connector we can latch the output of the circuit with the COM 1 port of the CPU (Central Processing Unit) of our computer and then we can see the output of our circuit in the hyper terminal of the computer screen. With the help of this we can monitor the output of the circuit from our computer thereby reducing our stress of monitoring the output in the LCD panel only. HyperACCESS is the name for a number of successive computer communications software, made by Hilgraeve. It was the first software product from Hilgraeve, and it was initially designed to let 8-bit Heath computers communicate over a modem. In 1995 Hilgraeve licensed a low-end version of HyperACCESS, known as HyperTerminal (essentially a "Lite" version) to Microsoft for use in their set of communications utilities. It was initially bundled with Windows 95, and subsequently all versions of Windows up to and including Windows XP. Windows Vista and Windows 7 do not include HyperTerminal, though the commercial
  • 42. Department of Electronics & Communication Engineering 42 products HyperTerminal Private Edition and HyperACCESS support all versions of Windows up to and including Windows 7. Figure 39. Steps to go to the Connection Description dialogue box HyperTerminal is an application you can use in order to connect your computer to other remote systems. These systems include other computers, bulletin board systems, servers, Telnet sites, and online services. However, you would need a modem, an Ethernet connection, or a null modem cable before you can use HyperTerminal. Though using HyperTerminal with a BBS to access information on remote computers is a practice that has become less common with the availability of the World Wide Web, HyperTerminal is still a useful means of configuring and testing your modem or examining your connection with other sites. HyperTerminal records the messages passed to and from the computer or service on the other end of your connection. Therefore, it can serve as a valuable troubleshooting tool when setting up and using your modem. To make sure that our modem is connected properly or to view our modem's settings, we can send commands through HyperTerminal and check the results. HyperTerminal has scroll functionality that allows you to look at received text that has scrolled off the screen.
  • 43. Department of Electronics & Communication Engineering 43 Figure 40. The Connection Description dialogue box We can use HyperTerminal to transfer large files from a computer onto your portable computer using a serial port rather than going through the process of setting up your portable computer on a network. Figure 41. Selction of the COMPort
  • 44. Department of Electronics & Communication Engineering 44 We can use HyperTerminal to help debug source code from a remote terminal. We can also use HyperTerminal to communicate with older character-based computers. Figure 42. The COM1 properties dialogue box HyperTerminal is designed to be an easy-to-use tool and is not meant to replace other full- feature tools available on the market. We can use HyperTerminal to perform the specific tasks described above, but do not attempt to use HyperTerminal for more complex communication needs.
  • 45. Department of Electronics & Communication Engineering 45 Figure 43. The hyper terminal window showing the output
  • 46. Department of Electronics & Communication Engineering 46 Conclusion From the above discussion we can conclude that the pulse counter that we have developed can be used for industrial automation which in turn can reduce the human workforce and thus increase the profit and reliability of the organisation. The various softwares that have been used in this project gave us hands on experience on them. We learnt how to fabricate a circuit in single sided copper PCB and how to design two layer copper layout, even though we have used only one layer copper layout for our project for simplicity.
  • 47. Department of Electronics & Communication Engineering 47 REFERENCES  Electronics For You, Oct, 2010.  www.keil.com, Keil Compiler.  www.expresspcb.com, Express PCB.  www.atmel.com/literature, Datasheet of AT89C4051.  www.fairchildsemi.com, Datasheet of MC78XX.  Texas Instruments, Datasheet of MAX232.  www.omega.com, RS-232 Standard.  www.iqdfrequencyproducts.com, Datasheet of HC49 Crystals.  www.silabs.com/MCU, Interrupt Architecture.  www.electronics-tutorials.ws/capacitor/cap_5.html, Capacitor colour codes.  www.en.wikipedia.org, General information about components.  Beyond Logic, April 12th ,2011, Interfacing Example- 16 Character * 2 Line LCD.  www.microsoftsto.112.2o7.net, Interrupt Architecture.  www.siliconfareast.com/ttl.htm, TTL Standards.