Design of FPGA based 8-bit RISC Controller IP core using VHDL

This paper describes the design, development and implementation of an 8-bit RISC controller IP core. The controller has been designed using Very high speed integrated circuit Hardware Description Language (VHDL). The design constraints are speed, power and area. This controller is efficient for specific applications and suitable for small applications. This non-pipelined controller has four units: - Fetch, Decode, Execute and a stage control unit. It has an in built program and data memory. Also it has four ports for communicating with other I/O devices. A hierarchical approach has been used so that basic units can be modeled using behavioral programming. The basic units are combined using structural programming. The design has been implemented using ALTERA STRATIX II FPGA

Empfohlen
Weitere ähnliche Inhalte
Was ist angesagt?
Was ist angesagt? (18)
Andere mochten auch
Andere mochten auch (11)
Ähnlich wie Design of FPGA based 8-bit RISC Controller IP core using VHDL
Ähnlich wie Design of FPGA based 8-bit RISC Controller IP core using VHDL (20)
Mehr von Aneesh Raveendran
Mehr von Aneesh Raveendran (7)
Kürzlich hochgeladen
Kürzlich hochgeladen (20)
Design of FPGA based 8-bit RISC Controller IP core using VHDL
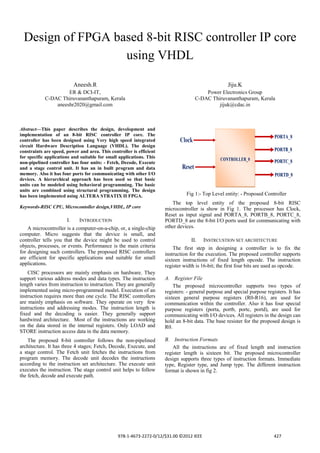
- 1. Design of FPGA based 8-bit RISC controller IP core using VHDL Aneesh.R Jiju.K ER & DCI-IT, C-DAC Thiruvananthapuram, Kerala aneeshr2020@gmail.com Power Electronics Group C-DAC Thiruvananthapuram, Kerala jijuk@cdac.in Abstract—This paper describes the design, development and implementation of an 8-bit RISC controller IP core. The controller has been designed using Very high speed integrated circuit Hardware Description Language (VHDL). The design constraints are speed, power and area. This controller is efficient for specific applications and suitable for small applications. This non-pipelined controller has four units: - Fetch, Decode, Execute and a stage control unit. It has an in built program and data memory. Also it has four ports for communicating with other I/O devices. A hierarchical approach has been used so that basic units can be modeled using behavioral programming. The basic units are combined using structural programming. The design has been implemented using ALTERA STRATIX II FPGA. Keywords-RISC CPU, Microcontoller design,VHDL, IP core I. INTRODUCTION A microcontroller is a computer-on-a-chip, or, a single-chip computer. Micro suggests that the device is small, and controller tells you that the device might be used to control objects, processes, or events. Performance is the main criteria for designing such controllers. The proposed RISC controllers are efficient for specific applications and suitable for small applications. CISC processors are mainly emphasis on hardware. They support various address modes and data types. The instruction length varies from instruction to instruction. They are generally implemented using micro-programmed model. Execution of an instruction requires more than one cycle. The RISC controllers are mainly emphasis on software. They operate on very few instructions and addressing modes. The instruction length is fixed and the decoding is easier. They generally support hardwired architecture. Most of the instructions are working on the data stored in the internal registers. Only LOAD and STORE instruction access data in the data memory. The proposed 8-bit controller follows the non-pipelined architecture. It has three 4 stages; Fetch, Decode, Execute, and a stage control. The Fetch unit fetches the instructions from program memory. The decode unit decodes the instructions according to the instruction set architecture. The execute unit executes the instruction. The stage control unit helps to follow the fetch, decode and execute path. Fig 1:- Top Level entity: - Proposed Controller The top level entity of the proposed 8-bit RISC microcontroller is show in Fig 1. The processor has Clock, Reset as input signal and PORTA_8, PORTB_8, PORTC_8, PORTD_8 are the 8-bit I/O ports used for communicating with other devices. II. INSTRCUSTION SET ARCHITECTURE The first step in designing a controller is to fix the instruction for the execution. The proposed controller supports sixteen instructions of fixed length opcode. The instruction register width is 16-bit; the first four bits are used as opcode. A. Register File The proposed microcontroller supports two types of registers: - general purpose and special purpose registers. It has sixteen general purpose registers (R0-R16), are used for communication within the controller. Also it has four special purpose registers (porta, portb, portc, portd), are used for communicating with I/O devices. All registers in the design can hold an 8-bit data. The base resister for the proposed design is R0. B. Instruction Formats All the instructions are of fixed length and instruction register length is sixteen bit. The proposed microcontroller design supports three types of instruction formats. Immediate type, Register type, and Jump type. The different instruction format is shown in fig 2. 978-1-4673-2272-0/12/$31.00 ©2012 IEEE 427
- 2. Fig 2:- Instruction Formats The op-code length for a proposed microcontroller is 4-bit. Also 4 bit used to represent the source and destination registers. In immediate type instructions an 8-bit immediate data is a part of the instruction. In this type a destination register is also available. In register type instruction format both the source and destination be registers. Also in jump type, a 12-bit program memory address is used as part of the instruction. C. Instrustion set The proposed IP core design has sixteen instructions of fixed length op-code. The design supports two flags:-ZERO and CARRY. The Table 1 represents the instruction set used in this design. this operation is R0 register. The Instructions ADD and SUB performs the addition and subtraction operation between destination and source registers and the result is stored in destination register. If the result of operation is zero, it sets the zero flag otherwise cleared. If any carry or borrow occur during the operation of an addition or a subtraction operation, carry flag is set or otherwise it is reset. The XOR operation performs the Exclusive-OR operation between the destination and source registers. It affects the zero flag only. The CMP instruction performs the comparison operation between source and destination registers. If the destination register is higher than source register, carry flag is set otherwise it is in reset condition. The JMP instruction performs the unconditional jump in the program memory. The jump address is specified as part of the instruction. The JNZ and JEQ are conditional jump instructions, they performs jump operation based on zero and carry flag. The IN and OUT instructions are used to communicate with other I/O devices. The ports are memory mapped to first four locations in the data memory. The port address is specified as part of the instruction. The base register used for these operations are R0. The IN instruction loads the value from the specified port address to the base register R0. The OUT instruction stores the value on the R0 to the specified port address. The BS and BC instructions are used to set and clear the bit positions in the destination register. III. INTERNAL ARCHITECTURE Fig 3 shows the internal diagram of the proposed 8 bit RISC microcontroller. The design uses a program counter of 13-bit, so the program memory depth is 8k x 16. Data memory is of size 256 bytes. The first four locations of data memory is memory mapped for the four ports. Basic units in this controller are stage control unit, Fetch unit, Decode unit and Execution unit. A. Stage Control Unit The stage control unit is used to control the flow of execution of an instruction in various stages (Fetch, Decode and Execute). The top level entity is show in Fig 4. Table 1:- Instruction set The NOP instruction performs the no operation; it delays the controller clock by 1 cycle. The MOV instructions perform the data movement between source and destination registers. The MVI instruction performs the movement of an immediate data to the destination register. The LD and ST instructions loads and stores the data to or from the data memory, memory address is specified as part of instruction. The base register for Fig 4:- Top Level entity: - Stage Control Unit This unit is a combinational unit. It checks for the completion signal from one unit and provides an enable signal to the next unit. The algorithm used for this is shown in Fig5. 428
- 3. Fig 3:- Internal Architecture Fig 6:- Top Level Entity:-Fetch Unit The fetch module is directly connected to the program memory. The flow chart for the working of a fetch unit is shown in Fig 7. Fig 5:- Algorithm- Stage Control unit After the removal of reset signal it is in Fetch_aft_rst state and enables the fetch unit and wait for the completion signal from the fetch unit. If fetch completion occurs then it moves to the Decode state and enables the decode unit. Once the decoding is complete it moves to the Execute state and enables the execution unit. As the execution unit completes its operation then it moves to the Fetch state for fetching the new instruction, and the operation continues. B. Fetch unit Fetch unit fetches the instructions from the program memory. It consists of a 13-bit Program counter (PC), which holds the address of next instruction to be executed and a 16-bit Instruction Register (IR) which holds the current instruction to be executed. The top level entity is shown in Fig 6. Fig 7:- Flowchart-Fetch Unit When a reset is applied, the Program counter and instruction register are set to be zero. After the removal of reset it comes to the work state and checks for the fetch enable signal, if it is enabled it places the program counter value on to the address bus of program memory and provides a read signal to the program memory. Within the one clock cycle duration the program memory will performs the read operation and state changes to update state. 429
- 4. In update state the value on to the data bus of the program memory is copied to the instruction register and program counter is incremented by one. After this operation a fetch completion signal is given to the stage control unit and state changed to work state. D. Execution unit The execution unit performs the execution of the instructions that is already decoded. The execution unit is divided into several subunits to perform operations. The internal diagram of an execution unit is shown in Fig 10. C. Decode unit The decode unit in the proposed controller performs the decoding of the instruction register obtained from the fetch unit. The top level entity of the decode unit is shown in Fig 8 Fig 8: Top Level Entity: - Decode Unit The input to the decode module is Inst_reg, a 16 bit register from the fetch unit. It has output of destination register (4-bit), source register (4-bit), immediate bus (8-bit), Branch address (12-bit), and a bit position (3 bit). The source and destination register is used to identify the source and destination registers used. The immediate bus is used to hold an 8-bit immediate value for immediate data transfers. The branch address bus is a 12-bit bus used to hold the addresses for jump operations. The Bit_pos bus is an 8-bit used for holding the bit position for the bit set and clear operations. The state diagram for a decode unit is shown in Fig 9. Fig 10:- Internal Diagram-Execution unit The Execution unit performs the proposed instruction set [Table 1]. The 16 instructions are grouped into 7 sub units. a. MOVE unit The MOVE unit is designed to perform MVI and MOV instructions. The MVI is move immediate. It performs the immediate movement of an 8-bit data to destination register. The example is: - MVI R0, 00010010.This instruction performs the movement of immediate value 00010010 to the destination register R0. The MOV instruction performs the movement of data between source and destination registers. The example is:-MOV R1, R2. This instruction performs the movement of the content of R2 into R1. b. ARITHMETIC unit The ARITHMETIC unit is designed to perform ADD and SUB instructions. The ADD instruction performs the addition of content in registers. The example is: - ADD R0, R1.This instruction performs the addition of contents in register R0 and R1. After the addition the result of operation is stored in destination register (R0). If any carry occur during the addition operation a carry flag is set. The content of register R1 is not altered. Fig 9: State Diagram: - Decode unit The state machine of the decode unit contains 4 states; RESET, IDLE, DECODE, DECODE_COMP. The RESET state is for reset operations. The IDLE state is the default state in decode unit. It checks for the enable signal of the decode unit. If it is enabled then it moves to the DECODE state otherwise it stays in IDLE state. In DECODE state it performs the decode operation and moves to the DECODE_COMP state and produces a decode completion signal In DECODE state first it checks for the first 4 bit to identify the opcode, based on that it performs the appropriate information extraction. The SUB instruction performs the subtraction of contents in register. The example is: - SUB R0, R1.This instruction performs the subtraction of contents in register R0 and R1. After the subtraction the result of operation is stored in destination register (R0). If any borrow occur during the subtraction operation a carry flag is set. c. LOGIC unit The LOGIC unit is designed to perform XOR and CMP instructions. The XOR instruction is used performs the Exclusive-OR operation between the source and destination registers. The example is: -XOR R2, R3. This instruction performs the Exclusive-OR operation between registers R2 and R3.After the execution of operation the result is stored on 430
- 5. to the register R2. The content of register R3 is not altered. If the result of operation is zero then a zero flag is set. The CMP instruction is used to perform comparison between source and destination registers. The example is: CMP R2, R3. This instruction performs the comparison operation between registers R2 and R3. After the execution of operation the result is stored on to the register R2. If the contents of registers are same the zero flag is set or otherwise it is reset. The content of registers is not altered after the execution. d. LOAD_STORE unit The LOAD_STORE unit is designed to perform LD and ST instructions. The base register used for load and store operation is R0.The LD instruction is used to perform the LOAD operation. As a part of instruction an 8-bit data memory address is specified. The example is:-LD 00100000. This instruction loads the content of memory location 00100000 (0x20H) in the base register R0. The ST instruction is used to perform the STORE operation. The memory address is specified as a part of the instruction. The example is:ST 00100000.This instruction stores the contents of base register on to the memory location 00100000 (0x20H). e. JUMP unit The JUMP unit is designed to perform JMP, JNZ, and JEQ instructions. It performs the jump in program memory. The jump address is specified as a part of instruction. The JMP is an unconditional jump instruction and JNZ and JEQ are conditional jump instruction. The maximum supported jump in program memory is 212. This unit works on the content of status of flag registers. The examples are JMP 0x020, JNZ 0x1FF, JEQ 0X2FF. In the instruction JMP 0x020 it jumps to the program memory location 0x020.For this instruction only the program counter (PC) value is substituted with jump address, and normal instruction fetch continuous. In the instruction JNZ0x1FF it jumps to the program memory location 0x1FF only the zero flag is in reset condition (active LOW). If the zero flag set then this instruction is not been executed. The instruction JEQ 0x2FF it jumps to the program memory location 0x2FF, only the zero flag is set. If the zero flag is low then this instruction is not been executed. register R0. The OUT instructions load the base register on to the port 00000001. All the ports are directly mapped to the first four locations in the data memory. g. SET_CLEAR unit The SET_CLEAR unit is used to perform bit setting and resetting of the specified register. This operation is done by specifying the bit position as a part of the instruction. The example is BS R0, 00000001. This instruction sets (high) the first position in the R0 register. Also BC R0, 00000000, this instruction resets (zero) the zeroth bit position in R0 register. h. NOP unit The NOP unit is used to perform the no operation. This operation used to wait the operation of the controller to 3 clock cycle. Only opcode is used as a part of the instruction. It doesn’t alter the content of any register. IV. SIMULATION RESULTS The proposed microcontroller is developed using VHDL and simulated using ModelSim 6.4SE. For simulation, place a piece of code on to the program memory and perform the simulation and verify the operations. Fig 11 shows the movement of an instruction MOV R2, 00000010. Fig 12 shows the movement of data from R2 to R1. Fig 11: MOV R2, 00000010 f. IN_OUT unit The IN and OUT instructions used for transferring data to and from the Input/output ports. The IN instruction stores the data from port to the base register R0. The OUT instruction stores the data on to the I/O port from base register R0.The address of ports are shown in Table 2. Table 2:- Port address The examples are IN 00000001, OUT 00000001.The IN instruction stores the status of the port 00000001 to the base Fig 12:- MOV R1, R2 431
- 6. V. IMPLEMENTATION ON FPGA The proposed microcontroller is synthesized using ALTERA QUARTUS II software. Fig 13 shows the Register Transfer Level (RTL) view of proposed controller. The controller is implemented on ALTERA STRATIX II EP2S60F672C3N FPGA. Table 3 shows the device utilization of the proposed controller. VI. CONCLUSION In this paper, how to design an 8-bit microcontroller IP core is presented. We adopted a top-down method and uses VHDL to describe system. First we design each module independently and the uses a structural programming to obtain an IP core. This uses Harvard Bus architecture and most of the instructions are single machine cycle instructions. This controller supports 16 instructions. The proposed controller is implemented in System on Chip environment to work for a certain specific applications. The controller can support a maximum frequency of 253.8MHz. REFERENCES [1] [2] Fig 13:- RTL View- Proposed controller [3] [4] [5] [6] [7] Table 3: Device Utilization Mamun Bin Ibne Reaz, Md. Shabiul Islam, Mohd. S. Sulaiman,”A single clcok cycle MIPS RISC processor design using VHDL”. ICSE2002 Proc. 2002, Penang, Malaysia. pp 199–203. Mrs. Rupali S. Balpande, Mrs.Rashmi S. Keote,’’Design of FPGA based Instruction Fetch & Decode module of 32-bit RISC (MIPS)Processor’’. 2011 International Conference on Communication Systems and Network Technologies.pp 409–413. Enoch O Hwang , Digital Logic and Microprocessor Design with VHDL. 2005. Jan Gray, Building a RISC system in an FPGA: Part 1,2 & 3, Circuit Cellar. Magazine (http://www.circuitcellar.com), David A. Patterson, John L. Hennessy, Computer Organization & Design, Morgan Kaufmann Publishers, 1999. Chan, P, Mourad, S Digital Design Using Field Programmable Gate Arrays, Prentice-Hall, Inc. Englewood Cliffs, NJ, 1994]. Douglas L. Perry, VHDL, McGraw-Hill Companies, Inc.: Singapore, 1999. 432