

Empfohlen
Empfohlen
Weitere ähnliche Inhalte
Was ist angesagt?
Was ist angesagt? (19)
Ähnlich wie Image processing report
Ähnlich wie Image processing report (20)
Kürzlich hochgeladen
Kürzlich hochgeladen (20)
Image processing report
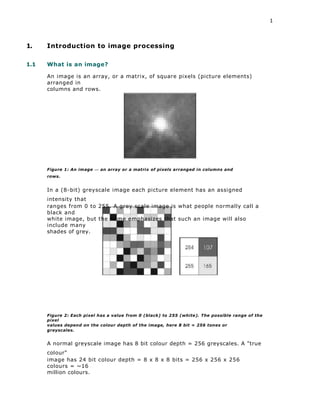
- 1. 1 1. Introduction to image processing 1.1 What is an image? An image is an array, or a matrix, of square pixels (picture elements) arranged in columns and rows. Figure 1: An image — an array or a matrix of pixels arranged in columns and rows. In a (8-bit) greyscale image each picture element has an assigned intensity that ranges from 0 to 255. A grey scale image is what people normally call a black and white image, but the name emphasizes that such an image will also include many shades of grey. Figure 2: Each pixel has a value from 0 (black) to 255 (white). The possible range of the pixel values depend on the colour depth of the image, here 8 bit = 256 tones or greyscales. A normal greyscale image has 8 bit colour depth = 256 greyscales. A "true colour" image has 24 bit colour depth = 8 x 8 x 8 bits = 256 x 256 x 256 colours = ~16 million colours.
- 2. 2 Figure 3: A true-colour image assembled from three greyscale images coloured red, green and blue. Such an image may contain up to 16 million different colours. Some greyscale images have more greyscales, for instance 16 bit = 65536 greyscales. In principle three greyscale images can be combined to form an image with 281,474,976,710,656 greyscales. There are two general groups of 'images': vector graphics (or line art) and bitmaps (pixel-based or 'images'). Some of the most common file formats are: GIF — an 8-bit (256 colour), non-destructively compressed bitmap format. Mostly used for web. Has several sub-standards one of which is the animated GIF. JPEG — a very efficient (i.e. much information per byte) destructively compressed 24 bit (16 million colours) bitmap format. Widely used, especially for web and Internet (bandwidth- limited). TIFF — the standard 24 bit publication bitmap format. Compresses non- destructively with, for instance, Lempel-Ziv-Welch (LZW) compression. PS — Postscript, a standard vector format. Has numerous sub- standards and can be difficult to transport across platforms and operating systems. PSD - a dedicated Photoshop format that keeps all the information in an image including all the layers. 1.2 1.2. 1 Colours For science communication, the two main colour spaces are RGB and CMYK. RGB
- 3. The RG B colo ur mo del rela tes ver y clos ely to the way we per ceiv e colo ur wit h the r, g an d b re ce pt or s in o ur re ti na s. R G B us es ad ditive colour mixing and is the basic colour model used in television or any other medium that projects colour with light. It is the basic colour model used in computers and for web graphics, but it cannot be used for print production. The secondary colours of RGB - cyan, magenta, and yellow - are formed by mixing two of the primary colours (red, green or blue) and excluding the third colour. Red and green combine to make yellow, green and blue to make cyan, and blue and red form magenta. The combination of red, green, and blue in full intensity makes white.
- 4. 3 In Photoshop using the "screen" mode for the different layers in an image will make the intensities mix together according to the additive colour mixing model. This is analogous to stacking slide images on top of each other and shining light through them. Figure 4: The additive model of RGB. Red, green, and blue are the primary stimuli for human colour perception and are the primary additive colours. Courtesy of adobe.com. 1.2. 2 CMYK The 4-colour CMYK model used in printing lays down overlapping layers of varying percentages of transparent cyan (C), magenta (M) and yellow (Y) inks. In addition a layer of black (K) ink can be added. The CMYK model uses the subtractive colour model. Figure 5: The colours created by the subtractive model of CMYK don't look exactly like the colours created in the additive model of RGB Most importantly, CMYK cannot reproduce the brightness of RGB colours. In addition, the CMYK gamut is much smaller than the RGB gamut. Courtesy of adobe.com. 1.2.3
- 5. G a m u t T h e r a n g e , o r g a m u t , o f h u m a n c o l o u r p e rception is quite large. The two colour spaces discussed here span only a fraction of the colours we can see. Furthermore the two spaces do not have the same gamut, meaning that converting from one colour space to the other may cause problems for colours in the outer regions of the gamuts.
- 6. 4 Figure 6: This illustration clearly shows the different gamuts of the RGB and CMYK colour spaces. The background is the CIE Chromaticity Diagram (representing the whole gamut of human colour perception). Courtesy adobe.com. 1.3 1.3. 1 Astronomical images Images of astronomical objects are usually taken with electronic detectors such as a CCD (Charge Coupled Device). Similar detectors are found in normal digital cameras. Telescope images are nearly always greyscale, but nevertheless contain some colour information. An astronomical image may be taken through a colour filter. Different detectors and telescopes also usually have different sensitivities to different colours (wavelengths). Filters A telescope such as the NASA/ESA Hubble Space Telescope typically has a fixed number of well-defined filters. A filter list for Hubble's WFPC2 (Wide Field and Planetary Camera 2) camera is seen below.
- 7. 5 Figure 7: Filter list for Hubble's WFPC2 camera (Wide Field and Planetary Camera 2). Filter names are to the left (names include approximate wavelength in nm) in column 1. Column 5 contains the physical property of the radiation the filter lets through. Column 7 is the central wavelength. The N's and W's are short for Narrow and Wide. Filters can either be broad-band (Wide) or narrow-band (Narrow). A broad-band filter lets a wide range of colours through, for instance the entire green or red area of the spectrum. A narrow-band filter typically only lets a small wavelength span through, thus effectively restricting the transmitted radiation to that coming from a given atomic transition, allowing astronomers to investigate individual
- 8. atomic processes in the object.
- 9. 6 A filename such as 502nmos.fits indicates that the filter used has a peak at 502 nm. In the table below, you can see that this filter is a narrow bandwidth filter, i.e. it only lets radiation with wavelengths within a few nm of 502 nm through. Below is an example of an image composed from narrow-band exposures. This results in very sharply defined wisps of nebulosity since each exposure separates light from only some very specific physical processes and locations in the nebula. Figure 7: Example of an image constructed from narrow-band exposures. Since the narrow- band exposures probe individual atomic transitions the result is an image that has very 'sharp' features. Galaxies are often studied through broad-band filters as they allow more light to get through. Also the processes in a galaxy are more 'mixed' or complicated, result from the outputs of billions of stars and so narrow-band filters give less 'specific' information about the processes there.
- 10. 7 Figure 8: A broad-band image of the "Hyperactive galaxy NGC 7673". A visual example of the different filters available onboard Hubble is seen in the following figure. Figure 9: An example of an image constructed from 7 broad-band filters all the way from ultraviolet (left) to infrared (right). A figure illustrating the process of stacking together different colour exposures is seen below.
- 11. 8 Figure 10: An example of how a colour image is constructed from four broad-band filters (seen from the side in 1.): blue, green yellow and red. When the images are overlaid (2. and 3.) the resulting image (4.) is a colour composite. 1.4 Assigning colours to different filter exposures The astronomical images we see on the web and in the media are usually 'refined' or 'processed' as compared to the raw data that the astronomers work on with their computers. In 'pretty pictures' all artefacts coming from the telescope or the detectors are for instance removed as they do not say anything about the objects themselves. It is very rare that images are taken with the sole intention of producing a 'pretty' colour picture. Most 'pretty pictures' are constructed from data that was acquired to study some physical process, and the astronomer herself probably never bothered to assemble the greyscale images to a colour image. Natural colour images It is possible to create colour images that are close to "true-colour" if three wide band exposures exist, and if the filters are close to the r, g and b receptors in our eyes. Images that approximate what a fictitious space
- 12. t r a v e l l e r w o u l d s e e i f h e o r s h e a c t u a l l y t r a v e l l e d t o t h e o bject are called "natural colour" images. To make a natural colour image the order of the colours assigned to the different exposures should be in "chromatic order", i.e. the lowest wavelength should be given a blue hue, the middle wavelength a green hue and the highest wavelength should be red.
- 13. 9 Representative colour images If one or more of the images in a data set is taken through a filter that allows radiation that lies outside the human vision span to pass - i.e. it records radiation invisible to us - it is of course not possible to make a natural colour image. But it is still possible to make a colour image that shows important information about the object. This type of image is called a representative colour image. Normally one would assign colours to these exposures in chromatic order with blue assigned to the shortest wavelength, and red to the longest. In this way it is possible to make colour images from electromagnetic radiation far from the human vision area, for example x-rays. Most often it is either infrared or ultraviolet radiation that is used. Enhanced colour images Sometimes there are reasons to not use a chromatic order for an image. Often these reasons are purely aesthetic, as is seen in the example below. This type of colour image is called an enhanced colour image. Figure 12: An example of an enhanced colour image (not in chromatic order): Sometimes it is necessary to break the 'rules' for image processing. Here the Hydrogen-alpha filter is coloured blue instead of the red colour it is in nature. This is an example of a so-called false- colour image, where the blue was chosen for aesthetic reasons. You are the judge When processing raw science images one of the biggest problems is that, to a large degree, you are 'creating' the image and this means a colossal freedom
- 14. within a huge parameter space. There are literally thousands of sliders, numbers, dials, curves etc. to twist and turn. Speaking of right and wrong, there really are no wrong or right images. There are some fundamental scientific principles that should normally be observed, but the rest is a matter of aesthetics — taste. Chromatic ordering of the exposures is one of the important scientific principles.
- 15. 10 Figure 13: Sequences in the production of a Hubble Space Telescope image of Messier 17. First the individual exposure (taken through three different filters): 1. 673n (Sulphur) shown in red in the final image), 2. 656n (hydrogen, green), 3. 502n (oxygen, blue), 4. First colour composite attempt, 5. Improving, 6. Improving, 7. Improving, 8. Adjusting the composition and then 9. Final colour and contrast adjustments for the final image. 1.5 Stretch function One particularly important aspect of image processing is the choice of the best stretch function. You choose which "stretch function" or representation to use in the Fits Liberator window. A logarithmic representation of the pixel values tends to suppress the bright parts of the image, i.e. the stars, and to enhance the fainter part, e.g. nebulosity. This can be desirable if the 'faint stuff' needs 'a boost', but a logarithmic stretch function can also reduce the contrast in an image, producing a lower dynamic range as is seen in the example below.
- 16. 11 Figure 14: The difference between two stretch functions. To the left is a linear representation of the pixels and to the right a logarithmic. It is seen that the log lowers the contrast too much and therefore is not the aesthetically desirable function to choose here. Links http://www.hubblesite.org/sci.d.tech/behind_the_pictu res/ http://heritage.stsci.edu/commonpages/infoindex/ourimages/color_co mp.html