SlideShare ist ein Scribd-Unternehmen logo
1 von 11
Downloaden Sie, um offline zu lesen
Using PHP Point of Sale
PHP Point of Sale is designed to be easy to use, with minimal training requirements. The following section details
instructions for day to day management and usage.

Home Screen
Once you successfully log in, you’ll be taken to the PHP Point of Sale Home Screen. The Home Screen is a central jumping
point for just about any task you’ll need to accomplish in the system. It’s located in the top navigation toolbar:


                                        Figure 2 – PHP Point of Sale Navigation Toolbar

Managing User Accounts
PHP Point of Sale user accounts are used by sales staff, managers and administrators. For security and reporting reasons,
it’s a good idea to have separate user accounts for every individual who will need to use PHP Point of Sale. For example,
sales activity reports can be organized by user account, so you can easily see your top sales performers if each person has
their own unique account.
When you first install PHP Point of Sale, one user account is created automatically:
          Username: admin
          Password: admin
          Important: You can, and should, change the admin password immediately. See Modifying a User Account below
          for instructions on how to change passwords.

Account Types
Every user account has a security level associated with it, known in PHP Point of Sale as an account type. The following
account types are available:
      Admin – Full system privileges. Users of this type can modify user accounts, add or change items, sales, discounts,
           customer data, configuration items and more.
      Sales Clerk – Limited system privileges. Users of this type can process sales transactions, create new customers,
           and that’s about it.
      Report Viewer – Limited system privileges. Users of this type can only view reports.


Adding a New User Account
To add a new user account to your PHP Point of Sale system, take the following steps:
     1.    Be sure you are logged into a user account with Admin privileges.
     2.    Click the Home button on the top toolbar.
     3.    Click the Add, Remove or Manage Users link.
     4.    Click the Create a New User link.
     5.    Fill out the appropriate details for the user account in each field provided. You’ll need to type the password twice
           to confirm.
Modifying a User Account
To make changes to a user account, including changing the password associated with a user account, take the following
steps:
     1. Be sure you are logged into a user account with Admin privileges.
     2. Click the Home button on the top toolbar.
     3. Click the Add, Remove or Manage Users link.
     4. Click the Manage Users link.
     5. Locate the user account you wish to modify in the table which is displayed. Then click the Update link next to that
        user account.
     6. Make any desired changes to the user account. If you are resetting the password associated with the user account,
        be sure to enter it twice.
     7. Click the Submit button to save your changes. If you change your mind and do not wish to save, simply click the
        Home button on the top toolbar.

Removing a User Account
You can only remove a user account if there are no sales associated with it. Once sales activity has been entered for a user
account, PHP Point of Sale will not allow you to delete it, because the account information is needed for reporting purposes.
The best way to handle old or expired user accounts (for example, if one of your staff members leaves for another job) is to
simply reset the password on the account to something that is unknown to the former user, as well as other staff members.
This preserves the security of your PHP Point of Sale system while maintaining data integrity for reporting.
To remove a user account, take the following steps:
     1. Be sure you are logged into a user account with Admin privileges.
     2. Click the Home button on the top toolbar.
     3. Click the Add, Remove or Manage Users link.
     4. Click the Manage Users link.
     5. Locate the user account you wish to remove in the table which is displayed. Then click the Delete link next to that
        user account.
     6. You’ll be prompted to confirm the delete operation. Click OK to continue, or Cancel to abort the operation.

Managing Suppliers
Before you can sell items in any retail setting, you first need a supplier of goods, or more than one. Consequently, all items
in PHP Point of Sale must have a Supplier associated with them - even if that Supplier is you.
Your first order of business, before any Items are added to your database, is to add one or more Suppliers.

Adding a Supplier
To add a new Supplier, take the following steps:
     1.   Be sure you are logged into a user account with Admin privileges.
     2.   Click the Home button on the top toolbar.
     3.   Click the Add, Remove or Manage Items for Sale link.
     4.   Click the Create a New Supplier link.
     5.   Fill out the necessary details for your supplier in the form provided. Required fields are outlined in bold.
     6.   Once you have added all necessary details, click the Submit button to add this new Supplier to your database.
Modifying a Supplier
To make changes to an existing Supplier, take the following steps:
     1. Be sure you are logged into a user account with Admin privileges.
     2. Click the Home button on the top toolbar.
     3. Click the Add, Remove or Manage Items for Sale link.
     4. Click the Manage Suppliers link.
     5. Locate the Supplier you wish to modify in the table which is displayed. Then click the Update link next to that
        Supplier.
     6. Make any desired changes to the Supplier profile in the form provided.
     7. Click the Submit button to save your changes.
•     If you change your mind and do not wish to save, simply click the Home button on the top toolbar.

Deleting a Supplier
You can only remove a Supplier if there are no sales associated with it. Once sales activity has been entered for Items
provided by a given Supplier, PHP Point of Sale will not allow you to delete it, because the information is needed for
reporting purposes.
To remove a Supplier, take the following steps:
     1. Be sure you are logged into a user account with Admin privileges.
     2. Click the Home button on the top toolbar.
     3. Click the Add, Remove or Manage Items for Sale link.
     4. Click the Manage Suppliers link.
     5. Locate the Supplier you wish to modify in the table which is displayed. Then click the Delete link next to that
        Supplier.
     6. You’ll be prompted to confirm the delete operation. Click OK to continue, or Cancel to abort the operation.

Managing Brands
All Items in PHP Point of Sale are associated with a Brand. Therefore, you’ll also need to add at least one Brand before you
can add Items.

Adding a Brand
To add a new Brand, take the following steps:
     1.   Be sure you are logged into a user account with Admin privileges.
     2.   Click the Home button on the top toolbar.
     3.   Click the Add, Remove or Manage Items for Sale link.
     4.   Click the Create a New Brand link.
     5.   Fill out the brand name in the field provided. Click the Submit button to add this new Brand to your database.

Modifying a Brand
To make changes to an existing Brand, take the following steps:
     1. Be sure you are logged into a user account with Admin privileges.
     2. Click the Home button on the top toolbar.
     3. Click the Add, Remove or Manage Items for Sale link.
     4. Click the Manage Brands link.
     5. Locate the Brand you wish to modify in the table which is displayed. Then click the Update link next to that
        Brand.
     6. Make any desired changes to the Brand in the field provided. Click the Submit button to save your changes.
•     If you change your mind and do not wish to save, simply click the Home button on the top toolbar.
Deleting a Brand
You can only remove a Brand if there are no sales associated with it. Once sales activity has been entered for Items of a
particular Brand, PHP Point of Sale will not allow you to delete it, because the information is needed for reporting purposes.
To remove a Brand, take the following steps:
     1.   Be sure you are logged into a user account with Admin privileges.
     2.   Click the Home button on the top toolbar.
     3.   Click the Add, Remove or Manage Items for Sale link.
     4.   Click the Manage Brands link.
     5.   Locate the Brand you wish to modify in the table which is displayed. Then click the Delete link next to that Brand.
     6.   You’ll be prompted to confirm the delete operation. Click OK to continue, or Cancel to abort the operation.

Managing Item Categories
All Items in PHP Point of Sale must belong to an Item Category. You’ll therefore need at least one Category before you can
add Items to the PHP Point of Sale database.

Adding a Category
To add a new Category, take the following steps:
     1.   Be sure you are logged into a user account with Admin privileges.
     2.   Click the Home button on the top toolbar.
     3.   Click the Add, Remove or Manage Items for Sale link.
     4.   Click the Create a New Category link.
     5.   Fill out the Category name in the field provided. Click the Submit button to add this new Category to your
          database.

Modifying a Category
To make changes to an existing Category, take the following steps:
     1. Be sure you are logged into a user account with Admin privileges.
     2. Click the Home button on the top toolbar.
     3. Click the Add, Remove or Manage Items for Sale link.
     4. Click the Manage Categories link.
     5. Locate the Category you wish to modify in the table which is displayed. Then click the Update link next to that
        Category.
     6. Make any desired changes to the Category in the field provided. Click the Submit button to save your changes.
•     If you change your mind and do not wish to save, simply click the Home button on the top toolbar.

Deleting a Category
You can only remove a Category if there are no sales or items associated with it. To remove a Category, take the following
steps:
     1.   Be sure you are logged into a user account with Admin privileges.
     2.   Click the Home button on the top toolbar.
     3.   Click the Add, Remove or Manage Items for Sale link.
     4.   Click the Manage Categories link.
     5.   Locate the Category you wish to modify in the table which is displayed. Then click the Delete link next to that
          Category.
                You’ll be prompted to confirm the delete operation. Click OK to continue, or Cancel to abort the
                   operation.
Managing Items
Items in PHP Point of Sale are often referred to as SKUs (pronounced “skews”) in retail lingo. Essentially, an Item is a
unique “entity” for sales reporting purposes.
The way you classify unique items depends on the level of detail you want to see in your sales reports. For example, a plain
t-shirt sells for $12.95 regardless of whether it is red, blue or orange. If you wanted to track individual sales of red, blue and
orange plain t-shirts, you should enter 3 separate Items. If, however, you wish only to track plain t-shirt sales regardless of
their color, you need to enter only a single Item in the PHP Point of Sale database.
          Important: Before you can add items to your PHP Point of Sale database, you must first create at least one Brand,
          at least one Category, and at least one Supplier.

Adding an Item
Once you have at least one Supplier, Category and Brand, you can add an Item to the PHP Point of Sale database. To add a
new item, take the following steps:
     1.   Be sure you are logged into a user account with Admin privileges.
     2.   Click the Items button on the top toolbar.
     3.   Click the Create a New Item link.
     4.   Fill out the required (and optional) fields as follows:
Item Name: A friendly name for the item. This name appears on invoices and receipts.
Description: The description field can contain any information you like. It is also printed on invoices and receipts.
Item Number: If you have an existing coding or numbering scheme, record that value here. You can use this code in
combination with the barcode scanning and printing capabilities built into PHP Point of Sale[5].
Brand: The associated Brand.
Category: The Category to which the item belongs.
Supplier: The Supplier which provides the item to you.
Buying Price: The per-unit price paid for each item from the Supplier.
Selling Price: The standard retail selling price of the Item. This price is subject to any Discounts which are subsequently
applied to the item.
Tax (%): A numeric value indicating the tax rate for the specific item. The value specified in this field overrides the global
tax rate[6].
Supplier Catalogue #: Most wholesalers or suppliers have their own item codes and part numbers. Use this field to record
those values for convenient re-ordering of stock.
Quantity in Stock: A numeric value indicating the current unit quantity in stock.
Reorder Level: A numeric value representing the quantity at which a stock replenishment order should be triggered.
     5. Click the Submit button to complete the addition of the Item to the database.

Modifying an Item
To modify an existing Item, take the following steps:
     1.   Be sure you are logged into a user account with Admin privileges.
     2.   Click the Items button on the top toolbar.
     3.   Click the Manage Items link.
     4.   Locate the item you wish to modify, and click the Update link next to it.
     5.   Make the appropriate adjustments to your Item’s profile in the fields provided. Then click the Submit button to
          save your changes.
Deleting an Item
You can only delete an Item if there are no sales associated with it. To delete an Item, take the following steps:
     1.   Be sure you are logged into a user account with Admin privileges.
     2.   Click the Items button in the top toolbar.
     3.   Click the Manage Items link.
     4.   Locate the Item you wish to remove, and then click the Delete link next to that item.

Applying Discounts to Items
When you want to run a special sale or promotion, you can use PHP Point of Sale to apply discounts to certain items in your
store. This way, you can leave the original pricing intact, to be restored once the sale or promotion is over.
To apply a discount to an Item, do the following:
     1.   Click the Items button in the top toolbar.
     2.   Click the Discount an Item link.
     3.   Choose the Item to discount from the available drop-down menu.
     4.   Enter the percentage of the discount to apply. For example, enter 10 for 10%, or 11.5 for 11.5%.
     5.   If desired, enter a comment. For example, Winter Sale.
     6.   Click the Submit button. The discount will now be applied to new sales for that Item.

Managing Discounts
You may implement many kinds of Discounts for various reasons. PHP Point of Sale allows you to manage all of your
Discounts from a single location. You can adjust discount levels or remove discounts altogether:
     1. Click the Items button in the top toolbar.
     2. Click the Manage Discounts link.
     3. Review all of your configured Discounts from the table provided.
To delete a previously configured Discount, click the Delete link next to the appropriate Discount. To make changes to a
previously configured Discount, click the Update link next to the appropriate Discount and make your changes.

Using the Barcode Sheet
PHP Point of Sale can create custom barcodes for each item in your store. You can use these barcodes to make stickers and
labels, which can then be applied directly to your products and/or the shelving where product is displayed:


                                                  Figure 3 – Sample Barcode
To see a complete barcode summary for all Items in your store, do the following:
     1. Click the Items button in the top toolbar.
     2. Click the Items Barcode Sheet link on the Items page.

Creating and Printing Item Barcode Labels Using Microsoft Word
The following instructions should work with Microsoft Word versions XP, 2002, or 2003. You can use Word to create label
sheets with multiple copies of the same label (for individual products), or with multiple unique labels on a single sheet (for
catalogues or shelving).
     1. Click Tools > Letters and Mailings > Envelopes and Labels.
     2. Click the Labels tab at the top of the displayed sub-window.
     3. Choose the appropriate label template to match the one you are using by clicking the label window in the bottom
        right part of the sub-window. Templates from the most popular manufacturers (Avery, for example) are available.
4. Once you’ve selected the appropriate label template, click the New Document button in the top right portion of the
        sub-window. A new Microsoft Word document will be created, with guides that enable you to precisely lay out
        your labels to match your label stock.
     5. To copy a barcode or label into your Word template, right click the barcode image in PHP Point of Sale, and
        choose Copy Image or Copy (depending on your web browser).
     6. Switch back to your Word document and place the cursor in a label cell. Press Ctrl+V to paste the barcode into the
        label cell. You may need to adjust the size of the pasted barcode to ensure that it isn’t too large. To resize the
        barcode, click once on it to select it, and then drag one of the corners. Don’t drag the flat sides, as these will distort
        your barcode image by stretching it horizontally or vertically.

Managing Customers
All sales transactions in PHP Point of Sale are associated with a particular customer account. If you’re not interested in
tracking customers, you can simply create a single ‘default’ customer account to be re-used for all transactions[7].

Adding a Customer
To add a new Customer to PHP Point of Sale, take the following steps:
     1.   Click the Customers button on the top toolbar.
     2.   Click the Create A New Customer link.
     3.   Enter the necessary customer details. The minimum required fields are first name, last name and telephone number.
     4.   Click the Submit button to add the new customer to the system.

Modifying a Customer
To modify a customer’s information (for example, if your customer moves to a new address) take the following steps:
     1. Click the Customers button on the top toolbar.
     2. Click the Manage Customers link.
     3. Locate the customer you wish to modify by reviewing the customer list. You can also search for a specific
        customer (by last name) in the search box provided at the top of the page. Once you’ve located the customer, click
        the Update link in the same row.
     4. Make any necessary adjustments in the fields provided, and then click the Submit button to save your changes.
        Remember that the first name, last name and telephone number fields are required.

Deleting a Customer
You cannot delete any customer who has previously purchased an item, because this information is needed for reporting
purposes. If, however, there is no sales activity associated with a particular customer, and you wish to delete the account,
take the following steps:
     1. Click the Customers button on the top toolbar.
     2. Click the Manage Customers link.
     3. Locate the Customer you wish to remove by reviewing the customer list. You can also search for a specific
        customer (by last name) in the search box provided at the top of the page. Once you’ve located the Customer to be
        removed, click the Delete link in the same row.
     4. If the delete operation was successful, you’ll see a message like You have successfully deleted row XX from the
        database. If it was not successful, PHP Point of Sale will return the appropriate error message.

Using Barcodes to Identify Customers
You can use PHP Point of Sale’s bar-coding features to create membership cards and account cards, which can be scanned
at each sales instance to quickly identify the customer without the need for manual lookups.
To create a master barcode list for all of your customers, click Customers in the top toolbar, followed by the Customers
Barcode Sheet link. See Creating and Printing Item Barcode Labels Using Microsoft Word on page 21 for barcode printing
tips.
Processing Sales Transactions
Once you have deployed PHP Point of Sale and set up your items, categories, and brands, you’ll (hopefully) spend most of
your time processing sales transactions.

Starting a New Sale
To begin a new sales transaction, click the Sales button in the top toolbar, followed by the Start a New Sale link.
The first step in the sales process is to identify your customer. You can locate a customer in any one of three different ways:
      By using the Find Customer search box. In this box, you can enter letters from the customer’s first or last name.
      By choosing a customer from the associated drop-down box in the Select Customer selector.
      By scanning a customer barcode into the Customer ID / Account Number field. Simply place the cursor into this
         field, and then use your barcode scanner to read the customer identification data from the associated bar code.
Choose the method that works best for you. If you’ve used the PHP Point of Sale barcode features to create Customer
account cards, you’ll probably find this method the fastest.
Once you’ve located the correct Customer, click the Submit Query button on the New Sale screen. This action begins a
sales session for that customer.

Understanding Sales Sessions
When you begin a new sales transaction by selecting a Customer, you create an active sales session within the PHP Point of
Sale system. This means that if you abandon the sales entry process at any point (say, for example, to look up information
on a different Item that your customer is asking about) you can easily return and pick up where you left off, without having
to re-enter customer information or lose the contents of the existing shopping cart.

Using the Shopping Cart
Once you’ve selected a customer, you can add Items to their virtual shopping cart. This can be done in one of three different
ways:
      By using the Find Item tool to search for a particular text match. PHP Point of Sale will scan the product’s main
         text fields for a suitable match.
      By selecting an item directly from the drop-down menu in the Select Item field.
      By using a barcode scanner (and associated barcode labels) to scan an item directly into the Item ID / Item
         Number field. Be sure to place the cursor into this field before scanning!
Once you’ve selected an Item, PHP Point of Sale adds it to the customer’s virtual shopping cart. You can adjust the quantity
afterwards, by updating the Quantity field for the desired Item, then clicking the Update button to recalculate the shopping
cart totals.
To remove Items from the shopping cart, click the Remove link next to the Item to be removed.

Applying Extra Discounts at Time of Sale
You can easily add extra discounting to individual items – or even the entire shopping cart – at any point during the sales
process. To discount an Item, you can adjust the Unit Price field next to the associated item. To apply a global discount,
enter an appropriate value (1 to 99) in the Global Sale Discount field.

Completing a Sales Transaction
Cash is King, as they say. The sales transaction is completed when money changes hands. These monies can take the form
of cash, check, credit card[8], account debit or gift card.
Choose the appropriate payment method in the Paid With, and enter the amount received from the customer in the Amt
Tendered field. You can also record comments or miscellaneous information in the Sale Comment field. Once you’ve
completed these entries, click the Add Sale button to “post” the sale permanently to the PHP Point of Sale System.
Handling Cash Transactions
For many transactions, it is not feasible, or even possible, to collect detailed customer information. In these cases, you can
create a special Cash Customer account, to be used as the default selection in situations where customer data is not
required.

Abandoning a Sale
You may find yourself needing to abort a sale that is halfway finished. Perhaps your customer forgot their wallet or purse,
or maybe they simply changed their mind about the purchase. In any case, you need to clear the sales session so that new
sales can be entered for a different customer.
At any point during the sales process, you can click the Clear Sale link at the top of the Shopping Cart window. This will
clear the sales session, including customer information and the contents of the shopping cart.

Modifying a Sale After Completion
It is possible to modify the particulars of a sale after it has already been completed, and even delete (void) a sales
transaction completely. Normally, this practice is not recommended because of the potential for fraud. This function is also
restricted to users with Admin privileges.
     1. Be sure you’re logged in with Admin privileges.
     2. Click the Sales button in the top toolbar, followed by the Manage Sales link.
     3. The following page contains a detailed history of all sales transactions. It can be a very large page. On this page,
        you can void an entire sale by clicking the Delete Entire Sale link. To modify the particulars of a sale, click the
        Update link.

Generating Reports
PHP Point of Sale provides over a dozen built-in reports. Choose the report you wish to run by clicking Reports in the top
toolbar.

All Brands Report
This report provides a complete sales summary, organized by Brand name. Available time ranges are Today, Yesterday,
Last 7 Days, This Month, Last Month, This Year and All Time. Before tax and after tax sales figures are included.

All Categories Report
This report provides a complete sales summary, organized by Category name. Available time ranges are Today, Yesterday,
Last 7 Days, This Month, Last Month, This Year and All Time. Before tax and after tax sales figures are included.

All Customers Report
This report provides a complete sales summary, organized by Customer. Available time ranges are Today, Yesterday, Last
7 Days, This Month, Last Month, This Year and All Time. Before tax and after tax sales figures are included.

All Employees Report
This report provides a complete sales summary, organized by Employee. Available time ranges are Today, Yesterday, Last
7 Days, This Month, Last Month, This Year and All Time. Before tax and after tax sales figures are included.

All Items Report
This report provides a complete sales summary, organized by Item. Available time ranges are Today, Yesterday, Last 7
Days, This Month, Last Month, This Year and All Time. Before tax and after tax sales figures are included, as well as
individual unit sales and subtotals for each Item.
Brand Report
The Brand Report allows you to focus on the sales performance of a specific individual Brand over a given time interval.
Choose the Brand you wish to use in your report, and then select the desired time interval. Available time ranges are Today,
Yesterday, Last 7 Days, This Month, Last Month, This Year and All Time. Before tax and after tax sales figures are
included. You can also use the Find Brand search box to locate a Brand by name.

Category Report
The Category Report allows you to focus on the sales performance of a specific individual Category over a given time
interval. Choose the Category you wish to use in your report, and then select the desired time interval. Available time ranges
are Today, Yesterday, Last 7 Days, This Month, Last Month, This Year and All Time. Before tax and after tax sales
figures are included. You can also use the Find Category rand search box to locate a Category by name.

Customer Report
The Customer Report allows you to focus on the sales performance of a specific individual Customer over a given time
interval. Choose the Customer you wish to use in your report, and then select the desired time interval. Available time
ranges are Today, Yesterday, Last 7 Days, This Month, Last Month, This Year and All Time. Before tax and after tax
sales figures are included. You can also use the Find Customer search box to locate a Customer by name.

Daily Report
The Daily Report is an up-to-the moment summary of sales activity for today’s date. You can also see details for individual
sales by clicking on the Show Sale Details link next to each line item.

Date Range Report
The Date Range Report allows you to produce a complete sales summary between the specified starting and ending dates.
Before tax and after tax sales figures are included. You can also see details for individual sales by clicking on the Show
Sale Details link next to each line item.

Employee Report
The Employee Report allows you to focus on the sales performance of a specific individual Employee over a given time
interval. Choose the Employee you wish to use in your report, and then select the desired time interval. Available time
ranges are Today, Yesterday, Last 7 Days, This Month, Last Month, This Year and All Time.
Before tax and after tax sales figures are included. You can also see details for individual sales by clicking on the Show
Sale Details link next to each line item.

Item Report
The Item Report allows you to focus on the sales performance of a specific individual Item over a given time interval.
Choose the Item you wish to use in your report, and then select the desired time interval. Available time ranges are Today,
Yesterday, Last 7 Days, This Month, Last Month, This Year and All Time. Before tax and after tax sales figures are
included.

Profit Report
The Profit Report shows sales margins over the specified time interval. This report compares the selling price of each item
against its cost. Available time ranges are Today, Yesterday, Last 7 Days, This Month, Last Month, This Year and All
Time. Before tax and after tax sales figures are included.
Tax Report
The Tax Report provides a summary of tax dollars collected on sales over a given time interval. This report can be used to
calculate the amount of tax which must be remitted to the appropriate government tax collection agency, based on the tax
rules you’ve specified in each item’s configuration. Available time ranges are Today, Yesterday, Last 7 Days, This
Month, Last Month, This Year and All Time.

Administration

Backing up the Database
It’s extremely important to make regular backups of your database. In the event of a hardware or software error, it is
possible that you could lose access to the data stored in your PHP Point of Sale database. In these cases, you’ll need backup
data to restore to your rebuilt system. To perform an up-to-date backup, do the following:
     1. Click the Home button on the navigation toolbar.
     2. Click the Backup Database link.
If your PHP Point of Sale system is deployed on a Linux host, a typical backup file resides at the following local path
(although the location may vary depending on your Apache configuration):
/home/phppoint/public_html/path_to_php_pos/backups/.db_backup.phppoint_demo2.2006-01-22.sql.gz
On a Windows host, backup files are saved in the following location/format (with a default IIS installation – your location
may vary):
C:inetpubwwwrootpath_to_php_posbackups.db_backup.phppoint_demo2.2006-01-22.sql.gz
         Important: Backup files are stored on the same computer as your live application. This means that if your hard
         drive fails, you’ll lose your production data and your backups too. It is critically important to place a copy of your
         backup files in a safe location, completely separate from your production system. CD burners are quite cheap
nowadays – archiving to CD is probably the best option for most PHP Point of Sale users. This also means that your backup
files could be accessible to malicious users who can download your customer database and steal personal information. Once
you complete a backup, it’s highly recommended that you download the file to a separate computer and delete the original
backup file from your production PHP Point of Sale system.

Restoring a Database from Backup
To restore a database from a backup file, extract the contents of zip archive to a folder on your PHP Point of Sale system.
On Linux systems, you can restore the backup file from the command line, using the following syntax:
mysql databasename < db_backup.phppoint_demo2.YYYY-MM-DD.sql
where databasename is the name of your PHP Point of Sale database, YYYY is the year, MM is the month and DD is the day
of the backup file.
This procedure creates a brand new PHP Point of Sale database, and repopulates it with all of your historical data. It’s a
perfect replica of your PHP Point of Sale system at the time of the backup.

Weitere ähnliche Inhalte

Was ist angesagt?

Simulation & Modeling - Smilulation Queuing System
Simulation & Modeling - Smilulation Queuing SystemSimulation & Modeling - Smilulation Queuing System
Simulation & Modeling - Smilulation Queuing SystemMaruf Rion
 
Sequence diagram for employee management system(EMS)
Sequence diagram for employee management system(EMS)Sequence diagram for employee management system(EMS)
Sequence diagram for employee management system(EMS)Achal (अचल) Porwal
 
Online Food Ordering System
Online Food Ordering SystemOnline Food Ordering System
Online Food Ordering SystemAnkita Jangir
 
resturent management
resturent managementresturent management
resturent managementFreelancer
 
Online restaurant management system
Online restaurant management systemOnline restaurant management system
Online restaurant management systemAmal Jose
 
Restaurant Project by Amit Mangukiya
Restaurant Project by Amit MangukiyaRestaurant Project by Amit Mangukiya
Restaurant Project by Amit MangukiyaAmit Mangukiya
 
Employee management system in Software Engineering
Employee management system in Software EngineeringEmployee management system in Software Engineering
Employee management system in Software EngineeringSadia Akter
 
Feasibility report for library management system
Feasibility report for library management systemFeasibility report for library management system
Feasibility report for library management systemArslan Nazim
 
Proposal complete school college management software.
Proposal complete school college management software.Proposal complete school college management software.
Proposal complete school college management software.Sohel Mahboob
 
Final document project1
Final document project1Final document project1
Final document project1zohaib naveed
 
library management system
library management systemlibrary management system
library management systemaniket chauhan
 
A Low-Cost IoT Application for the Urban Traffic of Vehicles, Based on Wirele...
A Low-Cost IoT Application for the Urban Traffic of Vehicles, Based on Wirele...A Low-Cost IoT Application for the Urban Traffic of Vehicles, Based on Wirele...
A Low-Cost IoT Application for the Urban Traffic of Vehicles, Based on Wirele...Fatima Qayyum
 
Library Management System SRS
Library Management System SRSLibrary Management System SRS
Library Management System SRSParas
 
Online old books sales by hemraj gahlot
Online old books sales by hemraj gahlotOnline old books sales by hemraj gahlot
Online old books sales by hemraj gahlotHemraj Gahlot
 

Was ist angesagt? (20)

Simulation & Modeling - Smilulation Queuing System
Simulation & Modeling - Smilulation Queuing SystemSimulation & Modeling - Smilulation Queuing System
Simulation & Modeling - Smilulation Queuing System
 
Onlineshopping
OnlineshoppingOnlineshopping
Onlineshopping
 
Sequence diagram for employee management system(EMS)
Sequence diagram for employee management system(EMS)Sequence diagram for employee management system(EMS)
Sequence diagram for employee management system(EMS)
 
Online Food Ordering System
Online Food Ordering SystemOnline Food Ordering System
Online Food Ordering System
 
resturent management
resturent managementresturent management
resturent management
 
Online restaurant management system
Online restaurant management systemOnline restaurant management system
Online restaurant management system
 
Mini Project- Shopping Cart Development
Mini Project- Shopping Cart DevelopmentMini Project- Shopping Cart Development
Mini Project- Shopping Cart Development
 
Project on PHP for Complaint management system
Project on PHP for Complaint management systemProject on PHP for Complaint management system
Project on PHP for Complaint management system
 
Restaurant Project by Amit Mangukiya
Restaurant Project by Amit MangukiyaRestaurant Project by Amit Mangukiya
Restaurant Project by Amit Mangukiya
 
Employee management system in Software Engineering
Employee management system in Software EngineeringEmployee management system in Software Engineering
Employee management system in Software Engineering
 
Feasibility report for library management system
Feasibility report for library management systemFeasibility report for library management system
Feasibility report for library management system
 
Erp modules hr
Erp modules hrErp modules hr
Erp modules hr
 
Library management system
Library management systemLibrary management system
Library management system
 
Mini Project presentation for MCA
Mini Project presentation for MCAMini Project presentation for MCA
Mini Project presentation for MCA
 
Proposal complete school college management software.
Proposal complete school college management software.Proposal complete school college management software.
Proposal complete school college management software.
 
Final document project1
Final document project1Final document project1
Final document project1
 
library management system
library management systemlibrary management system
library management system
 
A Low-Cost IoT Application for the Urban Traffic of Vehicles, Based on Wirele...
A Low-Cost IoT Application for the Urban Traffic of Vehicles, Based on Wirele...A Low-Cost IoT Application for the Urban Traffic of Vehicles, Based on Wirele...
A Low-Cost IoT Application for the Urban Traffic of Vehicles, Based on Wirele...
 
Library Management System SRS
Library Management System SRSLibrary Management System SRS
Library Management System SRS
 
Online old books sales by hemraj gahlot
Online old books sales by hemraj gahlotOnline old books sales by hemraj gahlot
Online old books sales by hemraj gahlot
 

Ähnlich wie Using PHP Point of Sale

Sales Navigator Quick Start
Sales Navigator Quick StartSales Navigator Quick Start
Sales Navigator Quick StartAndy Kellam
 
The New Sales Navigator: Admin Training Guide
The New Sales Navigator: Admin Training GuideThe New Sales Navigator: Admin Training Guide
The New Sales Navigator: Admin Training GuideLinkedIn Sales Solutions
 
How to register a training institute and allocate course under a distributor ...
How to register a training institute and allocate course under a distributor ...How to register a training institute and allocate course under a distributor ...
How to register a training institute and allocate course under a distributor ...Haris NP
 
WebsiteAlive Operator Panel
WebsiteAlive Operator PanelWebsiteAlive Operator Panel
WebsiteAlive Operator PanelWebsiteAlive
 
Know your seller panel- II
Know your seller panel- IIKnow your seller panel- II
Know your seller panel- IIPaytm
 
Integrating Mailchimp with Magento 2- Step by Step Process.pdf
Integrating Mailchimp with Magento 2- Step by Step Process.pdfIntegrating Mailchimp with Magento 2- Step by Step Process.pdf
Integrating Mailchimp with Magento 2- Step by Step Process.pdfEkta Patel
 
Facebook business manager blog
Facebook business manager blogFacebook business manager blog
Facebook business manager blogBhagyaV2
 
How to update profile details on seller panel
How to update profile details on seller panelHow to update profile details on seller panel
How to update profile details on seller panelPaytm
 
YoKart Admin Manual – Comprehensive Multivendor eCommerce Store Management Sy...
YoKart Admin Manual – Comprehensive Multivendor eCommerce Store Management Sy...YoKart Admin Manual – Comprehensive Multivendor eCommerce Store Management Sy...
YoKart Admin Manual – Comprehensive Multivendor eCommerce Store Management Sy...YoKart - eCommerce Platform
 
How to update profile details on seller panel - Wholesale
How to update profile details on seller panel - WholesaleHow to update profile details on seller panel - Wholesale
How to update profile details on seller panel - WholesalePaytm
 
oCodewire Price_Bargain_Extension_Demo
oCodewire Price_Bargain_Extension_DemooCodewire Price_Bargain_Extension_Demo
oCodewire Price_Bargain_Extension_DemoMagento oCodewire
 
Sc training 1 managing products.
Sc training 1 managing products.Sc training 1 managing products.
Sc training 1 managing products.Rory Maclnnes
 
Seller app- Cataloguing
Seller app- Cataloguing Seller app- Cataloguing
Seller app- Cataloguing Paytm
 
Know your seller panel- II
Know your seller panel- IIKnow your seller panel- II
Know your seller panel- IIPaytm
 
PayrollAdmin - Attendance and Payroll Management ERP Software
PayrollAdmin - Attendance and Payroll Management ERP SoftwarePayrollAdmin - Attendance and Payroll Management ERP Software
PayrollAdmin - Attendance and Payroll Management ERP SoftwareRanganath Shivaram
 

Ähnlich wie Using PHP Point of Sale (20)

Manage users
Manage usersManage users
Manage users
 
Sales Navigator Quick Start
Sales Navigator Quick StartSales Navigator Quick Start
Sales Navigator Quick Start
 
The New Sales Navigator: Admin Training Guide
The New Sales Navigator: Admin Training GuideThe New Sales Navigator: Admin Training Guide
The New Sales Navigator: Admin Training Guide
 
Manage users
Manage usersManage users
Manage users
 
How to register a training institute and allocate course under a distributor ...
How to register a training institute and allocate course under a distributor ...How to register a training institute and allocate course under a distributor ...
How to register a training institute and allocate course under a distributor ...
 
WebsiteAlive Operator Panel
WebsiteAlive Operator PanelWebsiteAlive Operator Panel
WebsiteAlive Operator Panel
 
Know your seller panel- II
Know your seller panel- IIKnow your seller panel- II
Know your seller panel- II
 
Operator How-To
Operator How-ToOperator How-To
Operator How-To
 
Integrating Mailchimp with Magento 2- Step by Step Process.pdf
Integrating Mailchimp with Magento 2- Step by Step Process.pdfIntegrating Mailchimp with Magento 2- Step by Step Process.pdf
Integrating Mailchimp with Magento 2- Step by Step Process.pdf
 
Facebook business manager blog
Facebook business manager blogFacebook business manager blog
Facebook business manager blog
 
How to update profile details on seller panel
How to update profile details on seller panelHow to update profile details on seller panel
How to update profile details on seller panel
 
YoKart Admin Manual – Comprehensive Multivendor eCommerce Store Management Sy...
YoKart Admin Manual – Comprehensive Multivendor eCommerce Store Management Sy...YoKart Admin Manual – Comprehensive Multivendor eCommerce Store Management Sy...
YoKart Admin Manual – Comprehensive Multivendor eCommerce Store Management Sy...
 
How to update profile details on seller panel - Wholesale
How to update profile details on seller panel - WholesaleHow to update profile details on seller panel - Wholesale
How to update profile details on seller panel - Wholesale
 
Css registration guide
Css registration guideCss registration guide
Css registration guide
 
oCodewire Price_Bargain_Extension_Demo
oCodewire Price_Bargain_Extension_DemooCodewire Price_Bargain_Extension_Demo
oCodewire Price_Bargain_Extension_Demo
 
Sc training 1 managing products.
Sc training 1 managing products.Sc training 1 managing products.
Sc training 1 managing products.
 
Seller app- Cataloguing
Seller app- Cataloguing Seller app- Cataloguing
Seller app- Cataloguing
 
Epic net content
Epic net contentEpic net content
Epic net content
 
Know your seller panel- II
Know your seller panel- IIKnow your seller panel- II
Know your seller panel- II
 
PayrollAdmin - Attendance and Payroll Management ERP Software
PayrollAdmin - Attendance and Payroll Management ERP SoftwarePayrollAdmin - Attendance and Payroll Management ERP Software
PayrollAdmin - Attendance and Payroll Management ERP Software
 

Mehr von webhostingguy

Running and Developing Tests with the Apache::Test Framework
Running and Developing Tests with the Apache::Test FrameworkRunning and Developing Tests with the Apache::Test Framework
Running and Developing Tests with the Apache::Test Frameworkwebhostingguy
 
MySQL and memcached Guide
MySQL and memcached GuideMySQL and memcached Guide
MySQL and memcached Guidewebhostingguy
 
Novell® iChain® 2.3
Novell® iChain® 2.3Novell® iChain® 2.3
Novell® iChain® 2.3webhostingguy
 
Load-balancing web servers Load-balancing web servers
Load-balancing web servers Load-balancing web serversLoad-balancing web servers Load-balancing web servers
Load-balancing web servers Load-balancing web serverswebhostingguy
 
SQL Server 2008 Consolidation
SQL Server 2008 ConsolidationSQL Server 2008 Consolidation
SQL Server 2008 Consolidationwebhostingguy
 
Master Service Agreement
Master Service AgreementMaster Service Agreement
Master Service Agreementwebhostingguy
 
PHP and MySQL PHP Written as a set of CGI binaries in C in ...
PHP and MySQL PHP Written as a set of CGI binaries in C in ...PHP and MySQL PHP Written as a set of CGI binaries in C in ...
PHP and MySQL PHP Written as a set of CGI binaries in C in ...webhostingguy
 
Dell Reference Architecture Guide Deploying Microsoft® SQL ...
Dell Reference Architecture Guide Deploying Microsoft® SQL ...Dell Reference Architecture Guide Deploying Microsoft® SQL ...
Dell Reference Architecture Guide Deploying Microsoft® SQL ...webhostingguy
 
Managing Diverse IT Infrastructure
Managing Diverse IT InfrastructureManaging Diverse IT Infrastructure
Managing Diverse IT Infrastructurewebhostingguy
 
Web design for business.ppt
Web design for business.pptWeb design for business.ppt
Web design for business.pptwebhostingguy
 
IT Power Management Strategy
IT Power Management Strategy IT Power Management Strategy
IT Power Management Strategy webhostingguy
 
Excel and SQL Quick Tricks for Merchandisers
Excel and SQL Quick Tricks for MerchandisersExcel and SQL Quick Tricks for Merchandisers
Excel and SQL Quick Tricks for Merchandiserswebhostingguy
 
Parallels Hosting Products
Parallels Hosting ProductsParallels Hosting Products
Parallels Hosting Productswebhostingguy
 
Microsoft PowerPoint presentation 2.175 Mb
Microsoft PowerPoint presentation 2.175 MbMicrosoft PowerPoint presentation 2.175 Mb
Microsoft PowerPoint presentation 2.175 Mbwebhostingguy
 

Mehr von webhostingguy (20)

File Upload
File UploadFile Upload
File Upload
 
Running and Developing Tests with the Apache::Test Framework
Running and Developing Tests with the Apache::Test FrameworkRunning and Developing Tests with the Apache::Test Framework
Running and Developing Tests with the Apache::Test Framework
 
MySQL and memcached Guide
MySQL and memcached GuideMySQL and memcached Guide
MySQL and memcached Guide
 
Novell® iChain® 2.3
Novell® iChain® 2.3Novell® iChain® 2.3
Novell® iChain® 2.3
 
Load-balancing web servers Load-balancing web servers
Load-balancing web servers Load-balancing web serversLoad-balancing web servers Load-balancing web servers
Load-balancing web servers Load-balancing web servers
 
SQL Server 2008 Consolidation
SQL Server 2008 ConsolidationSQL Server 2008 Consolidation
SQL Server 2008 Consolidation
 
What is mod_perl?
What is mod_perl?What is mod_perl?
What is mod_perl?
 
What is mod_perl?
What is mod_perl?What is mod_perl?
What is mod_perl?
 
Master Service Agreement
Master Service AgreementMaster Service Agreement
Master Service Agreement
 
Notes8
Notes8Notes8
Notes8
 
PHP and MySQL PHP Written as a set of CGI binaries in C in ...
PHP and MySQL PHP Written as a set of CGI binaries in C in ...PHP and MySQL PHP Written as a set of CGI binaries in C in ...
PHP and MySQL PHP Written as a set of CGI binaries in C in ...
 
Dell Reference Architecture Guide Deploying Microsoft® SQL ...
Dell Reference Architecture Guide Deploying Microsoft® SQL ...Dell Reference Architecture Guide Deploying Microsoft® SQL ...
Dell Reference Architecture Guide Deploying Microsoft® SQL ...
 
Managing Diverse IT Infrastructure
Managing Diverse IT InfrastructureManaging Diverse IT Infrastructure
Managing Diverse IT Infrastructure
 
Web design for business.ppt
Web design for business.pptWeb design for business.ppt
Web design for business.ppt
 
IT Power Management Strategy
IT Power Management Strategy IT Power Management Strategy
IT Power Management Strategy
 
Excel and SQL Quick Tricks for Merchandisers
Excel and SQL Quick Tricks for MerchandisersExcel and SQL Quick Tricks for Merchandisers
Excel and SQL Quick Tricks for Merchandisers
 
OLUG_xen.ppt
OLUG_xen.pptOLUG_xen.ppt
OLUG_xen.ppt
 
Parallels Hosting Products
Parallels Hosting ProductsParallels Hosting Products
Parallels Hosting Products
 
Microsoft PowerPoint presentation 2.175 Mb
Microsoft PowerPoint presentation 2.175 MbMicrosoft PowerPoint presentation 2.175 Mb
Microsoft PowerPoint presentation 2.175 Mb
 
Reseller's Guide
Reseller's GuideReseller's Guide
Reseller's Guide
 

Using PHP Point of Sale

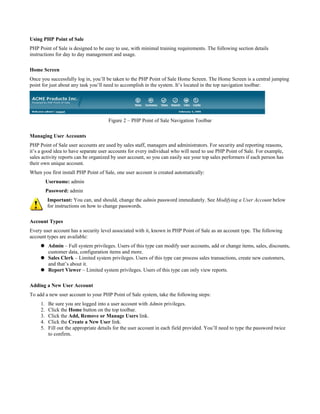
  • 1. Using PHP Point of Sale PHP Point of Sale is designed to be easy to use, with minimal training requirements. The following section details instructions for day to day management and usage. Home Screen Once you successfully log in, you’ll be taken to the PHP Point of Sale Home Screen. The Home Screen is a central jumping point for just about any task you’ll need to accomplish in the system. It’s located in the top navigation toolbar: Figure 2 – PHP Point of Sale Navigation Toolbar Managing User Accounts PHP Point of Sale user accounts are used by sales staff, managers and administrators. For security and reporting reasons, it’s a good idea to have separate user accounts for every individual who will need to use PHP Point of Sale. For example, sales activity reports can be organized by user account, so you can easily see your top sales performers if each person has their own unique account. When you first install PHP Point of Sale, one user account is created automatically: Username: admin Password: admin Important: You can, and should, change the admin password immediately. See Modifying a User Account below for instructions on how to change passwords. Account Types Every user account has a security level associated with it, known in PHP Point of Sale as an account type. The following account types are available:  Admin – Full system privileges. Users of this type can modify user accounts, add or change items, sales, discounts, customer data, configuration items and more.  Sales Clerk – Limited system privileges. Users of this type can process sales transactions, create new customers, and that’s about it.  Report Viewer – Limited system privileges. Users of this type can only view reports. Adding a New User Account To add a new user account to your PHP Point of Sale system, take the following steps: 1. Be sure you are logged into a user account with Admin privileges. 2. Click the Home button on the top toolbar. 3. Click the Add, Remove or Manage Users link. 4. Click the Create a New User link. 5. Fill out the appropriate details for the user account in each field provided. You’ll need to type the password twice to confirm.
  • 2. Modifying a User Account To make changes to a user account, including changing the password associated with a user account, take the following steps: 1. Be sure you are logged into a user account with Admin privileges. 2. Click the Home button on the top toolbar. 3. Click the Add, Remove or Manage Users link. 4. Click the Manage Users link. 5. Locate the user account you wish to modify in the table which is displayed. Then click the Update link next to that user account. 6. Make any desired changes to the user account. If you are resetting the password associated with the user account, be sure to enter it twice. 7. Click the Submit button to save your changes. If you change your mind and do not wish to save, simply click the Home button on the top toolbar. Removing a User Account You can only remove a user account if there are no sales associated with it. Once sales activity has been entered for a user account, PHP Point of Sale will not allow you to delete it, because the account information is needed for reporting purposes. The best way to handle old or expired user accounts (for example, if one of your staff members leaves for another job) is to simply reset the password on the account to something that is unknown to the former user, as well as other staff members. This preserves the security of your PHP Point of Sale system while maintaining data integrity for reporting. To remove a user account, take the following steps: 1. Be sure you are logged into a user account with Admin privileges. 2. Click the Home button on the top toolbar. 3. Click the Add, Remove or Manage Users link. 4. Click the Manage Users link. 5. Locate the user account you wish to remove in the table which is displayed. Then click the Delete link next to that user account. 6. You’ll be prompted to confirm the delete operation. Click OK to continue, or Cancel to abort the operation. Managing Suppliers Before you can sell items in any retail setting, you first need a supplier of goods, or more than one. Consequently, all items in PHP Point of Sale must have a Supplier associated with them - even if that Supplier is you. Your first order of business, before any Items are added to your database, is to add one or more Suppliers. Adding a Supplier To add a new Supplier, take the following steps: 1. Be sure you are logged into a user account with Admin privileges. 2. Click the Home button on the top toolbar. 3. Click the Add, Remove or Manage Items for Sale link. 4. Click the Create a New Supplier link. 5. Fill out the necessary details for your supplier in the form provided. Required fields are outlined in bold. 6. Once you have added all necessary details, click the Submit button to add this new Supplier to your database.
  • 3. Modifying a Supplier To make changes to an existing Supplier, take the following steps: 1. Be sure you are logged into a user account with Admin privileges. 2. Click the Home button on the top toolbar. 3. Click the Add, Remove or Manage Items for Sale link. 4. Click the Manage Suppliers link. 5. Locate the Supplier you wish to modify in the table which is displayed. Then click the Update link next to that Supplier. 6. Make any desired changes to the Supplier profile in the form provided. 7. Click the Submit button to save your changes. • If you change your mind and do not wish to save, simply click the Home button on the top toolbar. Deleting a Supplier You can only remove a Supplier if there are no sales associated with it. Once sales activity has been entered for Items provided by a given Supplier, PHP Point of Sale will not allow you to delete it, because the information is needed for reporting purposes. To remove a Supplier, take the following steps: 1. Be sure you are logged into a user account with Admin privileges. 2. Click the Home button on the top toolbar. 3. Click the Add, Remove or Manage Items for Sale link. 4. Click the Manage Suppliers link. 5. Locate the Supplier you wish to modify in the table which is displayed. Then click the Delete link next to that Supplier. 6. You’ll be prompted to confirm the delete operation. Click OK to continue, or Cancel to abort the operation. Managing Brands All Items in PHP Point of Sale are associated with a Brand. Therefore, you’ll also need to add at least one Brand before you can add Items. Adding a Brand To add a new Brand, take the following steps: 1. Be sure you are logged into a user account with Admin privileges. 2. Click the Home button on the top toolbar. 3. Click the Add, Remove or Manage Items for Sale link. 4. Click the Create a New Brand link. 5. Fill out the brand name in the field provided. Click the Submit button to add this new Brand to your database. Modifying a Brand To make changes to an existing Brand, take the following steps: 1. Be sure you are logged into a user account with Admin privileges. 2. Click the Home button on the top toolbar. 3. Click the Add, Remove or Manage Items for Sale link. 4. Click the Manage Brands link. 5. Locate the Brand you wish to modify in the table which is displayed. Then click the Update link next to that Brand. 6. Make any desired changes to the Brand in the field provided. Click the Submit button to save your changes. • If you change your mind and do not wish to save, simply click the Home button on the top toolbar.
  • 4. Deleting a Brand You can only remove a Brand if there are no sales associated with it. Once sales activity has been entered for Items of a particular Brand, PHP Point of Sale will not allow you to delete it, because the information is needed for reporting purposes. To remove a Brand, take the following steps: 1. Be sure you are logged into a user account with Admin privileges. 2. Click the Home button on the top toolbar. 3. Click the Add, Remove or Manage Items for Sale link. 4. Click the Manage Brands link. 5. Locate the Brand you wish to modify in the table which is displayed. Then click the Delete link next to that Brand. 6. You’ll be prompted to confirm the delete operation. Click OK to continue, or Cancel to abort the operation. Managing Item Categories All Items in PHP Point of Sale must belong to an Item Category. You’ll therefore need at least one Category before you can add Items to the PHP Point of Sale database. Adding a Category To add a new Category, take the following steps: 1. Be sure you are logged into a user account with Admin privileges. 2. Click the Home button on the top toolbar. 3. Click the Add, Remove or Manage Items for Sale link. 4. Click the Create a New Category link. 5. Fill out the Category name in the field provided. Click the Submit button to add this new Category to your database. Modifying a Category To make changes to an existing Category, take the following steps: 1. Be sure you are logged into a user account with Admin privileges. 2. Click the Home button on the top toolbar. 3. Click the Add, Remove or Manage Items for Sale link. 4. Click the Manage Categories link. 5. Locate the Category you wish to modify in the table which is displayed. Then click the Update link next to that Category. 6. Make any desired changes to the Category in the field provided. Click the Submit button to save your changes. • If you change your mind and do not wish to save, simply click the Home button on the top toolbar. Deleting a Category You can only remove a Category if there are no sales or items associated with it. To remove a Category, take the following steps: 1. Be sure you are logged into a user account with Admin privileges. 2. Click the Home button on the top toolbar. 3. Click the Add, Remove or Manage Items for Sale link. 4. Click the Manage Categories link. 5. Locate the Category you wish to modify in the table which is displayed. Then click the Delete link next to that Category.  You’ll be prompted to confirm the delete operation. Click OK to continue, or Cancel to abort the operation.
  • 5. Managing Items Items in PHP Point of Sale are often referred to as SKUs (pronounced “skews”) in retail lingo. Essentially, an Item is a unique “entity” for sales reporting purposes. The way you classify unique items depends on the level of detail you want to see in your sales reports. For example, a plain t-shirt sells for $12.95 regardless of whether it is red, blue or orange. If you wanted to track individual sales of red, blue and orange plain t-shirts, you should enter 3 separate Items. If, however, you wish only to track plain t-shirt sales regardless of their color, you need to enter only a single Item in the PHP Point of Sale database. Important: Before you can add items to your PHP Point of Sale database, you must first create at least one Brand, at least one Category, and at least one Supplier. Adding an Item Once you have at least one Supplier, Category and Brand, you can add an Item to the PHP Point of Sale database. To add a new item, take the following steps: 1. Be sure you are logged into a user account with Admin privileges. 2. Click the Items button on the top toolbar. 3. Click the Create a New Item link. 4. Fill out the required (and optional) fields as follows: Item Name: A friendly name for the item. This name appears on invoices and receipts. Description: The description field can contain any information you like. It is also printed on invoices and receipts. Item Number: If you have an existing coding or numbering scheme, record that value here. You can use this code in combination with the barcode scanning and printing capabilities built into PHP Point of Sale[5]. Brand: The associated Brand. Category: The Category to which the item belongs. Supplier: The Supplier which provides the item to you. Buying Price: The per-unit price paid for each item from the Supplier. Selling Price: The standard retail selling price of the Item. This price is subject to any Discounts which are subsequently applied to the item. Tax (%): A numeric value indicating the tax rate for the specific item. The value specified in this field overrides the global tax rate[6]. Supplier Catalogue #: Most wholesalers or suppliers have their own item codes and part numbers. Use this field to record those values for convenient re-ordering of stock. Quantity in Stock: A numeric value indicating the current unit quantity in stock. Reorder Level: A numeric value representing the quantity at which a stock replenishment order should be triggered. 5. Click the Submit button to complete the addition of the Item to the database. Modifying an Item To modify an existing Item, take the following steps: 1. Be sure you are logged into a user account with Admin privileges. 2. Click the Items button on the top toolbar. 3. Click the Manage Items link. 4. Locate the item you wish to modify, and click the Update link next to it. 5. Make the appropriate adjustments to your Item’s profile in the fields provided. Then click the Submit button to save your changes.
  • 6. Deleting an Item You can only delete an Item if there are no sales associated with it. To delete an Item, take the following steps: 1. Be sure you are logged into a user account with Admin privileges. 2. Click the Items button in the top toolbar. 3. Click the Manage Items link. 4. Locate the Item you wish to remove, and then click the Delete link next to that item. Applying Discounts to Items When you want to run a special sale or promotion, you can use PHP Point of Sale to apply discounts to certain items in your store. This way, you can leave the original pricing intact, to be restored once the sale or promotion is over. To apply a discount to an Item, do the following: 1. Click the Items button in the top toolbar. 2. Click the Discount an Item link. 3. Choose the Item to discount from the available drop-down menu. 4. Enter the percentage of the discount to apply. For example, enter 10 for 10%, or 11.5 for 11.5%. 5. If desired, enter a comment. For example, Winter Sale. 6. Click the Submit button. The discount will now be applied to new sales for that Item. Managing Discounts You may implement many kinds of Discounts for various reasons. PHP Point of Sale allows you to manage all of your Discounts from a single location. You can adjust discount levels or remove discounts altogether: 1. Click the Items button in the top toolbar. 2. Click the Manage Discounts link. 3. Review all of your configured Discounts from the table provided. To delete a previously configured Discount, click the Delete link next to the appropriate Discount. To make changes to a previously configured Discount, click the Update link next to the appropriate Discount and make your changes. Using the Barcode Sheet PHP Point of Sale can create custom barcodes for each item in your store. You can use these barcodes to make stickers and labels, which can then be applied directly to your products and/or the shelving where product is displayed: Figure 3 – Sample Barcode To see a complete barcode summary for all Items in your store, do the following: 1. Click the Items button in the top toolbar. 2. Click the Items Barcode Sheet link on the Items page. Creating and Printing Item Barcode Labels Using Microsoft Word The following instructions should work with Microsoft Word versions XP, 2002, or 2003. You can use Word to create label sheets with multiple copies of the same label (for individual products), or with multiple unique labels on a single sheet (for catalogues or shelving). 1. Click Tools > Letters and Mailings > Envelopes and Labels. 2. Click the Labels tab at the top of the displayed sub-window. 3. Choose the appropriate label template to match the one you are using by clicking the label window in the bottom right part of the sub-window. Templates from the most popular manufacturers (Avery, for example) are available.
  • 7. 4. Once you’ve selected the appropriate label template, click the New Document button in the top right portion of the sub-window. A new Microsoft Word document will be created, with guides that enable you to precisely lay out your labels to match your label stock. 5. To copy a barcode or label into your Word template, right click the barcode image in PHP Point of Sale, and choose Copy Image or Copy (depending on your web browser). 6. Switch back to your Word document and place the cursor in a label cell. Press Ctrl+V to paste the barcode into the label cell. You may need to adjust the size of the pasted barcode to ensure that it isn’t too large. To resize the barcode, click once on it to select it, and then drag one of the corners. Don’t drag the flat sides, as these will distort your barcode image by stretching it horizontally or vertically. Managing Customers All sales transactions in PHP Point of Sale are associated with a particular customer account. If you’re not interested in tracking customers, you can simply create a single ‘default’ customer account to be re-used for all transactions[7]. Adding a Customer To add a new Customer to PHP Point of Sale, take the following steps: 1. Click the Customers button on the top toolbar. 2. Click the Create A New Customer link. 3. Enter the necessary customer details. The minimum required fields are first name, last name and telephone number. 4. Click the Submit button to add the new customer to the system. Modifying a Customer To modify a customer’s information (for example, if your customer moves to a new address) take the following steps: 1. Click the Customers button on the top toolbar. 2. Click the Manage Customers link. 3. Locate the customer you wish to modify by reviewing the customer list. You can also search for a specific customer (by last name) in the search box provided at the top of the page. Once you’ve located the customer, click the Update link in the same row. 4. Make any necessary adjustments in the fields provided, and then click the Submit button to save your changes. Remember that the first name, last name and telephone number fields are required. Deleting a Customer You cannot delete any customer who has previously purchased an item, because this information is needed for reporting purposes. If, however, there is no sales activity associated with a particular customer, and you wish to delete the account, take the following steps: 1. Click the Customers button on the top toolbar. 2. Click the Manage Customers link. 3. Locate the Customer you wish to remove by reviewing the customer list. You can also search for a specific customer (by last name) in the search box provided at the top of the page. Once you’ve located the Customer to be removed, click the Delete link in the same row. 4. If the delete operation was successful, you’ll see a message like You have successfully deleted row XX from the database. If it was not successful, PHP Point of Sale will return the appropriate error message. Using Barcodes to Identify Customers You can use PHP Point of Sale’s bar-coding features to create membership cards and account cards, which can be scanned at each sales instance to quickly identify the customer without the need for manual lookups. To create a master barcode list for all of your customers, click Customers in the top toolbar, followed by the Customers Barcode Sheet link. See Creating and Printing Item Barcode Labels Using Microsoft Word on page 21 for barcode printing tips.
  • 8. Processing Sales Transactions Once you have deployed PHP Point of Sale and set up your items, categories, and brands, you’ll (hopefully) spend most of your time processing sales transactions. Starting a New Sale To begin a new sales transaction, click the Sales button in the top toolbar, followed by the Start a New Sale link. The first step in the sales process is to identify your customer. You can locate a customer in any one of three different ways:  By using the Find Customer search box. In this box, you can enter letters from the customer’s first or last name.  By choosing a customer from the associated drop-down box in the Select Customer selector.  By scanning a customer barcode into the Customer ID / Account Number field. Simply place the cursor into this field, and then use your barcode scanner to read the customer identification data from the associated bar code. Choose the method that works best for you. If you’ve used the PHP Point of Sale barcode features to create Customer account cards, you’ll probably find this method the fastest. Once you’ve located the correct Customer, click the Submit Query button on the New Sale screen. This action begins a sales session for that customer. Understanding Sales Sessions When you begin a new sales transaction by selecting a Customer, you create an active sales session within the PHP Point of Sale system. This means that if you abandon the sales entry process at any point (say, for example, to look up information on a different Item that your customer is asking about) you can easily return and pick up where you left off, without having to re-enter customer information or lose the contents of the existing shopping cart. Using the Shopping Cart Once you’ve selected a customer, you can add Items to their virtual shopping cart. This can be done in one of three different ways:  By using the Find Item tool to search for a particular text match. PHP Point of Sale will scan the product’s main text fields for a suitable match.  By selecting an item directly from the drop-down menu in the Select Item field.  By using a barcode scanner (and associated barcode labels) to scan an item directly into the Item ID / Item Number field. Be sure to place the cursor into this field before scanning! Once you’ve selected an Item, PHP Point of Sale adds it to the customer’s virtual shopping cart. You can adjust the quantity afterwards, by updating the Quantity field for the desired Item, then clicking the Update button to recalculate the shopping cart totals. To remove Items from the shopping cart, click the Remove link next to the Item to be removed. Applying Extra Discounts at Time of Sale You can easily add extra discounting to individual items – or even the entire shopping cart – at any point during the sales process. To discount an Item, you can adjust the Unit Price field next to the associated item. To apply a global discount, enter an appropriate value (1 to 99) in the Global Sale Discount field. Completing a Sales Transaction Cash is King, as they say. The sales transaction is completed when money changes hands. These monies can take the form of cash, check, credit card[8], account debit or gift card. Choose the appropriate payment method in the Paid With, and enter the amount received from the customer in the Amt Tendered field. You can also record comments or miscellaneous information in the Sale Comment field. Once you’ve completed these entries, click the Add Sale button to “post” the sale permanently to the PHP Point of Sale System.
  • 9. Handling Cash Transactions For many transactions, it is not feasible, or even possible, to collect detailed customer information. In these cases, you can create a special Cash Customer account, to be used as the default selection in situations where customer data is not required. Abandoning a Sale You may find yourself needing to abort a sale that is halfway finished. Perhaps your customer forgot their wallet or purse, or maybe they simply changed their mind about the purchase. In any case, you need to clear the sales session so that new sales can be entered for a different customer. At any point during the sales process, you can click the Clear Sale link at the top of the Shopping Cart window. This will clear the sales session, including customer information and the contents of the shopping cart. Modifying a Sale After Completion It is possible to modify the particulars of a sale after it has already been completed, and even delete (void) a sales transaction completely. Normally, this practice is not recommended because of the potential for fraud. This function is also restricted to users with Admin privileges. 1. Be sure you’re logged in with Admin privileges. 2. Click the Sales button in the top toolbar, followed by the Manage Sales link. 3. The following page contains a detailed history of all sales transactions. It can be a very large page. On this page, you can void an entire sale by clicking the Delete Entire Sale link. To modify the particulars of a sale, click the Update link. Generating Reports PHP Point of Sale provides over a dozen built-in reports. Choose the report you wish to run by clicking Reports in the top toolbar. All Brands Report This report provides a complete sales summary, organized by Brand name. Available time ranges are Today, Yesterday, Last 7 Days, This Month, Last Month, This Year and All Time. Before tax and after tax sales figures are included. All Categories Report This report provides a complete sales summary, organized by Category name. Available time ranges are Today, Yesterday, Last 7 Days, This Month, Last Month, This Year and All Time. Before tax and after tax sales figures are included. All Customers Report This report provides a complete sales summary, organized by Customer. Available time ranges are Today, Yesterday, Last 7 Days, This Month, Last Month, This Year and All Time. Before tax and after tax sales figures are included. All Employees Report This report provides a complete sales summary, organized by Employee. Available time ranges are Today, Yesterday, Last 7 Days, This Month, Last Month, This Year and All Time. Before tax and after tax sales figures are included. All Items Report This report provides a complete sales summary, organized by Item. Available time ranges are Today, Yesterday, Last 7 Days, This Month, Last Month, This Year and All Time. Before tax and after tax sales figures are included, as well as individual unit sales and subtotals for each Item.
  • 10. Brand Report The Brand Report allows you to focus on the sales performance of a specific individual Brand over a given time interval. Choose the Brand you wish to use in your report, and then select the desired time interval. Available time ranges are Today, Yesterday, Last 7 Days, This Month, Last Month, This Year and All Time. Before tax and after tax sales figures are included. You can also use the Find Brand search box to locate a Brand by name. Category Report The Category Report allows you to focus on the sales performance of a specific individual Category over a given time interval. Choose the Category you wish to use in your report, and then select the desired time interval. Available time ranges are Today, Yesterday, Last 7 Days, This Month, Last Month, This Year and All Time. Before tax and after tax sales figures are included. You can also use the Find Category rand search box to locate a Category by name. Customer Report The Customer Report allows you to focus on the sales performance of a specific individual Customer over a given time interval. Choose the Customer you wish to use in your report, and then select the desired time interval. Available time ranges are Today, Yesterday, Last 7 Days, This Month, Last Month, This Year and All Time. Before tax and after tax sales figures are included. You can also use the Find Customer search box to locate a Customer by name. Daily Report The Daily Report is an up-to-the moment summary of sales activity for today’s date. You can also see details for individual sales by clicking on the Show Sale Details link next to each line item. Date Range Report The Date Range Report allows you to produce a complete sales summary between the specified starting and ending dates. Before tax and after tax sales figures are included. You can also see details for individual sales by clicking on the Show Sale Details link next to each line item. Employee Report The Employee Report allows you to focus on the sales performance of a specific individual Employee over a given time interval. Choose the Employee you wish to use in your report, and then select the desired time interval. Available time ranges are Today, Yesterday, Last 7 Days, This Month, Last Month, This Year and All Time. Before tax and after tax sales figures are included. You can also see details for individual sales by clicking on the Show Sale Details link next to each line item. Item Report The Item Report allows you to focus on the sales performance of a specific individual Item over a given time interval. Choose the Item you wish to use in your report, and then select the desired time interval. Available time ranges are Today, Yesterday, Last 7 Days, This Month, Last Month, This Year and All Time. Before tax and after tax sales figures are included. Profit Report The Profit Report shows sales margins over the specified time interval. This report compares the selling price of each item against its cost. Available time ranges are Today, Yesterday, Last 7 Days, This Month, Last Month, This Year and All Time. Before tax and after tax sales figures are included.
  • 11. Tax Report The Tax Report provides a summary of tax dollars collected on sales over a given time interval. This report can be used to calculate the amount of tax which must be remitted to the appropriate government tax collection agency, based on the tax rules you’ve specified in each item’s configuration. Available time ranges are Today, Yesterday, Last 7 Days, This Month, Last Month, This Year and All Time. Administration Backing up the Database It’s extremely important to make regular backups of your database. In the event of a hardware or software error, it is possible that you could lose access to the data stored in your PHP Point of Sale database. In these cases, you’ll need backup data to restore to your rebuilt system. To perform an up-to-date backup, do the following: 1. Click the Home button on the navigation toolbar. 2. Click the Backup Database link. If your PHP Point of Sale system is deployed on a Linux host, a typical backup file resides at the following local path (although the location may vary depending on your Apache configuration): /home/phppoint/public_html/path_to_php_pos/backups/.db_backup.phppoint_demo2.2006-01-22.sql.gz On a Windows host, backup files are saved in the following location/format (with a default IIS installation – your location may vary): C:inetpubwwwrootpath_to_php_posbackups.db_backup.phppoint_demo2.2006-01-22.sql.gz Important: Backup files are stored on the same computer as your live application. This means that if your hard drive fails, you’ll lose your production data and your backups too. It is critically important to place a copy of your backup files in a safe location, completely separate from your production system. CD burners are quite cheap nowadays – archiving to CD is probably the best option for most PHP Point of Sale users. This also means that your backup files could be accessible to malicious users who can download your customer database and steal personal information. Once you complete a backup, it’s highly recommended that you download the file to a separate computer and delete the original backup file from your production PHP Point of Sale system. Restoring a Database from Backup To restore a database from a backup file, extract the contents of zip archive to a folder on your PHP Point of Sale system. On Linux systems, you can restore the backup file from the command line, using the following syntax: mysql databasename < db_backup.phppoint_demo2.YYYY-MM-DD.sql where databasename is the name of your PHP Point of Sale database, YYYY is the year, MM is the month and DD is the day of the backup file. This procedure creates a brand new PHP Point of Sale database, and repopulates it with all of your historical data. It’s a perfect replica of your PHP Point of Sale system at the time of the backup.