1. Install OS using an iso image
1. Create a folder named “fedora” in root directory.
vishnu@VishnuRaj:/$ sudo mkdir fedora
2. Copy the iso image to the folder created in previous step.
vishnu@VishnuRaj:/$ sudo cp /media/vaio/fedora-image.iso /fedora/
3. Mount the iso image to CD-Rom.
vishnu@VishnuRaj:/$ sudo mount -o loop /fedora/fedora-image.iso /media/cdrom
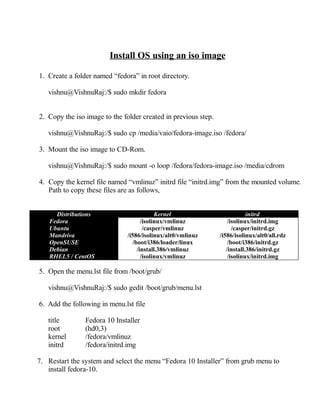
4. Copy the kernel file named “vmlinuz” initrd file “initrd.img” from the mounted volume.
Path to copy these files are as follows,
Distributions Kernel initrd
Fedora /isolinux/vmlinuz /isolinux/initrd.img
Ubuntu /casper/vmlinuz /casper/initrd.gz
Mandriva /i586/isolinux/alt0/vmlinuz /i586/isolinux/alt0/all.rdz
OpenSUSE /boot/i386/loader/linux /boot/i386/initrd.gz
Debian /install.386/vmlinuz /install.386/initrd.gz
RHEL5 / CentOS /isolinux/vmlinuz /isolinux/initrd.img
5. Open the menu.lst file from /boot/grub/
vishnu@VishnuRaj:/$ sudo gedit /boot/grub/menu.lst
6. Add the following in menu.lst file
title Fedora 10 Installer
root (hd0,3)
kernel /fedora/vmlinuz
initrd /fedora/initrd.img
7. Restart the system and select the menu “Fedora 10 Installer” from grub menu to
install fedora-10.
2. To change the user password
sudo passwd <user-name>
To delete the user password
sudo sudo passwd -d <user-name>
To lock the user
sudo passwd -l <user-name>
To unlock the user
sudo passwd -u <user-name
To encrypt the file in vim editor
vim -x <file-name>
Use shell inside vim editor
To use shell
press Esc and :sh
To resume file
press ^d (ctrl+d)
Differentiate And Patch The File
To differentiate files and create patch file
diff -c oldprg.c newprg.c > prg.patch
To patch the File
patch oldprg.c < prg.patch
To open microsoft office 2007 (docx) file in OpenOffice Wordprocessor
$ sudo apt-get install libgif4 libungif4g
3. Split And Combine Big File
To split the file
For example, consider a file image.iso of size 600MB. We can split the file into 3 parts
of 200MB each.
split -b 200m image.iso
This creates xaa xab xac of 200m each.
To the splited files
cat xa* > newimage.iso
This combines the 3 files into a single iso file named “newimage.iso”.
Send Mail In Terminal
To check status of sendmail
vishnu@VishnuRaj:/etc/init.d$ sendmail status
To start sendmail option
vishnu@VishnuRaj:/etc/init.d$ sendmail start
Sending Mail
vishnu@VishnuRaj:~$echo “mail body” | mail -s “subject” <to-address>
Sending mail from text file
vishnu@VishnuRaj:/$mail -s “subject” to-address < mail-body.txt
Sending mail with attachment
vishnu@VishnuRaj:/$echo “mail body” | mutt -s “subject” -a fileattach.gif <to-address>
4. Adding Wallpapers To Boot Menu
1. Choose a picture and then load it into the GIMP (right-click and
select Open With -> Open with "GIMP Image Editor").
2. Right-click the image within GIMP and select Image ? Scale Image.
In the Width box, type 640 and hit the Tab key. The Height box
should then automatically change to 480.
3. Right-click the image again within The GIMP and select Image
->Mode -> Indexed and then type 14 into the Maximum Number of Colors box.
Then click the Convert button.
4. Right-click the image again within GIMP and select File -> Save
As. Give the file a name in the Name box, and use the .xpm file
extension.
5. Open a terminal window and type the following (this assumes the
file was saved to the desktop):
$ sudo mkdir /boot/grub/splashimages
$ gzip ~/Desktop/bootwallaper.xpm
$ sudo mv ~/Desktop/bootwallpaper.xpm.gz /boot/grub/splashimages
6. Replace bootwallpaper mentions above with the filename you chose.
7. Then open the boot menu file for editing in Gedit:
$ sudo gedit /boot/grub/menu.lst
5. 8. Look for the line that begins ## ## End Default Options ## and, below, add a new line.
splashimage=(hd0,3)/boot/grub/splashimages/bootwallaper.xpm.gz.
As above, replace bootwallpaper with the filename you chose. See Figure for an
example taken from my test PC. Save the file and then reboot to see the new wallpaper in
action.