Convert Presentation to Video using PowerPoint 2010
•
1 gefällt mir•2,213 views

Microsoft has added a cool new feature in Powerpoint 2010 that converts the presentaion to a video file. Now you can convert your presentation to Video file and unloaded to YouTube, without running through another software.

Empfohlen
Weitere ähnliche Inhalte
Andere mochten auch
Mehr von NR Computer Learning Center
Mehr von NR Computer Learning Center (20)
Kürzlich hochgeladen
Kürzlich hochgeladen (15)
Convert Presentation to Video using PowerPoint 2010
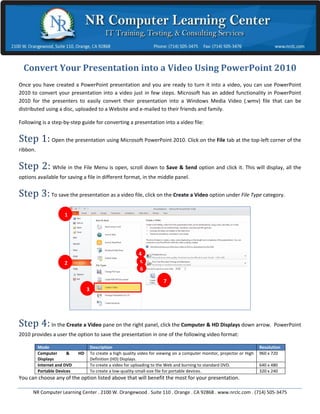
- 1. Convert Your Presentation into a Video Using PowerPoint 2010 Once you have created a PowerPoint presentation and you are ready to turn it into a video, you can use PowerPoint 2010 to convert your presentation into a video just in few steps. Microsoft has an added functionality in PowerPoint 2010 for the presenters to easily convert their presentation into a Windows Media Video (.wmv) file that can be distributed using a disc, uploaded to a Website and e-mailed to their friends and family. Following is a step-by-step guide for converting a presentation into a video file: Step 1: Open the presentation using Microsoft PowerPoint 2010. Click on the File tab at the top-left corner of the ribbon. Step 2: While in the File Menu is open, scroll down to Save & Send option and click it. This will display, all the options available for saving a file in different format, in the middle panel. Step 3: To save the presentation as a video file, click on the Create a Video option under File Type category. 1 4 2 5 6 7 3 Step 4: In the Create a Video pane on the right panel, click the Computer & HD Displays down arrow. PowerPoint 2010 provides a user the option to save the presentation in one of the following video format: Mode Description Resolution Computer & HD To create a high quality video for viewing on a computer monitor, projector or High 960 x 720 Displays Definition (HD) Displays. Internet and DVD To create a video for uploading to the Web and burning to standard DVD. 640 x 480 Portable Devices To create a low-quality-small-size file for portable devices. 320 x 240 You can choose any of the option listed above that will benefit the most for your presentation. NR Computer Learning Center . 2100 W. Orangewood . Suite 110 . Orange . CA 92868 . www.nrclc.com . (714) 505-3475
- 2. Step 5: You can have your presentation play based on the timings set for each of slide and you can queue up recordings and laser points as well. To incorporate all recorded timings, narrations, and laser pointer gestures in the video file, click on the drop down for Don’t Use Recorded Timings and Narrations. Select one of the following options: Option Description Don’t use Recorded Select this option if the presentation consists of no recorded Timings & Narrations timings or narrations. Use Recorded Timings Select this option if the presentation consists of recorded and and Narrations timed narration and/or pointer movements Record Timings and To turn on the recording for time narration and pointer Narrations movements Preview Timings and To preview the record of the time narration and pointer Narrations movements Step 6: The default time spent of each slide is set to 5 seconds. You can manually adjust the time spent on each slide, by entering the number in the text box next to Seconds to spend on each slide or click on the up arrow to increase or the down arrow to decrease the duration (in seconds) for each slide. Step 7: When you’re ready, click on the Create Video button to start the conversion process. When you click on the Create Video button, PowerPoint should pop-up the Save As window. Step 8: In the Save As Window, go to the File name text box, enter the name for your Windows Media Video file, choose the target location and click on the Save button to save the file. You can continue to use PowerPoint while the video is being created. Now that you have the video created, you can easily upload it to a website or distribute using a disk. For information on Microsoft PowerPoint Instructor Led and Online Training, visit www.nrclc.com. NR Computer Learning Center . 2100 W. Orangewood . Suite 110 . Orange . CA 92868 . www.nrclc.com . (714) 505-3475