SlideShare ist ein Scribd-Unternehmen logo
1 von 4
Downloaden Sie, um offline zu lesen
OPTRAMTECH

             Technical Instructions             Printers                        OEM Info                                 Tools          1
                                 Lexmark Optra M410              OEM Part Number:                      Needlenose Pliers
            CORPORATE
        LOS ANGELES, USA         Print speed    12ppm            17G0152 Standard                      Phillips #1 Screwdriver or Hex
        US 1 800 394.9900        Resolution     1200 x 600 dpi                                         bit driver
        Int’l +1 818 837.8100                                    OEM Yield:                            Small Flat Blade Screwdriver
        FAX 1 800 394.9910       Lexmark Optra M412              5,000 pages                           Soft Lint-free Cloth
        Int’l +1 818 838.7047
                                 Print speed    17ppm                                                  Anhydrous Isopropyl Alcohol
        ATLANTA, USA             Resolution     1200 x 600 dpi   OEM Part Number:                      Cotton Swabs
        US 1 877 676.4223                                        17G0154                               Vacuum
        Int’l +1 770 516.9488
        FAX 1 877 337.7976
        Int’l +1 770 516.7794                                    OEM Yield:                            Supplies R equir ed:
                                                                 15,000 pages High Yield               Toner
        DALLAS, USA
        US 1 877 499.4989                                                                              Wiper Blade
        Int’l +1 972 840.4989                                                                          Drum
        FAX 1 877 774.1750
        Int’l +1 972 840.1750    Photo 1                                        Step 1
        MIAMI, USA
        US 1 800 595.429
                                                                                Place the cartridge top down on the table with the
        Int’l +1 305 594.3396                                                   drum facing up and the small drum gear toward
        FAX 1 800 522.8640                                                      you. Using a small bladed screwdriver, pry off the
        Int’l +1 305 594.3309
                                                                                developer roller drive gear and set it aside.
        NEW YORK, USA                                                           (See Photo 1)
        US 1 800 431.7884
        Int’l +1 631 345.0121
        FAX 1 800 431.8812
        Int’l +1 631345.0690

        SANFORD,USA
        US 1 800 786.9049        Photo 2                                        Step 2
        Int’l +1 919 775.4584
        FAX 1 800 786.9049                                                      Rotate the cartridge to the right so the toner
        Int’l +1 919 775.4584                                                   hopper is facing you. Using a sprink-hook
        TORONTO, CAN                                                            or needlenose pliers, gently remove the toner
        CAN 1 877 848.0818                                                      hopper tension springs form the post at each side.
        Int’l +1 905 712.9501                                                   (See Photo 2)
        FAX 1 877 772.6773
        Int’l +1 905 712.9502
        BUENOS AIRES, ARG
        ARG 0810 444.2656
        Int’l +011 4583.5900
        FAX +011 4584.3100       Photo 3                                       Step 3
        MELBOURNE, AUS                                                         Flip the cartridge so that the drum is facing down
        AUS 1 800 003. 100                                                     and the cartridge handle is facing you. Place your
        Int’l +62 03 9561.8102
        FAX 1 800 004.302                                                      hand between the cartridge handle that is part
        Int’l +62 03 9561-7751                                                 of the shell and the toner hopper. Grasp the toner
                                                                               hopper and with your free hand release the tabs,
        SYDNEY, AUS
                                                                               gently pull the toner hopper back. Once separated
        AUS 1 800 003.100
        Int’l +62 02 9648.2630                                                 place the toner hopper aside. (See Photo 3)
        FAX 1800 004.302
        Int’l +62 02 9548.2635
                                 Photo 4                                        Step 4
        MONTEVIDEO,URY
        URY 02 902.7206                                                         Place the waste hopper with the drum facing up.
        Int’l +5982 900.8358                                                    Using a small flat bladed screwdriver or
        FAX +5982 908.3816                                                      needlenose pliers, remove the retaining clip on the
        JOHANNESBURG, S.A.                                                      right side of the drum shaft.
        S.A. +27 11 974.6155                                                    (See Photo 4)
        FAX +27 11 974.3593


E-mail: info@futuregraphicsllc.com                                        Website:            www.futuregraphicsllc.com
2                                                      Lexmark Optra M Technical Instructions

                                            Photo 8
                                                         Step 7
                                                         Slice the clear sealing tape on the topside of the
                                                         waste hopper covering the top of the wiper blade.
Step 5                                                   (See Photo 8)
Holding the large helical gear end of
the drum, pull the drum shaft out.
(See Photo 5)
Remove the drum and set it aside,
being sure not to loose the spring                       The PCR access door opens inward and sets on the
attached to the non gear side.              Photo 9
                                                         horizontal lip of the wiper blade. Open the PCR
(See Photo 6)                                            door to remove the wiper blade and be careful not
                                                         to damage the recovery blade. (See Photo 9)


Photo 5


                                            Photo 10     Step 8
                                                         Empty out the toner from the waste hopper
                                                         and inspect the recovery blade for nicks, tears or
                                                         wrinkles and replace as necessary. (See Photo 10)

Photo 6


                                            Photo 11     Step 9
                                                         Hold the waste hopper cavity firmly in your right
                                                         hand and the wiper blade in your left. Open the
                                                         PCR door with your left thumb and install the
                                                         wiper blade on the waste hopper and secure with
                                                         the screws you removed. (See Photo 11)


Step 6
Remove the two Hex bit screws on
either side of the wiper blade. You may
at times find #1 Philips screws used in
place of the Hex bit screws.
                                            Photo 12     Step 10
(See Photo 7)                                            Apply a small amount of padding powder to the
                                                         wiper blade, drum and recovery blade. Install the
                                                         drum, washer (if one was taken off ), drum axle and
                                                         the retaining clip and set the waste hopper aside
                                                         for now. Note: if the OEM drum comes with a one
Photo 7                                                  way spring, it may need to be transferred to the
                                                         new drum. This spring is to prevent the drum from
                                                         turning backwards. (See Photo 12)


                                            Photo 13     Step 11
                                                         Place the toner hopper on the table (label up) with
                                                         the developer roller facing you. Using your finger-
                                                         tips of both hands, gently pull off the Dr Blade
                                                         spring and set it aside. (See Photo 13)

    Need trust-worthy, detailed Technical
      Instructions for another engine?
    Visit: www.futuregraphicsllc.com
Lexmark Optra M Technical Instructions                                                                                                        3


Photo 14                                        Step 12
                                                Using a small flat bladed screwdriver pry against
                                                the base of the contact plate and remove the con-       Step 18
                                                tact and left end piece from the developer roller.
                                                                                                        Clean the underside of the Dr bar with
                                                (See Photo 14)
                                                                                                        a cotton swab and isopropyl alcohol.
                                                                                                        (See Photo 19)


                                                                                                        Photo 19

Photo 15                                        Step 13
                                                Grasp the left end shaft of the developer roller and
                                                lift it out and to the left, trying not to damage the
                                                Teflon washers or Mylar blades. (See Photo 15)


 Step 14                                                                                                 Step 19
 Remove the Teflon washers from the developer roller and inspect them thoroughly for damage and          Clean the developer roller with a dry
 wear. Replace the Teflon washers as a set.                                                              soft lint free cloth or compressed air
                                                                                                         only. Clean the developer roller shaft
                                                                                                         with a cotton swab and alcohol.
                                                                                                         (See Photo 20)
Photo 16                                        Step 15
                                                Turn the toner hopper to the right so the fill plug
                                                is facing you. Using a small flat bladed screwdriver,
                                                pry out the toner fill plug carefully and try not to    Photo 20
                                                damage it. Clean the filter inside the fill plug with
                                                either vacuum or compressed air. (See Photo 16)


Photo 17                                        Step 16
                                                Empty out all the toner from the toner hopper and        Step 20
                                                clean the hopper with vacuum or compressed air.          Install the Teflon washers on each end
                                                Be very careful not to damage the foam roller or         of the developer roller and slide the
                                                Mylar blades. (See Photo 17)                             flat (keyed) end of the roller into posi-
                                                                                                         tion on the right side of the toner hop-
                                                                                                         per. Lower the left end into position
                                                                                                         being careful not to damage the Teflon
                                                                                                         washer on that side. (See Photo 21)
Photo 18                                        Step 17
                                                Using a cotton swab and Isopropyl alcohol, clean
                                                the developer roller end seals at each end of the       Photo 21
                                                foam roller. (See Photo 28)
4                                                                                              Lexmark Optra M Technical Instructions

                                     Photo 22
                                                                                                     Step 21
                                                                                                     Install the end piece and contact plate into
          Notes                                                                                      position on the left end of the developer roller
                                                                                                     shaft. (See Photo 22)


                                     Photo 23
                                                                                                    Step 22
                                                                                                    Reinstall the Dr bar leaf spring with the point on the
                                                                                                    “V” stamped on the spring pointed towards you.
                                                                                                    (See Photo 23)


                                     Photo 24                                                       Step 23
                                                                                                    Pour the correct amount of Toner into the toner
                                                                                                    hopper and reinstall the fill plug. (See Photo 24)


                                     Photo 25
                                                                                                    Step 24
                                                                                                    Place the waste hopper top down on the table
                                                                                                    with the opening facing you and the hopper ten-
                                                                                                    sion springs out of the way.Turn the toner hopper,
                                                                                                    label down and line up the post on each side with
                                                                                                    the guide slots. Inspect for correct toner hopper
                                                                                                    position and ease of movement. (See Photo 25)


                                     Photo 26
                                                                                                    Step 25
                                                                                                    Reinstall the developer roller drive gear. The car-
                                                                                                    tridge is now ready to test. This cartridge contains
                                                                                                    no electronic chip or encoder wheel.
                                                                                                    (See Photo 26)


                                     Future Graphics (FG) is a distributor of compatible replacement parts and products for imagining equipment. None of FG's
                                     products are genuine OEM replacement parts and no affiliation or sponsorship is to be implied between FG and any OEM.

E-mail: info@futuregraphicsllc.com                                                      Website:               www.futuregraphicsllc.com

Weitere ähnliche Inhalte

Was ist angesagt?

Manual de Recarga HP Canon WX C3909A.
Manual de Recarga HP Canon WX C3909A.Manual de Recarga HP Canon WX C3909A.
Manual de Recarga HP Canon WX C3909A.Valejet
 
Manual de Recarga Lexmark E310.
Manual de Recarga Lexmark E310.Manual de Recarga Lexmark E310.
Manual de Recarga Lexmark E310.Valejet
 
Canon mf6500
Canon mf6500Canon mf6500
Canon mf6500Valejet
 
Hp 2600 1600 2605
Hp 2600 1600 2605Hp 2600 1600 2605
Hp 2600 1600 2605Valejet
 
Hp 4500 black
Hp 4500 blackHp 4500 black
Hp 4500 blackValejet
 
Hp 4500 drum
Hp 4500 drumHp 4500 drum
Hp 4500 drumValejet
 
Hp 3500 3700
Hp 3500 3700Hp 3500 3700
Hp 3500 3700Valejet
 
Brother 720 dr 200
Brother 720 dr 200Brother 720 dr 200
Brother 720 dr 200Valejet
 
Hp 4500 cmy
Hp 4500 cmyHp 4500 cmy
Hp 4500 cmyValejet
 
Brother 720 dr 250
Brother 720 dr 250Brother 720 dr 250
Brother 720 dr 250Valejet
 
Hp 1200 1300
Hp 1200 1300Hp 1200 1300
Hp 1200 1300Valejet
 
Manual de Recarga Samsung ML 1650 | ML 1651N | ML1650D8
Manual de Recarga Samsung ML 1650 | ML 1651N | ML1650D8Manual de Recarga Samsung ML 1650 | ML 1651N | ML1650D8
Manual de Recarga Samsung ML 1650 | ML 1651N | ML1650D8Valejet
 

Was ist angesagt? (17)

Hp 2300
Hp 2300Hp 2300
Hp 2300
 
Manual de Recarga HP Canon WX C3909A.
Manual de Recarga HP Canon WX C3909A.Manual de Recarga HP Canon WX C3909A.
Manual de Recarga HP Canon WX C3909A.
 
Manual de Recarga Lexmark E310.
Manual de Recarga Lexmark E310.Manual de Recarga Lexmark E310.
Manual de Recarga Lexmark E310.
 
Hp 8100
Hp 8100Hp 8100
Hp 8100
 
Canon mf6500
Canon mf6500Canon mf6500
Canon mf6500
 
Hp 2600 1600 2605
Hp 2600 1600 2605Hp 2600 1600 2605
Hp 2600 1600 2605
 
Hp 5000
Hp 5000Hp 5000
Hp 5000
 
Hp 4500 black
Hp 4500 blackHp 4500 black
Hp 4500 black
 
Hp 4500 drum
Hp 4500 drumHp 4500 drum
Hp 4500 drum
 
Hp 3500 3700
Hp 3500 3700Hp 3500 3700
Hp 3500 3700
 
Hp 5200
Hp 5200Hp 5200
Hp 5200
 
Hp 2400
Hp 2400Hp 2400
Hp 2400
 
Brother 720 dr 200
Brother 720 dr 200Brother 720 dr 200
Brother 720 dr 200
 
Hp 4500 cmy
Hp 4500 cmyHp 4500 cmy
Hp 4500 cmy
 
Brother 720 dr 250
Brother 720 dr 250Brother 720 dr 250
Brother 720 dr 250
 
Hp 1200 1300
Hp 1200 1300Hp 1200 1300
Hp 1200 1300
 
Manual de Recarga Samsung ML 1650 | ML 1651N | ML1650D8
Manual de Recarga Samsung ML 1650 | ML 1651N | ML1650D8Manual de Recarga Samsung ML 1650 | ML 1651N | ML1650D8
Manual de Recarga Samsung ML 1650 | ML 1651N | ML1650D8
 

Ähnlich wie Manual de Recarga Lexmark Optra M410 | M412

Manual de Recarga Lexmark T430
Manual de Recarga Lexmark T430Manual de Recarga Lexmark T430
Manual de Recarga Lexmark T430Valejet
 
Manual de Recarga Samsung 5050 | 5100 | 5500 | ML 5000
Manual de Recarga Samsung 5050 | 5100 | 5500 | ML 5000Manual de Recarga Samsung 5050 | 5100 | 5500 | ML 5000
Manual de Recarga Samsung 5050 | 5100 | 5500 | ML 5000Valejet
 
Hp 1160 1320 p2015
Hp 1160 1320 p2015Hp 1160 1320 p2015
Hp 1160 1320 p2015Valejet
 
Manual de Recarga HP Canon AX C3906A.
Manual de Recarga HP Canon AX C3906A.Manual de Recarga HP Canon AX C3906A.
Manual de Recarga HP Canon AX C3906A.Valejet
 
Manual de Recarga HP Canon PX 92274A.
Manual de Recarga HP Canon PX 92274A.Manual de Recarga HP Canon PX 92274A.
Manual de Recarga HP Canon PX 92274A.Valejet
 
Manual de Recarga HP Canon EX 92298A.
Manual de Recarga HP Canon EX 92298A.Manual de Recarga HP Canon EX 92298A.
Manual de Recarga HP Canon EX 92298A.Valejet
 
Manual de Recarga Lexmark E320 | E322
Manual de Recarga Lexmark E320 | E322Manual de Recarga Lexmark E320 | E322
Manual de Recarga Lexmark E320 | E322Valejet
 
Manual de Recarga Minolta 2300 DL
Manual de Recarga Minolta 2300 DLManual de Recarga Minolta 2300 DL
Manual de Recarga Minolta 2300 DLValejet
 
Hp 1500 2500
Hp 1500 2500Hp 1500 2500
Hp 1500 2500Valejet
 
Manual de Recarga Samsung CLP 600 CLP 650
Manual de Recarga Samsung CLP 600 CLP 650Manual de Recarga Samsung CLP 600 CLP 650
Manual de Recarga Samsung CLP 600 CLP 650Valejet
 
Hp 5500 c olor
Hp 5500 c olorHp 5500 c olor
Hp 5500 c olorValejet
 
Fuji xerox p 880
Fuji xerox p 880Fuji xerox p 880
Fuji xerox p 880Valejet
 
Hp 4200 4300 4345
Hp 4200 4300 4345Hp 4200 4300 4345
Hp 4200 4300 4345Valejet
 
Manual de Recarga Sharp 1010 | 1020 | 1041 | 1200 | 1220 | 1250 | AL1000
Manual de Recarga Sharp  1010 | 1020 | 1041 | 1200 | 1220 | 1250 | AL1000Manual de Recarga Sharp  1010 | 1020 | 1041 | 1200 | 1220 | 1250 | AL1000
Manual de Recarga Sharp 1010 | 1020 | 1041 | 1200 | 1220 | 1250 | AL1000Valejet
 
Manual de Recarga Lexmark T520 | T522
Manual de Recarga Lexmark T520 | T522Manual de Recarga Lexmark T520 | T522
Manual de Recarga Lexmark T520 | T522Valejet
 

Ähnlich wie Manual de Recarga Lexmark Optra M410 | M412 (19)

Hp 2100
Hp 2100Hp 2100
Hp 2100
 
Manual de Recarga Lexmark T430
Manual de Recarga Lexmark T430Manual de Recarga Lexmark T430
Manual de Recarga Lexmark T430
 
Hp 4000
Hp 4000Hp 4000
Hp 4000
 
Manual de Recarga Samsung 5050 | 5100 | 5500 | ML 5000
Manual de Recarga Samsung 5050 | 5100 | 5500 | ML 5000Manual de Recarga Samsung 5050 | 5100 | 5500 | ML 5000
Manual de Recarga Samsung 5050 | 5100 | 5500 | ML 5000
 
Hp 1160 1320 p2015
Hp 1160 1320 p2015Hp 1160 1320 p2015
Hp 1160 1320 p2015
 
Manual de Recarga HP Canon AX C3906A.
Manual de Recarga HP Canon AX C3906A.Manual de Recarga HP Canon AX C3906A.
Manual de Recarga HP Canon AX C3906A.
 
Manual de Recarga HP Canon PX 92274A.
Manual de Recarga HP Canon PX 92274A.Manual de Recarga HP Canon PX 92274A.
Manual de Recarga HP Canon PX 92274A.
 
Hp 1012
Hp 1012Hp 1012
Hp 1012
 
Hp 1300
Hp 1300Hp 1300
Hp 1300
 
Manual de Recarga HP Canon EX 92298A.
Manual de Recarga HP Canon EX 92298A.Manual de Recarga HP Canon EX 92298A.
Manual de Recarga HP Canon EX 92298A.
 
Manual de Recarga Lexmark E320 | E322
Manual de Recarga Lexmark E320 | E322Manual de Recarga Lexmark E320 | E322
Manual de Recarga Lexmark E320 | E322
 
Manual de Recarga Minolta 2300 DL
Manual de Recarga Minolta 2300 DLManual de Recarga Minolta 2300 DL
Manual de Recarga Minolta 2300 DL
 
Hp 1500 2500
Hp 1500 2500Hp 1500 2500
Hp 1500 2500
 
Manual de Recarga Samsung CLP 600 CLP 650
Manual de Recarga Samsung CLP 600 CLP 650Manual de Recarga Samsung CLP 600 CLP 650
Manual de Recarga Samsung CLP 600 CLP 650
 
Hp 5500 c olor
Hp 5500 c olorHp 5500 c olor
Hp 5500 c olor
 
Fuji xerox p 880
Fuji xerox p 880Fuji xerox p 880
Fuji xerox p 880
 
Hp 4200 4300 4345
Hp 4200 4300 4345Hp 4200 4300 4345
Hp 4200 4300 4345
 
Manual de Recarga Sharp 1010 | 1020 | 1041 | 1200 | 1220 | 1250 | AL1000
Manual de Recarga Sharp  1010 | 1020 | 1041 | 1200 | 1220 | 1250 | AL1000Manual de Recarga Sharp  1010 | 1020 | 1041 | 1200 | 1220 | 1250 | AL1000
Manual de Recarga Sharp 1010 | 1020 | 1041 | 1200 | 1220 | 1250 | AL1000
 
Manual de Recarga Lexmark T520 | T522
Manual de Recarga Lexmark T520 | T522Manual de Recarga Lexmark T520 | T522
Manual de Recarga Lexmark T520 | T522
 

Mehr von Valejet

Manual de Recarga Xerox Phaser 6130 1320 106R01278
Manual de Recarga Xerox Phaser 6130 1320 106R01278Manual de Recarga Xerox Phaser 6130 1320 106R01278
Manual de Recarga Xerox Phaser 6130 1320 106R01278Valejet
 
Manual de Recarga Xerox N24 N32 N40 113R173
Manual de Recarga Xerox N24 N32 N40 113R173Manual de Recarga Xerox N24 N32 N40 113R173
Manual de Recarga Xerox N24 N32 N40 113R173Valejet
 
Manual de Recarga Xerox 4118 6R1278
Manual de Recarga Xerox 4118 6R1278Manual de Recarga Xerox 4118 6R1278
Manual de Recarga Xerox 4118 6R1278Valejet
 
Manual de Recarga Samsung 4725ELS | 4725F | 4725FN | SCX-4725
Manual de Recarga Samsung 4725ELS | 4725F | 4725FN | SCX-4725Manual de Recarga Samsung 4725ELS | 4725F | 4725FN | SCX-4725
Manual de Recarga Samsung 4725ELS | 4725F | 4725FN | SCX-4725Valejet
 
Manual de Recarga Samsung ML 1440 | ML 1450 | ML 1451 | ML 6040 | ML6060D6
Manual de Recarga Samsung ML 1440 | ML 1450 | ML 1451 | ML 6040 | ML6060D6Manual de Recarga Samsung ML 1440 | ML 1450 | ML 1451 | ML 6040 | ML6060D6
Manual de Recarga Samsung ML 1440 | ML 1450 | ML 1451 | ML 6040 | ML6060D6Valejet
 
Manual de Recarga Samsung ML 1710 | SCX 4216 | SCX 4200 | SCX 4100
Manual de Recarga Samsung ML 1710 | SCX 4216 | SCX 4200 | SCX 4100Manual de Recarga Samsung ML 1710 | SCX 4216 | SCX 4200 | SCX 4100
Manual de Recarga Samsung ML 1710 | SCX 4216 | SCX 4200 | SCX 4100Valejet
 
Manual de Recarga Samsung ML 1210 | ML 1510 | ML 1610 | ML 1710 | ML 2010
Manual de Recarga Samsung ML 1210 | ML 1510 | ML 1610 | ML 1710 | ML 2010Manual de Recarga Samsung ML 1210 | ML 1510 | ML 1610 | ML 1710 | ML 2010
Manual de Recarga Samsung ML 1210 | ML 1510 | ML 1610 | ML 1710 | ML 2010Valejet
 
Manual de Recarga Samsung ML 2251N | ML 2251NP | ML 2251W | ML 2250
Manual de Recarga Samsung ML 2251N | ML 2251NP | ML 2251W | ML 2250Manual de Recarga Samsung ML 2251N | ML 2251NP | ML 2251W | ML 2250
Manual de Recarga Samsung ML 2251N | ML 2251NP | ML 2251W | ML 2250Valejet
 
Manual de Recarga Samsung CLP 610N | CLP 660N | CLP 610 CLP 660 Espanhol
Manual de Recarga Samsung CLP 610N | CLP 660N | CLP 610 CLP 660 EspanholManual de Recarga Samsung CLP 610N | CLP 660N | CLP 610 CLP 660 Espanhol
Manual de Recarga Samsung CLP 610N | CLP 660N | CLP 610 CLP 660 EspanholValejet
 
Manual de Recarga Samsung CLP 600
Manual de Recarga Samsung CLP 600Manual de Recarga Samsung CLP 600
Manual de Recarga Samsung CLP 600Valejet
 
Manual de Recarga Samsung CLP 500 CLP 550
Manual de Recarga Samsung CLP 500 CLP 550Manual de Recarga Samsung CLP 500 CLP 550
Manual de Recarga Samsung CLP 500 CLP 550Valejet
 
Manual de Recarga Okidata C7000 | C7100 Espanhol
Manual de Recarga Okidata C7000 | C7100 EspanholManual de Recarga Okidata C7000 | C7100 Espanhol
Manual de Recarga Okidata C7000 | C7100 EspanholValejet
 
Manual de Recarga Okidata C5500 | 6100 Espanhol
Manual de Recarga Okidata C5500 | 6100 EspanholManual de Recarga Okidata C5500 | 6100 Espanhol
Manual de Recarga Okidata C5500 | 6100 EspanholValejet
 
Manual de Recarga Okidata C5100 Espanhol
Manual de Recarga Okidata C5100 EspanholManual de Recarga Okidata C5100 Espanhol
Manual de Recarga Okidata C5100 EspanholValejet
 
Manual de Recarga Okidata C3400
Manual de Recarga Okidata C3400Manual de Recarga Okidata C3400
Manual de Recarga Okidata C3400Valejet
 
Manual de Recarga Okidata 9000 Espanhol
Manual de Recarga Okidata 9000 EspanholManual de Recarga Okidata 9000 Espanhol
Manual de Recarga Okidata 9000 EspanholValejet
 
Manual de Recarga Okidata 7100 Espanhol.
Manual de Recarga Okidata 7100 Espanhol.Manual de Recarga Okidata 7100 Espanhol.
Manual de Recarga Okidata 7100 Espanhol.Valejet
 
Manual de Recarga Minolta QMS 2400
Manual de Recarga Minolta QMS 2400Manual de Recarga Minolta QMS 2400
Manual de Recarga Minolta QMS 2400Valejet
 
Manual de Recarga Lexmark T640 | T642 | T644
Manual de Recarga Lexmark T640 | T642 | T644Manual de Recarga Lexmark T640 | T642 | T644
Manual de Recarga Lexmark T640 | T642 | T644Valejet
 

Mehr von Valejet (19)

Manual de Recarga Xerox Phaser 6130 1320 106R01278
Manual de Recarga Xerox Phaser 6130 1320 106R01278Manual de Recarga Xerox Phaser 6130 1320 106R01278
Manual de Recarga Xerox Phaser 6130 1320 106R01278
 
Manual de Recarga Xerox N24 N32 N40 113R173
Manual de Recarga Xerox N24 N32 N40 113R173Manual de Recarga Xerox N24 N32 N40 113R173
Manual de Recarga Xerox N24 N32 N40 113R173
 
Manual de Recarga Xerox 4118 6R1278
Manual de Recarga Xerox 4118 6R1278Manual de Recarga Xerox 4118 6R1278
Manual de Recarga Xerox 4118 6R1278
 
Manual de Recarga Samsung 4725ELS | 4725F | 4725FN | SCX-4725
Manual de Recarga Samsung 4725ELS | 4725F | 4725FN | SCX-4725Manual de Recarga Samsung 4725ELS | 4725F | 4725FN | SCX-4725
Manual de Recarga Samsung 4725ELS | 4725F | 4725FN | SCX-4725
 
Manual de Recarga Samsung ML 1440 | ML 1450 | ML 1451 | ML 6040 | ML6060D6
Manual de Recarga Samsung ML 1440 | ML 1450 | ML 1451 | ML 6040 | ML6060D6Manual de Recarga Samsung ML 1440 | ML 1450 | ML 1451 | ML 6040 | ML6060D6
Manual de Recarga Samsung ML 1440 | ML 1450 | ML 1451 | ML 6040 | ML6060D6
 
Manual de Recarga Samsung ML 1710 | SCX 4216 | SCX 4200 | SCX 4100
Manual de Recarga Samsung ML 1710 | SCX 4216 | SCX 4200 | SCX 4100Manual de Recarga Samsung ML 1710 | SCX 4216 | SCX 4200 | SCX 4100
Manual de Recarga Samsung ML 1710 | SCX 4216 | SCX 4200 | SCX 4100
 
Manual de Recarga Samsung ML 1210 | ML 1510 | ML 1610 | ML 1710 | ML 2010
Manual de Recarga Samsung ML 1210 | ML 1510 | ML 1610 | ML 1710 | ML 2010Manual de Recarga Samsung ML 1210 | ML 1510 | ML 1610 | ML 1710 | ML 2010
Manual de Recarga Samsung ML 1210 | ML 1510 | ML 1610 | ML 1710 | ML 2010
 
Manual de Recarga Samsung ML 2251N | ML 2251NP | ML 2251W | ML 2250
Manual de Recarga Samsung ML 2251N | ML 2251NP | ML 2251W | ML 2250Manual de Recarga Samsung ML 2251N | ML 2251NP | ML 2251W | ML 2250
Manual de Recarga Samsung ML 2251N | ML 2251NP | ML 2251W | ML 2250
 
Manual de Recarga Samsung CLP 610N | CLP 660N | CLP 610 CLP 660 Espanhol
Manual de Recarga Samsung CLP 610N | CLP 660N | CLP 610 CLP 660 EspanholManual de Recarga Samsung CLP 610N | CLP 660N | CLP 610 CLP 660 Espanhol
Manual de Recarga Samsung CLP 610N | CLP 660N | CLP 610 CLP 660 Espanhol
 
Manual de Recarga Samsung CLP 600
Manual de Recarga Samsung CLP 600Manual de Recarga Samsung CLP 600
Manual de Recarga Samsung CLP 600
 
Manual de Recarga Samsung CLP 500 CLP 550
Manual de Recarga Samsung CLP 500 CLP 550Manual de Recarga Samsung CLP 500 CLP 550
Manual de Recarga Samsung CLP 500 CLP 550
 
Manual de Recarga Okidata C7000 | C7100 Espanhol
Manual de Recarga Okidata C7000 | C7100 EspanholManual de Recarga Okidata C7000 | C7100 Espanhol
Manual de Recarga Okidata C7000 | C7100 Espanhol
 
Manual de Recarga Okidata C5500 | 6100 Espanhol
Manual de Recarga Okidata C5500 | 6100 EspanholManual de Recarga Okidata C5500 | 6100 Espanhol
Manual de Recarga Okidata C5500 | 6100 Espanhol
 
Manual de Recarga Okidata C5100 Espanhol
Manual de Recarga Okidata C5100 EspanholManual de Recarga Okidata C5100 Espanhol
Manual de Recarga Okidata C5100 Espanhol
 
Manual de Recarga Okidata C3400
Manual de Recarga Okidata C3400Manual de Recarga Okidata C3400
Manual de Recarga Okidata C3400
 
Manual de Recarga Okidata 9000 Espanhol
Manual de Recarga Okidata 9000 EspanholManual de Recarga Okidata 9000 Espanhol
Manual de Recarga Okidata 9000 Espanhol
 
Manual de Recarga Okidata 7100 Espanhol.
Manual de Recarga Okidata 7100 Espanhol.Manual de Recarga Okidata 7100 Espanhol.
Manual de Recarga Okidata 7100 Espanhol.
 
Manual de Recarga Minolta QMS 2400
Manual de Recarga Minolta QMS 2400Manual de Recarga Minolta QMS 2400
Manual de Recarga Minolta QMS 2400
 
Manual de Recarga Lexmark T640 | T642 | T644
Manual de Recarga Lexmark T640 | T642 | T644Manual de Recarga Lexmark T640 | T642 | T644
Manual de Recarga Lexmark T640 | T642 | T644
 

Kürzlich hochgeladen

Advantages of Hiring UIUX Design Service Providers for Your Business
Advantages of Hiring UIUX Design Service Providers for Your BusinessAdvantages of Hiring UIUX Design Service Providers for Your Business
Advantages of Hiring UIUX Design Service Providers for Your BusinessPixlogix Infotech
 
Strategize a Smooth Tenant-to-tenant Migration and Copilot Takeoff
Strategize a Smooth Tenant-to-tenant Migration and Copilot TakeoffStrategize a Smooth Tenant-to-tenant Migration and Copilot Takeoff
Strategize a Smooth Tenant-to-tenant Migration and Copilot Takeoffsammart93
 
What Are The Drone Anti-jamming Systems Technology?
What Are The Drone Anti-jamming Systems Technology?What Are The Drone Anti-jamming Systems Technology?
What Are The Drone Anti-jamming Systems Technology?Antenna Manufacturer Coco
 
Tata AIG General Insurance Company - Insurer Innovation Award 2024
Tata AIG General Insurance Company - Insurer Innovation Award 2024Tata AIG General Insurance Company - Insurer Innovation Award 2024
Tata AIG General Insurance Company - Insurer Innovation Award 2024The Digital Insurer
 
Driving Behavioral Change for Information Management through Data-Driven Gree...
Driving Behavioral Change for Information Management through Data-Driven Gree...Driving Behavioral Change for Information Management through Data-Driven Gree...
Driving Behavioral Change for Information Management through Data-Driven Gree...Enterprise Knowledge
 
Real Time Object Detection Using Open CV
Real Time Object Detection Using Open CVReal Time Object Detection Using Open CV
Real Time Object Detection Using Open CVKhem
 
Finology Group – Insurtech Innovation Award 2024
Finology Group – Insurtech Innovation Award 2024Finology Group – Insurtech Innovation Award 2024
Finology Group – Insurtech Innovation Award 2024The Digital Insurer
 
The 7 Things I Know About Cyber Security After 25 Years | April 2024
The 7 Things I Know About Cyber Security After 25 Years | April 2024The 7 Things I Know About Cyber Security After 25 Years | April 2024
The 7 Things I Know About Cyber Security After 25 Years | April 2024Rafal Los
 
Strategies for Unlocking Knowledge Management in Microsoft 365 in the Copilot...
Strategies for Unlocking Knowledge Management in Microsoft 365 in the Copilot...Strategies for Unlocking Knowledge Management in Microsoft 365 in the Copilot...
Strategies for Unlocking Knowledge Management in Microsoft 365 in the Copilot...Drew Madelung
 
From Event to Action: Accelerate Your Decision Making with Real-Time Automation
From Event to Action: Accelerate Your Decision Making with Real-Time AutomationFrom Event to Action: Accelerate Your Decision Making with Real-Time Automation
From Event to Action: Accelerate Your Decision Making with Real-Time AutomationSafe Software
 
Apidays New York 2024 - Scaling API-first by Ian Reasor and Radu Cotescu, Adobe
Apidays New York 2024 - Scaling API-first by Ian Reasor and Radu Cotescu, AdobeApidays New York 2024 - Scaling API-first by Ian Reasor and Radu Cotescu, Adobe
Apidays New York 2024 - Scaling API-first by Ian Reasor and Radu Cotescu, Adobeapidays
 
[2024]Digital Global Overview Report 2024 Meltwater.pdf
[2024]Digital Global Overview Report 2024 Meltwater.pdf[2024]Digital Global Overview Report 2024 Meltwater.pdf
[2024]Digital Global Overview Report 2024 Meltwater.pdfhans926745
 
Partners Life - Insurer Innovation Award 2024
Partners Life - Insurer Innovation Award 2024Partners Life - Insurer Innovation Award 2024
Partners Life - Insurer Innovation Award 2024The Digital Insurer
 
Workshop - Best of Both Worlds_ Combine KG and Vector search for enhanced R...
Workshop - Best of Both Worlds_ Combine  KG and Vector search for  enhanced R...Workshop - Best of Both Worlds_ Combine  KG and Vector search for  enhanced R...
Workshop - Best of Both Worlds_ Combine KG and Vector search for enhanced R...Neo4j
 
ProductAnonymous-April2024-WinProductDiscovery-MelissaKlemke
ProductAnonymous-April2024-WinProductDiscovery-MelissaKlemkeProductAnonymous-April2024-WinProductDiscovery-MelissaKlemke
ProductAnonymous-April2024-WinProductDiscovery-MelissaKlemkeProduct Anonymous
 
TrustArc Webinar - Stay Ahead of US State Data Privacy Law Developments
TrustArc Webinar - Stay Ahead of US State Data Privacy Law DevelopmentsTrustArc Webinar - Stay Ahead of US State Data Privacy Law Developments
TrustArc Webinar - Stay Ahead of US State Data Privacy Law DevelopmentsTrustArc
 
🐬 The future of MySQL is Postgres 🐘
🐬  The future of MySQL is Postgres   🐘🐬  The future of MySQL is Postgres   🐘
🐬 The future of MySQL is Postgres 🐘RTylerCroy
 
How to Troubleshoot Apps for the Modern Connected Worker
How to Troubleshoot Apps for the Modern Connected WorkerHow to Troubleshoot Apps for the Modern Connected Worker
How to Troubleshoot Apps for the Modern Connected WorkerThousandEyes
 
Developing An App To Navigate The Roads of Brazil
Developing An App To Navigate The Roads of BrazilDeveloping An App To Navigate The Roads of Brazil
Developing An App To Navigate The Roads of BrazilV3cube
 

Kürzlich hochgeladen (20)

Advantages of Hiring UIUX Design Service Providers for Your Business
Advantages of Hiring UIUX Design Service Providers for Your BusinessAdvantages of Hiring UIUX Design Service Providers for Your Business
Advantages of Hiring UIUX Design Service Providers for Your Business
 
Strategize a Smooth Tenant-to-tenant Migration and Copilot Takeoff
Strategize a Smooth Tenant-to-tenant Migration and Copilot TakeoffStrategize a Smooth Tenant-to-tenant Migration and Copilot Takeoff
Strategize a Smooth Tenant-to-tenant Migration and Copilot Takeoff
 
What Are The Drone Anti-jamming Systems Technology?
What Are The Drone Anti-jamming Systems Technology?What Are The Drone Anti-jamming Systems Technology?
What Are The Drone Anti-jamming Systems Technology?
 
+971581248768>> SAFE AND ORIGINAL ABORTION PILLS FOR SALE IN DUBAI AND ABUDHA...
+971581248768>> SAFE AND ORIGINAL ABORTION PILLS FOR SALE IN DUBAI AND ABUDHA...+971581248768>> SAFE AND ORIGINAL ABORTION PILLS FOR SALE IN DUBAI AND ABUDHA...
+971581248768>> SAFE AND ORIGINAL ABORTION PILLS FOR SALE IN DUBAI AND ABUDHA...
 
Tata AIG General Insurance Company - Insurer Innovation Award 2024
Tata AIG General Insurance Company - Insurer Innovation Award 2024Tata AIG General Insurance Company - Insurer Innovation Award 2024
Tata AIG General Insurance Company - Insurer Innovation Award 2024
 
Driving Behavioral Change for Information Management through Data-Driven Gree...
Driving Behavioral Change for Information Management through Data-Driven Gree...Driving Behavioral Change for Information Management through Data-Driven Gree...
Driving Behavioral Change for Information Management through Data-Driven Gree...
 
Real Time Object Detection Using Open CV
Real Time Object Detection Using Open CVReal Time Object Detection Using Open CV
Real Time Object Detection Using Open CV
 
Finology Group – Insurtech Innovation Award 2024
Finology Group – Insurtech Innovation Award 2024Finology Group – Insurtech Innovation Award 2024
Finology Group – Insurtech Innovation Award 2024
 
The 7 Things I Know About Cyber Security After 25 Years | April 2024
The 7 Things I Know About Cyber Security After 25 Years | April 2024The 7 Things I Know About Cyber Security After 25 Years | April 2024
The 7 Things I Know About Cyber Security After 25 Years | April 2024
 
Strategies for Unlocking Knowledge Management in Microsoft 365 in the Copilot...
Strategies for Unlocking Knowledge Management in Microsoft 365 in the Copilot...Strategies for Unlocking Knowledge Management in Microsoft 365 in the Copilot...
Strategies for Unlocking Knowledge Management in Microsoft 365 in the Copilot...
 
From Event to Action: Accelerate Your Decision Making with Real-Time Automation
From Event to Action: Accelerate Your Decision Making with Real-Time AutomationFrom Event to Action: Accelerate Your Decision Making with Real-Time Automation
From Event to Action: Accelerate Your Decision Making with Real-Time Automation
 
Apidays New York 2024 - Scaling API-first by Ian Reasor and Radu Cotescu, Adobe
Apidays New York 2024 - Scaling API-first by Ian Reasor and Radu Cotescu, AdobeApidays New York 2024 - Scaling API-first by Ian Reasor and Radu Cotescu, Adobe
Apidays New York 2024 - Scaling API-first by Ian Reasor and Radu Cotescu, Adobe
 
[2024]Digital Global Overview Report 2024 Meltwater.pdf
[2024]Digital Global Overview Report 2024 Meltwater.pdf[2024]Digital Global Overview Report 2024 Meltwater.pdf
[2024]Digital Global Overview Report 2024 Meltwater.pdf
 
Partners Life - Insurer Innovation Award 2024
Partners Life - Insurer Innovation Award 2024Partners Life - Insurer Innovation Award 2024
Partners Life - Insurer Innovation Award 2024
 
Workshop - Best of Both Worlds_ Combine KG and Vector search for enhanced R...
Workshop - Best of Both Worlds_ Combine  KG and Vector search for  enhanced R...Workshop - Best of Both Worlds_ Combine  KG and Vector search for  enhanced R...
Workshop - Best of Both Worlds_ Combine KG and Vector search for enhanced R...
 
ProductAnonymous-April2024-WinProductDiscovery-MelissaKlemke
ProductAnonymous-April2024-WinProductDiscovery-MelissaKlemkeProductAnonymous-April2024-WinProductDiscovery-MelissaKlemke
ProductAnonymous-April2024-WinProductDiscovery-MelissaKlemke
 
TrustArc Webinar - Stay Ahead of US State Data Privacy Law Developments
TrustArc Webinar - Stay Ahead of US State Data Privacy Law DevelopmentsTrustArc Webinar - Stay Ahead of US State Data Privacy Law Developments
TrustArc Webinar - Stay Ahead of US State Data Privacy Law Developments
 
🐬 The future of MySQL is Postgres 🐘
🐬  The future of MySQL is Postgres   🐘🐬  The future of MySQL is Postgres   🐘
🐬 The future of MySQL is Postgres 🐘
 
How to Troubleshoot Apps for the Modern Connected Worker
How to Troubleshoot Apps for the Modern Connected WorkerHow to Troubleshoot Apps for the Modern Connected Worker
How to Troubleshoot Apps for the Modern Connected Worker
 
Developing An App To Navigate The Roads of Brazil
Developing An App To Navigate The Roads of BrazilDeveloping An App To Navigate The Roads of Brazil
Developing An App To Navigate The Roads of Brazil
 

Manual de Recarga Lexmark Optra M410 | M412

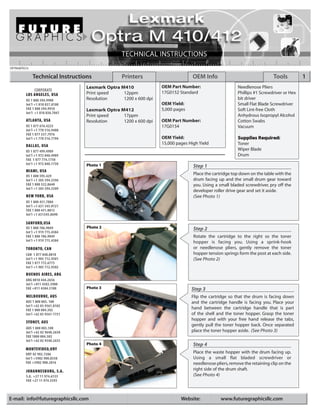
  • 1. OPTRAMTECH Technical Instructions Printers OEM Info Tools 1 Lexmark Optra M410 OEM Part Number: Needlenose Pliers CORPORATE LOS ANGELES, USA Print speed 12ppm 17G0152 Standard Phillips #1 Screwdriver or Hex US 1 800 394.9900 Resolution 1200 x 600 dpi bit driver Int’l +1 818 837.8100 OEM Yield: Small Flat Blade Screwdriver FAX 1 800 394.9910 Lexmark Optra M412 5,000 pages Soft Lint-free Cloth Int’l +1 818 838.7047 Print speed 17ppm Anhydrous Isopropyl Alcohol ATLANTA, USA Resolution 1200 x 600 dpi OEM Part Number: Cotton Swabs US 1 877 676.4223 17G0154 Vacuum Int’l +1 770 516.9488 FAX 1 877 337.7976 Int’l +1 770 516.7794 OEM Yield: Supplies R equir ed: 15,000 pages High Yield Toner DALLAS, USA US 1 877 499.4989 Wiper Blade Int’l +1 972 840.4989 Drum FAX 1 877 774.1750 Int’l +1 972 840.1750 Photo 1 Step 1 MIAMI, USA US 1 800 595.429 Place the cartridge top down on the table with the Int’l +1 305 594.3396 drum facing up and the small drum gear toward FAX 1 800 522.8640 you. Using a small bladed screwdriver, pry off the Int’l +1 305 594.3309 developer roller drive gear and set it aside. NEW YORK, USA (See Photo 1) US 1 800 431.7884 Int’l +1 631 345.0121 FAX 1 800 431.8812 Int’l +1 631345.0690 SANFORD,USA US 1 800 786.9049 Photo 2 Step 2 Int’l +1 919 775.4584 FAX 1 800 786.9049 Rotate the cartridge to the right so the toner Int’l +1 919 775.4584 hopper is facing you. Using a sprink-hook TORONTO, CAN or needlenose pliers, gently remove the toner CAN 1 877 848.0818 hopper tension springs form the post at each side. Int’l +1 905 712.9501 (See Photo 2) FAX 1 877 772.6773 Int’l +1 905 712.9502 BUENOS AIRES, ARG ARG 0810 444.2656 Int’l +011 4583.5900 FAX +011 4584.3100 Photo 3 Step 3 MELBOURNE, AUS Flip the cartridge so that the drum is facing down AUS 1 800 003. 100 and the cartridge handle is facing you. Place your Int’l +62 03 9561.8102 FAX 1 800 004.302 hand between the cartridge handle that is part Int’l +62 03 9561-7751 of the shell and the toner hopper. Grasp the toner hopper and with your free hand release the tabs, SYDNEY, AUS gently pull the toner hopper back. Once separated AUS 1 800 003.100 Int’l +62 02 9648.2630 place the toner hopper aside. (See Photo 3) FAX 1800 004.302 Int’l +62 02 9548.2635 Photo 4 Step 4 MONTEVIDEO,URY URY 02 902.7206 Place the waste hopper with the drum facing up. Int’l +5982 900.8358 Using a small flat bladed screwdriver or FAX +5982 908.3816 needlenose pliers, remove the retaining clip on the JOHANNESBURG, S.A. right side of the drum shaft. S.A. +27 11 974.6155 (See Photo 4) FAX +27 11 974.3593 E-mail: info@futuregraphicsllc.com Website: www.futuregraphicsllc.com
  • 2. 2 Lexmark Optra M Technical Instructions Photo 8 Step 7 Slice the clear sealing tape on the topside of the waste hopper covering the top of the wiper blade. Step 5 (See Photo 8) Holding the large helical gear end of the drum, pull the drum shaft out. (See Photo 5) Remove the drum and set it aside, being sure not to loose the spring The PCR access door opens inward and sets on the attached to the non gear side. Photo 9 horizontal lip of the wiper blade. Open the PCR (See Photo 6) door to remove the wiper blade and be careful not to damage the recovery blade. (See Photo 9) Photo 5 Photo 10 Step 8 Empty out the toner from the waste hopper and inspect the recovery blade for nicks, tears or wrinkles and replace as necessary. (See Photo 10) Photo 6 Photo 11 Step 9 Hold the waste hopper cavity firmly in your right hand and the wiper blade in your left. Open the PCR door with your left thumb and install the wiper blade on the waste hopper and secure with the screws you removed. (See Photo 11) Step 6 Remove the two Hex bit screws on either side of the wiper blade. You may at times find #1 Philips screws used in place of the Hex bit screws. Photo 12 Step 10 (See Photo 7) Apply a small amount of padding powder to the wiper blade, drum and recovery blade. Install the drum, washer (if one was taken off ), drum axle and the retaining clip and set the waste hopper aside for now. Note: if the OEM drum comes with a one Photo 7 way spring, it may need to be transferred to the new drum. This spring is to prevent the drum from turning backwards. (See Photo 12) Photo 13 Step 11 Place the toner hopper on the table (label up) with the developer roller facing you. Using your finger- tips of both hands, gently pull off the Dr Blade spring and set it aside. (See Photo 13) Need trust-worthy, detailed Technical Instructions for another engine? Visit: www.futuregraphicsllc.com
  • 3. Lexmark Optra M Technical Instructions 3 Photo 14 Step 12 Using a small flat bladed screwdriver pry against the base of the contact plate and remove the con- Step 18 tact and left end piece from the developer roller. Clean the underside of the Dr bar with (See Photo 14) a cotton swab and isopropyl alcohol. (See Photo 19) Photo 19 Photo 15 Step 13 Grasp the left end shaft of the developer roller and lift it out and to the left, trying not to damage the Teflon washers or Mylar blades. (See Photo 15) Step 14 Step 19 Remove the Teflon washers from the developer roller and inspect them thoroughly for damage and Clean the developer roller with a dry wear. Replace the Teflon washers as a set. soft lint free cloth or compressed air only. Clean the developer roller shaft with a cotton swab and alcohol. (See Photo 20) Photo 16 Step 15 Turn the toner hopper to the right so the fill plug is facing you. Using a small flat bladed screwdriver, pry out the toner fill plug carefully and try not to Photo 20 damage it. Clean the filter inside the fill plug with either vacuum or compressed air. (See Photo 16) Photo 17 Step 16 Empty out all the toner from the toner hopper and Step 20 clean the hopper with vacuum or compressed air. Install the Teflon washers on each end Be very careful not to damage the foam roller or of the developer roller and slide the Mylar blades. (See Photo 17) flat (keyed) end of the roller into posi- tion on the right side of the toner hop- per. Lower the left end into position being careful not to damage the Teflon washer on that side. (See Photo 21) Photo 18 Step 17 Using a cotton swab and Isopropyl alcohol, clean the developer roller end seals at each end of the Photo 21 foam roller. (See Photo 28)
  • 4. 4 Lexmark Optra M Technical Instructions Photo 22 Step 21 Install the end piece and contact plate into Notes position on the left end of the developer roller shaft. (See Photo 22) Photo 23 Step 22 Reinstall the Dr bar leaf spring with the point on the “V” stamped on the spring pointed towards you. (See Photo 23) Photo 24 Step 23 Pour the correct amount of Toner into the toner hopper and reinstall the fill plug. (See Photo 24) Photo 25 Step 24 Place the waste hopper top down on the table with the opening facing you and the hopper ten- sion springs out of the way.Turn the toner hopper, label down and line up the post on each side with the guide slots. Inspect for correct toner hopper position and ease of movement. (See Photo 25) Photo 26 Step 25 Reinstall the developer roller drive gear. The car- tridge is now ready to test. This cartridge contains no electronic chip or encoder wheel. (See Photo 26) Future Graphics (FG) is a distributor of compatible replacement parts and products for imagining equipment. None of FG's products are genuine OEM replacement parts and no affiliation or sponsorship is to be implied between FG and any OEM. E-mail: info@futuregraphicsllc.com Website: www.futuregraphicsllc.com