Weitere ähnliche Inhalte
Ähnlich wie Hp 4200 4300 4345
Ähnlich wie Hp 4200 4300 4345 (20)
Hp 4200 4300 4345
- 1. HP4200TECH
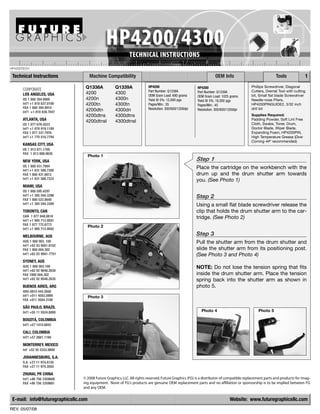
Technical Instructions Machine Compatibility OEM Info Tools 1
CORPORATE Q1338A Q1339A HP4200 HP4300 Phillips Screwdriver, Diagonal
Part Number: Q1338A Part Number: Q1339A Cutters, Dremel Tool with cutting
LOS ANGELES, USA 4200 4300
OEM Gram Load: 690 grams OEM Gram Load: 1025 grams bit, Small flat blade Screwdriver
US 1 800 394.9900 4200n 4300n Yield @ 5%: 12,000 pgs Yield @ 5%: 18,000 pgs Needle-nose Pliers,
Int’l +1 818 837.8100 4200tn 4300tn Pages/Min.: 35 Pages/Min.: 45 HP4200PINGUIDE2, 3/32 inch
FAX 1 800 394.9910 Resolution: 300/600/1200dpi drill bit
Int’l +1 818 838.7047 4200dtn 4300dn Resolution: 300/600/1200dpi
4200dtns 4300dtns Supplies Required:
ATLANTA, USA 4200dtnsl 4300dtnsl Padding Powder, Soft Lint Free
US 1 877 676.4223 Cloth, Swabs, Toner, Drum,
Int’l +1 678 919.1189 Doctor Blade, Wiper Blade,
FAX 1 877 337.7976 Expanding Foam, HP4200PIN,
Int’l +1 770 516.7794 High Temperature Grease (Dow
Corning 44® recommended)
KANSAS CITY, USA
US 1 913 871.1700
FAX 1 913 888.0626
Photo 1
NEW YORK, USA Step 1
US 1 800 431.7884 Place the cartridge on the workbench with the
Int’l +1 631 588.7300
FAX 1 800 431.8812 drum up and the drum shutter arm towards
Int’l +1 631 588.7333 you. (See Photo 1)
MIAMI, USA
US 1 800 595.4297
Int’l +1 305 594.3396 Step 2
FAX 1 800 522.8640
Int’l +1 305 594.3309 Using a small flat blade screwdriver release the
TORONTO, CAN clip that holds the drum shutter arm to the car-
CAN 1 877 848.0818 tridge. (See Photo 2)
Int’l +1 905 712.9501
FAX 1 877 772.6773
Photo 2
Int’l +1 905 712.9502
MELBOURNE, AUS Step 3
AUS 1 800 003. 100 Pull the shutter arm from the drum shutter and
Int’l +62 03 9561.8102
FAX 1 800 004.302 slide the shutter arm from its positioning post.
Int’l +62 03 9561-7751 (See Photo 3 and Photo 4)
SYDNEY, AUS
AUS 1 800 003.100 NOTE: Do not lose the tension spring that fits
Int’l +62 02 9648.2630
FAX 1800 004.302 inside the drum shutter arm. Place the tension
Int’l +62 02 9548.2635 spring back into the shutter arm as shown in
BUENOS AIRES, ARG photo 5.
ARG 0810 444.2656
Int’l +011 4583.5900 Photo 3
FAX +011 4584.3100
SÃO PAULO, BRAZIL
Int’l +55 11 5524.8000 Photo 4 Photo 5
BOGOTÁ, COLOMBIA
Int'l +57 1410.8842
CALI, COLOMBIA
Int'l +57 2661.1166
MONTERREY, MEXICO
Int' +52 55 5333.9800
JOHANNESBURG, S.A.
S.A. +27 11 974.6155
FAX +27 11 974.3593
ZHUHAI, PR CHINA
Int’l +86 756 3359608 © 2008 Future Graphics, LLC. All rights reserved. Future Graphics (FG) is a distributor of compatible replacement parts and products for imag-
FAX +86 756 3359681 ing equipment. None of FG's products are genuine OEM replacement parts and no affiliation or sponsorship is to be implied between FG
and any OEM.
E-mail: info@futuregraphicsllc.com Website: www.futuregraphicsllc.com
REV. 05/07/08
- 2. 2 HP4200 Technical Instructions
Photo 8
Step 6
Place the Side Plate Drill Guide onto the
bottom of the toner hopper. The Side
Step 4 Plate Drill Guide has three alignment pins.
Open the drum shutter, expos- (See Photo 8) The large alignment pin fits
ing the drum. The drum shutter into the square notch on the bottom of the
bar is keyed on the non-contact contact end cap, the smaller alignment
side of the cartridge. Slide the pin located next to the large pin fits just
shutter bar back until the bar over the first supporting rib next to the
can be removed from the car- end cap. The last alignment pin will fit over
tridge end cap. (See Photo 6) the fourth supporting rib.
Photo 9 (See Photo 9)
Photo 6
Step 7
Photo 10
Using the provided .136 (#29) drill bit, drill
a hole through the contact end cap.
(See Photo 10)
Step 5 Step 8
Pull the drum shutter bar from Remove the Drill Guide.
the cartridge contact end cap.
(See Photo 7)
Set the drum shutter aside.
Photo 11
Step 9
Photo 7
Remove the 2 screws holding the
cartridge contact end cap to the cartridge.
(See Photo 11)
Photo 12
Step 10
Place a small flat blade screwdriver at the
base of the three plastic welds that hold
the end cap to the toner hopper. Pry up on
the screwdriver to break the welds.
© 2008 Future Graphics, LLC. All rights reserved.
Future Graphics (FG) is a distributor of compatible
replacement parts and products for imaging equip- (See Photo 12)
ment. None of FG's products are genuine OEM
replacement parts and no affiliation or sponsorship
is to be implied between FG and any OEM.
- 3. HP4200 Technical Instructions 3
Photo 13
Step 11
Insert a flat blade screwdriver between the
toner hopper and the contact end cap,
Step 16
next to the plastic welds that hold the end
cap to the toner hopper. Carefully pry the Lift the drum by the small gear
end cap away from the toner hopper. and pull the drum from the
(See Photo 13) Remove the end cap. bearing hub.
(See Photo 18)
Photo 14
Step 12 Photo 18
Using diagonal cutters cut the 3 plastic
welds flush with the contact end cap.
(See Photo 14)
Photo 15
Step 13 Notes
Rotate the cartridge 180°. Remove the 4
screws holding the gear housing end cap.
(See Photo 15)
Photo 16
Step 14
While holding the opposite end of the car-
tridge, remove the gear assembly end cap
from the cartridge. (See Photo 16)
Separate the two sections and set the
toner hopper aside.
Photo 17
Step 15
Remove the screw holding the drum axle.
(See Photo 17) Remove the axle.
© 2008 Future Graphics, LLC. All rights reserved.
Future Graphics (FG) is a distributor of compatible
replacement parts and products for imaging equip-
ment. None of FG's products are genuine OEM
replacement parts and no affiliation or sponsorship
is to be implied between FG and any OEM.
- 4. 4 HP4200 Technical Instructions
Photo 19
Step 17
Remove the PCR from the PCR saddles.
(See Photo 19)
Notes NOTE: If you are going to reuse the PCR
clean the roller using a lint free cloth and
DI water.
Photo 20
Step 18
In order to remove the wiper blade, pull
the OEM sealing foam material away from
the wiper blade. (See Photo 20)
NOTE: The OEM sealing foam material is
sticky and is not easily removed.
Photo 21
Step 19
NOTE: This step is only for the HP4300.
Using a Dremel with a cutting bit cut away
the retaining wall that prevents the wiper
blade from being removed.
(See Photo 21)
Photo 22
Step 20
Remove the 2 screws holding the wiper
blade. (See Photo 22) Remove the blade.
Step 21
Dump the waste toner from the hopper.
Clean the hopper using dry compressed
air or a vacuum.
Photo 23
Step 22
Apply padding powder to the new wiper
blade and place the blade onto the waste
hopper. Install the 2 screws that hold the
blade in place. (See Photo 23)
© 2008 Future Graphics, LLC. All rights reserved.
Future Graphics (FG) is a distributor of compatible
replacement parts and products for imaging equip-
ment. None of FG's products are genuine OEM
replacement parts and no affiliation or sponsorship
is to be implied between FG and any OEM.
- 5. HP4200 Technical Instructions 5
Photo 24
Step 23
To seal the area around the wiper blade use
an expanding foam with an adjustable Notes
bead. Apply the foam along the edge of the
blade and in the square holes on the ends.
(See Photo 24)
Photo 25
Step 24
Clean the PCR saddles using a swab and
alcohol. (See Photo 25)
Photo 26
Step 25
Apply new conductive grease to the black
contact saddle. Install the cleaned PCR.
(See Photo 26)
Photo 27
Step 26
Apply high temperature grease to the
bearing hub before installing the drum.
Apply padding powder to the drum.
Slide the drive gear into the bearing hub.
(See Photo 27)
Photo 28
Step 27
Install the contact end plate.
(See Photo 28)
NOTE: Make sure the contact plate sits
flush with the end of the waste hopper.
© 2008 Future Graphics, LLC. All rights reserved.
Future Graphics (FG) is a distributor of compatible
replacement parts and products for imaging equip-
ment. None of FG's products are genuine OEM
replacement parts and no affiliation or sponsorship
is to be implied between FG and any OEM.
- 6. 6 HP4200 Technical Instructions
Photo 29
Step 28
Install the screw that holds the contact
plate in position.
Notes (See Photo 29)
Step 29
Place the waste hopper aside in a
protected area out of the light.
Photo 30
Step 30
Remove the mag roller drive gear housing
from the end of the toner hopper.
(See Photo 30) Remove the mag roller
drive gear.
Photo 31
Step 31
Remove the screw that holds the mag
roller end plate. (See Photo 31)
Photo 32
Step 32
Using needle nose pliers remove the
hinge pin from the mag roller end plate.
(See Photo 32)
Photo 33
Step 33
Remove the mag roller tension spring.
(See Photo 33)
© 2008 Future Graphics, LLC. All rights reserved.
Future Graphics (FG) is a distributor of compatible
replacement parts and products for imaging equip-
ment. None of FG's products are genuine OEM
replacement parts and no affiliation or sponsorship
is to be implied between FG and any OEM.
- 7. HP4200 Technical Instructions 7
Photo 34
Step 34
Pull the mag roller end plate from the toner
hopper. (See Photo 34) Notes
NOTE: Do not lose the bearing that sits
inside the mag roller end plate.
(See Photo 35)
Photo 35
Photo 36
Step 35
Lift the free end of the mag roller, slide the
roller out of the mag roller end plate on the
opposite side of the toner hopper. (See
Photo 36)
NOTE: Do not lose the bearing that sits
inside the mag roller end plate.
(See Photo 37)
Photo 37
Photo 38
Step 36
Remove the mag roller bearings from the
each end of the roller. (See Photo 38)
Clean the mag roller using dry com-
pressed air or a vacuum, then using a lint
free cloth and a mag roller cleaner. Clean
© 2008 Future Graphics, LLC. All rights reserved.
the mag roller bearings using alcohol and Future Graphics (FG) is a distributor of compatible
a lint free cloth. replacement parts and products for imaging equip-
ment. None of FG's products are genuine OEM
replacement parts and no affiliation or sponsorship
is to be implied between FG and any OEM.
- 8. 8 HP4200 Technical Instructions
Photo 39
Step 37
Remove the 2 screws holding the doc-
tor blade.
Notes (See Photo 39)
Photo 40
Step 38
Lift the plastic scrapers and mylar shims
off each end of the doctor blade.
(See Photo 40)
Step 39
Lift the doctor blade from the toner
hopper. (See Photo 41) If you plan on
using the doctor blade again, clean the
Photo 41 doctor blade using dry compressed air
or a vacuum, then using a lint free cloth
and alcohol.
Step 40
Dump the old toner out of the toner
hopper. Using dry compressed air or a
vacuum, clean out the hopper.
Step 41
Photo 42 Fill the toner hopper with the correct
amount of toner depending on the car-
tridge type you are building.
Step 42
Place the new or cleaned doctor blade
onto the toner hopper. Place the mylar
shims and the plastic scrapers on each
end of the doctor blade. Install the
2 screws holding the blade in place.
(See Photo 42)
Photo 43
Step 43
Slide the black mag roller bearing onto
the contact end and the white bearing
onto the drive gear end of the mag
© 2008 Future Graphics, LLC. All rights reserved.
roller. Slide the mag roller contact hub
Future Graphics (FG) is a distributor of compatible into the mag roller bearing plate on the
replacement parts and products for imaging equip- toner hopper. (See Photo 43)
ment. None of FG's products are genuine OEM
replacement parts and no affiliation or sponsorship
is to be implied between FG and any OEM.
- 9. HP4200 Technical Instructions 9
Photo 44
Step 44
Align the mag roller bearing end plate to
the toner hopper and slide the end plate
onto the toner hopper. (See Photo 44) Step 48
Place the mag roller drive gear
housing onto the end of the
mag roller, making sure the
keyed end of the magnet fits
into the gear housing.
(See Photo 49)
Photo 45
Step 45
Install the mag roller tension spring and
the screw into the mag roller bearing end
Photo 49
plate. (See Photo 45)
Photo 46
Step 46
Install the hinge pin into the mag roller
bearing end plate. (See Photo 46)
Step 49
Using a 3/32-drill bit, drill a hole
next to the toner sensing con-
tact on the cartridge contact
end cap as shown in photo 50.
Photo 47
Step 47
Slide the mag roller drive gear onto the
mag roller. (See Photo 47) NOTE: Make
sure the two injection molding points on Photo 50
the mag roller drive gear face outward.
(See Photo 48)
Photo 48
© 2008 Future Graphics, LLC. All rights reserved.
Future Graphics (FG) is a distributor of compatible
replacement parts and products for imaging equip-
ment. None of FG's products are genuine OEM
replacement parts and no affiliation or sponsorship
is to be implied between FG and any OEM.
- 10. 10 HP4200 Technical Instructions
Photo 53
Step 52
Insert the HP4200PIN into the drilled hole
in the bottom of the contact end cap. (See
Step 50 Photo 53)
Join the toner hopper and waste
hopper together. Place the car-
tridge gear housing end cap
onto the side of the cartridge.
Install the 4 screws that hold the
end cap in place. (See Photo 51) Photo 54
Step 53
Install the keyed end of the drum shutter
bar into the gear housing end cap.
(See Photo 54)
Photo 51
Step 54
Photo 55
Install the non-keyed end of the drum
shutter bar into the contact end cap.
(See Photo 55)
Step 55
Slide the drum shutter arm onto the
positioning post. Push the drum shutter
Photo 56 arm into the drum shutter. (See Photo 56)
Step 51 Slide open the drum shutter to engage the
Place the contact end cap onto tension spring.
the end of the cartridge. Install
the 2 screws that hold the end
cap in place. (See Photo 52)
Step 56
Place one probe of an Ohmmeter on the
toner sensor contact and place the other
probe into the hole that was drilled next to
Photo 57
the contact. (See Photo 57) Locate the
sensor bar that comes out from the toner
Photo 52
hopper through the hole drilled in the end
cap, making sure you have a low resist-
ance connection. (See Photo 58)
NOTE: If contact is not made between the
sensor bar and the contact on the end
plate this will result in an error “54.1
Remove Sealing Tape” or if contact is lost
Photo 58
during usage a premature toner low can
occur.
Step 57
Test cartridge.
© 2008 Future Graphics, LLC. All rights reserved.
Future Graphics (FG) is a distributor of compatible
replacement parts and products for imaging equip-
ment. None of FG's products are genuine OEM
replacement parts and no affiliation or sponsorship
is to be implied between FG and any OEM.
- 11. PRINTER MODEL COMPATIBILITY
PRINTER MODEL OEM NUMBER
HP LaserJet 4200 Q1338A
HP LaserJet 4200 dtn Q1338A
HP LaserJet 4200 dtns Q1338A
HP LaserJet 4200 dtnsl Q1338A
HP LaserJet 4200 n Q1338A
HP LaserJet 4200 tn Q1338A
FUTURE GRAPHICS PRODUCT LISTING
Product Description Item Number Pack Qty.
Chip Compatible Replacement HP42/4300CHIP 10/240
Doctor Blade Kuroki HP4200DRBLADEK 5/50
Drum Sinonar HP4200SNR 5/60
AEG, DuraTek Drum Coating Technology HP4200AEGDT 10
Drum
Compatible Replacement Chip, AEG Drum,750gm Onyx Toner, Kuroki Wiper Blade HP4200KITA
Drum Kit 10
Compatible Replacement Chip, AEG Drum, 750gm FG Toner, Kuroki Wiper BladeCompatible HP4200KITD
Drum Kit 10
Replacement Chip, Sinonar Drum, 750gm Onyx Toner, Kuroki Wiper Blade HP4200KITB
Drum Kit Compatible Replacement Chip, Sinonar Drum, 750gm FG Toner, Kuroki Wiper Blade 10
HP4200KITC
Drum Kit 15mm Metal WXCLIP15MM 10
Hopper Rail Clip New HP4200MAG 500
Mag Roller Sleeve Mag Roller Sleeve with Hub and Contact HP4200MAGONYXK 10
Cartridge Assembly Pin HP4200PIN 10
Mag Roller Kit
Adhesive Gold Seal HP4200GOLDSEAL
Pin 100
Adhesive, Aluminim, OEM Style HP4200SEALONYX
Seal 50
For Use with OEM or Onyx Aluminum Seal, 10" HP4200RAILFOAM2
Seal Expanding Foam, Foam Applicator/Dispenser, and Cleaner 50
EXPANDFOAMKIT
Seal Channel Rail Foam Cartridge Remanufacturing Instructions HP4200TECH 100
Sealant 750 GM Bottle HP4200TNR750 1 kit
Technical Guide Onyx, 750gm Bottle HP4200ONYX750 1
Bulk Bag, 22 lb Per-Fil - Box of 1, ONYX, Sold per box HP4200ONYX10KG 10
Toner
Bulk Bag, 22 lb Per-Fil - Box of 1, Sold per box HP4200TNR10KG
Toner 10
HP4200 - 650gm Bottle, Onyx Toner HP4200MICR650O
Toner 1
Bulk Bag, 22 lb Per-Fil - Box of 1, Sold per box HP4200MICR10KG
Toner Kuroki HP4200WBLADEK 1
Toner 10
Toner 1
Wiper Blade 10/200
© 2008 Future Graphics, LLC. All rights reserved. Future Graphics (FG) is a distributor of compatible replacement parts and products for imaging equipment. None of FG's products are
genuine OEM replacement parts and no affiliation or sponsorship is to be implied between FG and any OEM.
- 12. Hewlett Packard’s LaserJet 4200 Supplies Status Page. Like the
and the LaserJet 4300 series of print- HP4100, the 4200 and 4300 can be
ers were first released in November run with a spent chip or with no chip
2002. They were designed to replace installed at all.
the now discontinued HP4100 printer.
Based on a new print engine, the Our testing shows that the chip can
4200 and 4300 have increased print be run again in the printer it was used
speeds of 35 ppm for the 4200 and in originally. Running the used chip
45 ppm for the 4300 with an causes a “Replace Cartridge” mes-
improved first page out time of less sage and the loss of the toner low
than 9 seconds. At a starting cost of warning. Usage of the chip in a
about $1,000 for the base model machine other than the one it was
waste section. The waste hopper of
4200 and $1,399 for the base model previously run in will result in a “Non
the HP4300 is larger to hold the extra
4300, these new printers are priced at HP Cartridge Detected” message and
waste produced by the higher fill
the same cost as the HP4100. the loss of all the information on the
weight. The HP4200 waste hopper
Supplies Status Page.
also has a fin sticking up on the left
Differences in the molding of car-
side of the hopper that prevents the
tridges prevent them from being Running the cartridge without the
cartridge from fitting into the HP4300
interchangeable. One notable differ- chip will result in a “10.10.00 Supplies
printer.
ence is in the design of the toner hop- Memory Error” when the cartridge is
per. The toner hopper on the HP4300 first installed. After pressing the
Because the 4200 and the 4300 use
is larger and holds 1050 grams of Select button a “Non HP Cartridge
the same engine, the components
toner for an estimated yield of 18,000 Detected” message will appear
that make up the cartridges are the
pages @ 5% coverage. The smaller before the machine goes to ready. All
same. The cartridge chips located on
toner hopper on the HP4200 holds the information stored in the chip will
the top right side of the waste hopper
only 690 grams of toner and yields not be available and a “Warning”
however, are in fact different. A slight
12,000 pages @ 5% coverage. message is all you will find on the
difference in programming prevents
Another notable difference is in the Supplies Status Page.
one chip from being used on both
cartridges, so it's important to use
the correct chip when remanufactur-
ing the cartridge. Though the chip is
physically different than that of the
HP4100, the information the chip
stores is almost the same. A few
additional items like First Installed
Date and Last Date Used are now
stored in the chips. This information
HP4300 (Q1339A) HP4200 (Q1338A)
is displayed at the bottom of the
© 2008 Future Graphics, LLC. All rights reserved. Future Graphics (FG) is a distributor of compatible replacement parts and products for imaging equipment. None of FG's products are
genuine OEM replacement parts and no affiliation or sponsorship is to be implied between FG and any OEM.
E-mail: info@futuregraphicsllc.com Website: www.futuregraphicsllc.com