This tutorial explains how to use the Refine Edge tool in Photoshop to feather, or soften, the edges of image selections. Feathering helps minimize jagged edges and creates a more natural appearance when objects are extracted and placed into a new background. The tutorial demonstrates how to select an image, use the Refine Edge tool to adjust feathering and other edge properties, and apply the changes to a new layer for a seamless blend into the background.
2. This tutorial is provided by www.Scrapbook-Bytes.com.
All tutorials are copyright the individual designer. No portion of any tutorial may be duplicated or reproduced without the
permission of both Scrapbook-Bytes and the original writer / creator of the content.
A Feather value of 1 pixel the default, the feather value is measured in pixels. Usually a value of below 2
pixels is all that is required for extractions such as these. Push the slider to judge the best result. Here 0.6
was enough to soften the edges.
You can then use the other options to control or modify the edge of the extraction. As you hover over
each of the sliders the description box explains its’ purpose, with a visual example. Make any adjustments
as desired.
3. This tutorial is provided by www.Scrapbook-Bytes.com.
All tutorials are copyright the individual designer. No portion of any tutorial may be duplicated or reproduced without the
permission of both Scrapbook-Bytes and the original writer / creator of the content.
Here I have adjusted the Contrast and Smooth values slightly as well as contracting the selection slightly.
Ensure you check the entire perimeter of the extraction so that your refinements do not adversely affect
other areas.
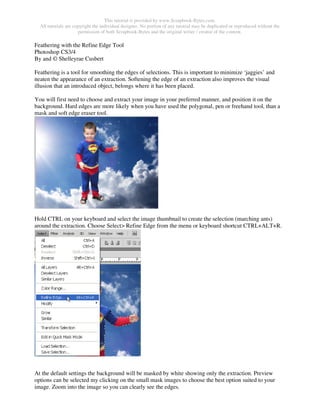
When you are satisfied with the result, click OK to return to the workspace. To actually apply the
selection refinements, you must use CTRL+J to copy the new selection to a new layer. You can then hide
or delete the unaltered layer below.
4. This tutorial is provided by www.Scrapbook-Bytes.com.
All tutorials are copyright the individual designer. No portion of any tutorial may be duplicated or reproduced without the
permission of both Scrapbook-Bytes and the original writer / creator of the content.
Your photo should now look better as part of the scene, with the softer edge transitions, creating a more
seamless blend.
Before/After
I have finished off this project by repositioning and adding some motion blur to finish.
5. This tutorial is provided by www.Scrapbook-Bytes.com.
All tutorials are copyright the individual designer. No portion of any tutorial may be duplicated or reproduced without the
permission of both Scrapbook-Bytes and the original writer / creator of the content.