SlideShare ist ein Scribd-Unternehmen logo
1 von 25
Downloaden Sie, um offline zu lesen
Create an interactive production wiki using PHP,
      Part 5: The open blog
      An environment for open discussion

      Skill Level: Intermediate


      Duane O'Brien (d@duaneobrien.com)
      PHP developer
      Freelance


      10 Apr 2007


      This "Create an interactive production wiki using PHP" tutorial series creates a wiki
      from scratch using PHP, with value-added features useful for tracking production.
      Wikis are widely used as tools to help speed development, increase productivity and
      educate others. Each part of the series develops integral parts of the wiki until it is
      complete and ready for prime time, with features including file uploading, a
      calendaring "milestone" system, and an open blog. The wiki will also contain projects
      whose permissions are customizable to certain users and will contain projects whose
      permissions are customizable to certain users. In Part 4 we added some task
      management. Now you will create an open blog, which will allow users a place to
      hold public discussions.


      Section 1. Before you start
      This "Create an interactive production wiki using PHP" series is designed for PHP
      application developers who want to to take a run at making their own custom wikis.
      You'll define everything about the application, from the database all the way up to
      the wiki markup you want to use. In the final product, you will be able to configure
      much of the application at a granular level, from who can edit pages to how open the
      blog really is.

      At the end of this tutorial, Part 5 of a five-part series, you will have an open blog
      working in your wiki. You should not continue until you have completed the first four
      tutorials.


The open blog
© Copyright IBM Corporation 1994, 2008. All rights reserved.                             Page 1 of 25
developerWorks®                                                                       ibm.com/developerWorks


     About this series
     Part 1 of this series draws the big picture. You determine how you want the
     application to look, flow, work, and behave. You'll design the database and
     rough-out some scaffolding. Part 2 focuses on the primary wiki development,
     including defining the markup, tracking changes, and file uploads. In Part 3, you
     define some users and groups, as well as a way to control access to certain aspects
     of individual wiki pages and uploaded files. Part 4 deals with a Calendaring and
     Milestones feature to track tasks, to-dos, and progress against set goals. Here in
     Part 5, you put together an open blog to allow discussion of production topics and
     concerns.


     About this tutorial
     This tutorial deals with creating an open blog for Criki. You have built the basic wiki
     features, and you have added task management for your users. An open blog is
     another valuable feature that will allow your users a place to hold public discussions.
     Topics include:

                • What is meant by "open blog"
                • Blog workflow design
                • Building out the blog database table
                • Basic blog features


     Prerequisites
     It is assumed you have completed Part 1, Part 2, Part 3, and Part 4 of this "Create
     an interactive production wiki using PHP" series. And it is assumed that you have
     some experience working with the PHP programming language and MySQL. We
     won't be doing a lot of deep database tuning, so as long as you know the basic ins
     and outs, you should be fine.


     System requirements
     Before you begin, you need to have an environment in which you can work. The
     general requirements are reasonably minimal:

                • An HTTP server that supports sessions (and preferably mod_rewrite).
                  This tutorial was written using Apache V1.3 with mod_rewrite enabled.
                • PHP V4.3.2 or later (including PHP V5). This was written using PHP
                  V5.0.4


The open blog
Page 2 of 25                                         © Copyright IBM Corporation 1994, 2008. All rights reserved.
ibm.com/developerWorks                                                              developerWorks®


                • Any version of MySQL from the last few years will do. This was written
                  using MySQL V4.1.15.
      You'll also need a database and database user ready for your application to use.
      The tutorial will provide syntax for creating any necessary tables in MySQL.

      Additionally, to save time, we will be developing Criki using a PHP framework called
      CakePHP. Download CakePHP by visiting CakeForge.org and downloading the
      latest stable version. This tutorial was written using V1.1.13. For information about
      installing and configuring CakePHP, check out the tutorial series titled "Cook up Web
      sites fast with CakePHP" (see Resources).


      Section 2. Criki so far
      At the end of Part 4, you were given several items to complete. There was at least
      one glaring security hole in the task management edit workflow. You were tasked
      with finding a way to use wiki markup when writing task descriptions, without
      reproducing the wiki markup rendering code. And the tasks views contained user
      names as text, which could have been made into links to the users' profiles. How did
      you do?


      Securing the task management edit workflow
      There are two specific problems in the task management edit workflow to address.
      Alert code monkeys will have noticed them already. The first should be fairly
      obvious. Consider this line from the tasks edit view in Listing 1.

      Listing 1. Tasks edit view excerpt

       <?php
         if ($task['Task']['user_id'] == $user['id']) :
           echo $html->link('Edit','/tasks/edit/' . $task['Task']['id']);
         endif;
       ?>


      This displays the edit link for only the user to whom the task has been assigned.

      Now consider the task edit action in Listing 2.

      Listing 2. Task edit action

       function edit($id = null) {
         if(empty($this->data)) {
           if(!$id) {
             $this->Session->setFlash('Invalid id for Task');
             $this->redirect('/task/index');


The open blog
© Copyright IBM Corporation 1994, 2008. All rights reserved.                               Page 3 of 25
developerWorks®                                                                        ibm.com/developerWorks


           }
           $task = $this->Task->read(null, $id);
           $this->data = $task;
           $this->set('task', $task);
           $this->set('percents', array ('0' => '0%', '25' => '25%', '50' => '50%', '75' =>
       '75%', '100' =>
       '100%'));
           $this->set('month', $this->buildCalendar($task['Task']['user_id'],
       $task['Task']['duedate']));
         } else {
           $this->cleanUpFields();
           if($this->Task->save($this->data)) {
             $this->Session->setFlash('The Task has been saved');
             $this->redirect('/tasks/view/' . $this->data['Task']['id']);
           } else {
             $this->Session->setFlash('Please correct errors below.');
           }
         }
       }


     At no time in this action do you verify that the user who has submitted the data for
     edit is the user to whom the task has been assigned. It is not enough to simply keep
     from showing the link to the user. Once the HTML has been sent to the user, it can
     easily be modified.

     While this seems an unlikely case, it is easily reproduced. In your favorite tabbed
     browser, Firefox, for example, open two tabs to Criki. In one tab, log in as User A
     and navigate to the edit task page for any task. Then in the second window, log out
     of Criki and log in again as User B. Return to the tab with the edit task page loaded,
     and you will find you can successfully edit the task, even though the task belongs to
     User A, and you are now logged in as User B.

     Always verify your data. Always. Twice if you're not certain.

     The second half of the Edit action might look more like Listing 3.

     Listing 3. Verify that the user is assigned to the task

       $user = $this->Session->read('User');
       $task = $this->Task->read(null, $this->data['Task']['id']);
       if ($user['id'] == $task['Task']['user_id']) {
         $this->cleanUpFields();
         if($this->Task->save($this->data)) {
           $this->Session->setFlash('The Task has been saved');
           $this->redirect('/tasks/view/' . $this->data['Task']['id']);
         } else {
           $this->Session->setFlash('Please correct errors below.');
         }
       } else {
         $this->Session->setFlash('You cannot modify this task.');
         $this->redirect('/tasks/view/' . $this->data['Task']['id']);
       }


     The second security problem with the task edit action may have been a little harder
     to spot. You will recall that the primary directive for editing a task was that the user
     should not be able to edit anything but the percentage complete. Only the
     percentage field was presented to the user via the task edit view.

     But, just as you verified the user, you should verify that the fields the user have


The open blog
Page 4 of 25                                          © Copyright IBM Corporation 1994, 2008. All rights reserved.
ibm.com/developerWorks                                                                 developerWorks®


      submitted match the fields you are expecting. Or, if you prefer, make sure you only
      use the data from the fields that you desire (a whitelisting approach). Achieving this
      is fairly simple. You can build a new array of data to be saved, including only those
      elements from the submitted data you desire. Just remember to format the array
      correctly.

      Listing 4. Whitelisting form fields

       $user = $this->Session->read('User');
       $task = $this->Task->read(null, $this->data['Task']['id']);
       if ($user['id'] == $task['Task']['user_id']) {
         $this->cleanUpFields();
         $savedata = array (
           'Task' => array (
             'id' => $this->data['Task']['id'],
             'percent' => $this->data['Task']['percent'],
           )
         );
         if($this->Task->save($savedata)) {
           $this->Session->setFlash('The Task has been saved');
           $this->redirect('/tasks/view/' . $this->data['Task']['id']);
         } else {
           $this->Session->setFlash('Please correct errors below.');
         }
       } else {
         $this->Session->setFlash('You cannot modify this task.');
         $this->redirect('/tasks/view/' . $this->data['Task']['id']);
       }


      You can test that this works as you expect it to by adding a field to the task edit view
      that will allow the user to modify the title of a task.


       <?php echo $html->input('Task/title', array('size' => '60'));?>


      Save the view and edit the action, making sure to change the percentage and the
      title. You should find that only the percentage is modified. This approach of
      whitelisting form fields is a powerful tool that can help protect you from maliciously
      inserted form data. Always verify your data. Always. Twice if you're not certain.

      Take some time now to look back over the code for Criki. See if you can find other
      places where you should be verifying your data.

      Future versions of CakePHP will automatically apply this form of whitelisting for form
      fields generated using the form helper.


      Reusing the wiki markup rendering code
      Using the wiki markup rendering code you already wrote to allow wiki markup in task
      descriptions could be done a couple different ways.

      One way would be to create an action in the entries controller called
      renderMarkup. This would work much like the buildCalendar action you wrote
      for the tasks controller. You could then call it via requestAction, passing in the
      unformatted task description and getting back the task description after the wiki


The open blog
© Copyright IBM Corporation 1994, 2008. All rights reserved.                               Page 5 of 25
developerWorks®                                                                      ibm.com/developerWorks


     markup has been rendered.

     Another way -- and, perhaps, a better way -- would be to create a custom helper,
     specifically for rendering wiki markup into HTML, and using this helper in your views.
     This would be a more versatile and somewhat more elegant approach. To do this,
     you would create the file app/views/helpers/wiki.php.

     Listing 5. Creating the WikiHelper

       <?php
         class WikiHelper extends Helper {
           function render($content) {
             ...
             ...
             ...
           }
         }
       ?>


     The Render function is far too long to reproduce here (you need to import it to the
     EntryRevisions controller), but it is functionally the same, save that $content is
     passed into the function, rather than being pulled from $this>data, and a
     $return variable necessary (as the rendered markup is not being set in
     $this>data.)

     Once you have created the helper, you need to add the helper to any controller you
     want to have access to it.


       var $helpers = array('Html', 'Form', 'Wiki' );


     Now that the wiki markup rendering code is in a helper, you can significantly reduce
     the size of the entries view action.

     Listing 6. New entries view action

       function view($title = null) {
         if(!$title) {
           $this->Session->setFlash('Invalid Entry.');
           $this->redirect('/entries/index');
         }
         $entry = $this->Entry->findByTitle($title);
         if ($entry) {
           $user = $this->Session->read('User');
           $user = $this->Entry->User->read(null, $user['id']);
           $this->Session->write('User', $user['User']);
           if ($user['User']['access'] < $entry['Entry']['access']) {
             $this->Session->setFlash('Access Denied.');
             $this->redirect('/entries/index');
           }
           $this->set('entry', $entry);
         } else {
           $this->redirect('/entries/edit/' . preg_replace("/[^a-z]/", , strtolower($title)));
         }
       }


     Now you should be able to use the helper to output data in a view. For example, if


The open blog
Page 6 of 25                                        © Copyright IBM Corporation 1994, 2008. All rights reserved.
ibm.com/developerWorks                                                                 developerWorks®


      you added wiki to the list of helpers for the Entries controller, and if you changed the
      entries view action to the one above, then in the entries view view, instead of using
      echo to output the content, you would use echo to output the result of passing the
      content through the wiki helper.


       <?php echo $wiki->render($entry['Entry']['content'])?>


      Save the view and view any entry. You should see no actual change; the entry
      should be rendered normally, just as before. However, now you have a helper you
      can use to render wiki markup across the application.

      This means you can replace the EntryRevisions view action with one more like the
      new one you wrote for the Entries controller. All you need to do is include the wiki
      helper and pass the content through $wiki render in the view. The same goes for
      using wiki markup in the Tasks controller: Include the wiki helper and pass the task
      description through $wiki render. You can even apply the same principle for the
      open blog you will write in this tutorial.


      Adding user profile links
      Changing the various task views to output links to user profiles instead of just user
      names should have been the easiest gap to fill. The code for it has appeared many
      times in the entry and upload views. It should look something like this:


       echo $html->link($task['User']['username'], '/users/view/'.$task['Task']['user_id']);


      The source code for this tutorial has updated task views that contain this code. You
      should either update your code with the code from the archive or, at the very least,
      compare the two sets of code to make sure you understand the changes before
      proceeding with the next task.


      Section 3. Creating the open blog
      In this section, we will create the open blog, thus allowing any user to post to the
      Criki blog.


      What is an open blog?
      To start, don't get too wrapped up in the terminology. It'll help to understand an open
      blog by specifying what is meant by blog in the first place.


The open blog
© Copyright IBM Corporation 1994, 2008. All rights reserved.                                 Page 7 of 25
developerWorks®                                                                         ibm.com/developerWorks


     A blog is basically a Web site where the content is generated by a user. Generally,
     the content is displayed with the newest information at the top. Frequently (but not
     always), readers are able to leave comments about specific blog postings, allowing
     for discussion.

     In an open blog, the content is not generated by a user. It's generated by any user.
     Conceptually, it's much like a cross between a forum -- where many users partake in
     threaded discussions -- and a blog. By allowing any user to post to the blog, you are
     further enhancing the open nature of Criki. It should be remembered that this can
     sometimes be a double-edge sword. Comment spam in blogs is an everyday
     problem. That problem could become significantly worse when you open up a blog
     to allow any user to post. If the open blog is external-facing, it will require more
     regular moderation and babysitting. If the open blog is internal-facing (such as an
     intranet), this is less of an issue.

     Keeping these potential pitfalls in mind, you can jump into the design work for the
     open blog.


     Doing the design
     As you did with the other parts of Criki, you should spend some time thinking
     through how the blog will work before you start writing code or building tables.

     For this open blog, some general principles will be adhered to:

                • Only registered users will be able to post, though anonymous users will
                  be able to comment.
                • Comments and posts will reside in distinct tables.
                • Editors can delete posts and comments from contributors. Administrators
                  can delete posts and comments from anyone.
                • The information that will be maintained for the blog will be minimal.
                • The blog will use the same wiki markup that has already been written.
     With these principles in mind, you should have some ideas for how the code will look
     and behave in the controllers. But don't jump ahead to that yet. You should get the
     database tables sorted out first.


     Building the blog database tables
     The open blog will consist of two tables. One table, called posts, will hold blog posts.
     The other table, called comments, will hold blog comments. One could argue
     successfully that posts and comments could reside in the same table, as a comment
     could be described as a post with no parent. But there are merits to keeping posts
     and comments segregated. For example, you can more easily change post or
     comment behavior without one affecting the other, you have more granular control


The open blog
Page 8 of 25                                           © Copyright IBM Corporation 1994, 2008. All rights reserved.
ibm.com/developerWorks                                                              developerWorks®


      over the way the controllers will behave, and you can more easily apply different
      sets of security rules.

      One of the directives is to keep the information being maintained minimal. Minimal
      does not imply Spartan. Finding the mix between "The least amount of useful
      information" and "The most information that can be recorded" is important. The least
      amount of useful information in a post would be content. Without content, there is no
      post. But you could go in ever-widening circles trying to catch all the information
      related to a post.

      A minimal posts table would need to record the following:

                • Id
                • Title
                • Content
                • Author
                • Access
                • Date
                • Ip
      The SQL to create the table might look like this:

      Listing 7. Posts table SQL

       CREATE TABLE 'posts' (
         'id' int(10) NOT NULL auto_increment,
         'title' varchar(255) NOT NULL default ,
         'content' text NOT NULL,
         'user_id' int(10) NOT NULL default '0',
         'access' tinyint(4) NOT NULL default '0',
         'date' datetime NOT NULL default '0000-00-00 00:00:00',
         'ip' varchar(15) NOT NULL default ,
         PRIMARY KEY ('id')
       ) ENGINE=MyISAM DEFAULT CHARSET=latin1 AUTO_INCREMENT=1 ;


      For the comments table, you need a different set of information:

                • Id
                • Post Id
                • Content
                • Author
                • Access
                • Date
                • Ip


The open blog
© Copyright IBM Corporation 1994, 2008. All rights reserved.                              Page 9 of 25
developerWorks®                                                                       ibm.com/developerWorks


     The SQL to create this table might look like this:

     Listing 8. Comments table SQL

       CREATE TABLE 'comments' (
         'id' int(10) NOT NULL auto_increment,
         'post_id' int(10) NOT NULL default '0',
         'content' text NOT NULL,
         'user_id' int(10) NOT NULL default '0',
         'access' tinyint(4) NOT NULL default '0',
         'date' datetime NOT NULL default '0000-00-00 00:00:00',
         'ip' varchar(15) NOT NULL default ,
         PRIMARY KEY ('id')
       ) ENGINE=MyISAM DEFAULT CHARSET=latin1 AUTO_INCREMENT=1 ;


     In both cases, you will notice the IP address is being recorded. For posts, this can
     be helpful for tracking problem users, but it's much more important for comments,
     where you will be allowing anonymous comments. What you may notice is the
     absence of tracking things like last modified, last read, hits, or comment count. Keep
     the application simple where you can. The extra data generally won't be necessary.

     Go ahead and create the tables, if you haven't already. Next, you write the models,
     bake the controllers and views, and dive in to building out your open blog.


     Section 4. Basic blog functionality
     By now, you've written a few models, and you should be pretty familiar with Bake. If
     you feel ambitious, you can write the controllers out by hand and skip the Bake
     section below. But you should at least read through the models information provided
     because the model associations for your blog tables are important.


     Writing the models
     You will need to define two models -- one for posts and one for comments. Setting
     up the associations for these models will be important and slightly differently model
     associations from what you've done before.

     The post model

     The post model will have two associations. It will have a belongsTo association to
     user, just like the entry and task models. But the post model will also have a
     hasMany association to comment. The code for the model might look like this:

     Listing 9. Post model

       <?php
       class Post extends AppModel {


The open blog
Page 10 of 25                                        © Copyright IBM Corporation 1994, 2008. All rights reserved.
ibm.com/developerWorks                                                              developerWorks®


                 var $name = 'Post';
                var $belongsTo = array('User' => array (
                  'className' => 'User',
                  'conditions' => ,
                  'order' => ,
                  'foreignKey' => 'user_id'
                )
              );
              var $hasMany = array('Comment' => array (
                'className' => 'Comment',
                'conditions' => ,
                'order' => 'Comment.date DESC',
                'foreignKey' => 'post_id'
              )
         );
       }
       ?>


      By setting up this hasMany association, you are able to get the post and comments
      all at once. The order key defined above will sort the comments for you.

      That takes care of the post model. The comment model looks a little different from
      what you might expect.

      The comment model

      It seems like the comment model would have two associations. A comment belongs
      to a user in the sense that the user was the author, and a comment belongs to a
      post, as the comment is tied to the post by ID. However, specifying the post
      association is not necessary in this context, as comments will not be retrieved
      outside the context of their parent posts, with the exception of editing comments,
      which does not require the post information. By not specifying the post association,
      you will save some query overhead.

      Listing 10. Comment model

       <?php
       class Comment extends AppModel {
             var $name = 'Comment';
            var $belongsTo = array('User' => array (
              'className' => 'User',
              'conditions' => ,
              'order' => ,
              'foreignKey' => 'user_id'
              )
          );
       }
       ?>


      Now that you've got your models sorted out, you can start baking.


      Baking the basics


The open blog
© Copyright IBM Corporation 1994, 2008. All rights reserved.                           Page 11 of 25
developerWorks®                                                                        ibm.com/developerWorks


     Since you used Bake in Parts 1 and 4 of this series, you don't need to be reminded
     that you need to make sure the PHP executable is in your PATH and that you have
     changed into the directory where you installed Cake.

     So, run bake, as shown below.


       php cakescriptsbake.php


     Walk through the menus baking the controllers for post and comment, then baking
     the views for post and comment. If you need a refresher on the Bake menus, consult
     Part 1 of this series (see Resources). Once everything is baked, you can jump right
     in to customizing the code.


     Customizing the code
     There are several things you need to change about the controller and view code that
     you just baked. A list of the principal changes will help you to understand the scope:

                • Comment and post add actions need to set the value of date.
                • Comment and post add and edit actions need to restrict the directly
                  editable fields.
                • Comment and post add and edit views need to display only editable
                  fields.
                • Comment view action and view can be removed.
                • Comment add, edit and delete actions should redirect the user to the
                  parent post.
                • Post view action needs to be modified to pull comments from the model.
                • Post view view need to be modified to display comments well.
                • Access checks should be made for post and comment edit and delete
                  actions.
     The code for each of these changes will be highlighted. Full details can be found in
     the source code.

     Setting date values

     Setting the value of the date fields in the posts or comments controller isn't difficult.
     Before the data is saved, you would need to set the date manually, for example, in
     the comments controller.


       $this->data['Comment']['date'] = date('Y-m-d H:i:s');
       if($this->Comment->save($this->data)) {
       ...


The open blog
Page 12 of 25                                         © Copyright IBM Corporation 1994, 2008. All rights reserved.
ibm.com/developerWorks                                                                   developerWorks®


      While you're already working with the fields, you may as well restrict the once that
      can be edited.

      Restricting editable fields

      Restricting the fields which the user can edit means more than just removing the
      fields from the related views -- though that's an excellent place to start. Actually,
      when you look at a post, the only fields a user should be able to edit are title and
      content. For a comment, a user should only be able to edit the content field.
      Everything else will be set by the controllers.

      Go through the add and edit views for posts and comments, and remove all but the
      fields mentioned above. You can also take the opportunity to remove the links to
      controllers or actions you don't need, such as the add user link in the comments edit
      view.

      But, as pointed out in the Criki so far section of this tutorial, removing the fields from
      the views is not enough to ensure that the user cannot modify the data. You should
      build a new array to hold the data to be saved and explicitly set the values for your
      fields. Building such an array for the posts controller will look like Listing 11.

      Listing 11. Building the data array for posts

       $savedata = array(
         'Post' => array (
           'title' => $this->data['Post']['title'],
           'content' => $this->data['Post']['content'],
           'user_id' => $user['id'],
           'access' => $user['access'],
           'date' => date('Y-m-d H:i:s'),
           'ip' => $_SERVER['REMOTE_ADDR'],
         )
       );


      Then, rather than saving $this>data, you would instead save $savedata. By
      following this method, you reduce the potential for a malicious user to force field
      editing you had not permitted.


      Redirecting to the parent post
      Within the comments controller, anytime a comment is added, edited or deleted,
      redirection should send the user back to the view action for the parent post. (You
      can delete the comments index and view actions, as the will not be used.)

      The actual process of redirecting the user to the parent post is simple, once you
      have the data you need (namely, the post_id for the comment). You already have
      to modify the comment add action, as you will be passing it the ID of the parent post,
      which means for Add, you will have the data you need. For the edit and delete
      actions, while you could pass the post_id in as a hidden form variable; it will be
      more secure to query for the comment by ID and read the post_id from the
      database. The user cannot edit post_id, so it will never change. For example, the


The open blog
© Copyright IBM Corporation 1994, 2008. All rights reserved.                                  Page 13 of 25
developerWorks®                                                                        ibm.com/developerWorks


     code to do this in the comment delete action looks like Listing 12.

     Listing 12. Comment delete action code snippet

       ...
       $comment = $this->Comment->findById($this->data['Comment']['id']);
       if ($comment) {
         if($this->Comment->del($id)) {
           $this->Session->setFlash('The Comment deleted: id '.$id.);
           $this->redirect('/posts/view/' . $comment['Comment']['post_id']);
         }
       } else {
         $this->Session->setFlash('Invalid id for Comment');
         $this->redirect('/posts/index');
       }
       ...


     Take a look at all the redirect statements in the comments controller found in the
     source code for more changes of this nature.


     Retrieving comments from within the posts controller
     For the posts view action, retrieving the post and the related comments will be two
     separate model requests. The first will retrieve the post and the user information.


       $post = $this->Post->read(null, $id);


     This request, if the model associations are set up properly, will actually get the post
     data, the user data for the post author, and the comments for the post. But the
     comments will not include the user data for each comment. Rather than open up a
     recursive can of worms, it's much simpler to just make an additional request.

     The second model request will retrieve the comments and comment user data for
     the post.

     Listing 13. Post view action code to retrieve comments data

       $post['Comment'] = $this->Post->Comment->findAll(
         'Comment.post_id = ' . $id . ' AND User.id = Comment.user_id',
         array('Comment.*', 'User.*'),
         'Comment.date DESC'
       );


     This findAll request is a little more complicated than findByFIELDNAME, but you
     are also exercising a bit more control over things like sort order. Sorting the
     comments in descending order by date will mean less scrolling for the end user. If
     you prefer to have the comments displayed in ascending order by date, you could
     use findByPostIt and save users a little typing.

     If you look at the posts index action, you will see it also is passing additional data to
     findAll to sort the posts in descending order by date.


The open blog
Page 14 of 25                                         © Copyright IBM Corporation 1994, 2008. All rights reserved.
ibm.com/developerWorks                                                                developerWorks®


      Displaying comments
      Last, but not least, you will need to modify theposts view view. Not only do you need
      to account for the new data structure but the comments should be reformatted into
      something more readable. Fully reproducing the code here is impractical, but look at
      Listing 14 to see how the comment iteration code looks.

      Listing 14. Posts view view amendment

       <?php if(!empty($post['Comment'])):?>
       <div class="related">
       <h2>Comments</h2>
       <?php foreach($post['Comment'] as $comment):?>
       <hr />
       <h4>
       By <?php echo $html->link($comment['User']['username'], '/users/view/'
       .$comment['User']['id'])?>
       on <?php echo $comment['Comment']['date']?>
       [
       <? php echo $html->link('Edit Comment', '/comments/edit/' . $comment['Comment']['id']) ?>
       |
       <?php echo $html->link('Delete Comment', '/comments/delete/' . $comment['Comment']['id'],
       null, 'Are you sure you want to delete this comment?')
       ?>
       ]
       </h4>
       <br />
       <p>
       <?php echo $wiki->render($comment['Comment']['content']) ?>
       </p>
       <?php endforeach; ?>
       <hr />
       </div>
       <?php endif; ?>


      Check the posts index view in the source code for more.


      Access checks
      As you have done with the tasks and entries parts of Criki, you will need to
      implement some access control within blog. Specifically, the following principles will
      apply:

                • A user must be logged in to post.
                • A user need not be logged in to comment.
                • A user may always edit or delete his own posts or comments.
                • Any user with an access level the access level of the post or comment
                  may perform delete actions.
      An example will be provided below and in the code of applying these principles to
      the post edit action. From there, you should be able to apply access checks to the
      comment edit action, as well as the post and comment delete actions.


The open blog
© Copyright IBM Corporation 1994, 2008. All rights reserved.                              Page 15 of 25
developerWorks®                                                                      ibm.com/developerWorks


     The process is should be a familiar one. You have already amended the edit views
     to only show the fields that can be edited. You will need to amend the posts edit
     action to perform the access check. You will need to amend the posts index and
     view actions to set variables used by the views to show/hide links. You will need to
     amend the posts index and view views to take advantage of these variables.


     Amending the posts edit action
     You will recall that the user data is already being pulled from session during the
     posts edit action.

     Listing 15. Posts edit action revisited

       $user = $this->Session->read('User');
         $savedata = array(
           'Post' => array (
           'id' => $this->data['Post']['id'],
           'title' => $this->data['Post']['title'],
           'content' => $this->data['Post']['content'],
           'user_id' => $user['id'],
           'access' => $user['access'],
           'ip' => $_SERVER['REMOTE_ADDR'],
         )
       );


     Performing the access check for the edit action will mean pulling the post information
     from the database and checking for access. In this case, the user may only edit the
     post if the user was the author. If you were checking a delete action, you would also
     pull the user information from the database and check to make sure the user access
     was greater than the post access.

     Listing 16. Post edit action revised

       $post = $this->Post->findById($this->data['Post']['id']);
       if ($post['Post']['user_id'] == $user['id']) {
         $savedata = array(
           'Post' => array (
             'id' => $this->data['Post']['id'],
             'title' => $this->data['Post']['title'],
             'content' => $this->data['Post']['content'],
             'user_id' => $user['id'],
             'access' => $user['access'],
             'ip' => $_SERVER['REMOTE_ADDR'],
           )
         );
         if($this->Post->save($savedata)) {
           $this->Session->setFlash('The Post has been saved');
           $this->redirect('/posts/index');
         } else {
           $this->Session->setFlash('Please correct errors below.');
           $this->set('users', $this->Post->User->generateList());
         }
       } else {
         $this->Session->setFlash('You cannot edit this post.');
         $this->redirect('/posts/index');
       }


     This will protect the post from being edited by anyone but the author. Now you


The open blog
Page 16 of 25                                       © Copyright IBM Corporation 1994, 2008. All rights reserved.
ibm.com/developerWorks                                                                   developerWorks®


      should make sure you don't show edit links to anyone but the author.


      Amending the posts index and view actions
      To allow the index and view actions to make decisions about showing or not
      showing the edit post link, you need to tell the posts controller to set a variable that
      the index and view views can use. The easiest way to do this is to retrieve the user
      data and set it as a variable. To do this in the index action, see Listing 17.

      Listing 17. Index action setting user data

       function index() {
         $this->Post->recursive = 0;
         $this->set('posts', $this->Post->findAll(
           'Post.user_id = User.id AND Post.id',
           array('Post.*', 'User.*'),
           'Post.date DESC'
         ));
         $this->set('user', $this->Session->read('User'));
       }


      The posts index view can access the variable $user and make decisions based on
      the user data about showing or hiding the edit post links.


      Amending the posts index and view views
      You've got the user data into your view. Using it to show or hide the edit post link is
      as easy as, well, Cake. See the posts index view below.

      Listing 18. Conditionally showing the edit post link

       <?php
       if ($user['id'] == $post['User']['id']) {
         echo $html->link('Edit','/posts/edit/' . $post['Post']['id']);
       }
       ?>


      The same code for the posts view view will look only marginally different from this,
      as indicated by the code in the source code.

      That's really all there is to it. Take it for a spin. Log in as different users and create
      some posts, testing out the access controls you've put in place to protect the posts
      from being edited. After you've done that, apply the same principles and add access
      controls to the posts and comments controller for delete actions (users with higher
      clearance or original author), comment edit actions (original author), post add
      (registered and logged in user), etc. Keep in mind the lessons you've learned, and
      you should be in good shape.


The open blog
© Copyright IBM Corporation 1994, 2008. All rights reserved.                                Page 17 of 25
developerWorks®                                                                        ibm.com/developerWorks


     Section 5. Configuration options
     In Part 1, you created a table called settings, which was designed as a sort of
     Entity-Attribute-Value table to hold specific configuration settings, allowing the
     administrator granular control over specifics like "Who can create a new Entry" and
     "Valid file upload types." Now that you have your primary Criki features in place, you
     can turn your attention to putting some of these settings into place.

     Gathering all of these configuration settings into a list will give you an idea for what
     is in play:

                • Editor promotion/demotion rights
                • Registration rights
                • Invitation rights
                • Page creation permissions (who can create a page?)
                • Page edit permissions
                • Valid file upload types
     You will walk through implementing one of the configuration options: page creation
     permissions. From there, you should be able to set up any individual settings and
     add new ones.


     Tweaking the settings controller
     Depending on the version of Cake you used to bake your settings controller, you
     may need to go through the controller and verify that all of the redirect statements
     point to the settings controller (plural), not the setting controller. The redirect
     statements should look like the code below.


       $this->redirect('/settings/index');


     You will want to come back to this controller later to add access controls, so only
     administrators can change or add settings.


     Adding a setting
     Adding a new setting is fairly simple. You can later decide to change the views or
     add data validation to facilitate or streamline the process, but the views as they were
     baked are sufficient.

     The add setting view contains four fields: Name, Value, Default, and Description.


The open blog
Page 18 of 25                                         © Copyright IBM Corporation 1994, 2008. All rights reserved.
ibm.com/developerWorks                                                                  developerWorks®


      The Name field will be used to reference the setting in the code. It should be a single
      word with no spaces, such as entryCreatePermission.

      The Value field holds the value for the setting. You determine what is and isn't a
      valid value, but you will probably find it helpful in the long term to make the values
      easy to comprehend. In this case, the entryCreatePermission setting will be
      used to identify the minimum user type that can create an entry. Valid values for this
      field might be anyone -- contributors, editors, administrators.

      The Default field is used to maintain the original value for the setting, so an
      administrator has the capacity to restore the defaults.

      The Description field should be used to sum up the purpose of the field and list the
      valid values for the setting.

      Adding the entryCreatePermission setting might look like this:

      Figure 1. Adding the entryCreatePermission setting


      Retrieving and caching the settings
      Retrieving the settings is easy. You can simply add the setting model to the $uses


The open blog
© Copyright IBM Corporation 1994, 2008. All rights reserved.                               Page 19 of 25
developerWorks®                                                                       ibm.com/developerWorks


     class variable much like you did with the EntryRevisions and UploadRevisions
     controllers. Add the setting model to the entries controller.

     Listing 19. Adding the setting model to the entries controller

       $settings = cache(FILENAME);
       if (!$settings) {
         $settings = $this->Entry->Setting->findAll();
         cache(FILENAME, $settings);
       }


     It wouldn't be efficient to keep querying the database to get the settings every time
     you want to access them. Instead, what you'll do is add a method to the setting
     model to cache the settings data.


     Adding the cacheSettings method to the model
     The CakePHP cache function serves two purposes. If you pass in only a filename,
     such as cache('settings'), Cake will check the Cake tmp directory for the file,
     and, if found, the cache function will use file_get_contents to return the
     contents of the file.

     If you pass a filename and a second variable that holds data, such as
     cache('settings', $anArray), Cake will use file_put_contents to write
     the data to the filename specified within Cake's tmp directory. The default life of the
     cache would be one day. You can pass in a third parameter, consisting of any date
     representation that can be interpreted by strtotime.

     The method you will add to the setting model will be called cacheSettings. Like
     the cache function, this method will return the settings from the cache, or if a $data
     parameter is set, this method will write the data to the cache. You can only pass a
     string to put_file_contents, so you need to flatten or serialize the array first.

     When you retrieve the data from the cache, it may be helpful to reformat the settings
     array into something more shallow, as well.

     The cacheSettings method might look something like Listing 20.

     Listing 20. cacheSettings method in the settings model

       function cacheSettings($data = null) {
         if ($data != null) {
           cache('settings', serialize($data));
         } else {
           $data = cache('settings');
           if ($data == null) {
             $data = $this->findAll();
             cache('settings', serialize($data));
           } else {
             $data = unserialize($data);
           }
         }
         foreach ($data as $key => $value) {
           $return[$value['Setting']['name']] = $value['Setting']['value'];


The open blog
Page 20 of 25                                        © Copyright IBM Corporation 1994, 2008. All rights reserved.
ibm.com/developerWorks                                                                      developerWorks®


           }
           return $return;
       }


      Using this method, you can save unnecessary database calls to get the value of an
      individual setting. Now that you can get the settings, you can put them to work.


      Using the page creation setting
      Retrieving and using this setting involves calling the cacheSettings method and
      applying some logic to the settings. For example, in the entries controller, if you
      wanted to verify the entryCreatePermission value allowed for anyone to create
      a new entry, you might do something like Listing 21.

      Listing 21. Checking against the entryCreatePermission setting

       $user_id = 0;
       if ($this->Session->check('User')) {
         $user = $this->Session->read('User');
         $user_id = $user['id'];
       }
       $settings = $this->Setting->cacheSettings();
       if ($settings['entryCreatePermission'] != 'anyone' && $user_id == 0) {
         $this->Session->setFlash('You must be a Contributor to create a new entry.');
         $this->redirect('/entries/index');
         exit();
       }


      This is a fairly basic overview of how to get and use your settings. How you decide
      to implement them is entirely up to you. You have a whole list of settings you can
      use for practice.


      Filling in the gaps
      You've gotten a lot done. But there's still tons of room for improvement within the
      Criki application. For example:


             1.     The access controls for the open blog in the code archive are incomplete.
                    You still need to add access controls that protect the delete actions on the
                    posts and comments controllers, and an access control is needed to
                    ensure that only logged-in users can post. Build out these access
                    controls.

             2.     There is a lot of settings and configuration work that you can put to use.
                    Try implementing a few and see how you do.

             3.     The settings controller is entirely unprotected. You should really do
                    something about that.

             4.     New settings won't make it into the cache until the existing cache expires.


The open blog
© Copyright IBM Corporation 1994, 2008. All rights reserved.                                   Page 21 of 25
developerWorks®                                                                        ibm.com/developerWorks


                  You should have the settings controller recache the settings whenever
                  one is added, edited, or deleted.

     Happy coding!


     Section 6. Summary
     You did it! You've completed this "Create an interactive production wiki using PHP"
     tutorial series and built your own wiki engine from scratch. If it feels like you've just
     scratched the surface, that's because you have loads of room to add new things to
     Criki.

     Or, you may feel like tearing it all back down and building a bigger and better wiki
     engine than Criki could ever be. Go for it! Tear it all down and build it back up again
     your own way. The experience will teach you much.

     But maybe that's not the case. Maybe you'd rather build on the work you've already
     done. That's great! Make Criki better. Build out the features of your dreams.


The open blog
Page 22 of 25                                         © Copyright IBM Corporation 1994, 2008. All rights reserved.
ibm.com/developerWorks                                                                         developerWorks®


      Downloads
       Description                                         Name             Size     Download method
      Part 5 source code                                   os-php-wiki5.source.zip
                                                                            32KB     HTTP

       Information about download methods


The open blog
© Copyright IBM Corporation 1994, 2008. All rights reserved.                                      Page 23 of 25
developerWorks®                                                                       ibm.com/developerWorks


     Resources
     Learn
        • Read Part 1, Part 2, Part 3, and Part 4 of this "Create an interactive production
          wiki using PHP" series.
        • Check out the Wikipedia entry for wiki.
        • Check out WikiWikiWeb for a good discussion about wikis.
        • Visit the official home of CakePHP.
        • Check out the "Cook up Web sites fast with CakePHP" tutorial series for a good
          place to get started.
        • The CakePHP API has been thoroughly documented. This is the place to get
          the most up-to-date documentation for CakePHP.
        • There's a ton of information available at The Bakery, the CakePHP user
          community.
        • Find out more about how PHP handles sessions.
        • Check out the official PHP documentation.
        • Read the five-part "Mastering Ajax" series on developerWorks for a
          comprehensive overview of Ajax.
        • Check out the "Considering Ajax" series to learn what developers need to know
          before using Ajax techniques when creating a Web site.
        • CakePHP Data Validation uses PHP Perl-compatible regular expressions.
        • See a tutorial on "How to use regular expressions in PHP."
        • Want to learn more about design patterns? Check out Design Patterns:
          Elements of Reusable Object-Oriented Software , also known as the "Gang Of
          Four" book.
        • Check out the Model-View-Controller on Wikipedia.
        • Here is more useful background on the Model-View-Controller.
        • Here's a whole list of different types of software design patterns.
        • Read about Design patterns.
        • PHP.net is the resource for PHP developers.
        • Check out the "Recommended PHP reading list."
        • Browse all the PHP content on developerWorks.
        • Expand your PHP skills by checking out IBM developerWorks' PHP project
          resources.
        • To listen to interesting interviews and discussions for software developers,


The open blog
Page 24 of 25                                        © Copyright IBM Corporation 1994, 2008. All rights reserved.
ibm.com/developerWorks                                                            developerWorks®


             check out developerWorks podcasts.
         • Stay current with developerWorks' Technical events and webcasts.
         • Check out upcoming conferences, trade shows, webcasts, and other Events
           around the world that are of interest to IBM open source developers.
         • Visit the developerWorks Open source zone for extensive how-to information,
           tools, and project updates to help you develop with open source technologies
           and use them with IBM's products.
      Get products and technologies
         • Innovate your next open source development project with IBM trial software,
           available for download or on DVD.
      Discuss
         • Participate in developerWorks blogs and get involved in the developerWorks
           community.
         • Participate in the developerWorks PHP Developer Forum.


      About the author
      Duane O'Brien
      Duane O'Brien has been a technological Swiss Army knife since the Oregon Trail
      was text only. His favorite color is sushi. He has never been to the moon.


The open blog
© Copyright IBM Corporation 1994, 2008. All rights reserved.                             Page 25 of 25

Weitere ähnliche Inhalte

Was ist angesagt?

Enhanced Workflows in Cascade Server by Leah Einecker
Enhanced Workflows in Cascade Server by Leah EineckerEnhanced Workflows in Cascade Server by Leah Einecker
Enhanced Workflows in Cascade Server by Leah Eineckerhannonhill
 
Take Your XPages Development to the Next Level
Take Your XPages Development to the Next LevelTake Your XPages Development to the Next Level
Take Your XPages Development to the Next Levelbalassaitis
 
Task scheduling in laravel 8 tutorial
Task scheduling in laravel 8 tutorialTask scheduling in laravel 8 tutorial
Task scheduling in laravel 8 tutorialKaty Slemon
 
Finally, Professional Frontend Dev with ReactJS, WebPack & Symfony (Symfony C...
Finally, Professional Frontend Dev with ReactJS, WebPack & Symfony (Symfony C...Finally, Professional Frontend Dev with ReactJS, WebPack & Symfony (Symfony C...
Finally, Professional Frontend Dev with ReactJS, WebPack & Symfony (Symfony C...Ryan Weaver
 
Skillwise-Spring framework 1
Skillwise-Spring framework 1Skillwise-Spring framework 1
Skillwise-Spring framework 1Skillwise Group
 
New Component Patterns in Ember.js
New Component Patterns in Ember.jsNew Component Patterns in Ember.js
New Component Patterns in Ember.jsMatthew Beale
 
Symfony Live 2018 - Développez votre frontend avec ReactJS et Symfony Webpack...
Symfony Live 2018 - Développez votre frontend avec ReactJS et Symfony Webpack...Symfony Live 2018 - Développez votre frontend avec ReactJS et Symfony Webpack...
Symfony Live 2018 - Développez votre frontend avec ReactJS et Symfony Webpack...Alain Hippolyte
 
Node JS Express : Steps to Create Restful Web App
Node JS Express : Steps to Create Restful Web AppNode JS Express : Steps to Create Restful Web App
Node JS Express : Steps to Create Restful Web AppEdureka!
 
Implementing auto complete using JQuery
Implementing auto complete using JQueryImplementing auto complete using JQuery
Implementing auto complete using JQueryBhushan Mulmule
 
Creating Your First WordPress Plugin
Creating Your First WordPress PluginCreating Your First WordPress Plugin
Creating Your First WordPress PluginBrad Williams
 
Utiliser Webpack dans une application Symfony
Utiliser Webpack dans une application SymfonyUtiliser Webpack dans une application Symfony
Utiliser Webpack dans une application SymfonyAlain Hippolyte
 
Tumbleweed intro
Tumbleweed introTumbleweed intro
Tumbleweed introRich Helton
 
Laravel - Website Development in Php Framework.
Laravel - Website Development in Php Framework.Laravel - Website Development in Php Framework.
Laravel - Website Development in Php Framework.SWAAM Tech
 
Adventures in Laravel 5 SunshinePHP 2016 Tutorial
Adventures in Laravel 5 SunshinePHP 2016 TutorialAdventures in Laravel 5 SunshinePHP 2016 Tutorial
Adventures in Laravel 5 SunshinePHP 2016 TutorialJoe Ferguson
 

Was ist angesagt? (20)

Tomcat + other things
Tomcat + other thingsTomcat + other things
Tomcat + other things
 
JSP Error handling
JSP Error handlingJSP Error handling
JSP Error handling
 
Enhanced Workflows in Cascade Server by Leah Einecker
Enhanced Workflows in Cascade Server by Leah EineckerEnhanced Workflows in Cascade Server by Leah Einecker
Enhanced Workflows in Cascade Server by Leah Einecker
 
Take Your XPages Development to the Next Level
Take Your XPages Development to the Next LevelTake Your XPages Development to the Next Level
Take Your XPages Development to the Next Level
 
Task scheduling in laravel 8 tutorial
Task scheduling in laravel 8 tutorialTask scheduling in laravel 8 tutorial
Task scheduling in laravel 8 tutorial
 
Writing first-hudson-plugin
Writing first-hudson-pluginWriting first-hudson-plugin
Writing first-hudson-plugin
 
JEE Programming - 04 Java Servlets
JEE Programming - 04 Java ServletsJEE Programming - 04 Java Servlets
JEE Programming - 04 Java Servlets
 
Finally, Professional Frontend Dev with ReactJS, WebPack & Symfony (Symfony C...
Finally, Professional Frontend Dev with ReactJS, WebPack & Symfony (Symfony C...Finally, Professional Frontend Dev with ReactJS, WebPack & Symfony (Symfony C...
Finally, Professional Frontend Dev with ReactJS, WebPack & Symfony (Symfony C...
 
Skillwise-Spring framework 1
Skillwise-Spring framework 1Skillwise-Spring framework 1
Skillwise-Spring framework 1
 
New Component Patterns in Ember.js
New Component Patterns in Ember.jsNew Component Patterns in Ember.js
New Component Patterns in Ember.js
 
Symfony Live 2018 - Développez votre frontend avec ReactJS et Symfony Webpack...
Symfony Live 2018 - Développez votre frontend avec ReactJS et Symfony Webpack...Symfony Live 2018 - Développez votre frontend avec ReactJS et Symfony Webpack...
Symfony Live 2018 - Développez votre frontend avec ReactJS et Symfony Webpack...
 
Node JS Express : Steps to Create Restful Web App
Node JS Express : Steps to Create Restful Web AppNode JS Express : Steps to Create Restful Web App
Node JS Express : Steps to Create Restful Web App
 
CakePHP
CakePHPCakePHP
CakePHP
 
Implementing auto complete using JQuery
Implementing auto complete using JQueryImplementing auto complete using JQuery
Implementing auto complete using JQuery
 
Creating Your First WordPress Plugin
Creating Your First WordPress PluginCreating Your First WordPress Plugin
Creating Your First WordPress Plugin
 
Utiliser Webpack dans une application Symfony
Utiliser Webpack dans une application SymfonyUtiliser Webpack dans une application Symfony
Utiliser Webpack dans une application Symfony
 
Tumbleweed intro
Tumbleweed introTumbleweed intro
Tumbleweed intro
 
Laravel - Website Development in Php Framework.
Laravel - Website Development in Php Framework.Laravel - Website Development in Php Framework.
Laravel - Website Development in Php Framework.
 
Flask
FlaskFlask
Flask
 
Adventures in Laravel 5 SunshinePHP 2016 Tutorial
Adventures in Laravel 5 SunshinePHP 2016 TutorialAdventures in Laravel 5 SunshinePHP 2016 Tutorial
Adventures in Laravel 5 SunshinePHP 2016 Tutorial
 

Ähnlich wie os-php-wiki5-a4

Cakephp's Cache
Cakephp's CacheCakephp's Cache
Cakephp's Cachevl
 
Intro to drupal_7_architecture
Intro to drupal_7_architectureIntro to drupal_7_architecture
Intro to drupal_7_architectureHai Vo Hoang
 
Lab #9 and 10 Web Server ProgrammingCreate a New Folder I s.docx
Lab #9 and 10 Web Server ProgrammingCreate a New Folder  I s.docxLab #9 and 10 Web Server ProgrammingCreate a New Folder  I s.docx
Lab #9 and 10 Web Server ProgrammingCreate a New Folder I s.docxDIPESH30
 
Module 4: Introduction to ASP.NET 3.5 (Material)
Module 4: Introduction to ASP.NET 3.5 (Material)Module 4: Introduction to ASP.NET 3.5 (Material)
Module 4: Introduction to ASP.NET 3.5 (Material)Mohamed Saleh
 
Get things done with Yii - quickly build webapplications
Get things done with Yii - quickly build webapplicationsGet things done with Yii - quickly build webapplications
Get things done with Yii - quickly build webapplicationsGiuliano Iacobelli
 
IRJET- Lightweight MVC Framework in PHP
IRJET- Lightweight MVC Framework in PHPIRJET- Lightweight MVC Framework in PHP
IRJET- Lightweight MVC Framework in PHPIRJET Journal
 
Developing Java Web Applications
Developing Java Web ApplicationsDeveloping Java Web Applications
Developing Java Web Applicationshchen1
 
5a329780735625624 ch10
5a329780735625624 ch105a329780735625624 ch10
5a329780735625624 ch10harkesh singh
 
ChircuVictor StefircaMadalin rad_aspmvc3_wcf_vs2010
ChircuVictor StefircaMadalin rad_aspmvc3_wcf_vs2010ChircuVictor StefircaMadalin rad_aspmvc3_wcf_vs2010
ChircuVictor StefircaMadalin rad_aspmvc3_wcf_vs2010vchircu
 
Symfony2 Introduction Presentation
Symfony2 Introduction PresentationSymfony2 Introduction Presentation
Symfony2 Introduction PresentationNerd Tzanetopoulos
 
CONTENT MANAGEMENT SYSTEM
CONTENT MANAGEMENT SYSTEMCONTENT MANAGEMENT SYSTEM
CONTENT MANAGEMENT SYSTEMANAND PRAKASH
 
Generic Repository Pattern in MVC3 Application with Entity Framework
Generic Repository Pattern in MVC3 Application with Entity FrameworkGeneric Repository Pattern in MVC3 Application with Entity Framework
Generic Repository Pattern in MVC3 Application with Entity FrameworkAkhil Mittal
 
Asp dot-net core problems and fixes
Asp dot-net core problems and fixes Asp dot-net core problems and fixes
Asp dot-net core problems and fixes sonia merchant
 
Part 3 web development
Part 3 web developmentPart 3 web development
Part 3 web developmenttechbed
 

Ähnlich wie os-php-wiki5-a4 (20)

Cakephp's Cache
Cakephp's CacheCakephp's Cache
Cakephp's Cache
 
Manual 5
Manual 5Manual 5
Manual 5
 
Intro to drupal_7_architecture
Intro to drupal_7_architectureIntro to drupal_7_architecture
Intro to drupal_7_architecture
 
Refresh controller
Refresh controllerRefresh controller
Refresh controller
 
Wordpress as a framework
Wordpress as a frameworkWordpress as a framework
Wordpress as a framework
 
Os php-wiki1-pdf
Os php-wiki1-pdfOs php-wiki1-pdf
Os php-wiki1-pdf
 
Lab #9 and 10 Web Server ProgrammingCreate a New Folder I s.docx
Lab #9 and 10 Web Server ProgrammingCreate a New Folder  I s.docxLab #9 and 10 Web Server ProgrammingCreate a New Folder  I s.docx
Lab #9 and 10 Web Server ProgrammingCreate a New Folder I s.docx
 
Module 4: Introduction to ASP.NET 3.5 (Material)
Module 4: Introduction to ASP.NET 3.5 (Material)Module 4: Introduction to ASP.NET 3.5 (Material)
Module 4: Introduction to ASP.NET 3.5 (Material)
 
Introduction to jQuery
Introduction to jQueryIntroduction to jQuery
Introduction to jQuery
 
Get things done with Yii - quickly build webapplications
Get things done with Yii - quickly build webapplicationsGet things done with Yii - quickly build webapplications
Get things done with Yii - quickly build webapplications
 
IRJET- Lightweight MVC Framework in PHP
IRJET- Lightweight MVC Framework in PHPIRJET- Lightweight MVC Framework in PHP
IRJET- Lightweight MVC Framework in PHP
 
Developing Java Web Applications
Developing Java Web ApplicationsDeveloping Java Web Applications
Developing Java Web Applications
 
5a329780735625624 ch10
5a329780735625624 ch105a329780735625624 ch10
5a329780735625624 ch10
 
ChircuVictor StefircaMadalin rad_aspmvc3_wcf_vs2010
ChircuVictor StefircaMadalin rad_aspmvc3_wcf_vs2010ChircuVictor StefircaMadalin rad_aspmvc3_wcf_vs2010
ChircuVictor StefircaMadalin rad_aspmvc3_wcf_vs2010
 
Symfony2 Introduction Presentation
Symfony2 Introduction PresentationSymfony2 Introduction Presentation
Symfony2 Introduction Presentation
 
CONTENT MANAGEMENT SYSTEM
CONTENT MANAGEMENT SYSTEMCONTENT MANAGEMENT SYSTEM
CONTENT MANAGEMENT SYSTEM
 
Generic Repository Pattern in MVC3 Application with Entity Framework
Generic Repository Pattern in MVC3 Application with Entity FrameworkGeneric Repository Pattern in MVC3 Application with Entity Framework
Generic Repository Pattern in MVC3 Application with Entity Framework
 
WebGUI Developers Workshop
WebGUI Developers WorkshopWebGUI Developers Workshop
WebGUI Developers Workshop
 
Asp dot-net core problems and fixes
Asp dot-net core problems and fixes Asp dot-net core problems and fixes
Asp dot-net core problems and fixes
 
Part 3 web development
Part 3 web developmentPart 3 web development
Part 3 web development
 

Mehr von tutorialsruby

&lt;img src="../i/r_14.png" />
&lt;img src="../i/r_14.png" />&lt;img src="../i/r_14.png" />
&lt;img src="../i/r_14.png" />tutorialsruby
 
TopStyle Help &amp; &lt;b>Tutorial&lt;/b>
TopStyle Help &amp; &lt;b>Tutorial&lt;/b>TopStyle Help &amp; &lt;b>Tutorial&lt;/b>
TopStyle Help &amp; &lt;b>Tutorial&lt;/b>tutorialsruby
 
The Art Institute of Atlanta IMD 210 Fundamentals of Scripting &lt;b>...&lt;/b>
The Art Institute of Atlanta IMD 210 Fundamentals of Scripting &lt;b>...&lt;/b>The Art Institute of Atlanta IMD 210 Fundamentals of Scripting &lt;b>...&lt;/b>
The Art Institute of Atlanta IMD 210 Fundamentals of Scripting &lt;b>...&lt;/b>tutorialsruby
 
&lt;img src="../i/r_14.png" />
&lt;img src="../i/r_14.png" />&lt;img src="../i/r_14.png" />
&lt;img src="../i/r_14.png" />tutorialsruby
 
&lt;img src="../i/r_14.png" />
&lt;img src="../i/r_14.png" />&lt;img src="../i/r_14.png" />
&lt;img src="../i/r_14.png" />tutorialsruby
 
Standardization and Knowledge Transfer – INS0
Standardization and Knowledge Transfer – INS0Standardization and Knowledge Transfer – INS0
Standardization and Knowledge Transfer – INS0tutorialsruby
 
0047ecaa6ea3e9ac0a13a2fe96f4de3bfd515c88f5d90c1fae79b956363d7f02c7fa060269
0047ecaa6ea3e9ac0a13a2fe96f4de3bfd515c88f5d90c1fae79b956363d7f02c7fa0602690047ecaa6ea3e9ac0a13a2fe96f4de3bfd515c88f5d90c1fae79b956363d7f02c7fa060269
0047ecaa6ea3e9ac0a13a2fe96f4de3bfd515c88f5d90c1fae79b956363d7f02c7fa060269tutorialsruby
 
BloggingWithStyle_2008
BloggingWithStyle_2008BloggingWithStyle_2008
BloggingWithStyle_2008tutorialsruby
 
BloggingWithStyle_2008
BloggingWithStyle_2008BloggingWithStyle_2008
BloggingWithStyle_2008tutorialsruby
 
cascadingstylesheets
cascadingstylesheetscascadingstylesheets
cascadingstylesheetstutorialsruby
 
cascadingstylesheets
cascadingstylesheetscascadingstylesheets
cascadingstylesheetstutorialsruby
 

Mehr von tutorialsruby (20)

&lt;img src="../i/r_14.png" />
&lt;img src="../i/r_14.png" />&lt;img src="../i/r_14.png" />
&lt;img src="../i/r_14.png" />
 
TopStyle Help &amp; &lt;b>Tutorial&lt;/b>
TopStyle Help &amp; &lt;b>Tutorial&lt;/b>TopStyle Help &amp; &lt;b>Tutorial&lt;/b>
TopStyle Help &amp; &lt;b>Tutorial&lt;/b>
 
The Art Institute of Atlanta IMD 210 Fundamentals of Scripting &lt;b>...&lt;/b>
The Art Institute of Atlanta IMD 210 Fundamentals of Scripting &lt;b>...&lt;/b>The Art Institute of Atlanta IMD 210 Fundamentals of Scripting &lt;b>...&lt;/b>
The Art Institute of Atlanta IMD 210 Fundamentals of Scripting &lt;b>...&lt;/b>
 
&lt;img src="../i/r_14.png" />
&lt;img src="../i/r_14.png" />&lt;img src="../i/r_14.png" />
&lt;img src="../i/r_14.png" />
 
&lt;img src="../i/r_14.png" />
&lt;img src="../i/r_14.png" />&lt;img src="../i/r_14.png" />
&lt;img src="../i/r_14.png" />
 
Standardization and Knowledge Transfer – INS0
Standardization and Knowledge Transfer – INS0Standardization and Knowledge Transfer – INS0
Standardization and Knowledge Transfer – INS0
 
xhtml_basics
xhtml_basicsxhtml_basics
xhtml_basics
 
xhtml_basics
xhtml_basicsxhtml_basics
xhtml_basics
 
xhtml-documentation
xhtml-documentationxhtml-documentation
xhtml-documentation
 
xhtml-documentation
xhtml-documentationxhtml-documentation
xhtml-documentation
 
CSS
CSSCSS
CSS
 
CSS
CSSCSS
CSS
 
0047ecaa6ea3e9ac0a13a2fe96f4de3bfd515c88f5d90c1fae79b956363d7f02c7fa060269
0047ecaa6ea3e9ac0a13a2fe96f4de3bfd515c88f5d90c1fae79b956363d7f02c7fa0602690047ecaa6ea3e9ac0a13a2fe96f4de3bfd515c88f5d90c1fae79b956363d7f02c7fa060269
0047ecaa6ea3e9ac0a13a2fe96f4de3bfd515c88f5d90c1fae79b956363d7f02c7fa060269
 
0047ecaa6ea3e9ac0a13a2fe96f4de3bfd515c88f5d90c1fae79b956363d7f02c7fa060269
0047ecaa6ea3e9ac0a13a2fe96f4de3bfd515c88f5d90c1fae79b956363d7f02c7fa0602690047ecaa6ea3e9ac0a13a2fe96f4de3bfd515c88f5d90c1fae79b956363d7f02c7fa060269
0047ecaa6ea3e9ac0a13a2fe96f4de3bfd515c88f5d90c1fae79b956363d7f02c7fa060269
 
HowTo_CSS
HowTo_CSSHowTo_CSS
HowTo_CSS
 
HowTo_CSS
HowTo_CSSHowTo_CSS
HowTo_CSS
 
BloggingWithStyle_2008
BloggingWithStyle_2008BloggingWithStyle_2008
BloggingWithStyle_2008
 
BloggingWithStyle_2008
BloggingWithStyle_2008BloggingWithStyle_2008
BloggingWithStyle_2008
 
cascadingstylesheets
cascadingstylesheetscascadingstylesheets
cascadingstylesheets
 
cascadingstylesheets
cascadingstylesheetscascadingstylesheets
cascadingstylesheets
 

Kürzlich hochgeladen

My INSURER PTE LTD - Insurtech Innovation Award 2024
My INSURER PTE LTD - Insurtech Innovation Award 2024My INSURER PTE LTD - Insurtech Innovation Award 2024
My INSURER PTE LTD - Insurtech Innovation Award 2024The Digital Insurer
 
Integration and Automation in Practice: CI/CD in Mule Integration and Automat...
Integration and Automation in Practice: CI/CD in Mule Integration and Automat...Integration and Automation in Practice: CI/CD in Mule Integration and Automat...
Integration and Automation in Practice: CI/CD in Mule Integration and Automat...Patryk Bandurski
 
Developer Data Modeling Mistakes: From Postgres to NoSQL
Developer Data Modeling Mistakes: From Postgres to NoSQLDeveloper Data Modeling Mistakes: From Postgres to NoSQL
Developer Data Modeling Mistakes: From Postgres to NoSQLScyllaDB
 
Advanced Test Driven-Development @ php[tek] 2024
Advanced Test Driven-Development @ php[tek] 2024Advanced Test Driven-Development @ php[tek] 2024
Advanced Test Driven-Development @ php[tek] 2024Scott Keck-Warren
 
Search Engine Optimization SEO PDF for 2024.pdf
Search Engine Optimization SEO PDF for 2024.pdfSearch Engine Optimization SEO PDF for 2024.pdf
Search Engine Optimization SEO PDF for 2024.pdfRankYa
 
DevoxxFR 2024 Reproducible Builds with Apache Maven
DevoxxFR 2024 Reproducible Builds with Apache MavenDevoxxFR 2024 Reproducible Builds with Apache Maven
DevoxxFR 2024 Reproducible Builds with Apache MavenHervé Boutemy
 
Commit 2024 - Secret Management made easy
Commit 2024 - Secret Management made easyCommit 2024 - Secret Management made easy
Commit 2024 - Secret Management made easyAlfredo García Lavilla
 
WordPress Websites for Engineers: Elevate Your Brand
WordPress Websites for Engineers: Elevate Your BrandWordPress Websites for Engineers: Elevate Your Brand
WordPress Websites for Engineers: Elevate Your Brandgvaughan
 
Designing IA for AI - Information Architecture Conference 2024
Designing IA for AI - Information Architecture Conference 2024Designing IA for AI - Information Architecture Conference 2024
Designing IA for AI - Information Architecture Conference 2024Enterprise Knowledge
 
Unraveling Multimodality with Large Language Models.pdf
Unraveling Multimodality with Large Language Models.pdfUnraveling Multimodality with Large Language Models.pdf
Unraveling Multimodality with Large Language Models.pdfAlex Barbosa Coqueiro
 
What's New in Teams Calling, Meetings and Devices March 2024
What's New in Teams Calling, Meetings and Devices March 2024What's New in Teams Calling, Meetings and Devices March 2024
What's New in Teams Calling, Meetings and Devices March 2024Stephanie Beckett
 
Streamlining Python Development: A Guide to a Modern Project Setup
Streamlining Python Development: A Guide to a Modern Project SetupStreamlining Python Development: A Guide to a Modern Project Setup
Streamlining Python Development: A Guide to a Modern Project SetupFlorian Wilhelm
 
New from BookNet Canada for 2024: BNC CataList - Tech Forum 2024
New from BookNet Canada for 2024: BNC CataList - Tech Forum 2024New from BookNet Canada for 2024: BNC CataList - Tech Forum 2024
New from BookNet Canada for 2024: BNC CataList - Tech Forum 2024BookNet Canada
 
Artificial intelligence in cctv survelliance.pptx
Artificial intelligence in cctv survelliance.pptxArtificial intelligence in cctv survelliance.pptx
Artificial intelligence in cctv survelliance.pptxhariprasad279825
 
Training state-of-the-art general text embedding
Training state-of-the-art general text embeddingTraining state-of-the-art general text embedding
Training state-of-the-art general text embeddingZilliz
 
"ML in Production",Oleksandr Bagan
"ML in Production",Oleksandr Bagan"ML in Production",Oleksandr Bagan
"ML in Production",Oleksandr BaganFwdays
 
Human Factors of XR: Using Human Factors to Design XR Systems
Human Factors of XR: Using Human Factors to Design XR SystemsHuman Factors of XR: Using Human Factors to Design XR Systems
Human Factors of XR: Using Human Factors to Design XR SystemsMark Billinghurst
 
Are Multi-Cloud and Serverless Good or Bad?
Are Multi-Cloud and Serverless Good or Bad?Are Multi-Cloud and Serverless Good or Bad?
Are Multi-Cloud and Serverless Good or Bad?Mattias Andersson
 
AI as an Interface for Commercial Buildings
AI as an Interface for Commercial BuildingsAI as an Interface for Commercial Buildings
AI as an Interface for Commercial BuildingsMemoori
 
Vector Databases 101 - An introduction to the world of Vector Databases
Vector Databases 101 - An introduction to the world of Vector DatabasesVector Databases 101 - An introduction to the world of Vector Databases
Vector Databases 101 - An introduction to the world of Vector DatabasesZilliz
 

Kürzlich hochgeladen (20)

My INSURER PTE LTD - Insurtech Innovation Award 2024
My INSURER PTE LTD - Insurtech Innovation Award 2024My INSURER PTE LTD - Insurtech Innovation Award 2024
My INSURER PTE LTD - Insurtech Innovation Award 2024
 
Integration and Automation in Practice: CI/CD in Mule Integration and Automat...
Integration and Automation in Practice: CI/CD in Mule Integration and Automat...Integration and Automation in Practice: CI/CD in Mule Integration and Automat...
Integration and Automation in Practice: CI/CD in Mule Integration and Automat...
 
Developer Data Modeling Mistakes: From Postgres to NoSQL
Developer Data Modeling Mistakes: From Postgres to NoSQLDeveloper Data Modeling Mistakes: From Postgres to NoSQL
Developer Data Modeling Mistakes: From Postgres to NoSQL
 
Advanced Test Driven-Development @ php[tek] 2024
Advanced Test Driven-Development @ php[tek] 2024Advanced Test Driven-Development @ php[tek] 2024
Advanced Test Driven-Development @ php[tek] 2024
 
Search Engine Optimization SEO PDF for 2024.pdf
Search Engine Optimization SEO PDF for 2024.pdfSearch Engine Optimization SEO PDF for 2024.pdf
Search Engine Optimization SEO PDF for 2024.pdf
 
DevoxxFR 2024 Reproducible Builds with Apache Maven
DevoxxFR 2024 Reproducible Builds with Apache MavenDevoxxFR 2024 Reproducible Builds with Apache Maven
DevoxxFR 2024 Reproducible Builds with Apache Maven
 
Commit 2024 - Secret Management made easy
Commit 2024 - Secret Management made easyCommit 2024 - Secret Management made easy
Commit 2024 - Secret Management made easy
 
WordPress Websites for Engineers: Elevate Your Brand
WordPress Websites for Engineers: Elevate Your BrandWordPress Websites for Engineers: Elevate Your Brand
WordPress Websites for Engineers: Elevate Your Brand
 
Designing IA for AI - Information Architecture Conference 2024
Designing IA for AI - Information Architecture Conference 2024Designing IA for AI - Information Architecture Conference 2024
Designing IA for AI - Information Architecture Conference 2024
 
Unraveling Multimodality with Large Language Models.pdf
Unraveling Multimodality with Large Language Models.pdfUnraveling Multimodality with Large Language Models.pdf
Unraveling Multimodality with Large Language Models.pdf
 
What's New in Teams Calling, Meetings and Devices March 2024
What's New in Teams Calling, Meetings and Devices March 2024What's New in Teams Calling, Meetings and Devices March 2024
What's New in Teams Calling, Meetings and Devices March 2024
 
Streamlining Python Development: A Guide to a Modern Project Setup
Streamlining Python Development: A Guide to a Modern Project SetupStreamlining Python Development: A Guide to a Modern Project Setup
Streamlining Python Development: A Guide to a Modern Project Setup
 
New from BookNet Canada for 2024: BNC CataList - Tech Forum 2024
New from BookNet Canada for 2024: BNC CataList - Tech Forum 2024New from BookNet Canada for 2024: BNC CataList - Tech Forum 2024
New from BookNet Canada for 2024: BNC CataList - Tech Forum 2024
 
Artificial intelligence in cctv survelliance.pptx
Artificial intelligence in cctv survelliance.pptxArtificial intelligence in cctv survelliance.pptx
Artificial intelligence in cctv survelliance.pptx
 
Training state-of-the-art general text embedding
Training state-of-the-art general text embeddingTraining state-of-the-art general text embedding
Training state-of-the-art general text embedding
 
"ML in Production",Oleksandr Bagan
"ML in Production",Oleksandr Bagan"ML in Production",Oleksandr Bagan
"ML in Production",Oleksandr Bagan
 
Human Factors of XR: Using Human Factors to Design XR Systems
Human Factors of XR: Using Human Factors to Design XR SystemsHuman Factors of XR: Using Human Factors to Design XR Systems
Human Factors of XR: Using Human Factors to Design XR Systems
 
Are Multi-Cloud and Serverless Good or Bad?
Are Multi-Cloud and Serverless Good or Bad?Are Multi-Cloud and Serverless Good or Bad?
Are Multi-Cloud and Serverless Good or Bad?
 
AI as an Interface for Commercial Buildings
AI as an Interface for Commercial BuildingsAI as an Interface for Commercial Buildings
AI as an Interface for Commercial Buildings
 
Vector Databases 101 - An introduction to the world of Vector Databases
Vector Databases 101 - An introduction to the world of Vector DatabasesVector Databases 101 - An introduction to the world of Vector Databases
Vector Databases 101 - An introduction to the world of Vector Databases
 

os-php-wiki5-a4

  • 1. Create an interactive production wiki using PHP, Part 5: The open blog An environment for open discussion Skill Level: Intermediate Duane O'Brien (d@duaneobrien.com) PHP developer Freelance 10 Apr 2007 This "Create an interactive production wiki using PHP" tutorial series creates a wiki from scratch using PHP, with value-added features useful for tracking production. Wikis are widely used as tools to help speed development, increase productivity and educate others. Each part of the series develops integral parts of the wiki until it is complete and ready for prime time, with features including file uploading, a calendaring "milestone" system, and an open blog. The wiki will also contain projects whose permissions are customizable to certain users and will contain projects whose permissions are customizable to certain users. In Part 4 we added some task management. Now you will create an open blog, which will allow users a place to hold public discussions. Section 1. Before you start This "Create an interactive production wiki using PHP" series is designed for PHP application developers who want to to take a run at making their own custom wikis. You'll define everything about the application, from the database all the way up to the wiki markup you want to use. In the final product, you will be able to configure much of the application at a granular level, from who can edit pages to how open the blog really is. At the end of this tutorial, Part 5 of a five-part series, you will have an open blog working in your wiki. You should not continue until you have completed the first four tutorials. The open blog © Copyright IBM Corporation 1994, 2008. All rights reserved. Page 1 of 25
  • 2. developerWorks® ibm.com/developerWorks About this series Part 1 of this series draws the big picture. You determine how you want the application to look, flow, work, and behave. You'll design the database and rough-out some scaffolding. Part 2 focuses on the primary wiki development, including defining the markup, tracking changes, and file uploads. In Part 3, you define some users and groups, as well as a way to control access to certain aspects of individual wiki pages and uploaded files. Part 4 deals with a Calendaring and Milestones feature to track tasks, to-dos, and progress against set goals. Here in Part 5, you put together an open blog to allow discussion of production topics and concerns. About this tutorial This tutorial deals with creating an open blog for Criki. You have built the basic wiki features, and you have added task management for your users. An open blog is another valuable feature that will allow your users a place to hold public discussions. Topics include: • What is meant by "open blog" • Blog workflow design • Building out the blog database table • Basic blog features Prerequisites It is assumed you have completed Part 1, Part 2, Part 3, and Part 4 of this "Create an interactive production wiki using PHP" series. And it is assumed that you have some experience working with the PHP programming language and MySQL. We won't be doing a lot of deep database tuning, so as long as you know the basic ins and outs, you should be fine. System requirements Before you begin, you need to have an environment in which you can work. The general requirements are reasonably minimal: • An HTTP server that supports sessions (and preferably mod_rewrite). This tutorial was written using Apache V1.3 with mod_rewrite enabled. • PHP V4.3.2 or later (including PHP V5). This was written using PHP V5.0.4 The open blog Page 2 of 25 © Copyright IBM Corporation 1994, 2008. All rights reserved.
  • 3. ibm.com/developerWorks developerWorks® • Any version of MySQL from the last few years will do. This was written using MySQL V4.1.15. You'll also need a database and database user ready for your application to use. The tutorial will provide syntax for creating any necessary tables in MySQL. Additionally, to save time, we will be developing Criki using a PHP framework called CakePHP. Download CakePHP by visiting CakeForge.org and downloading the latest stable version. This tutorial was written using V1.1.13. For information about installing and configuring CakePHP, check out the tutorial series titled "Cook up Web sites fast with CakePHP" (see Resources). Section 2. Criki so far At the end of Part 4, you were given several items to complete. There was at least one glaring security hole in the task management edit workflow. You were tasked with finding a way to use wiki markup when writing task descriptions, without reproducing the wiki markup rendering code. And the tasks views contained user names as text, which could have been made into links to the users' profiles. How did you do? Securing the task management edit workflow There are two specific problems in the task management edit workflow to address. Alert code monkeys will have noticed them already. The first should be fairly obvious. Consider this line from the tasks edit view in Listing 1. Listing 1. Tasks edit view excerpt <?php if ($task['Task']['user_id'] == $user['id']) : echo $html->link('Edit','/tasks/edit/' . $task['Task']['id']); endif; ?> This displays the edit link for only the user to whom the task has been assigned. Now consider the task edit action in Listing 2. Listing 2. Task edit action function edit($id = null) { if(empty($this->data)) { if(!$id) { $this->Session->setFlash('Invalid id for Task'); $this->redirect('/task/index'); The open blog © Copyright IBM Corporation 1994, 2008. All rights reserved. Page 3 of 25
  • 4. developerWorks® ibm.com/developerWorks } $task = $this->Task->read(null, $id); $this->data = $task; $this->set('task', $task); $this->set('percents', array ('0' => '0%', '25' => '25%', '50' => '50%', '75' => '75%', '100' => '100%')); $this->set('month', $this->buildCalendar($task['Task']['user_id'], $task['Task']['duedate'])); } else { $this->cleanUpFields(); if($this->Task->save($this->data)) { $this->Session->setFlash('The Task has been saved'); $this->redirect('/tasks/view/' . $this->data['Task']['id']); } else { $this->Session->setFlash('Please correct errors below.'); } } } At no time in this action do you verify that the user who has submitted the data for edit is the user to whom the task has been assigned. It is not enough to simply keep from showing the link to the user. Once the HTML has been sent to the user, it can easily be modified. While this seems an unlikely case, it is easily reproduced. In your favorite tabbed browser, Firefox, for example, open two tabs to Criki. In one tab, log in as User A and navigate to the edit task page for any task. Then in the second window, log out of Criki and log in again as User B. Return to the tab with the edit task page loaded, and you will find you can successfully edit the task, even though the task belongs to User A, and you are now logged in as User B. Always verify your data. Always. Twice if you're not certain. The second half of the Edit action might look more like Listing 3. Listing 3. Verify that the user is assigned to the task $user = $this->Session->read('User'); $task = $this->Task->read(null, $this->data['Task']['id']); if ($user['id'] == $task['Task']['user_id']) { $this->cleanUpFields(); if($this->Task->save($this->data)) { $this->Session->setFlash('The Task has been saved'); $this->redirect('/tasks/view/' . $this->data['Task']['id']); } else { $this->Session->setFlash('Please correct errors below.'); } } else { $this->Session->setFlash('You cannot modify this task.'); $this->redirect('/tasks/view/' . $this->data['Task']['id']); } The second security problem with the task edit action may have been a little harder to spot. You will recall that the primary directive for editing a task was that the user should not be able to edit anything but the percentage complete. Only the percentage field was presented to the user via the task edit view. But, just as you verified the user, you should verify that the fields the user have The open blog Page 4 of 25 © Copyright IBM Corporation 1994, 2008. All rights reserved.
  • 5. ibm.com/developerWorks developerWorks® submitted match the fields you are expecting. Or, if you prefer, make sure you only use the data from the fields that you desire (a whitelisting approach). Achieving this is fairly simple. You can build a new array of data to be saved, including only those elements from the submitted data you desire. Just remember to format the array correctly. Listing 4. Whitelisting form fields $user = $this->Session->read('User'); $task = $this->Task->read(null, $this->data['Task']['id']); if ($user['id'] == $task['Task']['user_id']) { $this->cleanUpFields(); $savedata = array ( 'Task' => array ( 'id' => $this->data['Task']['id'], 'percent' => $this->data['Task']['percent'], ) ); if($this->Task->save($savedata)) { $this->Session->setFlash('The Task has been saved'); $this->redirect('/tasks/view/' . $this->data['Task']['id']); } else { $this->Session->setFlash('Please correct errors below.'); } } else { $this->Session->setFlash('You cannot modify this task.'); $this->redirect('/tasks/view/' . $this->data['Task']['id']); } You can test that this works as you expect it to by adding a field to the task edit view that will allow the user to modify the title of a task. <?php echo $html->input('Task/title', array('size' => '60'));?> Save the view and edit the action, making sure to change the percentage and the title. You should find that only the percentage is modified. This approach of whitelisting form fields is a powerful tool that can help protect you from maliciously inserted form data. Always verify your data. Always. Twice if you're not certain. Take some time now to look back over the code for Criki. See if you can find other places where you should be verifying your data. Future versions of CakePHP will automatically apply this form of whitelisting for form fields generated using the form helper. Reusing the wiki markup rendering code Using the wiki markup rendering code you already wrote to allow wiki markup in task descriptions could be done a couple different ways. One way would be to create an action in the entries controller called renderMarkup. This would work much like the buildCalendar action you wrote for the tasks controller. You could then call it via requestAction, passing in the unformatted task description and getting back the task description after the wiki The open blog © Copyright IBM Corporation 1994, 2008. All rights reserved. Page 5 of 25
  • 6. developerWorks® ibm.com/developerWorks markup has been rendered. Another way -- and, perhaps, a better way -- would be to create a custom helper, specifically for rendering wiki markup into HTML, and using this helper in your views. This would be a more versatile and somewhat more elegant approach. To do this, you would create the file app/views/helpers/wiki.php. Listing 5. Creating the WikiHelper <?php class WikiHelper extends Helper { function render($content) { ... ... ... } } ?> The Render function is far too long to reproduce here (you need to import it to the EntryRevisions controller), but it is functionally the same, save that $content is passed into the function, rather than being pulled from $this>data, and a $return variable necessary (as the rendered markup is not being set in $this>data.) Once you have created the helper, you need to add the helper to any controller you want to have access to it. var $helpers = array('Html', 'Form', 'Wiki' ); Now that the wiki markup rendering code is in a helper, you can significantly reduce the size of the entries view action. Listing 6. New entries view action function view($title = null) { if(!$title) { $this->Session->setFlash('Invalid Entry.'); $this->redirect('/entries/index'); } $entry = $this->Entry->findByTitle($title); if ($entry) { $user = $this->Session->read('User'); $user = $this->Entry->User->read(null, $user['id']); $this->Session->write('User', $user['User']); if ($user['User']['access'] < $entry['Entry']['access']) { $this->Session->setFlash('Access Denied.'); $this->redirect('/entries/index'); } $this->set('entry', $entry); } else { $this->redirect('/entries/edit/' . preg_replace("/[^a-z]/", , strtolower($title))); } } Now you should be able to use the helper to output data in a view. For example, if The open blog Page 6 of 25 © Copyright IBM Corporation 1994, 2008. All rights reserved.
  • 7. ibm.com/developerWorks developerWorks® you added wiki to the list of helpers for the Entries controller, and if you changed the entries view action to the one above, then in the entries view view, instead of using echo to output the content, you would use echo to output the result of passing the content through the wiki helper. <?php echo $wiki->render($entry['Entry']['content'])?> Save the view and view any entry. You should see no actual change; the entry should be rendered normally, just as before. However, now you have a helper you can use to render wiki markup across the application. This means you can replace the EntryRevisions view action with one more like the new one you wrote for the Entries controller. All you need to do is include the wiki helper and pass the content through $wiki render in the view. The same goes for using wiki markup in the Tasks controller: Include the wiki helper and pass the task description through $wiki render. You can even apply the same principle for the open blog you will write in this tutorial. Adding user profile links Changing the various task views to output links to user profiles instead of just user names should have been the easiest gap to fill. The code for it has appeared many times in the entry and upload views. It should look something like this: echo $html->link($task['User']['username'], '/users/view/'.$task['Task']['user_id']); The source code for this tutorial has updated task views that contain this code. You should either update your code with the code from the archive or, at the very least, compare the two sets of code to make sure you understand the changes before proceeding with the next task. Section 3. Creating the open blog In this section, we will create the open blog, thus allowing any user to post to the Criki blog. What is an open blog? To start, don't get too wrapped up in the terminology. It'll help to understand an open blog by specifying what is meant by blog in the first place. The open blog © Copyright IBM Corporation 1994, 2008. All rights reserved. Page 7 of 25
  • 8. developerWorks® ibm.com/developerWorks A blog is basically a Web site where the content is generated by a user. Generally, the content is displayed with the newest information at the top. Frequently (but not always), readers are able to leave comments about specific blog postings, allowing for discussion. In an open blog, the content is not generated by a user. It's generated by any user. Conceptually, it's much like a cross between a forum -- where many users partake in threaded discussions -- and a blog. By allowing any user to post to the blog, you are further enhancing the open nature of Criki. It should be remembered that this can sometimes be a double-edge sword. Comment spam in blogs is an everyday problem. That problem could become significantly worse when you open up a blog to allow any user to post. If the open blog is external-facing, it will require more regular moderation and babysitting. If the open blog is internal-facing (such as an intranet), this is less of an issue. Keeping these potential pitfalls in mind, you can jump into the design work for the open blog. Doing the design As you did with the other parts of Criki, you should spend some time thinking through how the blog will work before you start writing code or building tables. For this open blog, some general principles will be adhered to: • Only registered users will be able to post, though anonymous users will be able to comment. • Comments and posts will reside in distinct tables. • Editors can delete posts and comments from contributors. Administrators can delete posts and comments from anyone. • The information that will be maintained for the blog will be minimal. • The blog will use the same wiki markup that has already been written. With these principles in mind, you should have some ideas for how the code will look and behave in the controllers. But don't jump ahead to that yet. You should get the database tables sorted out first. Building the blog database tables The open blog will consist of two tables. One table, called posts, will hold blog posts. The other table, called comments, will hold blog comments. One could argue successfully that posts and comments could reside in the same table, as a comment could be described as a post with no parent. But there are merits to keeping posts and comments segregated. For example, you can more easily change post or comment behavior without one affecting the other, you have more granular control The open blog Page 8 of 25 © Copyright IBM Corporation 1994, 2008. All rights reserved.
  • 9. ibm.com/developerWorks developerWorks® over the way the controllers will behave, and you can more easily apply different sets of security rules. One of the directives is to keep the information being maintained minimal. Minimal does not imply Spartan. Finding the mix between "The least amount of useful information" and "The most information that can be recorded" is important. The least amount of useful information in a post would be content. Without content, there is no post. But you could go in ever-widening circles trying to catch all the information related to a post. A minimal posts table would need to record the following: • Id • Title • Content • Author • Access • Date • Ip The SQL to create the table might look like this: Listing 7. Posts table SQL CREATE TABLE 'posts' ( 'id' int(10) NOT NULL auto_increment, 'title' varchar(255) NOT NULL default , 'content' text NOT NULL, 'user_id' int(10) NOT NULL default '0', 'access' tinyint(4) NOT NULL default '0', 'date' datetime NOT NULL default '0000-00-00 00:00:00', 'ip' varchar(15) NOT NULL default , PRIMARY KEY ('id') ) ENGINE=MyISAM DEFAULT CHARSET=latin1 AUTO_INCREMENT=1 ; For the comments table, you need a different set of information: • Id • Post Id • Content • Author • Access • Date • Ip The open blog © Copyright IBM Corporation 1994, 2008. All rights reserved. Page 9 of 25
  • 10. developerWorks® ibm.com/developerWorks The SQL to create this table might look like this: Listing 8. Comments table SQL CREATE TABLE 'comments' ( 'id' int(10) NOT NULL auto_increment, 'post_id' int(10) NOT NULL default '0', 'content' text NOT NULL, 'user_id' int(10) NOT NULL default '0', 'access' tinyint(4) NOT NULL default '0', 'date' datetime NOT NULL default '0000-00-00 00:00:00', 'ip' varchar(15) NOT NULL default , PRIMARY KEY ('id') ) ENGINE=MyISAM DEFAULT CHARSET=latin1 AUTO_INCREMENT=1 ; In both cases, you will notice the IP address is being recorded. For posts, this can be helpful for tracking problem users, but it's much more important for comments, where you will be allowing anonymous comments. What you may notice is the absence of tracking things like last modified, last read, hits, or comment count. Keep the application simple where you can. The extra data generally won't be necessary. Go ahead and create the tables, if you haven't already. Next, you write the models, bake the controllers and views, and dive in to building out your open blog. Section 4. Basic blog functionality By now, you've written a few models, and you should be pretty familiar with Bake. If you feel ambitious, you can write the controllers out by hand and skip the Bake section below. But you should at least read through the models information provided because the model associations for your blog tables are important. Writing the models You will need to define two models -- one for posts and one for comments. Setting up the associations for these models will be important and slightly differently model associations from what you've done before. The post model The post model will have two associations. It will have a belongsTo association to user, just like the entry and task models. But the post model will also have a hasMany association to comment. The code for the model might look like this: Listing 9. Post model <?php class Post extends AppModel { The open blog Page 10 of 25 © Copyright IBM Corporation 1994, 2008. All rights reserved.
  • 11. ibm.com/developerWorks developerWorks® var $name = 'Post'; var $belongsTo = array('User' => array ( 'className' => 'User', 'conditions' => , 'order' => , 'foreignKey' => 'user_id' ) ); var $hasMany = array('Comment' => array ( 'className' => 'Comment', 'conditions' => , 'order' => 'Comment.date DESC', 'foreignKey' => 'post_id' ) ); } ?> By setting up this hasMany association, you are able to get the post and comments all at once. The order key defined above will sort the comments for you. That takes care of the post model. The comment model looks a little different from what you might expect. The comment model It seems like the comment model would have two associations. A comment belongs to a user in the sense that the user was the author, and a comment belongs to a post, as the comment is tied to the post by ID. However, specifying the post association is not necessary in this context, as comments will not be retrieved outside the context of their parent posts, with the exception of editing comments, which does not require the post information. By not specifying the post association, you will save some query overhead. Listing 10. Comment model <?php class Comment extends AppModel { var $name = 'Comment'; var $belongsTo = array('User' => array ( 'className' => 'User', 'conditions' => , 'order' => , 'foreignKey' => 'user_id' ) ); } ?> Now that you've got your models sorted out, you can start baking. Baking the basics The open blog © Copyright IBM Corporation 1994, 2008. All rights reserved. Page 11 of 25
  • 12. developerWorks® ibm.com/developerWorks Since you used Bake in Parts 1 and 4 of this series, you don't need to be reminded that you need to make sure the PHP executable is in your PATH and that you have changed into the directory where you installed Cake. So, run bake, as shown below. php cakescriptsbake.php Walk through the menus baking the controllers for post and comment, then baking the views for post and comment. If you need a refresher on the Bake menus, consult Part 1 of this series (see Resources). Once everything is baked, you can jump right in to customizing the code. Customizing the code There are several things you need to change about the controller and view code that you just baked. A list of the principal changes will help you to understand the scope: • Comment and post add actions need to set the value of date. • Comment and post add and edit actions need to restrict the directly editable fields. • Comment and post add and edit views need to display only editable fields. • Comment view action and view can be removed. • Comment add, edit and delete actions should redirect the user to the parent post. • Post view action needs to be modified to pull comments from the model. • Post view view need to be modified to display comments well. • Access checks should be made for post and comment edit and delete actions. The code for each of these changes will be highlighted. Full details can be found in the source code. Setting date values Setting the value of the date fields in the posts or comments controller isn't difficult. Before the data is saved, you would need to set the date manually, for example, in the comments controller. $this->data['Comment']['date'] = date('Y-m-d H:i:s'); if($this->Comment->save($this->data)) { ... The open blog Page 12 of 25 © Copyright IBM Corporation 1994, 2008. All rights reserved.
  • 13. ibm.com/developerWorks developerWorks® While you're already working with the fields, you may as well restrict the once that can be edited. Restricting editable fields Restricting the fields which the user can edit means more than just removing the fields from the related views -- though that's an excellent place to start. Actually, when you look at a post, the only fields a user should be able to edit are title and content. For a comment, a user should only be able to edit the content field. Everything else will be set by the controllers. Go through the add and edit views for posts and comments, and remove all but the fields mentioned above. You can also take the opportunity to remove the links to controllers or actions you don't need, such as the add user link in the comments edit view. But, as pointed out in the Criki so far section of this tutorial, removing the fields from the views is not enough to ensure that the user cannot modify the data. You should build a new array to hold the data to be saved and explicitly set the values for your fields. Building such an array for the posts controller will look like Listing 11. Listing 11. Building the data array for posts $savedata = array( 'Post' => array ( 'title' => $this->data['Post']['title'], 'content' => $this->data['Post']['content'], 'user_id' => $user['id'], 'access' => $user['access'], 'date' => date('Y-m-d H:i:s'), 'ip' => $_SERVER['REMOTE_ADDR'], ) ); Then, rather than saving $this>data, you would instead save $savedata. By following this method, you reduce the potential for a malicious user to force field editing you had not permitted. Redirecting to the parent post Within the comments controller, anytime a comment is added, edited or deleted, redirection should send the user back to the view action for the parent post. (You can delete the comments index and view actions, as the will not be used.) The actual process of redirecting the user to the parent post is simple, once you have the data you need (namely, the post_id for the comment). You already have to modify the comment add action, as you will be passing it the ID of the parent post, which means for Add, you will have the data you need. For the edit and delete actions, while you could pass the post_id in as a hidden form variable; it will be more secure to query for the comment by ID and read the post_id from the database. The user cannot edit post_id, so it will never change. For example, the The open blog © Copyright IBM Corporation 1994, 2008. All rights reserved. Page 13 of 25
  • 14. developerWorks® ibm.com/developerWorks code to do this in the comment delete action looks like Listing 12. Listing 12. Comment delete action code snippet ... $comment = $this->Comment->findById($this->data['Comment']['id']); if ($comment) { if($this->Comment->del($id)) { $this->Session->setFlash('The Comment deleted: id '.$id.); $this->redirect('/posts/view/' . $comment['Comment']['post_id']); } } else { $this->Session->setFlash('Invalid id for Comment'); $this->redirect('/posts/index'); } ... Take a look at all the redirect statements in the comments controller found in the source code for more changes of this nature. Retrieving comments from within the posts controller For the posts view action, retrieving the post and the related comments will be two separate model requests. The first will retrieve the post and the user information. $post = $this->Post->read(null, $id); This request, if the model associations are set up properly, will actually get the post data, the user data for the post author, and the comments for the post. But the comments will not include the user data for each comment. Rather than open up a recursive can of worms, it's much simpler to just make an additional request. The second model request will retrieve the comments and comment user data for the post. Listing 13. Post view action code to retrieve comments data $post['Comment'] = $this->Post->Comment->findAll( 'Comment.post_id = ' . $id . ' AND User.id = Comment.user_id', array('Comment.*', 'User.*'), 'Comment.date DESC' ); This findAll request is a little more complicated than findByFIELDNAME, but you are also exercising a bit more control over things like sort order. Sorting the comments in descending order by date will mean less scrolling for the end user. If you prefer to have the comments displayed in ascending order by date, you could use findByPostIt and save users a little typing. If you look at the posts index action, you will see it also is passing additional data to findAll to sort the posts in descending order by date. The open blog Page 14 of 25 © Copyright IBM Corporation 1994, 2008. All rights reserved.
  • 15. ibm.com/developerWorks developerWorks® Displaying comments Last, but not least, you will need to modify theposts view view. Not only do you need to account for the new data structure but the comments should be reformatted into something more readable. Fully reproducing the code here is impractical, but look at Listing 14 to see how the comment iteration code looks. Listing 14. Posts view view amendment <?php if(!empty($post['Comment'])):?> <div class="related"> <h2>Comments</h2> <?php foreach($post['Comment'] as $comment):?> <hr /> <h4> By <?php echo $html->link($comment['User']['username'], '/users/view/' .$comment['User']['id'])?> on <?php echo $comment['Comment']['date']?> [ <? php echo $html->link('Edit Comment', '/comments/edit/' . $comment['Comment']['id']) ?> | <?php echo $html->link('Delete Comment', '/comments/delete/' . $comment['Comment']['id'], null, 'Are you sure you want to delete this comment?') ?> ] </h4> <br /> <p> <?php echo $wiki->render($comment['Comment']['content']) ?> </p> <?php endforeach; ?> <hr /> </div> <?php endif; ?> Check the posts index view in the source code for more. Access checks As you have done with the tasks and entries parts of Criki, you will need to implement some access control within blog. Specifically, the following principles will apply: • A user must be logged in to post. • A user need not be logged in to comment. • A user may always edit or delete his own posts or comments. • Any user with an access level the access level of the post or comment may perform delete actions. An example will be provided below and in the code of applying these principles to the post edit action. From there, you should be able to apply access checks to the comment edit action, as well as the post and comment delete actions. The open blog © Copyright IBM Corporation 1994, 2008. All rights reserved. Page 15 of 25
  • 16. developerWorks® ibm.com/developerWorks The process is should be a familiar one. You have already amended the edit views to only show the fields that can be edited. You will need to amend the posts edit action to perform the access check. You will need to amend the posts index and view actions to set variables used by the views to show/hide links. You will need to amend the posts index and view views to take advantage of these variables. Amending the posts edit action You will recall that the user data is already being pulled from session during the posts edit action. Listing 15. Posts edit action revisited $user = $this->Session->read('User'); $savedata = array( 'Post' => array ( 'id' => $this->data['Post']['id'], 'title' => $this->data['Post']['title'], 'content' => $this->data['Post']['content'], 'user_id' => $user['id'], 'access' => $user['access'], 'ip' => $_SERVER['REMOTE_ADDR'], ) ); Performing the access check for the edit action will mean pulling the post information from the database and checking for access. In this case, the user may only edit the post if the user was the author. If you were checking a delete action, you would also pull the user information from the database and check to make sure the user access was greater than the post access. Listing 16. Post edit action revised $post = $this->Post->findById($this->data['Post']['id']); if ($post['Post']['user_id'] == $user['id']) { $savedata = array( 'Post' => array ( 'id' => $this->data['Post']['id'], 'title' => $this->data['Post']['title'], 'content' => $this->data['Post']['content'], 'user_id' => $user['id'], 'access' => $user['access'], 'ip' => $_SERVER['REMOTE_ADDR'], ) ); if($this->Post->save($savedata)) { $this->Session->setFlash('The Post has been saved'); $this->redirect('/posts/index'); } else { $this->Session->setFlash('Please correct errors below.'); $this->set('users', $this->Post->User->generateList()); } } else { $this->Session->setFlash('You cannot edit this post.'); $this->redirect('/posts/index'); } This will protect the post from being edited by anyone but the author. Now you The open blog Page 16 of 25 © Copyright IBM Corporation 1994, 2008. All rights reserved.
  • 17. ibm.com/developerWorks developerWorks® should make sure you don't show edit links to anyone but the author. Amending the posts index and view actions To allow the index and view actions to make decisions about showing or not showing the edit post link, you need to tell the posts controller to set a variable that the index and view views can use. The easiest way to do this is to retrieve the user data and set it as a variable. To do this in the index action, see Listing 17. Listing 17. Index action setting user data function index() { $this->Post->recursive = 0; $this->set('posts', $this->Post->findAll( 'Post.user_id = User.id AND Post.id', array('Post.*', 'User.*'), 'Post.date DESC' )); $this->set('user', $this->Session->read('User')); } The posts index view can access the variable $user and make decisions based on the user data about showing or hiding the edit post links. Amending the posts index and view views You've got the user data into your view. Using it to show or hide the edit post link is as easy as, well, Cake. See the posts index view below. Listing 18. Conditionally showing the edit post link <?php if ($user['id'] == $post['User']['id']) { echo $html->link('Edit','/posts/edit/' . $post['Post']['id']); } ?> The same code for the posts view view will look only marginally different from this, as indicated by the code in the source code. That's really all there is to it. Take it for a spin. Log in as different users and create some posts, testing out the access controls you've put in place to protect the posts from being edited. After you've done that, apply the same principles and add access controls to the posts and comments controller for delete actions (users with higher clearance or original author), comment edit actions (original author), post add (registered and logged in user), etc. Keep in mind the lessons you've learned, and you should be in good shape. The open blog © Copyright IBM Corporation 1994, 2008. All rights reserved. Page 17 of 25
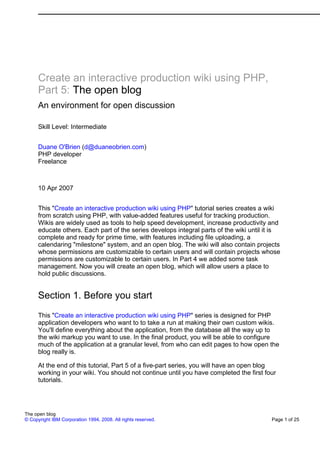
  • 18. developerWorks® ibm.com/developerWorks Section 5. Configuration options In Part 1, you created a table called settings, which was designed as a sort of Entity-Attribute-Value table to hold specific configuration settings, allowing the administrator granular control over specifics like "Who can create a new Entry" and "Valid file upload types." Now that you have your primary Criki features in place, you can turn your attention to putting some of these settings into place. Gathering all of these configuration settings into a list will give you an idea for what is in play: • Editor promotion/demotion rights • Registration rights • Invitation rights • Page creation permissions (who can create a page?) • Page edit permissions • Valid file upload types You will walk through implementing one of the configuration options: page creation permissions. From there, you should be able to set up any individual settings and add new ones. Tweaking the settings controller Depending on the version of Cake you used to bake your settings controller, you may need to go through the controller and verify that all of the redirect statements point to the settings controller (plural), not the setting controller. The redirect statements should look like the code below. $this->redirect('/settings/index'); You will want to come back to this controller later to add access controls, so only administrators can change or add settings. Adding a setting Adding a new setting is fairly simple. You can later decide to change the views or add data validation to facilitate or streamline the process, but the views as they were baked are sufficient. The add setting view contains four fields: Name, Value, Default, and Description. The open blog Page 18 of 25 © Copyright IBM Corporation 1994, 2008. All rights reserved.
  • 19. ibm.com/developerWorks developerWorks® The Name field will be used to reference the setting in the code. It should be a single word with no spaces, such as entryCreatePermission. The Value field holds the value for the setting. You determine what is and isn't a valid value, but you will probably find it helpful in the long term to make the values easy to comprehend. In this case, the entryCreatePermission setting will be used to identify the minimum user type that can create an entry. Valid values for this field might be anyone -- contributors, editors, administrators. The Default field is used to maintain the original value for the setting, so an administrator has the capacity to restore the defaults. The Description field should be used to sum up the purpose of the field and list the valid values for the setting. Adding the entryCreatePermission setting might look like this: Figure 1. Adding the entryCreatePermission setting Retrieving and caching the settings Retrieving the settings is easy. You can simply add the setting model to the $uses The open blog © Copyright IBM Corporation 1994, 2008. All rights reserved. Page 19 of 25
  • 20. developerWorks® ibm.com/developerWorks class variable much like you did with the EntryRevisions and UploadRevisions controllers. Add the setting model to the entries controller. Listing 19. Adding the setting model to the entries controller $settings = cache(FILENAME); if (!$settings) { $settings = $this->Entry->Setting->findAll(); cache(FILENAME, $settings); } It wouldn't be efficient to keep querying the database to get the settings every time you want to access them. Instead, what you'll do is add a method to the setting model to cache the settings data. Adding the cacheSettings method to the model The CakePHP cache function serves two purposes. If you pass in only a filename, such as cache('settings'), Cake will check the Cake tmp directory for the file, and, if found, the cache function will use file_get_contents to return the contents of the file. If you pass a filename and a second variable that holds data, such as cache('settings', $anArray), Cake will use file_put_contents to write the data to the filename specified within Cake's tmp directory. The default life of the cache would be one day. You can pass in a third parameter, consisting of any date representation that can be interpreted by strtotime. The method you will add to the setting model will be called cacheSettings. Like the cache function, this method will return the settings from the cache, or if a $data parameter is set, this method will write the data to the cache. You can only pass a string to put_file_contents, so you need to flatten or serialize the array first. When you retrieve the data from the cache, it may be helpful to reformat the settings array into something more shallow, as well. The cacheSettings method might look something like Listing 20. Listing 20. cacheSettings method in the settings model function cacheSettings($data = null) { if ($data != null) { cache('settings', serialize($data)); } else { $data = cache('settings'); if ($data == null) { $data = $this->findAll(); cache('settings', serialize($data)); } else { $data = unserialize($data); } } foreach ($data as $key => $value) { $return[$value['Setting']['name']] = $value['Setting']['value']; The open blog Page 20 of 25 © Copyright IBM Corporation 1994, 2008. All rights reserved.
  • 21. ibm.com/developerWorks developerWorks® } return $return; } Using this method, you can save unnecessary database calls to get the value of an individual setting. Now that you can get the settings, you can put them to work. Using the page creation setting Retrieving and using this setting involves calling the cacheSettings method and applying some logic to the settings. For example, in the entries controller, if you wanted to verify the entryCreatePermission value allowed for anyone to create a new entry, you might do something like Listing 21. Listing 21. Checking against the entryCreatePermission setting $user_id = 0; if ($this->Session->check('User')) { $user = $this->Session->read('User'); $user_id = $user['id']; } $settings = $this->Setting->cacheSettings(); if ($settings['entryCreatePermission'] != 'anyone' && $user_id == 0) { $this->Session->setFlash('You must be a Contributor to create a new entry.'); $this->redirect('/entries/index'); exit(); } This is a fairly basic overview of how to get and use your settings. How you decide to implement them is entirely up to you. You have a whole list of settings you can use for practice. Filling in the gaps You've gotten a lot done. But there's still tons of room for improvement within the Criki application. For example: 1. The access controls for the open blog in the code archive are incomplete. You still need to add access controls that protect the delete actions on the posts and comments controllers, and an access control is needed to ensure that only logged-in users can post. Build out these access controls. 2. There is a lot of settings and configuration work that you can put to use. Try implementing a few and see how you do. 3. The settings controller is entirely unprotected. You should really do something about that. 4. New settings won't make it into the cache until the existing cache expires. The open blog © Copyright IBM Corporation 1994, 2008. All rights reserved. Page 21 of 25
  • 22. developerWorks® ibm.com/developerWorks You should have the settings controller recache the settings whenever one is added, edited, or deleted. Happy coding! Section 6. Summary You did it! You've completed this "Create an interactive production wiki using PHP" tutorial series and built your own wiki engine from scratch. If it feels like you've just scratched the surface, that's because you have loads of room to add new things to Criki. Or, you may feel like tearing it all back down and building a bigger and better wiki engine than Criki could ever be. Go for it! Tear it all down and build it back up again your own way. The experience will teach you much. But maybe that's not the case. Maybe you'd rather build on the work you've already done. That's great! Make Criki better. Build out the features of your dreams. The open blog Page 22 of 25 © Copyright IBM Corporation 1994, 2008. All rights reserved.
  • 23. ibm.com/developerWorks developerWorks® Downloads Description Name Size Download method Part 5 source code os-php-wiki5.source.zip 32KB HTTP Information about download methods The open blog © Copyright IBM Corporation 1994, 2008. All rights reserved. Page 23 of 25
  • 24. developerWorks® ibm.com/developerWorks Resources Learn • Read Part 1, Part 2, Part 3, and Part 4 of this "Create an interactive production wiki using PHP" series. • Check out the Wikipedia entry for wiki. • Check out WikiWikiWeb for a good discussion about wikis. • Visit the official home of CakePHP. • Check out the "Cook up Web sites fast with CakePHP" tutorial series for a good place to get started. • The CakePHP API has been thoroughly documented. This is the place to get the most up-to-date documentation for CakePHP. • There's a ton of information available at The Bakery, the CakePHP user community. • Find out more about how PHP handles sessions. • Check out the official PHP documentation. • Read the five-part "Mastering Ajax" series on developerWorks for a comprehensive overview of Ajax. • Check out the "Considering Ajax" series to learn what developers need to know before using Ajax techniques when creating a Web site. • CakePHP Data Validation uses PHP Perl-compatible regular expressions. • See a tutorial on "How to use regular expressions in PHP." • Want to learn more about design patterns? Check out Design Patterns: Elements of Reusable Object-Oriented Software , also known as the "Gang Of Four" book. • Check out the Model-View-Controller on Wikipedia. • Here is more useful background on the Model-View-Controller. • Here's a whole list of different types of software design patterns. • Read about Design patterns. • PHP.net is the resource for PHP developers. • Check out the "Recommended PHP reading list." • Browse all the PHP content on developerWorks. • Expand your PHP skills by checking out IBM developerWorks' PHP project resources. • To listen to interesting interviews and discussions for software developers, The open blog Page 24 of 25 © Copyright IBM Corporation 1994, 2008. All rights reserved.
  • 25. ibm.com/developerWorks developerWorks® check out developerWorks podcasts. • Stay current with developerWorks' Technical events and webcasts. • Check out upcoming conferences, trade shows, webcasts, and other Events around the world that are of interest to IBM open source developers. • Visit the developerWorks Open source zone for extensive how-to information, tools, and project updates to help you develop with open source technologies and use them with IBM's products. Get products and technologies • Innovate your next open source development project with IBM trial software, available for download or on DVD. Discuss • Participate in developerWorks blogs and get involved in the developerWorks community. • Participate in the developerWorks PHP Developer Forum. About the author Duane O'Brien Duane O'Brien has been a technological Swiss Army knife since the Oregon Trail was text only. His favorite color is sushi. He has never been to the moon. The open blog © Copyright IBM Corporation 1994, 2008. All rights reserved. Page 25 of 25