SlideShare ist ein Scribd-Unternehmen logo
1 von 17
Downloaden Sie, um offline zu lesen
An Intermediate Google SketchUp Tutorial - Part 3
Note: Before reading this tutorial see Notice in the last paragraph.


In this installment we are going to introduce some new tools that allow us to use curves other
than circles or circle segments (arcs). These curves fall in a class called Bezier Curves (or
Splines). For the technically inclined you can go to Wikipedia for a detailed description. Our
interests as woodworkers are in using Bezier curves to form complex shapes such as Queen
Anne legs. The bad news is the tools needed do not exist in the SketchUp. The good news is you
can get them in a Ruby script and install them into SketchUp.
The Ruby script we will use is actually a number of scripts, icons and other files. So you have to
download a .zip file called bezierspline.zip. I recommend downloading it and saving it to disk
before unzipping. I am not going to explain how to use ZIP files or how to install Ruby scripts
into SketchUp. I assume you know how to do that by now. If you don t there are many places on
the Internet to get help, or contact me through email or phone and I will help you (see Contact
menu above). Maybe I will put this on a list of future tutorials. But for now you are on your own.
Download bezierspline.zip and install the unzipped files. In the unzipped files you will see a
number of Adobe files. One is a user s manual and one is a quick help file that explains
installation. You might want to read the latter at least.
When you have installed the scripts be sure to go to View/Toolbars and check Bezier Toolbar.
Now you should have tool icons that look like those in the picture above left. I should pause here
to say that most Ruby scripts are provided free. Some cost a few dollars, but generally they are
free. They are written mostly as a hobby or need, by people like us or software engineers that
can t help themselves - they need to hack. Consequently, these scripts do not receive the level of
testing that commercial software does. So you might expect an occasional strange behavior,
though my experience has been quite good. Also, since you are getting the source, most authors
allow you to modify the scripts yourself to tailor them to your needs. I do this a lot. But read
what is said in the source about copyright. Don t violate the license. These people are very
helpful to you and I. We want to keep them active and sharing.


Bezier curves can be difficult to use, at least the lower order ones. I will show you a comparison
of each of the four types available here and then we will focus on the one that I find most useful.
In the second picture above right is a grid I drew to compare these curves. I have placed a
number of construction points on this grid which I will use with all curve types (by the way the
grid and construction points were drawn using two other Ruby scripts). The curves I will draw
will intentionally exaggerate problems with each type by using a closed curve which is only
concave. But that will highlight why some are more difficult to use to get the shape you want.
Click to enlarge the picture and observe the guide points.
The first curve I am going to draw is the Classic Bezier Curve using its tool. The result is shown
in the third picture above left. I started at the lower left corner and clicked on the starting guide
point. Before clicking again I hit the shift key twice, quickly, which changed the red X to an
orange solid triangle. What this does is allows me to plot points of the curve in order. If I don t
do this I have to plot the first point, then the last, and then successive points after the first. Very
confusing. I do this for all curve types. Next I clicked on each guide point as I went around in
clockwise order. After clicking on the last point (the one BEFORE the start point) I right clicked
and chose Close loop nicely . I immediately right clicked again and chose Done and Exit
Tool . I will use this same sequence for all but the Polyline tool. Note that the resulting curve
misses all but the last two points. It is hard to know where it is going to draw the curve except
you can be sure it will be inside the points in cases of closed loops that are all concave.


Now I am going to draw a Polyline curve. This is not actually a curve, but a series of connected
points with straight lines in between. It is different than using the Line tool to connect a number
of points however. In the former case when you use the Push/Pull to to give the curve volume the
walls are smooth with hidden lines. In the latter case the walls appear as flat surfaces with lines
clearly delineating them. See fourth picture above right. This is a useful aspect of this tool, but
more useful is that it can be converted to either a Uniform B-Spline Curve or a Cubic Bezier
Curve. I drew the Polyline curve using the same sequence of steps as the Classic Bezier Curve
except in place of Close loop nicely I chose Close loop with line , the only option available.
See the fifth picture above left. You may notice that the intersections are not exactly on the guide
points. While the Polyline tool locates the guide points and provides a tool tip stating so, it
doesn t actually snap to those points. So if your work is critical, zoom in very closely to place
points.
Now let s convert this Polyline Curve to a Uniform B-Spline Curve. With the select tool I select
the Polyline curve, right click and choose Convert to Uniform B-Spline . I get the sixth picture
shown above right. The Uniform B-Spline Curve is similar to the Classic Bezier Curve. Don t let
these names throw you; they are just names for different algorithms. They could be called curve
Type A, Type B etc. But again this curve misses all the guide points except the one I started on.
Also the bottom of the curve is quite different than the Classic Bezier Curve, mostly because I
couldn t choose Close loop nicely when I made the Polyline curve from which this curve was
constructed.


Now we will convert the very same Polyline curve shown in the fifth picture above left to a
Cubic Bezier Curve. We do it the same way. With the Select tool we select the Polyline curve,
right click and choose Convert to Cubic Bezier Curve . We get the seventh curve shown above
left. Notice this curve hits all the guide points. This make the Cubic Bezier Curve much easier to
control and it is the one we will use when drawing curved furniture parts.
We don t need to construct Cubic Bezier Curves from Polyline curves. We can do that directly
using the Cubic Bezier Tool. I draw this curve using exactly the same sequence I used to draw
the Classic Bezier Curve, starting at the same point and finishing with Close loop nicely . The
result is the eighth picture shown above right. As we might expect, this curve too connects all the
points, though it is shaped slightly different at the bottom from the Cubic Bezier Curve
constructed using the Polyline tool. This is largely because I was able to choose Close loop
nicely instead of closing the Polyline Curve with Close loop with line Which curve is more
appealing is in the eye of the beholder, but clearly the Cubic Bezier Curve is the one most
predictable and hence most controllable. It will be our choice.


Before leaving this lengthy comparison of curve types I should mention two things. First, you do
not have to close these curves, they can remain open. Simply do not choose either closing
method and go straight to Done and Exit Tool . Secondly, read the Adobe file provide in the
unzipped file called Tutorial BezierSpline - English - v1.1 - 20 Jan 08.pdf . It covers a lot more
material than I reasonably can here.
Now let s get to the real purpose of this tutorial - drawing furniture! For this installment we are
going to use the Office Table available for download on my Free Plans page, or by clicking the
link just provided. Look at the corner and edges shown in the picture shown above left. Notice
how smooth the corner and edges look and how they are void of ugly delineating lines. They
appear much as they would on the real piece. This is the effect we want to achieve in our model
today.


At right is the profile for the edge. It id formed along the bottom with a standard 1/4 round over
router bit. We will model it with one quadrant of a 1/4 circle. The top edge is formed by a
special router bit that is used to cut gradually sloping edges on table tops and stair hand rails. We
will model this profile with the aid of the Cubic Bezier Curve tool. There are a number of ways
to place points that outline this profile for the Cubic Bezier Curve tool to follow. You can go to
the manufacturer s catalog and scan the profile in, then using the dimensions provided in the
catalog adjust the .jpg image in SketchUp to size and place points at strategic places on a
separate layer. Or you can do as I did which was to make a few measurements on the bit and
estimate the profile by eye. That is what we will do here.
The overall dimensions of the top are 1 thick by 30 wide by 72 long. Not shown in the
drawing above right are some dimensions I made on the actual bit. The thumbnail curve extends
back from the edge 1 and down from the edge 1/2 . That is convenient because it leaves a 1/4
flat on the edge for the router bit bearings to follow. But for our drawing purposes what it means
is that I will subtract 2 from the length and width and draw a rectangle that size. Next, using
Push/Pull, I will construct stock 1 thick. Next I will draw this profile extending at a right angle
from the center line of one end. I aid the drawing I start with a rectangle, actually a 1 square in
this case. Now I have to put a radius on all four corners. The radius, looking from the top, is 1
1/4 . However, I brought the ends and sides in 1 each to account for the profile I am going to
add. So the radius I need to draw is actually 1/4 . Note that for drawing purposes it is convenient
that the corner radius is large than the profile depth. After drawing the radius I use the Push/Pull
tool to round all four corner corners. Check closely to be sure that all four corners are rounded
appropriately or the Follow Me operation will not work. See picture at left.
Now I will draw the edge profile. Reference the picture at right to follow along. First I draw the
1/4 radius on the bottom/outside edge. Next I need to plot some construction points with the
Tape Measure tool. This is as much artistry and trial-and-error as it is drawing. Coming up with
construction points that exactly match the profile you want is almost impossible. But you can
come very close if you spend enough time. For this exercise I chose the following points
referenced from the center point of the outside edge of the square box. If you think of this point
as the origin (0,0) in an X-Y plane, plot the points (1/16 ,3/16 ), (1/4 ,5/16 ) and (5/8 ,7/16 ).
There are now five points to use with the Cubic Bezier Curve tool. The origin, or center of the
outside edge of the square, the three points we just plotted and the center or the table top stock. I
start with the origin and end on the table top clicking each point. I zoom in very close to be sure I
click on each of these points. Remember, the Bezier tools do not snap to construction points, end
points or intersections. You must be sure that you click on them. After all the points have been
clicked I right click and choose Done and Exit Tool to end the curve. This is not a closed
Bezier curve, it is open. Now, to make sure I connected all the points and formed a surface I
select the area enclosed by the top and left edge of the square and the Cubic Bezier Curve. If it is
a surface it becomes highlighted with blue dots, which is what I want.
Now I can erase the unwanted lines and delete the construction lines and guide points. With the
Follow Me tool I select the profile and follow the top edge of the table top stock. While doing
this the Follow Me tool may want to wander to another path. Simply back up and follow more
closely. See the partially completed operation at left. I continue all around until I am back at the
beginning before releasing the left mouse button.
Now, with the Eraser tool, and the Ctrl key held down, I use the Eraser much like a paint brush
and hide the unwanted lines on the top, edge and bottom all around. If I end up with the profile a
different color than the main top I simply right click on the profile and choose Reverse Faces .
The finished table top is shown at right.
The Cubic Bezier Curve can be edited prior to the Follow Me operation. This is useful if the
curve doesn t quite give you the results you wanted. Simply select the curve with the Select tool.
Next select the Edit tool. The plotted points and lines connection them will appear in orange.
Move one of the points with your cursor to adjust the curve. See picture at left. It is best to make
minor adjustments this way. Rough the curve out with construction points and lines and use them
to plot the curve. Then with edit fine tune your curve.

In An Intermediate Google SketchUp Tutorial - Part 4 I will show you how to draw these bracket
ogee feet using the Cubic Bezier Curve tool. See you then.

Notice
With this tutorial I am trying something new. I am capturing the drawing of each tutorial
installment, along with voice instruction, in a .AVI file. Anyone wishing a copy can go to my
Contact page and email me to request one. Be sure to provide all information, including mailing
address, necessary for me to get the file to you. I will charge a nominal fee of $6.00 US to cover
the cost of the mailing envelope, mailing fees, DVD and jewel case. I will put as many parts
(tutorial installments) on one DVD as I can and still charge only $6. Parts 1 & 2 of this tutorial
fit on one DVD. I don t know how the rest will divide up. These .AVI files are not professionally
created files, but I believe you will find them very instructional for those who prefer visual
learning.

Weitere ähnliche Inhalte

Was ist angesagt?

Production log
Production log Production log
Production log Fryers
 
Lesson revolve
Lesson revolveLesson revolve
Lesson revolveMr_Burns
 
How to Use the Photoshop Pen Tool – Photoshop Beginner Tutorial
How to Use the Photoshop Pen Tool – Photoshop Beginner TutorialHow to Use the Photoshop Pen Tool – Photoshop Beginner Tutorial
How to Use the Photoshop Pen Tool – Photoshop Beginner TutorialTowab Muhammad Yusuf
 
FMP Production log
FMP Production logFMP Production log
FMP Production logFryers
 
DID Unit 2 Exercises
DID Unit 2 ExercisesDID Unit 2 Exercises
DID Unit 2 ExercisesMrLawler
 
Solidworks 2012-basic-tutorials compress
Solidworks 2012-basic-tutorials compressSolidworks 2012-basic-tutorials compress
Solidworks 2012-basic-tutorials compressMahdi Zatout
 
How to - Edit the Settings and Layout on Netvibes
How to - Edit the Settings and Layout on NetvibesHow to - Edit the Settings and Layout on Netvibes
How to - Edit the Settings and Layout on Netvibesmmoore17
 
Double page spread evidence
Double page spread evidenceDouble page spread evidence
Double page spread evidenceCaponEmily
 
Tinkercad lesson 2
Tinkercad lesson 2Tinkercad lesson 2
Tinkercad lesson 2Aaron Maurer
 
How To - Add a Text Widget to Netvibes
How To - Add a Text Widget to NetvibesHow To - Add a Text Widget to Netvibes
How To - Add a Text Widget to Netvibesmmoore17
 

Was ist angesagt? (13)

Dwg 106 module 2 part 1
Dwg 106 module 2 part 1Dwg 106 module 2 part 1
Dwg 106 module 2 part 1
 
Production log
Production log Production log
Production log
 
Lesson revolve
Lesson revolveLesson revolve
Lesson revolve
 
How to Use the Photoshop Pen Tool – Photoshop Beginner Tutorial
How to Use the Photoshop Pen Tool – Photoshop Beginner TutorialHow to Use the Photoshop Pen Tool – Photoshop Beginner Tutorial
How to Use the Photoshop Pen Tool – Photoshop Beginner Tutorial
 
FMP Production log
FMP Production logFMP Production log
FMP Production log
 
DID Unit 2 Exercises
DID Unit 2 ExercisesDID Unit 2 Exercises
DID Unit 2 Exercises
 
Solidworks 2012-basic-tutorials compress
Solidworks 2012-basic-tutorials compressSolidworks 2012-basic-tutorials compress
Solidworks 2012-basic-tutorials compress
 
How to - Edit the Settings and Layout on Netvibes
How to - Edit the Settings and Layout on NetvibesHow to - Edit the Settings and Layout on Netvibes
How to - Edit the Settings and Layout on Netvibes
 
Production log
Production logProduction log
Production log
 
Skills indesign
Skills indesignSkills indesign
Skills indesign
 
Double page spread evidence
Double page spread evidenceDouble page spread evidence
Double page spread evidence
 
Tinkercad lesson 2
Tinkercad lesson 2Tinkercad lesson 2
Tinkercad lesson 2
 
How To - Add a Text Widget to Netvibes
How To - Add a Text Widget to NetvibesHow To - Add a Text Widget to Netvibes
How To - Add a Text Widget to Netvibes
 

Andere mochten auch

Andere mochten auch (6)

rails.html
rails.htmlrails.html
rails.html
 
p10
p10p10
p10
 
Informing Faculty Case Template
Informing Faculty Case TemplateInforming Faculty Case Template
Informing Faculty Case Template
 
M Y S P I R I T U A L Q U E S T O N D R
M Y  S P I R I T U A L  Q U E S T O N   D RM Y  S P I R I T U A L  Q U E S T O N   D R
M Y S P I R I T U A L Q U E S T O N D R
 
FreshAir2008
FreshAir2008FreshAir2008
FreshAir2008
 
M.S.Transcript
M.S.TranscriptM.S.Transcript
M.S.Transcript
 

Ähnlich wie An%20Intermediate%20Google%20SketchUp%20Tutorial%20-%20Part%203

Experiments for FMP
Experiments for FMPExperiments for FMP
Experiments for FMPaliceleeman
 
Tutorial: Photoshop Paths Explained
Tutorial: Photoshop Paths ExplainedTutorial: Photoshop Paths Explained
Tutorial: Photoshop Paths ExplainedClippingimages
 
Editing skills
Editing skillsEditing skills
Editing skillsMattRogero
 
Editingskills patch tool
Editingskills patch toolEditingskills patch tool
Editingskills patch toolalexclare
 
AiM Spinner Design Tutorial in Solidworks
AiM Spinner Design Tutorial in SolidworksAiM Spinner Design Tutorial in Solidworks
AiM Spinner Design Tutorial in Solidworksdsp39
 
How to Make Shapes in Photoshop CC 2024.
How to Make Shapes in Photoshop CC 2024.How to Make Shapes in Photoshop CC 2024.
How to Make Shapes in Photoshop CC 2024.Zenith Clipping
 
A graphic library and an application for simple curve manipolation
A graphic library and an application for simple curve manipolationA graphic library and an application for simple curve manipolation
A graphic library and an application for simple curve manipolationgraphitech
 
Unit66 production log_060314 (1)
Unit66 production log_060314 (1)Unit66 production log_060314 (1)
Unit66 production log_060314 (1)Luke Summers
 
6. production reflection
6. production reflection6. production reflection
6. production reflectionConnorAbbott3
 
6. [pro forma] project pro-forma
6. [pro forma] project pro-forma6. [pro forma] project pro-forma
6. [pro forma] project pro-formaWill NotTellYou
 
Advert 1 -billboard advert creation process
Advert 1 -billboard advert creation processAdvert 1 -billboard advert creation process
Advert 1 -billboard advert creation processomar2099
 
Advert 1 -billboard_ad_creation_process_f
Advert 1 -billboard_ad_creation_process_fAdvert 1 -billboard_ad_creation_process_f
Advert 1 -billboard_ad_creation_process_fomar2099
 
Educ 215 final- how to guide
Educ 215 final- how to guideEduc 215 final- how to guide
Educ 215 final- how to guidesmemontech
 
Sift logo creation analysis
Sift logo creation analysisSift logo creation analysis
Sift logo creation analysisomar2099
 
DID Unit 2: Exercises
DID Unit 2: Exercises DID Unit 2: Exercises
DID Unit 2: Exercises MrLawler
 
revit architecture basics
revit architecture basicsrevit architecture basics
revit architecture basicsali lemssefer
 

Ähnlich wie An%20Intermediate%20Google%20SketchUp%20Tutorial%20-%20Part%203 (20)

Experiments for FMP
Experiments for FMPExperiments for FMP
Experiments for FMP
 
Tutorial: Photoshop Paths Explained
Tutorial: Photoshop Paths ExplainedTutorial: Photoshop Paths Explained
Tutorial: Photoshop Paths Explained
 
Editing skills
Editing skillsEditing skills
Editing skills
 
Editingskills patch tool
Editingskills patch toolEditingskills patch tool
Editingskills patch tool
 
Unit Work Planes
Unit Work PlanesUnit Work Planes
Unit Work Planes
 
AiM Spinner Design Tutorial in Solidworks
AiM Spinner Design Tutorial in SolidworksAiM Spinner Design Tutorial in Solidworks
AiM Spinner Design Tutorial in Solidworks
 
How to Make Shapes in Photoshop CC 2024.
How to Make Shapes in Photoshop CC 2024.How to Make Shapes in Photoshop CC 2024.
How to Make Shapes in Photoshop CC 2024.
 
A graphic library and an application for simple curve manipolation
A graphic library and an application for simple curve manipolationA graphic library and an application for simple curve manipolation
A graphic library and an application for simple curve manipolation
 
Unit66 production log_060314 (1)
Unit66 production log_060314 (1)Unit66 production log_060314 (1)
Unit66 production log_060314 (1)
 
Unit 14 LO3
Unit 14 LO3Unit 14 LO3
Unit 14 LO3
 
Unit 14 LO3
Unit 14  LO3Unit 14  LO3
Unit 14 LO3
 
Unit 14 LO3
Unit 14 LO3Unit 14 LO3
Unit 14 LO3
 
6. production reflection
6. production reflection6. production reflection
6. production reflection
 
6. [pro forma] project pro-forma
6. [pro forma] project pro-forma6. [pro forma] project pro-forma
6. [pro forma] project pro-forma
 
Advert 1 -billboard advert creation process
Advert 1 -billboard advert creation processAdvert 1 -billboard advert creation process
Advert 1 -billboard advert creation process
 
Advert 1 -billboard_ad_creation_process_f
Advert 1 -billboard_ad_creation_process_fAdvert 1 -billboard_ad_creation_process_f
Advert 1 -billboard_ad_creation_process_f
 
Educ 215 final- how to guide
Educ 215 final- how to guideEduc 215 final- how to guide
Educ 215 final- how to guide
 
Sift logo creation analysis
Sift logo creation analysisSift logo creation analysis
Sift logo creation analysis
 
DID Unit 2: Exercises
DID Unit 2: Exercises DID Unit 2: Exercises
DID Unit 2: Exercises
 
revit architecture basics
revit architecture basicsrevit architecture basics
revit architecture basics
 

Mehr von tutorialsruby

<img src="../i/r_14.png" />
<img src="../i/r_14.png" /><img src="../i/r_14.png" />
<img src="../i/r_14.png" />tutorialsruby
 
TopStyle Help & <b>Tutorial</b>
TopStyle Help & <b>Tutorial</b>TopStyle Help & <b>Tutorial</b>
TopStyle Help & <b>Tutorial</b>tutorialsruby
 
The Art Institute of Atlanta IMD 210 Fundamentals of Scripting <b>...</b>
The Art Institute of Atlanta IMD 210 Fundamentals of Scripting <b>...</b>The Art Institute of Atlanta IMD 210 Fundamentals of Scripting <b>...</b>
The Art Institute of Atlanta IMD 210 Fundamentals of Scripting <b>...</b>tutorialsruby
 
<img src="../i/r_14.png" />
<img src="../i/r_14.png" /><img src="../i/r_14.png" />
<img src="../i/r_14.png" />tutorialsruby
 
<img src="../i/r_14.png" />
<img src="../i/r_14.png" /><img src="../i/r_14.png" />
<img src="../i/r_14.png" />tutorialsruby
 
Standardization and Knowledge Transfer – INS0
Standardization and Knowledge Transfer – INS0Standardization and Knowledge Transfer – INS0
Standardization and Knowledge Transfer – INS0tutorialsruby
 
0047ecaa6ea3e9ac0a13a2fe96f4de3bfd515c88f5d90c1fae79b956363d7f02c7fa060269
0047ecaa6ea3e9ac0a13a2fe96f4de3bfd515c88f5d90c1fae79b956363d7f02c7fa0602690047ecaa6ea3e9ac0a13a2fe96f4de3bfd515c88f5d90c1fae79b956363d7f02c7fa060269
0047ecaa6ea3e9ac0a13a2fe96f4de3bfd515c88f5d90c1fae79b956363d7f02c7fa060269tutorialsruby
 
BloggingWithStyle_2008
BloggingWithStyle_2008BloggingWithStyle_2008
BloggingWithStyle_2008tutorialsruby
 
BloggingWithStyle_2008
BloggingWithStyle_2008BloggingWithStyle_2008
BloggingWithStyle_2008tutorialsruby
 
cascadingstylesheets
cascadingstylesheetscascadingstylesheets
cascadingstylesheetstutorialsruby
 
cascadingstylesheets
cascadingstylesheetscascadingstylesheets
cascadingstylesheetstutorialsruby
 

Mehr von tutorialsruby (20)

<img src="../i/r_14.png" />
<img src="../i/r_14.png" /><img src="../i/r_14.png" />
<img src="../i/r_14.png" />
 
TopStyle Help & <b>Tutorial</b>
TopStyle Help & <b>Tutorial</b>TopStyle Help & <b>Tutorial</b>
TopStyle Help & <b>Tutorial</b>
 
The Art Institute of Atlanta IMD 210 Fundamentals of Scripting <b>...</b>
The Art Institute of Atlanta IMD 210 Fundamentals of Scripting <b>...</b>The Art Institute of Atlanta IMD 210 Fundamentals of Scripting <b>...</b>
The Art Institute of Atlanta IMD 210 Fundamentals of Scripting <b>...</b>
 
<img src="../i/r_14.png" />
<img src="../i/r_14.png" /><img src="../i/r_14.png" />
<img src="../i/r_14.png" />
 
<img src="../i/r_14.png" />
<img src="../i/r_14.png" /><img src="../i/r_14.png" />
<img src="../i/r_14.png" />
 
Standardization and Knowledge Transfer – INS0
Standardization and Knowledge Transfer – INS0Standardization and Knowledge Transfer – INS0
Standardization and Knowledge Transfer – INS0
 
xhtml_basics
xhtml_basicsxhtml_basics
xhtml_basics
 
xhtml_basics
xhtml_basicsxhtml_basics
xhtml_basics
 
xhtml-documentation
xhtml-documentationxhtml-documentation
xhtml-documentation
 
xhtml-documentation
xhtml-documentationxhtml-documentation
xhtml-documentation
 
CSS
CSSCSS
CSS
 
CSS
CSSCSS
CSS
 
0047ecaa6ea3e9ac0a13a2fe96f4de3bfd515c88f5d90c1fae79b956363d7f02c7fa060269
0047ecaa6ea3e9ac0a13a2fe96f4de3bfd515c88f5d90c1fae79b956363d7f02c7fa0602690047ecaa6ea3e9ac0a13a2fe96f4de3bfd515c88f5d90c1fae79b956363d7f02c7fa060269
0047ecaa6ea3e9ac0a13a2fe96f4de3bfd515c88f5d90c1fae79b956363d7f02c7fa060269
 
0047ecaa6ea3e9ac0a13a2fe96f4de3bfd515c88f5d90c1fae79b956363d7f02c7fa060269
0047ecaa6ea3e9ac0a13a2fe96f4de3bfd515c88f5d90c1fae79b956363d7f02c7fa0602690047ecaa6ea3e9ac0a13a2fe96f4de3bfd515c88f5d90c1fae79b956363d7f02c7fa060269
0047ecaa6ea3e9ac0a13a2fe96f4de3bfd515c88f5d90c1fae79b956363d7f02c7fa060269
 
HowTo_CSS
HowTo_CSSHowTo_CSS
HowTo_CSS
 
HowTo_CSS
HowTo_CSSHowTo_CSS
HowTo_CSS
 
BloggingWithStyle_2008
BloggingWithStyle_2008BloggingWithStyle_2008
BloggingWithStyle_2008
 
BloggingWithStyle_2008
BloggingWithStyle_2008BloggingWithStyle_2008
BloggingWithStyle_2008
 
cascadingstylesheets
cascadingstylesheetscascadingstylesheets
cascadingstylesheets
 
cascadingstylesheets
cascadingstylesheetscascadingstylesheets
cascadingstylesheets
 

Kürzlich hochgeladen

Breaking the Kubernetes Kill Chain: Host Path Mount
Breaking the Kubernetes Kill Chain: Host Path MountBreaking the Kubernetes Kill Chain: Host Path Mount
Breaking the Kubernetes Kill Chain: Host Path MountPuma Security, LLC
 
Strategies for Unlocking Knowledge Management in Microsoft 365 in the Copilot...
Strategies for Unlocking Knowledge Management in Microsoft 365 in the Copilot...Strategies for Unlocking Knowledge Management in Microsoft 365 in the Copilot...
Strategies for Unlocking Knowledge Management in Microsoft 365 in the Copilot...Drew Madelung
 
Slack Application Development 101 Slides
Slack Application Development 101 SlidesSlack Application Development 101 Slides
Slack Application Development 101 Slidespraypatel2
 
CNv6 Instructor Chapter 6 Quality of Service
CNv6 Instructor Chapter 6 Quality of ServiceCNv6 Instructor Chapter 6 Quality of Service
CNv6 Instructor Chapter 6 Quality of Servicegiselly40
 
08448380779 Call Girls In Civil Lines Women Seeking Men
08448380779 Call Girls In Civil Lines Women Seeking Men08448380779 Call Girls In Civil Lines Women Seeking Men
08448380779 Call Girls In Civil Lines Women Seeking MenDelhi Call girls
 
Scaling API-first – The story of a global engineering organization
Scaling API-first – The story of a global engineering organizationScaling API-first – The story of a global engineering organization
Scaling API-first – The story of a global engineering organizationRadu Cotescu
 
My Hashitalk Indonesia April 2024 Presentation
My Hashitalk Indonesia April 2024 PresentationMy Hashitalk Indonesia April 2024 Presentation
My Hashitalk Indonesia April 2024 PresentationRidwan Fadjar
 
08448380779 Call Girls In Greater Kailash - I Women Seeking Men
08448380779 Call Girls In Greater Kailash - I Women Seeking Men08448380779 Call Girls In Greater Kailash - I Women Seeking Men
08448380779 Call Girls In Greater Kailash - I Women Seeking MenDelhi Call girls
 
Transcript: #StandardsGoals for 2024: What’s new for BISAC - Tech Forum 2024
Transcript: #StandardsGoals for 2024: What’s new for BISAC - Tech Forum 2024Transcript: #StandardsGoals for 2024: What’s new for BISAC - Tech Forum 2024
Transcript: #StandardsGoals for 2024: What’s new for BISAC - Tech Forum 2024BookNet Canada
 
FULL ENJOY 🔝 8264348440 🔝 Call Girls in Diplomatic Enclave | Delhi
FULL ENJOY 🔝 8264348440 🔝 Call Girls in Diplomatic Enclave | DelhiFULL ENJOY 🔝 8264348440 🔝 Call Girls in Diplomatic Enclave | Delhi
FULL ENJOY 🔝 8264348440 🔝 Call Girls in Diplomatic Enclave | Delhisoniya singh
 
A Domino Admins Adventures (Engage 2024)
A Domino Admins Adventures (Engage 2024)A Domino Admins Adventures (Engage 2024)
A Domino Admins Adventures (Engage 2024)Gabriella Davis
 
#StandardsGoals for 2024: What’s new for BISAC - Tech Forum 2024
#StandardsGoals for 2024: What’s new for BISAC - Tech Forum 2024#StandardsGoals for 2024: What’s new for BISAC - Tech Forum 2024
#StandardsGoals for 2024: What’s new for BISAC - Tech Forum 2024BookNet Canada
 
Mastering MySQL Database Architecture: Deep Dive into MySQL Shell and MySQL R...
Mastering MySQL Database Architecture: Deep Dive into MySQL Shell and MySQL R...Mastering MySQL Database Architecture: Deep Dive into MySQL Shell and MySQL R...
Mastering MySQL Database Architecture: Deep Dive into MySQL Shell and MySQL R...Miguel Araújo
 
Presentation on how to chat with PDF using ChatGPT code interpreter
Presentation on how to chat with PDF using ChatGPT code interpreterPresentation on how to chat with PDF using ChatGPT code interpreter
Presentation on how to chat with PDF using ChatGPT code interpreternaman860154
 
Kalyanpur ) Call Girls in Lucknow Finest Escorts Service 🍸 8923113531 🎰 Avail...
Kalyanpur ) Call Girls in Lucknow Finest Escorts Service 🍸 8923113531 🎰 Avail...Kalyanpur ) Call Girls in Lucknow Finest Escorts Service 🍸 8923113531 🎰 Avail...
Kalyanpur ) Call Girls in Lucknow Finest Escorts Service 🍸 8923113531 🎰 Avail...gurkirankumar98700
 
08448380779 Call Girls In Friends Colony Women Seeking Men
08448380779 Call Girls In Friends Colony Women Seeking Men08448380779 Call Girls In Friends Colony Women Seeking Men
08448380779 Call Girls In Friends Colony Women Seeking MenDelhi Call girls
 
SQL Database Design For Developers at php[tek] 2024
SQL Database Design For Developers at php[tek] 2024SQL Database Design For Developers at php[tek] 2024
SQL Database Design For Developers at php[tek] 2024Scott Keck-Warren
 
Neo4j - How KGs are shaping the future of Generative AI at AWS Summit London ...
Neo4j - How KGs are shaping the future of Generative AI at AWS Summit London ...Neo4j - How KGs are shaping the future of Generative AI at AWS Summit London ...
Neo4j - How KGs are shaping the future of Generative AI at AWS Summit London ...Neo4j
 
Salesforce Community Group Quito, Salesforce 101
Salesforce Community Group Quito, Salesforce 101Salesforce Community Group Quito, Salesforce 101
Salesforce Community Group Quito, Salesforce 101Paola De la Torre
 
The Role of Taxonomy and Ontology in Semantic Layers - Heather Hedden.pdf
The Role of Taxonomy and Ontology in Semantic Layers - Heather Hedden.pdfThe Role of Taxonomy and Ontology in Semantic Layers - Heather Hedden.pdf
The Role of Taxonomy and Ontology in Semantic Layers - Heather Hedden.pdfEnterprise Knowledge
 

Kürzlich hochgeladen (20)

Breaking the Kubernetes Kill Chain: Host Path Mount
Breaking the Kubernetes Kill Chain: Host Path MountBreaking the Kubernetes Kill Chain: Host Path Mount
Breaking the Kubernetes Kill Chain: Host Path Mount
 
Strategies for Unlocking Knowledge Management in Microsoft 365 in the Copilot...
Strategies for Unlocking Knowledge Management in Microsoft 365 in the Copilot...Strategies for Unlocking Knowledge Management in Microsoft 365 in the Copilot...
Strategies for Unlocking Knowledge Management in Microsoft 365 in the Copilot...
 
Slack Application Development 101 Slides
Slack Application Development 101 SlidesSlack Application Development 101 Slides
Slack Application Development 101 Slides
 
CNv6 Instructor Chapter 6 Quality of Service
CNv6 Instructor Chapter 6 Quality of ServiceCNv6 Instructor Chapter 6 Quality of Service
CNv6 Instructor Chapter 6 Quality of Service
 
08448380779 Call Girls In Civil Lines Women Seeking Men
08448380779 Call Girls In Civil Lines Women Seeking Men08448380779 Call Girls In Civil Lines Women Seeking Men
08448380779 Call Girls In Civil Lines Women Seeking Men
 
Scaling API-first – The story of a global engineering organization
Scaling API-first – The story of a global engineering organizationScaling API-first – The story of a global engineering organization
Scaling API-first – The story of a global engineering organization
 
My Hashitalk Indonesia April 2024 Presentation
My Hashitalk Indonesia April 2024 PresentationMy Hashitalk Indonesia April 2024 Presentation
My Hashitalk Indonesia April 2024 Presentation
 
08448380779 Call Girls In Greater Kailash - I Women Seeking Men
08448380779 Call Girls In Greater Kailash - I Women Seeking Men08448380779 Call Girls In Greater Kailash - I Women Seeking Men
08448380779 Call Girls In Greater Kailash - I Women Seeking Men
 
Transcript: #StandardsGoals for 2024: What’s new for BISAC - Tech Forum 2024
Transcript: #StandardsGoals for 2024: What’s new for BISAC - Tech Forum 2024Transcript: #StandardsGoals for 2024: What’s new for BISAC - Tech Forum 2024
Transcript: #StandardsGoals for 2024: What’s new for BISAC - Tech Forum 2024
 
FULL ENJOY 🔝 8264348440 🔝 Call Girls in Diplomatic Enclave | Delhi
FULL ENJOY 🔝 8264348440 🔝 Call Girls in Diplomatic Enclave | DelhiFULL ENJOY 🔝 8264348440 🔝 Call Girls in Diplomatic Enclave | Delhi
FULL ENJOY 🔝 8264348440 🔝 Call Girls in Diplomatic Enclave | Delhi
 
A Domino Admins Adventures (Engage 2024)
A Domino Admins Adventures (Engage 2024)A Domino Admins Adventures (Engage 2024)
A Domino Admins Adventures (Engage 2024)
 
#StandardsGoals for 2024: What’s new for BISAC - Tech Forum 2024
#StandardsGoals for 2024: What’s new for BISAC - Tech Forum 2024#StandardsGoals for 2024: What’s new for BISAC - Tech Forum 2024
#StandardsGoals for 2024: What’s new for BISAC - Tech Forum 2024
 
Mastering MySQL Database Architecture: Deep Dive into MySQL Shell and MySQL R...
Mastering MySQL Database Architecture: Deep Dive into MySQL Shell and MySQL R...Mastering MySQL Database Architecture: Deep Dive into MySQL Shell and MySQL R...
Mastering MySQL Database Architecture: Deep Dive into MySQL Shell and MySQL R...
 
Presentation on how to chat with PDF using ChatGPT code interpreter
Presentation on how to chat with PDF using ChatGPT code interpreterPresentation on how to chat with PDF using ChatGPT code interpreter
Presentation on how to chat with PDF using ChatGPT code interpreter
 
Kalyanpur ) Call Girls in Lucknow Finest Escorts Service 🍸 8923113531 🎰 Avail...
Kalyanpur ) Call Girls in Lucknow Finest Escorts Service 🍸 8923113531 🎰 Avail...Kalyanpur ) Call Girls in Lucknow Finest Escorts Service 🍸 8923113531 🎰 Avail...
Kalyanpur ) Call Girls in Lucknow Finest Escorts Service 🍸 8923113531 🎰 Avail...
 
08448380779 Call Girls In Friends Colony Women Seeking Men
08448380779 Call Girls In Friends Colony Women Seeking Men08448380779 Call Girls In Friends Colony Women Seeking Men
08448380779 Call Girls In Friends Colony Women Seeking Men
 
SQL Database Design For Developers at php[tek] 2024
SQL Database Design For Developers at php[tek] 2024SQL Database Design For Developers at php[tek] 2024
SQL Database Design For Developers at php[tek] 2024
 
Neo4j - How KGs are shaping the future of Generative AI at AWS Summit London ...
Neo4j - How KGs are shaping the future of Generative AI at AWS Summit London ...Neo4j - How KGs are shaping the future of Generative AI at AWS Summit London ...
Neo4j - How KGs are shaping the future of Generative AI at AWS Summit London ...
 
Salesforce Community Group Quito, Salesforce 101
Salesforce Community Group Quito, Salesforce 101Salesforce Community Group Quito, Salesforce 101
Salesforce Community Group Quito, Salesforce 101
 
The Role of Taxonomy and Ontology in Semantic Layers - Heather Hedden.pdf
The Role of Taxonomy and Ontology in Semantic Layers - Heather Hedden.pdfThe Role of Taxonomy and Ontology in Semantic Layers - Heather Hedden.pdf
The Role of Taxonomy and Ontology in Semantic Layers - Heather Hedden.pdf
 

An%20Intermediate%20Google%20SketchUp%20Tutorial%20-%20Part%203

  • 1. An Intermediate Google SketchUp Tutorial - Part 3 Note: Before reading this tutorial see Notice in the last paragraph. In this installment we are going to introduce some new tools that allow us to use curves other than circles or circle segments (arcs). These curves fall in a class called Bezier Curves (or Splines). For the technically inclined you can go to Wikipedia for a detailed description. Our interests as woodworkers are in using Bezier curves to form complex shapes such as Queen Anne legs. The bad news is the tools needed do not exist in the SketchUp. The good news is you can get them in a Ruby script and install them into SketchUp.
  • 2. The Ruby script we will use is actually a number of scripts, icons and other files. So you have to download a .zip file called bezierspline.zip. I recommend downloading it and saving it to disk before unzipping. I am not going to explain how to use ZIP files or how to install Ruby scripts into SketchUp. I assume you know how to do that by now. If you don t there are many places on the Internet to get help, or contact me through email or phone and I will help you (see Contact menu above). Maybe I will put this on a list of future tutorials. But for now you are on your own. Download bezierspline.zip and install the unzipped files. In the unzipped files you will see a number of Adobe files. One is a user s manual and one is a quick help file that explains installation. You might want to read the latter at least.
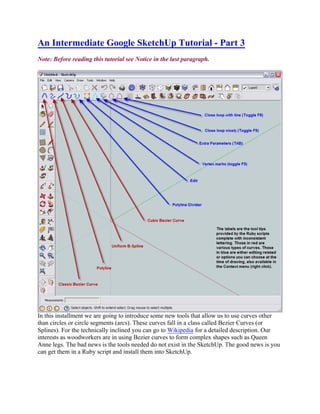
  • 3. When you have installed the scripts be sure to go to View/Toolbars and check Bezier Toolbar. Now you should have tool icons that look like those in the picture above left. I should pause here to say that most Ruby scripts are provided free. Some cost a few dollars, but generally they are free. They are written mostly as a hobby or need, by people like us or software engineers that can t help themselves - they need to hack. Consequently, these scripts do not receive the level of testing that commercial software does. So you might expect an occasional strange behavior, though my experience has been quite good. Also, since you are getting the source, most authors allow you to modify the scripts yourself to tailor them to your needs. I do this a lot. But read
  • 4. what is said in the source about copyright. Don t violate the license. These people are very helpful to you and I. We want to keep them active and sharing. Bezier curves can be difficult to use, at least the lower order ones. I will show you a comparison of each of the four types available here and then we will focus on the one that I find most useful. In the second picture above right is a grid I drew to compare these curves. I have placed a number of construction points on this grid which I will use with all curve types (by the way the grid and construction points were drawn using two other Ruby scripts). The curves I will draw will intentionally exaggerate problems with each type by using a closed curve which is only concave. But that will highlight why some are more difficult to use to get the shape you want. Click to enlarge the picture and observe the guide points.
  • 5. The first curve I am going to draw is the Classic Bezier Curve using its tool. The result is shown in the third picture above left. I started at the lower left corner and clicked on the starting guide point. Before clicking again I hit the shift key twice, quickly, which changed the red X to an orange solid triangle. What this does is allows me to plot points of the curve in order. If I don t do this I have to plot the first point, then the last, and then successive points after the first. Very confusing. I do this for all curve types. Next I clicked on each guide point as I went around in clockwise order. After clicking on the last point (the one BEFORE the start point) I right clicked and chose Close loop nicely . I immediately right clicked again and chose Done and Exit
  • 6. Tool . I will use this same sequence for all but the Polyline tool. Note that the resulting curve misses all but the last two points. It is hard to know where it is going to draw the curve except you can be sure it will be inside the points in cases of closed loops that are all concave. Now I am going to draw a Polyline curve. This is not actually a curve, but a series of connected points with straight lines in between. It is different than using the Line tool to connect a number of points however. In the former case when you use the Push/Pull to to give the curve volume the
  • 7. walls are smooth with hidden lines. In the latter case the walls appear as flat surfaces with lines clearly delineating them. See fourth picture above right. This is a useful aspect of this tool, but more useful is that it can be converted to either a Uniform B-Spline Curve or a Cubic Bezier Curve. I drew the Polyline curve using the same sequence of steps as the Classic Bezier Curve except in place of Close loop nicely I chose Close loop with line , the only option available. See the fifth picture above left. You may notice that the intersections are not exactly on the guide points. While the Polyline tool locates the guide points and provides a tool tip stating so, it doesn t actually snap to those points. So if your work is critical, zoom in very closely to place points.
  • 8. Now let s convert this Polyline Curve to a Uniform B-Spline Curve. With the select tool I select the Polyline curve, right click and choose Convert to Uniform B-Spline . I get the sixth picture shown above right. The Uniform B-Spline Curve is similar to the Classic Bezier Curve. Don t let these names throw you; they are just names for different algorithms. They could be called curve Type A, Type B etc. But again this curve misses all the guide points except the one I started on. Also the bottom of the curve is quite different than the Classic Bezier Curve, mostly because I
  • 9. couldn t choose Close loop nicely when I made the Polyline curve from which this curve was constructed. Now we will convert the very same Polyline curve shown in the fifth picture above left to a Cubic Bezier Curve. We do it the same way. With the Select tool we select the Polyline curve, right click and choose Convert to Cubic Bezier Curve . We get the seventh curve shown above left. Notice this curve hits all the guide points. This make the Cubic Bezier Curve much easier to control and it is the one we will use when drawing curved furniture parts.
  • 10. We don t need to construct Cubic Bezier Curves from Polyline curves. We can do that directly using the Cubic Bezier Tool. I draw this curve using exactly the same sequence I used to draw the Classic Bezier Curve, starting at the same point and finishing with Close loop nicely . The result is the eighth picture shown above right. As we might expect, this curve too connects all the points, though it is shaped slightly different at the bottom from the Cubic Bezier Curve constructed using the Polyline tool. This is largely because I was able to choose Close loop nicely instead of closing the Polyline Curve with Close loop with line Which curve is more appealing is in the eye of the beholder, but clearly the Cubic Bezier Curve is the one most predictable and hence most controllable. It will be our choice. Before leaving this lengthy comparison of curve types I should mention two things. First, you do not have to close these curves, they can remain open. Simply do not choose either closing method and go straight to Done and Exit Tool . Secondly, read the Adobe file provide in the unzipped file called Tutorial BezierSpline - English - v1.1 - 20 Jan 08.pdf . It covers a lot more material than I reasonably can here.
  • 11. Now let s get to the real purpose of this tutorial - drawing furniture! For this installment we are going to use the Office Table available for download on my Free Plans page, or by clicking the link just provided. Look at the corner and edges shown in the picture shown above left. Notice how smooth the corner and edges look and how they are void of ugly delineating lines. They appear much as they would on the real piece. This is the effect we want to achieve in our model today. At right is the profile for the edge. It id formed along the bottom with a standard 1/4 round over router bit. We will model it with one quadrant of a 1/4 circle. The top edge is formed by a special router bit that is used to cut gradually sloping edges on table tops and stair hand rails. We will model this profile with the aid of the Cubic Bezier Curve tool. There are a number of ways to place points that outline this profile for the Cubic Bezier Curve tool to follow. You can go to the manufacturer s catalog and scan the profile in, then using the dimensions provided in the catalog adjust the .jpg image in SketchUp to size and place points at strategic places on a separate layer. Or you can do as I did which was to make a few measurements on the bit and estimate the profile by eye. That is what we will do here.
  • 12. The overall dimensions of the top are 1 thick by 30 wide by 72 long. Not shown in the drawing above right are some dimensions I made on the actual bit. The thumbnail curve extends back from the edge 1 and down from the edge 1/2 . That is convenient because it leaves a 1/4 flat on the edge for the router bit bearings to follow. But for our drawing purposes what it means is that I will subtract 2 from the length and width and draw a rectangle that size. Next, using Push/Pull, I will construct stock 1 thick. Next I will draw this profile extending at a right angle from the center line of one end. I aid the drawing I start with a rectangle, actually a 1 square in this case. Now I have to put a radius on all four corners. The radius, looking from the top, is 1 1/4 . However, I brought the ends and sides in 1 each to account for the profile I am going to add. So the radius I need to draw is actually 1/4 . Note that for drawing purposes it is convenient that the corner radius is large than the profile depth. After drawing the radius I use the Push/Pull tool to round all four corner corners. Check closely to be sure that all four corners are rounded appropriately or the Follow Me operation will not work. See picture at left.
  • 13. Now I will draw the edge profile. Reference the picture at right to follow along. First I draw the 1/4 radius on the bottom/outside edge. Next I need to plot some construction points with the Tape Measure tool. This is as much artistry and trial-and-error as it is drawing. Coming up with construction points that exactly match the profile you want is almost impossible. But you can come very close if you spend enough time. For this exercise I chose the following points referenced from the center point of the outside edge of the square box. If you think of this point as the origin (0,0) in an X-Y plane, plot the points (1/16 ,3/16 ), (1/4 ,5/16 ) and (5/8 ,7/16 ). There are now five points to use with the Cubic Bezier Curve tool. The origin, or center of the outside edge of the square, the three points we just plotted and the center or the table top stock. I start with the origin and end on the table top clicking each point. I zoom in very close to be sure I click on each of these points. Remember, the Bezier tools do not snap to construction points, end points or intersections. You must be sure that you click on them. After all the points have been clicked I right click and choose Done and Exit Tool to end the curve. This is not a closed Bezier curve, it is open. Now, to make sure I connected all the points and formed a surface I select the area enclosed by the top and left edge of the square and the Cubic Bezier Curve. If it is a surface it becomes highlighted with blue dots, which is what I want.
  • 14. Now I can erase the unwanted lines and delete the construction lines and guide points. With the Follow Me tool I select the profile and follow the top edge of the table top stock. While doing this the Follow Me tool may want to wander to another path. Simply back up and follow more closely. See the partially completed operation at left. I continue all around until I am back at the beginning before releasing the left mouse button.
  • 15. Now, with the Eraser tool, and the Ctrl key held down, I use the Eraser much like a paint brush and hide the unwanted lines on the top, edge and bottom all around. If I end up with the profile a different color than the main top I simply right click on the profile and choose Reverse Faces . The finished table top is shown at right.
  • 16. The Cubic Bezier Curve can be edited prior to the Follow Me operation. This is useful if the curve doesn t quite give you the results you wanted. Simply select the curve with the Select tool. Next select the Edit tool. The plotted points and lines connection them will appear in orange. Move one of the points with your cursor to adjust the curve. See picture at left. It is best to make minor adjustments this way. Rough the curve out with construction points and lines and use them to plot the curve. Then with edit fine tune your curve. In An Intermediate Google SketchUp Tutorial - Part 4 I will show you how to draw these bracket ogee feet using the Cubic Bezier Curve tool. See you then. Notice
  • 17. With this tutorial I am trying something new. I am capturing the drawing of each tutorial installment, along with voice instruction, in a .AVI file. Anyone wishing a copy can go to my Contact page and email me to request one. Be sure to provide all information, including mailing address, necessary for me to get the file to you. I will charge a nominal fee of $6.00 US to cover the cost of the mailing envelope, mailing fees, DVD and jewel case. I will put as many parts (tutorial installments) on one DVD as I can and still charge only $6. Parts 1 & 2 of this tutorial fit on one DVD. I don t know how the rest will divide up. These .AVI files are not professionally created files, but I believe you will find them very instructional for those who prefer visual learning.