2. Technique 65
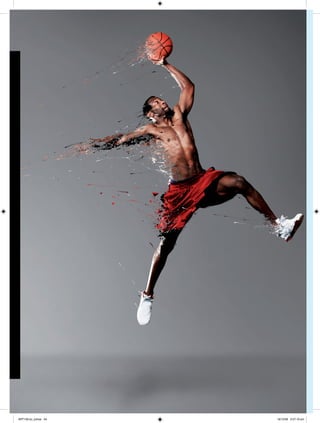
Photoshop CS3 or later 01 My objective
when approaching this
Create
visual was to create a
graphic and dynamic
montage, with a photo
turning into/being made out
dynamic
of paint. The first step is to
find the right photo, and
here I used a little bit of a
cliché – a basketball player.
distortion
The whole visual effect rests
on the photo used, so make
sure you choose wisely.
effects
Bring velocity and
meltdown to your
subjects with a little
Photoshop magic. Doucin
Pierre, aka Soemone,
shows you how…
I like to create dynamic work that conveys a sense of
velocity in its subjects, and the visual featured in this tutorial is a
prime example of that style. In the following steps, I’ll let you in on
one of the most effective and easily mastered techniques that I use
to make striking, dynamic distortions of subjects – in this case I’ve
used a model, although the technique can be adapted to any
objects that you wish to feature in your work, such as cars or trees.
In this tutorial we’ll use brushes to create what look like stains of 02 Open the photo (photo-original.jpg) from the disc. There are numerous ways
paint, but in your future work you can use similar techniques with to select and isolate the person. I chose the Pen tool (making sure Paths is selected in
any number of style forms to dissect and distort your subject. the Tool Options bar) as it enables you to isolate the curves of the body. Draw around
the person, then create a selection from the path and choose Select>Modify>Feather
and enter a value of 1. Remove the background using Delete.
Doucin Pierre movement and Time needed
After 10 years fragmentation of 4 hours
working as a graffiti subjects. He now
artist, Doucin Pierre’s works as a freelance
Skills
interest in digital graphic designer and
Using custom
techniques was is the artistic director
brushes
sparked when he of Factory 311
Using the Pen
tried his hand at (London). See more
tool to select
producing flyers and of his work at
objects
began winning www.soemone.com.
Using Layer
poster competitions.
Groups
Pierre’s prior
Dynamic
experience in
composition
painting and On the disc
photography has
enabled him to
The files you need to
complete this
03 Once the body of the basketball player has been isolated, create a new file
develop his digital tutorial can be found in A4 format – 300dpi and RGB. I’ve called it BasketKing (if this piece is to be printed,
design style very in Disc Contents use CMYK colour mode). Once the file has been created, apply a neutral grey
quickly, and his work Resources background colour and import the selected image of the basketball player. Resize the
focuses on both the Basketball player and place him where you want.
www.computerarts.co.uk Computer Arts February 2009
ART158.tut_pshop 65 16/12/08 5:57:20 pm
3. 66
05 A neutral background will bring out the basketball
04 It’s really important to have contrast and colours that are a little more raw in player. Create a new Layer Group called ‘Background’ to
the final piece than they were in the original photo, and we can bump these up using organise the layers. Create two new layers within this, and use
Curves. After this, desaturate the colours slightly using Hue/Saturation. I’ve chosen a the Gradient tool to apply a gradient with an Opacity of 25 per
Saturation value of -32. Now we can move onto the background. cent to each. In one, use a black-to-transparent gradient going
from the top-right to the bottom-left corners, and in the other
use a white-to-transparent gradient going from the bottom-left
to top-right corners.
07 To finish the work on the background, we’ll create the
06 Now create a ‘floor’. To do this, create a selection at the bottom of a new shadow of the basketball player. Using the Brush tool at 20%
layer and fill it with a very dark grey. Then apply a Gaussian blur of around 30%. With Opacity and 15% Flow, select Black and then, on a new layer,
the Brush tool on a low Opacity, blend the floor into the background (as demonstrated paint the shadow. Blur off the shadow on the edges with the
in the screenshots above). Eraser tool at 15% Opacity.
CV
Visualguide to
In pictures: a
rk of
the career and wo
iters
our Technique wr
Doucin
Pierre
Factory 311’s artistic
Jump Up – 2007
director demonstrates the Manchester United Soccer School – 2007 Tor Kristensen took the photo for this self-
power of his paint effect… This illustration was commissioned by Factory 311 (London). initiated piece.
Computer Arts February 2009 www.computerarts.co.uk
ART158.tut_pshop 66 16/12/08 5:57:23 pm
4. Technique 67
09 To create this liquid ‘decomposition’ effect, I use
08 This kind of project always ends up with a lot of layers – and it’s important brushes that create a paint-stain effect – these can be found
to anticipate this by creating and naming them so they’re easy to find and edit. To on sites such as Brusheezy.com, or you can create them
prepare yourself for the next stages, create Layer Groups to manage all the files. I’ve yourself. You’ll find my brushes on the disc. You can load these
created the following Layer Groups: Arms, Legs, Body, Ball, Form, Foot and by going to the Brushes palette, clicking the arrow and
Background. Apply a colour label to each of them if you wish. choosing Load Brushes.
10 Once you’ve imported the brushes and created the
Layer Groups, select the Brush tool and apply separate paint
strokes so that the splatters are on separate layers – and make 11 Now we’re ready to distort the body. We’ll start with the left arm because it’s
sure you name each layer to find them easily. For this exercise, I central to the movement of the piece. First, turn off the visibility of all the paint stains
used around 20 different paint stains on about 20 layers, but layers except for the first one you want to use. Place it over the arm, where you feel it
you can use more or less depending on your image and the works best, and select the layer (Ctrl/Cmd+click on the paint splat layer you’re working
effect you’re after. on in the Layers palette).
Sweet Hoodies – 2008
Of this personal work, Pierre says:
Personal work – 2007 “I like bright colour and a real soul. Le Cercle graphic – 2008 Wiz Khalifa – 2008
The photo at the centre of this self-initiated For me the soul is the starting This visual was created for the Brittany-based This image of Pittsburgh rapper Wiz Khalifa
piece was taken by Gildas Rafenel. point for creating a good visual.” eight-piece nu-jazz band Le Cercle. was commissioned by Factory 311, London.
www.computerarts.co.uk Computer Arts February 2009
ART158.tut_pshop 67 16/12/08 5:57:26 pm
5. 68 Technique
13 After building up the arm paint effect, you want to
12 Next, turn off the Splat layer’s visibility, select the Basketball Player layer, make parts of the underlying arm disappear. Do this by
and Cut and Paste. Do this several times with different splats to build up the arm. selecting part of the arm, blurring it slightly and then, with a
Decrease the Opacity of the basketball player to see the areas that have already been Standard brush (without the wet edge – 100% Opacity and
done. Place all the new layers created through Cutting and Pasting into the Arm Layer 100% Flow) delete the arm of the basketball player. Now the
Group that you created earlier. effect is pretty much complete on the arm.
Balance
Once the image is just about finished, all that
you need to do is check thoroughly that everything is
balanced and that there aren’t too many paint splats on
the arm or leg in relation to the other parts. Check that
you’ve not made too many lines of paint – it’s an important
part of your work to be self-critical.
15 Once you’ve finished ‘decomposing’ all the parts you want, all that remains
is to create the wispy traces of paint that detach from the body. These were made by
14 Now that you understand the technique, do the same painting with custom brushes, sampling colours from the basketball player and trying
to distort the ball, head, legs and feet, always placing the layers to create a sense of dynamism and movement.
in the designated Layer Groups so that you can find them
quickly if you decide to make changes. These steps can take
some time, especially at the beginning, but it’s the most
important part of this visual, so take all the time you need.
Computer Arts February 2009 www.computerarts.co.uk
ART158.tut_pshop 68 16/12/08 5:57:27 pm