
Empfohlen
Weitere ähnliche Inhalte
Andere mochten auch
Andere mochten auch (14)
Ähnlich wie A step for step tutorial on how to install and use the bretteleben
Ähnlich wie A step for step tutorial on how to install and use the bretteleben (20)
Kürzlich hochgeladen
Kürzlich hochgeladen (20)
A step for step tutorial on how to install and use the bretteleben
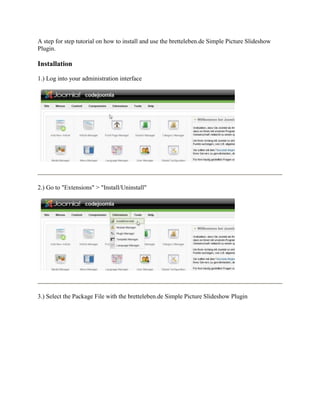
- 1. A step for step tutorial on how to install and use the bretteleben.de Simple Picture Slideshow Plugin. Installation 1.) Log into your administration interface 2.) Go to "Extensions" > "Install/Uninstall" 3.) Select the Package File with the bretteleben.de Simple Picture Slideshow Plugin
- 2. 4.) Click "Upload file & Install" 5.) If everything worked fine, you get the message "Install Plugin Success" 6.) Select "Extensions" > "Plugin Manager"
- 3. 7.) Find the "bretteleben.de Simple Picture Slideshow" and click it 8.) The first section of parameters controls the layout of the slideshow. The first parameter is the width of your slideshow in pixel. 9.) The next parameter is the height of your slideshow in pixel.
- 4. Pictures larger than set here are scaled by the visitors browser according to these settings. Smaller pictures are not enlarged. If possible you should offline scale your pictures to the width and height they will display because scaling by the visitors browser results in a loss of quality and it increases the time your page takes to load without any additional benefit for your visitor. 10.) The next parameter sets the position of the gallery within the available space. You may choose between left - centered - right, float left and float right. The last two options allow the gallery to get wrapped by your text. They also increase the dependence from the used template and will not always show the desired results! 11.) Background Color: The background color of your slideshow is of importance if you use pictures of different size or pictures with proportions different from the settings above. It prevents the next Pictures to be visible below the current one. Set the hexadecimal color-value without the leading pound key (#), e.g. ffffff for white.
- 5. 12.) "Sort Order" sets the order the images are shown. You may choose between alphabetic ascending, alphabetic descending, old to new and new to old (both use "last changed" not "created"!) and random. 13.) Next sections sets the values for the animation. "Time to show" is the time in seconds a picture is shown between two fades.
- 6. 14.) "Duration of Fading" is the time you set for the fading itself, again in seconds. In most cases 1 will do fine. 15.) The plugin moves transparency from 100% to 0% (or vice versa). "Fading steps" sets the stepwidth used. A value of 5 means, that the transparency is changed in 5 steps, each of 20%. 50 sets 50 steps, each of 2%. The higher this value the more smooth the fading but also the more computationally intensive. Setting a to high value when using large images may cause the set times to be excessed. Just try out. 16.) The next parameter sets if your slideshow starts automatically on pageload.
- 7. This option may be activated regardless of displaying controls. They do not influence this feature. 17.) The next section is about the optional control elements. The first parameter sets if you want to show them at all. 18.) The second parameter sets which elements to show, if they get shown left or right and in what sort order. This all is set with a combination of the values 1, 2, 3, 4, 5, and the minus sign "-".
- 8. 1 ... the Counter 2 ... Link/Button Start 3 ... Link/Button Stop 4 ... Link/Button Back 5 ... Link/Button Next '-' ... the minus sign splits the elements into left and right. If omitted, all elements are shown at the right. Samples: 1-2345 . . . . the counter at the left, the four links/buttons at the right 415 . . . . back-button/link, counter, next-button/link, all of them at the right side (no minus sign) 415- . . . . same elements again, this time all at the left side 19.) The next 4 parameters set what you want to use for the links. - Left empty, the plugin shows the automatically installed default buttons. - Insert any text and the text is shown. - Instead of text links you may also use buttons. Just insert the name of the image-file you want to be used (including the suffix). The plugin detects .jpg, .gif and .png and searches for the corresponding file in the set folder (we will set this a little later, by default it is "/images/stories/besps_buttons"). If the file exists, the image is shown. 20.) If you activate "Show captions?", you have the possibility to add Title and Text to your images.
- 9. Even when deactivated, Captions can be used to replace the (otherwise used by default) image filename as ALT-, TITLE-text. 21.) "Position of Captions" sets if the captions (and text) are shown crossfading over the lower part of the image or below the image. 22.) "Use links?" allows - if activated - to set links for the images.
- 10. 23.) Image root configures the path to the folder you are uploading (directly or stored in subfolders) your images. By default this parameter is set to /images/stories/ (and this folder is also used when the parameter is empty). In most cases this setting will fit your needs and there is no reason to change it. Only if you have organized your images in a folder structure outside of /images/stories/, put the path here. The set value of this parameter will be added to the folder name you insert in the code in your article automatically by the plugin and must not be repeated in the article. 24.) Buttonfolder If you are going to use custom buttons for the navigation between sets, this is the place to put the path to the folder you uploaded this buttons. By default this parameter is set to /images/stories/besps_buttons/ (and this folder is also used when the parameter is empty). 25.) Stylesheet If you have modified the default stylesheet besps.css or want to use a completely different stylesheet, you have the possibility to save it - with a different name - to the folder /plugins/content/plugin_besps and choose it here. This has the advantage that your renamed stylesheet does not get overwritten during an update like the default stylesheet besps.css.
- 11. 26.) JavaScript If you have modified the default JavaScript besps.js or want to use a completely different JavaScript, you have the possibility to save it - with a different name - to the folder /plugins/content/plugin_besps - and choose it here. This has the advantage that your renamed JavaScript does not get overwritten during an update like the default JavaScript besps.js. 27.) Preload This parameter offers the possibility to reduce the time, the page takes to load by replacing pictures with one small dummy-picture. This "besps.png" comes with the plugin and is stored in the folder /plugins/content/plugin_besps automatically. On pageload the script replaces this dummy with the actual images. The default setting of the plugin is to load all pictures with your page. If you set a number larger than 3 (the script needs at least 3 pictures to start), the pictures beyond this number will get loaded by the JavaScript on pageload.
- 12. Samples: Your folder contains 10 pictures, the parameter is empty, all pictures are loaded with the page. Your folder contains 10 pictures, the parameter is set to 3, 3 pictures are loaded with the page, 7 by script afterwards. Your folder contains 10 pictures, the parameter is set to 5, 5 pictures are loaded with the page, 5 by script afterwards. ... The feature is rather experimental at the moment, the JavaScript does not check if it is showing the real image or the dummy. If you use it, please do extended testing on it. Records about your experiences are most welcome! 28.) The parameter "Foldername as ID" gives you the possibility to set the name of the folder, from which the images are taken, as identity of the surrounding div-container of the slideshow. (id="foldername"). The plugin contains in the folder (Joomla-Installation)/plugins/content/plugin_besps the style sheet besps.css. This style sheet is loaded after the css-settings the plugin writes to the head- section of the page and gives you the possibility to overwrite every single setting. This works anyway and applies to all "simple picture slideshows" on your site.
- 13. Setting a unique identity gives you furthermore the possibility to use this identity as a CSS- Selector and use individual styles for one single slideshow . 29.) Activate the plugin 30.) Click "Save" - done Usage Next we need the images. We upload them to a folder in (Joomla-Installation)/images/stories. 1.) Go to "Site" > "Media Manager"
- 14. 2.) Navigate to the folder "Media" > "stories" 3.) Create a new subfolder for your images. In this sample I choose the name "simpleslideshow" 4.) Navigate to the new folder.
- 15. 5.) ... and upload your images to it. The plugin accepts images of type ".jpg", ".gif" and ".png". 6.) optional: If you want to display custom image-buttons for your control-elements, we have to take care of these images too. So, again navigate to the folder "Media" > "stories". And create a folder called besps_buttons. This is the place the plugin looks for the images you set in point 19 (Installation).
- 16. And therefore we upload them here. Notice: The plugin does NOT create this folder automatically. 7.) Next, go to "Article Manager" and open the article you want to display the gallery. 8.) At the place you want the slideshow to be shown insert the code to call it.
- 17. The code consists of the call {*besps}{/besps*} (without the asterisks) and contains the name of the folder with your images. The path to this folder "/images/stories" is added by the plugin automatically and must not be inserted. The complete call in our sample would look such as: {*besps}simpleslideshow{/besps*} - without the asterisks To use a folder within a folder, the path below "/images/stories/" is used, e. g. to use the folder /images/stories/folder/subfolder" the call would look such as: {*besps}folder/subfolder{/besps*} - without the asterisks In general that´s it and the slideshow is ready to go. How to show title and text with our images or modify the current slideshow from the default- settings in the backend, find out in the second part of this howto (link at the end of the page). 9.) Save - done! A survey of the possibilities to call, extend and modify galleries with the code in the content item: Howto Plugin Code If you have questions or suggestions, please use the comment-function. Please include the installed Joomla! version and if you have problems - if any possible - the affected page in your comment.
- 18. If you need additional features or customizations for your project that exceed the scope of support offered through the comments, you are invited to submit your requirements specification and the planned budget by email (menu item "Contact" in the menu at the top). If you use this extensions, please post a rating and a review at extensions.joomla.org.