SlideShare ist ein Scribd-Unternehmen logo
1 von 563
Part C Developing Your Design
Solution
The Production Cycle
Within the four stages of the design workflow there are two
distinct parts.
The first three stages, as presented in Part B of this book, were
described
as ‘The Hidden Thinking’ stages, as they are concerned with
undertaking
the crucial behind-the-scenes preparatory work. You may have
completed
them in terms of working through the book’s contents, but in
visualisation
projects they will continue to command your attention, even if
that is
reduced to a background concern.
You have now reached the second distinct part of the workflow
which
involves developing your design solution. This stage follows a
production
cycle, commencing with rationalising design ideas and moving
through to
the development of a final solution.
The term cycle is appropriate to describe this stage as there are
many loops
of iteration as you evolve rapidly between conceptual, practical
and
technical thinking. The inevitability of this iterative cycle is, in
large part,
again due to the nature of this pursuit being more about
optimisation rather
than an expectation of achieving that elusive notion of
perfection. Trade-
offs, compromises, and restrictions are omnipresent as you
juggle ambition
and necessary pragmatism.
How you undertake this stage will differ considerably
depending on the
nature of your task. The creation of a relatively simple, single
chart to be
slotted into a report probably will not require the same rigour of
a formal
production cycle that the development of a vast interactive
visualisation to
be used by the public would demand. This is merely an outline
of the most
you will need to do – you should edit, adapt and participate the
steps to fit
with your context.
There are several discrete steps involved in this production
cycle:
Conceiving ideas across the five layers of visualisation design.
Wireframing and storyboarding designs.
Developing prototypes or mock-up versions.
219
Testing.
Refining and completing.
Launching the solution.
Naturally, the specific approach for developing your design
solution (from
prototyping through to launching) will vary hugely, depending
particularly
on your skills and resources: it might be an Excel chart, or a
Tableau
dashboard, an infographic created using Adobe Illustrator, or a
web-based
interactive built with the D3.js library. As I have explained in
the book’s
introduction, I’m not going to attempt to cover the myriad ways
of
implementing a solution; that would be impossible to achieve as
each task
and tool would require different instructions.
For the scope of this book, I am focusing on taking you through
the first
two steps of this cycle – conceiving ideas and
wireframing/storyboarding.
There are parallels here with the distinctions between
architecture (design)
and engineering (execution) – I’m effectively chaperoning you
through to
the conclusion of your design thinking.
To fulfil this, Part C presents a detailed breakdown of the many
design
options you will face when conceiving your visualisation design
and
provides you with an appreciation of the key factors that will
influence the
actual choices you make. The next few chapters are therefore
concerned
with the design thinking involved with each of these five layers
of the
visualisation design anatomy, namely:
Chapter 6: Data representation
Chapter 7: Interactivity
Chapter 8: Annotation
Chapter 9: Colour
Chapter 10: Composition
The sequencing of these layers is deliberate, based on the need
to prioritise
your attention: what will be included and how will it appear.
Initially, you
will need to make decisions about what choices to make around
data
representation (charts), interactivity and annotation. These are
the layers
that result in visible design content or features being included
in your
work. You will then complete your design thinking by making
decisions
about the appearance of these visible components, considering
their colour
and composition.
220
Conceiving: This will cover all your initial thinking across the
various
layers of design covered in the next few chapters. The focus
here is on
conceiving ideas based on the design options that seem to fit
best with the
preparatory thinking that has gone before during the first three
stages. As
you fine-tune your emerging design choices the benefit of
sketching re-
emerges, helping you articulate your thoughts into a rough
visual form. As
mentioned in Chapter 3, for some people the best approach
involves
sketching with the pen, for others it is best expressed through
the medium
of technical fluency. Whichever approach suits you best, it is
helpful to
start to translate your conceptual thinking into visual thinking,
particularly
when collaborating. This sketching might build on your
instinctive
sketched concepts from stage 1, but you should now be far
better informed
about the realities of your challenge to determine what is
relevant and
feasible.
‘I tend to keep referring back to the original brief (even if it’s a
brief I’ve
made myself) to keep checking that the concepts I’m creating
tick all the
right boxes. Or sometimes I get excited about an idea but if I
talk about it
to friends and it’s hard to describe effectively then I know that
the concept
isn’t clear enough. Sometimes just sleeping on it is all it takes
to separate
the good from the bad! Having an established workflow is
important to
me, as it helps me cover all the bases of a project, and feel
confident that
my concept has a sound logic.’ Stefanie Posavec, Information
Designer
Wireframing and storyboarding: Wireframing involves creating
a low-
fidelity illustration of the potential layout for those solutions
that will
generally occupy a single page of space, such as a simple
interactive
visualisation or an infographic. There is no need to be too
precise just yet,
you are simply mapping out what will be on your page/screen
(charts,
annotations), how they will be arranged and what things
(interactive
functions) it will do. If your project is going to require a deeper
architecture, like a complex interactive, or will comprise
sequenced views,
like presentations, reports or animated graphics, each individual
wireframe
view will be weaved together using a technique called
storyboarding. This
maps out the relationships between all the views of your content
to form
an overall visual structure. Sometimes you might approach
things the other
way round, beginning with a high-level storyboard to provide a
skeleton
structure within which you can then form your more detailed
thinking
about the specific wireframe layouts within each page or view.
221
Prototypes/mock-ups: Whereas wireframing and storyboarding
are
characterised by the creation of low-fi ‘blueprints’, the
development of
mock-ups (for example, Figure C.1) or prototypes (the terms
tend to be
used interchangeably) involves advancing your decisions about
the content
and appearance of your proposed solution. This effectively
leads to the
development of a first working version that offers a reasonably
close
representation of what the finished product might look like.
Figure C.1 Mockup designs for ‘Poppy Field’
Testing: Once you have an established prototype version, you
must then
seek to have it tested. Firstly, you do this ‘internally’ (i.e. by
you or by
collaborators/colleagues) to help iron out any obvious
immediate
problems. In software development parlance, this would be
generally
consistent with alpha testing. Naturally, beta follows alpha and
this is
where you will seek others to test it, evaluate it, and feedback
on it. This
happens regardless of the output format; it doesn’t need to be a
digital,
interactive project to merit being tested. There will naturally be
many
different aspects to your proposed solution that will need
checking and
evaluating. The three principles of good visualisation design
that I
presented earlier offer a sensible high-level structure to guide
this testing:
Trustworthy design testing concerns assessing the reliability of
the
work, in terms of the integrity of its content and performance.
Are
there any inaccuracies, mistakes or even deceptions? Are there
any
design choices that could lead to misunderstandings? Any
aspects in
how the data has been calculated or counted that could
undermine
222
trust? If it is a digital solution, what is the speed of loading and
are
there any technical bugs or errors? Is it suitably responsive and
adaptable in its use across different platforms? Try out various
user
scenarios: multiple and concurrent users, real-time data, all data
vs
sample data, etc. Ask the people testing your solution to try to
break it
so you can find and resolve any problems now.
Accessible design testing relates to how intuitive or sufficiently
well
explained the work is. Do they understand how to read it and
what all
the encodings mean? Is the viewer provided with a sufficient
level of
assistance that would be required as per the characteristics of
the
intended audience? Can testers find the answers to the questions
you
intended them to find and quickly enough? Can they find
answers to
the questions they think are most relevant?
Elegant design testing relates to questions such as: Is the
solution
suitably appealing in design? Are there any features which are
redundant or superfluous design choices that are impeding the
process
of using the solution?
Who you invite to test your work will vary considerably from
one project
to the next but generally you will have different possible people
to
consider participating in this task:
Stakeholders: the ultimate customers/clients/colleagues who
have
commissioned the work may need to be included in this stage, if
not
for full testing then at least to engage them in receiving initial
concept
feedback.
Recipients: you might choose a small sample of your target
audience
and invite those viewers to take part in initial beta testing.
Critical friends: peers/team/colleagues with suitable knowledge
and
appreciation about the design process may offer a more
sophisticated
capacity to test out your work.
You: sometimes (often) it may ultimately be down to you to
undertake
the testing, through either lack of access to other people or most
typically a simple lack of time. To accomplish this effectively
you
have to find a way almost to detach yourself from the mindset
of the
creator and occupy that of the viewer: you need to see the wood
and
the trees.
The timing of when to seek feedback through testing/evaluation
will vary
across different contexts again. Sometimes the pressure from
stakeholders
223
who request to see progress will determine this. Otherwise, you
will need
to judge carefully the right moment to do so. You don’t want to
get
feedback when it is too late to change or you have invested too
much effort
creating a prototype that might require widespread changes in
approach.
Likewise, it can be risky showing far-too-undercooked concepts
to
stakeholders or testers when they might not have the capacity to
realise
this is just an early indication of the direction of travel. The
least valuable
form of testing feedback is when pedantic stakeholders spend
time
pointing out minutiae that of course need correcting but have no
significance at this stage. No-one comes away with anything of
value from
this kind of situation.
‘We can kid ourselves that we are successful in what we “want”
to
achieve, but ultimately an external and critical audience is
essential.
Feedback comes in many forms; I seek it, listen to it, sniff it,
touch it, taste
it and respond.’ Kate McLean, Smellscape Mapper and Senior
Lecturer Graphic Design
Refining and completing: Based on the outcome of your testing
process,
this will likely trigger a need to revisit some of the issues that
have
emerged and resolve them satisfactorily. Editing your work
involves:
correcting issues;
stripping away the superfluous content;
checking and enhancing preserved content;
adding extra degrees of sophistication to every layer of your
design;
improving the consistency and cohesion of your choices;
double-checking the accuracy of every component.
As your work heads towards a state of completion your mindset
will need
to shift from a micro-level checking back to a macro-level
assessment of
whether you have truly delivered against the contextual
requirements and
purpose of your project.
In any creative process a visualiser is faced with having to
declare work as
being complete. Judging this can be quite a tough call to make
in many
projects. As I have discussed plenty of times, your sense of
‘finished’ often
needs to be based on when you have reached the status of good
enough.
While the presence of a looming deadline (and at times
increasingly
agitated stakeholders) will sharpen the focus, often it comes
down to a
fingertip sense of when you feel you are entering the period of
diminishing
224
returns, when the refinements you make no longer add sufficient
value for
the amount of effort you invest in making them.
‘You know you’ve achieved perfection in design, not when you
have
nothing more to add, but when you have nothing more to take
away.’
Antoine de Saint-Exupéry, Writer, Poet, Aristocrat, Journalist,
and
Pioneering Aviator
‘Admit that nothing you create on a deadline will be perfect.
However, it
should never be wrong. I try to work by a motto my editor likes
to say: No
Heroics. Your code may not be beautiful, but if it works, it’s
good enough.
A visualisation may not have every feature you could possibly
want, but if
it gets the message across and is useful to people, it’s good
enough. Being
“good enough” is not an insult in journalism – it’s a necessity.’
Lena
Groeger, Science Journalist, Designer and Developer at
ProPublica
‘It was intimidating to release to the public a self-initiated
project on such
a delicate subject considering some limitation with content and
data
source. But I came to appreciate that it’s OK to offer a relevant
way of
looking at the subject, rather than provide a beginning-to-end
conclusion.’
Valentina D’efilippo, Information Designer, discussing her
‘Poppy
Field’ project that looked at the history of world conflicts and
the
resulting loss of life
Launching: The nature of launching work will again vary
significantly
based, as always, on the context of your challenge. It may
simply be
emailing a chart to a colleague or you might be presenting your
work to an
audience. For other cases it could be a graphic going to print for
a
newspaper or involve an anxious go-live moment with the
launch of a
digital project on a website, to much fanfare and public
anticipation.
Whatever the context of your ‘launch’ stage, there are a few
characteristic
matters to bear in mind – these will not be relevant to all
situations but
over time you might need to consider their implications for your
setting:
Are you ready? Regardless of the scope of your work, as soon
as you
declare work completed and published you are at the mercy of
your
decisions. You are no longer in control of how people will
interpret
your work and in what way they will truly use it. If you have
particularly large, diverse and potentially emotive subject
matter, you
will need to be ready for the questions and scrutiny that might
head in
your direction.
225
Communicating your work is a big deal. The need to publicise
and
sell its benefits is of particular relevance if you have a public-
facing
project (you might promote it strongly or leave it as a slow
burner
that spreads through ‘word of mouth’). For more modest and
personal
audiences you might need to consider directly presenting your
work
to these groups, coaching them through what it offers. This is
particularly necessary on those occasions when you may be
using a
less than familiar representation approach.
What ongoing commitment exists to support the work? This
clearly
refers to specific digital projects. Do you have to maintain a
live data
feed? Will it need to sustain operations with variable concurrent
visitors? What happens if it goes viral – have you got the
necessary
infrastructure? Have you got the luxury of ongoing access to the
skill
sets required to keep this project alive and thriving?
Will you need to revise, update and rerelease the project? As I
discussed in the contextual circumstances, will you need to
replicate
this work on a repeated basis? What can you do to make the
reproduction as seamless as possible?
What is the work’s likely shelf life? Does it have a point of
expiry
after which it could be archived or even killed? How might you
digitally preserve it beyond its useful lifespan?
226
6 Data Representation
In this chapter you will explore in detail the first, and arguably
the most
significant, layer of the visualisation design anatomy: data
representation.
This is concerned with deciding in what visual form you wish to
show
your data.
To really get under the skin of data representation, we are going
to look at
it from both theoretical and pragmatic perspectives. You will
start by
learning about the building blocks of visual encoding, the real
essence of
this discipline and something that underpins all data
representation
thinking. Whereas visual encoding is perhaps seen as the purist
‘bottom-
up’ viewpoint, the ‘top-down’ perspective possibly offers more
pragmatic
value by framing your data representation thinking around the
notion of
chart types. For most people facing up to this stage of data
representation,
this is conceptually the more practical entry point from which to
shape
their decisions.
To substantiate your understanding of this design layer you will
take a tour
through a gallery of 49 different chart type options, reflecting
the many
common and useful techniques being used to portray data
visually in the
field today. This gallery will then by supplemented by an
overview of the
key influencing factors that will inform and determine the
choices you
make.
6.1 Introducing Visual Encoding
As introduced in the opening chapter, data representation is the
act of
giving visual form to your data. As viewers, when we are
perceiving a
visual display of data we are decoding the various shapes, sizes,
positions
and colours to form an understanding of the quantitative and
categorical
values represented. As visualisers, we are doing the reverse
through visual
encoding, assigning visual properties to data values. Visual
encoding
forms the basis of any chart or map-based data representation,
along with
the components of chart apparatus that help complete the chart
display.
There are many different ways of encoding data but these
always comprise
227
combinations of two different properties, namely marks and
attributes.
Marks are visible features like dots, lines and areas. An
individual mark
can represent a record or instance of data (e.g. your phone bill
for a given
month). A mark can also represent an aggregation of records or
instances
(e.g. a summation of individual phone charges to produce the
bill for a
given month). A set of marks would therefore represent a set of
records or
instances (e.g. the 12 monthly phone bills for 2015).
Attributes are variations applied to the appearance of marks,
such as the
size, position, or colour. They are used to represent the values
held by
different quantitative or categorical variables against each
record or
instance (or, indeed, each aggregation). If you had 12 marks,
one for each
phone bill during 2015, you could use the size attribute of each
mark to
represent the various phone bill totals.
Figure 6.1 offers a more visual illustration. In the dataset there
are six
records, one for each record listed. ‘Gender’ is a categorical
variable and
‘Years Since First Movie’ is a quantitative variable. ‘Male’ and
‘43’ are
the specific values of these variables associated with Harrison
Ford. In the
associated chart, each actor from the table is represented by the
mark of a
line (or bar). This represents their record or instance in the
table. Harrison
Ford’s bar is proportionally sized in scale to represent the 43
years since
his first movie and is coloured purple to distinguish his gender
as ‘Male’.
Each of the five other actors similarly has a bar sized according
to the
years since their first movie and coloured according to their
gender.
Figure 6.1 Illustration of Visual Encoding
The objective of visual encoding is to find the right blend of
marks and
attributes that most effectively will portray the angle of analysis
you wish
to show your viewers. The factors that shape your choice and
define the
notion of what is considered ‘effective’ are multiple and varied
in their
influence. Before getting on to there, let’s take a closer look at
the range of
228
different marks and attributes that are commonly found in the
data
representation toolkit.
It is worth noting upfront that while the organisation of the
‘attributes’, in
particular, suggests a primary role, several can be deployed to
encode both
categorical (nominal, ordinal) variables and quantitative
variables.
Furthermore, as you see in the bar chart in Figure 6.1,
combinations of
several attributes are often applied to marks (such as colour and
size) to
encode multiple values.
Although beyond the scope of this book, there are techniques
being
developed in the field exploring the use of non-visual senses to
portray
data, using variations in properties for auditory (sound), haptic
(touch),
gustatory (taste) and olfactory (smell) senses.
Figure 6.2 List of Mark Encodings
Figure 6.3 List of Attribute Encodings
229
230
Grasping the basics of visual encoding and its role in data
visualisation is
one of the fundamental pillars of understanding this discipline.
However,
when it comes to the reality of considering your data
representation
options you do not necessarily need to always approach things
from this
somewhat bottom-up perspective. For most people’s needs when
creating a
data visualisation it is more pragmatic (and perhaps more
comprehensible)
to think about data representation from a top-down perspective
in the
shape of chart types.
If marks and attributes are the ingredients, a chart ‘type’ is the
recipe
offering a predefined template for displaying data. Different
chart types
offer different ways of representing data, each one comprising
unique
combinations of marks and attributes onto which specific types
of data can
be mapped.
Recall that I am using chart type as the all-encompassing term,
though
this is merely a convenient singular label to cover any variation
of map,
graph, plot and diagram based around the representation of data.
Let’s work through a few examples to illustrate the relationship
between
some selected chart types demonstrating different combinations
of marks
and attributes.
To begin with Figure 6.4, visualises the recent fortunes of the
world’s
billionaires. The display shows the relative ranking of each
profiled
billionaire in the rich list, grouping them by the different
sectors of
industry in which they have developed their wealth. This data is
encoded
using the point mark and two attributes of position. The point in
this
deployment is depicted using small caricature face drawings
representative
of each individual – effectively unique symbols to represent the
distinct
‘category’ of each different billionaire. Note that these are
points, as
distinct from area marks, because their size is constant and
insignificant in
terms of any quantitative implication. The position in the
allocated column
signifies the industry the individuals are associated with, while
the vertical
position signifies the rank (higher position = higher rank
towards number
1).
For reference, this is considered a derivative of the univariate
scatter
231
plot, which usually shows the dispersal of a range of absolute
values
rather than rank.
Figure 6.4 Bloomberg Billionaires
As seen in Chapter 1, the clustered bar chart in Figure 6.5
displays a series
of line marks (normally described as bars). There are 11 pairs of
bars, one
for each of the football seasons included in the aggregated
analysis. The
attribute of colour is used to distinguish the bars between the
two
quantitative measures displayed: blue is for ‘games’, purple is
for ‘goals’.
The size dimension of ‘height’ (the widths are constant) along
the y-axis
scale then represents the quantitative values associated with
each season
and each measure.
Figure 6.6 is called a bubble chart and displays a series of
geometric area
marks to represent the top 100 blog posts on my website based
on their
popularity over the previous 100 days. Each circle represents an
individual
post and is sized to show the quantitative value of ‘total visits’
and then
coloured according to the seven different post categories I use
to organise
my content.
Figure 6.5 Lionel Messi: Games and Goals for FC Barcelona
232
Figure 6.6 Image from the home page of visualisingdata.com
233
Figure 6.7 How the Insane Amount of Rain in Texas Could Turn
Rhode
Island Into a Lake
234
Figure 6.7 demonstrates the use of the form, which is more
rarely used. My
advice is that it should remain that way as it is hard for us to
judge scales
of volume in 2D displays. However, it can be of merit when
values are
extremely diverse in size as in this good example. The chart
displayed
contextualises the amount of water that had flowed into Texas
reservoirs in
the 30 days up to 27 May 2015. The size (volume) of a cube is
used to
display the amount of rain, with 8000 small cubes representing
1000 acre-
feet of water (43,560,000 cubic feet or 1233.5 mega litres) to
create the
whole (8 million acre-feet), which is then compared against the
heights of
235
the Statue of Liberty and what was then the world’s tallest
building, the
Burj Khalifa, to orient in height terms at least.
6.2 Chart Types
For many people, creating a visualisation involves using tools
that offer
chart menus: you might select a chart type and then ‘map’ the
records and
variables of data against the marks and attributes offered by that
particular
chart type. Different tools will offer the opportunity to work
with a
different range of chart types, some with more than others.
As you develop your capabilities in data visualisation and
become more
‘expressive’ – trying out unique combinations of marks and
attributes –
your approach might lean more towards thinking about
representation
from a bottom-up perspective, considering the visual encodings
you wish
to deploy and arriving at a particular chart type as the
destination rather
than an origin. This will be especially likely if you develop or
possess a
talent for creating visualisations through programming
languages.
As the field has matured over the years, and a greater number of
practitioners have been experimenting with different recipes of
marks and
attributes, there is now a broad range of established chart types.
Once
again I hesitate to use the universal label of chart type (some
mapping
techniques are not chart types per se) but it will suffice. While
all of us are
likely to be familiar with the ‘classic three’ – namely, the bar,
pie and line
chart – there are many other chart type options to consider.
To acquaint you with a broader repertoire of charting options,
over the
coming pages I present you with a gallery. This offers a curated
collection
of some of the common and useful chart types being used across
the field
today. This gallery aims to provide you with a valuable
reference that will
directly assist your judgements, helping you to pick
(conceptually, at least)
from a menu of options.
I have attempted to assign each chart to one of five main
families based on
their primary analytical purpose. What type of angle of analysis
does each
one principally show? Using the five-letter mnemonic CHRTS
this should
provide a useful taxonomy for organising your thinking about
which chart
or charts to use for your data representation needs.
236
I know what you’re thinking: ‘well that’s a suspiciously
convenient
acronym’! Honestly, if it was as intentional as that I would have
tried
harder to somehow crowbar in an ‘A’ family. OK, I did spend a
lot of
time, but I couldn’t find it and it’s now my life’s ambition to do
so.
Only then will my time on this planet have been truly
worthwhile. In the
meantime, CHRTS is close enough. Besides, vowels are hugely
overrated.
Each chart type presented is accompanied by an array of
supporting details
that will help you fully acquaint yourself with the role and
characteristics
of each option.
A few further comments about what this gallery provides:
The primary name used to label each chart type as well as some
further alternative names that are often used
An indication of which CHRTS family each chart belongs to,
based
on their specific primary role, as well as a sub-family definition
for
further classification
An indicator for each chart type to show which ones I consider
to be
most useful for undertaking Exploratory Data Analysis (the
black
magnifying glass symbol)
An indicator for whether I believe a chart would typically
require
interactive features to offer optimum usability (the black cursor
symbol)
A description of the chart’s representation: what it shows and
what
encodings (marks, attributes) it is comprised of
A working example of the chart type in use with a description
of what
it specifically shows
A ‘how to read’ guide, advising on the most effective and
efficient
approach to making sense of each chart type and what features
to look
out for
Presentation tips offering guidance on some of the specific
choices to
be considered around interactivity, annotation, colour or
composition
237
design
‘Variations and alternatives’ offer further derivatives and chart
‘siblings’ to consider for different purposes
Exclusions: It is by no means an exhaustive list: the vast
permutations of different marks and attributes prevents any
finite
limit to how one might portray data visually. I have, however,
consciously excluded some chart types from the gallery mainly
because they were not different enough from other charts that
have
been profiled in detail. I have mentioned charts that represent
legitimate derivatives of other charts where necessary but
simply did
not deem it worthy to assign a whole page to profile them
separately.
The Voronoi treemap, for example, is really just a circular
treemap
that uses different algorithms to arrange its constituent pieces.
While
the construction task is different, its usage is not. The waterfall
chart
is a single stacked bar chart broken down into sequenced stages.
Inclusions: I have wrestled with the rights and wrongs of
including
some chart types, unquestionably. The radar chart, for example,
has
many limitations and flaws but is not entirely without merit if
deployed in a very specific way and only for certain contexts.
By
including profiles of partially flawed charts like these I am
using the
gallery as much to signpost their shortcomings so that you know
to
use them sparingly. There will be some purists gathering in
angry
mobs and foaming at the mouth in reaction to the audacity of
my
including the pie chart and word cloud. These have limited
roles,
absolutely, but a role nonetheless. Put down your pitchforks,
return to
your homes and have a good read of my caveats. Rather than
being
the poacher of all bad stuff, I think a gamekeeper role is equally
important.
Although I have excluded several charts on grounds of
demonstrating
only a slight variation on profiled charts, there are some types
included that do exhibit only small derivations from other charts
(such as the bar chart and the clustered bar, or the scatter plot
and the
bubble plot). In these cases I felt there was sufficient difference
in
their practical application, and they were in common usage, to
merit
their separate inclusion, despite sharing many similarities with
other
profiled siblings.
‘Interestingly, visualisations of textual data are not as
developed as one
238
would expect. There is a great need for such visualisations
given the
amount of textual information we generate daily, from social
media to
news media and so on, not to mention all the materials
generated in the
past and that are now digitally available. There are
opportunities to
contribute to the research efforts of humanists as well as social
scientists
by devising ways to represent not only frequencies of words and
topics,
but also semantic content. However, this is not at all trivial.’
Isabel
Meirelles, Professor, OCAD University (Toronto), discussing
one of
the many remaining unknowns in visualisation
Categorical comparisons: All chart types can feasibly facilitate
comparisons between categories, so why have a separate C
family?
Well, the distinction is that those charts belonging to the H, R,
T and
S families offer an additional dimension of analysis as well as
providing comparison between categories.
Dual families: Some charts do not fit just into a single family.
Showing connected relationships (e.g. routes or flows) on a map
is
ticking the requirements across at least two or family groups
(Relational, Spatial). In each case I have tried to best-fit the
family
classifications around the primary angle of analysis portrayed
by each
chart – what is the most prominent aspect that characterises
each
representation technique.
Text visualisation: As I noted in the discussion about data
types,
when it comes to working with textual-based data you are
almost
always going to need to perform some transformation, maybe
through
value extraction or by applying a statistical technique. The text
itself
can otherwise largely function only as an annotated device.
Chart
types used to visualise text actually visualise the properties of
text.
For example, the word cloud visualises the quantitative
frequency of
the use of words: text might be the subject, but categories
(words) and
their quantities (counts) are the data mappings. Varieties of
network
diagrams might show the relationship between word usage, such
as
the sequence of words used in sentences (word trees), but these
are
still only made possible through some quantitative, categorical
or
semantic property being drawn from the original text.
Dashboard: These methods are popular in corporate settings or
any
context where you wish to create instrumentation that offers
both at-
a-glance and detailed views of many different analytical and
information monitoring dimensions. Dashboards are not a
unique
chart type themselves but rather should be considered projects
that
comprise multiple chart types from across the repertoire of
options
239
presented in the gallery. Some of the primary demands of
designing
dashboards concern editorial thinking (what angles to show and
why)
and composition choices (how to get it all presented in a unified
page
layout).
Small multiples: This is an invaluable technique for visualising
data
but not necessarily a chart type per se and, once again, more a
concern for about editorial thinking and composition design.
Small
multiples involve repeated display of the same chart type but
with
adjustments to the framing of the data in each panel. For
example,
each panel may show the same angle of analysis but for
different
categories or different points in time. Small multiples are highly
valued because they exploit the capabilities of our visual
perception
system when it comes to comparing charts in a simultaneous
view,
overcoming our weakness at remembering and recalling chart
views
when consumed through animated sequences or across different
pages.
A note about ‘storytelling’: Storytelling is an increasingly
popular
term used around data visualisation but I feel it is often misused
and
misunderstood, which is quite understandable as we all have
different
perspectives. I also feel it is worth clarifying my take on what I
believe storytelling means practically in data visualisation and
especially in this discussion about data representation, which is
where
it perhaps most logically resides in terms of how it is used.
Stories are constructs based on the essence of movement,
change or
narrative. A line chart shows how a series of values have
changed
over a temporal plane. A flow map can reveal what relationships
exist
across a spatial plane between two points separated by distance
– they
may be evident of a journey. However, aside from the temporal
and
spatial families of charts, I would argue that no other chart
family
realistically offers this type of construct in and of itself.
The only way to create a story from other types of charts is to
incorporate a temporal dimension (video/slideshow) or provide
a
verbal/written narrative that itself involves a dimension of time
through the sequence of its delivery.
For example, a bar chart alone does not represent a story, but if
you
show a ‘before’ and ‘after’ pair of bar charts side by side or
between
slides, you have essentially created ‘change’ through sequence.
If you
show a bar chart with a stack on top of it to indicate growth
between
two points in time, well, you have added a time dimension. A
network diagram shows relationships, but stood alone this is not
a
240
Sabin Bajracharya
story – its underlying structure and arrangement are in abstract
space.
Just as you do when showing friends a photograph from your
holiday,
you might use this chart as a prop to explain how relationships
between some of the different entities presented are significant.
Making the chart a prop allows you to provide a narrative. In
this case
it is the setting and delivery that are consistent with the notion
of
storytelling, not the chart itself. I made a similar observation
about
the role of exhibitory visualisations used as props within
explanatory
settings.
A further distinction to make is between stories as being
presented
and stories as being interpreted. The famous six-word story ‘for
sale:
baby shoes, never worn’ by Ernest Hemingway is not presented
as a
story, the story is triggered in our mind when we dissect this
passage
and start to infer meaning, implication and context. The
imagined bar
chart I mentioned earlier in the book that could show the 43
white
presidents and 1 black president is only presenting a story if it
is
accompanied by an explanatory narrative (in which case the
chart was
again really just a prop) or if you understand the meaning of the
significance of this statistic without this description and are
able to
form the story in your own mind.
Charts Comparisons
Bar chart
ALSO KNOWN AS Column chart, histogram (wrongly)
REPRESENTATION DESCRIPTION
A bar chart displays quantitative values for different categories.
The
chart comprises line marks (bars) – not rectangular areas – with
the size
attribute (length or height) used to represent the quantitative
value for
each category.
241
EXAMPLE Comparing the number of Oscar nominations for the
10
actors who have received the most nominations without actually
winning an award.
Figure 6.8 The 10 Actors with the Most Oscar Nominations but
No
Wins
HOW TO READ IT & WHAT TO LOOK FOR
Look at the axes so you know with which categorical value each
bar is
associated and what the range of the quantitative values is (min
to max).
Think about what high and low values mean: is it ‘good’ to be
large or
small? Glance across the entire chart to locate the big, small
and
medium bars and perform global comparisons to establish the
high-
level ranking of biggest > smallest. Identify any noticeable
exceptions
and/or outliers. Perform local comparisons between
neighbouring bars,
to identify larger than and smaller than relationships and
estimate the
relative proportions. Estimate (or read, if labels are present) the
absolute
values of specific bars of interest. Where available, compare the
quantities against annotated references such as targets, forecast,
last
year, average, etc.
PRESENTATION TIPS
ANNOTATION: Chart apparatus devices like tick marks and
gridlines,
in particular, can be helpful to increase the accuracy of the
reading of
the quantitative values. If you have axis labels you should not
need
direct labels on each bar – this will lead to label overload, so
generally
decide between one or the other.
242
COMPOSITION: The quantitative value axis should always start
from
the origin value of zero: a bar should be representative of the
true, full
quantitative value, nothing more, nothing less, otherwise the
perception
of bar sizes will be distorted when comparing relative sizes.
There is no
significant difference in perception between vertical or
horizontal bars
though horizontal layouts tend to make it easier to accommodate
and
read the category labels for each bar. Unlike the histogram,
there should
be a gap, even if very small, between bars to keep each
category’s value
distinct. Where possible, try to make the categorical sorting
meaningful.
VARIATIONS & ALTERNATIVES
A variation in the use of bar charts is to show changes over
time. You
would use a bar chart when the focus is on individual
quantitative
values over time rather than (necessarily) the trend/change
between
points, for which a line-chart would be best. ‘Spark bars’ are
mini bar
charts that aim to occupy only a word’s length amount of space.
They
are often seen in dashboards where space is at a premium and
there is a
desire to optimise the density of the display. To show further
categorical subdivisions, you might consider the ‘clustered bar
chart’ or
a ‘stacked bar chart’ if there is a part-to-whole angle. ‘Dot
plots’ offer a
particularly useful alternative to the bar chart for situations
where you
have to show large quantitative values with a narrow range of
differences.
Charts Comparisons
Clustered bar chart
ALSO KNOWN AS Clustered column chart, paired bar chart
REPRESENTATION DESCRIPTION
A clustered bar chart displays quantitative values for different
major
categories with additional categorical dimensions included for
further
243
breakdown. The chart comprises line marks (bars) – not
rectangular
areas – with the size attribute (length or height) used to
represent the
quantitative value for each category and colours used to
distinguish
further categorical dimensions.
EXAMPLE Comparing the number of Oscar nominations with
the
number of Oscar awards for the 10 actors who have received the
most
nominations.
Figure 6.9 The 10 Actors who have Received the Most Oscar
Nominations
HOW TO READ IT & WHAT TO LOOK FOR
Look at the axes so you know with which categorical value each
bar is
associated and what the range of the quantitative values is (min
to max).
Learn about the colour associations to understand what sub-
categories
the bars within each cluster represent. Glance across the entire
chart to
locate the big, small and medium bars and perform global
comparisons
to establish the high-level ranking of biggest > smallest.
Identify any
noticeable exceptions and/or outliers. Perform local
comparisons within
clusters to identify the size relationship (which is larger and by
how
much?) and estimate (or read, if labels are present) the absolute
values
of specific bars of interest.
PRESENTATION TIPS
ANNOTATION: Chart apparatus devices like tick marks and
gridlines,
244
in particular, can be helpful to increase the accuracy of the
reading of
the quantitative values. If you have axis labels you should not
need
direct labels on each bar – this will lead to label overload, so
generally
decide between one or the other.
COMPOSITION: The quantitative value axis should always start
from
the origin value of zero: a bar should be representative of the
true, full
quantitative value, nothing more, nothing less, otherwise the
perception
of bar sizes will be distorted when comparing relative sizes. If
your
categorical clusters involve a breakdown of more than three
bars, it
becomes a little too busy, so you might therefore consider
giving each
cluster its own separate bar chart and using small multiples to
show a
chart for each major category. Sometimes one bar might be
slightly
hidden behind the other, implying a before and after
relationship, often
when space is at a premium – just do not hide too much of the
back bar.
There is no significant difference in perception between vertical
or
horizontal bars though horizontal layouts tend to make it easier
to
accommodate and read the category labels for each bar. The
individual
bars should be positioned adjacent to each other with a
noticeable gap
and then between each cluster to help direct the eye towards the
clustering patterns first and foremost. Where possible try to
make the
categorical sorting meaningful.
VARIATIONS & ALTERNATIVES
Clustered bar charts are also sometimes used to show how two
associated sub-categories have changed over time (like the
Lionel
Messi bar chart discussed in Chapter 1). Alternatives would
include the
‘dot plot’ or, if you have just two categories forming the
clusters and
these categories have a binary state (male, female or yes %, no
%), the
‘back-to-back bar chart’ would be effective.
Charts Comparisons
Dot plot
245
ALSO KNOWN AS Dot chart
REPRESENTATION DESCRIPTION
A dot plot displays quantitative values for different categories.
In
contrast to the bar chart, rather than using the size of a bar,
point marks
(typically circles but any ‘symbol’ is legitimate) are used with
the
position along a scale indicating the quantitative value for each
category. Sometimes an area mark is used to indicate one value
through
position and another value through size. Additional categorical
dimensions can be accommodated in the same chart by
including
additional marks differentiated by colour or symbol.
EXAMPLE Comparing the number and percentage of PhDs
awarded
by gender across different academic subjects.
Figure 6.10 How Nations Fare in PhDs by Sex
HOW TO READ IT & WHAT TO LOOK FOR
For single-series dot plots (i.e. just one dot per row), look at the
axes so
you know with which categorical value each row is associated
and what
the range of the quantitative values is (min to max). Where you
have
multiple series dot plots (i.e. more than one dot), establish what
the
different colours/symbols represent in terms of categorical
breakdown.
Glance across the entire chart to locate the big, small and
medium
values and perform global comparisons to establish the high-
level
ranking of biggest > smallest. Identify any noticeable
exceptions and/or
246
outliers. Where you have multiple series look across each series
of dot
values separately and then perform local comparisons within
rows to
identify the relative position of each dot, observing the gaps,
big and
small. Estimate the absolute values of specific dots of interest.
Where
available, compare the quantities against annotated references
such as
targets, forecast, last year, average, etc.
PRESENTATION TIPS
ANNOTATION: Chart apparatus devices like tick marks and
gridlines,
in particular, can be helpful to increase the accuracy of the
reading of
the quantitative values.
COMPOSITION: Given that the quantitative value axis does not
need
to commence from a zero origin it is important to label clearly
the axis
values when the baseline is not commencing from a minimum of
zero.
There is no significant difference in perception between vertical
or
horizontal arrangement though horizontal layouts tend to make
it easier
to accommodate and read the category labels for each row.
Where
possible try to make the categorical sorting meaningful, maybe
organising values in ascending/descending size order.
VARIATIONS & ALTERNATIVES
Alternatives would include the ‘bar chart’, to show the size of
quantitative values for different categories. The ‘connected dot
plot’
would be used to focus on the difference between two measures.
The
‘univariate scatter plot’ would be used to show the range of
multiple
values across categories, to display the diversity and
distribution of
values.
Charts Comparisons
Connected Dot Plot
247
ALSO KNOWN AS Barbell chart, dumb-bell chart
REPRESENTATION DESCRIPTION
A connected dot plot displays absolute quantities and
quantitative
differences between two categorical dimensions for different
major
categories. The display is formed by two points (normally
circles but
any ‘symbol’ is legitimate) to mark the quantitative value
positions for
two comparable categorical dimensions. There is a row of
connected
dots for each major category. Colour or difference in symbol is
generally used to distinguish these points. Joining the two
points
together is a connecting line which effectively represents the
‘delta’
(difference) between the two values.
EXAMPLE Comparing the typical salaries for women and men
across
a range of different job categories in the US.
Figure 6.11 Gender Pay Gap US
HOW TO READ IT & WHAT TO LOOK FOR
Look at the axes so you know with which major categorical
values each
row is associated and what the range of the quantitative values
is (min
to max). Determine which dots resemble which categorical
dimension
(could be colour, symbol or a combination) and see if there is
any
meaning behind the colouring of the connecting bars. Think
about what
the quantitative values mean to determine whether it is a good
thing to
be higher or lower. Glance across the entire chart to locate the
big,
248
small and medium connecting bars in each direction. Perform
global
comparisons to establish the high-level ranking of biggest >
smallest
differences as well as the highest and lowest values. There may
be
deliberate sorting of the display based on one of the quantitative
measures. Identify any noticeable exceptions and/or outliers.
Estimate
(or read, if labels are present) the absolute values, direction and
size of
differences for specific categories of interest.
PRESENTATION TIPS
ANNOTATION: Chart apparatus devices like tick marks and
gridlines,
in particular, can be helpful to increase the accuracy of the
reading of
the quantitative values. Consider labelling categories adjacent
to the
plotted points rather than next to the axis line (and possibly far
away
from the values) to make it easier for the reader to understand
the
category–row association.
COLOUR TIPS: Colour may be used to indicate and emphasise
the
directional basis of the connecting line differences.
COMPOSITION: If the two plotted measures are very similar,
and the
point markers effectively overlap, you will need to decide
which should
be positioned on top. As the representation of the quantitative
values is
through position along a scale and not size (it is the difference
that is
sized, not the absolutes) the quantitative axis does not need to
have a
zero origin. However, a zero origin can be helpful to establish
the scale
of the differences. Where possible try to make the sorting
meaningful
using any one of the three quantitative measures to optimise the
layout.
VARIATIONS & ALTERNATIVES
Variations in the use of the ‘connected dot plot’ would show
before and
after analysis between two points in time, possibly using the
‘arrow
chart’ to indicate the direction of change explicitly. Similarly,
the
‘carrot chart’ uses line width tapering to indicate direction, the
fatter
end the more recent values. The ‘univariate scatter plot’ would
be used
to show the range of multiple values across categories, to
display the
diversity and distribution of values rather than comparing
differences
between values.
Charts Comparisons
249
Pictogram
ALSO KNOWN AS Isotype chart, pictorial bar chart, stacked
shape
chart, tally chart
REPRESENTATION DESCRIPTION
A pictogram displays quantitative values for different major
categories
with additional categorical dimensions included for further
breakdown.
In contrast with the bar chart, rather than using the size of a
bar,
quantities of point marks, in the form of symbols or pictures,
are
stacked to represent the quantitative value for each category.
Each point
may be representative of one or many quantitative units (e.g. a
single
shape may represent 1000 people) but note that, unless you use
symbol
portions, you will not be able to represent decimals. Pictograms
may be
used to offer a more emotive (humanising or more light-hearted)
display than a bar can offer. Additional categorical dimensions
can be
accommodated in the same chart by using marks differentiated
by
variations in colour, symbol or picture. Always ensure the
markers used
are as intuitively recognisable as possible and consider
minimising the
variety as this makes it cognitively harder for the viewer to
identify
associations easily and make sense of the quantities.
EXAMPLE Comparing the number of players with different
facial hair
types across the four teams in the NHL playoffs in 2015.
Figure 6.12 Who Wins the Stanley Cup of Playoff Beards?
250
HOW TO READ IT & WHAT TO LOOK FOR
Look at the major categorical axis to establish with which
category each
row is associated. Establish the mark associations to understand
what
categorical dimensions each colour/shape variation represents.
Glance
across the entire chart to locate the big, small and medium
stacks of
shapes and perform global comparisons to establish the high-
level
ranking of biggest > smallest. Identify any noticeable
exceptions and/or
outliers. Perform local comparisons between neighbouring
categories,
to identify larger than and smaller than relationships and
estimate the
relative proportions. Estimate (or read, if labels are present) the
absolute
values of specific groups of markers of interest.
PRESENTATION TIPS
ANNOTATION: The choice of symbol/ picture should be as
recognisably intuitive as possible and locate any legends as
close as
possible to the display.
COLOUR TIPS: Maximise the variation in marker by using
different
combinations in both colour and shape, rather than just
variation of one
attribute.
COMPOSITION: If the quantities of markers exceed a single
row, try
to make the number of units per row logically ‘countable’, such
as
displaying in groups of 5, 10 or 100. To aid readability, make
sure there
is a sufficiently noticeable gap between rows, otherwise
sometimes the
eye struggles to form the distinct clusters of shapes for each
category
displayed. Where possible try to make the categorical sorting
meaningful, maybe organising values in ascending/descending
size
order.
251
VARIATIONS & ALTERNATIVES
Extending the idea of using repeated quantities of representative
symbols, some applications take this further by using large
quantities of
individual symbols to get across the feeling of magnitude and
scale.
When showing a part-to-whole relationship, the ‘waffle chart’
can use
simple symbol devices to differentiate the constituent parts of a
whole.
Charts Comparisons
Proportional shape chart
ALSO KNOWN AS Area chart (wrongly)
REPRESENTATION DESCRIPTION
A proportional shape chart displays quantitative values for
different
categories. The chart is based on the use of different area
marks, one for
each category, sized in proportion to the quantities they
represent. By
using the quadratic dimension of area size rather than the linear
dimension of bar length or dot position, the shape chart offers
scope for
displaying a diverse range of quantitative values within the
same chart.
Typically the layout is quite free-form with no baseline or
central
gravity binding the display together.
EXAMPLE Comparing the market capitalisation ($) of
companies
involved in the legal sale of marijuana across different industry
sectors.
Figure 6.13 For These 55 Marijuana Companies, Every Day is
4/20
252
HOW TO READ IT & WHAT TO LOOK FOR
Look at the shapes and their associated labels so you know with
what
major categorical values each is associated. If there are only
direct
labels, find the largest shape to establish its quantitative value
as the
maximum and do likewise for the smallest – this will help
calibrate the
size judgements. Otherwise, if it exists, acquaint yourself with
the size
key. Glance across the entire chart to locate the big, small and
medium
shapes and perform global comparisons to establish the high-
level
ranking of biggest > smallest. Identify any noticeable
exceptions and/or
outliers. Perform local comparisons between neighbouring
shapes to
identify larger than and smaller than relationships and estimate
the
relative proportions. Estimate (or read, if labels are present) the
absolute
values of specific shapes of interest.
PRESENTATION TIPS
ANNOTATION: Sometimes a quantitative size key will be
included
rather than direct labelling (usually when there are many shapes
and
limited empty space) though direct labels will help overcome
some of
the limitations of judging area size. You will have to decide
how to
handle label positioning for those shapes with exceptionally
small sizes.
COLOUR TIPS: Colours are not fundamentally necessary to
encode
category (the position/separation of different shapes achieves
that
already) but they can be useful as redundant encodings to make
the
category even more immediately distinguishable.
COMPOSITION: Estimating and comparing the size of areas
with
253
accuracy is not as easy as it is for judging bar length or dot
position, so
only use this chart type if you have a diverse range of
quantitative
values. The geometric accuracy of the size calculations is
paramount.
Mistakes are often made, in particular, with circle size
calculations: it is
the area you are modifying, not the diameter/radius.
Arrangement
approaches vary: sometimes you see the shapes anchored to a
common
baseline (bottom or central alignment) while on other occasions
they
might just ‘float’. If you use an organic shape, like a human
figure, to
represent different quantities you need to adjust the entire shape
area,
not just the height. Often the approach for this type of display is
to treat
the figure as a rudimentary rectangular shape. Sometimes the
volume of
a shape is used rather than area to represent quantitative values
(especially if there are almost exponentially different values to
show)
but this increases the perceptual difficulty in estimating and
comparing
values. Where possible try to make the categorical sorting
meaningful,
maybe organising values in ascending/descending size order.
VARIATIONS & ALTERNATIVES
The ‘bubble chart’ uses clusters of sized bubbles to compare
categorical
values and, sometimes, to represent part-to-whole analysis. The
‘nested
shape chart’ might include secondary, smaller area sizes nested
within
each shape to display local part-to-whole relationships.
Charts Comparisons
Bubble chart
ALSO KNOWN AS Circle packing diagram
EXAMPLE Comparing the Public sector capital expenditure (£
million) on services by function of the UK Government during
2014/15.
REPRESENTATION DESCRIPTION
254
A bubble chart displays quantitative values for different major
categories with additional categorical dimensions included for
further
breakdown. It is based on the use of circles, one for each
category, sized
in proportion to the quantities they represent. Sometimes
several
separate clusters may be used to display further categorical
dimensions,
otherwise the colouring of each circle can achieve this. It is
similar in
concept to the proportional shape chart but differs through the
typical
layout being based on clustering, which therefore also enables it
as a
device for showing part-to-whole relationships as well.
Figure 6.14 UK Public Sector Capital Expenditure, 2014/15
HOW TO READ IT & WHAT TO LOOK FOR
Look at the shapes and their associated labels so you know with
what
major categorical values each is associated, noting any size and
colour
legends to assist in forming associations. If there are multiple
clusters,
learn about the significance of the grouping/separation in each
case. If
there are direct labels, find the largest shape to establish its
quantitative
value as the maximum and do likewise for the smallest – this
will help
calibrate other size judgements. Glance across the entire chart
to locate
the big, small and medium shapes and perform global
comparisons to
establish the high-level ranking of biggest > smallest. Identify
any
noticeable exceptions and/or outliers. Perform local
comparisons
between neighbouring shapes to identify larger than and smaller
than
relationships and estimate the relative proportions. Estimate (or
read, if
labels are present) the absolute values of specific shapes of
interest. If
there are multiple clusters, note the general relative size and
number of
members in each case.
255
PRESENTATION TIPS
INTERACTIVITY: Bubble charts may often be accompanied by
interactive features that let users select or mouseover individual
circles
to reveal annotated values for the quantity and category.
ANNOTATION: If interactivity is not achievable, a quantitative
size
key should be included or direct labelling; the latter may make
the
display busy (and be hard to fit into smaller circles) but will
help
overcome some of the limitations of judging area size.
COLOUR TIPS: Colours are sometimes used as redundant
encodings
to make the quantitative sizes even more immediately
distinguishable.
COMPOSITION: Estimating and comparing the size of areas
with
accuracy is not as easy as it is for judging bar length or dot
position, so
only use this chart type if you have a diverse range of
quantitative
values. The use of this chart will primarily be about facilitating
a gist, a
general sense of the largest and smallest values. The geometric
accuracy of the circle size calculations is paramount. Mistakes
are often
made with circle size calculations: it is the area you are
modifying, not
the diameter/radius. If you wish to make your bubbles appear as
3D
spheres you are essentially no longer representing quantitative
values
through the size of a geometric area mark; rather the mark will
be a
‘form’ and so the size calculation will be based on volume, not
area.
There is no categorical or quantitative sorting applied to the
layout of
the bubble chart, instead the tools that offer these charts will
generally
use a layout algorithm that applies a best-fit clustering to
arrange the
circles radially about a central ‘gravity’ force.
VARIATIONS & ALTERNATIVES
When the collection of quantities represents a whole, this
evolves into a
chart known as a ‘circle packing diagram’ and usually involves
many
parts that pack neatly into a circular layout representing the
whole.
Another variation of the packing diagram is when the adjacency
between circle ‘nodes’ indicates a connected relation, offering a
variation of the node–link diagram for showing networks of
relationships. The bubble plot also uses differently sized circles
but the
position in each case is overlaid onto a scatter plot structure,
based on
two dimensions of further quantitative variables. Removing the
size
attribute (and effectively replacing area with point mark) you
could
simply use the quantity of points clustered together for different
categories to create a ’tally chart’.
256
Charts Comparisons
Radar chart
ALSO KNOWN AS Filled radar chart, star chart, spider
diagram, web
chart
EXAMPLE Comparing the global competitive scores (out of 7)
across
12 ‘pillars’ of performance for the United Kingdom.
REPRESENTATION DESCRIPTION
A radar chart shows values for three or more different
quantitative
measures in the same display for, typically, a single category. It
uses a
radial (circular) layout comprising several axes emerging from
the
centre-like spokes on a wheel, one for each measure. The
quantitative
values for each measure are plotted through position along each
scale
and then joined by connecting lines to form a unique geometric
shape.
Sometimes this shape is then filled with colour. A radar chart
should
only be considered in situations where the cyclical ordering
(and
neighbourly pairings) has some significance (such as data that
might be
plotted around the face of a clock or compass) and when the
quantitative scales are the same (or similar) for each axis. Do
not plot
values for multiple categories on the same radar chart, but use
small
multiples formed of several radar charts instead.
Figure 6.15 Global Competitiveness Report 2014—2015
257
HOW TO READ IT & WHAT TO LOOK FOR
Look around the chart and acquaint yourself with the
quantitative
measure represented by each axis and note the sequencing of the
measures around the display. Is there any significance in this
arrangement that can assist in interpreting the overall shape?
Note the
range of values along each independent axis so you understand
what
positions along the scales mean in a value sense for each
measure. Scan
the shape to locate the outliers both towards the outside (larger
values)
and inside (smaller values) of the scales. It is more important to
pay
attention to the position of values along an axis than the nature
of the
connecting lines between axes, unless the axis scales are
consistent or at
least if the relative position along the scale has the same
implied
meaning. If the variable sequencing has cyclical relevance, the
spiking,
bulging or contracting shape formed will give you some sense
of the
balance of values. Perform local comparisons between
neighbouring
axes to identify larger than and smaller than relationships.
Estimate (or
read, if labels are present) the absolute values of specific shapes
of
interest.
PRESENTATION TIPS
258
ANNOTATION: The inclusion of visible annotated features like
axis
lines, tick marks, gridlines and value labels can naturally aid
the
readability of the radar chart. Gridlines are only relevant if
there are
common scales across each quantitative variable. If so, the
gridlines
must be presented as straight lines, not concentric arcs, because
the
connecting lines joining up the values are themselves straight
lines.
COLOUR TIPS: Often the radar shapes are filled with a colour,
sometimes with a degree of transparency to allow the
background
apparatus to be partially visible.
COMPOSITION: The cyclical ordering of the quantitative
variables
has to be of optimum significance as the connectors and shape
change
for every different ordering permutation. This will have a major
impact
on the readability and meaning of the resulting chart shape. As
the axes
will be angled all around the radial display, you will need to
make sure
all the associated labels are readable (i.e. not upside down or at
difficult
angles).
VARIATIONS & ALTERNATIVES
A ‘polar chart’ is an alternative to the radar chart that removes
some of
the main shortcomings caused by connecting lines in the radar
chart. If
you have consistent value scales across the different
quantitative
measures, a ‘bar chart’ or ‘dot plot’ would be a better
alternative. While
not strictly a variation, ‘parallel coordinates’ display a similar
technique
for plotting several independent quantitative measures in the
same
chart. The main difference is that parallel coordinates use a
linear layout
and can accommodate many categories in one display.
Charts Comparisons
Polar chart
ALSO KNOWN AS Coxcomb plot, polar area plot
259
REPRESENTATION DESCRIPTION
A polar chart shows values for three or more different
quantitative
measures in the same display. It uses a radial (circular) layout
comprising several equal-angled circular sectors like slices of a
pizza,
one for each measure. In contrast to the radar chart (which uses
position
along a scale), the polar chart uses variation in the size of the
sector
areas to represent the quantitative values. It is, in essence, a
radially
plotted bar chart. Colour is an optional attribute, sometimes
used
visually to indicate further categorical dimensions. A polar
chart should
only be considered in situations where the cyclical ordering
(and
neighbourly pairings) has some significance (such as data that
might be
plotted around the face of a clock or compass) and when the
quantitative scales are the same (or similar) for each axis.
EXAMPLE Comparing the quantitative match statistics across
14
different performance measures for a rugby union player.
Figure 6.16 Excerpt from a Rugby Union Player Dashboard
HOW TO READ IT & WHAT TO LOOK FOR
260
Look around the chart and acquaint yourself with the
quantitative
measures each sector represents and note the sequencing of the
measures around the display. Is there any significance in this
arrangement that can assist in interpreting the overall shape?
Note the
range of values included on the quantitative scale and acquaint
yourself
with any colour associations. Glance across the entire chart to
locate the
big, small and medium sectors and perform global comparisons
to
establish the high-level ranking of biggest > smallest. Identify
any
noticeable exceptions and/or outliers. Perform local
comparisons
between neighbouring variables to identify the order of
magnitude and
estimate the relative sizes. Estimate (or read, if labels are
present) the
absolute values of specific sectors of interest. Where available,
compare
the quantities against annotated references such as targets,
forecast, last
year, average, etc. If there is significance behind the sequencing
of the
variables, look out for any patterns that emerge through spiking,
bulging or contracting shapes.
PRESENTATION TIPS
ANNOTATION: The inclusion of visible annotated features like
tick
marks and value labels can naturally aid the readability of the
polar
chart. Gridlines are only relevant if there are common scales
across
each quantitative variable. If so, the gridlines must be presented
as arcs
reflecting the outer shape of each sector. Connecting lines
joining up
the values are themselves straight lines. Each sector typically
uses the
same quantitative scale for each quantitative measure but, on
the
occasions when this is not the case, each axis will require its
own, clear
value scale.
COLOUR TIPS: Often polar chart sectors are filled with a
meaningful
colour, sometimes with a degree of transparency to allow the
background apparatus to be partially visible.
COMPOSITION: The cyclical ordering of the quantitative
variables
has to be of some significance to legitimise the value of the
polar chart
over the bar chart. As the sectors will be angled all around the
radial
display, you will need to make sure all the associated labels are
readable (i.e. not upside down or at difficult angles). The
quantitative
values represented by the size of the sectors need to be carefully
calculated. It is the area of the sector, not the radius length, that
will be
modified to portray the values accurately. If you make
maximum
quantitative value equivalent to the largest sector area, all other
sector
sizes can be calculated accordingly. Knowing how many
different
quantitative variables you are showing means you can easily
calculate
261
the angle of any given sector. The quantitative measure axes
should
always start from the origin value of zero: a sector should be
representative of the true, full quantitative value, nothing more,
nothing
less, otherwise the perception of size will be distorted when
comparing
relative sizes.
VARIATIONS & ALTERNATIVES
Unless the radial layout provides meaning through the notion of
a
‘whole’ or through the cyclical arrangement of measures, you
might be
best using a ‘bar chart’. Variations in approach tend to see
modifications in the sector shape with measure values
represented by
individual bars lengths or, in the example of the Better Life
Index
project, through variations in ‘petal’ sizes.
Charts Distributions
Range Chart
ALSO KNOWN AS Span chart, floating bar chart, barometer
chart
REPRESENTATION DESCRIPTION
A range chart displays the minimum to maximum distribution of
a
series of quantitative values for different categories. The
display is
formed by a bar, one for each category, with the lower and
upper
position of the bars shaped by the minimum and maximum
quantitative
values in each case. The resulting bar lengths thus represent the
range
of values between the two limits.
EXAMPLE Comparing the highest and lowest temperatures (°F)
recorded across the top 10 most populated cities during 2015.
Figure 6.17 Range of Temperatures Recorded in Top 10 Most
Populated Cities (2015)
262
HOW TO READ IT & WHAT TO LOOK FOR
Look at the axes so you know with what major categorical
values each
range bar is associated and what the range of the quantitative
values is
(min to max). Glance across the entire chart to locate the big,
small and
medium bars and perform global comparisons to establish the
high-
level ranking of biggest > smallest differences as well as the
highest and
lowest values. Identify any noticeable exceptions and/or
outliers.
Perform local comparisons between neighbouring bars, to
identify
larger than and smaller than relationships and estimate the
relative
proportions. There may be deliberate sorting of the display
based on
one of the quantitative measures. Estimate (or read, if labels are
present) the absolute values of specific bars of interest. Where
available, compare the quantities against annotated references
such as
targets, forecast, last year, average, etc.
PRESENTATION TIPS
ANNOTATION: Chart apparatus devices like tick marks and
gridlines,
in particular, can be helpful to increase the accuracy of the
reading of
the quantitative values. If you have axis labels you may not
need direct
labels on each bar – this will be lead to label overload, so
generally
decide between one or the other.
COMPOSITION: The quantitative value axis does not need to
commence from zero, unless it means something significant to
the
263
interpretation, as the range of values themselves does not
necessarily
start from zero and the focus is more on the range and
difference
between the outer values. There is no significant difference in
perception between vertical or horizontal layouts, though the
latter tend
to make it easier to accommodate and read the category labels.
Where
possible, try to make the categorical sorting meaningful, maybe
organising values in ascending/descending size order.
VARIATIONS & ALTERNATIVES
‘Connected dot plots’ will also emphasise the difference
between two
selected measure values (as opposed to min/max) or where the
underlying data is a change over time between two observations.
‘Band
charts’ will often be used to show how the range of data values
has
changed over time, displaying the minimum and maximum
bands at
each time unit. These are often used in displays like weather
forecasts.
Charts Distributions
Box-and-whisker plot
ALSO KNOWN AS Box plot
REPRESENTATION DESCRIPTION
A box-and-whisker plot displays the distribution and shape of a
series
of quantitative values for different categories. The display is
formed by
a combination of lines and point markers to indicate (through
position
and length), typically, five different statistical measures. Three
of the
statistical values are common to all plots: the first quartile (25th
percentile), the second quartile (or median) and the third
quartile (75th
percentile) values. These are displayed with a box (effectively a
wide
bar) positioned and sized according to the first and third
quartile values
with a marker indicating the median. The remaining two
statistical
values vary in definition: usually either the minimum and
maximum
264
values or the 10th and 90th percentiles. These statistical values
are
represented by extending a line beyond the bottom and top of
the main
box to join with a point marker indicating the appropriate
position.
These are the whiskers. A plot will be produced for each major
category.
EXAMPLE Comparing the distribution of annual earnings 10
years
after starting school for graduates across the eight Ivy League
schools.
Figure 6.18 Ranking the Ivies
HOW TO READ IT & WHAT TO LOOK FOR
Begin by looking at the axes so you know with which category
each
plot is associated and what the range of quantitative values is
(min to
max). Establish the specific statistics being displayed, by
consulting any
legends or descriptions, especially in order to identify what the
‘whiskers’ are representing. Glance across the entire chart to
locate the
main patterns of spread, identifying any common or noticeably
different
265
patterns across categories. Look across the shapes formed for
each
category to learn about the dispersal of values: starting with the
median,
then observing the extent and balance of the ‘box’ (the
interquartile
range between the 25th and 75th percentiles) and then check the
‘whisker’ extremes. Is the shape balanced or skewed around the
median? Is the interquartile range wide or narrow? Are the
whisker
extremes far away from the edges of the box? Then return to
comparing
shapes across all categories to identify more precisely any
interesting
differences or commonalities for each of the five statistical
measures.
PRESENTATION TIPS
ANNOTATION: If you have axis labels you may not need direct
labels
on each bar – this will lead to label overload, so generally
decide
between one or the other.
COMPOSITION: The quantitative value axis does not need to
commence from zero, unless it means something significant to
the
interpretation, as the range of values themselves do not
necessarily start
from zero and the focus is on the statistical properties between
the outer
values. There is no significant difference in perception between
vertical
or horizontal box-and-whisker plots, though horizontal layouts
tend to
make it easier to accommodate and read the category labels. Try
to keep
a noticeable gap between plots to enable greater clarity in
reading.
When you have several or many plots in the same chart, where
possible
try to make the categorical sorting meaningful, maybe
organising values
in ascending/descending order based on the median value.
VARIATIONS & ALTERNATIVES
Variations involve reducing the number of statistical measures
included
in the display by removing the whiskers to just show the 25th
and 75th
percentiles through the lower and upper parts of the box. The
‘candlestick chart’ (or OHLC chart) involves a similar approach
and is
often used in finance to show the distribution and milestone
values of
stock performances during a certain time frame (usually daily),
plotting
the opening, highest, lowest and closing prices, using colour to
indicate
an up or down trend.
Charts Distributions
266
Univariate scatter plot
ALSO KNOWN AS 1D scatter plot, jitter plot
REPRESENTATION DESCRIPTION
A univariate scatter plot displays the distribution of a series of
quantitative values for different categories. In contrast to the
box-and-
whisker plot, which shows selected statistical values, a
univariate
scatter plot shows all values across a series. For each category,
a range
of points (typically circles but any ‘symbol’ is legitimate) are
used to
mark the position along the scale of the quantitative values.
From this
you can see the range, the outliers and the clusters and form an
understanding about the general shape of the data.
EXAMPLE Comparing the distribution of average critics score
(%)
from the Rotten Tomatoes website for each movie released
across a
range of different franchises and movie theme collections.
Figure 6.19 Comparing Critics Scores for Major Movie
Franchises
267
HOW TO READ IT & WHAT TO LOOK FOR
Look at the axes so you know what each scatter row/column
relates to
in terms of which category it is associated with and what the
range of
the quantitative values is (min to max). If colour has been used
to
emphasise or separate different marks, establish what the
associations
are. Also, learn about how the design depicts multiple marks on
the
same value – these may appear darker or indeed larger. Glance
across
the entire chart to observe the main patterns of clustering and
identify
any noticeable exceptions and/or outliers across all categories.
Then
look more closely at the patterns within each scatter to learn
about each
category’s specific dispersal of values. Look for empty regions
where
no quantitative values exist. Estimate the absolute values of
specific
dots of interest. Where available, compare the quantities against
annotated references such as the average or median.
PRESENTATION TIPS
ANNOTATION: Chart apparatus devices like gridlines can be
helpful
to increase the accuracy of the reading of the quantitative
values. Direct
labelling is normally restricted to including values for
specifically
noteworthy points only.
COLOUR: Colour may be used to establish focus of certain
points
268
and/or distinction between different sub-category groups to
assist with
interpretation. When several points have the exact same value
you
might need to use unfilled or semi-transparent filled circles to
facilitate
a sense of value density.
COMPOSITION: The representation of the quantitative values
is
based on position and not size, therefore the quantitative axis
does not
need to have a zero origin. There is no significant difference in
perception between vertical or horizontal arrangement, though
horizontal layouts tend to make it easier to accommodate and
read the
category labels. Where possible try to make the categorical
sorting
meaningful, maybe organising values in ascending/descending
size
order.
VARIATIONS & ALTERNATIVES
To overcome occlusion caused by plotting several marks at the
same
value, a variation of the univariate scatter plot may see the
points
replaced by geometric areas (like circles), where the position
attribute is
used to represent a quantitative value along a scale and the size
attribute
is used to indicate the frequency of observations of similar
value.
Adding a second quantitative variable axis would lead to the use
of a
’scatter plot’.
Charts Distributions
Histogram
ALSO KNOWN AS Bar chart (wrongly)
REPRESENTATION DESCRIPTION
A histogram displays the frequency and distribution for a range
of
quantitative groups. Whereas bar charts compare quantities for
different
categories, a histogram technically compares the number of
269
observations across a range of value ‘bins’ using the size of
lines/bars
(if the bins relate to values with equal intervals) or the area of
rectangles (if the bins have unequal value ranges) to represent
the
quantitative counts. With the bins arranged in meaningful order
(that
effectively form ordinal groupings) the resulting shape formed
reveals
the overall pattern of the distribution of observations.
EXAMPLE Comparing the distribution of movies released over
time
starring Michael Caine across five-year periods based on the
date of
release in the US.
Figure 6.20 A Career in Numbers: Movies Starring Michael
Caine
HOW TO READ IT & WHAT TO LOOK FOR
Begin by looking at the axes so you know what the chart depicts
in
terms of the categorical bins and the range of the quantitative
values
(zero to max). Glance across the entire chart to establish the
main
pattern. Is it symmetrically shaped, like a bell or pyramid
(around a
median or average value)? Is it skewed to the left or right? Does
it dip
in the middle and peak at the edges (known as bimodal)? Does it
have
several peaks and troughs? Maybe it is entirely random in its
pattern?
270
All these characteristics of ‘shape’ will inform you about the
underlying
distribution of the data.
PRESENTATION TIPS
ANNOTATION: Chart apparatus devices like tick marks and
gridlines
in particular can be helpful to increase the accuracy of the
reading of
the quantitative values. Axis labels more than direct value
labels tend to
be used so as not to crowd the shape of the histogram.
COMPOSITION: Unlike the bar chart there should be no (or at
most a
very thin) gap between bars to help the collective shape of the
frequencies emerge. The sorting of the quantitative bins must be
in
ascending order so that the reading of the overall shape
preserves its
meaning. The number of value bins and the range of values
covered by
each have a prominent influence over the appearance of the
histogram
and the usefulness of what it might reveal: too few bins may
disguise
interesting nuances, patterns and outliers; too many bins and the
most
interesting shapes may be abstracted by noise above signal.
There is no
singular best approach, the right choice simply arrives through
experimentation and iteration.
VARIATIONS & ALTERNATIVES
For analysis that looks at the distribution of values across two
dimensions, such as the size of populations for age across
genders, a
‘back-to-back histogram’ (with male on one side, female on the
other),
also commonly known as a ‘violin plot’ or ‘population
pyramid’, is a
useful approach to see and compare the respective shapes. A
‘box-and-
whisker plot’ reduces the distribution of values to five key
statistical
measures to describe key dimensions of the spread of values.
Charts Distributions
Word cloud
271
ALSO KNOWN AS Tag cloud
REPRESENTATION DESCRIPTION
A word cloud shows the frequency of individual word items
used in
textual data (such as tweets, comments) or documents (passages,
articles). The display is based around an enclosed cluster of
words with
the font (not the word length) sized according to the frequency
of usage.
In modifying the size of font this is effectively increasing the
area size
of the whole word. All words have a different shape and size so
this can
make it quite difficult to avoid the prominence of long words,
irrespective of their font size. Word clouds are therefore only
useful
when you are trying to get a quick and rough sense of some of
the
dominant keywords used in the text. They can be an option for
working
with qualitative data during the data exploration stage, more so
as a
means for reporting analysis to others.
EXAMPLE Comparing the frequency of words used in Chapter
1 of
this book.
Figure 6.21 Word Cloud of the Text from Chapter 1
HOW TO READ IT & WHAT TO LOOK FOR
The challenge with reading word clouds is to avoid being drawn
to the
length and/or area of a word – they are simply attributes of the
word,
not a meaningful representation of frequency. It is the size of
the font
that you need to focus on. Scan the display to spot the larger
text
showing the more frequently used words. Consider any words of
specific interest to see if you can find them; if they are not
significantly
visible, that in itself could be revealing. While most word cloud
272
generators will dismiss many irrelevant words, you might still
need to
filter out perceptually the significance of certain dominantly
sized text.
PRESENTATION TIPS
INTERACTIVITY: Interactive features that let users
interrogate, filter
and scrutinise the words in more depth, perhaps presenting
examples of
their usage in a passage, can be quite useful to enhance the
value of a
word cloud.
ANNOTATION: While the absolutes are generally of less
interest than
relative comparisons, to help viewers get as much out of the
display as
possible a simple legend explaining how the font size equates to
frequency number can be useful.
COLOUR: Colours may be used as redundant encoding to
accentuate
further the larger frequencies or categorically to create useful
visual
separation.
COMPOSITION: The arrangement of the words within a word
cloud
is typically based on a layout process. Although not random,
this will
generally prioritise the placement of words to occupy optimum
collective space that preserves an overall shape (with
essentially a
central gravity) over and above any arrangement that might
better
enable direct comparison.
VARIATIONS & ALTERNATIVES
The alternative approach would be to use any other method in
this
categorical family of charts that would more usefully display
the counts
of text, such as a bar chart.
Charts Part-to-whole
Pie chart
273
ALSO KNOWN AS Pizza chart
REPRESENTATION DESCRIPTION
A pie chart shows how the quantities of different constituent
categories
make up a whole. It uses a circular display divided into sectors
for each
category, with the angle representing each of the percentage
proportions. The resulting size of the sector (in area terms) is a
spatial
by-product of the angle applied to each part and so offers an
additional
means for judging the respective values. The role of a pie chart
is
primarily about being able to compare a part to a whole than
being able
to compare one part to another part. They therefore work best
when
there are only two or three parts included. There are a few
important
rules for pie charts. Firstly, the total percentage values of all
sector
values must be 100%; if the aggregate is greater than or less
than 100%
the chart will be corrupted. Secondly, the whole has to be
meaningful –
often people just add up independent percentages but that is not
what a
pie chart is about. Finally, the category values must represent
exclusive
quantities; nothing should be counted twice or overlap across
different
categories. Despite all these warnings, do not be afraid of the
pie chart –
just use it with discretion.
EXAMPLE Comparing the proportion of eligible voters in the
2015
UK election who voted for the Conservative Party, for other
parties and
who did not vote.
Figure 6.22 Summary of Eligible Votes in the UK General
Election
2015
274
HOW TO READ IT & WHAT TO LOOK FOR
Begin by establishing which sectors relate to what categories.
This may
involve referring to a colour key legend or through labels
directly
adjacent to the pie. Quickly scan the pie to identify the big,
medium and
small sectors. Notice if there is any significance behind the
ordering of
the parts. Unless there are value labels, you next will attempt to
judge
the individual sector angles. This usually involves mentally
breaking
the pie into 50% halves (180°) or 25% quarters (90°) and using
those
guides to perceptually measure the category values. Comparing
parts
against other parts with any degree of accuracy will only be
possible
once you have formed estimates of the individual sector sizes. If
you
are faced with the task of judging the size of many parts it is
quite
understandable if you decide to give up quite soon.
PRESENTATION TIPS
ANNOTATION: The use of local labelling for category values
can be
useful but too many labels can become cluttered, especially
when
attempting to label very small angled sectors.
COLOUR: Colour is generally vital to create categorical
separation
275
and association of the different sectors so aim to use the
difference in
colour hue and not colour saturation to maximise the visible
difference.
COMPOSITION: Positioning the first slice at the vertical 12
o’clock
position gives a useful baseline to help judge the first sector
angle
value. The ordering of sectors using descending values or
ordinal
characteristics helps with the overall readability and allocation
of effort.
Do not consider using gratuitous decoration (like 3D, gradient
colours,
or exploding slices).
VARIATIONS & ALTERNATIVES
Sometimes a pie chart has a hole in the centre and is known as a
‘doughnut chart’, continuing the food-related theme. The
function is
exactly the same as a pie but the removal of the centre, often to
accommodate a labelling property, removes the possibility of
the reader
judging the angles at the origin. One therefore has to derive the
angles
from the resulting arc lengths. If you want to display multiple
parts
(more than three) the bar chart will be a better option and, for
many
parts, the ‘treemap’ is best. Depending on the allocated space, a
‘stacked bar chart’ may provide an alternative to the pie. Unlike
most
chart types, the pie chart does not work well in the form of
small
multiples (unless there is only a single part being displayed). A
‘nested
shape chart’, typically based on embedded square or circle
areas,
enables comparison across a series of one-part-to-whole
relationships
based on absolute numbers, rather than percentages, where the
wholes
may vary in size.
Charts Part-to-whole
Waffle chart
ALSO KNOWN AS Square pie, unit chart, 100% stacked shape
chart
REPRESENTATION DESCRIPTION
276
A waffle chart shows how the quantities of different constituent
categories make up a whole. It uses a square display usually
representing 100 point ‘cells’ through a 10 × 10 grid layout.
Each
constituent category proportion is displayed through colour-
coding a
proportional number of cells. Difference in symbol can also be
used.
The role of the waffle chart is to simplify the counting of
proportions in
contrast to the angle judgements of the pie chart, though the
display is
limited to rounded integer values. This is easier when the grid
layout
facilitates quick recognition of units of 10. As with the pie
chart, the
waffle chart works best when you are showing how a single part
compares to the whole and perhaps offers greater visual impact
when
there are especially small percentages of a whole. Rather than
just
colouring in the grid cells, sometimes different symbols will be
used to
associate with different categories. For example, you might see
figures
or gender icons used to show the makeup of a given sample
population.
EXAMPLE Comparing the proportion of total browser usage for
Internet Explorer and Chrome across key milestone moments.
Figure 6.23 The Changing Fortunes of Internet Explorer and
Google
Chrome
HOW TO READ IT & WHAT TO LOOK FOR
Begin by establishing how the different shapes or colours are
associated
with different categories. Assess the grid layout to understand
the
dimension of the chart and the quantity of cell ‘units’ forming
the
display (e.g. is it a 10 x 10 grid?). Quickly scan the chart to
identify the
big, medium and small sectors. Notice if there is any
significance
277
behind the ordering of the parts. Unless there are value labels,
you will
need to count/estimate the number of units representing each
category
value. Comparing parts against other parts will only be possible
once
you have established the individual part sizes. If several related
waffle
charts are shown, possibly for different categories or points in
time,
identify the related colours/shapes in each chart and establish
the
patterns of size between and across the various charts, looking
for
trends, declines and general differences.
PRESENTATION TIPS
ANNOTATION: Direct labelling can become very cluttered and
hard
to incorporate elegantly without the need for long arrows.
COLOUR: Borders around each square cell are useful to help
establish
the individual units, but do not make the borders too thick to
the point
where they dominate attention.
COMPOSITION: Always start each row of values from the same
side,
for consistency and to make it easier for people to estimate the
values.
When you have several parts in the same waffle chart, where
possible
try to make the categorical sorting meaningful, maybe
organising values
in ascending/descending size order or based on a logical
categorical
order.
VARIATIONS & ALTERNATIVES
Sometimes the waffle chart approach is used to show stacks of
absolute
unit values and indeed there are overlaps in concept between
this
variation in the waffle chart and potential applications of the
pictogram.
Aside from the pie chart, a ‘nested shape chart’ will provide an
alternative way of showing a part-to-whole relationship while
also
occupying a squarified layout.
Charts Part-to-whole
Stacked bar chart
278
ALSO KNOWN AS
REPRESENTATION DESCRIPTION
A stacked bar chart displays a part-to-whole breakdown of
quantitative
values for different major categories. The percentage proportion
of each
categorical dimension or ‘part’ is represented by separate bars,
distinguished by colour, that are sized according to their
proportion and
then stacked to create the whole. Sometimes the whole is
standardised
to represent 100%, at other times the whole will be
representative of
absolute values. Stacked bar charts work best when the parts are
based
on ordinal dimensions, which enables ordering of the parts
within the
stack to help establish the overall shape of the data. If the parts
are
representative of nominal data, it is best to keep the number of
constituent categories quite low, as estimating the size of
individual
stacked parts when there are many becomes quite hard.
EXAMPLE Comparing the percentage of adults (16–65 year
olds)
achieving different proficiency levels in literacy across
different
countries.
Figure 6.24 Literarcy Proficiency: Adult Levels by Country
279
HOW TO READ IT & WHAT TO LOOK FOR
Look at the axes so you know with what major categorical
values each
bar is associated and what the quantitative values are,
determining if it
is a 100% stacked bar or an absolute stacked bar (in which case
identify
the min and the max). Establish the colour association to
understand
what categories the bars within each stack represent. Glance
across the
entire chart. If the categorical data is ordinal, and the
sorting/colour of
the stacks is intuitive, you should be able to derive meaning
from the
overall balance of colour patterns, especially where any
annotated
gridlines help to guide your value estimation. If the categorical
data is
nominal, seek to locate the dominant colours and the least
noticeable
ones. Comparing across different stacked bars is made harder by
the
lack of a common baseline for anything other than the bottom
stack on
the zero baseline (and for 100% stacked bars, those final ones at
the
top) and so a general sense of magnitude will be your focus.
Study
closer the constituent parts within each stack to establish the
high-level
ranking of biggest > smallest. Estimate (or read, if labels are
present)
280
Part C Developing Your Design SolutionThe Production Cycle.docx

Weitere ähnliche Inhalte

Ähnlich wie Part C Developing Your Design SolutionThe Production Cycle.docx

Top UX Deliverables : What will I make as a UX Designer?
Top UX Deliverables : What will I make as a UX Designer?Top UX Deliverables : What will I make as a UX Designer?
Top UX Deliverables : What will I make as a UX Designer?nariyaravi
 
NUX October 6th 2014 - UX in a traditional enterprise
NUX October 6th 2014 - UX in a traditional enterpriseNUX October 6th 2014 - UX in a traditional enterprise
NUX October 6th 2014 - UX in a traditional enterprisepjhauser
 
Evolving the Creative Process
Evolving the Creative ProcessEvolving the Creative Process
Evolving the Creative Processcreed
 
Professional project writing
Professional project writingProfessional project writing
Professional project writingjkmaster
 
Importance of Wireframes in Web Design
Importance of Wireframes in Web DesignImportance of Wireframes in Web Design
Importance of Wireframes in Web DesignHitesh Mehta
 
Propeller UI/UX Process
Propeller UI/UX ProcessPropeller UI/UX Process
Propeller UI/UX ProcessBlair Stewart
 
design_fundamental_new_.ppt
design_fundamental_new_.pptdesign_fundamental_new_.ppt
design_fundamental_new_.pptMohsenGhorbani9
 
AD - Developer communication and Technology
AD - Developer communication and TechnologyAD - Developer communication and Technology
AD - Developer communication and TechnologyEnplore AB
 
Design thinking
Design thinkingDesign thinking
Design thinkingchandkec
 
Principles of visual consistency
Principles of visual consistencyPrinciples of visual consistency
Principles of visual consistencyHalil Eren Çelik
 
Storyboarding for Data Visualization
Storyboarding for Data VisualizationStoryboarding for Data Visualization
Storyboarding for Data VisualizationAmanda Makulec
 
How to Best Develop a Product by PlateRate Founder
How to Best Develop a Product by PlateRate FounderHow to Best Develop a Product by PlateRate Founder
How to Best Develop a Product by PlateRate FounderProduct School
 
Why Can't We All Just Get Along? Improving Designer/Developer Collaboration
Why Can't We All Just Get Along? Improving Designer/Developer CollaborationWhy Can't We All Just Get Along? Improving Designer/Developer Collaboration
Why Can't We All Just Get Along? Improving Designer/Developer CollaborationAllison Corbett
 

Ähnlich wie Part C Developing Your Design SolutionThe Production Cycle.docx (20)

Net Magazine Feb 2010
Net Magazine Feb 2010Net Magazine Feb 2010
Net Magazine Feb 2010
 
Top UX Deliverables : What will I make as a UX Designer?
Top UX Deliverables : What will I make as a UX Designer?Top UX Deliverables : What will I make as a UX Designer?
Top UX Deliverables : What will I make as a UX Designer?
 
NUX October 6th 2014 - UX in a traditional enterprise
NUX October 6th 2014 - UX in a traditional enterpriseNUX October 6th 2014 - UX in a traditional enterprise
NUX October 6th 2014 - UX in a traditional enterprise
 
Evolving the Creative Process
Evolving the Creative ProcessEvolving the Creative Process
Evolving the Creative Process
 
Professional project writing
Professional project writingProfessional project writing
Professional project writing
 
Os Leung
Os LeungOs Leung
Os Leung
 
Graphic narrative brief
Graphic narrative briefGraphic narrative brief
Graphic narrative brief
 
Importance of Wireframes in Web Design
Importance of Wireframes in Web DesignImportance of Wireframes in Web Design
Importance of Wireframes in Web Design
 
Propeller UI/UX Process
Propeller UI/UX ProcessPropeller UI/UX Process
Propeller UI/UX Process
 
UI/UX Design in Agile process
UI/UX Design in Agile process  UI/UX Design in Agile process
UI/UX Design in Agile process
 
design_fundamental_new_.ppt
design_fundamental_new_.pptdesign_fundamental_new_.ppt
design_fundamental_new_.ppt
 
AD - Developer communication and Technology
AD - Developer communication and TechnologyAD - Developer communication and Technology
AD - Developer communication and Technology
 
Design thinking
Design thinkingDesign thinking
Design thinking
 
Principles of visual consistency
Principles of visual consistencyPrinciples of visual consistency
Principles of visual consistency
 
Storyboarding for Data Visualization
Storyboarding for Data VisualizationStoryboarding for Data Visualization
Storyboarding for Data Visualization
 
list script and flowchart
list script and flowchartlist script and flowchart
list script and flowchart
 
How to Best Develop a Product by PlateRate Founder
How to Best Develop a Product by PlateRate FounderHow to Best Develop a Product by PlateRate Founder
How to Best Develop a Product by PlateRate Founder
 
Design process
Design processDesign process
Design process
 
Why Can't We All Just Get Along? Improving Designer/Developer Collaboration
Why Can't We All Just Get Along? Improving Designer/Developer CollaborationWhy Can't We All Just Get Along? Improving Designer/Developer Collaboration
Why Can't We All Just Get Along? Improving Designer/Developer Collaboration
 
Design Drivers
Design DriversDesign Drivers
Design Drivers
 

Mehr von smile790243

PART B Please response to these two original posts below. Wh.docx
PART B Please response to these two original posts below. Wh.docxPART B Please response to these two original posts below. Wh.docx
PART B Please response to these two original posts below. Wh.docxsmile790243
 
PART A You will create a media piece based around the theme of a.docx
PART A You will create a media piece based around the theme of a.docxPART A You will create a media piece based around the theme of a.docx
PART A You will create a media piece based around the theme of a.docxsmile790243
 
Part 4. Implications to Nursing Practice & Implication to Patien.docx
Part 4. Implications to Nursing Practice & Implication to Patien.docxPart 4. Implications to Nursing Practice & Implication to Patien.docx
Part 4. Implications to Nursing Practice & Implication to Patien.docxsmile790243
 
PART AHepatitis C is a chronic liver infection that can be e.docx
PART AHepatitis C is a chronic liver infection that can be e.docxPART AHepatitis C is a chronic liver infection that can be e.docx
PART AHepatitis C is a chronic liver infection that can be e.docxsmile790243
 
Part A post your answer to the following question1. How m.docx
Part A post your answer to the following question1. How m.docxPart A post your answer to the following question1. How m.docx
Part A post your answer to the following question1. How m.docxsmile790243
 
PART BPlease response to these two original posts below..docx
PART BPlease response to these two original posts below..docxPART BPlease response to these two original posts below..docx
PART BPlease response to these two original posts below..docxsmile790243
 
Part A (50 Points)Various men and women throughout history .docx
Part A (50 Points)Various men and women throughout history .docxPart A (50 Points)Various men and women throughout history .docx
Part A (50 Points)Various men and women throughout history .docxsmile790243
 
Part A1. K2. D3. N4. C5. A6. O7. F8. Q9. H10..docx
Part A1. K2. D3. N4. C5. A6. O7. F8. Q9. H10..docxPart A1. K2. D3. N4. C5. A6. O7. F8. Q9. H10..docx
Part A1. K2. D3. N4. C5. A6. O7. F8. Q9. H10..docxsmile790243
 
Part A Develop an original age-appropriate activity for your .docx
Part A Develop an original age-appropriate activity for your .docxPart A Develop an original age-appropriate activity for your .docx
Part A Develop an original age-appropriate activity for your .docxsmile790243
 
Part 3 Social Situations2. Identify multicultural challenges th.docx
Part 3 Social Situations2. Identify multicultural challenges th.docxPart 3 Social Situations2. Identify multicultural challenges th.docx
Part 3 Social Situations2. Identify multicultural challenges th.docxsmile790243
 
Part A (1000 words) Annotated Bibliography - Create an annota.docx
Part A (1000 words) Annotated Bibliography - Create an annota.docxPart A (1000 words) Annotated Bibliography - Create an annota.docx
Part A (1000 words) Annotated Bibliography - Create an annota.docxsmile790243
 
Part 6 Disseminating Results Create a 5-minute, 5- to 6-sli.docx
Part 6 Disseminating Results Create a 5-minute, 5- to 6-sli.docxPart 6 Disseminating Results Create a 5-minute, 5- to 6-sli.docx
Part 6 Disseminating Results Create a 5-minute, 5- to 6-sli.docxsmile790243
 
Part 3 Social Situations • Proposal paper which identifies multicul.docx
Part 3 Social Situations • Proposal paper which identifies multicul.docxPart 3 Social Situations • Proposal paper which identifies multicul.docx
Part 3 Social Situations • Proposal paper which identifies multicul.docxsmile790243
 
Part 3 Social Situations 2. Identify multicultural challenges that .docx
Part 3 Social Situations 2. Identify multicultural challenges that .docxPart 3 Social Situations 2. Identify multicultural challenges that .docx
Part 3 Social Situations 2. Identify multicultural challenges that .docxsmile790243
 
Part 2The client is a 32-year-old Hispanic American male who c.docx
Part 2The client is a 32-year-old Hispanic American male who c.docxPart 2The client is a 32-year-old Hispanic American male who c.docx
Part 2The client is a 32-year-old Hispanic American male who c.docxsmile790243
 
Part 2For this section of the template, focus on gathering deta.docx
Part 2For this section of the template, focus on gathering deta.docxPart 2For this section of the template, focus on gathering deta.docx
Part 2For this section of the template, focus on gathering deta.docxsmile790243
 
Part 2 Observation Summary and Analysis • Summary paper of observat.docx
Part 2 Observation Summary and Analysis • Summary paper of observat.docxPart 2 Observation Summary and Analysis • Summary paper of observat.docx
Part 2 Observation Summary and Analysis • Summary paper of observat.docxsmile790243
 
Part 2 Observation Summary and Analysis 1. Review and implement any.docx
Part 2 Observation Summary and Analysis 1. Review and implement any.docxPart 2 Observation Summary and Analysis 1. Review and implement any.docx
Part 2 Observation Summary and Analysis 1. Review and implement any.docxsmile790243
 
Part 2Data collectionfrom your change study initiative,.docx
Part 2Data collectionfrom your change study initiative,.docxPart 2Data collectionfrom your change study initiative,.docx
Part 2Data collectionfrom your change study initiative,.docxsmile790243
 
Part 2 Financial Statement Analysis A. Based on your financial .docx
Part 2 Financial Statement Analysis A. Based on your financial .docxPart 2 Financial Statement Analysis A. Based on your financial .docx
Part 2 Financial Statement Analysis A. Based on your financial .docxsmile790243
 

Mehr von smile790243 (20)

PART B Please response to these two original posts below. Wh.docx
PART B Please response to these two original posts below. Wh.docxPART B Please response to these two original posts below. Wh.docx
PART B Please response to these two original posts below. Wh.docx
 
PART A You will create a media piece based around the theme of a.docx
PART A You will create a media piece based around the theme of a.docxPART A You will create a media piece based around the theme of a.docx
PART A You will create a media piece based around the theme of a.docx
 
Part 4. Implications to Nursing Practice & Implication to Patien.docx
Part 4. Implications to Nursing Practice & Implication to Patien.docxPart 4. Implications to Nursing Practice & Implication to Patien.docx
Part 4. Implications to Nursing Practice & Implication to Patien.docx
 
PART AHepatitis C is a chronic liver infection that can be e.docx
PART AHepatitis C is a chronic liver infection that can be e.docxPART AHepatitis C is a chronic liver infection that can be e.docx
PART AHepatitis C is a chronic liver infection that can be e.docx
 
Part A post your answer to the following question1. How m.docx
Part A post your answer to the following question1. How m.docxPart A post your answer to the following question1. How m.docx
Part A post your answer to the following question1. How m.docx
 
PART BPlease response to these two original posts below..docx
PART BPlease response to these two original posts below..docxPART BPlease response to these two original posts below..docx
PART BPlease response to these two original posts below..docx
 
Part A (50 Points)Various men and women throughout history .docx
Part A (50 Points)Various men and women throughout history .docxPart A (50 Points)Various men and women throughout history .docx
Part A (50 Points)Various men and women throughout history .docx
 
Part A1. K2. D3. N4. C5. A6. O7. F8. Q9. H10..docx
Part A1. K2. D3. N4. C5. A6. O7. F8. Q9. H10..docxPart A1. K2. D3. N4. C5. A6. O7. F8. Q9. H10..docx
Part A1. K2. D3. N4. C5. A6. O7. F8. Q9. H10..docx
 
Part A Develop an original age-appropriate activity for your .docx
Part A Develop an original age-appropriate activity for your .docxPart A Develop an original age-appropriate activity for your .docx
Part A Develop an original age-appropriate activity for your .docx
 
Part 3 Social Situations2. Identify multicultural challenges th.docx
Part 3 Social Situations2. Identify multicultural challenges th.docxPart 3 Social Situations2. Identify multicultural challenges th.docx
Part 3 Social Situations2. Identify multicultural challenges th.docx
 
Part A (1000 words) Annotated Bibliography - Create an annota.docx
Part A (1000 words) Annotated Bibliography - Create an annota.docxPart A (1000 words) Annotated Bibliography - Create an annota.docx
Part A (1000 words) Annotated Bibliography - Create an annota.docx
 
Part 6 Disseminating Results Create a 5-minute, 5- to 6-sli.docx
Part 6 Disseminating Results Create a 5-minute, 5- to 6-sli.docxPart 6 Disseminating Results Create a 5-minute, 5- to 6-sli.docx
Part 6 Disseminating Results Create a 5-minute, 5- to 6-sli.docx
 
Part 3 Social Situations • Proposal paper which identifies multicul.docx
Part 3 Social Situations • Proposal paper which identifies multicul.docxPart 3 Social Situations • Proposal paper which identifies multicul.docx
Part 3 Social Situations • Proposal paper which identifies multicul.docx
 
Part 3 Social Situations 2. Identify multicultural challenges that .docx
Part 3 Social Situations 2. Identify multicultural challenges that .docxPart 3 Social Situations 2. Identify multicultural challenges that .docx
Part 3 Social Situations 2. Identify multicultural challenges that .docx
 
Part 2The client is a 32-year-old Hispanic American male who c.docx
Part 2The client is a 32-year-old Hispanic American male who c.docxPart 2The client is a 32-year-old Hispanic American male who c.docx
Part 2The client is a 32-year-old Hispanic American male who c.docx
 
Part 2For this section of the template, focus on gathering deta.docx
Part 2For this section of the template, focus on gathering deta.docxPart 2For this section of the template, focus on gathering deta.docx
Part 2For this section of the template, focus on gathering deta.docx
 
Part 2 Observation Summary and Analysis • Summary paper of observat.docx
Part 2 Observation Summary and Analysis • Summary paper of observat.docxPart 2 Observation Summary and Analysis • Summary paper of observat.docx
Part 2 Observation Summary and Analysis • Summary paper of observat.docx
 
Part 2 Observation Summary and Analysis 1. Review and implement any.docx
Part 2 Observation Summary and Analysis 1. Review and implement any.docxPart 2 Observation Summary and Analysis 1. Review and implement any.docx
Part 2 Observation Summary and Analysis 1. Review and implement any.docx
 
Part 2Data collectionfrom your change study initiative,.docx
Part 2Data collectionfrom your change study initiative,.docxPart 2Data collectionfrom your change study initiative,.docx
Part 2Data collectionfrom your change study initiative,.docx
 
Part 2 Financial Statement Analysis A. Based on your financial .docx
Part 2 Financial Statement Analysis A. Based on your financial .docxPart 2 Financial Statement Analysis A. Based on your financial .docx
Part 2 Financial Statement Analysis A. Based on your financial .docx
 

Kürzlich hochgeladen

How to do quick user assign in kanban in Odoo 17 ERP
How to do quick user assign in kanban in Odoo 17 ERPHow to do quick user assign in kanban in Odoo 17 ERP
How to do quick user assign in kanban in Odoo 17 ERPCeline George
 
Incoming and Outgoing Shipments in 3 STEPS Using Odoo 17
Incoming and Outgoing Shipments in 3 STEPS Using Odoo 17Incoming and Outgoing Shipments in 3 STEPS Using Odoo 17
Incoming and Outgoing Shipments in 3 STEPS Using Odoo 17Celine George
 
4.18.24 Movement Legacies, Reflection, and Review.pptx
4.18.24 Movement Legacies, Reflection, and Review.pptx4.18.24 Movement Legacies, Reflection, and Review.pptx
4.18.24 Movement Legacies, Reflection, and Review.pptxmary850239
 
USPS® Forced Meter Migration - How to Know if Your Postage Meter Will Soon be...
USPS® Forced Meter Migration - How to Know if Your Postage Meter Will Soon be...USPS® Forced Meter Migration - How to Know if Your Postage Meter Will Soon be...
USPS® Forced Meter Migration - How to Know if Your Postage Meter Will Soon be...Postal Advocate Inc.
 
ACC 2024 Chronicles. Cardiology. Exam.pdf
ACC 2024 Chronicles. Cardiology. Exam.pdfACC 2024 Chronicles. Cardiology. Exam.pdf
ACC 2024 Chronicles. Cardiology. Exam.pdfSpandanaRallapalli
 
call girls in Kamla Market (DELHI) 🔝 >༒9953330565🔝 genuine Escort Service 🔝✔️✔️
call girls in Kamla Market (DELHI) 🔝 >༒9953330565🔝 genuine Escort Service 🔝✔️✔️call girls in Kamla Market (DELHI) 🔝 >༒9953330565🔝 genuine Escort Service 🔝✔️✔️
call girls in Kamla Market (DELHI) 🔝 >༒9953330565🔝 genuine Escort Service 🔝✔️✔️9953056974 Low Rate Call Girls In Saket, Delhi NCR
 
Influencing policy (training slides from Fast Track Impact)
Influencing policy (training slides from Fast Track Impact)Influencing policy (training slides from Fast Track Impact)
Influencing policy (training slides from Fast Track Impact)Mark Reed
 
How to Add Barcode on PDF Report in Odoo 17
How to Add Barcode on PDF Report in Odoo 17How to Add Barcode on PDF Report in Odoo 17
How to Add Barcode on PDF Report in Odoo 17Celine George
 
Transaction Management in Database Management System
Transaction Management in Database Management SystemTransaction Management in Database Management System
Transaction Management in Database Management SystemChristalin Nelson
 
Keynote by Prof. Wurzer at Nordex about IP-design
Keynote by Prof. Wurzer at Nordex about IP-designKeynote by Prof. Wurzer at Nordex about IP-design
Keynote by Prof. Wurzer at Nordex about IP-designMIPLM
 
Science 7 Quarter 4 Module 2: Natural Resources.pptx
Science 7 Quarter 4 Module 2: Natural Resources.pptxScience 7 Quarter 4 Module 2: Natural Resources.pptx
Science 7 Quarter 4 Module 2: Natural Resources.pptxMaryGraceBautista27
 
ISYU TUNGKOL SA SEKSWLADIDA (ISSUE ABOUT SEXUALITY
ISYU TUNGKOL SA SEKSWLADIDA (ISSUE ABOUT SEXUALITYISYU TUNGKOL SA SEKSWLADIDA (ISSUE ABOUT SEXUALITY
ISYU TUNGKOL SA SEKSWLADIDA (ISSUE ABOUT SEXUALITYKayeClaireEstoconing
 
ANG SEKTOR NG agrikultura.pptx QUARTER 4
ANG SEKTOR NG agrikultura.pptx QUARTER 4ANG SEKTOR NG agrikultura.pptx QUARTER 4
ANG SEKTOR NG agrikultura.pptx QUARTER 4MiaBumagat1
 
Like-prefer-love -hate+verb+ing & silent letters & citizenship text.pdf
Like-prefer-love -hate+verb+ing & silent letters & citizenship text.pdfLike-prefer-love -hate+verb+ing & silent letters & citizenship text.pdf
Like-prefer-love -hate+verb+ing & silent letters & citizenship text.pdfMr Bounab Samir
 
Judging the Relevance and worth of ideas part 2.pptx
Judging the Relevance  and worth of ideas part 2.pptxJudging the Relevance  and worth of ideas part 2.pptx
Judging the Relevance and worth of ideas part 2.pptxSherlyMaeNeri
 
Inclusivity Essentials_ Creating Accessible Websites for Nonprofits .pdf
Inclusivity Essentials_ Creating Accessible Websites for Nonprofits .pdfInclusivity Essentials_ Creating Accessible Websites for Nonprofits .pdf
Inclusivity Essentials_ Creating Accessible Websites for Nonprofits .pdfTechSoup
 
INTRODUCTION TO CATHOLIC CHRISTOLOGY.pptx
INTRODUCTION TO CATHOLIC CHRISTOLOGY.pptxINTRODUCTION TO CATHOLIC CHRISTOLOGY.pptx
INTRODUCTION TO CATHOLIC CHRISTOLOGY.pptxHumphrey A Beña
 
Visit to a blind student's school🧑‍🦯🧑‍🦯(community medicine)
Visit to a blind student's school🧑‍🦯🧑‍🦯(community medicine)Visit to a blind student's school🧑‍🦯🧑‍🦯(community medicine)
Visit to a blind student's school🧑‍🦯🧑‍🦯(community medicine)lakshayb543
 

Kürzlich hochgeladen (20)

How to do quick user assign in kanban in Odoo 17 ERP
How to do quick user assign in kanban in Odoo 17 ERPHow to do quick user assign in kanban in Odoo 17 ERP
How to do quick user assign in kanban in Odoo 17 ERP
 
Incoming and Outgoing Shipments in 3 STEPS Using Odoo 17
Incoming and Outgoing Shipments in 3 STEPS Using Odoo 17Incoming and Outgoing Shipments in 3 STEPS Using Odoo 17
Incoming and Outgoing Shipments in 3 STEPS Using Odoo 17
 
FINALS_OF_LEFT_ON_C'N_EL_DORADO_2024.pptx
FINALS_OF_LEFT_ON_C'N_EL_DORADO_2024.pptxFINALS_OF_LEFT_ON_C'N_EL_DORADO_2024.pptx
FINALS_OF_LEFT_ON_C'N_EL_DORADO_2024.pptx
 
4.18.24 Movement Legacies, Reflection, and Review.pptx
4.18.24 Movement Legacies, Reflection, and Review.pptx4.18.24 Movement Legacies, Reflection, and Review.pptx
4.18.24 Movement Legacies, Reflection, and Review.pptx
 
USPS® Forced Meter Migration - How to Know if Your Postage Meter Will Soon be...
USPS® Forced Meter Migration - How to Know if Your Postage Meter Will Soon be...USPS® Forced Meter Migration - How to Know if Your Postage Meter Will Soon be...
USPS® Forced Meter Migration - How to Know if Your Postage Meter Will Soon be...
 
ACC 2024 Chronicles. Cardiology. Exam.pdf
ACC 2024 Chronicles. Cardiology. Exam.pdfACC 2024 Chronicles. Cardiology. Exam.pdf
ACC 2024 Chronicles. Cardiology. Exam.pdf
 
call girls in Kamla Market (DELHI) 🔝 >༒9953330565🔝 genuine Escort Service 🔝✔️✔️
call girls in Kamla Market (DELHI) 🔝 >༒9953330565🔝 genuine Escort Service 🔝✔️✔️call girls in Kamla Market (DELHI) 🔝 >༒9953330565🔝 genuine Escort Service 🔝✔️✔️
call girls in Kamla Market (DELHI) 🔝 >༒9953330565🔝 genuine Escort Service 🔝✔️✔️
 
Influencing policy (training slides from Fast Track Impact)
Influencing policy (training slides from Fast Track Impact)Influencing policy (training slides from Fast Track Impact)
Influencing policy (training slides from Fast Track Impact)
 
How to Add Barcode on PDF Report in Odoo 17
How to Add Barcode on PDF Report in Odoo 17How to Add Barcode on PDF Report in Odoo 17
How to Add Barcode on PDF Report in Odoo 17
 
Transaction Management in Database Management System
Transaction Management in Database Management SystemTransaction Management in Database Management System
Transaction Management in Database Management System
 
Keynote by Prof. Wurzer at Nordex about IP-design
Keynote by Prof. Wurzer at Nordex about IP-designKeynote by Prof. Wurzer at Nordex about IP-design
Keynote by Prof. Wurzer at Nordex about IP-design
 
Science 7 Quarter 4 Module 2: Natural Resources.pptx
Science 7 Quarter 4 Module 2: Natural Resources.pptxScience 7 Quarter 4 Module 2: Natural Resources.pptx
Science 7 Quarter 4 Module 2: Natural Resources.pptx
 
ISYU TUNGKOL SA SEKSWLADIDA (ISSUE ABOUT SEXUALITY
ISYU TUNGKOL SA SEKSWLADIDA (ISSUE ABOUT SEXUALITYISYU TUNGKOL SA SEKSWLADIDA (ISSUE ABOUT SEXUALITY
ISYU TUNGKOL SA SEKSWLADIDA (ISSUE ABOUT SEXUALITY
 
ANG SEKTOR NG agrikultura.pptx QUARTER 4
ANG SEKTOR NG agrikultura.pptx QUARTER 4ANG SEKTOR NG agrikultura.pptx QUARTER 4
ANG SEKTOR NG agrikultura.pptx QUARTER 4
 
Raw materials used in Herbal Cosmetics.pptx
Raw materials used in Herbal Cosmetics.pptxRaw materials used in Herbal Cosmetics.pptx
Raw materials used in Herbal Cosmetics.pptx
 
Like-prefer-love -hate+verb+ing & silent letters & citizenship text.pdf
Like-prefer-love -hate+verb+ing & silent letters & citizenship text.pdfLike-prefer-love -hate+verb+ing & silent letters & citizenship text.pdf
Like-prefer-love -hate+verb+ing & silent letters & citizenship text.pdf
 
Judging the Relevance and worth of ideas part 2.pptx
Judging the Relevance  and worth of ideas part 2.pptxJudging the Relevance  and worth of ideas part 2.pptx
Judging the Relevance and worth of ideas part 2.pptx
 
Inclusivity Essentials_ Creating Accessible Websites for Nonprofits .pdf
Inclusivity Essentials_ Creating Accessible Websites for Nonprofits .pdfInclusivity Essentials_ Creating Accessible Websites for Nonprofits .pdf
Inclusivity Essentials_ Creating Accessible Websites for Nonprofits .pdf
 
INTRODUCTION TO CATHOLIC CHRISTOLOGY.pptx
INTRODUCTION TO CATHOLIC CHRISTOLOGY.pptxINTRODUCTION TO CATHOLIC CHRISTOLOGY.pptx
INTRODUCTION TO CATHOLIC CHRISTOLOGY.pptx
 
Visit to a blind student's school🧑‍🦯🧑‍🦯(community medicine)
Visit to a blind student's school🧑‍🦯🧑‍🦯(community medicine)Visit to a blind student's school🧑‍🦯🧑‍🦯(community medicine)
Visit to a blind student's school🧑‍🦯🧑‍🦯(community medicine)
 

Part C Developing Your Design SolutionThe Production Cycle.docx

  • 1. Part C Developing Your Design Solution The Production Cycle Within the four stages of the design workflow there are two distinct parts. The first three stages, as presented in Part B of this book, were described as ‘The Hidden Thinking’ stages, as they are concerned with undertaking the crucial behind-the-scenes preparatory work. You may have completed them in terms of working through the book’s contents, but in visualisation projects they will continue to command your attention, even if that is reduced to a background concern.
  • 2. You have now reached the second distinct part of the workflow which involves developing your design solution. This stage follows a production cycle, commencing with rationalising design ideas and moving through to the development of a final solution. The term cycle is appropriate to describe this stage as there are many loops of iteration as you evolve rapidly between conceptual, practical and technical thinking. The inevitability of this iterative cycle is, in large part, again due to the nature of this pursuit being more about optimisation rather than an expectation of achieving that elusive notion of perfection. Trade- offs, compromises, and restrictions are omnipresent as you juggle ambition and necessary pragmatism. How you undertake this stage will differ considerably depending on the nature of your task. The creation of a relatively simple, single
  • 3. chart to be slotted into a report probably will not require the same rigour of a formal production cycle that the development of a vast interactive visualisation to be used by the public would demand. This is merely an outline of the most you will need to do – you should edit, adapt and participate the steps to fit with your context. There are several discrete steps involved in this production cycle: Conceiving ideas across the five layers of visualisation design. Wireframing and storyboarding designs. Developing prototypes or mock-up versions. 219 Testing. Refining and completing. Launching the solution.
  • 4. Naturally, the specific approach for developing your design solution (from prototyping through to launching) will vary hugely, depending particularly on your skills and resources: it might be an Excel chart, or a Tableau dashboard, an infographic created using Adobe Illustrator, or a web-based interactive built with the D3.js library. As I have explained in the book’s introduction, I’m not going to attempt to cover the myriad ways of implementing a solution; that would be impossible to achieve as each task and tool would require different instructions. For the scope of this book, I am focusing on taking you through the first two steps of this cycle – conceiving ideas and wireframing/storyboarding. There are parallels here with the distinctions between architecture (design) and engineering (execution) – I’m effectively chaperoning you through to
  • 5. the conclusion of your design thinking. To fulfil this, Part C presents a detailed breakdown of the many design options you will face when conceiving your visualisation design and provides you with an appreciation of the key factors that will influence the actual choices you make. The next few chapters are therefore concerned with the design thinking involved with each of these five layers of the visualisation design anatomy, namely: Chapter 6: Data representation Chapter 7: Interactivity Chapter 8: Annotation Chapter 9: Colour Chapter 10: Composition The sequencing of these layers is deliberate, based on the need to prioritise your attention: what will be included and how will it appear. Initially, you will need to make decisions about what choices to make around
  • 6. data representation (charts), interactivity and annotation. These are the layers that result in visible design content or features being included in your work. You will then complete your design thinking by making decisions about the appearance of these visible components, considering their colour and composition. 220 Conceiving: This will cover all your initial thinking across the various layers of design covered in the next few chapters. The focus here is on conceiving ideas based on the design options that seem to fit best with the preparatory thinking that has gone before during the first three stages. As you fine-tune your emerging design choices the benefit of sketching re-
  • 7. emerges, helping you articulate your thoughts into a rough visual form. As mentioned in Chapter 3, for some people the best approach involves sketching with the pen, for others it is best expressed through the medium of technical fluency. Whichever approach suits you best, it is helpful to start to translate your conceptual thinking into visual thinking, particularly when collaborating. This sketching might build on your instinctive sketched concepts from stage 1, but you should now be far better informed about the realities of your challenge to determine what is relevant and feasible. ‘I tend to keep referring back to the original brief (even if it’s a brief I’ve made myself) to keep checking that the concepts I’m creating tick all the right boxes. Or sometimes I get excited about an idea but if I talk about it to friends and it’s hard to describe effectively then I know that
  • 8. the concept isn’t clear enough. Sometimes just sleeping on it is all it takes to separate the good from the bad! Having an established workflow is important to me, as it helps me cover all the bases of a project, and feel confident that my concept has a sound logic.’ Stefanie Posavec, Information Designer Wireframing and storyboarding: Wireframing involves creating a low- fidelity illustration of the potential layout for those solutions that will generally occupy a single page of space, such as a simple interactive visualisation or an infographic. There is no need to be too precise just yet, you are simply mapping out what will be on your page/screen (charts, annotations), how they will be arranged and what things (interactive functions) it will do. If your project is going to require a deeper architecture, like a complex interactive, or will comprise sequenced views,
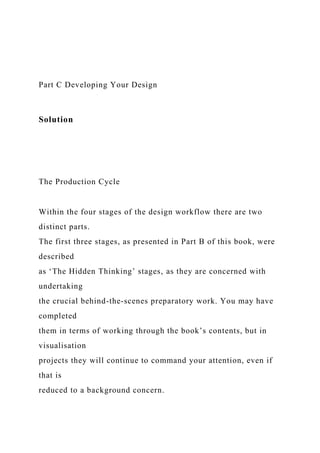
  • 9. like presentations, reports or animated graphics, each individual wireframe view will be weaved together using a technique called storyboarding. This maps out the relationships between all the views of your content to form an overall visual structure. Sometimes you might approach things the other way round, beginning with a high-level storyboard to provide a skeleton structure within which you can then form your more detailed thinking about the specific wireframe layouts within each page or view. 221 Prototypes/mock-ups: Whereas wireframing and storyboarding are characterised by the creation of low-fi ‘blueprints’, the development of mock-ups (for example, Figure C.1) or prototypes (the terms tend to be used interchangeably) involves advancing your decisions about
  • 10. the content and appearance of your proposed solution. This effectively leads to the development of a first working version that offers a reasonably close representation of what the finished product might look like. Figure C.1 Mockup designs for ‘Poppy Field’ Testing: Once you have an established prototype version, you must then seek to have it tested. Firstly, you do this ‘internally’ (i.e. by you or by collaborators/colleagues) to help iron out any obvious immediate problems. In software development parlance, this would be generally consistent with alpha testing. Naturally, beta follows alpha and this is where you will seek others to test it, evaluate it, and feedback on it. This happens regardless of the output format; it doesn’t need to be a digital, interactive project to merit being tested. There will naturally be many
  • 11. different aspects to your proposed solution that will need checking and evaluating. The three principles of good visualisation design that I presented earlier offer a sensible high-level structure to guide this testing: Trustworthy design testing concerns assessing the reliability of the work, in terms of the integrity of its content and performance. Are there any inaccuracies, mistakes or even deceptions? Are there any design choices that could lead to misunderstandings? Any aspects in how the data has been calculated or counted that could undermine 222 trust? If it is a digital solution, what is the speed of loading and are there any technical bugs or errors? Is it suitably responsive and
  • 12. adaptable in its use across different platforms? Try out various user scenarios: multiple and concurrent users, real-time data, all data vs sample data, etc. Ask the people testing your solution to try to break it so you can find and resolve any problems now. Accessible design testing relates to how intuitive or sufficiently well explained the work is. Do they understand how to read it and what all the encodings mean? Is the viewer provided with a sufficient level of assistance that would be required as per the characteristics of the intended audience? Can testers find the answers to the questions you intended them to find and quickly enough? Can they find answers to the questions they think are most relevant? Elegant design testing relates to questions such as: Is the solution suitably appealing in design? Are there any features which are redundant or superfluous design choices that are impeding the process
  • 13. of using the solution? Who you invite to test your work will vary considerably from one project to the next but generally you will have different possible people to consider participating in this task: Stakeholders: the ultimate customers/clients/colleagues who have commissioned the work may need to be included in this stage, if not for full testing then at least to engage them in receiving initial concept feedback. Recipients: you might choose a small sample of your target audience and invite those viewers to take part in initial beta testing. Critical friends: peers/team/colleagues with suitable knowledge and appreciation about the design process may offer a more sophisticated capacity to test out your work. You: sometimes (often) it may ultimately be down to you to undertake
  • 14. the testing, through either lack of access to other people or most typically a simple lack of time. To accomplish this effectively you have to find a way almost to detach yourself from the mindset of the creator and occupy that of the viewer: you need to see the wood and the trees. The timing of when to seek feedback through testing/evaluation will vary across different contexts again. Sometimes the pressure from stakeholders 223 who request to see progress will determine this. Otherwise, you will need to judge carefully the right moment to do so. You don’t want to get feedback when it is too late to change or you have invested too much effort creating a prototype that might require widespread changes in
  • 15. approach. Likewise, it can be risky showing far-too-undercooked concepts to stakeholders or testers when they might not have the capacity to realise this is just an early indication of the direction of travel. The least valuable form of testing feedback is when pedantic stakeholders spend time pointing out minutiae that of course need correcting but have no significance at this stage. No-one comes away with anything of value from this kind of situation. ‘We can kid ourselves that we are successful in what we “want” to achieve, but ultimately an external and critical audience is essential. Feedback comes in many forms; I seek it, listen to it, sniff it, touch it, taste it and respond.’ Kate McLean, Smellscape Mapper and Senior Lecturer Graphic Design Refining and completing: Based on the outcome of your testing process,
  • 16. this will likely trigger a need to revisit some of the issues that have emerged and resolve them satisfactorily. Editing your work involves: correcting issues; stripping away the superfluous content; checking and enhancing preserved content; adding extra degrees of sophistication to every layer of your design; improving the consistency and cohesion of your choices; double-checking the accuracy of every component. As your work heads towards a state of completion your mindset will need to shift from a micro-level checking back to a macro-level assessment of whether you have truly delivered against the contextual requirements and purpose of your project. In any creative process a visualiser is faced with having to declare work as being complete. Judging this can be quite a tough call to make in many
  • 17. projects. As I have discussed plenty of times, your sense of ‘finished’ often needs to be based on when you have reached the status of good enough. While the presence of a looming deadline (and at times increasingly agitated stakeholders) will sharpen the focus, often it comes down to a fingertip sense of when you feel you are entering the period of diminishing 224 returns, when the refinements you make no longer add sufficient value for the amount of effort you invest in making them. ‘You know you’ve achieved perfection in design, not when you have nothing more to add, but when you have nothing more to take away.’ Antoine de Saint-Exupéry, Writer, Poet, Aristocrat, Journalist, and
  • 18. Pioneering Aviator ‘Admit that nothing you create on a deadline will be perfect. However, it should never be wrong. I try to work by a motto my editor likes to say: No Heroics. Your code may not be beautiful, but if it works, it’s good enough. A visualisation may not have every feature you could possibly want, but if it gets the message across and is useful to people, it’s good enough. Being “good enough” is not an insult in journalism – it’s a necessity.’ Lena Groeger, Science Journalist, Designer and Developer at ProPublica ‘It was intimidating to release to the public a self-initiated project on such a delicate subject considering some limitation with content and data source. But I came to appreciate that it’s OK to offer a relevant way of looking at the subject, rather than provide a beginning-to-end conclusion.’
  • 19. Valentina D’efilippo, Information Designer, discussing her ‘Poppy Field’ project that looked at the history of world conflicts and the resulting loss of life Launching: The nature of launching work will again vary significantly based, as always, on the context of your challenge. It may simply be emailing a chart to a colleague or you might be presenting your work to an audience. For other cases it could be a graphic going to print for a newspaper or involve an anxious go-live moment with the launch of a digital project on a website, to much fanfare and public anticipation. Whatever the context of your ‘launch’ stage, there are a few characteristic matters to bear in mind – these will not be relevant to all situations but over time you might need to consider their implications for your setting:
  • 20. Are you ready? Regardless of the scope of your work, as soon as you declare work completed and published you are at the mercy of your decisions. You are no longer in control of how people will interpret your work and in what way they will truly use it. If you have particularly large, diverse and potentially emotive subject matter, you will need to be ready for the questions and scrutiny that might head in your direction. 225 Communicating your work is a big deal. The need to publicise and sell its benefits is of particular relevance if you have a public- facing project (you might promote it strongly or leave it as a slow burner that spreads through ‘word of mouth’). For more modest and personal
  • 21. audiences you might need to consider directly presenting your work to these groups, coaching them through what it offers. This is particularly necessary on those occasions when you may be using a less than familiar representation approach. What ongoing commitment exists to support the work? This clearly refers to specific digital projects. Do you have to maintain a live data feed? Will it need to sustain operations with variable concurrent visitors? What happens if it goes viral – have you got the necessary infrastructure? Have you got the luxury of ongoing access to the skill sets required to keep this project alive and thriving? Will you need to revise, update and rerelease the project? As I discussed in the contextual circumstances, will you need to replicate this work on a repeated basis? What can you do to make the reproduction as seamless as possible? What is the work’s likely shelf life? Does it have a point of expiry after which it could be archived or even killed? How might you digitally preserve it beyond its useful lifespan?
  • 22. 226 6 Data Representation In this chapter you will explore in detail the first, and arguably the most significant, layer of the visualisation design anatomy: data representation. This is concerned with deciding in what visual form you wish to show your data. To really get under the skin of data representation, we are going to look at it from both theoretical and pragmatic perspectives. You will start by learning about the building blocks of visual encoding, the real essence of this discipline and something that underpins all data representation thinking. Whereas visual encoding is perhaps seen as the purist ‘bottom-
  • 23. up’ viewpoint, the ‘top-down’ perspective possibly offers more pragmatic value by framing your data representation thinking around the notion of chart types. For most people facing up to this stage of data representation, this is conceptually the more practical entry point from which to shape their decisions. To substantiate your understanding of this design layer you will take a tour through a gallery of 49 different chart type options, reflecting the many common and useful techniques being used to portray data visually in the field today. This gallery will then by supplemented by an overview of the key influencing factors that will inform and determine the choices you make. 6.1 Introducing Visual Encoding As introduced in the opening chapter, data representation is the act of
  • 24. giving visual form to your data. As viewers, when we are perceiving a visual display of data we are decoding the various shapes, sizes, positions and colours to form an understanding of the quantitative and categorical values represented. As visualisers, we are doing the reverse through visual encoding, assigning visual properties to data values. Visual encoding forms the basis of any chart or map-based data representation, along with the components of chart apparatus that help complete the chart display. There are many different ways of encoding data but these always comprise 227 combinations of two different properties, namely marks and attributes. Marks are visible features like dots, lines and areas. An
  • 25. individual mark can represent a record or instance of data (e.g. your phone bill for a given month). A mark can also represent an aggregation of records or instances (e.g. a summation of individual phone charges to produce the bill for a given month). A set of marks would therefore represent a set of records or instances (e.g. the 12 monthly phone bills for 2015). Attributes are variations applied to the appearance of marks, such as the size, position, or colour. They are used to represent the values held by different quantitative or categorical variables against each record or instance (or, indeed, each aggregation). If you had 12 marks, one for each phone bill during 2015, you could use the size attribute of each mark to represent the various phone bill totals. Figure 6.1 offers a more visual illustration. In the dataset there are six
  • 26. records, one for each record listed. ‘Gender’ is a categorical variable and ‘Years Since First Movie’ is a quantitative variable. ‘Male’ and ‘43’ are the specific values of these variables associated with Harrison Ford. In the associated chart, each actor from the table is represented by the mark of a line (or bar). This represents their record or instance in the table. Harrison Ford’s bar is proportionally sized in scale to represent the 43 years since his first movie and is coloured purple to distinguish his gender as ‘Male’. Each of the five other actors similarly has a bar sized according to the years since their first movie and coloured according to their gender. Figure 6.1 Illustration of Visual Encoding The objective of visual encoding is to find the right blend of marks and attributes that most effectively will portray the angle of analysis you wish
  • 27. to show your viewers. The factors that shape your choice and define the notion of what is considered ‘effective’ are multiple and varied in their influence. Before getting on to there, let’s take a closer look at the range of 228 different marks and attributes that are commonly found in the data representation toolkit. It is worth noting upfront that while the organisation of the ‘attributes’, in particular, suggests a primary role, several can be deployed to encode both categorical (nominal, ordinal) variables and quantitative variables. Furthermore, as you see in the bar chart in Figure 6.1, combinations of several attributes are often applied to marks (such as colour and size) to
  • 28. encode multiple values. Although beyond the scope of this book, there are techniques being developed in the field exploring the use of non-visual senses to portray data, using variations in properties for auditory (sound), haptic (touch), gustatory (taste) and olfactory (smell) senses. Figure 6.2 List of Mark Encodings Figure 6.3 List of Attribute Encodings 229 230 Grasping the basics of visual encoding and its role in data visualisation is one of the fundamental pillars of understanding this discipline.
  • 29. However, when it comes to the reality of considering your data representation options you do not necessarily need to always approach things from this somewhat bottom-up perspective. For most people’s needs when creating a data visualisation it is more pragmatic (and perhaps more comprehensible) to think about data representation from a top-down perspective in the shape of chart types. If marks and attributes are the ingredients, a chart ‘type’ is the recipe offering a predefined template for displaying data. Different chart types offer different ways of representing data, each one comprising unique combinations of marks and attributes onto which specific types of data can be mapped. Recall that I am using chart type as the all-encompassing term, though
  • 30. this is merely a convenient singular label to cover any variation of map, graph, plot and diagram based around the representation of data. Let’s work through a few examples to illustrate the relationship between some selected chart types demonstrating different combinations of marks and attributes. To begin with Figure 6.4, visualises the recent fortunes of the world’s billionaires. The display shows the relative ranking of each profiled billionaire in the rich list, grouping them by the different sectors of industry in which they have developed their wealth. This data is encoded using the point mark and two attributes of position. The point in this deployment is depicted using small caricature face drawings representative of each individual – effectively unique symbols to represent the distinct ‘category’ of each different billionaire. Note that these are
  • 31. points, as distinct from area marks, because their size is constant and insignificant in terms of any quantitative implication. The position in the allocated column signifies the industry the individuals are associated with, while the vertical position signifies the rank (higher position = higher rank towards number 1). For reference, this is considered a derivative of the univariate scatter 231 plot, which usually shows the dispersal of a range of absolute values rather than rank. Figure 6.4 Bloomberg Billionaires As seen in Chapter 1, the clustered bar chart in Figure 6.5
  • 32. displays a series of line marks (normally described as bars). There are 11 pairs of bars, one for each of the football seasons included in the aggregated analysis. The attribute of colour is used to distinguish the bars between the two quantitative measures displayed: blue is for ‘games’, purple is for ‘goals’. The size dimension of ‘height’ (the widths are constant) along the y-axis scale then represents the quantitative values associated with each season and each measure. Figure 6.6 is called a bubble chart and displays a series of geometric area marks to represent the top 100 blog posts on my website based on their popularity over the previous 100 days. Each circle represents an individual post and is sized to show the quantitative value of ‘total visits’ and then coloured according to the seven different post categories I use to organise
  • 33. my content. Figure 6.5 Lionel Messi: Games and Goals for FC Barcelona 232 Figure 6.6 Image from the home page of visualisingdata.com 233 Figure 6.7 How the Insane Amount of Rain in Texas Could Turn Rhode Island Into a Lake 234 Figure 6.7 demonstrates the use of the form, which is more rarely used. My advice is that it should remain that way as it is hard for us to
  • 34. judge scales of volume in 2D displays. However, it can be of merit when values are extremely diverse in size as in this good example. The chart displayed contextualises the amount of water that had flowed into Texas reservoirs in the 30 days up to 27 May 2015. The size (volume) of a cube is used to display the amount of rain, with 8000 small cubes representing 1000 acre- feet of water (43,560,000 cubic feet or 1233.5 mega litres) to create the whole (8 million acre-feet), which is then compared against the heights of 235 the Statue of Liberty and what was then the world’s tallest building, the Burj Khalifa, to orient in height terms at least. 6.2 Chart Types
  • 35. For many people, creating a visualisation involves using tools that offer chart menus: you might select a chart type and then ‘map’ the records and variables of data against the marks and attributes offered by that particular chart type. Different tools will offer the opportunity to work with a different range of chart types, some with more than others. As you develop your capabilities in data visualisation and become more ‘expressive’ – trying out unique combinations of marks and attributes – your approach might lean more towards thinking about representation from a bottom-up perspective, considering the visual encodings you wish to deploy and arriving at a particular chart type as the destination rather than an origin. This will be especially likely if you develop or possess a talent for creating visualisations through programming languages.
  • 36. As the field has matured over the years, and a greater number of practitioners have been experimenting with different recipes of marks and attributes, there is now a broad range of established chart types. Once again I hesitate to use the universal label of chart type (some mapping techniques are not chart types per se) but it will suffice. While all of us are likely to be familiar with the ‘classic three’ – namely, the bar, pie and line chart – there are many other chart type options to consider. To acquaint you with a broader repertoire of charting options, over the coming pages I present you with a gallery. This offers a curated collection of some of the common and useful chart types being used across the field today. This gallery aims to provide you with a valuable reference that will directly assist your judgements, helping you to pick (conceptually, at least) from a menu of options.
  • 37. I have attempted to assign each chart to one of five main families based on their primary analytical purpose. What type of angle of analysis does each one principally show? Using the five-letter mnemonic CHRTS this should provide a useful taxonomy for organising your thinking about which chart or charts to use for your data representation needs. 236 I know what you’re thinking: ‘well that’s a suspiciously convenient acronym’! Honestly, if it was as intentional as that I would have tried harder to somehow crowbar in an ‘A’ family. OK, I did spend a lot of time, but I couldn’t find it and it’s now my life’s ambition to do so. Only then will my time on this planet have been truly worthwhile. In the meantime, CHRTS is close enough. Besides, vowels are hugely
  • 38. overrated. Each chart type presented is accompanied by an array of supporting details that will help you fully acquaint yourself with the role and characteristics of each option. A few further comments about what this gallery provides: The primary name used to label each chart type as well as some further alternative names that are often used An indication of which CHRTS family each chart belongs to, based on their specific primary role, as well as a sub-family definition for further classification An indicator for each chart type to show which ones I consider to be most useful for undertaking Exploratory Data Analysis (the black magnifying glass symbol) An indicator for whether I believe a chart would typically require interactive features to offer optimum usability (the black cursor
  • 39. symbol) A description of the chart’s representation: what it shows and what encodings (marks, attributes) it is comprised of A working example of the chart type in use with a description of what it specifically shows A ‘how to read’ guide, advising on the most effective and efficient approach to making sense of each chart type and what features to look out for Presentation tips offering guidance on some of the specific choices to be considered around interactivity, annotation, colour or composition 237 design ‘Variations and alternatives’ offer further derivatives and chart ‘siblings’ to consider for different purposes
  • 40. Exclusions: It is by no means an exhaustive list: the vast permutations of different marks and attributes prevents any finite limit to how one might portray data visually. I have, however, consciously excluded some chart types from the gallery mainly because they were not different enough from other charts that have been profiled in detail. I have mentioned charts that represent legitimate derivatives of other charts where necessary but simply did not deem it worthy to assign a whole page to profile them separately. The Voronoi treemap, for example, is really just a circular treemap that uses different algorithms to arrange its constituent pieces. While the construction task is different, its usage is not. The waterfall chart is a single stacked bar chart broken down into sequenced stages. Inclusions: I have wrestled with the rights and wrongs of including some chart types, unquestionably. The radar chart, for example, has many limitations and flaws but is not entirely without merit if deployed in a very specific way and only for certain contexts.
  • 41. By including profiles of partially flawed charts like these I am using the gallery as much to signpost their shortcomings so that you know to use them sparingly. There will be some purists gathering in angry mobs and foaming at the mouth in reaction to the audacity of my including the pie chart and word cloud. These have limited roles, absolutely, but a role nonetheless. Put down your pitchforks, return to your homes and have a good read of my caveats. Rather than being the poacher of all bad stuff, I think a gamekeeper role is equally important. Although I have excluded several charts on grounds of demonstrating only a slight variation on profiled charts, there are some types included that do exhibit only small derivations from other charts (such as the bar chart and the clustered bar, or the scatter plot and the bubble plot). In these cases I felt there was sufficient difference in
  • 42. their practical application, and they were in common usage, to merit their separate inclusion, despite sharing many similarities with other profiled siblings. ‘Interestingly, visualisations of textual data are not as developed as one 238 would expect. There is a great need for such visualisations given the amount of textual information we generate daily, from social media to news media and so on, not to mention all the materials generated in the past and that are now digitally available. There are opportunities to contribute to the research efforts of humanists as well as social scientists by devising ways to represent not only frequencies of words and topics,
  • 43. but also semantic content. However, this is not at all trivial.’ Isabel Meirelles, Professor, OCAD University (Toronto), discussing one of the many remaining unknowns in visualisation Categorical comparisons: All chart types can feasibly facilitate comparisons between categories, so why have a separate C family? Well, the distinction is that those charts belonging to the H, R, T and S families offer an additional dimension of analysis as well as providing comparison between categories. Dual families: Some charts do not fit just into a single family. Showing connected relationships (e.g. routes or flows) on a map is ticking the requirements across at least two or family groups (Relational, Spatial). In each case I have tried to best-fit the family classifications around the primary angle of analysis portrayed by each chart – what is the most prominent aspect that characterises each representation technique. Text visualisation: As I noted in the discussion about data
  • 44. types, when it comes to working with textual-based data you are almost always going to need to perform some transformation, maybe through value extraction or by applying a statistical technique. The text itself can otherwise largely function only as an annotated device. Chart types used to visualise text actually visualise the properties of text. For example, the word cloud visualises the quantitative frequency of the use of words: text might be the subject, but categories (words) and their quantities (counts) are the data mappings. Varieties of network diagrams might show the relationship between word usage, such as the sequence of words used in sentences (word trees), but these are still only made possible through some quantitative, categorical or semantic property being drawn from the original text. Dashboard: These methods are popular in corporate settings or
  • 45. any context where you wish to create instrumentation that offers both at- a-glance and detailed views of many different analytical and information monitoring dimensions. Dashboards are not a unique chart type themselves but rather should be considered projects that comprise multiple chart types from across the repertoire of options 239 presented in the gallery. Some of the primary demands of designing dashboards concern editorial thinking (what angles to show and why) and composition choices (how to get it all presented in a unified page layout). Small multiples: This is an invaluable technique for visualising data but not necessarily a chart type per se and, once again, more a
  • 46. concern for about editorial thinking and composition design. Small multiples involve repeated display of the same chart type but with adjustments to the framing of the data in each panel. For example, each panel may show the same angle of analysis but for different categories or different points in time. Small multiples are highly valued because they exploit the capabilities of our visual perception system when it comes to comparing charts in a simultaneous view, overcoming our weakness at remembering and recalling chart views when consumed through animated sequences or across different pages. A note about ‘storytelling’: Storytelling is an increasingly popular term used around data visualisation but I feel it is often misused and misunderstood, which is quite understandable as we all have different perspectives. I also feel it is worth clarifying my take on what I believe storytelling means practically in data visualisation and
  • 47. especially in this discussion about data representation, which is where it perhaps most logically resides in terms of how it is used. Stories are constructs based on the essence of movement, change or narrative. A line chart shows how a series of values have changed over a temporal plane. A flow map can reveal what relationships exist across a spatial plane between two points separated by distance – they may be evident of a journey. However, aside from the temporal and spatial families of charts, I would argue that no other chart family realistically offers this type of construct in and of itself. The only way to create a story from other types of charts is to incorporate a temporal dimension (video/slideshow) or provide a verbal/written narrative that itself involves a dimension of time through the sequence of its delivery. For example, a bar chart alone does not represent a story, but if you show a ‘before’ and ‘after’ pair of bar charts side by side or between
  • 48. slides, you have essentially created ‘change’ through sequence. If you show a bar chart with a stack on top of it to indicate growth between two points in time, well, you have added a time dimension. A network diagram shows relationships, but stood alone this is not a 240 Sabin Bajracharya story – its underlying structure and arrangement are in abstract space. Just as you do when showing friends a photograph from your holiday, you might use this chart as a prop to explain how relationships between some of the different entities presented are significant. Making the chart a prop allows you to provide a narrative. In this case it is the setting and delivery that are consistent with the notion of
  • 49. storytelling, not the chart itself. I made a similar observation about the role of exhibitory visualisations used as props within explanatory settings. A further distinction to make is between stories as being presented and stories as being interpreted. The famous six-word story ‘for sale: baby shoes, never worn’ by Ernest Hemingway is not presented as a story, the story is triggered in our mind when we dissect this passage and start to infer meaning, implication and context. The imagined bar chart I mentioned earlier in the book that could show the 43 white presidents and 1 black president is only presenting a story if it is accompanied by an explanatory narrative (in which case the chart was again really just a prop) or if you understand the meaning of the significance of this statistic without this description and are able to form the story in your own mind.
  • 50. Charts Comparisons Bar chart ALSO KNOWN AS Column chart, histogram (wrongly) REPRESENTATION DESCRIPTION A bar chart displays quantitative values for different categories. The chart comprises line marks (bars) – not rectangular areas – with the size attribute (length or height) used to represent the quantitative value for each category. 241 EXAMPLE Comparing the number of Oscar nominations for the 10 actors who have received the most nominations without actually winning an award.
  • 51. Figure 6.8 The 10 Actors with the Most Oscar Nominations but No Wins HOW TO READ IT & WHAT TO LOOK FOR Look at the axes so you know with which categorical value each bar is associated and what the range of the quantitative values is (min to max). Think about what high and low values mean: is it ‘good’ to be large or small? Glance across the entire chart to locate the big, small and medium bars and perform global comparisons to establish the high- level ranking of biggest > smallest. Identify any noticeable exceptions and/or outliers. Perform local comparisons between neighbouring bars, to identify larger than and smaller than relationships and estimate the relative proportions. Estimate (or read, if labels are present) the absolute
  • 52. values of specific bars of interest. Where available, compare the quantities against annotated references such as targets, forecast, last year, average, etc. PRESENTATION TIPS ANNOTATION: Chart apparatus devices like tick marks and gridlines, in particular, can be helpful to increase the accuracy of the reading of the quantitative values. If you have axis labels you should not need direct labels on each bar – this will lead to label overload, so generally decide between one or the other. 242 COMPOSITION: The quantitative value axis should always start from the origin value of zero: a bar should be representative of the true, full
  • 53. quantitative value, nothing more, nothing less, otherwise the perception of bar sizes will be distorted when comparing relative sizes. There is no significant difference in perception between vertical or horizontal bars though horizontal layouts tend to make it easier to accommodate and read the category labels for each bar. Unlike the histogram, there should be a gap, even if very small, between bars to keep each category’s value distinct. Where possible, try to make the categorical sorting meaningful. VARIATIONS & ALTERNATIVES A variation in the use of bar charts is to show changes over time. You would use a bar chart when the focus is on individual quantitative values over time rather than (necessarily) the trend/change between points, for which a line-chart would be best. ‘Spark bars’ are mini bar
  • 54. charts that aim to occupy only a word’s length amount of space. They are often seen in dashboards where space is at a premium and there is a desire to optimise the density of the display. To show further categorical subdivisions, you might consider the ‘clustered bar chart’ or a ‘stacked bar chart’ if there is a part-to-whole angle. ‘Dot plots’ offer a particularly useful alternative to the bar chart for situations where you have to show large quantitative values with a narrow range of differences. Charts Comparisons Clustered bar chart ALSO KNOWN AS Clustered column chart, paired bar chart REPRESENTATION DESCRIPTION A clustered bar chart displays quantitative values for different major categories with additional categorical dimensions included for
  • 55. further 243 breakdown. The chart comprises line marks (bars) – not rectangular areas – with the size attribute (length or height) used to represent the quantitative value for each category and colours used to distinguish further categorical dimensions. EXAMPLE Comparing the number of Oscar nominations with the number of Oscar awards for the 10 actors who have received the most nominations. Figure 6.9 The 10 Actors who have Received the Most Oscar Nominations HOW TO READ IT & WHAT TO LOOK FOR
  • 56. Look at the axes so you know with which categorical value each bar is associated and what the range of the quantitative values is (min to max). Learn about the colour associations to understand what sub- categories the bars within each cluster represent. Glance across the entire chart to locate the big, small and medium bars and perform global comparisons to establish the high-level ranking of biggest > smallest. Identify any noticeable exceptions and/or outliers. Perform local comparisons within clusters to identify the size relationship (which is larger and by how much?) and estimate (or read, if labels are present) the absolute values of specific bars of interest. PRESENTATION TIPS ANNOTATION: Chart apparatus devices like tick marks and gridlines,
  • 57. 244 in particular, can be helpful to increase the accuracy of the reading of the quantitative values. If you have axis labels you should not need direct labels on each bar – this will lead to label overload, so generally decide between one or the other. COMPOSITION: The quantitative value axis should always start from the origin value of zero: a bar should be representative of the true, full quantitative value, nothing more, nothing less, otherwise the perception of bar sizes will be distorted when comparing relative sizes. If your categorical clusters involve a breakdown of more than three bars, it becomes a little too busy, so you might therefore consider giving each cluster its own separate bar chart and using small multiples to
  • 58. show a chart for each major category. Sometimes one bar might be slightly hidden behind the other, implying a before and after relationship, often when space is at a premium – just do not hide too much of the back bar. There is no significant difference in perception between vertical or horizontal bars though horizontal layouts tend to make it easier to accommodate and read the category labels for each bar. The individual bars should be positioned adjacent to each other with a noticeable gap and then between each cluster to help direct the eye towards the clustering patterns first and foremost. Where possible try to make the categorical sorting meaningful. VARIATIONS & ALTERNATIVES Clustered bar charts are also sometimes used to show how two associated sub-categories have changed over time (like the Lionel
  • 59. Messi bar chart discussed in Chapter 1). Alternatives would include the ‘dot plot’ or, if you have just two categories forming the clusters and these categories have a binary state (male, female or yes %, no %), the ‘back-to-back bar chart’ would be effective. Charts Comparisons Dot plot 245 ALSO KNOWN AS Dot chart REPRESENTATION DESCRIPTION A dot plot displays quantitative values for different categories. In contrast to the bar chart, rather than using the size of a bar, point marks (typically circles but any ‘symbol’ is legitimate) are used with
  • 60. the position along a scale indicating the quantitative value for each category. Sometimes an area mark is used to indicate one value through position and another value through size. Additional categorical dimensions can be accommodated in the same chart by including additional marks differentiated by colour or symbol. EXAMPLE Comparing the number and percentage of PhDs awarded by gender across different academic subjects. Figure 6.10 How Nations Fare in PhDs by Sex HOW TO READ IT & WHAT TO LOOK FOR For single-series dot plots (i.e. just one dot per row), look at the axes so you know with which categorical value each row is associated and what the range of the quantitative values is (min to max). Where you have multiple series dot plots (i.e. more than one dot), establish what the
  • 61. different colours/symbols represent in terms of categorical breakdown. Glance across the entire chart to locate the big, small and medium values and perform global comparisons to establish the high- level ranking of biggest > smallest. Identify any noticeable exceptions and/or 246 outliers. Where you have multiple series look across each series of dot values separately and then perform local comparisons within rows to identify the relative position of each dot, observing the gaps, big and small. Estimate the absolute values of specific dots of interest. Where available, compare the quantities against annotated references such as targets, forecast, last year, average, etc.
  • 62. PRESENTATION TIPS ANNOTATION: Chart apparatus devices like tick marks and gridlines, in particular, can be helpful to increase the accuracy of the reading of the quantitative values. COMPOSITION: Given that the quantitative value axis does not need to commence from a zero origin it is important to label clearly the axis values when the baseline is not commencing from a minimum of zero. There is no significant difference in perception between vertical or horizontal arrangement though horizontal layouts tend to make it easier to accommodate and read the category labels for each row. Where possible try to make the categorical sorting meaningful, maybe organising values in ascending/descending size order. VARIATIONS & ALTERNATIVES
  • 63. Alternatives would include the ‘bar chart’, to show the size of quantitative values for different categories. The ‘connected dot plot’ would be used to focus on the difference between two measures. The ‘univariate scatter plot’ would be used to show the range of multiple values across categories, to display the diversity and distribution of values. Charts Comparisons Connected Dot Plot 247 ALSO KNOWN AS Barbell chart, dumb-bell chart REPRESENTATION DESCRIPTION A connected dot plot displays absolute quantities and quantitative
  • 64. differences between two categorical dimensions for different major categories. The display is formed by two points (normally circles but any ‘symbol’ is legitimate) to mark the quantitative value positions for two comparable categorical dimensions. There is a row of connected dots for each major category. Colour or difference in symbol is generally used to distinguish these points. Joining the two points together is a connecting line which effectively represents the ‘delta’ (difference) between the two values. EXAMPLE Comparing the typical salaries for women and men across a range of different job categories in the US. Figure 6.11 Gender Pay Gap US HOW TO READ IT & WHAT TO LOOK FOR Look at the axes so you know with which major categorical values each
  • 65. row is associated and what the range of the quantitative values is (min to max). Determine which dots resemble which categorical dimension (could be colour, symbol or a combination) and see if there is any meaning behind the colouring of the connecting bars. Think about what the quantitative values mean to determine whether it is a good thing to be higher or lower. Glance across the entire chart to locate the big, 248 small and medium connecting bars in each direction. Perform global comparisons to establish the high-level ranking of biggest > smallest differences as well as the highest and lowest values. There may be deliberate sorting of the display based on one of the quantitative measures. Identify any noticeable exceptions and/or outliers.
  • 66. Estimate (or read, if labels are present) the absolute values, direction and size of differences for specific categories of interest. PRESENTATION TIPS ANNOTATION: Chart apparatus devices like tick marks and gridlines, in particular, can be helpful to increase the accuracy of the reading of the quantitative values. Consider labelling categories adjacent to the plotted points rather than next to the axis line (and possibly far away from the values) to make it easier for the reader to understand the category–row association. COLOUR TIPS: Colour may be used to indicate and emphasise the directional basis of the connecting line differences. COMPOSITION: If the two plotted measures are very similar, and the
  • 67. point markers effectively overlap, you will need to decide which should be positioned on top. As the representation of the quantitative values is through position along a scale and not size (it is the difference that is sized, not the absolutes) the quantitative axis does not need to have a zero origin. However, a zero origin can be helpful to establish the scale of the differences. Where possible try to make the sorting meaningful using any one of the three quantitative measures to optimise the layout. VARIATIONS & ALTERNATIVES Variations in the use of the ‘connected dot plot’ would show before and after analysis between two points in time, possibly using the ‘arrow chart’ to indicate the direction of change explicitly. Similarly, the ‘carrot chart’ uses line width tapering to indicate direction, the fatter
  • 68. end the more recent values. The ‘univariate scatter plot’ would be used to show the range of multiple values across categories, to display the diversity and distribution of values rather than comparing differences between values. Charts Comparisons 249 Pictogram ALSO KNOWN AS Isotype chart, pictorial bar chart, stacked shape chart, tally chart REPRESENTATION DESCRIPTION A pictogram displays quantitative values for different major categories with additional categorical dimensions included for further
  • 69. breakdown. In contrast with the bar chart, rather than using the size of a bar, quantities of point marks, in the form of symbols or pictures, are stacked to represent the quantitative value for each category. Each point may be representative of one or many quantitative units (e.g. a single shape may represent 1000 people) but note that, unless you use symbol portions, you will not be able to represent decimals. Pictograms may be used to offer a more emotive (humanising or more light-hearted) display than a bar can offer. Additional categorical dimensions can be accommodated in the same chart by using marks differentiated by variations in colour, symbol or picture. Always ensure the markers used are as intuitively recognisable as possible and consider minimising the variety as this makes it cognitively harder for the viewer to identify associations easily and make sense of the quantities.
  • 70. EXAMPLE Comparing the number of players with different facial hair types across the four teams in the NHL playoffs in 2015. Figure 6.12 Who Wins the Stanley Cup of Playoff Beards? 250 HOW TO READ IT & WHAT TO LOOK FOR Look at the major categorical axis to establish with which category each row is associated. Establish the mark associations to understand what categorical dimensions each colour/shape variation represents. Glance across the entire chart to locate the big, small and medium stacks of shapes and perform global comparisons to establish the high- level ranking of biggest > smallest. Identify any noticeable exceptions and/or
  • 71. outliers. Perform local comparisons between neighbouring categories, to identify larger than and smaller than relationships and estimate the relative proportions. Estimate (or read, if labels are present) the absolute values of specific groups of markers of interest. PRESENTATION TIPS ANNOTATION: The choice of symbol/ picture should be as recognisably intuitive as possible and locate any legends as close as possible to the display. COLOUR TIPS: Maximise the variation in marker by using different combinations in both colour and shape, rather than just variation of one attribute. COMPOSITION: If the quantities of markers exceed a single row, try to make the number of units per row logically ‘countable’, such as
  • 72. displaying in groups of 5, 10 or 100. To aid readability, make sure there is a sufficiently noticeable gap between rows, otherwise sometimes the eye struggles to form the distinct clusters of shapes for each category displayed. Where possible try to make the categorical sorting meaningful, maybe organising values in ascending/descending size order. 251 VARIATIONS & ALTERNATIVES Extending the idea of using repeated quantities of representative symbols, some applications take this further by using large quantities of individual symbols to get across the feeling of magnitude and scale. When showing a part-to-whole relationship, the ‘waffle chart’ can use simple symbol devices to differentiate the constituent parts of a
  • 73. whole. Charts Comparisons Proportional shape chart ALSO KNOWN AS Area chart (wrongly) REPRESENTATION DESCRIPTION A proportional shape chart displays quantitative values for different categories. The chart is based on the use of different area marks, one for each category, sized in proportion to the quantities they represent. By using the quadratic dimension of area size rather than the linear dimension of bar length or dot position, the shape chart offers scope for displaying a diverse range of quantitative values within the same chart. Typically the layout is quite free-form with no baseline or central gravity binding the display together.
  • 74. EXAMPLE Comparing the market capitalisation ($) of companies involved in the legal sale of marijuana across different industry sectors. Figure 6.13 For These 55 Marijuana Companies, Every Day is 4/20 252 HOW TO READ IT & WHAT TO LOOK FOR Look at the shapes and their associated labels so you know with what major categorical values each is associated. If there are only direct labels, find the largest shape to establish its quantitative value as the maximum and do likewise for the smallest – this will help calibrate the size judgements. Otherwise, if it exists, acquaint yourself with the size key. Glance across the entire chart to locate the big, small and
  • 75. medium shapes and perform global comparisons to establish the high- level ranking of biggest > smallest. Identify any noticeable exceptions and/or outliers. Perform local comparisons between neighbouring shapes to identify larger than and smaller than relationships and estimate the relative proportions. Estimate (or read, if labels are present) the absolute values of specific shapes of interest. PRESENTATION TIPS ANNOTATION: Sometimes a quantitative size key will be included rather than direct labelling (usually when there are many shapes and limited empty space) though direct labels will help overcome some of the limitations of judging area size. You will have to decide how to handle label positioning for those shapes with exceptionally small sizes.
  • 76. COLOUR TIPS: Colours are not fundamentally necessary to encode category (the position/separation of different shapes achieves that already) but they can be useful as redundant encodings to make the category even more immediately distinguishable. COMPOSITION: Estimating and comparing the size of areas with 253 accuracy is not as easy as it is for judging bar length or dot position, so only use this chart type if you have a diverse range of quantitative values. The geometric accuracy of the size calculations is paramount. Mistakes are often made, in particular, with circle size calculations: it is the area you are modifying, not the diameter/radius.
  • 77. Arrangement approaches vary: sometimes you see the shapes anchored to a common baseline (bottom or central alignment) while on other occasions they might just ‘float’. If you use an organic shape, like a human figure, to represent different quantities you need to adjust the entire shape area, not just the height. Often the approach for this type of display is to treat the figure as a rudimentary rectangular shape. Sometimes the volume of a shape is used rather than area to represent quantitative values (especially if there are almost exponentially different values to show) but this increases the perceptual difficulty in estimating and comparing values. Where possible try to make the categorical sorting meaningful, maybe organising values in ascending/descending size order. VARIATIONS & ALTERNATIVES The ‘bubble chart’ uses clusters of sized bubbles to compare
  • 78. categorical values and, sometimes, to represent part-to-whole analysis. The ‘nested shape chart’ might include secondary, smaller area sizes nested within each shape to display local part-to-whole relationships. Charts Comparisons Bubble chart ALSO KNOWN AS Circle packing diagram EXAMPLE Comparing the Public sector capital expenditure (£ million) on services by function of the UK Government during 2014/15. REPRESENTATION DESCRIPTION 254 A bubble chart displays quantitative values for different major categories with additional categorical dimensions included for
  • 79. further breakdown. It is based on the use of circles, one for each category, sized in proportion to the quantities they represent. Sometimes several separate clusters may be used to display further categorical dimensions, otherwise the colouring of each circle can achieve this. It is similar in concept to the proportional shape chart but differs through the typical layout being based on clustering, which therefore also enables it as a device for showing part-to-whole relationships as well. Figure 6.14 UK Public Sector Capital Expenditure, 2014/15 HOW TO READ IT & WHAT TO LOOK FOR Look at the shapes and their associated labels so you know with what major categorical values each is associated, noting any size and colour legends to assist in forming associations. If there are multiple clusters,
  • 80. learn about the significance of the grouping/separation in each case. If there are direct labels, find the largest shape to establish its quantitative value as the maximum and do likewise for the smallest – this will help calibrate other size judgements. Glance across the entire chart to locate the big, small and medium shapes and perform global comparisons to establish the high-level ranking of biggest > smallest. Identify any noticeable exceptions and/or outliers. Perform local comparisons between neighbouring shapes to identify larger than and smaller than relationships and estimate the relative proportions. Estimate (or read, if labels are present) the absolute values of specific shapes of interest. If there are multiple clusters, note the general relative size and number of members in each case. 255
  • 81. PRESENTATION TIPS INTERACTIVITY: Bubble charts may often be accompanied by interactive features that let users select or mouseover individual circles to reveal annotated values for the quantity and category. ANNOTATION: If interactivity is not achievable, a quantitative size key should be included or direct labelling; the latter may make the display busy (and be hard to fit into smaller circles) but will help overcome some of the limitations of judging area size. COLOUR TIPS: Colours are sometimes used as redundant encodings to make the quantitative sizes even more immediately distinguishable. COMPOSITION: Estimating and comparing the size of areas with
  • 82. accuracy is not as easy as it is for judging bar length or dot position, so only use this chart type if you have a diverse range of quantitative values. The use of this chart will primarily be about facilitating a gist, a general sense of the largest and smallest values. The geometric accuracy of the circle size calculations is paramount. Mistakes are often made with circle size calculations: it is the area you are modifying, not the diameter/radius. If you wish to make your bubbles appear as 3D spheres you are essentially no longer representing quantitative values through the size of a geometric area mark; rather the mark will be a ‘form’ and so the size calculation will be based on volume, not area. There is no categorical or quantitative sorting applied to the layout of the bubble chart, instead the tools that offer these charts will generally use a layout algorithm that applies a best-fit clustering to arrange the
  • 83. circles radially about a central ‘gravity’ force. VARIATIONS & ALTERNATIVES When the collection of quantities represents a whole, this evolves into a chart known as a ‘circle packing diagram’ and usually involves many parts that pack neatly into a circular layout representing the whole. Another variation of the packing diagram is when the adjacency between circle ‘nodes’ indicates a connected relation, offering a variation of the node–link diagram for showing networks of relationships. The bubble plot also uses differently sized circles but the position in each case is overlaid onto a scatter plot structure, based on two dimensions of further quantitative variables. Removing the size attribute (and effectively replacing area with point mark) you could simply use the quantity of points clustered together for different categories to create a ’tally chart’. 256
  • 84. Charts Comparisons Radar chart ALSO KNOWN AS Filled radar chart, star chart, spider diagram, web chart EXAMPLE Comparing the global competitive scores (out of 7) across 12 ‘pillars’ of performance for the United Kingdom. REPRESENTATION DESCRIPTION A radar chart shows values for three or more different quantitative measures in the same display for, typically, a single category. It uses a radial (circular) layout comprising several axes emerging from the centre-like spokes on a wheel, one for each measure. The quantitative
  • 85. values for each measure are plotted through position along each scale and then joined by connecting lines to form a unique geometric shape. Sometimes this shape is then filled with colour. A radar chart should only be considered in situations where the cyclical ordering (and neighbourly pairings) has some significance (such as data that might be plotted around the face of a clock or compass) and when the quantitative scales are the same (or similar) for each axis. Do not plot values for multiple categories on the same radar chart, but use small multiples formed of several radar charts instead. Figure 6.15 Global Competitiveness Report 2014—2015 257 HOW TO READ IT & WHAT TO LOOK FOR
  • 86. Look around the chart and acquaint yourself with the quantitative measure represented by each axis and note the sequencing of the measures around the display. Is there any significance in this arrangement that can assist in interpreting the overall shape? Note the range of values along each independent axis so you understand what positions along the scales mean in a value sense for each measure. Scan the shape to locate the outliers both towards the outside (larger values) and inside (smaller values) of the scales. It is more important to pay attention to the position of values along an axis than the nature of the connecting lines between axes, unless the axis scales are consistent or at least if the relative position along the scale has the same implied meaning. If the variable sequencing has cyclical relevance, the spiking, bulging or contracting shape formed will give you some sense of the balance of values. Perform local comparisons between
  • 87. neighbouring axes to identify larger than and smaller than relationships. Estimate (or read, if labels are present) the absolute values of specific shapes of interest. PRESENTATION TIPS 258 ANNOTATION: The inclusion of visible annotated features like axis lines, tick marks, gridlines and value labels can naturally aid the readability of the radar chart. Gridlines are only relevant if there are common scales across each quantitative variable. If so, the gridlines must be presented as straight lines, not concentric arcs, because the connecting lines joining up the values are themselves straight lines.
  • 88. COLOUR TIPS: Often the radar shapes are filled with a colour, sometimes with a degree of transparency to allow the background apparatus to be partially visible. COMPOSITION: The cyclical ordering of the quantitative variables has to be of optimum significance as the connectors and shape change for every different ordering permutation. This will have a major impact on the readability and meaning of the resulting chart shape. As the axes will be angled all around the radial display, you will need to make sure all the associated labels are readable (i.e. not upside down or at difficult angles). VARIATIONS & ALTERNATIVES A ‘polar chart’ is an alternative to the radar chart that removes some of the main shortcomings caused by connecting lines in the radar
  • 89. chart. If you have consistent value scales across the different quantitative measures, a ‘bar chart’ or ‘dot plot’ would be a better alternative. While not strictly a variation, ‘parallel coordinates’ display a similar technique for plotting several independent quantitative measures in the same chart. The main difference is that parallel coordinates use a linear layout and can accommodate many categories in one display. Charts Comparisons Polar chart ALSO KNOWN AS Coxcomb plot, polar area plot 259 REPRESENTATION DESCRIPTION
  • 90. A polar chart shows values for three or more different quantitative measures in the same display. It uses a radial (circular) layout comprising several equal-angled circular sectors like slices of a pizza, one for each measure. In contrast to the radar chart (which uses position along a scale), the polar chart uses variation in the size of the sector areas to represent the quantitative values. It is, in essence, a radially plotted bar chart. Colour is an optional attribute, sometimes used visually to indicate further categorical dimensions. A polar chart should only be considered in situations where the cyclical ordering (and neighbourly pairings) has some significance (such as data that might be plotted around the face of a clock or compass) and when the quantitative scales are the same (or similar) for each axis. EXAMPLE Comparing the quantitative match statistics across 14 different performance measures for a rugby union player.
  • 91. Figure 6.16 Excerpt from a Rugby Union Player Dashboard HOW TO READ IT & WHAT TO LOOK FOR 260 Look around the chart and acquaint yourself with the quantitative measures each sector represents and note the sequencing of the measures around the display. Is there any significance in this arrangement that can assist in interpreting the overall shape? Note the range of values included on the quantitative scale and acquaint yourself with any colour associations. Glance across the entire chart to locate the big, small and medium sectors and perform global comparisons to establish the high-level ranking of biggest > smallest. Identify any noticeable exceptions and/or outliers. Perform local comparisons
  • 92. between neighbouring variables to identify the order of magnitude and estimate the relative sizes. Estimate (or read, if labels are present) the absolute values of specific sectors of interest. Where available, compare the quantities against annotated references such as targets, forecast, last year, average, etc. If there is significance behind the sequencing of the variables, look out for any patterns that emerge through spiking, bulging or contracting shapes. PRESENTATION TIPS ANNOTATION: The inclusion of visible annotated features like tick marks and value labels can naturally aid the readability of the polar chart. Gridlines are only relevant if there are common scales across each quantitative variable. If so, the gridlines must be presented as arcs reflecting the outer shape of each sector. Connecting lines joining up
  • 93. the values are themselves straight lines. Each sector typically uses the same quantitative scale for each quantitative measure but, on the occasions when this is not the case, each axis will require its own, clear value scale. COLOUR TIPS: Often polar chart sectors are filled with a meaningful colour, sometimes with a degree of transparency to allow the background apparatus to be partially visible. COMPOSITION: The cyclical ordering of the quantitative variables has to be of some significance to legitimise the value of the polar chart over the bar chart. As the sectors will be angled all around the radial display, you will need to make sure all the associated labels are readable (i.e. not upside down or at difficult angles). The quantitative values represented by the size of the sectors need to be carefully calculated. It is the area of the sector, not the radius length, that will be
  • 94. modified to portray the values accurately. If you make maximum quantitative value equivalent to the largest sector area, all other sector sizes can be calculated accordingly. Knowing how many different quantitative variables you are showing means you can easily calculate 261 the angle of any given sector. The quantitative measure axes should always start from the origin value of zero: a sector should be representative of the true, full quantitative value, nothing more, nothing less, otherwise the perception of size will be distorted when comparing relative sizes. VARIATIONS & ALTERNATIVES Unless the radial layout provides meaning through the notion of
  • 95. a ‘whole’ or through the cyclical arrangement of measures, you might be best using a ‘bar chart’. Variations in approach tend to see modifications in the sector shape with measure values represented by individual bars lengths or, in the example of the Better Life Index project, through variations in ‘petal’ sizes. Charts Distributions Range Chart ALSO KNOWN AS Span chart, floating bar chart, barometer chart REPRESENTATION DESCRIPTION A range chart displays the minimum to maximum distribution of a series of quantitative values for different categories. The display is formed by a bar, one for each category, with the lower and upper
  • 96. position of the bars shaped by the minimum and maximum quantitative values in each case. The resulting bar lengths thus represent the range of values between the two limits. EXAMPLE Comparing the highest and lowest temperatures (°F) recorded across the top 10 most populated cities during 2015. Figure 6.17 Range of Temperatures Recorded in Top 10 Most Populated Cities (2015) 262 HOW TO READ IT & WHAT TO LOOK FOR Look at the axes so you know with what major categorical values each range bar is associated and what the range of the quantitative values is (min to max). Glance across the entire chart to locate the big, small and medium bars and perform global comparisons to establish the
  • 97. high- level ranking of biggest > smallest differences as well as the highest and lowest values. Identify any noticeable exceptions and/or outliers. Perform local comparisons between neighbouring bars, to identify larger than and smaller than relationships and estimate the relative proportions. There may be deliberate sorting of the display based on one of the quantitative measures. Estimate (or read, if labels are present) the absolute values of specific bars of interest. Where available, compare the quantities against annotated references such as targets, forecast, last year, average, etc. PRESENTATION TIPS ANNOTATION: Chart apparatus devices like tick marks and gridlines, in particular, can be helpful to increase the accuracy of the reading of the quantitative values. If you have axis labels you may not need direct
  • 98. labels on each bar – this will be lead to label overload, so generally decide between one or the other. COMPOSITION: The quantitative value axis does not need to commence from zero, unless it means something significant to the 263 interpretation, as the range of values themselves does not necessarily start from zero and the focus is more on the range and difference between the outer values. There is no significant difference in perception between vertical or horizontal layouts, though the latter tend to make it easier to accommodate and read the category labels. Where possible, try to make the categorical sorting meaningful, maybe organising values in ascending/descending size order. VARIATIONS & ALTERNATIVES
  • 99. ‘Connected dot plots’ will also emphasise the difference between two selected measure values (as opposed to min/max) or where the underlying data is a change over time between two observations. ‘Band charts’ will often be used to show how the range of data values has changed over time, displaying the minimum and maximum bands at each time unit. These are often used in displays like weather forecasts. Charts Distributions Box-and-whisker plot ALSO KNOWN AS Box plot REPRESENTATION DESCRIPTION A box-and-whisker plot displays the distribution and shape of a series of quantitative values for different categories. The display is formed by
  • 100. a combination of lines and point markers to indicate (through position and length), typically, five different statistical measures. Three of the statistical values are common to all plots: the first quartile (25th percentile), the second quartile (or median) and the third quartile (75th percentile) values. These are displayed with a box (effectively a wide bar) positioned and sized according to the first and third quartile values with a marker indicating the median. The remaining two statistical values vary in definition: usually either the minimum and maximum 264 values or the 10th and 90th percentiles. These statistical values are represented by extending a line beyond the bottom and top of the main box to join with a point marker indicating the appropriate
  • 101. position. These are the whiskers. A plot will be produced for each major category. EXAMPLE Comparing the distribution of annual earnings 10 years after starting school for graduates across the eight Ivy League schools. Figure 6.18 Ranking the Ivies HOW TO READ IT & WHAT TO LOOK FOR Begin by looking at the axes so you know with which category each plot is associated and what the range of quantitative values is (min to max). Establish the specific statistics being displayed, by consulting any legends or descriptions, especially in order to identify what the ‘whiskers’ are representing. Glance across the entire chart to locate the main patterns of spread, identifying any common or noticeably different
  • 102. 265 patterns across categories. Look across the shapes formed for each category to learn about the dispersal of values: starting with the median, then observing the extent and balance of the ‘box’ (the interquartile range between the 25th and 75th percentiles) and then check the ‘whisker’ extremes. Is the shape balanced or skewed around the median? Is the interquartile range wide or narrow? Are the whisker extremes far away from the edges of the box? Then return to comparing shapes across all categories to identify more precisely any interesting differences or commonalities for each of the five statistical measures. PRESENTATION TIPS ANNOTATION: If you have axis labels you may not need direct labels
  • 103. on each bar – this will lead to label overload, so generally decide between one or the other. COMPOSITION: The quantitative value axis does not need to commence from zero, unless it means something significant to the interpretation, as the range of values themselves do not necessarily start from zero and the focus is on the statistical properties between the outer values. There is no significant difference in perception between vertical or horizontal box-and-whisker plots, though horizontal layouts tend to make it easier to accommodate and read the category labels. Try to keep a noticeable gap between plots to enable greater clarity in reading. When you have several or many plots in the same chart, where possible try to make the categorical sorting meaningful, maybe organising values in ascending/descending order based on the median value.
  • 104. VARIATIONS & ALTERNATIVES Variations involve reducing the number of statistical measures included in the display by removing the whiskers to just show the 25th and 75th percentiles through the lower and upper parts of the box. The ‘candlestick chart’ (or OHLC chart) involves a similar approach and is often used in finance to show the distribution and milestone values of stock performances during a certain time frame (usually daily), plotting the opening, highest, lowest and closing prices, using colour to indicate an up or down trend. Charts Distributions 266 Univariate scatter plot
  • 105. ALSO KNOWN AS 1D scatter plot, jitter plot REPRESENTATION DESCRIPTION A univariate scatter plot displays the distribution of a series of quantitative values for different categories. In contrast to the box-and- whisker plot, which shows selected statistical values, a univariate scatter plot shows all values across a series. For each category, a range of points (typically circles but any ‘symbol’ is legitimate) are used to mark the position along the scale of the quantitative values. From this you can see the range, the outliers and the clusters and form an understanding about the general shape of the data. EXAMPLE Comparing the distribution of average critics score (%) from the Rotten Tomatoes website for each movie released across a range of different franchises and movie theme collections. Figure 6.19 Comparing Critics Scores for Major Movie
  • 106. Franchises 267 HOW TO READ IT & WHAT TO LOOK FOR Look at the axes so you know what each scatter row/column relates to in terms of which category it is associated with and what the range of the quantitative values is (min to max). If colour has been used to emphasise or separate different marks, establish what the associations are. Also, learn about how the design depicts multiple marks on the same value – these may appear darker or indeed larger. Glance across the entire chart to observe the main patterns of clustering and identify any noticeable exceptions and/or outliers across all categories. Then look more closely at the patterns within each scatter to learn
  • 107. about each category’s specific dispersal of values. Look for empty regions where no quantitative values exist. Estimate the absolute values of specific dots of interest. Where available, compare the quantities against annotated references such as the average or median. PRESENTATION TIPS ANNOTATION: Chart apparatus devices like gridlines can be helpful to increase the accuracy of the reading of the quantitative values. Direct labelling is normally restricted to including values for specifically noteworthy points only. COLOUR: Colour may be used to establish focus of certain points 268
  • 108. and/or distinction between different sub-category groups to assist with interpretation. When several points have the exact same value you might need to use unfilled or semi-transparent filled circles to facilitate a sense of value density. COMPOSITION: The representation of the quantitative values is based on position and not size, therefore the quantitative axis does not need to have a zero origin. There is no significant difference in perception between vertical or horizontal arrangement, though horizontal layouts tend to make it easier to accommodate and read the category labels. Where possible try to make the categorical sorting meaningful, maybe organising values in ascending/descending size order. VARIATIONS & ALTERNATIVES To overcome occlusion caused by plotting several marks at the
  • 109. same value, a variation of the univariate scatter plot may see the points replaced by geometric areas (like circles), where the position attribute is used to represent a quantitative value along a scale and the size attribute is used to indicate the frequency of observations of similar value. Adding a second quantitative variable axis would lead to the use of a ’scatter plot’. Charts Distributions Histogram ALSO KNOWN AS Bar chart (wrongly) REPRESENTATION DESCRIPTION A histogram displays the frequency and distribution for a range of quantitative groups. Whereas bar charts compare quantities for different
  • 110. categories, a histogram technically compares the number of 269 observations across a range of value ‘bins’ using the size of lines/bars (if the bins relate to values with equal intervals) or the area of rectangles (if the bins have unequal value ranges) to represent the quantitative counts. With the bins arranged in meaningful order (that effectively form ordinal groupings) the resulting shape formed reveals the overall pattern of the distribution of observations. EXAMPLE Comparing the distribution of movies released over time starring Michael Caine across five-year periods based on the date of release in the US. Figure 6.20 A Career in Numbers: Movies Starring Michael Caine
  • 111. HOW TO READ IT & WHAT TO LOOK FOR Begin by looking at the axes so you know what the chart depicts in terms of the categorical bins and the range of the quantitative values (zero to max). Glance across the entire chart to establish the main pattern. Is it symmetrically shaped, like a bell or pyramid (around a median or average value)? Is it skewed to the left or right? Does it dip in the middle and peak at the edges (known as bimodal)? Does it have several peaks and troughs? Maybe it is entirely random in its pattern? 270 All these characteristics of ‘shape’ will inform you about the underlying distribution of the data.
  • 112. PRESENTATION TIPS ANNOTATION: Chart apparatus devices like tick marks and gridlines in particular can be helpful to increase the accuracy of the reading of the quantitative values. Axis labels more than direct value labels tend to be used so as not to crowd the shape of the histogram. COMPOSITION: Unlike the bar chart there should be no (or at most a very thin) gap between bars to help the collective shape of the frequencies emerge. The sorting of the quantitative bins must be in ascending order so that the reading of the overall shape preserves its meaning. The number of value bins and the range of values covered by each have a prominent influence over the appearance of the histogram and the usefulness of what it might reveal: too few bins may disguise interesting nuances, patterns and outliers; too many bins and the
  • 113. most interesting shapes may be abstracted by noise above signal. There is no singular best approach, the right choice simply arrives through experimentation and iteration. VARIATIONS & ALTERNATIVES For analysis that looks at the distribution of values across two dimensions, such as the size of populations for age across genders, a ‘back-to-back histogram’ (with male on one side, female on the other), also commonly known as a ‘violin plot’ or ‘population pyramid’, is a useful approach to see and compare the respective shapes. A ‘box-and- whisker plot’ reduces the distribution of values to five key statistical measures to describe key dimensions of the spread of values. Charts Distributions Word cloud
  • 114. 271 ALSO KNOWN AS Tag cloud REPRESENTATION DESCRIPTION A word cloud shows the frequency of individual word items used in textual data (such as tweets, comments) or documents (passages, articles). The display is based around an enclosed cluster of words with the font (not the word length) sized according to the frequency of usage. In modifying the size of font this is effectively increasing the area size of the whole word. All words have a different shape and size so this can make it quite difficult to avoid the prominence of long words, irrespective of their font size. Word clouds are therefore only useful when you are trying to get a quick and rough sense of some of the dominant keywords used in the text. They can be an option for
  • 115. working with qualitative data during the data exploration stage, more so as a means for reporting analysis to others. EXAMPLE Comparing the frequency of words used in Chapter 1 of this book. Figure 6.21 Word Cloud of the Text from Chapter 1 HOW TO READ IT & WHAT TO LOOK FOR The challenge with reading word clouds is to avoid being drawn to the length and/or area of a word – they are simply attributes of the word, not a meaningful representation of frequency. It is the size of the font that you need to focus on. Scan the display to spot the larger text showing the more frequently used words. Consider any words of specific interest to see if you can find them; if they are not significantly visible, that in itself could be revealing. While most word cloud
  • 116. 272 generators will dismiss many irrelevant words, you might still need to filter out perceptually the significance of certain dominantly sized text. PRESENTATION TIPS INTERACTIVITY: Interactive features that let users interrogate, filter and scrutinise the words in more depth, perhaps presenting examples of their usage in a passage, can be quite useful to enhance the value of a word cloud. ANNOTATION: While the absolutes are generally of less interest than relative comparisons, to help viewers get as much out of the display as possible a simple legend explaining how the font size equates to
  • 117. frequency number can be useful. COLOUR: Colours may be used as redundant encoding to accentuate further the larger frequencies or categorically to create useful visual separation. COMPOSITION: The arrangement of the words within a word cloud is typically based on a layout process. Although not random, this will generally prioritise the placement of words to occupy optimum collective space that preserves an overall shape (with essentially a central gravity) over and above any arrangement that might better enable direct comparison. VARIATIONS & ALTERNATIVES The alternative approach would be to use any other method in this categorical family of charts that would more usefully display the counts
  • 118. of text, such as a bar chart. Charts Part-to-whole Pie chart 273 ALSO KNOWN AS Pizza chart REPRESENTATION DESCRIPTION A pie chart shows how the quantities of different constituent categories make up a whole. It uses a circular display divided into sectors for each category, with the angle representing each of the percentage proportions. The resulting size of the sector (in area terms) is a spatial by-product of the angle applied to each part and so offers an additional means for judging the respective values. The role of a pie chart is
  • 119. primarily about being able to compare a part to a whole than being able to compare one part to another part. They therefore work best when there are only two or three parts included. There are a few important rules for pie charts. Firstly, the total percentage values of all sector values must be 100%; if the aggregate is greater than or less than 100% the chart will be corrupted. Secondly, the whole has to be meaningful – often people just add up independent percentages but that is not what a pie chart is about. Finally, the category values must represent exclusive quantities; nothing should be counted twice or overlap across different categories. Despite all these warnings, do not be afraid of the pie chart – just use it with discretion. EXAMPLE Comparing the proportion of eligible voters in the 2015 UK election who voted for the Conservative Party, for other
  • 120. parties and who did not vote. Figure 6.22 Summary of Eligible Votes in the UK General Election 2015 274 HOW TO READ IT & WHAT TO LOOK FOR Begin by establishing which sectors relate to what categories. This may involve referring to a colour key legend or through labels directly adjacent to the pie. Quickly scan the pie to identify the big, medium and small sectors. Notice if there is any significance behind the ordering of the parts. Unless there are value labels, you next will attempt to judge the individual sector angles. This usually involves mentally breaking
  • 121. the pie into 50% halves (180°) or 25% quarters (90°) and using those guides to perceptually measure the category values. Comparing parts against other parts with any degree of accuracy will only be possible once you have formed estimates of the individual sector sizes. If you are faced with the task of judging the size of many parts it is quite understandable if you decide to give up quite soon. PRESENTATION TIPS ANNOTATION: The use of local labelling for category values can be useful but too many labels can become cluttered, especially when attempting to label very small angled sectors. COLOUR: Colour is generally vital to create categorical separation 275
  • 122. and association of the different sectors so aim to use the difference in colour hue and not colour saturation to maximise the visible difference. COMPOSITION: Positioning the first slice at the vertical 12 o’clock position gives a useful baseline to help judge the first sector angle value. The ordering of sectors using descending values or ordinal characteristics helps with the overall readability and allocation of effort. Do not consider using gratuitous decoration (like 3D, gradient colours, or exploding slices). VARIATIONS & ALTERNATIVES Sometimes a pie chart has a hole in the centre and is known as a ‘doughnut chart’, continuing the food-related theme. The function is exactly the same as a pie but the removal of the centre, often to
  • 123. accommodate a labelling property, removes the possibility of the reader judging the angles at the origin. One therefore has to derive the angles from the resulting arc lengths. If you want to display multiple parts (more than three) the bar chart will be a better option and, for many parts, the ‘treemap’ is best. Depending on the allocated space, a ‘stacked bar chart’ may provide an alternative to the pie. Unlike most chart types, the pie chart does not work well in the form of small multiples (unless there is only a single part being displayed). A ‘nested shape chart’, typically based on embedded square or circle areas, enables comparison across a series of one-part-to-whole relationships based on absolute numbers, rather than percentages, where the wholes may vary in size. Charts Part-to-whole
  • 124. Waffle chart ALSO KNOWN AS Square pie, unit chart, 100% stacked shape chart REPRESENTATION DESCRIPTION 276 A waffle chart shows how the quantities of different constituent categories make up a whole. It uses a square display usually representing 100 point ‘cells’ through a 10 × 10 grid layout. Each constituent category proportion is displayed through colour- coding a proportional number of cells. Difference in symbol can also be used. The role of the waffle chart is to simplify the counting of proportions in contrast to the angle judgements of the pie chart, though the display is limited to rounded integer values. This is easier when the grid layout
  • 125. facilitates quick recognition of units of 10. As with the pie chart, the waffle chart works best when you are showing how a single part compares to the whole and perhaps offers greater visual impact when there are especially small percentages of a whole. Rather than just colouring in the grid cells, sometimes different symbols will be used to associate with different categories. For example, you might see figures or gender icons used to show the makeup of a given sample population. EXAMPLE Comparing the proportion of total browser usage for Internet Explorer and Chrome across key milestone moments. Figure 6.23 The Changing Fortunes of Internet Explorer and Google Chrome HOW TO READ IT & WHAT TO LOOK FOR Begin by establishing how the different shapes or colours are associated
  • 126. with different categories. Assess the grid layout to understand the dimension of the chart and the quantity of cell ‘units’ forming the display (e.g. is it a 10 x 10 grid?). Quickly scan the chart to identify the big, medium and small sectors. Notice if there is any significance 277 behind the ordering of the parts. Unless there are value labels, you will need to count/estimate the number of units representing each category value. Comparing parts against other parts will only be possible once you have established the individual part sizes. If several related waffle charts are shown, possibly for different categories or points in time, identify the related colours/shapes in each chart and establish the
  • 127. patterns of size between and across the various charts, looking for trends, declines and general differences. PRESENTATION TIPS ANNOTATION: Direct labelling can become very cluttered and hard to incorporate elegantly without the need for long arrows. COLOUR: Borders around each square cell are useful to help establish the individual units, but do not make the borders too thick to the point where they dominate attention. COMPOSITION: Always start each row of values from the same side, for consistency and to make it easier for people to estimate the values. When you have several parts in the same waffle chart, where possible try to make the categorical sorting meaningful, maybe organising values in ascending/descending size order or based on a logical
  • 128. categorical order. VARIATIONS & ALTERNATIVES Sometimes the waffle chart approach is used to show stacks of absolute unit values and indeed there are overlaps in concept between this variation in the waffle chart and potential applications of the pictogram. Aside from the pie chart, a ‘nested shape chart’ will provide an alternative way of showing a part-to-whole relationship while also occupying a squarified layout. Charts Part-to-whole Stacked bar chart 278 ALSO KNOWN AS
  • 129. REPRESENTATION DESCRIPTION A stacked bar chart displays a part-to-whole breakdown of quantitative values for different major categories. The percentage proportion of each categorical dimension or ‘part’ is represented by separate bars, distinguished by colour, that are sized according to their proportion and then stacked to create the whole. Sometimes the whole is standardised to represent 100%, at other times the whole will be representative of absolute values. Stacked bar charts work best when the parts are based on ordinal dimensions, which enables ordering of the parts within the stack to help establish the overall shape of the data. If the parts are representative of nominal data, it is best to keep the number of constituent categories quite low, as estimating the size of individual stacked parts when there are many becomes quite hard.
  • 130. EXAMPLE Comparing the percentage of adults (16–65 year olds) achieving different proficiency levels in literacy across different countries. Figure 6.24 Literarcy Proficiency: Adult Levels by Country 279 HOW TO READ IT & WHAT TO LOOK FOR Look at the axes so you know with what major categorical values each bar is associated and what the quantitative values are, determining if it is a 100% stacked bar or an absolute stacked bar (in which case identify the min and the max). Establish the colour association to understand what categories the bars within each stack represent. Glance across the entire chart. If the categorical data is ordinal, and the
  • 131. sorting/colour of the stacks is intuitive, you should be able to derive meaning from the overall balance of colour patterns, especially where any annotated gridlines help to guide your value estimation. If the categorical data is nominal, seek to locate the dominant colours and the least noticeable ones. Comparing across different stacked bars is made harder by the lack of a common baseline for anything other than the bottom stack on the zero baseline (and for 100% stacked bars, those final ones at the top) and so a general sense of magnitude will be your focus. Study closer the constituent parts within each stack to establish the high-level ranking of biggest > smallest. Estimate (or read, if labels are present) 280