
Empfohlen
Weitere ähnliche Inhalte
Was ist angesagt?
Was ist angesagt? (20)
Andere mochten auch
Ähnlich wie How to navigate with a compass
Ähnlich wie How to navigate with a compass (20)
Kürzlich hochgeladen
Kürzlich hochgeladen (20)
How to navigate with a compass
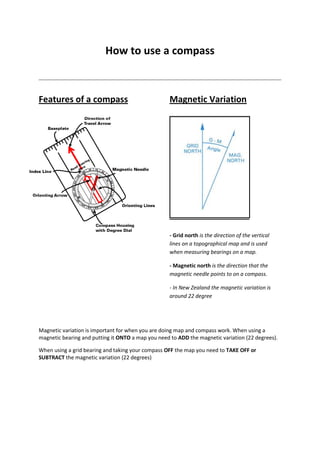
- 1. How to use a compass Features of a compass Magnetic Variation - Grid north is the direction of the vertical lines on a topographical map and is used when measuring bearings on a map. - Magnetic north is the direction that the magnetic needle points to on a compass. - In New Zealand the magnetic variation is around 22 degree Magnetic variation is important for when you are doing map and compass work. When using a magnetic bearing and putting it ONTO a map you need to ADD the magnetic variation (22 degrees). When using a grid bearing and taking your compass OFF the map you need to TAKE OFF or SUBTRACT the magnetic variation (22 degrees)
- 2. Orientating your map using compass - Put your compass onto the map with the dial turned so the orientation lines match up with the grid lines on your map. - With your map and compass flat rotate both to line the magnetic needle up with 22 degrees line. (- alternatively you can set your compass to 22 degrees and “put red in the shed”) - Your map should be orientated. Taking a bearing using features in the field This is useful if you can temporarily see a feature in the field you want to get to so then you can follow the direction of your compass to get to it. - Point the directional arrow of your compass at your feature - Turn the dial until the magnetic needle lines up with north on the dial (or “put red in the shed”) Taking a bearing from the map This is useful if you cannot see a feature that you want to get to (because of poor visibility i.e. fog or mist) but you know where you are on the map. Using your map and compass: - Find where you are on map (point A) - Find where you want to go on map (point B) - Get your compass and line up the side of your compass base plate with the directional arrow pointing where you want to go.(From point A to point B) - Move the dial to line the orientation lines up with the grid lines on map so all pointing north. - Take the compass off the map and look at bearing. - Take off 22 degrees to that bearing (magnetic variation), moving the dial. E.g. if you had 42 degrees move the dial so it points at 20degrees. - “Put red in the shed”. - The direction the directional arrow is pointing to on your compass is where you should follow
- 3. Resections (triangulations) This skill is really useful to learn while you are navigating and has the purpose of locating where you are on the map if you are lost. It is useful when you can see around you 2 to 3 or more features that you can locate on your map. The more you have the better, to give you an accurate pinpoint. - Choose a feature you can clearly see both in the field and on map. - Point the directional arrow at your feature in the field - Turn the dial until the magnetic needle lines up with north on the dial or “put red in the shed” - Add 22 degrees because you are adding your compass to the map (magnetic variation). - Put your compass on to the map with the edge of the base plate touching the known feature on the map with the direction of travel arrow pointing towards the feature. - Turn the whole compass around until the orientation lines of the compass line up with the grid lines on the map. Pointing north to south - Draw a line on the map along the edge of the compass making sure it intersects the known feature. - Repeat with another known feature preferably in another direction. - You are located where the lines intersect.