Workshop - Best of Both Worlds_ Combine KG and Vector search for enhanced R...
Media player
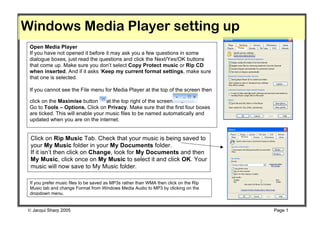
1. Windows Media Player setting up
Open Media Player
If you have not opened it before it may ask you a few questions in some
dialogue boxes, just read the questions and click the Next/Yes/OK buttons
that come up. Make sure you don’t select Copy Protect music or Rip CD
when inserted. And if it asks ‘Keep my current format settings, make sure
that one is selected.
If you cannot see the File menu for Media Player at the top of the screen then
click on the Maximise button at the top right of the screen
Go to Tools – Options. Click on Privacy. Make sure that the first four boxes
are ticked. This will enable your music files to be named automatically and
updated when you are on the internet.
Click on Rip Music Tab. Check that your music is being saved to
your My Music folder in your My Documents folder.
If it isn’t then click on Change, look for My Documents and then
My Music, click once on My Music to select it and click OK. Your
music will now save to My Music folder.
If you prefer music files to be saved as MP3s rather than WMA then click on the Rip
Music tab and change Format from Windows Media Audio to MP3 by clicking on the
dropdown menu.
Jacqui Sharp 2005 Page 1
2. Windows Media Player
To Burn music from a CD
• Insert a music CD
• Click on Rip music from CD
• Click OK
• Media Player will open and immediately start ripping the music (if
you are online at the same time then the tracks will be named as
well
• Select Play Audio CD using Windows Media Player
• Your music should start playing immediately
• If you are online at the same time it will also name your tracks for
you
If you would like to hear the music before it is ripped, select Play Audio CD after
you insert the CD (if you already have Media Player opened it will play
automatically)
1. Click on the Rip Tab
2. Click in the boxes of the songs you don’t want to rip
3. Click Rip music when you are ready
Jacqui Sharp 2005 Page 2
3. Windows Media Player
If you are not connected to the Internet you can still rename your
songs
• Click once on the Track and then click again, type in the name of
the song
• Name the Composer and Artist in the same way
• Clicking twice on a track will start the track playing
To play the songs
• Click on the Library tab
• Click on the + next to All Music
• Click on the + next to Album
• Choose an album from the list
• Click the Play button it will play all the songs in the album
• Click the Stop button to stop songs
• Click the previous or next buttons to move between the
songs
• Mute the songs by clicking
• Alter the volume by clicking and dragging the slider
• Clicking on any of the other choices such as Genre will have the
different types of music sorted for you so if you have several
Jazz albums they will be sorted in that Genre
Jacqui Sharp 2005 Page 3
4. Windows Media Player
To burn music to a CD
• Insert CD
• Select Album from list,
Burn Panel
• Click and drag that album over to the Burn Panel
• If you want individual songs rather than a whole album
then click and drag individual songs over
• Click on Start Burn
• All the songs will be converted ready to burn and then
will start to be burned
• Once it has finished the CD will eject out automatically
Jacqui Sharp 2005 Page 4
5. Windows Media Player
• You need to be in Library
• Make your own compilation Playlist of your favourite songs
• Click on the + next to My Playlists
• Right click on it and select New
• Drag the songs you want to go into this playlist by clicking on Album, choose an
Album, choose a song and then drag into the Playlist panel on the right hand side
• Click on the New Playlist drop down menu and choose from the items listed
Playlist panel
• Click on Shuffle List to change the order
• Click on Sort to sort the list
• Click on Save Playlist As once you have made all your changes,
type in a name for it and click Save
• Click on Burn List to burn to CD
Jacqui Sharp 2005 Page 5
6. Windows Media Player
While you are playing your music you can set it to skin mode Full Mode
by clicking on the Skin button
To click back to whole screen click the Return to Full mode
button
Skin Mode
You can change the look of your skin by going to View –
Skin Chooser
Click on the name of a skin in the left hand panel to view the
skins
Click on Apply Skin to change the skin
Clicking More Skins takes you to the Microsoft Website
where you can download more skins
Change your Visualisations by going to View –
Visualisations or download some more from the Internet by
going to View – Visualisations – Download Visualisations
Once your songs are downloaded you can access them
through MovieMaker and PowerPoint. Your music will be Three effects Single Picture
filed in the My Music Folder in My Documents.
Jacqui Sharp 2005 Page 6