1. P4i45GV R5.0
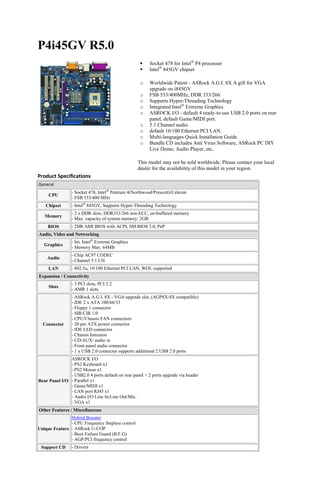
Socket 478 for Intel® P4 processor
Intel® 845GV chipset
o Worldwide Patent - ASRock A.G.I. 8X A gift for VGA
upgrade on i845GV
o FSB 533/400MHz, DDR 333/266
o Supports Hyper-Threading Technology
o Integrated Intel® Extreme Graphics
o ASROCK I/O - default 4 ready-to-use USB 2.0 ports on rear
panel, default Game/MIDI port.
o 5.1 Channel audio.
o default 10/100 Ethernet PCI LAN.
o Multi-languages Quick Installation Guide.
o Bundle CD includes Anti Virus Software, ASRock PC DIY
Live Demo, Audio Player, etc..
This model may not be sold worldwide. Please contact your local
dealer for the availability of this model in your region.
Product Specifications
General
- Socket 478, Intel® Pentium 4(Northwood/Prescott)/Celeron
CPU
- FSB 533/400 MHz
Chipset - Intel® 845GV, Supports Hyper-Threading Technology
- 2 x DDR slots, DDR333/266 non-ECC, un-buffered memory
Memory
- Max. capacity of system memory: 2GB
BIOS - 2Mb AMI BIOS with ACPI, SM BIOS 3.0, PnP
Audio, Video and Networking
- Int. Intel® Extreme Graphics
Graphics
- Memory Max. 64MB
- Chip AC97 CODEC
Audio
- Channel 5.1 CH
LAN - 802.3u, 10/100 Ethernet PCI LAN, WOL supported
Expansion / Connectivity
- 3 PCI slots, PCI 2.2
Slots
- AMR 1 slots
- ASRock A.G.I. 8X - VGA upgrade slot, (AGP8X/4X compatible)
- IDE 2 x ATA 100/66/33
- Floppy 1 connector
- SIR/CIR 1/0
- CPU/Chassis FAN connectors
Connector - 20 pin ATX power connector
- IDE LED connector
- Chassis Intrusion
- CD/AUX/ audio in
- Front panel audio connector
- 1 x USB 2.0 connector supports additional 2 USB 2.0 ports
ASROCK I/O
- PS2 Keyboard x1
- PS2 Mouse x1
- USB2.0 4 ports default on rear panel + 2 ports upgrade via header
Rear Panel I/O - Parallel x1
- Game/MIDI x1
- LAN port RJ45 x1
- Audio I/O Line In/Line Out/Mic.
- VGA x1
Other Features / Miscellaneous
Hybrid Booster:
- CPU Frequency Stepless control
Unique Feature - ASRock U-COP
- Boot Failure Guard (B.F.G)
- AGP/PCI frequency control
Support CD - Drivers
2. - Bundle CD includes: Anti Virus Software, ASRock PC DIY Live Demo, Audio Player, etc..
- Quick Installation Guide
- Support CD
Accessories
- Floppy/ATA 100 Cables
- 1x COM Port Bracket
Form Factor - MicroATX
OS - Microsoft® Windows® 98SE/ME/2000/XP compliant
Caution:
Please realize that there is a certain risk involved with overclocking, including adjusting the setting in the BIOS or
using the third-party overclocking tools. Overclocking may affect your system stability, or even cause damage to the
components and devices of your system. It should be done at your own risk and expense. We are not responsible for
possible damage caused by overclocking.
The specification is subject to change without notice in advance. The brand and product names are trademarks of
their respective companies. Any configuration other than original product specification is not guaranteed.
»BIOS Update Utility
ASRUBIOS.EXE, ASRFLASH.BIN and UCODE.DAT: These are the Flash Memory Writer utility that updates the BIOS
by uploading a new BIOS file to the programmable flash ROM chip on the motherboard. To determine the BIOS version
of your motherboard, press <F2> to enter the BIOS setup utility during boot up, and check the BIOS version from the
Main menu. Larger numbers represent a newer BIOS file. This utility works only in pure DOS. And this utility is
included in the BIOS package. (How do I check the BIOS version?)
The Flash Memory Writer utility can not be suitable for all ASRock motherboards. Please use the Flash utility which is
included in each BIOS file to update its BIOS. Also ASRock motherboard MUST use ASRock's Flash utility to update
BIOS, those uncertified BIOS flashing tools will cause motherboard damage.
»Updating BIOS Procedures
1. Create a bootable system floppy disk and prepare a blank floppy disk.
2. Download the BIOS package (WinZip format with .zip file extension), unzip and save it to the blank floppy disk and you should see ASRUBIOS.EXE,
ASRFLASH.BIN, UCODE.DAT, BIOS file and README.TXT.
3. Boot from the disk you created in step 1 then switch to the floppy disk you created in step 2.
4. At the "A:" prompt, type ASRUBIOS, hit space bar once, and type BIOS file name then press <Enter>. For example: A:ASRUBIOS 75i65GV1.70
<Enter> then you will see a message "Please wait for loading BIOS ROM".
5. After about 1 minute, you will see the message "Flash ROM Update Completed - Pass", then you have finished upgrading the BIOS.
6. After finishing upgrading the BIOS, please remove the floppy disk. Restart your system and press <F2> to enter the BIOS setup utility during boot up.
7. In Exit menu, please select "Load Default Settings" and press <Enter> to continue.
8. Select "Exit Saving Changes" and press <Enter> to exit the BIOS setup utility.
9. Now, system is booting up with new BIOS.
»How do I check the BIOS version?
2.The BIOS version can be found in BIOS setup utility.
1.The BIOS version can be found during system boot up.
»Notice
If you encounter problems while updating the new BIOS, DO NOT turn off your system since
this corrupt BIOS might cause your system failed to boot up. Just repeat the process, and if the
problem still persists, update the original BIOS file. If the Flash Memory Writer utility was not
able to successfully update a complete BIOS file, your system may not be able to boot up. If this
happens, your system will need service.