SlideShare ist ein Scribd-Unternehmen logo
1 von 21
A CLINCA ESIETCO PRODUCTION
                                           A JONATHON DEMME PICTURE


                                                                                                                photoshop hollywood
                                                           “PHILADELPHIA”
    JASON ROBARDOS MARY STEENBURGEN ANTONIO BANDERAS
                            BY HOWARD SHORE PHOTOGRAPHY TAk FUJIMOTO
                          MUSIC                      DIRECTOR

            PRODUCERS GARY GOETzMAN, kENNETH UTT, RON BOzMAN
             EXECUTIVE

                                                       BY RON NYSWANER
                                                 WRITTEN

                              BY EDWARD SAXON AND JONATHAN DEMME
                        PRODUCED

                                                  BY JONATHAN DEMME
                                            DIRECTED


ENI SANTONI • ANDY ROBINSON • JOHN
Julian Fink & R M Fink and Dean Reisner                                                                                                     RESTRICTED
                                                                                                                                      UNDER 17 REQUIRES ACCOMPANYING
                                                                                                                                         PARENT OR ADULT GUARDIAN
OLOR • Warner Bros. A Kinney Company


             Alexander Scourby Valerie Bettis Torin Thatcher
    with
                     OSCAR SAUL and JAMES GUNN                                                   VINCENT SHERMAN A BECKWORTH CORPORATION PRODUCTION A COLUMBIA PICTURE
    Screen Play by                                                    Produced and Directed by
                                                                  •                                             •                                                      •


R FILMS PRESENT A SCOTT FREE PRODUCTION A FILM BY TONY SCOTT DENZEL WASHININGTON “DEJA VU” VAL KILMER
                                                                                                                                                                           hollywood
                                                                                                                     WRITTEN
                                                                                                                          BY
 LDBERG AND JIM CAVIEZEL SUPERVISOR BOB BADAMI BY HARRY GREGSIN-WILLIAMS DESIGNER ELLEN MIROJNICK                   RON WOODBINE
                                 MUSIC             MUSIC                      COSTUME

HOTOGRAPHY PAUL CAMERON,ASC DIRECTORS MIKE STENSON CHAD OMAN TED ELLIOTT TERRY ROSSIO BARRY WALDMAN
DIRECTOR OF                 EXECUTTIVE

 BRUCKHEIMER BY BILL MARSILII & TERRY ROSSIO BY TONY SCOTT
                  WRITTEN                                DIRECTED
by Valerie Bettis Torin Thatcher
     4                                                                                                                                                                                                                                                                                       5
AMES GUNNphotoshopDirected by VINCENT SHERMAN A BECKWORTH CORPORATION PRODUCTION A COLUMBIA PICTURE
                         hollywood                                                                                                                                                                                                                                 1952 - Back to Trinidad
            Produced and
           •                             •                                     •


                                                                                                                                                                                                     back to trinidad
                                                                                                               Alexander Scourby Valerie Bettis Torin Thatcher
                                                                                                      with
                                                                                                                       OSCAR SAUL and JAMES GUNN                                  VINCENT SHERMAN A BECKWORTH CORPORATION PRODUCTION A COLUMBIA PICTURE
                                                                                                      Screen Play by                                   Produced and Directed by
                                                                                                                                                   •                                             •                                   •


                                                                                                                                                                                                                           Alexander Scourby Valerie Bettis Torin Thatcher
                                                                                                                                                                                                                    with
                                                                                                                                                                                                                                                   •                           •
6                                                                                                                                                 7
    photoshop hollywood                                                                                                 1952 - Back to Trinidad


the cast
This thriller drips of 1950’s style. After a brief retirement and an even briefer
marriage, Rita Hayworth returned to the screen in this riveting film noir. The
poster screams “Hayworth’s Back” and capitalises on the success of Hayworth and
Glenn Ford’s earlier film “Gilda.”
This particular style of poster has become increasingly popular in the last few years
due to the seductive image of Hayworth.


                                                                                            iStock_000006309222
                                                                                        1   istockphoto.com


         1


                                                                                            5164516-1804x2712
                                                                                        2   Jupiter Images collection


                                                                          2
8                                                                                                                                                                                                                                                              9
    photoshop hollywood                                                                                                                                                                                                        1952 - Back to Trinidad


lighting the set                                                                                                                                                                     film        3               2                      1
             R    43                                         R    253                                              R    235
             G    115                                        G    252                                              G    210
             B    168                                        B    1                                                B    188


                                                                                                                                                                                                      overlay
                                                                                                                                                                                            1
             R    202                                        R    165                                              R    4
                                                                                                                                                                                            2
             G    135                                        G    52                                               G    12                                                                       6               5                      4
                                                                                                                                                                                            3
             B    65                                         B    44                                               B    23

                                                                                                                                                                                            4

the titles                                                                                                                                                                                  5

                                                                                                                                                                                            6
                   Brody SB Regular                                                                                    Helvetica Neue
                                                                                                                                           (her “Gilda” man)
                                                                                                                                                                                                 9               8                      7
                                                                                                                                                                                            7
                                                                                                                       77 Bold Condensed
                   This font has been redrawn
                   to match the poster exactly.
                                                                                                                                                                                            8
                   Brody SB Regular is the
                   font most similar to this


                                                                                                                                                                                                                                                 vivid light
                   1950 font.


                                                                                                                                                                                                      multiply
                                                                                                                                                                                            9


                                                                                                                                                                                                                      color
                                                Alexander Scourby Valerie Bettis Torin Thatcher
                                       with
                   Univers
                                                                                                                                                                                            10   12              11                     10
                   39 Untra Thin
                                                        OSCAR SAUL and JAMES GUNN                                  VINCENT SHERMAN A BECKWORTH CORPORATION PRODUCTION A COLUMBIA PICTURE
                   Condensed           Screen Play by                                   Produced and Directed by
                                                                                    •                                                 •                                  •

                                                                                                                                                                                            11


SFX


                                                                                                                                                                                                                      vivid light 53%


                                                                                                                                                                                                                                                 soft light
                                                                                                                                                                                            12


                                                                                                                                                                                                       overlay
                                                                                                                                                                                            13
                                                                                                                                                                                                                 14                     13
Creating this poster is all about using the power of Blending Modes                        applied to the image. To re-create the final texture a simple grain texture
within Photoshop. The vibrant and saturated style of this 1950’s poster                    is added and placed on a Overlayed layer.
                                                                                                                                                                                            14
uses a combination of Vivid Light, Multiply, Overlay, Color and Soft
                                                                                           Subtle brushstrokes of colour are applied to create the 1950’s makeup.
Light modes. The whole process is fairly simple as long as the order of
                                                                                           The main text titles have been redrawn in illustrator, Brody Sb Regular
events are follwed well.
                                                                                           type face is close but not exact.
Some intersting steps are taken to create the poster. Loading the
                                                                                           The fighting couple in the bottom right corner uses the same filters and
Luminosity selection and filling it with white seems very usual, but
                                                                                           layer blends as the main image. the replacement picture used in this re-
creates an amazing effect!
                                                                                           creation is amazing similar to the original.
In reproducing the painted appearance, Blur More and Surface Blurs are
10                                                                                                                                                                                                                                                                                                           11
     photoshop hollywood                                                                                                                                                                                                                                                  1952 - Back to Trinidad


the script
Open the original poster affair_in_trinidad_ver2_xlg.jpg. This original                                                    Duplicate the base girl                                                                                  Set the foreground colour to R 186 G 33 B 34. This will
file will be the guide for setting the positioning of all the elements.                                                    layer and set the top                                                                                    produce a red. Set the background colour to white. Now
                                                                                                                           version to Overlay. Now                                                                                  select the newly created merged layer girl copy 4.
Enlarge the dimensions to:
                                                                                                                           the image will appear
                                                                                                                                                                                                                                    Go to Filter > Sketch > Photocopy. Adjust the settings as
                                                                                                                           darker.
                                                                                                                                                                                                                                    below.


Tint the transparency of the original to 25%. This will allow you to
place the original on the top layer and be able to see the place items on
the lower layers.

                                                                                                                                                                                                                                    Set the blending to Multiply to knock the white out. This step has added
                                                                                                                                                                                                                                    a subtle detail to the image.


                                                                                                                                                         Now copy this selection to its own layer by pressing Command-J or
                                                                            Now add a Curve adjustment layer to the top girl copy layer only (right-
                                                                                                                                                         Ctrl-J on PC.
                                                                            click on the adjustment layer in the layers pallet and choose Create
                                                                            Clipping Mask...). Adjust the Curves to bring back some of the detail in     A new layer will now appear on top. Call the new layer girl copy 2
                                                                            the over-exposed image.                                                      and set it’s blending to Vivid Light and reduce the opacity to 59% (see
                                                                                                                                                         above).
                                                                                                                                                         Now load the latest layer- girl copy 2 as a selection (A). (Click on the
                                                                                                                                                         layer thumbnail and press Command or Ctrl). Create a new layer on top
                                                                                                                                                         (call it girl copy 3) and fill the selection with white (B).

                                                                                                                                                          A                         B                          C                    It has also however, added a reddish tint to the image, looking at
                                                                                                                                                                                                                                    the Rita original, its less red and more subtle greens. Add another
                                                                                                                                                                                                                                    adjustment layer to this layer only. This time add Hue and Saturation.
Place, rotate and scale the female image (iStock_000006309222.jpg)
                                                                                                                                                                                                                                    Refer to the Rita original to correct the colours. See below.
into position.
Once in position, turn off the
orginal Rita layer.
Add a Surface Blur across the
entire image. See the setting
below, this will help create the
                                                                                                                                                         Now set the blend on girl copy 3 to Soft Light (C).
                                                                            Now you need to load the luminosity of the girl copy layer as a selection.
painted 1950’s appearance.
                                                                            To do this by pressing on Option-Command and then the Tilde key (~)          Make a merged layer of all the layers. the outcome will be a new layer
The next few steps involves                                                 or on a PC Ctrl-Alt and then the Tilde key. This will now bring up the       comprised of all the layers, leaving the lower layers untouched.
using the power of layers and                                               selection on the layer.
                                                                                                                                                         Hold down the Option key or the Alt key on PC and go to the
blends. This will enable you
                                                                            Now invert the selection by pressing on Shift-Command-I or Shift-            dropdown menu in the top right hand corner of the Layer Palette.
to re-create this 1950’s style
                                                                            Ctrl-I on a PC.
poster, rich and colour and                                                                                                                              Choose Merged Visible, if the Option or Alt key is held down, A merged
contrast.                                                                                                                                                version will now appear in the Layer Palette. Rename it girl copy 4.
12                                                                                                                                                                                                                                                                                                              13
     photoshop hollywood                                                                                                                                                                                                                                                      1952 - Back to Trinidad


                                                                                                                                                                                                                                         Rasterize the layer and duplicate the layer. Change the colour of the text
Lets now look at the make-up. Your skills with the paintbrush are                                                                                          The texture will be presented in colour, remove this by pressing Shift-
                                                                            Create a new layer with a merged version of all the layers. This final layer
                                                                                                                                                                                                                                         to a 40% gray. Apply a grain texture to the gray layer, using the same
needed here. Constantly refer back to the Rita original to help you place                                                                                  Command-U or Shift-Ctrl-U for PC.
                                                                            with sit above the layers below. Here you will add some subtle changes.
                                                                                                                                                                                                                                         settings as the previous page. Set the blending mode to Overlay. This will
the make-up on the correct place
                                                                            Remove the wrinkles below the model’s eyes and blur the whole image
                                                                                                                                                                                                                                         create a nice strong grainy appearance. Apply a Blur More - 1.
and amounts. Also use colour
                                                                            slightly to create a realistic 1950’s print.
samples from the Rita original.
                                                                            First use the Clone tool and remove the wrinkles from her eyes.
Paint the colour on a new layer
                                                                            Then add a slight blur using Blur More - 1 pixel
using a feathered brush. Its a
subtle process, use the layer
opacity below, I’ve adjusted the opacity to 43%.
Set the blending Mode to Color.
                                                                                                                                                                                                                                         Repeat this process with the
                                                                                                                                                           Change the layer’s blending mode to Overlay.
                                                                                                                                                                                                                                         reamianing blue text, start with
                                                                                                                                                                                                                                         the top left. Also apply a Blur
                                                                                                                                                                                                                                         More - 1.
                                                                                                                                                                                                                                         The blue text on the middle
                                                                                                                                                                                                                                         right is slightly darker than the
                                                                                                                                                                                                                                         top left. Remember the Blur
                                                                                                                                                                                                                                         More - 1!
                                                                                                                                                                                                                                         Add the final smaller text
                                                                            Create a white filled base layer underneath the new merged layer. On the       Using the steps on the previous pages, create the fighting couple image
                                                                                                                                                                                                                                         using Helvetica Neue 77 Bold
                                                                            merged layer use a mask layer to fade the bottom of the model’s dress.         that appears on the bottom right. Create a new folder called fight. Scale
                                                                                                                                                                                                                                         Condensed and apply a Blur
                                                                                                                                                           and position the image 5164516-1804x2712.jpg.
                                                                                                                                                                                                                                         More - 1.
                                                                            See the bottom of the Rita
                                                                            original poster.
                                                                                                                                                                                                                                         You have successfully brought
                                                                                                                                                                                                                                         Rita back to life after 56 years!
                                                                            Now its time to create the
                                                                            surrounding elements. Turn
                                                                            the Rita original layer and
On a new layer paint over the
                                                                            reduce the opacity. Again
lips. Use a red colour and again
                                                                            you will use it as a positional
refer to the Rita original. Use the
                                                                            guide.
painbrush to apply a strong red
(sample red from Rita lips)
                                                                            Firstly, create a new layer and
                                                                            call it black box. Re-create
Set this Lips layer Mode to Vivid
                                                                            the black box that houses the
Light.
                                                                            Affair in Trinidad text.
                                                                            The Rita
                                                                            original has
                                                                                                                                                           Using Univers 39 Untra Thin Condensed enter the title credits into
                                                                            quite a grainy
                                                                                                                                                           position.
                                                                            texture. This
                                                                            next step will                                                                 The final part of this poster is to add the main titles to the poster. As
                                                                            re-create this. Create a new                                                   mentioned earlier the script type does not exactly match Brody SB
                                                                            layer and call it grain. Fill the                                              Regular, but is fairly close. You may chose to use Broday or trace the Rita
                                                                            layer will 50% gray and apply                                                  original text in Illustrator. the samples to
                                                                            a texture filter. go to Filter                                                 follow have been traced.
                                                                            > Texture > Grain. Refer to
                                                                                                                                                           Place the vector file into Photoshop from
                                                                            the settings on the right and
                                                                                                                                                           Illustrator, apply a Color Overlay use the
                                                                            apply.
                                                                                                                                                           colour yellow - R 253 G 252 B1 (double
                                                                                                                                                           click on the layer to bring up the Layer
                                                                                                                                                           Style.)
1971
arring HARRY GUARDINO • RENI SANTONI • ANDY ROBINSON • JOHN
Daley • Screenplay by Harry Julian Fink & R M Fink and Dean Reisner         RESTRICTED
                                                                      UNDER 17 REQUIRES ACCOMPANYING

      14 photoshop hollywood                                                                                                                                                                                                                                                          15
                                                                         PARENT OR ADULT GUARDIAN
                                                                                                                                                                                                                                     1971 - Remaking Harry’s Day
 el • PANAVISION • TECHNICOLOR • Warner Bros. A Kinney Company


                                                                                                                                                                  re-making Harry’s                                               day
                                                                                                       CLINT EASTWOOD in “DIrTy hArry” A Malpaso Company Production Co-Starring HARRY GUARDINO • RENI SANTONI • ANDY ROBINSON • JOHN
                                                                                                       LARCH and JOHN VERNON as “The Mayor” • Executive Producer Robert Daley • Screenplay by Harry Julian Fink & R M Fink and Dean Reisner                RESTRICTED
                                                                                                                                                                                                                                                     UNDER 17 REQUIRES ACCOMPANYING
                                                                                                                                                                                                                                                        PARENT OR ADULT GUARDIAN
                                                                                                       Story by Harry Julian Fink & R M Fink • Produced and Directed by Don Siegel • PANAVISION • TECHNICOLOR • Warner Bros. A Kinney Company


                                                                                                                                                  CLINT EASTWOOD in “DIrTy hArry” A Malpaso Company Production Co-Starring HARRY GUARDINO • RENI SANTONI • ANDY RO
                                                                                                                                                  LARCH and JOHN VERNON as “The Mayor” • Executive Producer Robert Daley • Screenplay by Harry Julian Fink & R M Fink a
16                                                                                                                                                  17
     photoshop hollywood                                                                                              1971 - Remaking Harry’s Day


the cast
In the year 1971, San Francisco faces the terror of a maniac known as Scorpio-
who snipes at innocent victims and demands ransom through notes left at the
scene of the crime.
This simple yet striking design creates an instant visual energy for any passer-by.
                                                                                          11661039-5370x3580
                                                                                      1
The designer uses simple concept with dramatic angles and vivid colours.
                                                                                          Jupiter Images collection


                                                                           1


                                                                                          iStock_000006070838
                                                                                      2   istockphoto.com

                                            2


                               3


                                                                                          iStock_000007106051
                                                                                      3   istockphoto.com
                                        4


This chapter re-creates this timeless poster by combining varying greyscale tonal
ranges onto separate layers and then overlaying the bold colours.


                                                                                      4
18                                                                                                                                                                                                                                                                19
     photoshop hollywood                                                                                                                                                                                                        1971 - Remaking Harry’s Day


lighting the set                                                                                                                                        film
                                                                                                                                                                                                                3          2            1
             R    212                                    R     250                        R     2
             G    115                                    G     225                        G     8
             B    142                                    B     104                        B     19


                                                                                                                                                                                                                                                       overlay
                                                                                                                                                                                     1
                                                                                                                                                                                                                6          5            4
                                                                                                                                                                                     2


the titles                                                                                                                                                                           3

                                                                                                                                                                                     4

                                              Clint Eastwood
                   Helvetica Neue
                                                                                                                                                                                     5
                   95 Black


                                              Dirty Harry                                                                                                                            6                          9          8            7
                                                                                                                                                                                     7
                                            CLINT EASTWOOD in “DIrTy hArry” A Malpaso Company Production Co-Starring HARRY GUARDINO • RENI SANTONI • ANDY ROBINSON • JOHN
                   Helvetica Neue
                                                                                                                                                                                     8
                                            LARCH and JOHN VERNON as “The Mayor” • Executive Producer Robert Daley • Screenplay by Harry Julian Fink & R M Fink and Dean Reisner
                   55 Roman                                                                                                                                                                     RESTRICTED
                                            Story by Harry Julian Fink & R M Fink • Produced and Directed by Don Siegel • PANAVISION • TECHNICOLOR • Warner Bros. A Kinney Company
                                                                                                                                                                                          UNDER 17 REQUIRES ACCOMPANYING
                                                                                                                                                                                             PARENT OR ADULT GUARDIAN


                                                                                                                                                                                                                                                       multiply
                                                                                                                                                                                     9


SFX                                                                                                                                                                                  10
                                                                                                                                                                                                               12          11          10
                                                                                                                                                                                     11
The re-creation of this seventies poster requires a pattern to replicate     Revert back to grayscale, make a selection of the black and cut an paste
                                                                                                                                                                                     12
the course printing method. The pattern is a simple four toned graphic       into the original Photoshop file.
repeated over the solid colours. The dodge and burn tools are used to
                                                                             The gun is placed into position to create the illusion the male is in
create an uneven exposure range seen in the top left. A texture is also
                                                                             possession and aiming.
applied to the main text to “dirty” and roughen the text
                                                                             The small image collage at the bottom is a series of images scaled and
An extreme contrast alteration of the shattered glass image is used to
                                                                             worked together in grayscale.
create the white shattered effect. The selection is acquired using the
                                                                             Overall this poster is a fairly simple project. A little experimentation
channels, and a white fill applied. Slight masking is also used to clean
                                                                             with the tonal range to create the right type to black and white bitmap
up any unwanted shatters. Artistic license is also applied here, using the
                                                                             is required. The gun is always placed on a separate layer to give more
brush to extend the cracks to the edge of the poster.
                                                                             control when creating the bitmaps.
Transforming the images to a bitmap appearance, is exactly that. Alter
the contrast of the male image to create the different layers of colour,
extract the image into a new file, grayscale the image, then convert to
bitmap.
20                                                                                                                                                                                                                                                                                                                   21
     photoshop hollywood                                                                                                                                                                                                                                                1971 - Remaking Harry’s Day


the script
Open the original poster dirty_harry_xlg.jpg. This original file will be    Place, rotate and scale the gun image (iStock_000006070838) into a                                                                                           Create a new layer below these layers and fill it with the yellow colour.
                                                                            new layer and create a hard-lined clipping mask around the image.
the guide for setting the positioning of all the elements.
Enlarge the dimensions to:


Create guides to outline the main image area.
                                                                                                                                                          To remove the white out of the layer find a suitable channel and Alt -
                                                                                                                                                          click on the channel layer (e.g. green). This will create a selection of the
                                                                                                                                                          image, now inverse this selection, create a new layer and fill with black
                                                                                                                                                          or change to the red using the Layer Style and Colour Overlay.
                                                                                                                                                                                                                                         Now create another layer above the yellow and fill it with the black
                                                                                                                                                                                                                                         colour. Create a mask to cover the yellow area, that needs to be black.


                                                                            Save this Photoshop file. Resave this file and Save As “greyscale.psd. This
Tint the transparency of the original to 25%. This will allow you to        new file will create the bitmaps for the main Photoshop file.
place the original on the top layer and be able to see the place items on
                                                                            In this new file you need to experiment with the tonal ranges to create
the lower layers
                                                                            different levels of intensity to create the black and red colours.
Place and scale the male image (11661039-5370x3580.jpg) into
                                                                            Convert the mode to grayscale and then to bitmap.
position. Create a rough mask around the curved features on the male
                                                                                                                                                          You can choose to leave the black layers white a solid white, make sure
head. Create straight masks on the edges (use the prelaid guides).
                                                                                                                                                          those layers are blended to Multiply


                                                                                                                                                                                                                                                                                                            mask
                                                                                                                                                          Once all the layers are placed in the original psd file, use masking to
                                                                                                                                                          create a similar look to the original Dirty Harry poster. See below.


                                                                            You’ll see the bitmap effect. Using the burn tool and levels create an
                                                                                                                                                                                                                                         Open the shattered glass image iStock_000007106051 and apply a level
                                                                            outcome for the red and black layers. To capture the extra black and red
                                                                                                                                                                                                                                         adjustment layer. An extreme adjustment is required here. The outcome
                                                                            detail on the gun, you may decide to create a second black layer.
                                                                                                                                                                                                                                         is a high contrasting selection that you can transfer into the original.
                                                                            Once you find the right level of black and white convert the mode back
                                                                            to grayscale and drag each layer into the original psd file.
22                                                                                                                                                                                                                                                                                                              23
     photoshop hollywood                                                                                                                                                                                                                                              1971 - Remaking Harry’s Day


Create a selection of the white colour (Alt-click on a colour channel and   A subtle pattern now interacts against the solid colours below it.
inverse) and transfer to the original psd. Position, rotate and fill with
white. Use artistic license to mask and create extra shards of glass to
replicate the Dirty Harry original.


                                                                            Use the Dodge Tool to over expose the black on the right side of the          Create a new gray scale Psd file and place the Dirty Harry original in the
                                                                            poster. This a purely an effect to replicate the Dirty Harry poster.          centre. Reduce the transparency. Again this will allow you to add, scale
                                                                                                                                                          and manipulate the images into the correct position.


                                                                                                                                                                                                                                       Create a merge layer and add to the main Psd file. Adjust the contrast
                                                                                                                                                                                                                                       and run a texture (grain) through it. You are done.


The poster needs a texture throughout to replicate the 1970s appearance.
Create a new layer on top and fill it with grey (R 111 G 111 B111).
                                                                            Create the main text within the poster. Use Helvetica Neue 95 Black.          Add the building first, scale, skew and then mask out the surrounding
Apply the Filter > Texture > Grain to the layer. Apply a Desaturate to
                                                                                                                                                          buildings. Once you are happy with the positioning adjust the contrast
                                                                            Once you have scaled and kerned to the right size rasterize the text
this layer to remove the colour.                                                                                                                          to match the black white original version. Repeat this process with the
                                                                            layer, apply a texture filter (grain > horizontal) to the text and a slight
                                                                                                                                                          remaining images.
                                                                            horizontal blur.


Set the layer of the blend to Overlay. Apply a Pattern Overlay to the
layer. Create a pattern similar to the below and apply the settings.


                                                                            Set the layer of text below the textured greyscale layer and reduce the
                                                                            transparency to 85%. Repeat this process to the sub text that ranges to
                                                                            the left just above the main text. Use a lighter Helvetica Neue font.
                                                                            The final black and white collage is a simple arrangement of highly
                                                                            contrasted imagery. This collage is really a sub graphic so it’s accuracy
                                                                            depends on much time you spend on it.
1993
 STEENBURGEN ANTONIO BANDERAS
 WARD SHORE PHOTOGRAPHY TAk FUJIMOTO
                    DIRECTOR
        24 photoshop hollywood                                                                                                                                                           25
                                                                                                                                   1993 - Retrial Philadelhpia
ETzMAN, kENNETH UTT, RON BOzMAN
                      BY RON NYSWANER
                WRITTEN

DWARD SAXON AND JONATHAN DEMME
                 BY JONATHAN DEMME
           DIRECTED


                                                                                                                   retrial philadelphia
                                                                                  TRISTAR PICTURES PRESENTS
                                                                                  A CLINCA ESIETCO PRODUCTION
                                                                                  A JONATHON DEMME PICTURE
                                                                                                  “PHILADELPHIA”
                                           JASON ROBARDOS MARY STEENBURGEN ANTONIO BANDERAS
                                                                   BY HOWARD SHORE PHOTOGRAPHY TAk FUJIMOTO
                                                                 MUSIC                      DIRECTOR

                                                   PRODUCERS GARY GOETzMAN, kENNETH UTT, RON BOzMAN
                                                    EXECUTIVE

                                                                                              BY RON NYSWANER
                                                                                        WRITTEN

                                                                     BY EDWARD SAXON AND JONATHAN DEMME
                                                               PRODUCED

                                                                                         BY JONATHAN DEMME
                                                                                   DIRECTED


                                                                                                                                                                          TRISTAR PICTURES PRESENTS
                                                                                                                                                                          A CLINCA ESIETCO PRODUCTION
                                                                                                                                                                          A JONATHON DEMME PICTURE
                                                                                                                                                                                          “PHILADELPHIA”
                                                                                                                                   JASON ROBARDOS MARY STEENBURGEN ANTONIO BANDERAS
                                                                                                                                                           BY HOWARD SHORE PHOTOGRAPHY TAk FUJIMOTO
                                                                                                                                                         MUSIC                      DIRECTOR

                                                                                                                                           PRODUCERS GARY GOETzMAN, kENNETH UTT, RON BOzMAN
                                                                                                                                            EXECUTIVE

                                                                                                                                                                                      BY RON NYSWANER
                                                                                                                                                                                WRITTEN

                                                                                                                                                             BY EDWARD SAXON AND JONATHAN DEMME
                                                                                                                                                       PRODUCED

                                                                                                                                                                                 BY JONATHAN DEMME
                                                                                                                                                                           DIRECTED
26                                                                                                                                                  27
     photoshop hollywood                                                                                              1993 - Retrial Philadelhpia


the cast
Te vel euipis ea facidunt ulput vel dui eriustion eumsandip eriure min hendrerat.
kvlcxlkvk xvklxvk kvdskkodsfodsiofi sfiodfispod fopsdifo dsiof ofi ifds fosaodfsifo
dsop aodsfioadsfiodsifodisfo ofiosdif i odfi od dof odf Um amconse diamcore do-
lobor sum et lore dolorem zzrit nit luptatue velis nullan ulput accummy nullaore
cons et incipsum alis eugue eugue magnim alit wisis niam zzrillum quisis alisl            4523873-4142x6213.jpg
                                                                                      1
ullan vel eu faccumm olorem ilissequi bla cor iliquipisi.                                 Jupiter Images collection
Volore elesto dignis nim iure modoloreet wisit pratio esed etue dt v


      1


                                                                                          Postcard Exchange.com
                                                                                      2
                                                2


                                     4

                                                                        3

                                                                                          5808602-5370x3580.jpg
                                                                                      3   Jupiter Images collection


                                                                                          4066826-1287x3300.jpg
                                                                                      4   Jupiter Images collection
28                                                                                                                                                                             29
       photoshop hollywood                                                                                                                 1993 - Retrial Philadelhpia


lighting the set                                                                                          film
                                                                                                                      3               2                  1
                R     45                                               R     12            R    255              1
                G     91                                               G     16            G    255
                                                                                                                 2
                B     168                                              B     17            B    255


                                                                                                                                              Color
                                                                                                                 3
                                                                                                                      6               5                  4


the titles
                                                                                                                 4
                                                                                                                 5
                                                                                                                 6


                                                                                                                           Multiply


                                                                                                                                              Multiply
             Eurostile Bold Condensed                                                      Eurostile
                                                                                                                 7
                                                                                           Condensed
             This font has been
             redrawn to match the
             poster exactly.
                                                                                                                      9               8                  7
             Futura Bold                                                                   Futura Extra
                                                                                           Bold
                                                                                                                 8
                                                           TRISTAR PICTURES PRESENTS
             Univers
                                                           A CLINCA ESIETCO PRODUCTION
             39 Untra Thin
                                                           A JONATHON DEMME PICTURE
             Condensed

                                                                          “PHILADELPHIA”
                                                JASON ROBARDOS MARY STEENBUR-                                         12              11                 10

SFX
                                                                                                                 9
                                                         GEN ANTONIO BANDERAS
                                               HOWARD SHORE PHOTOGRAPHY TAk FUJIMOTO
                                         MUSIC                      DIRECTOR
                                           BY

                           PRODUCERS GARY GOETzMAN, kENNETH UTT, RON BOzMAN
                            EXECUTIVE

                                                                      BY RON NYSWANER
                                                                WRITTEN
                                                                                                                 10


                                                                                                                                                                  Color Burn
This poster is a simple poster to reproduce. A lot of time and care is
needed to create the multiple masksBYuse within the AND JONATHAN DEMME
                                                EDWARD SAXON recreation process
                                       PRODUCED


Level Adjustment layers are used to create the high BY JONATHAN DEMME
                                                           DIRECTED
                                                                 contracting male
images. Two adjustments layers are used. An under-exposed vesion and
                                                                                                                 11
an over-exposed version. The layers are masked to revel the different
tonal ranges on the faces.
                                                                                                                 12
The same process is applied to the gavel. Again great care is needed when
applying the masks.
The black background uses soft paint brushes
30                                                                                                                                                                                                                                                                                                                  31
     photoshop hollywood                                                                                                                                                                                                                                                  1993 - Retrial Philadelhpia


the script
Open the original poster philadelphia_xlg.jpg. This original file will be                                                                                   Mask the man bottom using the layer mask. Use a combination of hard
                                                                               The faces on the movie poster have quite a contrasting look. To create
the guide for setting the positioning of all the elements.                                                                                                  lines for the front of the face and soft brushes for the back of his head.
                                                                               this, you will make two adjustment layers of Levels for the face. An
                                                                               under and over exposed version and then create masks for those
Enlarge the dimensions to:
                                                                               adjustment layers to reveal the dark and light areas.
                                                                               Start by adding the two Level
                                                                               adjustment layers above the man
                                                                               top layer. Make sure you set them
                                                                               to mask the top man layer only
                                                                               (right-click on the adjustment
                                                                                                                                                                                                                                           Change the colour to black and white. Don’t change the Mode setting of
                                                                               layers in the layers pallet and
Tint the transparency of the original to 25%. This will allow you to                                                                                                                                                                       the file. Add an adjustment layer, Black & White and place it above the
                                                                               choose Create Clipping Mask...).
place the original on the top layer and be able to see the place items on                                                                                                                                                                  image layers.
the lower layers.                                                              Call each adjustment layer dark
                                                                               and light.
Create a white filled base layer
                                                                               Adjust the Levels on the light adjustment layer first. Refer below for the
Place, rotate and scale the 2 male images (5808602-5370x3580.jpg and


                                                                                                                                                                                                                                    Mask
                                                                               settings. The exposure now looks low.
4523873-4142x6213.jpg) into position. Name the top left male layer
“man top” and the other “man
bottom”
Once in position, turn the
original movie poster layer and                                                                                                                             To create a similar contrating image, you will repeat the process used on
the male bottom layer off for                                                                                                                               the top man layer. Add two Level adjustment layers. Lable them light
now.                                                                                                                                                        and dark. See the Level settings below.
Using original movie poster layer
as a reference create a mask of
                                                                                                                                                                                                                                           Place and scale the gavel image
the top man layer. Slowly paint
                                                                                                                                                                                                                                           (4066826-1287x3300.jpg) into position
the background away using a                                                    Now adjust the dark adjust layer. See the
                                                                                                                                                                                                                                           and apply a mask.
large soft brush.                                                              setting below. It is now overexposed.
                                                                                                                                                                                                                                           The image will appear in black and white
Adjust the brush opacity and
                                                                                                                                                                                                                                           as it is sitting under the Black & White
flow to create the soften effect on
                                                                                                                                                                                                                                           adjustment layer.
the mask. See the mask below on
the right.                                                                                                                                                                                                                                 The gavel will need the same Levels
                                                                                                                                                                                                                                           adjustment treatment previously used on
                                                                                                                                                                                                                                           the male images. Before this can happen,
                                                                                                                                                                                                                                           you’ll notice the subtle cityscape of
                                                                                                                                                                                                                                           Philadephia inside the gavel.
                                                                                                                                                                                                                                           Open the cityscape
                                                                                                                                                                                                                                           image (Postcard
                                                                               Using the mask on the dark adjustement layer, you will now need to
                                                                                                                                                                                                                                           Exchange.com)
                                                                               hide the overexposed areas. Refer to the original for guidance.
                                                                                                                                                                                                                                           and adjust the
                                                                                                                                                                                                                                           levels in the image
                                                                                                                                                                                                                                           to create an high
                                                                                                                                                                                                                                           contrasting black
                                                                                                                                                                                                                                           and white image.
                                                                                                                                                            Again, on the dark adjustment layer, use the mask to hide the unrequired       See right.
                                                                        Mask


                                                                                                                                                            overexposed areas. Refer again to the original poster to see the allocation
                                                                                                                      Mask


                                                                                                                                                                                                                                           Place the contrasting image into position on the main PSD poster file.
                                                                                                                                                            of dark and light areas.
32                                                                                                                                                                                                                                                                                                               33
     photoshop hollywood                                                                                                                                                                                                                                                 1993 - Retrial Philadelhpia


                                                                                                                                                                                                                                         Create another layer on top of the black layer and fill it with 50% black.
                                                                                                                                                            Set the Blending Mode to Multiply.
                                                                                                                                                                                                                                         Apply a texture to the layer, the same settings as the texture previously
                                                                                                                                                                                                                                         mentioned.
                                                                                                                                                                                                                                         This time change the blending mode to Color Burn. The texture should
                                                                                                                                                                                                                                         now look quite contrasting.


                                                                          Refer to the original poster to see how the light
                                                                          and dark elements fall on the gavel. Use the
                                                                          mask on the dark layer to hide the unwanted
                                                                          shadows.


                                                                                                                                                            Create a new layer called “black” and position it above the white bottom
                                                                                                                                                                                                                                         To fine tune the gradients apply a Level adjustment layer to the “black”
                                                                                                                                                            layer. Fill the layer with 100% black. Using the original as a guide, mask
                                                                                                                                                                                                                                         layer. Lighten the black back to reveal more detail.
                                                                                                                                                            the black where the faces are on the poster. This will allow the white
                                                                                                                                                                                                                                         See the Level setting below.
                                                                                                                                                            below to come through and create the white areas, like the original.
                                                                                                                                                            Use the soft brushes to paint the white through.

Place the City layer into the masking area of the hammer layer (right-
click on the city layer in the layers pallet and choose Create Clipping
Mask...). The city will now mask to the hammer mask below. In the city
layer, mask out the image at the bottom, so it merges into the gavel.
Set the city layer blending mode to Multiply.
Now add two Level adjustment layers above the city layer, lable them
light and dark. See the light Level setting below.

                                                                                                                                                                                                                                         Also apply a Level adjustment layer to the
                                                                                                                                                                                                                                         Texture layer. Apply the below settings. This
                                                                                                                                                                                                                                         will bring more detail to the gradients in the
                                                                                                                                                                                                                                         black background.
                                                                                                                                                     Mask


                                                                          One final element needs to be added to the gavel, a grainy texture.
                                                                          Create a new layer, called hammer texture and fill it with 50% black.
Now adjust the dark adjust layer. See the
                                                                          Apply the Filter, Texture>Grain... to the gray and place the layer below
next setting. It is now overexposed.


                                                                                                                                                                                                               Mask
                                                                          the Level adjustment layers.
34                                                                                                                                                                                                                                                                                                             35
     photoshop hollywood                                                                                                                                                                                                                                                 1993 - Retrial Philadelhpia


                                                                                                                                                                                                                                         Place the vector graphic into place on the poster and apply a color
It is now time to introduce the blue tint to the poster. Create a Solid
                                                                                                                                                                                                                                         overlay of R 120 G 12 B 26.
Color adjustment layer and choose the colour values R 45 G 91 B 168.
Move the adjustment layer the sit above the Black & White adjustment
layer. Reduce the opacity of the Solid Colour adjustment layer to 48%.


                                                                                                                                                                                                                                         That’s a wrap!


                                                                                                                                                   Mask
                                                                                                                                                          The next text sits above the main title. This typeface is Futura Bold.
                                                                          Create a new layer folder and
                                                                          call it “text”.
                                                                          This folder can sit above the
                                                                          Solid Color adjustment layer.
                                                                          Turn the movie poster original
                                                                          layer back on and reduce to
Change the blending mode to Color. This will give an even blue tint
                                                                          25% opacity.
thoughout the poster.
                                                                          Again you can use this as a
                                                                                                                                                          The final main text is the movie title. the typeface is a close match to
                                                                          guide to place the text in the
                                                                                                                                                          Eurostile Bold Condensed. You can use Eurostile or modify and redraw
                                                                          correct position.
                                                                                                                                                          the title in Illustrator.
                                                                          Add the first text. The two
                                                                          name titles along the top. Use
                                                                          the below type settings for
                                                                          both.


                                                                                                                                                          Refer to the Illustrator settings below. Use the tools within Illustrator to
                                                                                                                                                          replicate the final text.


                                                                          Now add the two sub text in the middle of the poster. This typeface is
                                                                          Futura Extra Bold.
The original has lighter areas of blue in soome parts. Use the mask on
the Solid Color adjustment layer to reduce the blue intensity. Refer to
the original as a guide.
Work in Progress Book

Weitere ähnliche Inhalte

Kürzlich hochgeladen

Low Rate Young Call Girls in Surajpur Greater Noida ✔️☆9289244007✔️☆ Female E...
Low Rate Young Call Girls in Surajpur Greater Noida ✔️☆9289244007✔️☆ Female E...Low Rate Young Call Girls in Surajpur Greater Noida ✔️☆9289244007✔️☆ Female E...
Low Rate Young Call Girls in Surajpur Greater Noida ✔️☆9289244007✔️☆ Female E...SofiyaSharma5
 
𓀤Call On 6297143586 𓀤 Ultadanga Call Girls In All Kolkata 24/7 Provide Call W...
𓀤Call On 6297143586 𓀤 Ultadanga Call Girls In All Kolkata 24/7 Provide Call W...𓀤Call On 6297143586 𓀤 Ultadanga Call Girls In All Kolkata 24/7 Provide Call W...
𓀤Call On 6297143586 𓀤 Ultadanga Call Girls In All Kolkata 24/7 Provide Call W...rahim quresi
 
Call Girl Nagpur Roshni Call 7001035870 Meet With Nagpur Escorts
Call Girl Nagpur Roshni Call 7001035870 Meet With Nagpur EscortsCall Girl Nagpur Roshni Call 7001035870 Meet With Nagpur Escorts
Call Girl Nagpur Roshni Call 7001035870 Meet With Nagpur EscortsCall Girls in Nagpur High Profile
 
Call Girls in Barasat | 7001035870 At Low Cost Cash Payment Booking
Call Girls in Barasat | 7001035870 At Low Cost Cash Payment BookingCall Girls in Barasat | 7001035870 At Low Cost Cash Payment Booking
Call Girls in Barasat | 7001035870 At Low Cost Cash Payment Bookingnoor ahmed
 
VIP Call Girls Nagpur Megha Call 7001035870 Meet With Nagpur Escorts
VIP Call Girls Nagpur Megha Call 7001035870 Meet With Nagpur EscortsVIP Call Girls Nagpur Megha Call 7001035870 Meet With Nagpur Escorts
VIP Call Girls Nagpur Megha Call 7001035870 Meet With Nagpur Escortsranjana rawat
 
Independent Sonagachi Escorts ✔ 9332606886✔ Full Night With Room Online Booki...
Independent Sonagachi Escorts ✔ 9332606886✔ Full Night With Room Online Booki...Independent Sonagachi Escorts ✔ 9332606886✔ Full Night With Room Online Booki...
Independent Sonagachi Escorts ✔ 9332606886✔ Full Night With Room Online Booki...Riya Pathan
 
5* Hotels Call Girls In Goa {{07028418221}} Call Girls In North Goa Escort Se...
5* Hotels Call Girls In Goa {{07028418221}} Call Girls In North Goa Escort Se...5* Hotels Call Girls In Goa {{07028418221}} Call Girls In North Goa Escort Se...
5* Hotels Call Girls In Goa {{07028418221}} Call Girls In North Goa Escort Se...Apsara Of India
 
Independent Hatiara Escorts ✔ 9332606886✔ Full Night With Room Online Booking...
Independent Hatiara Escorts ✔ 9332606886✔ Full Night With Room Online Booking...Independent Hatiara Escorts ✔ 9332606886✔ Full Night With Room Online Booking...
Independent Hatiara Escorts ✔ 9332606886✔ Full Night With Room Online Booking...Riya Pathan
 
👙 Kolkata Call Girls Park Circus 💫💫7001035870 Model escorts Service
👙  Kolkata Call Girls Park Circus 💫💫7001035870 Model escorts Service👙  Kolkata Call Girls Park Circus 💫💫7001035870 Model escorts Service
👙 Kolkata Call Girls Park Circus 💫💫7001035870 Model escorts Serviceanamikaraghav4
 
Verified Trusted Call Girls Tambaram Chennai ✔✔7427069034 Independent Chenna...
Verified Trusted Call Girls Tambaram Chennai ✔✔7427069034  Independent Chenna...Verified Trusted Call Girls Tambaram Chennai ✔✔7427069034  Independent Chenna...
Verified Trusted Call Girls Tambaram Chennai ✔✔7427069034 Independent Chenna... Shivani Pandey
 
↑Top Model (Kolkata) Call Girls Sonagachi ⟟ 8250192130 ⟟ High Class Call Girl...
↑Top Model (Kolkata) Call Girls Sonagachi ⟟ 8250192130 ⟟ High Class Call Girl...↑Top Model (Kolkata) Call Girls Sonagachi ⟟ 8250192130 ⟟ High Class Call Girl...
↑Top Model (Kolkata) Call Girls Sonagachi ⟟ 8250192130 ⟟ High Class Call Girl...noor ahmed
 
↑Top Model (Kolkata) Call Girls Howrah ⟟ 8250192130 ⟟ High Class Call Girl In...
↑Top Model (Kolkata) Call Girls Howrah ⟟ 8250192130 ⟟ High Class Call Girl In...↑Top Model (Kolkata) Call Girls Howrah ⟟ 8250192130 ⟟ High Class Call Girl In...
↑Top Model (Kolkata) Call Girls Howrah ⟟ 8250192130 ⟟ High Class Call Girl In...noor ahmed
 
Beautiful 😋 Call girls in Lahore 03210033448
Beautiful 😋 Call girls in Lahore 03210033448Beautiful 😋 Call girls in Lahore 03210033448
Beautiful 😋 Call girls in Lahore 03210033448ont65320
 
Book Sex Workers Available Kolkata Call Girls Service Airport Kolkata ✔ 62971...
Book Sex Workers Available Kolkata Call Girls Service Airport Kolkata ✔ 62971...Book Sex Workers Available Kolkata Call Girls Service Airport Kolkata ✔ 62971...
Book Sex Workers Available Kolkata Call Girls Service Airport Kolkata ✔ 62971...ritikasharma
 
Nayabad Call Girls ✔ 8005736733 ✔ Hot Model With Sexy Bhabi Ready For Sex At ...
Nayabad Call Girls ✔ 8005736733 ✔ Hot Model With Sexy Bhabi Ready For Sex At ...Nayabad Call Girls ✔ 8005736733 ✔ Hot Model With Sexy Bhabi Ready For Sex At ...
Nayabad Call Girls ✔ 8005736733 ✔ Hot Model With Sexy Bhabi Ready For Sex At ...aamir
 
Call Girls In Goa 9316020077 Goa Call Girl By Indian Call Girls Goa
Call Girls In Goa  9316020077 Goa  Call Girl By Indian Call Girls GoaCall Girls In Goa  9316020077 Goa  Call Girl By Indian Call Girls Goa
Call Girls In Goa 9316020077 Goa Call Girl By Indian Call Girls Goasexy call girls service in goa
 

Kürzlich hochgeladen (20)

Low Rate Young Call Girls in Surajpur Greater Noida ✔️☆9289244007✔️☆ Female E...
Low Rate Young Call Girls in Surajpur Greater Noida ✔️☆9289244007✔️☆ Female E...Low Rate Young Call Girls in Surajpur Greater Noida ✔️☆9289244007✔️☆ Female E...
Low Rate Young Call Girls in Surajpur Greater Noida ✔️☆9289244007✔️☆ Female E...
 
𓀤Call On 6297143586 𓀤 Ultadanga Call Girls In All Kolkata 24/7 Provide Call W...
𓀤Call On 6297143586 𓀤 Ultadanga Call Girls In All Kolkata 24/7 Provide Call W...𓀤Call On 6297143586 𓀤 Ultadanga Call Girls In All Kolkata 24/7 Provide Call W...
𓀤Call On 6297143586 𓀤 Ultadanga Call Girls In All Kolkata 24/7 Provide Call W...
 
Call Girl Nagpur Roshni Call 7001035870 Meet With Nagpur Escorts
Call Girl Nagpur Roshni Call 7001035870 Meet With Nagpur EscortsCall Girl Nagpur Roshni Call 7001035870 Meet With Nagpur Escorts
Call Girl Nagpur Roshni Call 7001035870 Meet With Nagpur Escorts
 
Call Girls in Barasat | 7001035870 At Low Cost Cash Payment Booking
Call Girls in Barasat | 7001035870 At Low Cost Cash Payment BookingCall Girls in Barasat | 7001035870 At Low Cost Cash Payment Booking
Call Girls in Barasat | 7001035870 At Low Cost Cash Payment Booking
 
VIP Call Girls Nagpur Megha Call 7001035870 Meet With Nagpur Escorts
VIP Call Girls Nagpur Megha Call 7001035870 Meet With Nagpur EscortsVIP Call Girls Nagpur Megha Call 7001035870 Meet With Nagpur Escorts
VIP Call Girls Nagpur Megha Call 7001035870 Meet With Nagpur Escorts
 
Independent Sonagachi Escorts ✔ 9332606886✔ Full Night With Room Online Booki...
Independent Sonagachi Escorts ✔ 9332606886✔ Full Night With Room Online Booki...Independent Sonagachi Escorts ✔ 9332606886✔ Full Night With Room Online Booki...
Independent Sonagachi Escorts ✔ 9332606886✔ Full Night With Room Online Booki...
 
5* Hotels Call Girls In Goa {{07028418221}} Call Girls In North Goa Escort Se...
5* Hotels Call Girls In Goa {{07028418221}} Call Girls In North Goa Escort Se...5* Hotels Call Girls In Goa {{07028418221}} Call Girls In North Goa Escort Se...
5* Hotels Call Girls In Goa {{07028418221}} Call Girls In North Goa Escort Se...
 
Independent Hatiara Escorts ✔ 9332606886✔ Full Night With Room Online Booking...
Independent Hatiara Escorts ✔ 9332606886✔ Full Night With Room Online Booking...Independent Hatiara Escorts ✔ 9332606886✔ Full Night With Room Online Booking...
Independent Hatiara Escorts ✔ 9332606886✔ Full Night With Room Online Booking...
 
Call Girls South Avenue Delhi WhatsApp Number 9711199171
Call Girls South Avenue Delhi WhatsApp Number 9711199171Call Girls South Avenue Delhi WhatsApp Number 9711199171
Call Girls South Avenue Delhi WhatsApp Number 9711199171
 
Call Girls Chirag Delhi Delhi WhatsApp Number 9711199171
Call Girls Chirag Delhi Delhi WhatsApp Number 9711199171Call Girls Chirag Delhi Delhi WhatsApp Number 9711199171
Call Girls Chirag Delhi Delhi WhatsApp Number 9711199171
 
Russian ℂall gIRLS In Goa 9316020077 ℂall gIRLS Service In Goa
Russian ℂall gIRLS In Goa 9316020077  ℂall gIRLS Service  In GoaRussian ℂall gIRLS In Goa 9316020077  ℂall gIRLS Service  In Goa
Russian ℂall gIRLS In Goa 9316020077 ℂall gIRLS Service In Goa
 
👙 Kolkata Call Girls Park Circus 💫💫7001035870 Model escorts Service
👙  Kolkata Call Girls Park Circus 💫💫7001035870 Model escorts Service👙  Kolkata Call Girls Park Circus 💫💫7001035870 Model escorts Service
👙 Kolkata Call Girls Park Circus 💫💫7001035870 Model escorts Service
 
Verified Trusted Call Girls Tambaram Chennai ✔✔7427069034 Independent Chenna...
Verified Trusted Call Girls Tambaram Chennai ✔✔7427069034  Independent Chenna...Verified Trusted Call Girls Tambaram Chennai ✔✔7427069034  Independent Chenna...
Verified Trusted Call Girls Tambaram Chennai ✔✔7427069034 Independent Chenna...
 
↑Top Model (Kolkata) Call Girls Sonagachi ⟟ 8250192130 ⟟ High Class Call Girl...
↑Top Model (Kolkata) Call Girls Sonagachi ⟟ 8250192130 ⟟ High Class Call Girl...↑Top Model (Kolkata) Call Girls Sonagachi ⟟ 8250192130 ⟟ High Class Call Girl...
↑Top Model (Kolkata) Call Girls Sonagachi ⟟ 8250192130 ⟟ High Class Call Girl...
 
↑Top Model (Kolkata) Call Girls Howrah ⟟ 8250192130 ⟟ High Class Call Girl In...
↑Top Model (Kolkata) Call Girls Howrah ⟟ 8250192130 ⟟ High Class Call Girl In...↑Top Model (Kolkata) Call Girls Howrah ⟟ 8250192130 ⟟ High Class Call Girl In...
↑Top Model (Kolkata) Call Girls Howrah ⟟ 8250192130 ⟟ High Class Call Girl In...
 
Beautiful 😋 Call girls in Lahore 03210033448
Beautiful 😋 Call girls in Lahore 03210033448Beautiful 😋 Call girls in Lahore 03210033448
Beautiful 😋 Call girls in Lahore 03210033448
 
Book Sex Workers Available Kolkata Call Girls Service Airport Kolkata ✔ 62971...
Book Sex Workers Available Kolkata Call Girls Service Airport Kolkata ✔ 62971...Book Sex Workers Available Kolkata Call Girls Service Airport Kolkata ✔ 62971...
Book Sex Workers Available Kolkata Call Girls Service Airport Kolkata ✔ 62971...
 
CHEAP Call Girls in Malviya Nagar, (-DELHI )🔝 9953056974🔝(=)/CALL GIRLS SERVICE
CHEAP Call Girls in  Malviya Nagar, (-DELHI )🔝 9953056974🔝(=)/CALL GIRLS SERVICECHEAP Call Girls in  Malviya Nagar, (-DELHI )🔝 9953056974🔝(=)/CALL GIRLS SERVICE
CHEAP Call Girls in Malviya Nagar, (-DELHI )🔝 9953056974🔝(=)/CALL GIRLS SERVICE
 
Nayabad Call Girls ✔ 8005736733 ✔ Hot Model With Sexy Bhabi Ready For Sex At ...
Nayabad Call Girls ✔ 8005736733 ✔ Hot Model With Sexy Bhabi Ready For Sex At ...Nayabad Call Girls ✔ 8005736733 ✔ Hot Model With Sexy Bhabi Ready For Sex At ...
Nayabad Call Girls ✔ 8005736733 ✔ Hot Model With Sexy Bhabi Ready For Sex At ...
 
Call Girls In Goa 9316020077 Goa Call Girl By Indian Call Girls Goa
Call Girls In Goa  9316020077 Goa  Call Girl By Indian Call Girls GoaCall Girls In Goa  9316020077 Goa  Call Girl By Indian Call Girls Goa
Call Girls In Goa 9316020077 Goa Call Girl By Indian Call Girls Goa
 

Empfohlen

2024 State of Marketing Report – by Hubspot
2024 State of Marketing Report – by Hubspot2024 State of Marketing Report – by Hubspot
2024 State of Marketing Report – by HubspotMarius Sescu
 
Everything You Need To Know About ChatGPT
Everything You Need To Know About ChatGPTEverything You Need To Know About ChatGPT
Everything You Need To Know About ChatGPTExpeed Software
 
Product Design Trends in 2024 | Teenage Engineerings
Product Design Trends in 2024 | Teenage EngineeringsProduct Design Trends in 2024 | Teenage Engineerings
Product Design Trends in 2024 | Teenage EngineeringsPixeldarts
 
How Race, Age and Gender Shape Attitudes Towards Mental Health
How Race, Age and Gender Shape Attitudes Towards Mental HealthHow Race, Age and Gender Shape Attitudes Towards Mental Health
How Race, Age and Gender Shape Attitudes Towards Mental HealthThinkNow
 
AI Trends in Creative Operations 2024 by Artwork Flow.pdf
AI Trends in Creative Operations 2024 by Artwork Flow.pdfAI Trends in Creative Operations 2024 by Artwork Flow.pdf
AI Trends in Creative Operations 2024 by Artwork Flow.pdfmarketingartwork
 
PEPSICO Presentation to CAGNY Conference Feb 2024
PEPSICO Presentation to CAGNY Conference Feb 2024PEPSICO Presentation to CAGNY Conference Feb 2024
PEPSICO Presentation to CAGNY Conference Feb 2024Neil Kimberley
 
Content Methodology: A Best Practices Report (Webinar)
Content Methodology: A Best Practices Report (Webinar)Content Methodology: A Best Practices Report (Webinar)
Content Methodology: A Best Practices Report (Webinar)contently
 
How to Prepare For a Successful Job Search for 2024
How to Prepare For a Successful Job Search for 2024How to Prepare For a Successful Job Search for 2024
How to Prepare For a Successful Job Search for 2024Albert Qian
 
Social Media Marketing Trends 2024 // The Global Indie Insights
Social Media Marketing Trends 2024 // The Global Indie InsightsSocial Media Marketing Trends 2024 // The Global Indie Insights
Social Media Marketing Trends 2024 // The Global Indie InsightsKurio // The Social Media Age(ncy)
 
Trends In Paid Search: Navigating The Digital Landscape In 2024
Trends In Paid Search: Navigating The Digital Landscape In 2024Trends In Paid Search: Navigating The Digital Landscape In 2024
Trends In Paid Search: Navigating The Digital Landscape In 2024Search Engine Journal
 
5 Public speaking tips from TED - Visualized summary
5 Public speaking tips from TED - Visualized summary5 Public speaking tips from TED - Visualized summary
5 Public speaking tips from TED - Visualized summarySpeakerHub
 
ChatGPT and the Future of Work - Clark Boyd
ChatGPT and the Future of Work - Clark Boyd ChatGPT and the Future of Work - Clark Boyd
ChatGPT and the Future of Work - Clark Boyd Clark Boyd
 
Getting into the tech field. what next
Getting into the tech field. what next Getting into the tech field. what next
Getting into the tech field. what next Tessa Mero
 
Google's Just Not That Into You: Understanding Core Updates & Search Intent
Google's Just Not That Into You: Understanding Core Updates & Search IntentGoogle's Just Not That Into You: Understanding Core Updates & Search Intent
Google's Just Not That Into You: Understanding Core Updates & Search IntentLily Ray
 
Time Management & Productivity - Best Practices
Time Management & Productivity -  Best PracticesTime Management & Productivity -  Best Practices
Time Management & Productivity - Best PracticesVit Horky
 
The six step guide to practical project management
The six step guide to practical project managementThe six step guide to practical project management
The six step guide to practical project managementMindGenius
 
Beginners Guide to TikTok for Search - Rachel Pearson - We are Tilt __ Bright...
Beginners Guide to TikTok for Search - Rachel Pearson - We are Tilt __ Bright...Beginners Guide to TikTok for Search - Rachel Pearson - We are Tilt __ Bright...
Beginners Guide to TikTok for Search - Rachel Pearson - We are Tilt __ Bright...RachelPearson36
 

Empfohlen (20)

2024 State of Marketing Report – by Hubspot
2024 State of Marketing Report – by Hubspot2024 State of Marketing Report – by Hubspot
2024 State of Marketing Report – by Hubspot
 
Everything You Need To Know About ChatGPT
Everything You Need To Know About ChatGPTEverything You Need To Know About ChatGPT
Everything You Need To Know About ChatGPT
 
Product Design Trends in 2024 | Teenage Engineerings
Product Design Trends in 2024 | Teenage EngineeringsProduct Design Trends in 2024 | Teenage Engineerings
Product Design Trends in 2024 | Teenage Engineerings
 
How Race, Age and Gender Shape Attitudes Towards Mental Health
How Race, Age and Gender Shape Attitudes Towards Mental HealthHow Race, Age and Gender Shape Attitudes Towards Mental Health
How Race, Age and Gender Shape Attitudes Towards Mental Health
 
AI Trends in Creative Operations 2024 by Artwork Flow.pdf
AI Trends in Creative Operations 2024 by Artwork Flow.pdfAI Trends in Creative Operations 2024 by Artwork Flow.pdf
AI Trends in Creative Operations 2024 by Artwork Flow.pdf
 
Skeleton Culture Code
Skeleton Culture CodeSkeleton Culture Code
Skeleton Culture Code
 
PEPSICO Presentation to CAGNY Conference Feb 2024
PEPSICO Presentation to CAGNY Conference Feb 2024PEPSICO Presentation to CAGNY Conference Feb 2024
PEPSICO Presentation to CAGNY Conference Feb 2024
 
Content Methodology: A Best Practices Report (Webinar)
Content Methodology: A Best Practices Report (Webinar)Content Methodology: A Best Practices Report (Webinar)
Content Methodology: A Best Practices Report (Webinar)
 
How to Prepare For a Successful Job Search for 2024
How to Prepare For a Successful Job Search for 2024How to Prepare For a Successful Job Search for 2024
How to Prepare For a Successful Job Search for 2024
 
Social Media Marketing Trends 2024 // The Global Indie Insights
Social Media Marketing Trends 2024 // The Global Indie InsightsSocial Media Marketing Trends 2024 // The Global Indie Insights
Social Media Marketing Trends 2024 // The Global Indie Insights
 
Trends In Paid Search: Navigating The Digital Landscape In 2024
Trends In Paid Search: Navigating The Digital Landscape In 2024Trends In Paid Search: Navigating The Digital Landscape In 2024
Trends In Paid Search: Navigating The Digital Landscape In 2024
 
5 Public speaking tips from TED - Visualized summary
5 Public speaking tips from TED - Visualized summary5 Public speaking tips from TED - Visualized summary
5 Public speaking tips from TED - Visualized summary
 
ChatGPT and the Future of Work - Clark Boyd
ChatGPT and the Future of Work - Clark Boyd ChatGPT and the Future of Work - Clark Boyd
ChatGPT and the Future of Work - Clark Boyd
 
Getting into the tech field. what next
Getting into the tech field. what next Getting into the tech field. what next
Getting into the tech field. what next
 
Google's Just Not That Into You: Understanding Core Updates & Search Intent
Google's Just Not That Into You: Understanding Core Updates & Search IntentGoogle's Just Not That Into You: Understanding Core Updates & Search Intent
Google's Just Not That Into You: Understanding Core Updates & Search Intent
 
How to have difficult conversations
How to have difficult conversations How to have difficult conversations
How to have difficult conversations
 
Introduction to Data Science
Introduction to Data ScienceIntroduction to Data Science
Introduction to Data Science
 
Time Management & Productivity - Best Practices
Time Management & Productivity -  Best PracticesTime Management & Productivity -  Best Practices
Time Management & Productivity - Best Practices
 
The six step guide to practical project management
The six step guide to practical project managementThe six step guide to practical project management
The six step guide to practical project management
 
Beginners Guide to TikTok for Search - Rachel Pearson - We are Tilt __ Bright...
Beginners Guide to TikTok for Search - Rachel Pearson - We are Tilt __ Bright...Beginners Guide to TikTok for Search - Rachel Pearson - We are Tilt __ Bright...
Beginners Guide to TikTok for Search - Rachel Pearson - We are Tilt __ Bright...
 

Work in Progress Book

  • 1. A CLINCA ESIETCO PRODUCTION A JONATHON DEMME PICTURE photoshop hollywood “PHILADELPHIA” JASON ROBARDOS MARY STEENBURGEN ANTONIO BANDERAS BY HOWARD SHORE PHOTOGRAPHY TAk FUJIMOTO MUSIC DIRECTOR PRODUCERS GARY GOETzMAN, kENNETH UTT, RON BOzMAN EXECUTIVE BY RON NYSWANER WRITTEN BY EDWARD SAXON AND JONATHAN DEMME PRODUCED BY JONATHAN DEMME DIRECTED ENI SANTONI • ANDY ROBINSON • JOHN Julian Fink & R M Fink and Dean Reisner RESTRICTED UNDER 17 REQUIRES ACCOMPANYING PARENT OR ADULT GUARDIAN OLOR • Warner Bros. A Kinney Company Alexander Scourby Valerie Bettis Torin Thatcher with OSCAR SAUL and JAMES GUNN VINCENT SHERMAN A BECKWORTH CORPORATION PRODUCTION A COLUMBIA PICTURE Screen Play by Produced and Directed by • • • R FILMS PRESENT A SCOTT FREE PRODUCTION A FILM BY TONY SCOTT DENZEL WASHININGTON “DEJA VU” VAL KILMER hollywood WRITTEN BY LDBERG AND JIM CAVIEZEL SUPERVISOR BOB BADAMI BY HARRY GREGSIN-WILLIAMS DESIGNER ELLEN MIROJNICK RON WOODBINE MUSIC MUSIC COSTUME HOTOGRAPHY PAUL CAMERON,ASC DIRECTORS MIKE STENSON CHAD OMAN TED ELLIOTT TERRY ROSSIO BARRY WALDMAN DIRECTOR OF EXECUTTIVE BRUCKHEIMER BY BILL MARSILII & TERRY ROSSIO BY TONY SCOTT WRITTEN DIRECTED
  • 2. by Valerie Bettis Torin Thatcher 4 5 AMES GUNNphotoshopDirected by VINCENT SHERMAN A BECKWORTH CORPORATION PRODUCTION A COLUMBIA PICTURE hollywood 1952 - Back to Trinidad Produced and • • • back to trinidad Alexander Scourby Valerie Bettis Torin Thatcher with OSCAR SAUL and JAMES GUNN VINCENT SHERMAN A BECKWORTH CORPORATION PRODUCTION A COLUMBIA PICTURE Screen Play by Produced and Directed by • • • Alexander Scourby Valerie Bettis Torin Thatcher with • •
  • 3. 6 7 photoshop hollywood 1952 - Back to Trinidad the cast This thriller drips of 1950’s style. After a brief retirement and an even briefer marriage, Rita Hayworth returned to the screen in this riveting film noir. The poster screams “Hayworth’s Back” and capitalises on the success of Hayworth and Glenn Ford’s earlier film “Gilda.” This particular style of poster has become increasingly popular in the last few years due to the seductive image of Hayworth. iStock_000006309222 1 istockphoto.com 1 5164516-1804x2712 2 Jupiter Images collection 2
  • 4. 8 9 photoshop hollywood 1952 - Back to Trinidad lighting the set film 3 2 1 R 43 R 253 R 235 G 115 G 252 G 210 B 168 B 1 B 188 overlay 1 R 202 R 165 R 4 2 G 135 G 52 G 12 6 5 4 3 B 65 B 44 B 23 4 the titles 5 6 Brody SB Regular Helvetica Neue (her “Gilda” man) 9 8 7 7 77 Bold Condensed This font has been redrawn to match the poster exactly. 8 Brody SB Regular is the font most similar to this vivid light 1950 font. multiply 9 color Alexander Scourby Valerie Bettis Torin Thatcher with Univers 10 12 11 10 39 Untra Thin OSCAR SAUL and JAMES GUNN VINCENT SHERMAN A BECKWORTH CORPORATION PRODUCTION A COLUMBIA PICTURE Condensed Screen Play by Produced and Directed by • • • 11 SFX vivid light 53% soft light 12 overlay 13 14 13 Creating this poster is all about using the power of Blending Modes applied to the image. To re-create the final texture a simple grain texture within Photoshop. The vibrant and saturated style of this 1950’s poster is added and placed on a Overlayed layer. 14 uses a combination of Vivid Light, Multiply, Overlay, Color and Soft Subtle brushstrokes of colour are applied to create the 1950’s makeup. Light modes. The whole process is fairly simple as long as the order of The main text titles have been redrawn in illustrator, Brody Sb Regular events are follwed well. type face is close but not exact. Some intersting steps are taken to create the poster. Loading the The fighting couple in the bottom right corner uses the same filters and Luminosity selection and filling it with white seems very usual, but layer blends as the main image. the replacement picture used in this re- creates an amazing effect! creation is amazing similar to the original. In reproducing the painted appearance, Blur More and Surface Blurs are
  • 5. 10 11 photoshop hollywood 1952 - Back to Trinidad the script Open the original poster affair_in_trinidad_ver2_xlg.jpg. This original Duplicate the base girl Set the foreground colour to R 186 G 33 B 34. This will file will be the guide for setting the positioning of all the elements. layer and set the top produce a red. Set the background colour to white. Now version to Overlay. Now select the newly created merged layer girl copy 4. Enlarge the dimensions to: the image will appear Go to Filter > Sketch > Photocopy. Adjust the settings as darker. below. Tint the transparency of the original to 25%. This will allow you to place the original on the top layer and be able to see the place items on the lower layers. Set the blending to Multiply to knock the white out. This step has added a subtle detail to the image. Now copy this selection to its own layer by pressing Command-J or Now add a Curve adjustment layer to the top girl copy layer only (right- Ctrl-J on PC. click on the adjustment layer in the layers pallet and choose Create Clipping Mask...). Adjust the Curves to bring back some of the detail in A new layer will now appear on top. Call the new layer girl copy 2 the over-exposed image. and set it’s blending to Vivid Light and reduce the opacity to 59% (see above). Now load the latest layer- girl copy 2 as a selection (A). (Click on the layer thumbnail and press Command or Ctrl). Create a new layer on top (call it girl copy 3) and fill the selection with white (B). A B C It has also however, added a reddish tint to the image, looking at the Rita original, its less red and more subtle greens. Add another adjustment layer to this layer only. This time add Hue and Saturation. Place, rotate and scale the female image (iStock_000006309222.jpg) Refer to the Rita original to correct the colours. See below. into position. Once in position, turn off the orginal Rita layer. Add a Surface Blur across the entire image. See the setting below, this will help create the Now set the blend on girl copy 3 to Soft Light (C). Now you need to load the luminosity of the girl copy layer as a selection. painted 1950’s appearance. To do this by pressing on Option-Command and then the Tilde key (~) Make a merged layer of all the layers. the outcome will be a new layer The next few steps involves or on a PC Ctrl-Alt and then the Tilde key. This will now bring up the comprised of all the layers, leaving the lower layers untouched. using the power of layers and selection on the layer. Hold down the Option key or the Alt key on PC and go to the blends. This will enable you Now invert the selection by pressing on Shift-Command-I or Shift- dropdown menu in the top right hand corner of the Layer Palette. to re-create this 1950’s style Ctrl-I on a PC. poster, rich and colour and Choose Merged Visible, if the Option or Alt key is held down, A merged contrast. version will now appear in the Layer Palette. Rename it girl copy 4.
  • 6. 12 13 photoshop hollywood 1952 - Back to Trinidad Rasterize the layer and duplicate the layer. Change the colour of the text Lets now look at the make-up. Your skills with the paintbrush are The texture will be presented in colour, remove this by pressing Shift- Create a new layer with a merged version of all the layers. This final layer to a 40% gray. Apply a grain texture to the gray layer, using the same needed here. Constantly refer back to the Rita original to help you place Command-U or Shift-Ctrl-U for PC. with sit above the layers below. Here you will add some subtle changes. settings as the previous page. Set the blending mode to Overlay. This will the make-up on the correct place Remove the wrinkles below the model’s eyes and blur the whole image create a nice strong grainy appearance. Apply a Blur More - 1. and amounts. Also use colour slightly to create a realistic 1950’s print. samples from the Rita original. First use the Clone tool and remove the wrinkles from her eyes. Paint the colour on a new layer Then add a slight blur using Blur More - 1 pixel using a feathered brush. Its a subtle process, use the layer opacity below, I’ve adjusted the opacity to 43%. Set the blending Mode to Color. Repeat this process with the Change the layer’s blending mode to Overlay. reamianing blue text, start with the top left. Also apply a Blur More - 1. The blue text on the middle right is slightly darker than the top left. Remember the Blur More - 1! Add the final smaller text Create a white filled base layer underneath the new merged layer. On the Using the steps on the previous pages, create the fighting couple image using Helvetica Neue 77 Bold merged layer use a mask layer to fade the bottom of the model’s dress. that appears on the bottom right. Create a new folder called fight. Scale Condensed and apply a Blur and position the image 5164516-1804x2712.jpg. More - 1. See the bottom of the Rita original poster. You have successfully brought Rita back to life after 56 years! Now its time to create the surrounding elements. Turn the Rita original layer and On a new layer paint over the reduce the opacity. Again lips. Use a red colour and again you will use it as a positional refer to the Rita original. Use the guide. painbrush to apply a strong red (sample red from Rita lips) Firstly, create a new layer and call it black box. Re-create Set this Lips layer Mode to Vivid the black box that houses the Light. Affair in Trinidad text. The Rita original has Using Univers 39 Untra Thin Condensed enter the title credits into quite a grainy position. texture. This next step will The final part of this poster is to add the main titles to the poster. As re-create this. Create a new mentioned earlier the script type does not exactly match Brody SB layer and call it grain. Fill the Regular, but is fairly close. You may chose to use Broday or trace the Rita layer will 50% gray and apply original text in Illustrator. the samples to a texture filter. go to Filter follow have been traced. > Texture > Grain. Refer to Place the vector file into Photoshop from the settings on the right and Illustrator, apply a Color Overlay use the apply. colour yellow - R 253 G 252 B1 (double click on the layer to bring up the Layer Style.)
  • 7. 1971 arring HARRY GUARDINO • RENI SANTONI • ANDY ROBINSON • JOHN Daley • Screenplay by Harry Julian Fink & R M Fink and Dean Reisner RESTRICTED UNDER 17 REQUIRES ACCOMPANYING 14 photoshop hollywood 15 PARENT OR ADULT GUARDIAN 1971 - Remaking Harry’s Day el • PANAVISION • TECHNICOLOR • Warner Bros. A Kinney Company re-making Harry’s day CLINT EASTWOOD in “DIrTy hArry” A Malpaso Company Production Co-Starring HARRY GUARDINO • RENI SANTONI • ANDY ROBINSON • JOHN LARCH and JOHN VERNON as “The Mayor” • Executive Producer Robert Daley • Screenplay by Harry Julian Fink & R M Fink and Dean Reisner RESTRICTED UNDER 17 REQUIRES ACCOMPANYING PARENT OR ADULT GUARDIAN Story by Harry Julian Fink & R M Fink • Produced and Directed by Don Siegel • PANAVISION • TECHNICOLOR • Warner Bros. A Kinney Company CLINT EASTWOOD in “DIrTy hArry” A Malpaso Company Production Co-Starring HARRY GUARDINO • RENI SANTONI • ANDY RO LARCH and JOHN VERNON as “The Mayor” • Executive Producer Robert Daley • Screenplay by Harry Julian Fink & R M Fink a
  • 8. 16 17 photoshop hollywood 1971 - Remaking Harry’s Day the cast In the year 1971, San Francisco faces the terror of a maniac known as Scorpio- who snipes at innocent victims and demands ransom through notes left at the scene of the crime. This simple yet striking design creates an instant visual energy for any passer-by. 11661039-5370x3580 1 The designer uses simple concept with dramatic angles and vivid colours. Jupiter Images collection 1 iStock_000006070838 2 istockphoto.com 2 3 iStock_000007106051 3 istockphoto.com 4 This chapter re-creates this timeless poster by combining varying greyscale tonal ranges onto separate layers and then overlaying the bold colours. 4
  • 9. 18 19 photoshop hollywood 1971 - Remaking Harry’s Day lighting the set film 3 2 1 R 212 R 250 R 2 G 115 G 225 G 8 B 142 B 104 B 19 overlay 1 6 5 4 2 the titles 3 4 Clint Eastwood Helvetica Neue 5 95 Black Dirty Harry 6 9 8 7 7 CLINT EASTWOOD in “DIrTy hArry” A Malpaso Company Production Co-Starring HARRY GUARDINO • RENI SANTONI • ANDY ROBINSON • JOHN Helvetica Neue 8 LARCH and JOHN VERNON as “The Mayor” • Executive Producer Robert Daley • Screenplay by Harry Julian Fink & R M Fink and Dean Reisner 55 Roman RESTRICTED Story by Harry Julian Fink & R M Fink • Produced and Directed by Don Siegel • PANAVISION • TECHNICOLOR • Warner Bros. A Kinney Company UNDER 17 REQUIRES ACCOMPANYING PARENT OR ADULT GUARDIAN multiply 9 SFX 10 12 11 10 11 The re-creation of this seventies poster requires a pattern to replicate Revert back to grayscale, make a selection of the black and cut an paste 12 the course printing method. The pattern is a simple four toned graphic into the original Photoshop file. repeated over the solid colours. The dodge and burn tools are used to The gun is placed into position to create the illusion the male is in create an uneven exposure range seen in the top left. A texture is also possession and aiming. applied to the main text to “dirty” and roughen the text The small image collage at the bottom is a series of images scaled and An extreme contrast alteration of the shattered glass image is used to worked together in grayscale. create the white shattered effect. The selection is acquired using the Overall this poster is a fairly simple project. A little experimentation channels, and a white fill applied. Slight masking is also used to clean with the tonal range to create the right type to black and white bitmap up any unwanted shatters. Artistic license is also applied here, using the is required. The gun is always placed on a separate layer to give more brush to extend the cracks to the edge of the poster. control when creating the bitmaps. Transforming the images to a bitmap appearance, is exactly that. Alter the contrast of the male image to create the different layers of colour, extract the image into a new file, grayscale the image, then convert to bitmap.
  • 10. 20 21 photoshop hollywood 1971 - Remaking Harry’s Day the script Open the original poster dirty_harry_xlg.jpg. This original file will be Place, rotate and scale the gun image (iStock_000006070838) into a Create a new layer below these layers and fill it with the yellow colour. new layer and create a hard-lined clipping mask around the image. the guide for setting the positioning of all the elements. Enlarge the dimensions to: Create guides to outline the main image area. To remove the white out of the layer find a suitable channel and Alt - click on the channel layer (e.g. green). This will create a selection of the image, now inverse this selection, create a new layer and fill with black or change to the red using the Layer Style and Colour Overlay. Now create another layer above the yellow and fill it with the black colour. Create a mask to cover the yellow area, that needs to be black. Save this Photoshop file. Resave this file and Save As “greyscale.psd. This Tint the transparency of the original to 25%. This will allow you to new file will create the bitmaps for the main Photoshop file. place the original on the top layer and be able to see the place items on In this new file you need to experiment with the tonal ranges to create the lower layers different levels of intensity to create the black and red colours. Place and scale the male image (11661039-5370x3580.jpg) into Convert the mode to grayscale and then to bitmap. position. Create a rough mask around the curved features on the male You can choose to leave the black layers white a solid white, make sure head. Create straight masks on the edges (use the prelaid guides). those layers are blended to Multiply mask Once all the layers are placed in the original psd file, use masking to create a similar look to the original Dirty Harry poster. See below. You’ll see the bitmap effect. Using the burn tool and levels create an Open the shattered glass image iStock_000007106051 and apply a level outcome for the red and black layers. To capture the extra black and red adjustment layer. An extreme adjustment is required here. The outcome detail on the gun, you may decide to create a second black layer. is a high contrasting selection that you can transfer into the original. Once you find the right level of black and white convert the mode back to grayscale and drag each layer into the original psd file.
  • 11. 22 23 photoshop hollywood 1971 - Remaking Harry’s Day Create a selection of the white colour (Alt-click on a colour channel and A subtle pattern now interacts against the solid colours below it. inverse) and transfer to the original psd. Position, rotate and fill with white. Use artistic license to mask and create extra shards of glass to replicate the Dirty Harry original. Use the Dodge Tool to over expose the black on the right side of the Create a new gray scale Psd file and place the Dirty Harry original in the poster. This a purely an effect to replicate the Dirty Harry poster. centre. Reduce the transparency. Again this will allow you to add, scale and manipulate the images into the correct position. Create a merge layer and add to the main Psd file. Adjust the contrast and run a texture (grain) through it. You are done. The poster needs a texture throughout to replicate the 1970s appearance. Create a new layer on top and fill it with grey (R 111 G 111 B111). Create the main text within the poster. Use Helvetica Neue 95 Black. Add the building first, scale, skew and then mask out the surrounding Apply the Filter > Texture > Grain to the layer. Apply a Desaturate to buildings. Once you are happy with the positioning adjust the contrast Once you have scaled and kerned to the right size rasterize the text this layer to remove the colour. to match the black white original version. Repeat this process with the layer, apply a texture filter (grain > horizontal) to the text and a slight remaining images. horizontal blur. Set the layer of the blend to Overlay. Apply a Pattern Overlay to the layer. Create a pattern similar to the below and apply the settings. Set the layer of text below the textured greyscale layer and reduce the transparency to 85%. Repeat this process to the sub text that ranges to the left just above the main text. Use a lighter Helvetica Neue font. The final black and white collage is a simple arrangement of highly contrasted imagery. This collage is really a sub graphic so it’s accuracy depends on much time you spend on it.
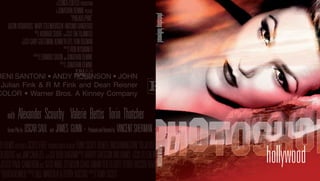
  • 12. 1993 STEENBURGEN ANTONIO BANDERAS WARD SHORE PHOTOGRAPHY TAk FUJIMOTO DIRECTOR 24 photoshop hollywood 25 1993 - Retrial Philadelhpia ETzMAN, kENNETH UTT, RON BOzMAN BY RON NYSWANER WRITTEN DWARD SAXON AND JONATHAN DEMME BY JONATHAN DEMME DIRECTED retrial philadelphia TRISTAR PICTURES PRESENTS A CLINCA ESIETCO PRODUCTION A JONATHON DEMME PICTURE “PHILADELPHIA” JASON ROBARDOS MARY STEENBURGEN ANTONIO BANDERAS BY HOWARD SHORE PHOTOGRAPHY TAk FUJIMOTO MUSIC DIRECTOR PRODUCERS GARY GOETzMAN, kENNETH UTT, RON BOzMAN EXECUTIVE BY RON NYSWANER WRITTEN BY EDWARD SAXON AND JONATHAN DEMME PRODUCED BY JONATHAN DEMME DIRECTED TRISTAR PICTURES PRESENTS A CLINCA ESIETCO PRODUCTION A JONATHON DEMME PICTURE “PHILADELPHIA” JASON ROBARDOS MARY STEENBURGEN ANTONIO BANDERAS BY HOWARD SHORE PHOTOGRAPHY TAk FUJIMOTO MUSIC DIRECTOR PRODUCERS GARY GOETzMAN, kENNETH UTT, RON BOzMAN EXECUTIVE BY RON NYSWANER WRITTEN BY EDWARD SAXON AND JONATHAN DEMME PRODUCED BY JONATHAN DEMME DIRECTED
  • 13. 26 27 photoshop hollywood 1993 - Retrial Philadelhpia the cast Te vel euipis ea facidunt ulput vel dui eriustion eumsandip eriure min hendrerat. kvlcxlkvk xvklxvk kvdskkodsfodsiofi sfiodfispod fopsdifo dsiof ofi ifds fosaodfsifo dsop aodsfioadsfiodsifodisfo ofiosdif i odfi od dof odf Um amconse diamcore do- lobor sum et lore dolorem zzrit nit luptatue velis nullan ulput accummy nullaore cons et incipsum alis eugue eugue magnim alit wisis niam zzrillum quisis alisl 4523873-4142x6213.jpg 1 ullan vel eu faccumm olorem ilissequi bla cor iliquipisi. Jupiter Images collection Volore elesto dignis nim iure modoloreet wisit pratio esed etue dt v 1 Postcard Exchange.com 2 2 4 3 5808602-5370x3580.jpg 3 Jupiter Images collection 4066826-1287x3300.jpg 4 Jupiter Images collection
  • 14. 28 29 photoshop hollywood 1993 - Retrial Philadelhpia lighting the set film 3 2 1 R 45 R 12 R 255 1 G 91 G 16 G 255 2 B 168 B 17 B 255 Color 3 6 5 4 the titles 4 5 6 Multiply Multiply Eurostile Bold Condensed Eurostile 7 Condensed This font has been redrawn to match the poster exactly. 9 8 7 Futura Bold Futura Extra Bold 8 TRISTAR PICTURES PRESENTS Univers A CLINCA ESIETCO PRODUCTION 39 Untra Thin A JONATHON DEMME PICTURE Condensed “PHILADELPHIA” JASON ROBARDOS MARY STEENBUR- 12 11 10 SFX 9 GEN ANTONIO BANDERAS HOWARD SHORE PHOTOGRAPHY TAk FUJIMOTO MUSIC DIRECTOR BY PRODUCERS GARY GOETzMAN, kENNETH UTT, RON BOzMAN EXECUTIVE BY RON NYSWANER WRITTEN 10 Color Burn This poster is a simple poster to reproduce. A lot of time and care is needed to create the multiple masksBYuse within the AND JONATHAN DEMME EDWARD SAXON recreation process PRODUCED Level Adjustment layers are used to create the high BY JONATHAN DEMME DIRECTED contracting male images. Two adjustments layers are used. An under-exposed vesion and 11 an over-exposed version. The layers are masked to revel the different tonal ranges on the faces. 12 The same process is applied to the gavel. Again great care is needed when applying the masks. The black background uses soft paint brushes
  • 15. 30 31 photoshop hollywood 1993 - Retrial Philadelhpia the script Open the original poster philadelphia_xlg.jpg. This original file will be Mask the man bottom using the layer mask. Use a combination of hard The faces on the movie poster have quite a contrasting look. To create the guide for setting the positioning of all the elements. lines for the front of the face and soft brushes for the back of his head. this, you will make two adjustment layers of Levels for the face. An under and over exposed version and then create masks for those Enlarge the dimensions to: adjustment layers to reveal the dark and light areas. Start by adding the two Level adjustment layers above the man top layer. Make sure you set them to mask the top man layer only (right-click on the adjustment Change the colour to black and white. Don’t change the Mode setting of layers in the layers pallet and Tint the transparency of the original to 25%. This will allow you to the file. Add an adjustment layer, Black & White and place it above the choose Create Clipping Mask...). place the original on the top layer and be able to see the place items on image layers. the lower layers. Call each adjustment layer dark and light. Create a white filled base layer Adjust the Levels on the light adjustment layer first. Refer below for the Place, rotate and scale the 2 male images (5808602-5370x3580.jpg and Mask settings. The exposure now looks low. 4523873-4142x6213.jpg) into position. Name the top left male layer “man top” and the other “man bottom” Once in position, turn the original movie poster layer and To create a similar contrating image, you will repeat the process used on the male bottom layer off for the top man layer. Add two Level adjustment layers. Lable them light now. and dark. See the Level settings below. Using original movie poster layer as a reference create a mask of Place and scale the gavel image the top man layer. Slowly paint (4066826-1287x3300.jpg) into position the background away using a Now adjust the dark adjust layer. See the and apply a mask. large soft brush. setting below. It is now overexposed. The image will appear in black and white Adjust the brush opacity and as it is sitting under the Black & White flow to create the soften effect on adjustment layer. the mask. See the mask below on the right. The gavel will need the same Levels adjustment treatment previously used on the male images. Before this can happen, you’ll notice the subtle cityscape of Philadephia inside the gavel. Open the cityscape image (Postcard Using the mask on the dark adjustement layer, you will now need to Exchange.com) hide the overexposed areas. Refer to the original for guidance. and adjust the levels in the image to create an high contrasting black and white image. Again, on the dark adjustment layer, use the mask to hide the unrequired See right. Mask overexposed areas. Refer again to the original poster to see the allocation Mask Place the contrasting image into position on the main PSD poster file. of dark and light areas.
  • 16. 32 33 photoshop hollywood 1993 - Retrial Philadelhpia Create another layer on top of the black layer and fill it with 50% black. Set the Blending Mode to Multiply. Apply a texture to the layer, the same settings as the texture previously mentioned. This time change the blending mode to Color Burn. The texture should now look quite contrasting. Refer to the original poster to see how the light and dark elements fall on the gavel. Use the mask on the dark layer to hide the unwanted shadows. Create a new layer called “black” and position it above the white bottom To fine tune the gradients apply a Level adjustment layer to the “black” layer. Fill the layer with 100% black. Using the original as a guide, mask layer. Lighten the black back to reveal more detail. the black where the faces are on the poster. This will allow the white See the Level setting below. below to come through and create the white areas, like the original. Use the soft brushes to paint the white through. Place the City layer into the masking area of the hammer layer (right- click on the city layer in the layers pallet and choose Create Clipping Mask...). The city will now mask to the hammer mask below. In the city layer, mask out the image at the bottom, so it merges into the gavel. Set the city layer blending mode to Multiply. Now add two Level adjustment layers above the city layer, lable them light and dark. See the light Level setting below. Also apply a Level adjustment layer to the Texture layer. Apply the below settings. This will bring more detail to the gradients in the black background. Mask One final element needs to be added to the gavel, a grainy texture. Create a new layer, called hammer texture and fill it with 50% black. Now adjust the dark adjust layer. See the Apply the Filter, Texture>Grain... to the gray and place the layer below next setting. It is now overexposed. Mask the Level adjustment layers.
  • 17. 34 35 photoshop hollywood 1993 - Retrial Philadelhpia Place the vector graphic into place on the poster and apply a color It is now time to introduce the blue tint to the poster. Create a Solid overlay of R 120 G 12 B 26. Color adjustment layer and choose the colour values R 45 G 91 B 168. Move the adjustment layer the sit above the Black & White adjustment layer. Reduce the opacity of the Solid Colour adjustment layer to 48%. That’s a wrap! Mask The next text sits above the main title. This typeface is Futura Bold. Create a new layer folder and call it “text”. This folder can sit above the Solid Color adjustment layer. Turn the movie poster original layer back on and reduce to Change the blending mode to Color. This will give an even blue tint 25% opacity. thoughout the poster. Again you can use this as a The final main text is the movie title. the typeface is a close match to guide to place the text in the Eurostile Bold Condensed. You can use Eurostile or modify and redraw correct position. the title in Illustrator. Add the first text. The two name titles along the top. Use the below type settings for both. Refer to the Illustrator settings below. Use the tools within Illustrator to replicate the final text. Now add the two sub text in the middle of the poster. This typeface is Futura Extra Bold. The original has lighter areas of blue in soome parts. Use the mask on the Solid Color adjustment layer to reduce the blue intensity. Refer to the original as a guide.