
Empfohlen
Weitere ähnliche Inhalte
Was ist angesagt?
Was ist angesagt? (20)
Ähnlich wie Gomez-softchalk How to hang drywall
Ähnlich wie Gomez-softchalk How to hang drywall (20)
Kürzlich hochgeladen
Kürzlich hochgeladen (15)
Gomez-softchalk How to hang drywall
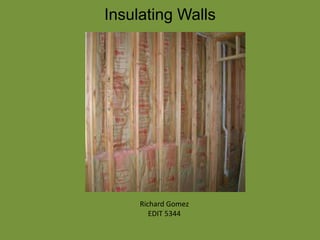
- 2. Insulating Walls • Instructor will film project on insulating a wall • Instructor will provide direct instruction on material and processes needed to complete this project. • Students will learn how to properly insulate a wall
- 3. • Project will begin by gathering tools and materials • Instructor will demonstrate techniques • Students will see process step by step • Instructor will integrate video with PowerPoint. • Instructor integrate into one presentation • Students will see final product Insulating Walls
- 4. • Project will contain cost estimate worksheet • Final product will have a breakdown of all parts sequentially Insulating Walls
- 5. Obtaining the proper materials for the job Richard Gomez EDIT 5344
- 6. • Before you begin your project, it is crucial that you have the correct materials. • Your budget will have a great impact in determining what material you use. Obtaining the proper materials for the job • We will look at various insulation and drywall options
- 7. • Insulation comes in a variety of options. There is traditional rolled or batt insulation, blown insulation, rigid insulation, liquid insulation, and loose filled. Obtaining the proper materials for the job • You must also decide what type of rolled or pre cut insulation you will use. • For this project we will concentrate on rolled or pre cut insulation.
- 8. • You should take a look at the R-value of the insulation and determine which would be best for your project. Obtaining the proper materials for the job • An R value measures how well building insulation materials, such as fiberglass insulation, resist heat. • The higher the R-value, the greater the insulation. Insulation with a higher R-value will perform better than insulation with a lower rating insulation
- 9. • 2 inch x 4 inch walls can hold R-13 or R-15 batts. 2 inch x 6 inch walls can use R-19 or R-21 products. Obtaining the proper materials for the job • For climates that are humid and hot an R value of 15 or R-21 should be used. • The choice of going with rolled or batt depends on the project. Many older homes have unique room dimensions. Batts that are pre cut in various widths can help reduce time.
- 10. Obtaining the proper materials for the job Rolled Pre cut • Here are examples of rolled and pre cut insulation
- 11. Obtaining the proper materials for the job • Drywall comes in sheets. The most common size is 4 x 8 feet. • Larger sheets are available to use so that you can reduce the number of seams. • We now take a look at drywall. • If the room you are remodeling is larger than usual, the larger sheets will be helpful.
- 12. Obtaining the proper materials for the job • Square-edged • Moisture-resistant • Here are the various types of drywall. • Foil-backed • Taper-edged • Fire-resistant • Soundproof • Abuse-resistant
- 13. Obtaining the proper materials for the job • 3/8 inch and 1/2 inch being the most common. • You must also choose how thick you want the drywall to be. • For this project, we will use ½ inch drywall.
- 14. Obtaining the proper materials for the job • We are now ready to begin!
- 17. Preparing to insulate • To begin, measure the width between wall studs. • Make sure you also measure the height of the wall. • Write down measurements on paper
- 18. Preparing to insulate • Take insulation and get one batt • Measure batt and mark off measurement with a pen. • With a box cutter, proceed to cut horizontally.
- 19. Preparing to insulate • Place batt in between studs. • Make sure that batt reaches to about ¼ inch from floor • Gently pat batt to insure that there are no air gaps
- 20. • Locate tabs on both sides of drywall. • Pull tabs out so that they can be fastened to drywall • With staple gun, gently staple tab to stud Preparing to insulate • Do not pull to hard as insulation may tear • Fasten tab to the side of the stud • Do not fasten to top of stud
- 21. Drywall • We will now look at two forms of drywall • We will go over characteristics of each one
- 22. Drywall
- 23. Installing Drywall • We will now look at installing drywall • We will go over the procedure on how to hang drywall
- 24. Installing Drywall • Once you have measured you’re the dimensions of the area you will cover, you must determine which drywall type is best. • If the area is inside the home or a building, traditional drywall will be best. • If the area will be exposed to moisture, such as a bathroom, green drywall will be best.
- 25. Installing Drywall • When working with drywall, you want to use as few as possible • The reason behind this is because you want the least amount of seams possible. • This will ensure less work later on and the wall will have a smoother appearance.
- 26. Installing Drywall • Make sure you have the tools necessary for installation • Sheets of drywall • Box Cutter • Drywall sander • Drywall jack• Drywall screws • Drill
- 27. Installing Drywall • Once you have determined how many sheets you will need it is best to have them in the within reach • Make sure than you fasten properly to avoid cracking or falling • Begin to hang drywall from the top down
- 29. Installing Drywall • After installing drywall, inspect for unevenness • Many times a stud may be warped or crooked • If you have an area that is too uneven, you may have to remove the sheet and take care of the stud. • If everything is alright, then you are ready to begin the next phase which would be tape and float.
- 30. Hope you enjoyed my presentation Have a great day !