Beginners Guide to TikTok for Search - Rachel Pearson - We are Tilt __ Bright...
Fe850r Manual Web
1. Model H-FE850R Model H-FE850R
Setup Instructions
Your Projector’s
new Best Friend
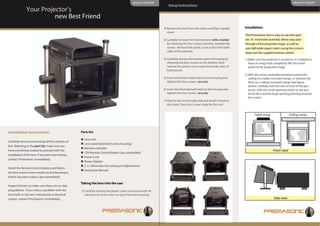
2) Remove the lens from the stand, and flip it upside Installation:
down
The Prismasonic lens is easy to use and oper-
3) Carefully remove the front element with a holder ate. It’s motorized assembly allows easy pass-
by releasing the four screws pointing towards the through of the projected image, as-well as
screen. Remove the plastic cover coats from both user-definable aspect ratio’s using the custom-
sides of the element. stops and the supplied remote control.
4) Carefully remove the bottom plate of housing by 1) Make sure the projector is turned on. It is helpful to
releasing the four screws on the bottom. Now have an image that completely fills the entire
remove the plastic cover coats from both sides of panel of the projected image.
both prisms.
2) With the motor-assembly pointing towards the
5) insert the bottom plate back to the housing and ceiling (in a table-mounted setup), or towards the
tighten the four screws securely floor (in a ceiling-mounted setup) (see figure
below) carefully hold the lens in front of the pro-
6) insert the front element back to the housing and jector, with the small opening closest to the pro-
tighten the four screws securely. jector lens and the large opening pointing towards
the screen.
7) Flip the lens to the right side and attach it back to
the stand. Your lens is now ready for the use !
Table setup Ceiling setup
Installation Instructions: Parts list:
Lens Unit
Carefully remove and unwrap all the contents of
Lens stand (attached to lens housing)
box. Referring to the part list, make sure you
Remote controller
have everything needed to proceed with the Front view
12V Remote Control Battery (pre-assembled)
installation of the lens. If any parts are missing,
Power Cord
contact Prismasonic immediately.
Power Adapter
2 x L-Wrenches (for tuning and adjustment)
Install the Remote Control battery and fasten
Instruction Manual
the four screws to the remote control housing to
hold it securely in place. (pre-assembled)
Taking the lens into the use:
Inspect the lens to make sure there are no ship-
ping defects. If you notice a problem with the 1) Carefully remove the plastic cover coats from both IR-
lens itself, or the lens’ mechanical or electrical windows of motor cover on top of the lens housing
system, contact Prismasonic immediately. Side view
2. Model H-FE850R Model H-FE850R
Setup Instructions Setup Instructions
3) Make sure the entire projected image fits centered NOTE: Open the pinstop screw of the prism, which Installation checklist:
within the two prisms. Lower, raise, and tilt the lens has a shorter travel, and close the pinstop screw of
that prism, which has a longer travel until both Remember to mount the lens close to an electrical
if necessary using the arm extension. When the
desired height and angle is reached, secure the sides operates synchronously with each other. You outlet for the motorized assembly Sit down and relax.
may have to do some iterative setting up starting
lens in place by tightening the arm-extension
screws. (See illustration for correct beam place- from point 6. Make sure that the IR window on the Remote Con- I’ll do the work for you.
ment through lens.) trol Motor Assembly can be directly or via screen
9) Take the front element and secure it to the lens accessed by the IR emitters of the remote control.
NOTE: The perfect symmetry for the projected image can body using the four screws. You may slightly have
only be achieved by tilting the lens to the direction of the to zoom in the picture after front element installa- Do not forget to install the batteries in the Remote
beam. tion. Control assembly and secure the compartment by
using the screws included window on the Remote
4) Prepare a test presentation to use with your pro- 10)Adjust focus and picture to achieve the optimum Control Motor Assembly can be directly accessed
jector, and make sure it is playing when you begin settings in “wide” mode, and note these settings by the IR emitters of the remote control.
to setup the Prismasonic lens. It is best to select for future reference.
2.35:1 aspect movie for the Cinemascope setup, Be sure your lens is secure and stable before mov-
and perform the vertical expand using the custom- ing on the “Operating Instructions”
You’re done! Now it’s as simple as using the supplied
aspect ratio controls of your media player/projec-
tor. remote control to recall the settings for the lens, and Never attempt to hold the lens in place without
the desired settings on your projector and video play- some type of secure brace. Remember the lens is
5) Carefully remove the front element with a holder back machine/ video scaler / projector. very fragile.
by releasing the four screws pointing towards the
screen, and put it in a clean, safe location.
Maintenance:
6) First move the prisms to the “pass” mode using the
supplied remote control until the prisms stop. Your Prismasonic lens was designed to require very
Make sure that the image is now rectangular and minimal cleaning. It is best to only wipe the lens
symmetrically in the centre of the 2.37:1 screen. housing with a clean, damp, soft cloth when needed.
NOTE: H-FE850R introduces some horizontal off- The prisms should ONLY be cleaned if absolutely nec-
set to the image. Offset is to the left for table essary and do so with great care.
mounted, and to the right for ceiling mounted lens.
This must be compensated by horizontally shifting
the screen in respect to the projector, or if available,
using the horizontal lens shift of projector.
Cleaning the prisms:
7) Using the remote control, press “wide” until the 1) Only used optically safe lens-cleaning solutions
prisms stop again. The tuning can be accom- and a clean, lint-free cloth certified for cleaning of
plished by manually adjusting the removable pin- delicate lens materials (available at most camera
stops inside the lens to match your screen per- shops).
fectly on both sides.
2) If dust or debris should become trapped in
NOTE: Tuning is done to the pinstop screws to
between the prisms, it is possible to open the bot-
where the prisms stop after pressing the “wide” but-
ton tom plate of the housing and clean the prisms
from the both sides. Also a small amount of “air in a
8) If the sides of picture are not opening/closing syn- can” or a hand-operated camera lens air-squeezer
chronously to each other, when switching the can be used (also available at most camera shops)
modes, tune the terminal screws to where the to blow-away this unwanted dust or debris.
prisms stop after pressing the “pass” button