Designing IA for AI - Information Architecture Conference 2024
Assignment2 B Walkthrough
1. CS193P Assignment 2B Walkthrough
Winter 2010 Cannistraro/Shaffer
CS193P: HelloPoly Walkthrough
Overview
The goal of this ‘walkthrough’ is to give you a fairly step by step path through building a simple Cocoa Touch
application. You are encouraged to follow the walkthrough, as it should help you successfully complete the
assignment, help you quickly become familiar with the tools and basic iPhone development workflow.
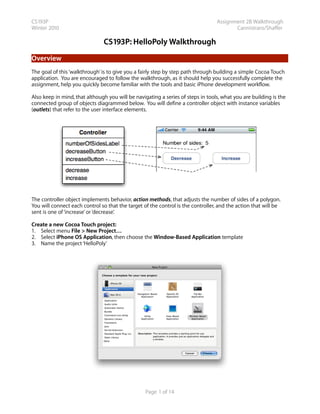
Also keep in mind, that although you will be navigating a series of steps in tools, what you are building is the
connected group of objects diagrammed below. You will define a controller object with instance variables
(outlets) that refer to the user interface elements.
The controller object implements behavior, action methods, that adjusts the number of sides of a polygon.
You will connect each control so that the target of the control is the controller, and the action that will be
sent is one of ‘increase’ or ‘decrease’.
Create a new Cocoa Touch project:
1. Select menu File > New Project…
2. Select iPhone OS Application, then choose the Window-Based Application template
3. Name the project ‘HelloPoly’
Page 1 of 14
2. CS193P Assignment 2B Walkthrough
Winter 2010 Cannistraro/Shaffer
Setting the Active SDK
For simplicity, we’ll use the iPhone Simulator in this walkthrough. When building iPhone applications you
need to tell Xcode which platform to build against. To change the Active SDK use the Project > Set Active
SDK menu item. Set this to ‘Simulator - iPhone OS 2.0’. There is also a handy toolbar popup labeled
‘Overview’ which allows for setting both the Active SDK and the Build Configuration (typically debug or
release) in one convenient location. If you choose View > Customize Toolbar... you can add this popup to the
toolbar. Many people find this the easiest way to switch SDKs while developing iPhone apps.
Checkpoint: Build and Test
The project is already set up with the skeleton of a Cocoa Touch application. Convince yourself and double
check by clicking the “Build and Go” button in the toolbar. This will build the application and then run it in
the simulator.
Note that the template we are using is nothing more than a blank view. This is the most basic starting point
template where you have to build everything yourself. Other templates provide different starting points,
depending on the intended design of your application. We will use other templates in future assignments
and examples.
Troubleshooting: If you reach this point and your application does not work as expected, please let us know.
It’s possible you selected a different project template or there may be an issue with the installation of the
iPhone SDK.
Working in Interface Builder
The empty white view that you saw when you built and ran the bare-bones iPhone application are defined in
the MainWindow.xib file. A xib file (sometimes called an “interface file” or “nib file”) contains archived objects
that you configure and connect in Interface Builder. Typically the Xcode project template will be configured
to load the file named “MainWindow.xib” at launch time. This interface file contains the main window of the
application and potentially other user interface element. At design time when a xib file is saved, objects
archive their state and store it in the file. When a xib is loaded at runtime, all the objects within it are
unarchived into live object instances and their state is restored.
Open the file MainWindow.xib by double clicking. This will launch Interface Builder. (Interface Builder is
located in /Developer/Applications).
Tip: You can select Hide Others from the Interface Builder menu to focus on just Interface Builder.
In Interface Builder we will be doing four main tasks:
1. Layout and configure the user interface
2. Define a controller class and create an instance of that class
3. Connect the user interface and controller
4. Generate source files for the new controller class
Page 2 of 14
3. CS193P Assignment 2B Walkthrough
Winter 2010 Cannistraro/Shaffer
Layout and configure the user interface
Following the steps below should give you a user interface that looks similar to:
The Library window contains a variety of objects you can drag to the window. It also provides access to media
resources (images, sounds, etc) that you may want to use in your user interface
1. In the Objects tab select the Inputs & Values item under Cocoa Touch Plugin
2. Drag two push buttons from the Library to your application’s window
3. Now drag two text labels into the app’s window. One will be for the label on the left (“Number of sides”)
and the other will be for displaying the value.
The Attributes Inspector
Show the Attributes Inspector by selecting Tools > Attributes Inspector. You use the inspector to view and
edit properties of the selected item.
Page 3 of 14
4. CS193P Assignment 2B Walkthrough
Winter 2010 Cannistraro/Shaffer
You can edit the title of the labels by editing the Text field in the Attributes Inspector, or by double clicking
directly on the label.
1. From the menu select Tools > Attributes Inspector if it is not already showing.
2. Select one of the text labels
3. Use the Text field in the inspector to set the text of the label to “Number of sides:”
4. Set the text of the other text label to “5” (the default number of sides we’ll use)
5. Double click on one of the buttons to begin editing its title
6. Set the title to “Decrease”
7. Set the title of the other button to “Increase”
The user interface elements of your application are now in place. Lay them out in the window in a pleasing
manner. Save your changes. You can build and run the project in Xcode again to verify that your interface
file is being loaded correctly.
Page 4 of 14
5. CS193P Assignment 2B Walkthrough
Winter 2010 Cannistraro/Shaffer
Defining and instantiating a class in Interface Builder
We are now going to define a custom class named Controller. It will have instance variables that reference
the two buttons and the value text label. Each reference is known as an outlet. The class will also define two
methods that will be called by the buttons known as an action.
1. In the Library, select the Controllers group (under Cocoa Touch Plugin)
2. Select the Object item. This icon represents a custom object which you define.
3. Drag the Object icon to your interface document window
4. Select the Object item in the document window
5. Use the Tools > Identity Inspector menu item to show the inspector window
6. In the Class field, type Controller. Note that the name in the document window is updated
The Identity Inspector is also where you add outlets and actions to classes. To add outlets to our custom
class:
1. Keep the ‘Controller’ object selected
2. In the Class Outlets section, add outlets with the following values for the outlet and types:
Outlet Type
numberOfSidesLabel UILabel
decreaseButton UIButton
increaseButton UIButton
3. In the Class Actions section, add two actions. Set the first action to ‘increase’ and set the second
action to ‘decrease‘.
Your inspector should look like the following:
Page 5 of 14
6. CS193P Assignment 2B Walkthrough
Winter 2010 Cannistraro/Shaffer
Connect the Controller to the UI
The Controller class is now defined and we have an instance created in our interface file, now we need to
establish connections between the controller object and the user interface controls.
Connecting the Outlets
First, we’ll connect the outlets. An outlet is a reference from one object to another.
Establish a connection from the controller to the text label by:
1. Select the Controller object in the document window.
2. Use the Tools > Connections Inspector to show the appropriate inspector. The connections inspector
shows all of the available outlets and actions for the selected object.
3. Next to each outlet and action is a “connection circle” Drag from the connection circle next to the
.
‘numberOfSidesLabel’ outlet to the text label you will use for showing the number of sides. You may note
that IB will only allow connections to objects of the type that we had specified for the outlet above
(UILabel in this case).
Page 6 of 14
7. CS193P Assignment 2B Walkthrough
Winter 2010 Cannistraro/Shaffer
4. When the destination of the drag is highlighted, release the mouse.
5. The inspector will update to reflect that the connection for the outlet is now established, as shown below.
Repeat for the remaining outlets, dragging from the controller to the appropriate user interface element.
Note that IB won’t let you connect an outlet to an object of the wrong type. For example, when connecting
the decreaseButton outlet, try connecting it to the text label. Because you specified the type of the
decreaseButton as UIButton in the Identity Inspector it will only allow you to connect the outlet to buttons.
At runtime, the controller object will have references to these controls, and will be able to send messages to
them, in our case, to set the value of the text label or to enable/disable the buttons.
Save your changes.
Connecting the buttons to a target and action
Each control is able to store references to objects, known as the control’s targets, and a method to be called
on the target, known as the action. When specific events occur while the application is running, the control
will invoke the action upon its target(s). In our application we want to connect the buttons to our Controller
object and have them invoke the increase and decrease methods when the corresponding button is
clicked. Connections for controls are set in a similar fashion to how outlets are specified. To set connect the
sliders to our controller object, do the following:
1. Select the Increase button.
2. Use the Tools > Connections Inspector if the connections inspector is already visible.
3. In the inspector you will see a list of events that the control supports. Next to each event is a connection
circle which you can drag. The event we are interested in is the “Touch Up Inside” event. Drag a
connection from the Touch Up Inside event to our Controller object. With the Controller object
highlighted, release the mouse. You have now specified the first part of the connection – the target
4. Upon releasing the mouse, a popup menu will appear showing the available action methods that can be
invoked on the target object. In this case we have two actions methods. Choose the increase
method. You have now specified the second part of the connection – the action.
5. Set the target and action of the Decrease button in the same way.
Page 7 of 14
8. CS193P Assignment 2B Walkthrough
Winter 2010 Cannistraro/Shaffer
Save your changes.
Page 8 of 14
9. CS193P Assignment 2B Walkthrough
Winter 2010 Cannistraro/Shaffer
Generate source files for the new class
The Controller class is defined in Interface Builder, but since it is a class we just created, there is currently no
Objective-C source code that defines the class. At the moment we are in a state such that when the nib file is
loaded, there will be a runtime error because an object of type Controller will want to be created, yet there is
no compiled code that defines the class.
If you’re curious to see what happens and what the failure mode is, try it. Build and run in Xcode. You should
see the application drop into the debugger and in the console you’ll see a log saying, “Unknown class
Controller in Interface Builder file.“
To generate the source files for our Controller class:
1. Select the Controller object in the document window.
2. Select the menu item File > Write Class Files...
3. A Save panel will appear. Notice the Save panel will create a header file and an Objective-C
implementation file for the class. Click Save to accept the default settings.
4. Another dialog will appear asking if you would like to add the newly created files to your project. The
dialog will list all the targets defined in the project. Our project only has a single target defined, our
HelloPoly application. Click the checkbox next to the HelloPoly target and then click the Add button
In a moment, you will switch over to Xcode to view and edit the newly created file.
Save any changes to the nib file. We are now finished defining our interface.
Page 9 of 14
10. CS193P Assignment 2B Walkthrough
Winter 2010 Cannistraro/Shaffer
Inspecting our Controller class
Switch back to Xcode.
You will notice the Controller.h and Controller.m classes are now in your project. First take a look at the
header file. Double-click Controller.h to open it in another window, or click the Editor button in the toolbar, a
single click then will show the selected file in the editor in the main project window.
Header file
The Controller.h file should look something like:
#import <UIKit/UIKit.h>
#import <Foundation/Foundation.h>
@interface Controller : /* Specify a superclass (eg: NSObject or NSView) */
{
IBOutlet UIButton *decreaseButton;
IBOutlet UIButton *increaseButton;
IBOutlet UILabel *numberOfSidesLabel;
}
- (IBAction)decrease;
- (IBAction)increase;
@end
Objective-C can look quite foreign to someone viewing it for the first time, even if familiar with C, C++, or
Java. From our previous assignment you should be able to recognize this as a custom class. Because we
created this custom class in Interface Builder, we never specified what class it inherited from. The template
header file contains a comment where the superclass name should appear. If we tried to compile this header
file the compilation would fail with a syntax error because no superclass has been specified. Replace the
comment with the word NSObject. NSObject is the base class of the Cocoa Touch class hierarchy. All objects
inherit from NSObject. Your class declaration should look like this:
@interface Controller : NSObject {
Within the curly braces you see the outlets you defined in Interface Builder, these are instance variables – and
each is literally a pointer to an object (note the UIButton *). At runtime, when the nib is loaded all of these
instance variables will have their values set according to the connections you made in Interface Builder, so
you can message these objects. But what is the meaning of the IBOutlet keyword? IBOutlet is simply a hint
to Interface Builder that the instance variable is something that should appear in the Connections Inspector
in IB. It has no meaning at compile time (it’s literally #defined as nothing so it just disappears).
You also see the declaration of the increase and decrease methods. Similar to IBOutlet, you’ll note the
IBAction keyword. This is again a hint to IB that the method is one that should appear as an action method
for an object when making target-action connections in IB. It is synonymous with void. To see for yourself
you can command-double-click on IBOutlet or IBAction (or any other keyword or method name) and Xcode
will jump to the declaration of the thing you double clicked on.
So, every outlet and action defined in Interface Builder is represented here in code.
Page 10 of 14
11. CS193P Assignment 2B Walkthrough
Winter 2010 Cannistraro/Shaffer
Implementation File
Next, open the Controller.m file.
Tip: You can jump between the header and implementation file using the Go To Counterparts button
in the directly above the text. You can change the behavior of this to switch between the two in the same
editor by adjusting Xcode > Preferences… > General > Open counterparts in same editor.
#import "Controller.h"
@implementation Controller
- (IBAction)decrease {
}
- (IBAction)increase {
}
@end
The .m file contains stubs for the implementation of the increase and decrease action methods. In
Interface Builder the buttons were set to have the controller object as its target and these methods as their
actions. Whenever one of the buttons is clicked, it will invoke the corresponding method message on the
controller object.
Checkpoint: Log, Build, and Test
Before you write the guts of the increase and decrease methods, you may want to put in a simple logging
statement in each, then build and test your application. If you’ve hooked up all the actions correctly, clicking
the buttons should display the log message in the console.
A simple log statement in Cocoa:
NSLog(@“I’m in the increase method”);
To view the console in Xcode, select the Run > Console menu item.
Troubleshooting: If your log does not appear when clicking the buttons double check the connections for
the button in IB. This is the most common mistake when using Interface Builder to specify target/actions for
controls. If you still don’t get the expected logs and the connections look correct, please let us know and
we’ll help sort out what’s wrong.
Putting the M in MVC
Up to this point we’ve been working on the V and C in MVC. The V is the user interface that we constructed
in InterfaceBuilder. The C is the Controller object that we defined in the nib file. The controller was
connected with the view using outlets and target-action. But where does the polygon come into play? Well,
that’s going to be our model, or the M.
It’s fortunate that our last assignment involved creating a polygon class. We’ll make use of that class here.
The first step is to add that class to your Xcode project. Do the following:
Page 11 of 14
12. CS193P Assignment 2B Walkthrough
Winter 2010 Cannistraro/Shaffer
1. In Xcode, select Project > Add to Project...
2. In the Open panel, navigate to your PolygonShape.h and .m files from the WhatATool project. Shift select
both files and click Add.
3. In the next panel that appears be sure to check the “Copy items into destination group’s folder (if
needed)” so that the files are copied into your project directory. Failing to do so will cause the files to not
be included with your HelloPoly project submission and will fail to build when we do grading.
Now that your PolygonShape class is part of your Xcode project we can begin using it. Because the polygon
object is our model, it holds the actual state for our polygon, namely the number of sides that the polygon
has. Our controller object needs access to this information in order to update the user interface and to
update when the user clicks the increase and decrease buttons. We need to connect the Controller to the
model object. This will be our next task.
Connect the Controller to the Model
In order to access the PolygonShape instance you will need to establish a connection between the Controller
object in the nib and the newly added PolygonShape object. At this point you’ve got all the know-how to
accomplish this task so we’ll just give a brief overview of what needs to be done:
1. Add a new instance variable outlet of type PolygonShape to your Controller class (note, you will have to
#import PolygonShape.h into your Controller.h file). Similar to the other instance variables in your
Controller class, you should specify the polygon as an IBOutlet so that it appears in the connections
inspector in IB. Note: be sure to save the Controller.h file so that IB takes note of the newly added outlet
2. In IB, drag a new custom object into the document window. Set the class to PolygonShape (hint: this is
the same as how we had initially created the Controller class). Note how Interface Builder is already
aware of the PolygonShape class as you start typing the class name.
3. Using the connections inspector in IB, establish a connection from the Controller instance to the
PolygonShape instance (hint: if the polygon outlet doesn’t appear in the connections inspector double
check that you saved Controller.h).
4. Save your nib file.
Checkpoint: Build and Run
You’ve done a lot of stuff so this would be a good time to do a quick build and make sure all the pieces are in
the right place. Build your application and make sure it still runs as expected at this point.
We’re almost done! We have all the pieces in place and now need to implement our Controller’s behavior.
There are two things we need to do: setup our initial state and implement our increase and decrease
methods.
Setting up initial state
In order to set up our initial state we need to configure our polygon with its minimum, maximum and
starting number of sides. The question is when is the right time to do this initialization. Because both the
Controller and the PolygonShape instances are created in the nib we need to have a point where we can
execute some code where both objects have been instantiated and the outlet from the controller to the
polygon has been established. Cocoa Touch defines such a hook for us to leverage, called awakeFromNib.
After all the objects in a nib have been unarchived and all connections have been established, each object
will receive an awakeFromNib method call. If you choose to implement this method in your custom classes
you can perform any setup that needs to be done. In our case we want to configure our polygon object’s
minimum, maximum and current number of sides. Your awakeFromNib method should be declared as
follows:
Page 12 of 14
13. CS193P Assignment 2B Walkthrough
Winter 2010 Cannistraro/Shaffer
- (void)awakeFromNib {
// configure your polygon here
}
Set the minimum and maximum number of sides to 3 and 12, respectively.
In order to set the numberOfSides of the polygon, we can use the value that is in text label from the UI.
Because we’re in awakeFromNib, all of the user interface elements have been loaded and our outlets
established. You can get the value of the numberOfSidesLabel field by doing:
numberOfSidesLabel.text.integerValue
Checkpoint: Build and Run
To make sure that you have all the connections set up correctly you should put a log at the end of your
awakeFromNib method and log the description of your polygon. Something like:
NSLog (@”My polygon: %@”, polygon);
Verify that your polygon is configured with the correct number of sides.
Implementing action methods
The last step is to implement our increase and decrease methods. In each case your action methods should
do the following:
1. Retrieve the current number of sides from the polygon
2. Increment or decrement the number
3. Set the new number of sides on the polygon
4. Update the user interface to reflect the new state
Updating the user interface is common behavior which you will need to do in both the increase or decrease
cases. This will involve doing three things:
1. Enable or disable the decrease button depending whether the current number of sides is greater than
the minimum number of sides the polygon allows.
2. Enable or disable the increase button depending whether the current number of sides is less than the
maximum number of sides the polygon allows.
3. Set the text of text label to indicate the current number of sides
Because this code needs to be invoked from multiple methods you should factor this code out to a common
method which both the increase and decrease methods call. Implement a method such as:
- (void)updateInterface {
// set interface state here
}
Page 13 of 14
14. CS193P Assignment 2B Walkthrough
Winter 2010 Cannistraro/Shaffer
Hints for updating the interface
• You can set the enabled property of a UIButton by setting the “enabled” property. For example,
someButton.enabled = NO;
would disable the button.
• You can set the text of a UILabel by setting the “text” property. For example,
someLabel.text = [NSString stringWithFormat:@”%d”, someNumber];
would set the text of the label to a string which displays a number.
• You may want to use the same method for updating the interface when you set up the initial state, for
example from awakeFromNib.
Build and Test
Once you have implemented the increase and decrease methods, build in Xcode, and run the
application. Verify that you can tap the increase and decrease buttons and that the text label updates
correctly. Also verify that you cannot decrease the number of sides below 3 nor above 12.
Building for an iPhone or iPod touch
Now that we have successfully built our application in the iPhone Simulator, we can try building it on a real
iPhone or iPod touch. If you have a device that is set up for development you should be able to simply set
the Active SDK to Device - iPhone OS 2.0 and then build and run. Xcode will build the application for the
device, install it and launch it. If this does not work for you, please let us know and we will help work out any
technical issues.
Reviewing Our Design
Congratulations on completing your first “real” iPhone application! Furthermore, you’ve completed a cleanly
designed Model-View-Controller application. To give an overview of the “architecture” of our application and
how the vocabulary we’ve seen so far fits into the picture, we could use a diagram like this:
Page 14 of 14