POP ART Tutorial Guide
•
0 gefällt mir•4,030 views

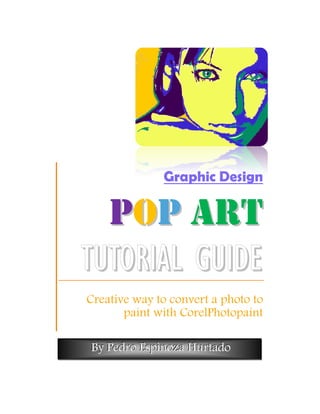
This is a Tutorial about How to Create a Pop Art portrait using CorelPhotopaint. This work shows the Super Star Angelina Jolie photo converted to paint. This is an Advanced Tutorial level designer. Guía creativa de como hacer un retrato de foto a pintura usando CorelPhotopaint aquí se muestra a la Super Star Angelina Jolie. Está escrita en Inglés. Para nivel Avanzado de manejo de Corel Photopaint.

Empfohlen
Weitere ähnliche Inhalte
Was ist angesagt?
Andere mochten auch
Andere mochten auch (17)
Ähnlich wie POP ART Tutorial Guide
Ähnlich wie POP ART Tutorial Guide (20)
Mehr von Pedro Espinoza Hurtado
Mehr von Pedro Espinoza Hurtado (15)
Kürzlich hochgeladen
Kürzlich hochgeladen (20)
POP ART Tutorial Guide
- 1. Graphic Design P OP A R T TUTORIAL GUIDE Creative way to convert a photo to paint with CorelPhotopaint By Pedro Espinoza Hurtado
- 2. POP ART /TUTORIAL GUIDE POP ART TUTORIAL GUIDE by Pedro Espinoza Hurtado 1. Menu/ Open a color image file. I suggest you to pick out your favorite movie star photo in Google and save it to your computer. Large photos are better (my Angelina is a 1024x768 pixels JPG image). 2. Duplicate the image by clicking on the photo object: right click button /duplicate selected or by dragging image object (layer) to the icon “New Object” at the bottom of the object palette and drop it there. 3. Go to Menu/Adjust/Desaturate and turn your photo into Gray Scale mode. 4. Apply Menu/Image/Transform/ Threshold (Umbral). Copy this image for your practice (191 KB 1024x768 pixels) RGB Channels A blanco Threshold: 137 Automatic Nivel Superior: 255 5. Select every grey area in the image using Magic Wand tool (W) this is upon your taste (try obtaining three areas at least) use pressing Ctrl key or Shift key for removing or adding selecting areas interchangeably. When detailing for a better whole grey well- selected area use Mask brush tool instead of Magic Wand. WARNING: Don’t forget to create a new object (layer) for every gray area 6. Use Zoom tool (Z) on selection area : left click (zoom in) and right click (zoom out) Mask Brush tool (B) can be customize upon your selecting needs to resize selection brush instantly by keeping pressing Alt key and slightly dragging the mouse forward or backward for increasing or decreasing the size brush. 2 Author: PEDRO ESPINOZA H.
- 3. POP ART /TUTORIAL GUIDE 7. After you get a whole grey area selected you must create a new object and paint it using Fill tool (F) “paint bucket” right clicking on one color in the color palette. Use the dropper tool if you need some specific color you are not using anymore but you want to restore it to apply it again at some new color selection area, it is necessary to focus in the color area where the object´s been already painted and then by clicking only once: left click for frontal color (Paint Tool) and right click (Fill Tool). 8. If it happens that you see some pixels not painted as little holes allowing seeing through them the background I recommend you to create a new object (layer) and paint it according to your harmony composition gamut to fill these spaces to get a cute visual final outcome (Objeto 8). Object Palette 5 Gray area objects + 1 gray image object + 1 original color photo background+1 "blank spaces" fill layer Copyright @ all the rights are under permission of the author. 3 Author: PEDRO ESPINOZA H.