Step By Step Guide Setting An Example With Ict
•
0 gefällt mir•291 views

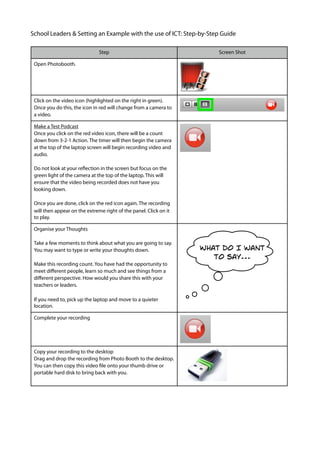
School leaders are provided with a step-by-step guide to create a video recording using Photo Booth on a Mac laptop to share lessons learned and experiences gained from professional development opportunities. The guide outlines how to open Photo Booth, start video recording using the video icon, focus on the camera light while recording, end the recording, organize thoughts before recording, and copy the finished recording to the desktop for storage and transport. The purpose is to allow school leaders to reflect on their learnings and share their perspectives with others back home.

Empfohlen
Weitere ähnliche Inhalte
Was ist angesagt?
Was ist angesagt? (20)
Andere mochten auch
Ähnlich wie Step By Step Guide Setting An Example With Ict
Ähnlich wie Step By Step Guide Setting An Example With Ict (20)
Mehr von Paviter Singh
Mehr von Paviter Singh (13)
Kürzlich hochgeladen
Kürzlich hochgeladen (20)
Step By Step Guide Setting An Example With Ict
- 1. School Leaders & Setting an Example with the use of ICT: Step-by-Step Guide Step Screen Shot Open Photobooth. Click on the video icon (highlighted on the right in green). Once you do this, the icon in red will change from a camera to a video. Make a Test Podcast Once you click on the red video icon, there will be a count down from 3-2-1 Action. The timer will then begin the camera at the top of the laptop screen will begin recording video and audio. Do not look at your reflection in the screen but focus on the green light of the camera at the top of the laptop. This will ensure that the video being recorded does not have you looking down. Once you are done, click on the red icon again. The recording will then appear on the extreme right of the panel. Click on it to play. Organise your Thoughts Take a few moments to think about what you are going to say. What do I want You may want to type or write your thoughts down. to say... Make this recording count. You have had the opportunity to meet different people, learn so much and see things from a different perspective. How would you share this with your teachers or leaders. If you need to, pick up the laptop and move to a quieter location. Complete your recording Copy your recording to the desktop Drag and drop the recording from Photo Booth to the desktop. You can then copy this video file onto your thumb drive or portable hard disk to bring back with you.