

Empfohlen
Weitere ähnliche Inhalte
Andere mochten auch
Mehr von Nitigan Nakjuatong
Mehr von Nitigan Nakjuatong (18)
Applet 7 image_j_panel
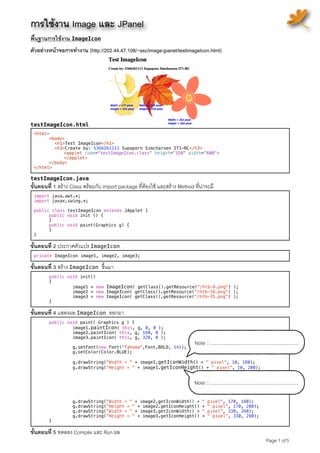
- 1. การใชงาน Image และ JPanel ssc พื้นฐานการใชงาน ImageIcon ตัวอยางหนาจอการทำงาน (http://202.44.47.108/~ssc/image-jpanel/testImageIcon.html) testImageIcon.html <html> ! <body> <h1>Test ImageIcon</h1> <h3>Create by: 5366261111 Supaporn Simcharoen IT1-RC</h3> ! ! <applet code="testImageIcon.class" height="350" width="600"> ! ! </applet> ! </body> </html> testImageIcon.java ขั้นตอนที่ 1 สราง Class พรอมกับ import package ที่ตองใช และสราง Method ที่นาจะมี import java.awt.*; import javax.swing.*; public class testImageIcon extends JApplet { ! public void init () { ! } ! public void paint(Graphics g) { ! } } ขั้นตอนที่ 2 ประกาศตัวแปร ImageIcon private ImageIcon image1, image2, image3; ขั้นตอนที่ 3 สราง ImageIcon ขึ้นมา ! public void init() ! { ! ! image1 = new ImageIcon( getClass().getResource("/htb-8.png") ); ! ! image2 = new ImageIcon( getClass().getResource("/htb-16.png") ); ! ! image3 = new ImageIcon( getClass().getResource("/htb-35.png") ); ! } ขั้นตอนที่ 4 แสดงผล ImageIcon ออกมา ! public void paint( Graphics g ) { ! ! image1.paintIcon( this, g, 0, 0 ); ! ! image2.paintIcon( this, g, 160, 0 ); ! ! image3.paintIcon( this, g, 320, 0 ); Note :: ................................................................ ! ! g.setFont(new Font("Tahoma",Font.BOLD, 14)); ! ! g.setColor(Color.BLUE); ! ! g.drawString("Width = " + image1.getIconWidth() + " pixel", 10, 180); ! ! g.drawString("Height = " + image1.getIconHeight() + " pixel", 10, 200); Note :: ................................................................ ! ! g.drawString("Width = " + image2.getIconWidth() + " pixel", 170, 180); ! ! g.drawString("Height = " + image2.getIconHeight() + " pixel", 170, 200); ! ! g.drawString("Width = " + image3.getIconWidth() + " pixel", 330, 260); ! ! g.drawString("Height = " + image3.getIconHeight() + " pixel", 330, 280); ! } ขั้นตอนที่ 5 ทดลอง Compile และ Run ผล Page 1 of 5
- 2. การใชงาน ImageIcon และ JPanel แบบ Composition ตัวอยางหนาจอการทำงาน (http://202.44.47.108/~ssc/image-jpanel/testImageJPanel.html) JPanel คือ ................................................. ............................................................................. ............................................................................. ............................................................................. ............................................................................. ............................................................................. Picture.java import java.awt.*; import javax.swing.*; public class Picture { ! private ImageIcon image; ! private int x, y; ! public Picture(String fname) { ! ! image = new ImageIcon(getClass().getResource(fname)); ! } ! public void draw( JPanel jPanel ) { ! ! image.paintIcon( jPanel , jPanel.getGraphics(), x, y ); ! } ! public void position(int x, int y) { ! ! this.x = x; ! ! this.y = y; ! } ! public void clear(JPanel jPanel) { ! ! jPanel.paint(jPanel.getGraphics()); ! } } Class Picture มีไวเพื่อ ......................................................................................................................................................... testImageJPanel.html <html> ! <body> <h1>Test Image and JPanel</h1> <h3>Create by: 5366261111 Supaporn Simcharoen IT1-RC</h3> ! ! <applet code="testImageJPanel.class" height="350" width="500"> ! ! </applet> ! </body> </html> testImageJPanel.java ขั้นตอนที่ 1 สราง Class พรอมกับ import package ที่ตองใช และสราง Method ที่นาจะมี import java.awt.*; import javax.swing.*; import java.awt.event.*; public class testImageJPanel extends JApplet implements ActionListener{ ! public void init() { ! } ! public void paint( Graphics g ) { ! } ! public void actionPerformed(ActionEvent e) { ! } } ขั้นตอนที่ 2 ประกาศคาตางๆ ! private Picture image1, image2, image3; ! private JPanel guiPanel, graphicsPanel; ! private JButton btn1, btn2, btn3, btnShow, btnClear; ! private boolean isShow = false; ! private int imageNo; Page 2 of 5
- 3. ขั้นตอนที่ 3 สรางคาเริ่มตน ! public void init() { ! ! Container c = getContentPane(); ! ! c.setLayout(new FlowLayout()); ! ! guiPanel = new JPanel(); ! ! guiPanel.setPreferredSize(new Dimension(500, 50)); ! ! guiPanel.setBorder( BorderFactory.createBevelBorder(0)); ! ! btn1 = new JButton("Flower1"); ! ! btn1.addActionListener(this); ! ! guiPanel.add(btn1); ! ! btn2 = new JButton("Flower2"); ! ! btn2.addActionListener(this); ! ! guiPanel.add(btn2); ! ! btn3 = new JButton("Flower3"); ! ! btn3.addActionListener(this); ! ! guiPanel.add(btn3); ! ! btnShow = new JButton("Show"); ! ! btnShow.addActionListener(this); ! ! guiPanel.add(btnShow); ! ! btnClear = new JButton("Clear"); ! ! btnClear.addActionListener(this); ! ! guiPanel.add(btnClear); ! ! graphicsPanel = new JPanel(); ! ! graphicsPanel.setPreferredSize(new Dimension(520, 260)); ! ! graphicsPanel.setBorder(BorderFactory.createBevelBorder(0)); ! ! c.add(guiPanel); ! ! c.add(graphicsPanel); ! ! loadImage(); ! } ! public void loadImage() ! { ! ! image1 = new Picture( "/htb-8.png" ); ! ! image2 = new Picture( "/htb-16.png" ); ! ! image3 = new Picture( "/htb-35.png" ); ! } ! public void paint( Graphics g ) ! { ! ! super.paint( g ); ! ! if (isShow) { ! ! ! switch( imageNo ) { ! ! ! ! case 1: ! ! ! ! ! image1.draw( graphicsPanel ); ! ! ! ! ! break; ! ! ! ! case 2: ! ! ! ! ! image2.draw( graphicsPanel ); ! ! ! ! ! break; ! ! ! ! case 3: ! ! ! ! ! image3.draw( graphicsPanel ); ! ! ! ! ! break; ! ! ! } ! ! } ! } ขั้นตอนที่ 4 สรางในสวนของการตรวจสอบการกระทำกับปุมตางๆ ! public void actionPerformed(ActionEvent e) { ! ! if (e.getSource() == btn1) imageNo = 1; ! ! else if (e.getSource() == btn2) imageNo = 2; ! ! else if (e.getSource() == btn3) imageNo = 3; ! ! else if (e.getSource() == btnShow) { ! ! ! if (isShow == true) { btnShow.setText("Not show"); } ! ! ! else { btnShow.setText("Show"); } ! ! ! isShow = !isShow; ! ! } ! ! else { ! ! ! imageNo = 0; ! ! ! image1.clear( graphicsPanel ); ! ! } ! ! repaint(); ! } ขั้นตอนที่ 5 ทดลอง Compile และ Run ผล Page 3 of 5
- 4. การใชงาน ImageIcon และ JPanel แบบ Inheritance กับ Timer ตัวอยางหนาจอการทำงาน (http://202.44.47.108/~ssc/image-jpanel/testAnimation.html) Animation.java import java.awt.*; import java.awt.event.*; import javax.swing.*; import javax.swing.Timer; public class Animation extends JPanel implements ActionListener { ! private int width = 400; ! private int height = 400; ! private Timer time; ! private ImageIcon image[] = new ImageIcon[5]; ! private int imageNo = 0; ! private Color color; ! public Animation() { ! ! super(); ! ! setPreferredSize( new Dimension(width, height)); ! ! setBorder( BorderFactory.createBevelBorder(0)); ! ! time = new Timer(500, this); ! ! loadImage(); ! ! color = getBackground(); ! } ! public Animation(int w, int h) { ! ! super(); ! ! width = w; ! ! height = h; ! ! setPreferredSize( new Dimension(width, height)); ! ! setBorder( BorderFactory.createBevelBorder(0)); ! ! time = new Timer(100, this); ! ! loadImage(); ! ! color = getBackground(); ! } ! private void loadImage() { ! ! for(int n = 0; n < image.length ; n++) { ! ! ! image[n] = new ImageIcon(getClass().getResource("/images/htb-"+n+".png")); ! ! } ! } ! public void play() { ! ! time.start(); ! } ! public void stop() { ! ! time.stop(); ! } ! public void actionPerformed(ActionEvent e) { ! ! nextImage(); ! ! Graphics g = getGraphics(); ! ! g.setColor(color); ! ! g.fillRect( 1, 1, width, height); ! ! image[imageNo].paintIcon( this, getGraphics(), 1, 1); ! } ! public void nextImage() { ! ! imageNo++; ! ! if (imageNo == 5) { imageNo = 0; } ! } ! protected void paintComponent(Graphics g) { ! ! super.paintComponent(g); ! } } Method loadImage มีไวเพื่อ ................................................................................................................................................ ที่ Method actionPerformed มีการทำงานอะไรบาง ................................................................................................................ ............................................................................................................................................................................................. Page 4 of 5
- 5. testAnimation.html <html> ! <body> <h1>Test Animation</h1> <h3>Create by: 5366261111 Supaporn Simcharoen IT1-RC</h3> ! ! <applet code="testAnimation.class" height="400" width="400"> ! ! </applet> ! </body> </html> testAnimation.java import java.awt.*; import java.awt.event.*; import javax.swing.*; public class testAnimation extends JApplet implements ActionListener { ! private Animation display; ! private JButton playBtn, stopBtn; ! public void init() { ! ! Container c = getContentPane(); ! ! c.setLayout(new FlowLayout()); ! ! ! ! playBtn = new JButton("Play"); ! ! playBtn.addActionListener(this); ! ! c.add(playBtn); ! ! ! ! stopBtn = new JButton("Stop"); ! ! stopBtn.addActionListener(this); ! ! c.add(stopBtn); ! ! ! ! display = new Animation(); ! ! c.add(display); ! } ! public void paint(Graphics g) { ! ! super.paint(g); ! } ! public void stop( ) { ! ! display.stop(); ! } ! public void actionPerformed(ActionEvent e) { ! ! if (e.getSource() == playBtn) { ! ! ! display.play(); ! ! ! playBtn.setEnabled(false); ! ! } ! ! else if (e.getSource() == stopBtn) { ! ! ! display.stop(); ! ! ! playBtn.setEnabled(true); ! ! } ! } } Page 5 of 5