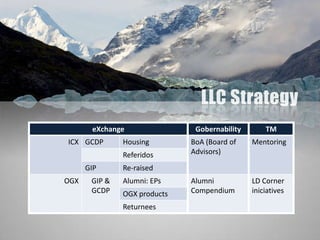
2. • Mentoring
• Portafolio de Mentees para la Red Alumni LLC (EB + Miembros
antiguos interesados en el programa TM)
• Facilitadores para desarrollo del programa
• LEC (LD Corner )
• Facilitadores (Coaching + Trainers)
• Espacios de integración: Compartir experiencias
• Comprender lineamientos
3. Housing
GCDP LLC articula
información para el LC
Referidos
(campaña LLC)
GIP
Re-raised
iniciatives
4. Manejo de cuentas
Alumni EPs
Productos OGX (oferta
GIP & de TNs para Alumni)
GCDP Definir estrategia
returnees
Centralización de la
información con
IM&COMM)
5. • BoA (Board of Advisors)
• Revisar lineamientos
• Detección necesidades LC
• Invitación
• Políticas de ex-membresía
• Actual Status:
• Cierre y compilación de documento oficial
• Considerar tiempos en ejercicio legislativo
• Régimen de Transición:
• Construcción con Red Alumni (Espacio de Co-creación)
6. • LC Events
• LLC Day 17 – 23 Junio
• EB’s Meeting Semana 10 – 16 Junio
• Key Alumni & BoA Meeting 9 Junio
• External Events
• Seminarios & Foros
• Julio - Agosto
• Aniversario Bogotá 29 – 30 Septiembre
• Seguimiento LLC Javeriana al OC buscando velar por
nuestros interes y beneficios de la Red Alumni.
• Segmentación GIP para soporte ER con el OC
• Celebración 35 años AIESEC Javeriana!
• Cena o coctel de celebración
Hinweis der Redaktion
Picture with reflected caption(Basic)To reproduce the picture effects on this slide, do the following:On the Home tab, in the Slides group, click Layout and then click Blank. On the Insert tab, in the Images group, click Picture. In the Insert Picture dialog box, select a picture, and then click Insert. Under PictureTools, on the Format tab, in the Size group, click the Size and Position dialog box launcher. In the Format Picture dialog box, resize or crop the image so that the height is set to 3.17” and the widthis set to 10”. To crop the picture, click Crop in the left pane, and in the right pane, under Crop position, enter values into the Height, Width, Left, and Top boxes. To resize the picture, click Size in the left pane, and in the right pane, under Size and rotate, enter values into the Height and Width boxes.Select the picture. On the Home tab, in the Drawing group, click Arrange, point to Align, and then do the following:Click Align to Slide. Click Align Top.Under Picture Tools, on the Format tab, in the Picture Styles group, click Picture Effects, point to Reflections, and then under Reflection Variations click Half Reflection, touching (first row, second option from the left). On the Insert tab, in the Text group, click Text Box, and then on the slide, drag to draw the text box.Enter text in the text box, select the text, and then on the Home tab, in the Font group, select Impact from the Font list and then enter 42 in the Font Size box.On the Home tab, in the Paragraph group, click Align Text Right to align the text right in the text box.Select the text box. Under Drawing Tools, on the Format tab, in the WordArt Styles group, click Text Effects, point to Reflection, and then under Reflection Variations click Half Reflection, touching (first row, second option from the left). Under Drawing Tools, on the Format tab, in the WordArt Styles group, click the Format Text Effects dialog box launcher. In the Format Text Effects dialog box, click Text Fill in the left pane, select Solid fill in the Text Fill pane, and then do the following:Click the button next to Color, and then under Theme Colors, click White, Background 1 (first row, first option from the left). In the Transparency box, enter 12%.On the slide, drag the text box onto the picture to position as needed. To reproduce the background on this slide, do the following: Right-click the slide background area, and then click Format Background. In the Format Background dialog box, click Fill in the left pane, select Gradient fill in the Fill pane, and then do the following:In the Type list, select Radial.Click the button next to Direction, and then click From Center (third option from the left).Under Gradient stops, click Add or Remove until two stops appear on the slider.Also under Gradient stops, customize the gradient stops that you added as follows:Select Stop 1 from the list, and then do the following:In the Stop position box, enter 10%.Click the button next to Color, and then under Theme Colors click White, Background 1, Darker 5% (second row, first option from the left).Select Stop 2 from the list, and then do the following: In the Stop position box, enter 99%.Click the button next to Color, and then under Theme Colors click White, Background 1, Darker 35% (fifth row, first option from the left).
Picture with reflected caption(Basic)To reproduce the picture effects on this slide, do the following:On the Home tab, in the Slides group, click Layout and then click Blank. On the Insert tab, in the Images group, click Picture. In the Insert Picture dialog box, select a picture, and then click Insert. Under PictureTools, on the Format tab, in the Size group, click the Size and Position dialog box launcher. In the Format Picture dialog box, resize or crop the image so that the height is set to 3.17” and the widthis set to 10”. To crop the picture, click Crop in the left pane, and in the right pane, under Crop position, enter values into the Height, Width, Left, and Top boxes. To resize the picture, click Size in the left pane, and in the right pane, under Size and rotate, enter values into the Height and Width boxes.Select the picture. On the Home tab, in the Drawing group, click Arrange, point to Align, and then do the following:Click Align to Slide. Click Align Top.Under Picture Tools, on the Format tab, in the Picture Styles group, click Picture Effects, point to Reflections, and then under Reflection Variations click Half Reflection, touching (first row, second option from the left). On the Insert tab, in the Text group, click Text Box, and then on the slide, drag to draw the text box.Enter text in the text box, select the text, and then on the Home tab, in the Font group, select Impact from the Font list and then enter 42 in the Font Size box.On the Home tab, in the Paragraph group, click Align Text Right to align the text right in the text box.Select the text box. Under Drawing Tools, on the Format tab, in the WordArt Styles group, click Text Effects, point to Reflection, and then under Reflection Variations click Half Reflection, touching (first row, second option from the left). Under Drawing Tools, on the Format tab, in the WordArt Styles group, click the Format Text Effects dialog box launcher. In the Format Text Effects dialog box, click Text Fill in the left pane, select Solid fill in the Text Fill pane, and then do the following:Click the button next to Color, and then under Theme Colors, click White, Background 1 (first row, first option from the left). In the Transparency box, enter 12%.On the slide, drag the text box onto the picture to position as needed. To reproduce the background on this slide, do the following: Right-click the slide background area, and then click Format Background. In the Format Background dialog box, click Fill in the left pane, select Gradient fill in the Fill pane, and then do the following:In the Type list, select Radial.Click the button next to Direction, and then click From Center (third option from the left).Under Gradient stops, click Add or Remove until two stops appear on the slider.Also under Gradient stops, customize the gradient stops that you added as follows:Select Stop 1 from the list, and then do the following:In the Stop position box, enter 10%.Click the button next to Color, and then under Theme Colors click White, Background 1, Darker 5% (second row, first option from the left).Select Stop 2 from the list, and then do the following: In the Stop position box, enter 99%.Click the button next to Color, and then under Theme Colors click White, Background 1, Darker 35% (fifth row, first option from the left).
Picture with reflected caption(Basic)To reproduce the picture effects on this slide, do the following:On the Home tab, in the Slides group, click Layout and then click Blank. On the Insert tab, in the Images group, click Picture. In the Insert Picture dialog box, select a picture, and then click Insert. Under PictureTools, on the Format tab, in the Size group, click the Size and Position dialog box launcher. In the Format Picture dialog box, resize or crop the image so that the height is set to 3.17” and the widthis set to 10”. To crop the picture, click Crop in the left pane, and in the right pane, under Crop position, enter values into the Height, Width, Left, and Top boxes. To resize the picture, click Size in the left pane, and in the right pane, under Size and rotate, enter values into the Height and Width boxes.Select the picture. On the Home tab, in the Drawing group, click Arrange, point to Align, and then do the following:Click Align to Slide. Click Align Top.Under Picture Tools, on the Format tab, in the Picture Styles group, click Picture Effects, point to Reflections, and then under Reflection Variations click Half Reflection, touching (first row, second option from the left). On the Insert tab, in the Text group, click Text Box, and then on the slide, drag to draw the text box.Enter text in the text box, select the text, and then on the Home tab, in the Font group, select Impact from the Font list and then enter 42 in the Font Size box.On the Home tab, in the Paragraph group, click Align Text Right to align the text right in the text box.Select the text box. Under Drawing Tools, on the Format tab, in the WordArt Styles group, click Text Effects, point to Reflection, and then under Reflection Variations click Half Reflection, touching (first row, second option from the left). Under Drawing Tools, on the Format tab, in the WordArt Styles group, click the Format Text Effects dialog box launcher. In the Format Text Effects dialog box, click Text Fill in the left pane, select Solid fill in the Text Fill pane, and then do the following:Click the button next to Color, and then under Theme Colors, click White, Background 1 (first row, first option from the left). In the Transparency box, enter 12%.On the slide, drag the text box onto the picture to position as needed. To reproduce the background on this slide, do the following: Right-click the slide background area, and then click Format Background. In the Format Background dialog box, click Fill in the left pane, select Gradient fill in the Fill pane, and then do the following:In the Type list, select Radial.Click the button next to Direction, and then click From Center (third option from the left).Under Gradient stops, click Add or Remove until two stops appear on the slider.Also under Gradient stops, customize the gradient stops that you added as follows:Select Stop 1 from the list, and then do the following:In the Stop position box, enter 10%.Click the button next to Color, and then under Theme Colors click White, Background 1, Darker 5% (second row, first option from the left).Select Stop 2 from the list, and then do the following: In the Stop position box, enter 99%.Click the button next to Color, and then under Theme Colors click White, Background 1, Darker 35% (fifth row, first option from the left).
Picture with reflected caption(Basic)To reproduce the picture effects on this slide, do the following:On the Home tab, in the Slides group, click Layout and then click Blank. On the Insert tab, in the Images group, click Picture. In the Insert Picture dialog box, select a picture, and then click Insert. Under PictureTools, on the Format tab, in the Size group, click the Size and Position dialog box launcher. In the Format Picture dialog box, resize or crop the image so that the height is set to 3.17” and the widthis set to 10”. To crop the picture, click Crop in the left pane, and in the right pane, under Crop position, enter values into the Height, Width, Left, and Top boxes. To resize the picture, click Size in the left pane, and in the right pane, under Size and rotate, enter values into the Height and Width boxes.Select the picture. On the Home tab, in the Drawing group, click Arrange, point to Align, and then do the following:Click Align to Slide. Click Align Top.Under Picture Tools, on the Format tab, in the Picture Styles group, click Picture Effects, point to Reflections, and then under Reflection Variations click Half Reflection, touching (first row, second option from the left). On the Insert tab, in the Text group, click Text Box, and then on the slide, drag to draw the text box.Enter text in the text box, select the text, and then on the Home tab, in the Font group, select Impact from the Font list and then enter 42 in the Font Size box.On the Home tab, in the Paragraph group, click Align Text Right to align the text right in the text box.Select the text box. Under Drawing Tools, on the Format tab, in the WordArt Styles group, click Text Effects, point to Reflection, and then under Reflection Variations click Half Reflection, touching (first row, second option from the left). Under Drawing Tools, on the Format tab, in the WordArt Styles group, click the Format Text Effects dialog box launcher. In the Format Text Effects dialog box, click Text Fill in the left pane, select Solid fill in the Text Fill pane, and then do the following:Click the button next to Color, and then under Theme Colors, click White, Background 1 (first row, first option from the left). In the Transparency box, enter 12%.On the slide, drag the text box onto the picture to position as needed. To reproduce the background on this slide, do the following: Right-click the slide background area, and then click Format Background. In the Format Background dialog box, click Fill in the left pane, select Gradient fill in the Fill pane, and then do the following:In the Type list, select Radial.Click the button next to Direction, and then click From Center (third option from the left).Under Gradient stops, click Add or Remove until two stops appear on the slider.Also under Gradient stops, customize the gradient stops that you added as follows:Select Stop 1 from the list, and then do the following:In the Stop position box, enter 10%.Click the button next to Color, and then under Theme Colors click White, Background 1, Darker 5% (second row, first option from the left).Select Stop 2 from the list, and then do the following: In the Stop position box, enter 99%.Click the button next to Color, and then under Theme Colors click White, Background 1, Darker 35% (fifth row, first option from the left).
Picture with reflected caption(Basic)To reproduce the picture effects on this slide, do the following:On the Home tab, in the Slides group, click Layout and then click Blank. On the Insert tab, in the Images group, click Picture. In the Insert Picture dialog box, select a picture, and then click Insert. Under PictureTools, on the Format tab, in the Size group, click the Size and Position dialog box launcher. In the Format Picture dialog box, resize or crop the image so that the height is set to 3.17” and the widthis set to 10”. To crop the picture, click Crop in the left pane, and in the right pane, under Crop position, enter values into the Height, Width, Left, and Top boxes. To resize the picture, click Size in the left pane, and in the right pane, under Size and rotate, enter values into the Height and Width boxes.Select the picture. On the Home tab, in the Drawing group, click Arrange, point to Align, and then do the following:Click Align to Slide. Click Align Top.Under Picture Tools, on the Format tab, in the Picture Styles group, click Picture Effects, point to Reflections, and then under Reflection Variations click Half Reflection, touching (first row, second option from the left). On the Insert tab, in the Text group, click Text Box, and then on the slide, drag to draw the text box.Enter text in the text box, select the text, and then on the Home tab, in the Font group, select Impact from the Font list and then enter 42 in the Font Size box.On the Home tab, in the Paragraph group, click Align Text Right to align the text right in the text box.Select the text box. Under Drawing Tools, on the Format tab, in the WordArt Styles group, click Text Effects, point to Reflection, and then under Reflection Variations click Half Reflection, touching (first row, second option from the left). Under Drawing Tools, on the Format tab, in the WordArt Styles group, click the Format Text Effects dialog box launcher. In the Format Text Effects dialog box, click Text Fill in the left pane, select Solid fill in the Text Fill pane, and then do the following:Click the button next to Color, and then under Theme Colors, click White, Background 1 (first row, first option from the left). In the Transparency box, enter 12%.On the slide, drag the text box onto the picture to position as needed. To reproduce the background on this slide, do the following: Right-click the slide background area, and then click Format Background. In the Format Background dialog box, click Fill in the left pane, select Gradient fill in the Fill pane, and then do the following:In the Type list, select Radial.Click the button next to Direction, and then click From Center (third option from the left).Under Gradient stops, click Add or Remove until two stops appear on the slider.Also under Gradient stops, customize the gradient stops that you added as follows:Select Stop 1 from the list, and then do the following:In the Stop position box, enter 10%.Click the button next to Color, and then under Theme Colors click White, Background 1, Darker 5% (second row, first option from the left).Select Stop 2 from the list, and then do the following: In the Stop position box, enter 99%.Click the button next to Color, and then under Theme Colors click White, Background 1, Darker 35% (fifth row, first option from the left).
Picture with reflected caption(Basic)To reproduce the picture effects on this slide, do the following:On the Home tab, in the Slides group, click Layout and then click Blank. On the Insert tab, in the Images group, click Picture. In the Insert Picture dialog box, select a picture, and then click Insert. Under PictureTools, on the Format tab, in the Size group, click the Size and Position dialog box launcher. In the Format Picture dialog box, resize or crop the image so that the height is set to 3.17” and the widthis set to 10”. To crop the picture, click Crop in the left pane, and in the right pane, under Crop position, enter values into the Height, Width, Left, and Top boxes. To resize the picture, click Size in the left pane, and in the right pane, under Size and rotate, enter values into the Height and Width boxes.Select the picture. On the Home tab, in the Drawing group, click Arrange, point to Align, and then do the following:Click Align to Slide. Click Align Top.Under Picture Tools, on the Format tab, in the Picture Styles group, click Picture Effects, point to Reflections, and then under Reflection Variations click Half Reflection, touching (first row, second option from the left). On the Insert tab, in the Text group, click Text Box, and then on the slide, drag to draw the text box.Enter text in the text box, select the text, and then on the Home tab, in the Font group, select Impact from the Font list and then enter 42 in the Font Size box.On the Home tab, in the Paragraph group, click Align Text Right to align the text right in the text box.Select the text box. Under Drawing Tools, on the Format tab, in the WordArt Styles group, click Text Effects, point to Reflection, and then under Reflection Variations click Half Reflection, touching (first row, second option from the left). Under Drawing Tools, on the Format tab, in the WordArt Styles group, click the Format Text Effects dialog box launcher. In the Format Text Effects dialog box, click Text Fill in the left pane, select Solid fill in the Text Fill pane, and then do the following:Click the button next to Color, and then under Theme Colors, click White, Background 1 (first row, first option from the left). In the Transparency box, enter 12%.On the slide, drag the text box onto the picture to position as needed. To reproduce the background on this slide, do the following: Right-click the slide background area, and then click Format Background. In the Format Background dialog box, click Fill in the left pane, select Gradient fill in the Fill pane, and then do the following:In the Type list, select Radial.Click the button next to Direction, and then click From Center (third option from the left).Under Gradient stops, click Add or Remove until two stops appear on the slider.Also under Gradient stops, customize the gradient stops that you added as follows:Select Stop 1 from the list, and then do the following:In the Stop position box, enter 10%.Click the button next to Color, and then under Theme Colors click White, Background 1, Darker 5% (second row, first option from the left).Select Stop 2 from the list, and then do the following: In the Stop position box, enter 99%.Click the button next to Color, and then under Theme Colors click White, Background 1, Darker 35% (fifth row, first option from the left).