Screen Capturing Basics
•
0 gefällt mir•138 views

This is a basic How to help sheet for those who wish to screen capture with Screencast-o-matic.

Empfohlen
Weitere ähnliche Inhalte
Was ist angesagt?
Was ist angesagt? (20)
Ähnlich wie Screen Capturing Basics
Ähnlich wie Screen Capturing Basics (20)
Mehr von John Allan
Mehr von John Allan (20)
Kürzlich hochgeladen
Kürzlich hochgeladen (20)
Screen Capturing Basics
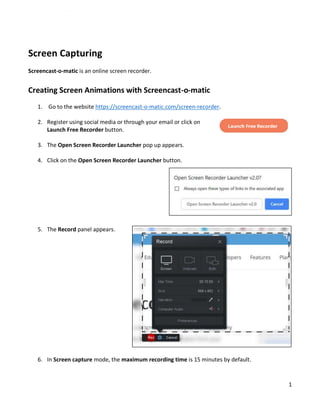
- 1. 1 Screen Capturing Screencast-o-matic is an online screen recorder. Creating Screen Animations with Screencast-o-matic 1. Go to the website https://screencast-o-matic.com/screen-recorder. 2. Register using social media or through your email or click on Launch Free Recorder button. 3. The Open Screen Recorder Launcher pop up appears. 4. Click on the Open Screen Recorder Launcher button. 5. The Record panel appears. 6. In Screen capture mode, the maximum recording time is 15 minutes by default.
- 2. 2 7. To change the size of the screen area to be captured, click on the Size option. 8. Drag the Resizing nodes to resize the capture area if necessary. 9. To select a microphone, click on the Narration option. 10. Choose a microphone from your device or laptop. 11. The free version of Screencast-o-matic does not capture Computer audio.
- 3. 3 12. To enable more control over the screen capturing process, click on the Preferences button at the bottom of the panel. 13. To move the screen capture area, drag the capture border into position. 14. Click on the Rec button to start recording. 15. To capture a web camera session, click on the Webcam icon.
- 4. 4 16. Make option settings (as above). 17. Click on the Rec button to start recording. 18. To capture both a screen and a web camera session, click on the Both icon.
- 5. 5 19. Click on the Rec button to start recording. 20. After the session is over, click on the Pause button. 21. Click on the Done button on the Record bar. Note: The What’s Next? Pop-up appears. 22. Click on Save / Upload. 23. To publish the video, choose one of the options: Video file, Screencast-O-matic server, or YouTube. 24. If Video File is chosen, these options appear. 25. Choose your preferred settings. 26. Click on the Publish button. 27. Close the Screencast-O-Matic app.