Make a Mind Map with Mindmeister
•
1 gefällt mir•740 views

This is a worksheet that students and teachers can use to practice and learn the basics of the tool Mind Meister.

Empfohlen
Weitere ähnliche Inhalte
Was ist angesagt?
Ähnlich wie Make a Mind Map with Mindmeister
Ähnlich wie Make a Mind Map with Mindmeister (20)
Mehr von John Allan
Mehr von John Allan (20)
Kürzlich hochgeladen
Kürzlich hochgeladen (20)
Make a Mind Map with Mindmeister
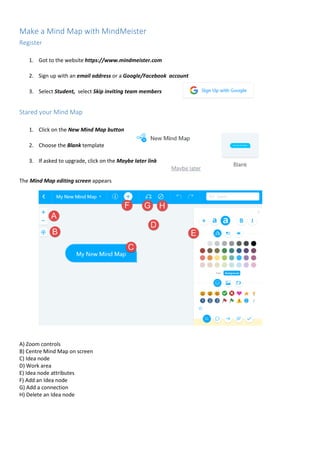
- 1. Make a Mind Map with MindMeister Register 1. Got to the website https://www.mindmeister.com 2. Sign up with an email address or a Google/Facebook account 3. Select Student, select Skip inviting team members Stared your Mind Map 1. Click on the New Mind Map button 2. Choose the Blank template 3. If asked to upgrade, click on the Maybe later link The Mind Map editing screen appears A) Zoom controls B) Centre Mind Map on screen C) Idea node D) Work area E) Idea node attributes F) Add an Idea node G) Add a connection H) Delete an Idea node
- 2. Make a Mind Map with MindMeister 4. Click on the node My New Mind Map 5. Type in your topic 6. Click on the Add and idea button 7. A new node appears, type some text 8. Repeat steps 6 and 7 for each category 9. To remove a node, click on it 10. Select the Delete an idea button 11. The node disappears 12. To change the category node, click on it
- 3. Make a Mind Map with MindMeister 13. Type the new text 14. To add subcategory items, select a category node, click on the Add and idea button 15. Type text 16. Repeat this process until your Mind Map is complete 17. Attributes of the elements of a Mind Map can be changed by selecting the item on the work area, then choosing options in the sidebar 18. For our purposes, we will not be using these in our assignments 19. With the free version the download or export options do not work 20. Type snip in the Cortana search box 21. Choose the Snipping Tool icon that appears 22. Click New
- 4. Make a Mind Map with MindMeister 23. Highlight around (draw a rectangle) your Mind Map 24. Click File, Save as… 25. Type a name for the Mind Map (example: John’s Learning Style Mind Map) 26. Click Save 27. Close the Snipping Tool window Consider upgrading to have more features and more dynamic results.