

Empfohlen
Weitere ähnliche Inhalte
Andere mochten auch
Andere mochten auch (13)
Ähnlich wie Mahara, Student set up guide
Ähnlich wie Mahara, Student set up guide (20)
Mehr von Moodle Mahara Meetup
Mehr von Moodle Mahara Meetup (12)
Kürzlich hochgeladen
Kürzlich hochgeladen (20)
Mahara, Student set up guide
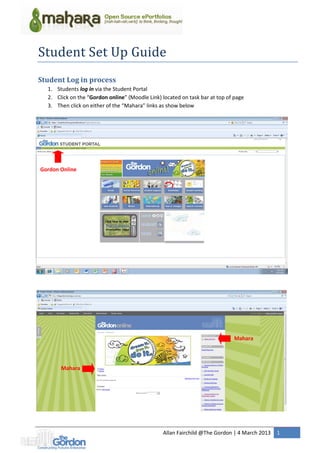
- 1. Allan Fairchild @The Gordon | 4 March 2013 1 Student Set Up Guide Student Log in process 1. Students log in via the Student Portal 2. Click on the “Gordon online” (Moodle Link) located on task bar at top of page 3. Then click on either of the “Mahara” links as show below Gordon Online Mahara Mahara
- 2. Allan Fairchild @The Gordon | 4 March 2013 2 Navigation 1. Once in Mahara, the Home button is the key navigation area to access different functions Profile 1. After first log in, students should setup their profile by clicking on Profile View edit button in the My Portfolio tab 2. Then upload a photo image of yourself for your profile 3. And then add some interesting details about yourself or the project that you will be working on You will be invited to a Group 1. The facilitator will invite you to join the Group relevant to your course or project or you can request to join a Group from the Share and network link on Home tab 2. If Invited to join a Group an email will be sent to you 3. On top right side of page, above My Groups, click on the Group Invitation link and accept Student acceptance as friend 1. Once you have been invited as a friend, Mahara will issue an email 2. Click on email link to log in to Mahara 3. Click on ‘Pending Friend’ link on top right side of page 4. To accept as Friend click on ‘Approve Request’
- 3. Allan Fairchild @The Gordon | 4 March 2013 3 Blogs 1. Click on ‘My Portfolio’ 2. Then click on ‘My Blogs’ tab 3. Create a blog and make a post Opening a view 1. Log in to Mahara 2. Click on the group name of your project from ‘Home’ or switch to ’Group’ 3. Then click on the ‘View’ tab and select the view for your project and open link Copying an template view 1. Log in to Mahara, 2. Then click on ‘My Portfolio’ tab along top of page 3. Click on the green tab ‘copy a view’ top of page 4. Select the required ‘view ’ and click on green tab ‘copy view’ 5. You can customise page or click next to save as is (This can be customised later) 6. In the green tab at bottom of page, click Next: Edit tile and description 7. To change the view name select ‘Copy of selected view template’ in View Title * box and rename to ‘project view name’ i.e. remove the ‘copy to’ from file name. You can also add description in the View Description box if required 8. Then click Next: Edit Access (will be discussed in class on day of training) 9. Finally click on Save Inviting other friends within the Group 1. Log in to Mahara 2. Click on the ‘Group’ tab along top of page or select from the Share and network link on Home tab 3. Then click on ‘Find Friends’ 4. After Friend found, click on ‘Send friend Request’ 5. This will generate an email to the requested friend asking them to be your friend 6. Once the invited Friend has accepted, you can communicate with them and share information like photos that have been uploaded on your site (works similar to Facebook but is a private network with each Group site) 7. Students are reminded that material on a friends site is not for the purpose of copying and can only be used with the permission of the originator Uploading files and photos to your site (called artefacts) 1. Log in to Mahara, 2. Click on the ‘group name’ on right hand side of page under the heading ‘My Groups’ 3. Then click on the ‘Files’ tab 4. Click on ‘Upload Files’ on the grey tab and use the browse command to locate and upload files or photos. Ensure that you tick the copyright notice check box. Photos should be compressed to between 80-150kb max per image. Maximum total file storage size is limited to 100mb per user 5. Once files or photos are uploaded, click on the ‘edit this view link’ and then the ‘configure this block’ icon next to the red arrow shown below for the block that you wish to add files to 6. Then click select on the files that you wish to upload and then save once completed 7. Documents will now be displayed in your site view
- 4. Allan Fairchild @The Gordon | 4 March 2013 4 Editing files and layouts 1. To edit files and layout click on the My Portfolio tab 2. In the selected group, click on “edit content and layout” 3. To edit files within a folder click on the edit icon next to the red arrow Student Notes