ICDL Advanced Excel 2010 - Tutorial
•
9 gefällt mir•5,194 views

ECDL / ICDL Advanced Excel 2010 Tutorial - AM4 is a high level certification programme which presents candidates with the opportunity to bring their spreadsheet skills to an expert level. Individuals with ECDL / ICDL Advanced Spreadsheets certified skills can: Produce higher quality information Pinpoint key information quicker and more easily Provide more sharply-defined analysis Produce more sophisticated reports Use advanced editing, data handling, functions and analysis features Use macros within the spreadsheets application

Empfohlen
Weitere ähnliche Inhalte
Was ist angesagt?
Was ist angesagt? (20)
Andere mochten auch
Andere mochten auch (20)
Ähnlich wie ICDL Advanced Excel 2010 - Tutorial
Ähnlich wie ICDL Advanced Excel 2010 - Tutorial (20)
Mehr von Michael Lew
Mehr von Michael Lew (14)
Kürzlich hochgeladen
Kürzlich hochgeladen (20)
ICDL Advanced Excel 2010 - Tutorial
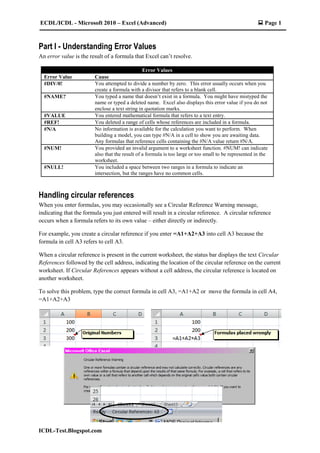
- 1. ECDL/ICDL - Microsoft 2010 – Excel (Advanced) Page 1 ICDL-Test.Blogspot.com Part I - Understanding Error Values An error value is the result of a formula that Excel can’t resolve. Error Values Error Value Cause #DIV/0! You attempted to divide a number by zero. This error usually occurs when you create a formula with a divisor that refers to a blank cell. #NAME? You typed a name that doesn’t exist in a formula. You might have mistyped the name or typed a deleted name. Excel also displays this error value if you do not enclose a text string in quotation marks. #VALUE You entered mathematical formula that refers to a text entry. #REF! You deleted a range of cells whose references are included in a formula. #N/A No information is available for the calculation you want to perform. When building a model, you can type #N/A in a cell to show you are awaiting data. Any formulas that reference cells containing the #N/A value return #N/A. #NUM! You provided an invalid argument to a worksheet function. #NUM! can indicate also that the result of a formula is too large or too small to be represented in the worksheet. #NULL! You included a space between two ranges in a formula to indicate an intersection, but the ranges have no common cells. Handling circular references When you enter formulas, you may occasionally see a Circular Reference Warning message, indicating that the formula you just entered will result in a circular reference. A circular reference occurs when a formula refers to its own value – either directly or indirectly. For example, you create a circular reference if you enter =A1+A2+A3 into cell A3 because the formula in cell A3 refers to cell A3. When a circular reference is present in the current worksheet, the status bar displays the text Circular References followed by the cell address, indicating the location of the circular reference on the current worksheet. If Circular References appears without a cell address, the circular reference is located on another worksheet. To solve this problem, type the correct formula in cell A3, =A1+A2 or move the formula in cell A4, =A1+A2+A3
- 2. Page 2 ECDL/ICDL - Microsoft 2010 – Excel (Advanced) ICDL-Test.Blogspot.com Part II – Auditing, Data Validation Auditing Worksheet A common source of errors in spreadsheets is the inaccurate construction of formulas, which, in turn, causes misleading results. Formula auditing involves checking formulas for mistakes and inconsistencies. To resolve an error, Choose Formulas tab Formula Auditing group Error Checking Trace Error Error Checking When you select a cell displaying an error indicator, the Error Checking button will appear beside it. You can click this button to find out why the cell has been flagged with an error indicator. The options available in the Error Checking dialog box will vary depending on the cause of the error, which is indicated by the first item on the list. Click on Show Calculation Steps… to evaluate formula.
- 3. ECDL/ICDL - Microsoft 2010 – Excel (Advanced) Page 3 ICDL-Test.Blogspot.com Tracing Precedents and Dependents Excel’s tracing feature let you see a graphical representation of a cell formula in the form of blue arrows (for Precedents) and red arrows (for Dependents) that link the cells together. Place the cell pointer in one of the formula and Choose Formulas tab Formula Auditing group Trace Precedents Choose Formulas tab Formula Auditing group Trace Dependents Just click Trace Dependents again to see whether the dependents cells have other dependents. Excel lets you trace multiple levels of relationships. Click Remove Arrows when done. Show Formula Excel displays the cells formula contents instead of the results – but on current worksheet only. Excel also widens the columns so they show more information. Choose Formulas tab Formula Auditing group Show Formulas or press Ctrl+’. Repeat again to turn it off.
- 4. Page 4 ECDL/ICDL - Microsoft 2010 – Excel (Advanced) ICDL-Test.Blogspot.com Watch Window When working with a large worksheet, you may find it helpful to use the Watch Window to keep track of certain cells so that you can continually audit the cells’ formulas and results as you make changes to the worksheet. The Watch Window can be moved around the worksheet or docked to the top, bottom, left, right of the worksheet and will display the workbook, sheet, name, cell, value, and formula for each entry. If you make a change to the worksheet that affects any of the cells being watched, the Watch Window will update automatically. To use the Watch Window to keep track of a cell’s properties, follow these steps: Steps: 1. Choose Formulas tab Formula Auditing group Watch Window 2. The Watch Window opens. 3. Click Add Watch and enter the cell reference e.g. $B$12 you want to watch over. 4. Drag the title bar of the Watch Window to move it to the desired position. 5. To go to a cell that you are watching, double-click its reference in the Watch Window. 6. If you no longer wish to track a cell, select its reference in the Watch Window and click Delete Watch. 7. Click the Close button in the top-right corner to close the Watch Window. The references to the watched cells will be stored in it until you reopen it again as long as the workbook remains open.
- 5. ECDL/ICDL - Microsoft 2010 – Excel (Advanced) Page 5 ICDL-Test.Blogspot.com Part III - Complex Formulas IF One of the hardest functions to get a grip on is IF. Found in the Logical category, most Excel users, novice and expert alike consider this to be the king of functions, and mastery of it opens a whole new range of possibilities in your worksheets. Simplest case The simplest version of the IF function is a 3—parts: Syntax : IF(logical_test, value_if_true, value_if_false) Arguments : logical_test – the first argument is what you want to test for. This can be a number, a string, an expression, even a TRUE or FALSE value. value_if_true – is what Excel will return if the logical_test is true, i.e. the condition has passed the check. value_if_false – is the answer Excel will return if the logical_test is false, i.e. the condition failed the check The IF function is best understood in an academic setting. Consider the following example, where our first task is to determine if students have passed overall based on an aggregate (average) taken from 6 subject examinations: To determine if they pass or fail, we use the IF function in a column called RESULT: =IF(J8>=50, “Passed”, “Failed”) What we are saying is: logical_test : Is the value in J8 greater or equal to 50? value_if_true : If J8 is greater or equal to 50, display the test “Passed”. value_if_false : If J8 is not greater or equal to 50, display the text “Failed”. Note that the following comparison operators apply when constructing the IF function: Comparison operator Operation = Is equal to > Is more than < Is less than >= Is greater than or equal to (inclusive) <= Is less than or equal to (inclusive) <> Not equal to In other words, Excel is branching – it checks to see if J8 fulfils a condition (J8>50) and takes the appropriate path depending on whether the value in J8 is higher or lower than 50.
- 6. Page 6 ECDL/ICDL - Microsoft 2010 – Excel (Advanced) ICDL-Test.Blogspot.com This is known as Boolean logic. Boolean logic or Boolean algebra (as it is sometimes known) is a set of mathematics known for its discrete thinking. In other words, there are no grey areas. The values are absolute, and one can never become the other: If A = TRUE Then Ā (not A) = FALSE And Å (not not A) = TRUE Therefore, in our example above, once we enter the function =IF(J8>=50, “Passed”, “Failed”) and press Enter Excel gives us the correct result – the first student did indeed pass, having attained a score of 51.83 which is above 50. It is then a simple matter to use the Fill handle to get the rest of the results. Check to see if J8 contains a value higher than 50 Is J8>=50 TRUE (J8 is greater or equal to 50) - PASSED FALSE (J8 is not greater or equal to 50) - FAILED Yes No
- 7. ECDL/ICDL - Microsoft 2010 – Excel (Advanced) Page 7 ICDL-Test.Blogspot.com Multiple conditions The ability to test conditions and return results based on whether they prove true or false is powerful indeed. But the real world is not so simple. Very often, situations present themselves where two or more conditions must prevail before a decision can be made. In our academic worksheet above, we have seen that using a simple IF can determine passing or failing. But passing the overall exam is insufficient to be deemed eligible for the next level – IB. In order to take the IB exam, the student must pass the overall examination and score a grade of 55 or better in English. How would we encompass the second condition? By using a logical function, we can incorporate a second, or even more conditions, into the basic IF expression. There are three of these logical functions: AND, OR and NOT. AND / OR / NOT Syntax : AND(logical1, logical2 …) OR(logical1, logical2 …) NOT(logical1, logical2 …) Arguments : logical1 – the condition to be included for testing logical2 – the second condition. You may enter as many conditions as needed. AND is usually used to denote that all the conditions stated must be met, i.e. they must all prove TRUE. =AND([Age]>30, [Gender]=”Male”) Translation – only males aged 30 and older may apply. OR is used when any of the conditions can be met =OR([Age]>30, [Gender]=”Male”) Translation – a female aged 42, or a male aged 26 may apply. NOT is used when neither of the conditions specified are applicable – somewhat like a reverse of logic. =NOT([Age]>30, [Gender]=”Male”) Translation – ONLY females younger than age 30 may apply. Placed into context, the formula to evaluate whether any students are applicable for IB would read as =IF(AND(D8>=55, J8>=50), “Eligible”, “Ineligible”)
- 8. Page 8 ECDL/ICDL - Microsoft 2010 – Excel (Advanced) ICDL-Test.Blogspot.com Caution: the AND function must be closed with a parenthesis after the final condition to terminate it. Failure to do so will cause Excel to return an error. The function checks to see if each student passes both English and the overall exam (as indicated by the AND function), and if both are TRUE, returns an “Eligible” result. If any condition is not met, “Ineligible” is the result. Nesting functions for complex scenarios Believe it or not, even with the AND/OR/NOT inclusions, the IF function isn’t really that complex – yet. Consider now that the form teachers would now have to assign grades to the students – - A If the student scores 85 or above - B If the student scores 70 to 84 - C If the student scores 50 to 69 - D If the student scores 35 to 49 - F If the student scores below 30 With so many possible situations and outcomes, how will we write the IF function? 1. Begin with the first condition: =IF(J8>=85, “A”, “B”). Wait! Something’s not quite right. Assigning a “B” to the value_if_false argument implies that everyone who did not score 85 and higher would automatically be awarded a B! That is incorrect!. 2. To resolve the situation, replace the part that is shaded =IF(J8>=85, “A”, “B”) with IF(J8>=70, “B”, So now the function reads =IF(J8>=85, “A”, IF(J8>=70, “B”, This is known as a nested function. The second IF takes the place of the value_if_false argument and effectively introduces a new set of conditions.
- 9. ECDL/ICDL - Microsoft 2010 – Excel (Advanced) Page 9 ICDL-Test.Blogspot.com 3. The problem reappears with the third grade – “C”. The solution is not to place the “C” immediately after the comma following “B”, but to introduce another IF. =IF(J8>=85, “A”, IF(J8>=70, “B”, IF(J8>=50, “C”, 4. You continue till you reach the final grade which is “F”. The formula now reads =IF(J8>=85, “A”, IF(J8>=70, “B”, IF(J8>=50, “C”, IF(J8>=35, “D”, “F”)))) Notice that there is no need to place an IF before the final “F” grade? That’s because you are indicating to Excel that it’s the final choice and the last resort. All the parentheses are closed at that point. Press Alt-Enter for Line Break (The function in the illustration above has had line breaks [Alt+Enter] added for clarity.) Note: you can nest up to 64 IF statements in a single function. Any more than that and you will have to break the formula into smaller, intermediary pieces.
- 10. Page 10 ECDL/ICDL - Microsoft 2010 – Excel (Advanced) ICDL-Test.Blogspot.com Compound IFs SUMIF A SUMIF adds up a range of cells which meet a criterion. Syntax : SUMIF(range, “criteria”, sum_range) Arguments : range – the range or block of cells for the count. criteria – the criteria, entered as text and surrounded by double quotation marks, that determine which cells to be included in the sum. sum_range – the range from which the values to be added are derived. Example The extract shows a Parts table. SUMIF was used to find the Total Cost for parts where the Division field is 3. Note that “Parts” referred to in the formula is the named range A7:H14. SUMIFS SUMIFS is new to Excel 2010. Users have long complained about the single criterion limitation of SUMIF. SUMIFS addresses that limitation SUMIFS adds up cells in one or more ranges which fulfill one or more criteria. You can sum up to 127 ranges or pairs of criteria. Syntax : SUMIFS(range1, “criteria1”, range2, “criteria2” …) Arguments : range1 – the first range or block of cells to be added. criteria – the first criterion, entered as text and surrounded by double quotation marks, that determine which cells to be included in the sum. range2 – the second range or block of cells to be added. criteria2 – the second criterion, entered as text and surrounded by double quotation marks, that determine which cells to be included in the sum.
- 11. ECDL/ICDL - Microsoft 2010 – Excel (Advanced) Page 11 ICDL-Test.Blogspot.com Example The warehousing manager needs to find out which products have the word “Soup” in their name and are out of stock, i.e. Qty On Hold = 0. The final formula reads =SUMIFS(Inventory[Qty On Hand], Inventory[Product Name], “*Soup*”, Inventory[Qty On Hold], “=0”). AVERAGEIF AVERAGEIF is one of the most exciting additions to Excel’s function list. Previously, to average a range of values which met a criterion required a hefty formula known as an array formula, and was tedious to write. AVERAGEIF averages (i.e. finds the arithmetic mean) of a range of cells which meet a given criterion. Syntax : AVERAGEIF(range, “criteria”, average_range) Arguments : range – the range or block of cells for the calculating the average. criteria – the criteria, entered as text and surrounded by double quotation marks, that determine which cells to be included in the average.. average_range – the range from which the values to be averaged are derived. Example Here AVERAGEIF is used to determine the Gross Margin for parts whose Cost is less than 10.
- 12. Page 12 ECDL/ICDL - Microsoft 2010 – Excel (Advanced) ICDL-Test.Blogspot.com AVERAGEIFS Like its counterparts SUMIFS and COUNTIFS, AVERAGEIFS accepts multiple criteria and ranges for its average. You can average up to 127 ranges or pairs of criteria. Syntax : AVERAGEIFS(average_range, range1, “criteria1”, range2, “criteria2” …) Arguments : average_range – the values to be used in computing the average. range1 – the first range or block of cells to be averaged. criteria – the first criterion, entered as text and surrounded by double quotation marks, that determine which cells to be averaged. range2 – the second range or block of cells to be averaged. criteria2 – the second criterion, entered as text and surrounded by double quotation marks, that determine which cells to be averaged. Example This Accounts Receivable table needs to figure out the average number of days overdue for invoices that are late, and have amounts of at least $1,000. The final formula reads =AVERAGEIFS(ARData[Days Overdue], ARData[Days Overdue], “>0”, ARData[Invoice Amount], “>=1000”).
- 13. ECDL/ICDL - Microsoft 2010 – Excel (Advanced) Page 13 ICDL-Test.Blogspot.com Lookups Introduction When you consult a dictionary to find the meaning of a word, that is, essentially, a lookup process. A lookup process almost always involves 2 steps: first you look up the word itself, then you read the definition or meaning of the word. Another way of considering this is when you look up a friend’s name in the phone book and you get the phone number in return. In many worksheet formulae, one result can depend very much on another. For example: In an invoice total, the customer’s discount may depend on the number of units purchased. For a formula that charges interest on overdue payments, the interest percentage might depend on the number of days each invoice is overdue by. When calculating employee bonuses as a percentage of the salary, that percentage might depend on how much the employee improved upon the current budget. The most common way to resolve these problems is to find the appropriate value and base the calculation on that. This section will introduce a number of functions which enable the user to perform lookup operations on the worksheet model. We will concentrate on using CHOOSE, the VLOOKUP and HLOOKUP, INDEX and MATCH functions. Excel’s Lookup Functions Function Description CHOOSE Uses a numerical reference to return a value from the list of value arguments. Use CHOOSE to select one of up to 254 values based on this index number. Example: If value1 through value7 are assigned the days of the week, CHOOSE returns one of the days when a number between 1 and 7 is used as index_num. HLOOKUP Searches for a value in the top row of a table or an array of values, and then returns a value in the same column from a row you specify in the table or array. Use HLOOKUP when your comparison values are located in a row across the top of a table of data, and you want to look down a specified number of rows. INDEX Returns a value or the reference to a value from within a table or range. There are two forms of the INDEX function: the array form (returns the value of a specified cell or array of cells) and the reference form (returns a reference to specified cells). LOOKUP LOOKUP returns a value either from a one-row or one-column range, or from an array The LOOKUP function has two syntax forms: 1. Vector form: looks in a one-row or one-column range for a value, and return a value from the same position in a second one-row or one-column range. Use this form when you have a large list of values to look up or when the values may change over time. 2. Array form: Look in the first row or column of an array for the specified value and return a value from the same position in the last row or column of the array. Use the array form when you have a small list of values and the values remain constant over time. MATCH MATCH searches for a specified item in a range of cells, and then returns the relative position of that item in the range. Example: If the range A1:A3 contains the values 5, 25, and 38, then the formula =MATCH(25,A1:A3,0) returns the number 2, because 25 is the second item in the range. VLOOKUP VLOOKUP will search the first column of a range of cells, and then return a value from any cell on the same row of the range.
- 14. Page 14 ECDL/ICDL - Microsoft 2010 – Excel (Advanced) ICDL-Test.Blogspot.com Using the Lookup Functions CHOOSE The simplest of all the lookup functions is CHOOSE, which simply allows you to select a function from a list. Syntax : CHOOSE(index_num, value1, value2) Arguments : index_num – specifies which value argument is selected (a number between 1 and 254, or a formula or reference to a cell containing a number between 1 and 254) Value1, value2 … – These are 1 to 254 value arguments from which CHOOSE selects the return value. Example 1 The formula: =CHOOSE(2, “Surface Mail”, “Air Mail”, “Courier”) evaluates to: Courier The num argument is 2, so CHOOSE returns the second value in the list, which the text string value “Courier”. Example 2 In this example, the formula means “choose the fourth item from the cells B2, B3, B4, B5”.
- 15. ECDL/ICDL - Microsoft 2010 – Excel (Advanced) Page 15 ICDL-Test.Blogspot.com LOOKUP, VLOOKUP, HLOOKUP The lookup functions all work the same way – they return a value either from a one-row or one- column range, or from an array. VLOOKUP searches for a value in the left-most column of a table, and then returns a value in the same row from a column you specify in the table. (The V in VLOOKUP stands for vertical.) HLOOKUP searches for a value in the top-most row of a table, and then returns a value in the same column from a row you specify in the table. (The H in VLOOKUP stands for horizontal.) LOOKUP Syntax : LOOKUP(lookup_value, lookup_range, result_range) Arguments : lookup_value – the value the function must search for. lookup_range – a one-column or one-row range containing the values to be consulted. result_range - a one-column or one-row range containing the values be returned. Example: Here, the formula checks the Frequency from cell C9 against the Frequencies in the range B2:B7. Once a frequency match is found, the Colour is returned from the corresponding row in column C2:C9. Important!: 1. The values in the lookup_range must be arranged in ascending order. 2. Lookup values are case-sensitive. 3. The lookup_range and the result_range must be the same size. VLOOKUP VLOOKUP is most commonly used when you have a list of data with the key field in the left-most column. Syntax : VLOOKUP(lookup_value, table_array, col_index_num, [range_lookup]) Arguments : lookup_value – the value the function must search for. table_array – a range containing the values to be consulted.
- 16. Page 16 ECDL/ICDL - Microsoft 2010 – Excel (Advanced) ICDL-Test.Blogspot.com col_index_num – a number indicating the column from which the result will be returned, counted from the left of the range. range_lookup – a logical value (TRUE or FALSE) indicating if the answer is an exact match (FALSE) or an approximate match (TRUE or omitted). Example: In our example, we need to assign the Chief Salesperson’s name to the country he/she is in charge of. The formula would read =VLOOKUP(B4, E3:F20, 2, FALSE) That means “check the value in cell A4 (“Country”) against the table E3:F20, return the answer from column 2 (“Chief Salesperson”) and ensure its an exact match (the “FALSE”). Once you press Enter, the formula returns the right result.
- 17. ECDL/ICDL - Microsoft 2010 – Excel (Advanced) Page 17 ICDL-Test.Blogspot.com HLOOKUP HLOOKUP is similar to VLOOKUP, except that the data is in rows rather than columns. For that reason, HLOOKUP is often not as popular as data in rows can get unwieldy. Syntax : HLOOKUP(lookup_value, table_array, row_index_num, [range_lookup]) Arguments : lookup_value – the value the function must search for. table_array – a range containing the values to be consulted. row_index_num – a number indicating the row from which the result will be returned, counted from the top of the range. range_lookup – a logical value (TRUE or FALSE) indicating if the answer is an exact match (FALSE) or an approximate match (TRUE or omitted).
- 18. Page 18 ECDL/ICDL - Microsoft 2010 – Excel (Advanced) ICDL-Test.Blogspot.com Example In this example, we need to determine the Practice Day for each of the boys who have already been assigned their teams and coaches. The formula would read =HLOOKUP(G6, A40:G41, 2 FALSE). This translates as check the value in cell G6 (“Team”) against the table A40:G41 (“Practice Schedule”), return the answer from row 2 (“Day”) and ensure its an exact match (the “FALSE”). The result shows the correct Practice Day.
- 19. ECDL/ICDL - Microsoft 2010 – Excel (Advanced) Page 19 ICDL-Test.Blogspot.com
- 20. Page 20 ECDL/ICDL - Microsoft 2010 – Excel (Advanced) ICDL-Test.Blogspot.com Combining Functions IF, AND, SUM, ISNUMBER Scenario Varekai is a company with profits for each division declared by quarter. Unfortunately, owing to a glitch in the data-processing, Quarter 4’s profits cannot be declared. Now the company is in a quandary – to sum up the total and declare it as incorrect, or to sum up only the divisions and quarters that have data and place the words “Incomplete” in the cells which fall in the missing data. Solution The solution would be to write a complex, megaformula which comprises 4 parts. The entire formula reads =IF(AND(ISNUMBER(C7), ISNUMBER(C8), ISNUMBER(C9), ISNUMBER(C10)), SUM(C7:C10), “Incomplete”). Because the formula is so long, let’s break it up for better analysis: =IF – the opening tells Excel we are declaring a logical function. AND – use of AND signals that two or more conditions must be fulfilled for Excel to take the TRUE branch of the logic. ISNUMBER – this is a special information function which returns TRUE if the cell contains a genuine number, FALSE if the cell contains a string or is blank. So the first part =IF(AND(ISNUMBER(C7), ISNUMBER(C8), ISNUMBER(C9), ISNUMBER(C10)) tells Excel to consider all four ISNMBER arguments as one (the AND condition). When all of them prove TRUE (i.e. they are numbers), do we add them up, otherwise, the formula returns an “Incomplete” result – the FALSE branch. Tip: ISNUMBER is part of a category of functions known as Information functions. The other functions in the group are ISERR, ISERROR, ISBLANK, ISEVEN, ISLOGICA, ISNA, ISNONTEXT, ISODD, ISREF and ISTEXT. They all return TRUE if the cell contains the value or string being checked and FALSE otherwise. So if a formula =ISBLANK(A3) returns FALSE, then that cell contains “something”, even though it may appear to be blank.
- 21. ECDL/ICDL - Microsoft 2010 – Excel (Advanced) Page 21 ICDL-Test.Blogspot.com IF and VLOOKUP Scenario Darellon Properties LLC has estate agents who have been with the company for varying periods – from the newly joined (6 months) to the old guard (7+ years). In order to be fair to everyone, a two-tier system of commissions has been instituted, with the new hires following one range of percentages and the senior ranked agents following another. Payroll now has to set-up an Excel worksheet to calculate commission and factor in both percentage ranges. Solution So as not to complicate matters, the two different commission scales have been put in two tables. They have also been named as Lesser3 (G1:H9) and Greater3 (G11:H17). The goal is to find the correct commission rate. So we will use VLOOKUP to compare the Amount (C4) against the two tables. IF is then used to decide which of two tables will return the correct result by checking if the Tenure cell (B4) contains a value lower than 3. If it does (B4<3 is TRUE), then the formula returns a value from the Lesser3 table, otherwise it returns from the Greater3 table. 1. Start with the cell-pointer in cell D4 and type =VLOOKUP(C4, This is the first part of the formula, the VLOOKUP.
- 22. Page 22 ECDL/ICDL - Microsoft 2010 – Excel (Advanced) ICDL-Test.Blogspot.com 2. Now we add the IF – =VLOOKUP(C4, IF(B4<3, Lesser3, Greater3) Placing the IF at this point effectively “splits” the formula, forcing it to “choose” between the Lesser3 and Greater3 tables depending on whether the value in B4 is lower or higher than 3. Note: the IF function must be closed after the value_if_false argument as it is a “nested” function. Failing to do so will cause Excel to return an error. 3. The final switch – the “2” is now placed to indicate that the answer is returned from the second column. =VLOOKUP(C4, IF(B4<3, Lesser3, Greater3), 2) In this case, the FALSE argument is not needed as it is an approximate match. 4. Press Enter and Excel will return the right result. Now it is a simple matter to use the Fill Handle to populate the rest of the Rates, and Commission is simply [Amount]*[Rate].
- 23. ECDL/ICDL - Microsoft 2010 – Excel (Advanced) Page 23 ICDL-Test.Blogspot.com Multi-Dimension 3D Formulas A multi-dimension formula, sometimes called a 3D formula, is one where the formula’s references span several worksheets and sometimes even workbooks. It is a great way to consolidate data and, if executed correctly, can be even more accurate than even Excel’s own Consolidate feature. Multi-dimension formulas are created by actually linking sheets together. This is easily seen in the formula itself – the cell reference is prefaced by the sheet name enclosed in single quotation marks, and followed by an exclamation mark. Creating a Multi-Dimension Formula Creating a multi-dimension formula is easier than it looks. The secret is to click the cell references, not type them in. Open the workbook or sheets containing the data to be consolidated. Start the formula as usual – here we are adding up the four quarters so it’s a SUM function =SUM(. Now click on the first sheet tab which contains the data to be included in the formula. In this case the QTR 1 Sales worksheet. Select the data cells B5:D5.
- 24. Page 24 ECDL/ICDL - Microsoft 2010 – Excel (Advanced) ICDL-Test.Blogspot.com You should notice in the formula bar that the formula has updated to include the sheet reference along with the cells – ‘QTR 1 Sales’!B5:D5. Also if you look at the Status Bar below, both sheet tabs have turned white, indicating they are now linked. Type a comma. Repeat for the other 3 tabs – click on the sheet tab, select the range, type a comma. When you reach the final tab, after you select the final set of cell references, close the function as normal with the closing parenthesis. The formula should now read =SUM('QTR 1 Sales'!B5:D5, 'QTR 2 Sales'!B5:D5, 'QTR 3 Sales'!B5:D5, 'QTR 4 Sales'!B5:D5). Once you press Enter, the formula will evaluate and return you the total for all four quarters. =SUM(Sheet1:Sheetn!A1)
- 25. ECDL/ICDL - Microsoft 2010 – Excel (Advanced) Page 25 ICDL-Test.Blogspot.com Part IV – Paste Special When using Copy and Paste or Cut and Paste, the default is to paste the cell exactly as it was originally. Paste Special is also used to paste - Combine cells together by adding, subtracting, multiplying - Transpose data (changing rows to columns, columns to rows) - Paste only formulas, values etc. For example, to combine cells together, in the case of Basic pay X 1.5 = Overtime pay Combine Cells Steps: 1. Open the workbook Overtime Claim Multiply.xlsx 2. In range C8 to C18, this is a list of basic pay input by the employee John. 3. When this form is submitted to payroll department, you as a payroll officer are to multiply the amount by 1.5 times. 4. First, place cell pointer to C5 which contains the rate 1.5 5. Click Copy button, the amount 1.5 is copied to the clipboard. 6. Next, select the range where you want the 1.5 to multiply to. 7. Select C8:C18. Click Home tab Paste Paste Special….. 8. From the Paste Special dialog box, under Operation sub-group, click Multiply, click OK 9. The basic pay is filled with the Overtime pay. File Save to Overtime Claim Multiply OT.xlsx
- 26. Page 26 ECDL/ICDL - Microsoft 2010 – Excel (Advanced) ICDL-Test.Blogspot.com Transpose cells Steps: 1. Open the workbook Overtime Claim Multiply.xlsx 2. In range A7 to E18, we would want to transpose rows to columns, columns to rows 3. Select A7:E18, and click Copy button 4. Position the cell pointer to a new location e.g. A22 5. Click Home tab Paste Paste Special….. 6. From the Paste Special dialog box, under Operation sub-group, click Transpose, click OK 7. The range is transposed, the formulas are updated with the correct cell range. 8. File Save to Overtime Claim Multiply Transpose.xlsx . Replace Formulas with Values and number format cells Steps: 1. Open the workbook Overtime Claim Multiply.xlsx. Format E7 to E18 with Currency $ format 2. In range E7 to E18, instead of copying the Total Wages with its formulas, we would want to copy it as a value. 3. Select E7:E18, and click Copy button 4. Position the cell pointer to a new location e.g. G7 5. Click Home tab Paste Paste Special….. 6. From the Paste Special dialog box, under Paste sub-group, click Values and number formats, click OK 7. The range is copied with only values and its number formats
- 27. ECDL/ICDL - Microsoft 2010 – Excel (Advanced) Page 27 ICDL-Test.Blogspot.com Part V – Worksheet Protection Varying levels of protection can be applied to worksheets, or have some cells locked and some cells unlocked within worksheets. For example, to lock the whole worksheet and unlock only some cells for data entry Unlock some cells for data-entry Steps: 1. Open the workbook Overtime Claim Multiply.xlsx 2. By default in Excel 2010, the cells in the worksheet is already protected (locked). 3. This is proved by, click Home tab Number group Format cells Protection tab 4. Select C8:C18 where we want data-entry for this range. So the user will not be able to move to other parts of the worksheet. 5. To unlock this range, click Home tab Cells group Protection sub-group 6. Click on Lock Cell (the orange coloured indicate that it is locked – click once to unlock it)
- 28. Page 28 ECDL/ICDL - Microsoft 2010 – Excel (Advanced) ICDL-Test.Blogspot.com 7. Next, the protection is not complete until you protect the whole worksheet. 8. To protect the whole worksheet, click Home tab Cells group Protection sub-group 9. Click on Protect Sheet…. 10. Type the password ‘michael’. 11. Tick off the Select locked cells to restrict the users to access only unlocked cells. Click OK. 12. Re-enter the password ‘michael’. Click OK 13. Your cell pointer only moves within the unlocked cells. 14. File Save to Overtime Claim Multiply Data-Entry.xlsx .
- 29. ECDL/ICDL - Microsoft 2010 – Excel (Advanced) Page 29 ICDL-Test.Blogspot.com Next example, to lock the whole worksheet and unlock only some cells for data entry Unlock whole worksheet, but lock only some cells. Hide the formula display Steps: 1. Open the workbook Overtime Claim Multiply.xlsx 2. By default in Excel 2010, the cells in the worksheet is already protected (locked). 3. To unprotect the whole worksheet, click on the Select All button 4. Press Ctrl+A 5. Choose Home tab Number group Format cells Protection tab Tick off Locked. Click OK 6. To lock and protect the range A7 to E18, select the range A7:E18 and click Home tab Cells group Protection sub-group 7. Click on Lock Cell (click once to lock it) OR 8. If you want to lock the cells and at the same time you want to hide all formulas in the range (to disable the display of formula in the formula bar), you can 9. Select the range A7:E18 and 10. Choose Home tab Number group Format cells Protection tab Turn on Locked and Turn on Hidden . Click OK (Because of the selected range, the locked and hidden are applied only to this range)
- 30. Page 30 ECDL/ICDL - Microsoft 2010 – Excel (Advanced) ICDL-Test.Blogspot.com 11. Next, the protection is not complete until you protect the whole worksheet. 12. To protect the whole worksheet, click Home tab Cells group Protection sub-group 13. Click on Protect Sheet…. 14. Type the password ‘michael’. Click OK. Re-enter the password ‘michael’. Click OK 15. If you attempt to enter data into the locked ranges, the message will appear 16. If you point to the formulas, the formulas are hidden from the formula bar. 17. But if you move out of the locked range, you are able to enter the data. 18. File Save to Overtime Claim Multiply Lock and Hidden.xlsx .
- 31. ECDL/ICDL - Microsoft 2010 – Excel (Advanced) Page 31 ICDL-Test.Blogspot.com Part VI – Sorting and Filtering To make the data in your worksheet easier to work with, you may need to display the data in a particular order or view only those records that meet specified conditions. Sorting Data Sorting lets you order the items in your table alphabetically or numerically according to the information in a column. Before you can sort your data, you need to choose a sorting key – the piece of information Excel uses to order your records. For example, if you want to sort a table of products so the cheapest (or most expensive) products appear at the top of the table, the Price column would be the sorting key. In addition to choosing a sorting key, you also need to decide whether you want to use ascending or descending order. The exact wording depends on the type of data in the column, as follows: If your column contains numbers, you see “Sort Smallest to Largest” and “Sort Largest to Smallest” If your column contains text, you see “Sort A to Z” and “Sort Z to A” If your column contains dates, you see “Sort Oldest to Newest” and “Sort Newest to Oldest” Sorting data in a Single Column Steps: 1. Place cell pointer at the beginning of the sort data. 2. Choose Home tab Editing group Sort & Filter and use the drop-down menu to select Sort A to Z 3. The sorted data shows Alternatively, you can also choose the sort command from Data tab Sort & Filter group
- 32. Page 32 ECDL/ICDL - Microsoft 2010 – Excel (Advanced) ICDL-Test.Blogspot.com Sorting data in a Table Steps: 1. Retrieve the filename ProductListPrice.xlsx 2. Select any cell within the worksheet region 3. Choose Home tab Editing group Filter to turn on the filter 4. Place the cell pointer to the column you wish to sort 5. Click on the down arrow and choose the sorting order 6. Excel immediately sort the records, and then places a tiny arrow in the column header to indicate that you used this column for your sort
- 33. ECDL/ICDL - Microsoft 2010 – Excel (Advanced) Page 33 ICDL-Test.Blogspot.com Sorting data with Multiple Criteria With multiple sort criteria, Excel orders the table using more than one sorting key. The second sorting key springs into action only if there are duplicate values in the first sorting key. For example, if you sort by Category and Model Name, Excel first separates the records into alphabetically ordered category groups. It then sorts the products in each category in order of their model name. Steps: 1. Select any cell within the worksheet region 2. Choose Home tab Editing group Custom Sort… 3. 1st level sort by : Category 4. Click Add Level button 5. 2nd level sort by : Model Name 6. Click OK The Category is sorted first, followed by the Model Name
- 34. Page 34 ECDL/ICDL - Microsoft 2010 – Excel (Advanced) ICDL-Test.Blogspot.com Sorting with a Custom List You may have good reason to arrange the categories in a different order that puts more important categories at the top of the table. In the Order column of the Sort dialog box, choose Custom List. This choice opens the Custom List dialog box, where you can choose an existing list or create a new one by selecting NEW LIST, and then typing in your values. Steps: 1. Select any cell within the table 2. Choose Home tab Editing group Custom Sort… 3. Change the Order to Custom List… for Category group 4. Click NEW LIST 5. Add in the new list in List entries: 6. Click Add, and OK Sorting by Colour One of Excel sorting options is sort-by-color, which lets you arrange your records based on the color of each cell. This feature is really designed to work in conjunction with conditional formatting. You can create a conditional format that changes the foreground or background color of the cells you’re interested in. Using the Sort On column, you can choose to sort using the Cell Color (background color) or the Font Color.
- 35. ECDL/ICDL - Microsoft 2010 – Excel (Advanced) Page 35 ICDL-Test.Blogspot.com Filtering Data Sorting is great for ordering your data, but it may not be enough to tame large piles of data of hundreds or thousands of rows. You can try another useful technique, Filtering, which lets you limit the table so it displays only the data that you want to see. Automatic filtering, like sorting, uses the drop-down column headings. When you click the drop- down arrow, based on the type of data in your column, Excel adds a wide range of useful filter options to the drop-down column lists. To remove a filter, open the drop-down column menu, and then choose Clear Filter. If you add any new records to the table, sorting or filtering is not performed automatically to the records. You have to reapply or refresh by choosing Data tab Sort & Filter group Reapply Filtering Dates For example, you want to filter records with Date Sold in the month of March 2012 (presume if your system date is April 2012) Steps: 1. Place cell-pointer within the table 2. Click on Date Sold drop-down 3. Click on Date Filters 4. From the list of choice, choose “Last Month” Excel takes several steps to make the situation more apparent. Funnel icon is added to the column heading. Blue coloured row number for filtered records. Status bar message shows the number of filtered matches and the total number of records in the list.
- 36. Page 36 ECDL/ICDL - Microsoft 2010 – Excel (Advanced) ICDL-Test.Blogspot.com Filtering Numbers For numbers, you can filter values that match exactly, numbers that are smaller or larger than a specified number, or numbers that are above or below average. For example, you want to filter records with Price between $200 to $400 Steps: 1. Place cell-pointer within the table 2. Click on Price drop-down 3. Click on Numbers Filters 4. From the list of choice, choose “Between…” 5. This will open up the Custom AutoFilter dialog box 6. You can key in the values and click OK.
- 37. ECDL/ICDL - Microsoft 2010 – Excel (Advanced) Page 37 ICDL-Test.Blogspot.com Filtering Text For text, you can filter values that match exactly, or values that contain a piece of text. You can also use wildcards – asterisk (*) to match any series of characters, question mark (?) to match a single character. For example, you want to filter product records with Model Name that has the word “Pencil” Steps: 1. Place cell-pointer within the table 2. Click on Model Name drop-down 3. Click on Text Filters 4. From the list of choice, choose “Contains..” 5. This will open up the Custom AutoFilter dialog box 6. You can key in the values and click OK.
- 38. Page 38 ECDL/ICDL - Microsoft 2010 – Excel (Advanced) ICDL-Test.Blogspot.com Removing Duplicate Invoices Sometimes, you may have some duplicates of invoices or records which you want to remove. Steps: 1. Select the table column – Column B -- that you want to check for duplicate values. 2. Choose Home tab Styles group Conditional Formatting Highlight Cells Rules Duplicate Values. 3. Click OK. 4. The duplicates are highlighted in light red. 5. To remove the duplicates, choose Data Data Tools Remove Duplicates 6. In the Remove Duplicates dialog box, unselect all the column and invoice column, click OK. 7. “1 duplicate values found and removed; 70 unique values remain.” Remember, when using the Remove Duplicates feature, you have no way of knowing what records Excel’s deleted. For that reason, people often use the Highlight Duplicates rule first to check out duplicates
- 39. ECDL/ICDL - Microsoft 2010 – Excel (Advanced) Page 39 ICDL-Test.Blogspot.com Advanced Filters Sometimes, you may want to filter records based on some criteria. In addition, you can use the Advanced Filter command to extract rows from the range and place copies of those rows to another part of the current worksheet. For example, you want to extract only unique Model Name to Sheet2 of your current worksheet. Steps: 1. Set the criteria range first to specify what you want to include in the filter. 2. For example, in Cell D1 and D2, type Model Name and Rubber respectively 3. Place cell-pointer inside the list. 4. Choose Data Sort & Filter Advanced Filters 5. Fill in the List range, Criteria range, Copy to: and click OK. 6. The result: Setting up the Excel Advanced Filter Criteria Range AND vs OR If a record meets all criteria on one row in the criteria range, it will pass through the Excel advanced filter as an AND condition Criteria on two rows are joined with an OR operator
- 40. Page 40 ECDL/ICDL - Microsoft 2010 – Excel (Advanced) ICDL-Test.Blogspot.com This page is intentionally left blank
- 41. ECDL/ICDL - Microsoft 2010 – Excel (Advanced) Page 41 ICDL-Test.Blogspot.com Part VII – Excel Tables Table Basics Within Excel 2010, you can easily create, format, and expand an Excel Table (or Excel List as it was known in 2003 version) to organise your large amounts of information in a manner more suited for analysis. Along with the name change Microsoft has improved the functionality of tables to include features like Headers that can be switched on and off Calculated columns that automatically expand to include additional rows An Automatic Filter button in each header cell for quick sorting and filtering Structured references that allow you to use column heading names and special item specifiers in formulas instead of cell references Total rows that can use custom formulas and text entries Table styles to add coordinated formatting that will update automatically as rows are added or removed Typically, the worksheet range defined as a excel table should have the following characteristics: 1) Top rows should consists of labels or field name. 2) Each column should contain the same kind of information. 3) The rows are the records. Tip: When creating your table or list, you may want to add an extra field (for example, Record Number) where you can add consecutive numbers as you enter each new record. This will allow you to return your table or list to the original order the records were entered in at any stage. 1. Creating a Table Steps: 1. Select any cell within the worksheet region 2. Press Ctrl+T or Ctrl+L 3. or Choose Insert tab Tables group Click Table 4. Excel 2010 figures out the dimensions of the table for you and asks for confirmation in the Create Table dialog box. 5. Change the data for your table to =$A$11:$G$82, click OK 6. Excel 2010 figures out whether the top row of your range is a header row. If not, you can deselect the tick, Excel 2010 will use labels such as Column 1, Column 2 (not advisable). 7. When you click OK, the range of cells will be converted into a table and the default formatting will be applied. If the need arises to turn a table back into an ordinary worksheet range, select any cell and or Choose Table Tools Design tab Tools group Convert to Range
- 42. Page 42 ECDL/ICDL - Microsoft 2010 – Excel (Advanced) ICDL-Test.Blogspot.com 2. Formatting a Table When you move to a cell in a table, Excel adds a new tab to the ribbon – the Table Tools/Design tab. This tab has five sections: Properties – which lets you rename your table and resize it. The table name is important only if you choose to use it in a formula. Tools – which lets you use pivot tables, find duplicate rows, and convert your table back to ordinary cells. External Table Data – which lets you work with external data using an Excel table. Table Style Options and Table Styles – which help to fine tune the table’s appearance.
- 43. ECDL/ICDL - Microsoft 2010 – Excel (Advanced) Page 43 ICDL-Test.Blogspot.com 3. Editing a Table Once you have created an Excel table, you can edit the contents, add records or delete records. The table will adjust themselves accordingly. If you need to add new columns, make sure that it is added within the table range. 4. Naming a Table Excel 2010 uses default table name Table1, Table2. To change to a meaningful name, under Table Tools design tab Properties group, Type the new table name e.g. ProductList 5. Expanding a Table To add a new row to the end of a table, go to the bottom-right cell of the table (ignoring the total row, if there is one), and press Tab A new row is inserted. Add : 72 14071 382 Survival Bar $7 General 30/04/2012 6. Adding Totals to a Table To add a total row to your table, select any cell with the table, and then tick on the By default, the total row uses the SUBTOTAL function, 109, to the rightmost column of the table. You can choose alternative functions by clicking the right edge of a total row cell
- 44. Page 44 ECDL/ICDL - Microsoft 2010 – Excel (Advanced) ICDL-Test.Blogspot.com 7. Using Calculated Columns in a Table To create a calculated column, click in a cell of a blank table column that you want to make a calculated column. Then, type the formula that you want to use into the cell and press Enter. The formula will automatically be copied to the other cells in the column, both above and below the active cell. For example, in cell H15, you want to know: How much does “Escape Cord cost at $14 x 2 ? 8. Using Structured References in a Table Structured references can make formula construction much simpler, and the result is more comprehensible formulas that will adjust as table ranges change. A major difference between named ranges and structured references is that the names that can be referenced in tables are automatically generated when you create the table, including the name of the table itself. If a table expands or shrinks, the names will adjust, and if a table is deleted, the names will be removed. Also, if you rename a table or a column, Excel 2010 will automatically update any structured references that use that table or column header. This can save you a lot of time, not only when initially entering formulas but also by lessening the need to alter formulas as your table is edited and rows or columns are added or deleted. A table name (ProductList) –up to 255 characters in length and must begin with a letter, underscore or backslash A column specifier ([@Price]) – taken from column header A special item specifier ([#Totals]) – refers to a particular section of the tables A table specifier ([[#Totals],[Price]]) – refers to the outer portion of a structured reference Once you type a table name followed by an open bracket, Excel shows a list of columns in that table. You can select any one from the list and complete the formula =sum(ProductList[Price])
- 45. ECDL/ICDL - Microsoft 2010 – Excel (Advanced) Page 45 ICDL-Test.Blogspot.com 9. The SUBTOTAL ( ) Function The total row will only sum those currently visible rows in a table. That is because the SUBTOTAL( ) function is the only Excel function that takes table filtering into account. Syntax SUBTOTAL ( function_code, column_range ) Function used for calculation Code that ignores hidden rows Code that includes hidden rows AVERAGE( ) 101 1 COUNT( ) 102 2 COUNTA( ) 103 3 MAX( ) 104 4 MIN( ) 105 5 PRODUCT( ) 106 6 STDEV( ) 107 7 STDEVP( ) 108 8 SUM( ) 109 9 VAR( ) 110 10 VARP( ) 111 11
- 46. Page 46 ECDL/ICDL - Microsoft 2010 – Excel (Advanced) ICDL-Test.Blogspot.com 10. The Database Functions Excel also includes functions exclusively for use with long tables. These are the database functions, a set of 11 functions that let you analyse groups of data. The database functions are very similar to the basic statistical functions like SUM( ), AVERAGE( ), and COUNT( ). In fact, the database functions have the exact same names, but with an initial letter D – so you find a DSUM( ), DAVERAGE( ), DCOUNT( ), and so on. The database functions differ from their non-database counterparts in that they can selectively filter out rows. In other words, when you use DSUM( ), you can specify a set of criteria that a record must match in order to be included in the sum. (The filtering that you apply with the AutoFilter feature makes no difference to the database functions. They don’t ignore hidden rows.) Syntax DFUNCTION ( table_range, field, criteria ) Table_range – is the range that the function uses. Create a NAME for the table range A11:G82 e.g. Database You cannot use the automatically generated table names for the table range. Field – the name of the column you want to use for the calculation e.g. Price Criteria – a range of cells that specifies all the conditions that rows must meet to be included in the calculation. Rules for the Criteria Each condition needs 2 cells. One cell specifies the name of the field, and the other specifies the filter condition. The cell with the filter condition must be directly under the cell with the field name. You can place more conditions. They must be placed next to each other. No empty column.
- 47. ECDL/ICDL - Microsoft 2010 – Excel (Advanced) Page 47 ICDL-Test.Blogspot.com Database Functions Description Similar to DAVERAGE( ) Calculates the average in rows that meet the specified criteria AVERAGE( ) DCOUNT( ) Counts the number of rows that meet the specified criteria COUNT( ) DCOUNTA( ) Calculates the number of non-blank values in rows that meet the specified criteria COUNTA( ) DGET( ) Returns the value that meet the specified criteria. If more than one value matches, DGET( ) returns the #NUM! error. If no records match, it returns the #VALUE! Error No equivalent DMAX( ) Returns the maximum value in rows that meet the specified criteria MAX( ) DMIN( ) Returns the minimum value in rows that meet the specified criteria MIN( ) DPRODUCT( ) Calculates the product produced by multiplying all values in rows that meet the specified criteria PRODUCT( ) DSTDEV( ) Calculates the standard deviation in rows that meet the specified criteria STDEV( ) DSUM( ) Calculates the sum of values in rows that meet the specified criteria SUM( ) DVAR( ) Estimates the variance of a sample population in the rows that meet the specified criteria VAR( ) DVARP( ) Estimates the variance of an entire population in the rows that meet the specified criteria VARP( ) DGET( ) is the only function without a statistical counterpart. DGET( ) works a little like the VLOOKUP( ) AND HLOOKUP( ) functions, and it returns a single value in a row that meets the specified criteria.
- 48. Page 48 ECDL/ICDL - Microsoft 2010 – Excel (Advanced) ICDL-Test.Blogspot.com Using Forms to key in Data New to Excel 2010, you can convert a table to a Form for easy entry of data. Steps: 1. Click on Microsoft Office button, click on Excel Options 2. Choose Customize category, 3. Choose command from: Commands Not in the Ribbon 4. Choose Form… 5. Click Add>>> add to the Quick Access Toolbar 6. Click OK. 7. A new Form icon is added to QAT. 8. Click on Form icon, you will be lead into the data entry screen. 9. Click New button to continue your data entry.
- 49. ECDL/ICDL - Microsoft 2010 – Excel (Advanced) Page 49 ICDL-Test.Blogspot.com Auto Subtotal and Group Outline Auto Outline, a feature that gets Excel to examine your worksheet, and then create all the column and row groups you need automatically. Steps: 1. Retrieve the ProductListPrice.xlsx 2. Place cell-pointer in the category column. 3. First, Sort the category group in ascending order. 4. Next, Choose Data tab Outline group Subtotal 5. At each change in: Category, Sum , Add subtotal to: Price, click OK 6. The product list, with subtotalling at Row 20, 26 etc. 7. The grouping bars show you the range of cells that are bound together in a single group. The minus sign (-) is for you to collapse the group and plus sign (+) is for you to expand the group. 8. Grouping buttons – Each grouping button is labelled with a number. If you click group button, Excel collapses all the groups except the first level. In total, Excel can have 8 levels of groups.
- 50. Page 50 ECDL/ICDL - Microsoft 2010 – Excel (Advanced) ICDL-Test.Blogspot.com Data Validation Prevention is always better than cure, and one way to help ensure the accuracy of your spreadsheet is to check the validity of the data as it is being entered. You can do this by applying data validation rules to cells to prevent users from entering data of the wrong type or value. For example, you can use data validation to restrict the values that can be entered to whole numbers within a specified range or to text of a particular length. To clarify the process for users, you can also display a message to advise users on what values they can enter, and you can customise the alert used to warn users that an entry is invalid. After the setting, you can use Circle Invalid Data Allowing Numbers, Dates etc. in a Range You can control the entry of numerical data in your worksheet by specifying that values should be either whole numbers or decimals, and by imposing a maximum and/or minimum value that can be entered. Steps: 1. Open Sample Salary.xls , select range S11:S25 that you want to validate. 2. Choose Data tab Data Tools group Data Validation 3. In the Settings tab of the Data Validation dialog box, select Whole number from the Allow dropdown list. 4. Fill in Data, Minimum, Maximum values 5. Next, click on Input Message tab 6. Fill in the displaying message 7. Next, click on Error Alert tab 8. Fill in error alert action and message to display when errors occur Displaying an Input Message and an Error Alert An input message will contain instructions for the user on what values can be entered into the cell. You can also design a custom error alert to be displayed if a user attempts to enter a value outside of the permitted range or list.
- 51. ECDL/ICDL - Microsoft 2010 – Excel (Advanced) Page 51 ICDL-Test.Blogspot.com Circle Invalid Data As we have entered some invalid data in the ordinary salary column, you can select Circle Invalid Data to point out the error. You can also clear the circle by choosing clear validation circles Allowing Values from a List Often in worksheet model, there will be range of cells that should contain one of a finite group of values, such as the name of citizenship or age_group list. The following steps show you how to set up data validation to accept only values from a specified list: Steps: 1. Select the cell or cells that you want to validate and click the Data Validation button. 2. In the box Allow: List 3. Enter the source separate by commas or simply use = press F3 to paste the named range 4. Click OK 5. In the cell, you will see a drop-down. Click on the drop-down and choose from the list.
- 52. Page 52 ECDL/ICDL - Microsoft 2010 – Excel (Advanced) ICDL-Test.Blogspot.com This page is intentionally left blank
- 53. ECDL/ICDL - Microsoft Excel 2010 (Advanced) Page 53 ICDL-Test.Blogspot.com Part VIII - Linking A link is a formula reference to a cell in the same worksheet, another worksheet in the same workbook or to another workbook. The worksheet that contains the link is called the container workbook. The workbook pointed to by the link, which has the original data is known as the source workbook. The reference is live, which means that if all worksheets are open, any changes in the source workbook are automatically seen in the container workbook. Links can be used to consolidate several related worksheets/workbooks into one. For example, financial information can be collected in separate worksheets from the various divisions within a company, and then gathered together into one workbook to show the overall company results. Linking data has a number of advantages: To share or consolidate information To simplify a complex problem by breaking it down into several separate workbooks To divide work among several people To build models normally too large for memory To add flexibility to workbooks Steps:- 1. Open the workbook Link Demo and display the Consol sheet. This represents the consolidated results for a company with 3 divisions. 2. Click on cell C8. The formula contains a reference to cell C7 so that if C7 changes, so will C8. This is the simplest form of link. 3. The range C6 to C7 contains references like South!C6. This is a link referring to the cell C6 on sheet named South. 4. Switch to the worksheet South, in cell C6, change the amount from 500 to 1000 5. Switch to the worksheet Consol and the Sales is updated with 1840 and the Profit is updated with $76,940.32
- 54. Page 54 ECDL/ICDL - Microsoft Excel 2010 (Advanced) ICDL-Test.Blogspot.com Creating Links 1. Links to cells on the same worksheet, as in a formula for example, use the simple cell link reference, e.g. =B3+B4 2. Links created between worksheets must include the worksheet name followed by a ! e.g. =Sheet2!C10 worksheet name ! cell reference 3. A 3D-sum function can be used to consolidate data from several worksheets. It adds corresponding cells across adjacent worksheets. 3D Formulas Steps: For example, in a blank workbook that contains 4 worksheets 1) In Sheet1, cell A1, type 100 2) In Sheet2, cell A1, type 200 3) In Sheet3, cell A1, type 300 4) In Sheet4, cell A1, to sum all the 3 sheets cell A1 contents, type =sum( 5) Click on the first sheet name tab Sheet1 , click cell A1 6) Hold down to Shift key 7) Next, click on the last sheet name tab Sheet3 8) Observe that the formula bar shows the formula as 9) Complete the formula by typing ) and press enter 10) Any changes to the numbers made in these A1 cells will be updated to the 3D formula Note: Besides the sum function, you can use average, min, max, count etc. function in 3D formulas
- 55. ECDL/ICDL - Microsoft Excel 2010 (Advanced) Page 55 ICDL-Test.Blogspot.com Linking between Workbooks Links created between container workbook and source workbook must include [ ] square brackets, worksheet name, ! cell reference, e.g. =[SalesReport2013]Sheet2!C10 [ source workbook ] worksheet name ! cell reference Links are best created with the workbooks open. If after creating a link and the source workbook is closed, then the cell reference will formula will include the full file path, e.g. =C:......DocumentsExcel 2010 Data[SalesReport2013]Sheet2!C10 To create links between workbooks, copy from the source workbook and paste into the container workbook by using the Paste Link option Always save the source workbook first Steps: 1) Open 3 workbooks - Container.xlsx, Source_Jan.xlsx, Source_Feb.xlsx 2) Arrange these 3 worksheet side-by-side (Click View tab Arrange All Vertical option) 3) In Container.xlsx, in cell B5 we would like to capture the Jan amount, in cell B6 the Feb amount 4) Create by copying from Source_Jan.xlsx, cell B8 and paste-link to Container.xlsx cell B5 Answer : 5) Create by copying from Source_Feb.xlsx, cell B8 and paste-link to Container.xlsx cell B6 Answer :
- 56. Page 56 ECDL/ICDL - Microsoft Excel 2010 (Advanced) ICDL-Test.Blogspot.com 6) Save the updated file Container.xlsx 7) Close all the 3 workbooks 8) Open Source_Jan.xlsx workbook and change Materials X, Y, Z units to 1000, 2000, 3000 respectively. Save and close the workbook. Note : Remember to save the source document after changes take place so that the container document will be updated. Open a linked workbook, Update links, Edit links, Break Link 1) The first time the Container.xlsx workbook is opened, a warning message is shown 2) Click Options… , to select Enable the content, and click OK 3) The link is updated and B5 shows the amended value retrieved from the Source_Jan.xlsx 4) Close the workbook without saving so that the amended value is not saved. 5) The second time this Container.xlsx workbook is opened, the original value and a message is now displayed with a choice of updating or not.
- 57. ECDL/ICDL - Microsoft Excel 2010 (Advanced) Page 57 ICDL-Test.Blogspot.com 6) For this exercise, click Don’t Update 7) Click to cell B5. As the source workbook is no longer open, the link in the formula now shows the full path. 8) The links can be updated at any time. To update the links, choose Data tab Connections group Edit Links 9) This dialog box controls the links in this workbook. The options are listed on the right. - Update Values – the new total is retrieved from the unopened workbook 10) To break a link, select Edit Links and select the required link source, and click Break Link 11) Read the message carefully. If the Break Links is chosen, it will convert the cell to its existing value and the link is removed.
- 58. Page 58 ECDL/ICDL - Microsoft Excel 2010 (Advanced) ICDL-Test.Blogspot.com Linking to a Word Document A spreadsheet created in Excel can be copied into a Word document. This can be done in a way thst the data is linked to the workbook it originated from and any changes to the original workbook are reflected in the Word document. Paste Link Steps: 1) Open the workbook Company Results.xlsx This workbook contains a spreadsheet and a chart, that are to be linked to a word document. 2) Start the Word application. 3) Open the word document, 9th Mgt Meeting.docx 4) Position the cursor to where you want to insert the excel sheet
- 59. ECDL/ICDL - Microsoft Excel 2010 (Advanced) Page 59 ICDL-Test.Blogspot.com 5) Switch to Excel workbook Company Results.xlsx. 6) Select the range to be copied e.g. Click Copy or press Ctrl+C. This is captured to the clipboard. 7) Switch to Word application. Click Paste Special from the Paste drop down. 8) In the Paste Special dialog box, select Microsoft Excel Worksheet Object from the As box. Then select the Paste Link option. 9) Click OK to paste the range as a linked object. 9) Next, copy the chart in excel and paste link to word 10) Save the word document as 9th Mgt Meeting Linked.xlsx and close the file.
- 60. Page 60 ECDL/ICDL - Microsoft Excel 2010 (Advanced) ICDL-Test.Blogspot.com 11) Switch to Company Results.xlsx workbook and change the North worksheet, cell F6 to 1000. Save the workbook again using the same name. 12) Switch back to Word and open the document 9th Mgt Metting.xlsx. Click Yes to update the links in the document. Both the cell in the table and the chart will be updated. 13) Save the document and close the Word document. Paste Link as an icon Steps: 1) If you don’t want to display the full table or chart, you can always paste link as an icon as it takes much lesser document space. As and when it is required to read the table or chart, user will click on the icon which will open directly to view the content.
- 61. ECDL/ICDL - Microsoft Excel 2010 (Advanced) Page 61 ICDL-Test.Blogspot.com Part IX - Hyperlinks When a spreadsheet is being viewed on screen, there are ways of making it easier for users to move to different locations within it, or to access connected information held in other locations. This is done using hyperlinks A hyperlink can be applied to a cell in a spreadsheet so that clicking the cell will display another location in the sheet which has been defined with a name. The hyperlink may also display a different worksheet, or open a different workbook. Alternatively the hyperlink could be used for reference purposes, opening a file from a different application or a web page. The colours of “unvisited” hyperlink is blue and the colours of “visited” hyperlink is purple. Creating hyperlinks Steps: 1) Open the workbook hyperlink.xlsx. Try to click on the various hyperlink to access different location. 2) Create 3 hyperlinks in consol worksheet. Select Insert tab Links group Hyperlink In cell J6, consol worksheet – hyperlink to North!C8 (The cell position is for you to decide) In cell J7, consol worksheet – hyperlink to South!C8 In cell J8, consol worksheet – hyperlink to Mid!C8 3) Make sure Place in This Document is selected from the left of the dialog box, and if necessary click the + sign at the left of Defined Names to show the list of available names. 4) Next, select the cell reference 5) Create another 3 hyperlinks
- 62. Page 62 ECDL/ICDL - Microsoft Excel 2010 (Advanced) ICDL-Test.Blogspot.com In cell J6, north worksheet – hyperlink to defined names Profit In cell J6, south worksheet – hyperlink to defined names Profit In cell J6, mid worksheet – hyperlink to defined names Profit 6) To hyperlink to a web page, in consol worksheet, cell J10, hyperlink to website address. Remember to choose Link to : Existing File or Web Page and type in Address: box and click OK
- 63. ECDL/ICDL - Microsoft Excel 2010 (Advanced) Page 63 ICDL-Test.Blogspot.com Editing and Removing hyperlinks Steps: 1) All hyperlinks can be edited or changed to update with the correct link. Right-click mouse on the hyperlink, and choose Edit hyperlink 2) To remove hyperlink, right-click mouse and choose Remove hyperlink Autoshape a hyperlink Steps: 1) You can put an autoshape over a hyperlink. 2) First, Insert a autoshape Insert tab Illustrations group Shapes select any shape 3) Right-click on the shape and set the transparency to 50% 4) Move the shape over the hyperlink e.g. North!C8 5) Next, right-click on the shape and choose Hyperlink, set the cell reference North, C8 6) Click on the shape and this will bring you to the hyperlink.
- 64. Page 64 ECDL/ICDL - Microsoft Excel 2010 (Advanced) ICDL-Test.Blogspot.com This page is intentionally left blank
- 65. ECDL/ICDL - Microsoft Excel 2010 (Advanced) Page 65 ICDL-Test.Blogspot.com Part X - Importing from an External Data Source Data can be imported to a spreadsheet in various format. Data may be imported into a workbook from a text file, as long as the text file has been saved in the correct format and the text set out in such a manner that separators (tabs, commas, spaces, etc) can be specified to spilt the text into the columns. Steps: 1) Place your cell pointer to A1 in a blank worksheet 2) Select Data tab Get External Data From Text 3) Select the imported file name e.g. staff.txt and click Import
- 66. Page 66 ECDL/ICDL - Microsoft Excel 2010 (Advanced) ICDL-Test.Blogspot.com 4) The Text Import Wizard opens. The basic preview of the data layout is shown. 5) Click Next > to display Step 2. Ensure that the Comma option is checked in the Delimiters section. A clearer preview of the data layout is shown in the lower part of the box. 6) Click Next.
- 67. ECDL/ICDL - Microsoft Excel 2010 (Advanced) Page 67 ICDL-Test.Blogspot.com 7) At Step 3, format the data by column by selecting the column and set the required data format. E.g. Date – set to Day Month Year (DMY) 8) Click Finish. 9) The Import Data dialog box is displayed. Click OK 10) The data from the text file Staff.txt is imported into the empty worksheet, starting at cell A1
- 68. Page 68 ECDL/ICDL - Microsoft Excel 2010 (Advanced) ICDL-Test.Blogspot.com This page is intentionally left blank
- 69. ECDL/ICDL - Microsoft Excel 2010 (Advanced) Page 69 ICDL-Test.Blogspot.com Part XI - File AutoRecover New to Excel 2010, the new feature Versions saves your excel workbook periodically every 10 mins. It happens in the background, and you can access these autosaved versions of your work. The Versions feature consists of 2 components: - Versions of a workbook are saved automatically, and you can view them. - Workbooks that you closed without saving are saved as draft versions. Recovering versions of the current workbook Choose File Info to see whether any previous versions of the current workbook are available. The Versions section Versions lists the available old versions (if any) of the current workbook. In some cases, more than one autosaved version will be listed. You can open an autosaved version by clicking its name. Remember that opening an autosaved version won’t automatically replace the current version of your workbook. Therefore, you can decide whether the autosaved version is preferable to the current version. Or, you can just copy some information that may have been accidentally deleted, and paste it to your current workbook. When you close the workbook, the autosaved versions are deleted. Recovering unsaved work When you close a workbook without saving your changes, Excel asks whether you are sure. To recover a workbook that you closed without saving, choose File Info Versions, and choose Recover Draft Versions. You will see a list f draft version of your workbooks. You can open them and hopefully recover something that you needed. These drafts are also listed in the recent file list, displayed when you choose File Recent Draft versions are deleted after 4 days, or until you edit the file.
- 70. Page 70 ECDL/ICDL - Microsoft Excel 2010 (Advanced) ICDL-Test.Blogspot.com Part XII - Customising the Ribbon New to Excel 2010, you can customised the Ribbon in such a way that the commands you need are on the same tab. You can add a new tab, a new group, add commands to a custom group, change the order and delete the group. But you cannot remove built-in tab, you cannot remove commands from built-in groups, cannot change the order of the built-in group Steps to add a new ribbon tab: 1. Right click anywhere on the Ribbon, and choose Customize the Ribbon… Or Choose File tab Options Customize Ribbon 2. Use the Choose Command From : drop-down list on the left to display various groups of command.
- 71. ECDL/ICDL - Microsoft Excel 2010 (Advanced) Page 71 ICDL-Test.Blogspot.com 3. For example, you want to put the command ‘Using Forms to key in Data’ which allows you to convert a table to a Form for easy entry of data. 4. Locate the command in the list box on the left, and select it. 5. Use the Customise the Ribbon drop-down list on the right to choose a group of tabs. Main Tabs – refer to the tab that are always visible; Tool Tabs – refer to the contextual tabs that appear when a particular object is selected. In the list box on the right, select the tab and the group where you would like to put the command. You will need to click the plus-sign to expand the tab name so that it displays its group name. 6. To add a new tab, Click on A new tab appears. Rename the new tab to Extra tab , Rename the new group to Forms. Double-click on the name to change. 7. Next, to add the command to the new tab and new group, click the Add>> button to add the selected command from the left to the selected group on the right.
- 72. Page 72 ECDL/ICDL - Microsoft Excel 2010 (Advanced) ICDL-Test.Blogspot.com 8. A new Form icon is added to the new Extra tab, under the Forms group 9. Click OK to exit. 10. On the ribbon, you will see the Extra tab with the Forms command under the Forms group Note To rearrange the order of tabs, groups, or commands, select the item and use the Move Up and Move Down buttons on the right. Note that you can move a group into a different tab. To restore all or part of the Ribbon to its default state, use the Reset button on the Customise Ribbon tab of the Excel Options dialog box. Click this button to display two options : Reset Only Selected Ribbon Tab, and Rest All Customisations. If you choose the latter, you will also lose any Quick Access toolbar customisation that you made.
- 73. ECDL/ICDL - Microsoft Excel 2010 (Advanced) Page 73 ICDL-Test.Blogspot.com Part XIII - Pivot Tables Introduction Excel’s Pivot Tables are a marvellous piece of engineering. They are powerful tools for analysing data. With only a few minutes of work, mostly drag-and-drop, even a relatively new user can create an attractively formatted table which summarizes thousands of rows of data into a coherent report. A PivotTable report is especially designed for: Querying large amounts of data in many user-friendly ways. Subtotaling and aggregating numeric data, summarizing data by categories and subcategories, and creating custom calculations and formulas. Expanding and collapsing levels of data to focus your results, and drilling down to details from the summary data for areas of interest to you. Moving rows to columns or columns to rows (or “pivoting”) to see different summaries of the source data. Filtering, sorting, grouping, and conditionally formatting the most useful and interesting subset of data to enable you to focus on the information that you want. Presenting concise, attractive, and annotated online or printed reports. You often use a PivotTable report when you want to analyse related totals, especially when you have a long list of figures to sum and you want to compare several facts about each figure. In Excel 2010, Pivot Tables have been given a new lease of life. Creating a Pivot Table The Source Data The most important item of a Pivot Table is (surprise!) the data itself. This is often overlooked by most users, who then wonder why their Pivots do not produce coherent hypotheses! Data for Pivot Tables can come from several sources. Using worksheet data. You can use data from a Microsoft Office Excel worksheet as the basis for a report. The data should be in list format, with column labels in the first row. Each cell in subsequent rows should contain data appropriate to its column heading. There should not be any blank rows or columns within the data of interest. Excel uses your column labels for the field names in the report. Using a named range. To make the report easier to update, name the source range, and use the name when you create the report. If the named range expands to include more data, you can refresh the report to include the new data. Excel table - Excel 2010, tables (Ctrl+T), are already in list format and are good candidates for PivotTable source data. When you refresh the PivotTable report, any new rows pasted to the bottom of the table and updated data in the Excel table is automatically included in the refresh operation. Rules for the Source Data 1) The first row contains the field names and each name is unique. 2) The second and subsequent row contains the data. 3) There must not be any entire blank row, although individual blank cells may be present. 4) If you often add new data to the bottom of the data set, you should strongly consider converting your data set to a table using Ctrl+T. Pivot tables created from tables automatically pick up new rows pasted to the bottom of the table after a refresh.
- 74. Page 74 ECDL/ICDL - Microsoft Excel 2010 (Advanced) ICDL-Test.Blogspot.com Creating the Pivot Table The best way to understand a Pivot Table is to actually create one from scratch. Let’s take the example shown below: Filename : Customers.xlsx -- This is a list of customer whom we sell the products to. We have divided the customers into 3 regions- East, West, Central. Each customer shows the details of Invoice Number, Invoice Date, Quantity Sold, Revenue, Cost of Goods Sold and Profit earned. Steps: 1. Open the file Customers.xlsx 2. Select one cell in your data. 3. Press Ctrl+T 4. Where is the data for your table? Excel IntelliSense chose the right range for your data. Click OK 5. The list has been converted to a table. Pivoting the data 6. A new contextual tab appears Table Tools – Design with a new table name given 7. Select any cell within the table 8. Choose Insert Tables PivotTable PivotTable
- 75. ECDL/ICDL - Microsoft Excel 2010 (Advanced) Page 75 ICDL-Test.Blogspot.com 9. In the lower portion of the dialog, you can choose to create your pivot table on a new worksheet or in a blank portion of the existing worksheet. 10. Click OK – Excel creates an empty Pivot Table and displays the PivotTable Field List. 11. The graphic shown in columns A:C is a placeholder to indicate where the pivot table will appear after you choose some fields. On the right, the Pivot table Field List contains the field names in your source data. You can click on the field that you wish to add to the pivot table. If a field has already been added to the Pivot Table, its name appears in bold. 12. Select the fields for (1st ) Region, next (2nd ) Product, and next (3rd ) Revenue check boxes. 13. Because the Region and Product fields contain text, they are automatically moved to the row area. Because the Revenue is numeric, it is automatically moved to the Values area.
- 76. Page 76 ECDL/ICDL - Microsoft Excel 2010 (Advanced) ICDL-Test.Blogspot.com Anatomy of a Pivot Table Row Labels - This section is for fields that appear on the left side of the pivot table. By default, all text fields move here when you select the check boxes. Row labels can contain non-numeric data such as text and dates. Column Labels – This section is for fields that stretch along the top columns of the pivot table. Column labels can also contain non-numeric data such as text and dates. Values – This section is for all the numeric fields that are summarized in the pivot table. By default, it is summed, but you can change the default calculation to an average, minimum, maximum, or others.
- 77. ECDL/ICDL - Microsoft Excel 2010 (Advanced) Page 77 ICDL-Test.Blogspot.com Report Filter – This section is to limit the report to only certain criteria. This section is equivalent to the PageField section in the old classic model (Version 2003). It is virtually replaced by the new slicer feature in Excel 2010. Rearrange the Pivot Table Making Changes After you create the basic Pivot Table, making changes is easy: 1. To add a field, drag and drop the field to the appropriate Column drop zone or Row drop zone. 2. To remove a field, drag it off the Field List. 3. You rearrange fields by dragging them around. 4. If you add a field as a Report Filter, it shows as a drop-down, allowing you to filter the displayed data by one or more items.
- 78. Page 78 ECDL/ICDL - Microsoft Excel 2010 (Advanced) ICDL-Test.Blogspot.com Four Things you have to know when using Pivot Tables 1. Your Pivot Table is in Manual Calculation mode until you click Refresh button Pivot tables are fast because the data from the worksheet is loaded into a special cache in memory. If you build a pivot table and then change the underlying data, you must click the Refresh icon in the Options tab to have the change appear in the pivot table. 2. One Blank Cell in a Value Column causes Excel to count instead of sum When all the cells in a column contain numeric data, Excel chooses to sum. If just one cell is either blank or contains text, Excel chooses to count. To solve this, select the Field Settings icon. Change from Count to Sum in that dialog. 3. If you click outside the Pivot Table, all the Pivot Table field list and tools disappear The Field List will be visible only when the Pivot Table is active. To make a Pivot Table active, click any cell in it. 4. You cannot change, move a part of, or insert cells in a Pivot Table Many times, pivot tables get you very close to the final report you want, and you just want to insert a row or move one bit of the table. You cannot do this as Excel needs to figure out how to redraw the table when you move something in the field list. The solution is to copy the entire pivot table and use Paste Values to convert the report to regular Excel data and modify it. Numeric Formatting of PivotTable Data The first thing you may have noticed is that the Pivot Table uses General number formats. While it may be tempting to change the format directly from the Number subgroup in the Home tab – don’t! The reason is that the formats there are linked to the cell. The Pivot Table is dynamic. When it expands or shrinks to accommodate changes, such formats don’t change with it. To change the number format: 1. Select any value in the Pivot Table.
- 79. ECDL/ICDL - Microsoft Excel 2010 (Advanced) Page 79 ICDL-Test.Blogspot.com 2. On the PivotTable Tools contextual tab Options tab under Active Field: It shows Sum of Revenue. Click on the Field Settings icon 3. Choose Field Settings to display the Value Field Settings dialog. 4. The label for this field appears in the Custom Name box at the top of the dialog. Change Sum of Revenue by typing a space and then the word Revenue. Note that the space is critical. You cannot use just the word Revenue without a space as this would create a duplicate field name. 5. Click the Number Format button in the bottom of the Value Field Settings dialog. Excel displays the familiar Number tab of the Format Cells dialog. 6. Select the Number category. Select 0 decimal places. Add a thousand separator. Click OK, OK to close the dialog.
- 80. Page 80 ECDL/ICDL - Microsoft Excel 2010 (Advanced) ICDL-Test.Blogspot.com Manipulating Pivot Table Options Fill up the Blanks with Zeros If you want to show zeros instead of blanks in the values area of the pivot table, do these:- Steps:- 1. Select any one cell inside the pivot table 2. On the PivotTable Tools contextual tab Options tab Options 3. On the Layout & Format tab, For empty cells show: 0 4. Click OK.Excel will fill in the empty cells with zeros. Refreshing the data Unfortunately, when the source data changes, the Pivot Table doesn’t update automatically! To do a Refresh, choose PivotTable Tools Options tab Refresh Choose Refresh from the drop-down to update the Pivot, or Refresh All if you have more than one Pivot Table that was updated. Deleting the Pivot Table To delete a Pivot Table (actually remove it and not just clear the data or the structure) 1. Click the PivotTable report. 2. On the Options tab Actions group click Select, and then click Entire PivotTable. 3. Press Delete key.
- 81. ECDL/ICDL - Microsoft Excel 2010 (Advanced) Page 81 ICDL-Test.Blogspot.com Choosing Report Layout Options In Excel 2010, PivotTables by default use a more compact presentation style called Compact Layout. All 3 Layout options affects only the presentation of the row axis. To change the layout – choose PivotTable Tools Design Report Layout (1) Compact Layout – indents inner fields on the row axis beneath their outer fields, letting you see more information at a glance (2) Outline Layout –indents customer details below the customer2 listing (3)Tabular Layout – indents customer details same line as the customer2 listing (Better Readability – Tabular Layout)
- 82. Page 82 ECDL/ICDL - Microsoft Excel 2010 (Advanced) ICDL-Test.Blogspot.com Grouping One of the best features of the Pivot Table is the ability to group or consolidate items into categories. Both Column and Row Labels can be grouped. There are two ways to group: 1. Manual Items are individually selected after the Pivot is created and grouped. 2. Automatic Numeric items like Dates can be automatically grouped into intervals and/or series. Manual Grouping This Pivot Table is created from a Customer list which we want to categorized into ‘Electronics’ and ‘Household’. Steps: 1. Select the Fields as shown on the field list on the right side 2. Switch to Tabular Layout 3. Select the cells you want to group e.g. for ‘Household’, 4. Select customer name, – press the Ctrl key while selecting non-contiguous cells. 5. Next, choose Options tab Group tab Group selection 6. Customer group is moved inward, with a new customer2 group created for Group naming 7. Label this Group1 with a more meaningful name such as ‘Electronics’. Use F2 to edit or click on the cell to change.
- 83. ECDL/ICDL - Microsoft Excel 2010 (Advanced) Page 83 ICDL-Test.Blogspot.com 8. Create a 2nd group ‘Household’ for Cool Bottle Co and Crisp Opener Partners 9. You can click on the Filter button to select and show only the groups. 10. New to Excel 2010, you can add and repeat item labels to eliminate the blanks in column A. Choose PivotTable Tools Design Report Layout Repeat All Items Labels To turn off the item labels, repeat the command and select Do Not Repeat Item Labels 11. To show only the group headings, you can click on the collapse button located next to the group heading. To expand it, click on the expand button. Alternatively, you can also use the Collapse Entire Field or Expand Entire Field button
- 84. Page 84 ECDL/ICDL - Microsoft Excel 2010 (Advanced) ICDL-Test.Blogspot.com Automatic Grouping – Grouping Daily Dates to Months and Years Automatic grouping is used when numeric items in a Pivot Table can be classified into intervals. This is particularly useful if the Pivot contains numbers, dates or times. Steps: 1. Create a new pivot table on another new worksheet. 2. Select the Fields as shown on the field list on the right side 3. Switch to Tabular Layout. Show all item label. 4. Click on the cells you want to group e.g. in ‘Date’ column 5. Choose Options tab Group tab Group selection 6. Excel displays the Grouping dialog. 7. Notice that Months is already selected in the By box? If that isn’t the right choice, deselect it and reselect the one you want. In our case, choose the Months and Years option. 8. Verify that the Starting at and Ending at dates are correct. 9. Click OK. Excel groups the dates into Months and Year intervals.
- 85. ECDL/ICDL - Microsoft Excel 2010 (Advanced) Page 85 ICDL-Test.Blogspot.com 10. If you want to add Quarters to the group, you can click on Group Field to bring back the group dialog box and click on Quarters. Click OK. 11. You now have a pivot table that provides totals by month, quarter, and year. Notice that your pivot table field list includes 3 fields related to dates; the years and quarters are virtual fields. The original Date field includes the months. Practical Create a year to year comparison on customer.xlsx based on the pivot table field list. Show subtotal at the bottom of group. Save the file under the filename comparison.xlsx
- 86. Page 86 ECDL/ICDL - Microsoft Excel 2010 (Advanced) ICDL-Test.Blogspot.com Creating a Frequency Distribution Creating a frequency distribution for these students test scores. The goal is to determine how many students are in each 10-point range (1-10, 11-20, and so on) Steps: 1. Open the file Test Scores.xlsx and create a pivot table in cell D1. 2. Select the Fields as shown on the field list on the right side 3. Change from Sum of Score to Count of Score 4. Group the scores into bin of 10 5. By default, Excel does not display items with a count of zero. In this example, no test scores are less than 21, so the 1-10 and 11-20 items are hidden. To force the display of empty bins, choose PivotTableTools Options Field Settings to display the Field Settings dialog box. Click the Layout & Print tab, and select Show Items with No Data.
- 87. ECDL/ICDL - Microsoft Excel 2010 (Advanced) Page 87 ICDL-Test.Blogspot.com Adding Calculations Outside the Pivot Table You would probably rather show a % of Growth instead of a Grand Total column in Column E. After you grouped the dates in the pivot table, you are prevented from adding a calculated item inside the pivot table, so you have to turn back to regular Excel to provide the % of Growth column. Steps: 1. Open the file Comparison.xlsx and create a pivot table on a new worksheet. 2. Select the Fields as shown on the field list on the right side 3. Remove the row grand total. Click on Design tab Grand totals On for Columns Only 4. In cell E5, type = D5/C5-1 5. You really have to type this formula! Do not touch the mouse or the arrow keys while you are building the formula, otherwise the getpivot command will appear. 6. Format E5 to Percentage format with 1 decimal place. 7. Copy E5 to E6:E21
- 88. Page 88 ECDL/ICDL - Microsoft Excel 2010 (Advanced) ICDL-Test.Blogspot.com 8. To format column E to look like it is part of pivot table, copy the format from column D to column E. 9. Select D3:D21, choose Copy 10. Position at E3:E21, choose Paste Special with Formats 11. Format E5:E21 to Percentage format with 1 decimal place again. 12. Type % of Growth in cell E4 The result should look like this: 13. Save the file as Comparison with Calculations outside Pivot Table.xlsx
- 89. ECDL/ICDL - Microsoft Excel 2010 (Advanced) Page 89 ICDL-Test.Blogspot.com Formatting a Pivot Table The Design tab that appears on the ribbon under PivotTable Tools when you select any part of a PivotTable includes a large selection of 73 professionally design PivotTable styles. The 73 styles are further modified by using the 4 check boxes for Banded Rows, Banded Columns, Row Headers, and Column Headers. You can also choose the 3 report layouts, 2 options for blank rows, Grand Totals on and off for Rows or Columns, Subtotals Above or Below to further enhance your report Choose PivotTable Design tab PivotTable Styles Light, Medium, Dark category Displaying Subtotals and Grand Totals By default, Excel generates grand totals for all outer fields in the PivotTable report. Click on the Grand Totals and choose from the choice given. By default, Excel creates subtotals for all but the innermost fields. Click on the Subtotals and choose from the choice given. But to customise subtotals for a particular field, right-click an item in the field, and click Field Settings. Automatic means Excel decide for you. None means turning off subtotals. Custom lets you change the default subtotal calculation, such as Sum to Average. Displaying the Details behind a Data Value If you double-click any PivotTable value that represents a summary calculation, Excel displays the details behind that calculation on a new worksheet. The purpose is for you to further analyse the details or you can perform further pivot table on the given data.
- 90. Page 90 ECDL/ICDL - Microsoft Excel 2010 (Advanced) ICDL-Test.Blogspot.com Filtering a Pivot Table Pivot tables are a miraculously powerful tool for creating detailed summary tables. The only problem is that sometimes these reports are too detailed- leaving you with summaries that are nearly as detailed as the original table. To simplify your pivot tables, you may want to restrict them so that they show only a portion of the total data. This process is known as filtering, and you can do it in three ways:- - Report Filtering - Slicers - Row Label Filtering Report Filtering Report filtering lets you filter out your data so that your pivot table uses only the rows that really interest you. Before you go any further, it’s important to understand one basic fact about report filtering. Any fields you use to perform report filtering cannot be used in your pivot table for grouping. So if you are filtering by customer, you cannot group by customer. If you try it, Excel will remove your grouping when you add the report filter. This limitation does not apply to the slicers or group filters. Steps: 1. Open the file Customers Pg 104.xlsx 2. Insert 20 empty rows before the heading row 3. Turn off subtotal and display report in Tabular format 4. Drag the Customer field to Report Filter
- 91. ECDL/ICDL - Microsoft Excel 2010 (Advanced) Page 91 ICDL-Test.Blogspot.com 4. Click on the drop-down arrow for Customer 5. You can choose the one customer you wish to display. 6. If you want to filter for several customers at once. Switch on the Select Multiple Fields checkbox at the bottom of the list, with a checkmark. Excel uses checked values to create the pivot table, and ignores unchecked entries. 7. As seen in ‘Multiple Items’, we cannot see what contain in multiple items. That’s why New in Excel 2010, Slicers are introduced. Replicating a Pivot Table for Every Customer This technique makes many copies of the pivot table, with a different Report Filter value in each copy. If your pivot table contains at least one Report Filter label, select the Options drop-down form the Options tab. Select Show Report Filter Pages from the drop down menu. Confirm which field should be used. Excel adds worksheets to your workbook. Each worksheet contains the original pivot table, with a different value chosen for the selected filter field.
- 92. Page 92 ECDL/ICDL - Microsoft Excel 2010 (Advanced) ICDL-Test.Blogspot.com Slicers Slicers are visual filters that are new in Excel 2010. They solve the problem of selecting Multiple Items. Although slicers take up much more space than the equivalent Report Filters, the slicer arrangement invites people to start running ad hoc analysis by clicking the slicers. Add Slicers Steps: 1. Before you add slicers, insert some extra rows to place the slicers above the pivot table. 2. Select any cell in your pivot table. Click and select ‘All’ for customer in the report filter. 3. On the Options tab, select the Insert Slicer icon. Excel shows the Insert Slicer dialog box. 4. The Insert Slicers dialog box appears, with a list of all fields in the pivot table. Place a check mark next to the Slicers you want, and then click OK. 5. Slicers can be moved and resized, and you can change the look. Arranging the Slicers You can reposition and resize the slicers. Choose a logical arrangement for the slicers. For the months, you want to arrange in 4 rows by 3 columns. Click on the Slicer Tools buttons, Buttons and Size to arrange A gallery on the Slicer Tools Options offers 14 slicers colour themes. Click each slicer and choose a different colour scheme for each slicer.
- 93. ECDL/ICDL - Microsoft Excel 2010 (Advanced) Page 93 ICDL-Test.Blogspot.com Formatting the Slicers You can also control the caption that appears at the top of each slicer. Choose a slicer. Click the Slicer Settings icon on the left side of the Slicer Tools Options tab. You can adjust the caption in the Slicer Settings dialog. Using the Slicers To select a single item from a slicer, choose that item. To multiselect from a single slicer, hold down the Ctrl key while selecting the multiple items. To select adjacent items, click on the first item and drag to the last item to be selected. To clear a filter from a slicer, click the Funnel-X icon in the top right of the slicer.
- 94. Page 94 ECDL/ICDL - Microsoft Excel 2010 (Advanced) ICDL-Test.Blogspot.com Row Label Filtering The pivot table shown with row fields. Drop downs in cells A16, B16 lead to the row filter menus. The type of filter shown will depend on the type of data we have in that column. The Search Box New in Excel 2010, the Search Box lets you filter labels that include a certain word. For example, you want to search for words starts with Co* and click OK. Another time when you want to search for Cr*, you can click on Add current selection to filter . This second time that you use search, the capability to add these results to the previous makes the search box powerful. Clearing a Filter To clear filters form one field in the pivot table, open the filter drop-down for that field and select Clear Field from “Field”
- 95. ECDL/ICDL - Microsoft Excel 2010 (Advanced) Page 95 ICDL-Test.Blogspot.com Pivot Charts A pivot chart is an interactive graphical representation of the data in a Pivot Table. And just like in a Pivot Table, you can rearrange the layout, select a different type of chart, and add or remove data. To create a Pivot Chart together with the Pivot Table, Steps: 1. Open the Customers.xlsx 2. Click anywhere inside the Pivot Table. 3. Go to Insert tab PivotTable PivotChart 4. Click OK to accept the table range 5. You will see a pivot table placeholder and the pivot chart placeholder.