what is slit lamp Biomicroscopy | What is a slit lamp exam used for? |Difference between Haag Streit and Zeiss |Slit lamp Filters
•
3 gefällt mir•1,734 views

Hi, Naeem Ahmad Here. Please Subscribe My Ahmadinfotech YouTube Channel - https://www.youtube.com/channel/UCNCQ3m5muOsiQ5fGpRfgNIg LIKE || COMMENT || SHARE || SUBSCRIBE ||

Empfohlen
Weitere ähnliche Inhalte
Was ist angesagt?
Was ist angesagt? (20)
Ähnlich wie what is slit lamp Biomicroscopy | What is a slit lamp exam used for? |Difference between Haag Streit and Zeiss |Slit lamp Filters
Ähnlich wie what is slit lamp Biomicroscopy | What is a slit lamp exam used for? |Difference between Haag Streit and Zeiss |Slit lamp Filters (20)
Kürzlich hochgeladen
Kürzlich hochgeladen (20)
what is slit lamp Biomicroscopy | What is a slit lamp exam used for? |Difference between Haag Streit and Zeiss |Slit lamp Filters
- 1. SLIT LAMP BIOMICROSCOPY AHMADINFOTECH • NAEEM AHMAD YouTube.com/ahmadinfotech
- 2. Introduction ★ The slit lamp is indispensable for the detailed examination of virtually all tissues of the eye and some of its adnexa. ★ It is routinely used for examination of the anterior segment, which includes the anterior vitreous and those structures that are anterior to it. ★ The lamp facilitates an examination of the anterior segment and posterior segment of the human eye which includes the eyelid, sclera,conjunctiva,iris, natural crystalline lens, and cornea. ★ In addition to physical (visual)examination, Tonometry, linear measurement of tissues or lesions, and ophthalmic photography. contact lens fitting Etc.
- 3. The binocular slit-lamp examination provides a stereoscopic magnified view of the eye structures in detail, enabling anatomical diagnoses to be made for a variety of eye conditions. A second, hand-held lens is used to examine the retina. ❖ The concept come in 1850 by Hermann von Helmholtz ❖ In 1911 the credit goes to Allvar Gullstrand ❖ In 1919 lamp and magnification is introduced by Vogt Henker ❖ In 1926, the slit lamp instrument was redesigned. ❖ In 1927 the stereo cameras has been introduced ❖ In 1930, Rudolf Theil further developed the slit lamp, encouraged by Hans Goldmann. ❖ In 1938 vertical and horizontal movement and joystick was introduced ❖ In 1976 the halogen bulb was introduced. ❖ In 1996 the last major development History
- 4. Types There are two different types of slit lamp based on the location of their illumination system: Zeiss type In the Zeiss type slit lamp, the illumination is located below the microscope(Integrated illumination type). This type of slit lamp is named after the manufacturing company Carl Zeiss. Haag Streit type In the Haag Streit type slit lamp, the illumination is located above the microscope(Tower illumination type). This type of slit lamp is named after the manufacturing company Haag Streit.
- 5. Slit lamp is composed of three basic systems: ❖ Observation system (Microscope) ❖ Illumination system (Slit-lamp) ❖ Mechanical system (Engineering support) ❖ OBSERVATION SYSTEM (MICROSCOPE) ★ It works on the same principle as a compound microscope.Which is composed of two optical elements,an objective and an eyepiece. ★ The objective lens (+22 D) is towards the patient,whose eye forms the object. The eyepiece is +10 to +14 D and is towards the examiner. ★ The objective lens consists of two planoconvex lenses with their convexities facing towards each other.
- 6. ❖ ILLUMINATION SYSTEM 1. Light source 2. Slit and other diaphragms 3. Filters 4. Projection lens Light source, ★ Originally , a Nernst lamp was used as a light source which was followed by Nitra lamp, arc lamp, mercury vapour lamp and finally halogen lamps. ★ It provides an illumination of 2X 10^5 to 4X 10^5 lux. ★ The illuminating system can be adjusted to vary the width, height and angle of incidence of the light beam. ★ Slit lamps provide a range of magnification from 6X to 40X.
- 7. Slit and other diaphragms, ★ Height and width of the slit can be varied using two knobs. ★ There are some stenopaeic slit 2.0 and 0.5mm to provide conical beam of light. Filters Different filters can be inserted into the illumination beam, 1. Cobalt Blue 2. Red free 3. Neutral density 4. Heat absorbing 5. Grey 6. Yellow filter 7. Diffuser
- 8. Filter Typical symbol Use Cobalt blue Blue filled circle Enhances the view of fluorescein dye in the tear film of the eye. Typically used for fluorescein staining and Goldmann tonometry. Red free Green filled circle Enhance the view of blood vessels and haemorrhages Neutral density Circle with hashed lines Decreases maximum brightness for photosensitive patients Heat absorbing Built into most slit-lamps Decreases patient discomfort Grey Circle with thick line Decreases maximum brightness for photosensitive patients Yellow filter Yellow filled circle Located in the observation system For good contrast enhancement when using fluorescein and the cobalt blue filter Diffuser May be a flip-up filter placed on the illumination source overall observations of the eye filter placed on the and adnexa
- 9. Projection lens ★ Forms an image of the slit at the eye. This has two advantages: 1. It keeps the aberrations of the lens down,better quality image. 2. It increase the depth of focus of the slit,better optical section of the eye. MECHANICAL SUPPORT SYSTEM 1. Joystick arrangement 2. Up and down movement arrangement 3. Patient support arrangement 4. Fixation target
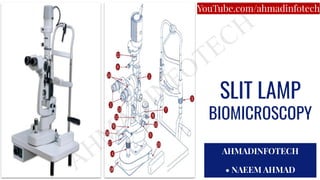
- 10. PARTS OF A SLIT LAMP BIOMICROSCOPE 1. EyePieces 2. Reflecting Mirror 3. Chin Rest - Adjustment Knob 4. Joystick 5. Slit width Adjustment Knob 6. Adjustment Knob For Aperture Height And Slit Tilt 7. Illumination System Arm 8. Illumination System Lock Knob To Obs. Arm 9. Observation System Arm 10. Observation System Lock Knob To Base 11. Illumination System Tilt Adjuster 12. Filter Selector Switch 13. Magnification Selector 14.Binoculars, Adjustable For PD. 15. Base Axis 16. Axis Rollers 17. Rails 18. Rolling Pad/Plate. Attached to Table 19.Forehead Rest 20.Chin Rest 21. Light Compartment 22.Patient Grip Handle 23.Power Switch 24.Fixation Light
- 11. 1.Eyepieces 2. Reflecting Mirror 3. Chin - Rest Adjustment Knob
- 12. 4.Joystick 5. Slit Width Adjustment Knob 6. Adjustment Knob For Aperture Height And Slit Tilt
- 13. 7. Illumination System Arm 8. Illumination System Lock Knob To Obs. Arm 9.Observation System Arm 10.Observation System Lock Knob To Base 11. Illumination System Tilt Adjuster
- 14. 12. Filter Selector Switch 13. Magnification Selector 14. Binoculars, Adjustable For PD. 15. Base Axis
- 15. 16. Axis Rollers 17. Rails 18. Rolling Pad/Plate. Attached to Table 19. Forehead Rest
- 16. 20. Chin Rest 21. Light Compartment
- 17. 22. Patient Grip Handle 23. Power Switch 24. Fixation Light
- 18. Principles of Slit-Lamp Illumination The slit lamp is capable of illuminating the tissues of the eye in several different ways, any or all of which can be useful, depending on the clinical situation. The beginning ophthalmology resident should strive early to master all of these techniques of illumination, so as to be able to use the slit lamp to its full advantage. Types of Illumination The slit lamp exam is dynamic; the observer uses multiple types of illumination simultaneously. ❏ The three main categories of illumination are DIFFUSE, DIRECT, AND INDIRECT. ❏ Diffuse illumination provides an even light over the entire ocular surface. ❏ With direct illumination techniques, the light is shone directly onto the area or structure of interest. ❏ With indirect illumination methods, the object of interest is illuminated by light that is reflected off of another structure.
- 19. Methodes of Illumination There are s basic methods of illumination using the slit-lamp :- 1. Diffuse Illumination 2. Direct Illumination a. Parallelopiped b. Optical section c. Pinpoint (conical) d. Tangential e. Specular Reflection 3. Indirect Illumination a. Retro Illumination b. Sclerotic scatter c. Transillumination d. Proximal Illumination Diffuse Illumination Direct Illumination Indirect Illumination
- 20. Diffuse Illumination ● Diffuse illumination is still a good starting point of the eye.(especially the skin). ● Diffuse illumination is used mainly for obtaining an overview of ocular surface tissues (eg, bulbar and palpebral conjunctiva), although it can also be useful for examining intraocular structures (iris, lens capsule). ● Diffuse illumination is most often used in slit lamp photography. ● Angle between microscope and illumination system should be 30-45 Degree. ● Slit width should be widest. ● Filter to be used is diffusing filter. ● Magnification used is low to medium. ● Illumination should be medium to high.
- 21. ● The cobalt blue and red-free filters also act as diffusers, but white light is generally used for this technique. ● The red-free filter produces light-green light, facilitating the evaluation of rose-bengal staining ● Observe: eyelids, lashes, conjunctiva, sclera, pattern of redness, iris, pupil, gross pathology, and media opacities. ● Contact lens fitting.
- 22. Direct Illumination The slit beam and microscope are focused on the same area, and examination is performed. Changes in the corneal stroma and epithelium are better noted by this technique. a. Parallelopiped b. Optical section c. Pinpoint (conical beam) d. Tangential e. Specular Reflection Parallelopiped of the cornea is observed using a 2-3mm wide focused slit. ★ The slit should be 45-60 degree on to the temporally. ★ Set the slit to a medium width, and the angle to vertical position. ★ Increase the magnification for more detailed analysis as required. ★ Magnification is 7-10X. ★ Microscope is placed directly in front of patients cornea. ★ The room should be darkened.
- 23. ➢ To determine the fit of a contact lens, particularly a rigid lens after fluorescein has been instilled in the eye and the cobalt blue filter used. ➢ Examine the crystalline lens. ➢ Used to detect and examine corneal structures and defects. ➢ The white blood cells will reflect the light and be seen as white dots floating in the anterior chamber. ➢ Cells and flare in the anterior chamber are graded by using a Parallelopiped 2 mm wide X 4mm high. ➢ To give a broad view of the anterior and posterior corneal surfaces. ➢ To determine anterior surface irregularities. ➢ To examine the endothelium.
- 24. OPTICAL SECTION ● A thin slice of tissue can be thrown into bright contrast with its illuminated surroundings. ● Tear layer is seen as a bright anterior most zone. ● Epithelium is seen as a dark line immediately behind the tear layer. ● Bowman’s membrane is seen as a bright line. ● Stroma is focused as a wider granular and greyer zone. ● Descemet’s membrane and endothelial layers are seen as posterior most bright zone. Examination of cornea by optical section gives information about : ● Changes in corneal curvature ● Changes in corneal thickness ● Depth of the corneal pathologies, e.g. location of a foreign body.
- 25. ➢ The position of the microscope directly in front of the eye to be examined. ➢ Angle of about 45 degrees to the microscope on the temporal side. ➢ Use low power magnification first. ➢ The slit to a narrow width and the angle to vertical position. ➢ Use the joystick, bring the illuminated "slice" or section into very sharp focus. ➢ Increase the angle between the microscope and the illuminating arm to expose a greater area of stroma. ➢ Increase the magnification. ➢ While scanning, as the slit position reaches the corneal apex, swing the illuminating arm about 90 degrees to the nasal side for viewing the medial half of the cornea. ➢ Observe: Cornea, Iris, Lens, Vitreous,Nerve Fibers,Blood vessels,AC Depth Etc.
- 26. Pinpoint (conical beam) ➢ Also known as "Conical beam", a small circular aperture of light is focused on a specific point on the cornea, or aimed through the pupil to reveal anterior chamber details. ➢ Target in the cornea while minimizing the brightness of the beam for client comfort. ➢ The principle is the same as a beam of sunlight streaming through a room, illuminating airborne dust particles.This occurrence is known as Tyndall’s phenomenon. ➢ Angle of about 45 degree to the microscope on the temporal side. ➢ Reduce room lighting to a minimum or to total darkness. ➢ Magnification is high (16-25X). ➢ Pinpoint illumination is easier if the pupil is not dilated. ➢ Observe: cells, flare
- 27. Tangential This technique is used to observe surface texture.Examination of the cornea and the iris using very oblique illumination when the microscope is aligned in front of the eye being observed. The angle of the beam is variable. ➢ To evaluate the position and movement of a contact lens with a minimum of light intensity. ➢ Using a blue filter, to observe Fleisher's ring in keratoconus. ➢ To reveal the topography, integrity, pigmentation and pathology of the anterior of the iris. ➢ To observe floaters in the anterior chamber. ➢ The microscope directly in front of the eye.Angle, more than 70 degrees, to the oculars. ➢ Use a medium-wide beam of moderate height. ➢ Magnifications of 10X, 16X, or 25X are used. ➢ If you are looking for details on the cornea or lens, dilation is preferred because this creates a dark background against which to view those structures ➢ Observe: anterior and posterior cornea, iris, anterior lens.
- 28. Specular Reflection ➢ It is used to visualize the actuality of the corneal and lens surfaces. ➢ If the surface is smooth, then reflection smooth and regular; if the surface is broken or rough, then reflection will likewise be irregular. ➢ Position the illuminator about 30 degrees to one side and the microscope 30 degrees to the other side. ➢ Angle of the illuminator to the microscope must be equal and opposite. ➢ To visualize the endothelium, start with lower magnification (10X to 16X). ➢ The endothelium is best viewed using only one ocular, so you may want to close one eye. This technique is difficult to master, partly because the cells have such low contrast, and takes some experimentation and experience. ➢ Cell counts done strictly by slit lamp observation are not generally accepted. Contact specular microscopy is much more accurate. ➢ Observe: corneal epithelium and endothelium, endothelial mosaic, lens surfaces.
- 29. Indirect Illumination The light is directed just to the side of the lesion to be examined.Some of the light enters the lesion, causing it to glow internally.This type of illumination is most useful for translucent lesions such as some corneal opacities or iris nodules. Indirect illumination provides more detail than diffuse or direct illumination. The microscope itself is focused at a different depth or plane than the light source. a. Retro Illumination b. Sclerotic scatter c. Transillumination d. Proximal Illumination
- 30. Retro Illumination ➢ Retroillumination is used to evaluate the optical qualities of a structure. ➢ Object of interest is illuminated only by light reflected from the structures behind it. ➢ Retroillumination from the fundus is a quick and easy way to examine the lens, iris, and cornea. The red reflex, the reflection of light off the back of the eye, can be used to highlight opacities in the cornea or lens, and defects in the iris. ➢ 10x–16x magnification. ➢ The microscope is focused on more anterior structures within the reflected light. There are two types of Retro-illuminations:- 1. Direct Retroillumination 2. Indirect Retroillumination
- 31. Direct Retroillumination ➢ This illumination method is used to view corneal pathology. ➢ Use a magnification of 16X to 25X, and direct the light from 45degrees. ➢ The microscope is directed straight ahead. The light strikes the iris, highlighting the corneal pathology on which you focus the microscope. ➢ Using the joystick, focus the microscope sharply on the cornea. ➢ This technique is best accomplished if the patient is not dilated. ➢ Objects viewed may have one color in direct and a different color with retroillumination. ➢ Observe: Cornea
- 32. Indirect Retro-illumination ➢ The observed feature is not viewed in the direct pathway of the reflected light. ➢ The oculars are moved so that the retro illuminated object is viewed against a dark, non-illuminated background. ➢ The angle between the microscope and the illuminating arm can be varied considerably. ➢ Observe: Cornea, Angles
- 33. Sclerotic scatter ➢ A broad beam of light is focused sharply at the limbus and the microscope is focused sharply on the cornea. ➢ This method is useful to view the distribution of corneal pathology. ➢ It especially useful in contact lens evaluation. ➢ Use 10X magnification, with the microscope directed straight ahead. ➢ The angle between the microscope and illuminating arm should be 45 degrees or greater. ➢ This technique is easiest if the patient is not dilated so that the iris provides a contrasting dark background. ➢ Observe: General pattern of corneal opacities.
- 34. Transillumination In transillumination, a structure (in the eye, the iris) is evaluated by how light passes through it. Iris Transillumination ➢ This technique also takes advantage of the red reflex. ➢ Use a full circle beam of light equal to the size of the pupil. ➢ Magnification of 10X to 16X is adequate. ➢ Observe: Iris defects (they will glow with the orange light reflected from the fundus).
- 35. Proximal Illumination This illumination technique is used to observe internal detail, depth, and density. The light will be scattered into the surrounding tissue, creating a light background that highlights the edges of the abnormality. It opaque the foreign body embedded in the cornea. Observe: Corneal opacities (edema, infiltrates, vessels, foreign bodies), lens, iris.
- 36. SLIT-LAMP BIOMICROSCOPY ROUTINE While performing slit-lamp biomicroscopy, following routine may be adopted:- ❖ The slit lamp should be set up in a room that is free of dust. ❖ Excessive heat or humidity, as well as exposure to direct sunlight, should also be avoided. ❖ Patient should be positioned comfortably in front of the slit-lamp with his/her chin resting on the chin rest and forehead opposed to head rest. ❖ If the table is too low, or too high, the patient will be uncomfortable. ❖ Beginning the actual examination you should adjust the eyepieces of the slit lamp oculars. ❖ If you wear glasses or remove glasses, the oculars must be set to compensate for your refractive error.
- 37. ❖ Examination should be carried out in semidark room so that the examiner’s eyes are partially dark adapted to ensure sensitivity to low intensities of light. ❖ Diffuse illumination used for short time as necessary. ❖ Medications like ointments and anaesthetic eye drops produce corneal surface disturbances which can be mistaken for pathology. ❖ Low magnification should be first used to locate the pathology and higher magnification should be used to examine it. ❖ You will also need to set the pupillary distance (PD) of the oculars. ❖ If your slit lamp has a fixation light, have the patient look at that.If you do not have a fixation device, you can ask the patient to look straight ahead at your ear or over your shoulder at a large letter or other target at the end of the room. ❖ It is a good idea to begin the examination at 6X or 10X magnification. You can move to 16X or more when you examine the cornea and internal structures and when you see some abnormality that warrants closer inspection.
- 39. During the test, the doctor will examine all areas of your eye, including the: ● Eyelids ● Iris ● Lens ● Sclera ● Cornea ● Retina ● Optic Nerve ● Cataracts, Which Is An Opacity Or Cloudiness Of The Lens ● Macular Degeneration, An Eye Disease That Destroys The Central Vision ● Optic Nerve, Such As Glaucoma
- 40. ● Bleeding In The Eye ● Foreign Body In The Eye ● Conjunctivitis ● Corneal Injury Such As Corneal Ulcer Or Corneal Swelling ● Diabetic Retinopathy ● Fuchs' Dystrophy ● Keratoconus (Fleischer Ring) ● Retinal Detachment ● Retinal Vessel Occlusion ● Retinitis Pigmentosa ● Sjögren's Syndrome ● Toxoplasmosis ● Uveitis
- 41. There are number of other investigative techniques that utilise the slit lamp:- ➢ Gonioscopy ➢ Hruby-lens ➢ Fundus examinations ➢ Tonometry ➢ Van Herick’s technique ➢ Pachometry ➢ Tearscopeâ ➢ Photography using 35 mm, video or digital systems ➢ Aesthiometry Tearscopeâ Hruby-lens Applanation tonometer Pachometry Gonioscopy