Weitere ähnliche Inhalte
Ähnlich wie Using microsoftword2 gettingstartedwithword (20)
Kürzlich hochgeladen (20)
Using microsoftword2 gettingstartedwithword
- 1. Using Microsoft Word Getting Started With Word
Using Microsoft Word
Getting Started With Word
Starting the Program
There are several ways to start a program in Microsoft Windows and they may include the following:
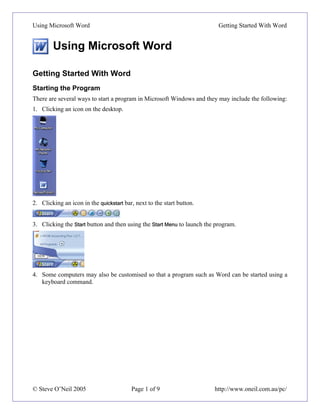
1. Clicking an icon on the desktop.
2. Clicking an icon in the quickstart bar, next to the start button.
3. Clicking the Start button and then using the Start Menu to launch the program.
4. Some computers may also be customised so that a program such as Word can be started using a
keyboard command.
© Steve O’Neil 2005 Page 1 of 9 http://www.oneil.com.au/pc/
- 2. Using Microsoft Word Getting Started With Word
Exercise 1. Starting Word with the Start Menu
1) Click the Start button in the bottom-left corner of your screen. The Start Menu will appear. (you
can also press the key on your keyboard to make the start menu appear)
2) When the Start Menu appears, move your mouse on to the All Programs option. This will display a
list of programs. If Microsoft Word does not appear in that list you may need to move to a sub-
menu as shown in the example below.
3) When you have located Microsoft Word in the start menu, click on it to launch the program.
When the program starts, it will look similar to the example on the following page with a blank
document provided.
© Steve O’Neil 2005 Page 2 of 9 http://www.oneil.com.au/pc/
- 3. Using Microsoft Word Getting Started With Word
The Word Interface
Title bar Menu Bar Tool bars Window Icons
Rulers
Document
editing area
Task Pane
Status Bar
All of this may seem a little confusing at first but it will become clearer as you begin to use the
program. A lot of what you see can also be customised to suit the way you like to work. Each of the
items labelled in the picture above is briefly explained in the following page.
© Steve O’Neil 2005 Page 3 of 9 http://www.oneil.com.au/pc/
- 4. Using Microsoft Word Getting Started With Word
Title Bar – This is common to all programs in Windows. It shows the name of the program currently
being used and in the case of some programs like Word, also shows the name of the document
currently being edited.
Menu Bar – Most Windows programs have a row of menus along the top of the screen which can be
used to access the program’s functions. There are several ways of using the menus as you will see
later.
Windows Icons – These standard windows icons provide quick ways to close a window or change the
position of a window. The first icon will minimise a window (Shrinking it to a button at the bottom
of your screen). The second one switches between maximising the window (so it fills the screen) and
restoring the window to its normal size. Programs like Word are usually best used in their maximised
state. The third icon closes a window when clicked.
Tool Bar – The tool bar contains icons that give quick access to commonly used features.
Rulers – The two rules can be used not only for measurements but can also be used to assist in
adjusting tabs and margins.
Task Pane – This area has a number of functions. It will automatically appear when you are working
on certain tasks and will display shortcuts to common functions.
Status Bar – Displays information about the current document and also provides quick access to some
functions.
© Steve O’Neil 2005 Page 4 of 9 http://www.oneil.com.au/pc/
- 5. Using Microsoft Word Getting Started With Word
Exercise 2. Basic Text Editing
1) Close the Task Pane by clicking its close icon (shown with a
circle around it). This will give you more room for editing your
document. If you need it again, you can select it from the View
menu or use the [Ctrl][F1] shortcut to turn it on or off.
2) Type the following text, including the mistakes. Don’t worry
about pressing the [Enter] key at the end of a line. When you reach the end of a line, the
remaining text will automatically continue on a new line.
Microsoft Word is a computer program that can be used to easily creat and
edit documents. You can use it to create letters, reports and a whole range of
other documents.
If you type it as shown then you will see a wavy red line under the word create and any other word
you may have typed incorrectly. This indicates that Microsoft Word doesn’t recognise the indicated
word and it is most likely an error. We’ll look at how to use the spell checker later but for now, we’ll
edit it manually.
At the end of the text you type, you will see a small vertical line as shown below (with a circle
around it).
This vertical line is called the insertion point as it indicates where anything you type will be inserted.
It is also often referred to as the cursor since many older programs, such as
the one shown to the right, used a rectangular shaped symbol called a
cursor to indicate where text would appear.
If you want to edit text in a different place you can move the insertion point in a number of different
ways. The first method that most people learn is to use the mouse.
3) Click your mouse just after the incorrect word ‘creat’ right before the space. Type a letter ‘e’ to
complete the word.
You can also use the arrow keys on your keyboard to move the insertion point around the text. If you
are typing, then using your keyboard is much quicker than constantly taking your hands off the
keyboard to reach for the mouse. Avoid the common trap of relying too much on your mouse since
keyboard methods are often far quicker.
4) Practice using your arrow keys to move around the text.
5) Press the [Enter] key on your keyboard to start a new paragraph. Type your name on the new
paragraph.
© Steve O’Neil 2005 Page 5 of 9 http://www.oneil.com.au/pc/
- 6. Using Microsoft Word Getting Started With Word
Exercise 3. Saving a Document
When you are working in Microsoft Word, any text you type and any changes you make are stored in
the computer’s RAM (Random Access Memory). RAM is a temporary form of storage and will only
retain information as long as the computer is switched on. If you want to keep your work, you need
to save it to a long term storage device such as a floppy disk, a location on a computer network or
your computer’s internal hard drive. Also, it is a good idea to save regularly in case your computer
loses the work from a power failure or computer problem.
1) Move your mouse to the menu bar at the top of your screen and click on File.
2) When the file menu appears, click on Save.
Since this is the first time you are saving the document, you will be prompted for a file name and a
file location.
3) Use the Save in: list at the top to choose where you want to save the file. You can click on the
New Folder icon to create a new folder if necessary.
4) In the File name: box at the bottom, type Basic Editing Document as shown above. Word will add
‘.doc’ on the end of the filename. The .doc part is the file extension and is used to identify the file
within Windows as a Word document.
5) When you have specified the file location and file name, click the Save button to save the file.
When the file is saved, the name of the file will appear in the title bar.
© Steve O’Neil 2005 Page 6 of 9 http://www.oneil.com.au/pc/
- 7. Using Microsoft Word Getting Started With Word
Once a file is saved, you can use the save command again and it will update the file with any new
changes. You won’t be asked for the file name again unless you use the Save As option, which is
generally used for saving a copy of a document under a different name or in a different location.
Below are some other ways to choose the save command. Try each method.
6) Hold down the [Alt] key on your keyboard. The menu bar will become active. You will notice that
each menu has a letter underlined. Once the menu is active, you can press the underlined letter to
activate that menu.
7) Press [F] on your keyboard to activate the File menu.
8) Press [S] to activate the Save option from within the file menu. The file will be saved again
without asking for the filename.
When the File menu is open, you will notice that many of the options
have a picture to the left of the menu command and some letters to the
right of the menu command. The picture shows that there is an icon on
the toolbar that can be clicked to activate the command, while the
letters indicate a keyboard shortcut for that command.
9) To the left of the Save command in the File menu is a picture of a small floppy disk. Find the icon
(button) on the toolbar that looks the same and click it to save the file.
10) To the right of the Save command in the menu are the letters ‘Ctrl + S’. This indicates that a
keyboard shortcut may be used to access the command. Hold down the [Ctrl] key and while it is
still held down, press the [S] key to save the file. In the remainder of these exercises, shortcut
keys such as this will be shown as [Ctrl] [S]. If you want the Save As command, you can use the
[F12] shortcut key.
Note When you select a menu in Word, it will often show only the most recently used menu
items. If the menu command you want is not visible, you can either wait a few seconds for
the full menu to appear or click on the arrow at the bottom of the menu. You can also
make a full menu display immediately by double-clicking the menu.
© Steve O’Neil 2005 Page 7 of 9 http://www.oneil.com.au/pc/
- 8. Using Microsoft Word Getting Started With Word
Exercise 4. Customising the Toolbar
In older versions of Word, there were generally two toolbars displayed on two rows. The Standard
toolbar contained shortcuts for general commands such as saving and printing. The Formatting
toolbar below that contained shortcuts for common formatting options such as changing font style
and size. In recent versions of Word these two toolbars generally share the same row and only show
the most recently use commands.
1) Click on the arrow on the right edge of the tool bar to display a list of the
icons that aren’t displayed on the main toolbar. If you prefer to see all of the
icons, you can click on the Show Buttons on Two Rows option. The
complete Standard and Formatting toolbars will then show on separate rows.
Many additional toolbars are available in Word. Often additional toolbars will appear when you are
working on a certain task (for example placing a picture in your document). Any toolbar can be
turned on or off manually. This can be useful if you are working on a computer where one of the
main toolbars that you need has been turned off.
2) From the View menu, select Toolbars to see a list of available toolbars. Another
way you can see a list of toolbars is to move your mouse over any visible
toolbar and click your right mouse button. The toolbars that are currently visible
will be ticked. You can use this list to turn toolbars on and off.
3) Click on the Customize option at the bottom of the list.
4) Make sure the Options tab is selected along the top.
The first option allows you to specify whether the main toolbars will show on one row or not. If the
second option is selected, menus will display all commands instead of only the most recently used
commands. Other options under the other tables allow you to customise the options that appear in
toolbars and menus.
5) Click the Close button to close the Customize toolbar options.
© Steve O’Neil 2005 Page 8 of 9 http://www.oneil.com.au/pc/
- 9. Using Microsoft Word Getting Started With Word
Exercise 5. Closing a Document
Like most operations in Word, there is more than one way to close a file.
• Select the Close command from the File menu.
• Use the keyboard shortcut [Ctrl][F4].
• Click the close document button in the top-right corner of the window.
1) Close the current document by clicking the Close Document icon in the top-right corner of the
document. Don’t confuse it with the icon above it which closes Microsoft Word.
Close Microsoft Word
Close Document
If you have made any changes since you last saved the document, you will be asked if you want to
save those changes.
Tip If you have several documents open at once and you want to close or save them all at the
same time, hold down the [Shift] key while you click on the File menu. The Close command
will change to Close All and the Save command will be changed to Save All.
© Steve O’Neil 2005 Page 9 of 9 http://www.oneil.com.au/pc/