1. EKIZYAN MARIAM: An Example of Technical Writing
HOW TO HOT-WAX A SNOWBOARD
Introduction
A waxed base is essential for the performance of a snowboard. You will know it is time
to wax the base, once your snowboard starts sticking frequently to the snow and slows over flat
areas. Fixing this problem in the snowboarding stores is more expensive than doing it at home. If
your snowboard does not need any repairs (tuning the edges or filling in the scratches), and if
you are positive that the base is dry and your glide is slow, then the following simple steps will
help you to make the performance smooth and fast and to protect the surface of the board.
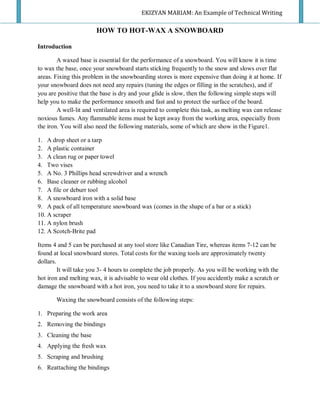
A well-lit and ventilated area is required to complete this task, as melting wax can release
noxious fumes. Any flammable items must be kept away from the working area, especially from
the iron. You will also need the following materials, some of which are show in the Figure1.
1. A drop sheet or a tarp
2. A plastic container
3. A clean rug or paper towel
4. Two vises
5. A No. 3 Phillips head screwdriver and a wrench
6. Base cleaner or rubbing alcohol
7. A file or deburr tool
8. A snowboard iron with a solid base
9. A pack of all temperature snowboard wax (comes in the shape of a bar or a stick)
10. A scraper
11. A nylon brush
12. A Scotch-Brite pad
Items 4 and 5 can be purchased at any tool store like Canadian Tire, whereas items 7-12 can be
found at local snowboard stores. Total costs for the waxing tools are approximately twenty
dollars.
It will take you 3- 4 hours to complete the job properly. As you will be working with the
hot iron and melting wax, it is advisable to wear old clothes. If you accidently make a scratch or
damage the snowboard with a hot iron, you need to take it to a snowboard store for repairs.
Waxing the snowboard consists of the following steps:
1. Preparing the work area
2. Removing the bindings
3. Cleaning the base
4. Applying the fresh wax
5. Scraping and brushing
6. Reattaching the bindings
2. A bar of 2
wax A brush
A file tool
A scraper
A Scotch-Brite Pad
A snowboard iron
Figure 1. Snowboard waxing tools.
ShopWiki Inc. (2006-2010). Dakine Super Tune. Retrieved from
http://www.shopwiki.com/DAKINE+Tune-Up+Kit+Deluxe
Preparing the Work Area
Warning: If you do the waxing indoors, open all the windows to let out possible toxic fumes of
the melting wax. Make sure that hot iron is away from flammable objects, especially
rubbing alcohol, carpets, and clothes.
1. Choose a flat area, such as a dinner table or a floor.
2. Cover the area with the tarp.
3. Put a vise on the edge of the table and fasten it by turning the handle (at the bottom of the
vise) clockwise. Telephone books or boxes can be used instead of vises to keep the board
above the floor and steady.
4. Leave 3-4 feet of space between two vises.
5. Repeat step 3 for the second vise.
Removing the Bindings
Caution: The heat from the iron can cause dimples (dented areas) where the screws of the
bindings are tightened. To avoid this problem and get a smooth surface you need to
remove bindings.
1. Place the snowboard face up on the table.
2. Put the end of No. 3 Philips screwdriver into the screw of the front binding and turn it
counterclockwise.
Note: If the screw does not come out easily, you can use a wrench to turn it.
3. Keep turning until the screw loosens and comes out.
4. Pull out the screw and the washer (round ring below the screw).
5. Store them in a plastic container in order not to lose them.
3. 3
6. Repeat steps 3-7 with the remaining screws in the front and back bindings.
7. Pull the bindings and the base plates (a plastic round part between the boot and the
snowboard) off of the board once all the screws are removed.
Cleaning the Base
Caution: To avoid damaging the board, put a piece of cloth or rubber between the vise and the
snowboard on both sides.
1. Turn the board and stabilize it to the table with vises to prevent the snowboard from
moving during ironing and scraping.
2. Take a scraper and remove the old wax by scraping the board from nose till tale in one
motion.
3. Repeat Step 3 a few times until the old wax is completely removed, particularly from the
tips of the board that barely touch the ground.
4. After scraping, use a file tool to take down the burr (dirt) and rust from the edges of the
board.
5. Pour 30 ml of base cleaner on a clean rug or a paper towel.
6. Wipe the board from the remaining wax and oil, so the new wax can soak into the board
nicely.
7. Let the base cleaner dry for a couple of minutes before applying the wax.
Applying the Fresh Wax
Note: You can choose a clothes iron instead of a snowboard one. Once used for the waxing of
the snowboard, do not use the iron on the clothes, as it will leave greasy spots on them.
1. Turn on the iron and allow it to preheat 4 minutes.
2. Read the temperature instructions on the box of the wax and adjust the iron temperature
according to it.
Danger: A hot iron can burn your skin, so make sure that there is a safe distance between your
fingers and the iron while holding the wax.
3. Take a stick of the wax and hold it against the base of the hot iron until it melts and starts
dripping on the board.
4. Hold the iron 2-4 inches above the snowboard.
5. Move the iron with the wax from tip to tail in a U shape pattern.
6. Let the melting wax cover the entire base of the snowboard, especially the edges.
Warning: Do not hold the iron in one place for a long time, as this can cause blisters on the
base. If the wax starts smoking, immediately reduce the temperature of the iron.
7. Next iron the wax into the board by moving the iron in one direction with an up-and-
down motion.
8. Spread the wax over the entire base until you reach a thin and uniform coat.
4. 4
9. Add more wax to areas that seem dry and iron them.
Caution: Do not cool the snowboard outside as the cold weather can push the wax out of the
scratches of the snowboard.
10. Let the wax cool for about 30 minutes to an hour.
11. Turn off the iron and when it cools down, clean the wax first by scraping and then with
the brush.
Scraping and Brushing
Note: For the first time waxing your snowboard use a plastic scraper, as metal one can damage
the surface. If the plastic scraper is dull, use a file to sharpen its edge.
1. Position a scraper at a 45-degree angle at the tip of the board.
2. Apply pressure on the scraper by putting your thumbs near the edge of the scraper.
3. Push the scraper towards you by moving it from the nose to the tail of the board with long
overlapping strokes (see Figure 2). You will see the extra wax accumulating on the
scraper blade.
4. Do continuous strokes until the base of the board is nearly free from the wax.
5. Make sure to scrape the edges off the wax, again moving the scraper from nose to tail.
Some plastic scrapers have a small notch for this purpose.
Figure 2. Scraping the wax off the board
Transworld. (2010). How To: Wax your Snowboard. Retrieved from
http://snowboarding.transworld.net/1000080309/photos/how-to-wax-your-snowboard/
6. After this, brush the base of the board by using 15-20 strokes to push the wax into the
surface.
7. Then run the Scotch-Brite pad along the base to get it smooth and shiny.
8. Slide your hand across the board to check if there are any wax bumps
9. Brush again, if necessary, to eliminate any excess wax.
5. 5
Reattaching the Bindings
1. Place the base plate in the front binding
2. Set the binding and the base plate at the angle you want your binding to be positioned on
the board (see Figure 3).
Angle markings of
the base plate
Binding angle marks
Figure 3. Base Plate Angle Markings
The Carver’s Almanac. (2007). Binding manufacturers. Retrieved from
http://www.alpinecarving.com/binding_model.html
3. Then line up the front binding with the screw holes.
4. Take one of the binding screws, and loosely fasten it with the Phillips screwdriver into
any of the four holes aligned.
5. Do not tight on the screw up all the way.
6. Follow steps 4-5 for the remaining three screws.
7. Adjust the binding forward or back to get the desired position.
8. Then tighten down all the screws in the binding.
9. Repeat steps 1-9 for the back binding.
Conclusion
Waxing the snowboard at home is cheaper and quicker than getting it done in a snowboard shop.
To carry out the process you need to have a well-ventilated flat area and hot-waxing tools that
can be purchased online or at any snowboard store. The waxing process involves six steps: (1)
preparing the work area, (2) removing the bindings, (3) cleaning the old wax and (4) applying
fresh wax, (5) scraping and brushing the surface, and (6) reattaching the bindings. Thus, closely
following the above instructions, you can make your snowboard last longer, go faster and turn
more easily.