SlideShare ist ein Scribd-Unternehmen logo
1 von 6
User Guide – Adobe Premier

Adobe Premier is a piece of software that allows you to import and edit
various pieces of video footage to create a professional final product. It
includes many features that allow you to accurately cut and crop to
achieve a precise music video.


This is the main page of the edit. This is called the timeline and
everything that you create and edit appears on this timeline. However as
you can see if you were to import a very small piece of video footage it
may be difficult to cut it down. However below you can see that you are
able to stretch the timeline to make it more accurate down to the
nearest 100th of a second. (This allows you to be more accurate, making
the transition between the different clips unnoticeable).


The first thing that you must do is open up a blank page within the
software, click on file then import. Once you have done this a prompt
screen will appear, this is where you must go into the designated folders
to find the video clip that you wish to import. (If you need to import any
other video clips then just follow the same process).


                             Here, in the project box, shows everything
                             you have imported so if you make a mistake
                             you can drag a new copy onto the timeline
                             and re-edit. This is very helpful as
                             otherwise you have to keep going through
                             the import process which would be very time
                             consuming and you will end up spending more
                             time on importing and less on tweaking the
                             video to get a more professional final
product.
One of the main tools that you will
           come across is the razor tool. To
           use this you simply mark and cut up
           various segments of a video clip to
           narrow it down to the footage that
           you require. (This is very helpful if
           the footage is very long as you can
           cut that particular piece into many
           segments     saving    time      from
           importing each individual clip).


After the cutting has been done, you simply
just have to drag it onto the timeline into its
desired place. This will form the basis of the
creation of the music video.
Once the various segments have been cut up they all
                    appear on the timeline and you can see that it shows
                    the clips individually so if you did not like the affects
                    or the speed of the one segment then you can easily
remove them individually instead of the whole timeline.


                          As I was creating a music video to go along
                         with the video I needed to add the soundtrack
                         in as well. This was done by using the same
                         process as importing the video clips; however,
                         instead of dragging it into the video section of
                         the timeline you drag it into the audio section
                         so that they play simultaneously. You can also
edit the sound in more depth, especially the sound of the video clips as
they must be muted so that it does not interfere with music in the
background.


 To make the final product more visually exciting and interesting for the
viewer various effects can be inputted by clicking on the project screen
and then video transitions. (This means the way in which the video
transfers from one clip to another). For the music video we decided to
use the dissolve transition as this gave off smooth transition between
clips.
Once you have chosen and edited to desired effect
you can then drag it to wherever you want. As this is a
transition effect you must place it directly between
the two of the individual clips. In more depth you can
then edit the amount of time the effect has over the
two clips so for example you can have it 2 seconds
before and 2 seconds after the clips to show a smooth transition.
A simple but very affective feature of the software is that it allows you
to preview the work that you have done as you go along, so that any
mistakes or changes you wish to make can be indentified immediately
after some editing has been taken place. It also gives you an idea of what
the final product is going to look like.

Weitere ähnliche Inhalte

Was ist angesagt?

Premiere Pro Step by Step Guide
Premiere Pro Step by Step GuidePremiere Pro Step by Step Guide
Premiere Pro Step by Step GuideCharlotte Jean
 
How to edit using premiere pro
How to edit using premiere proHow to edit using premiere pro
How to edit using premiere prophele1512
 
Getting Started with Adobe Premiere Pro
Getting Started with Adobe Premiere ProGetting Started with Adobe Premiere Pro
Getting Started with Adobe Premiere ProJenna9
 
New editing powerpoint
New editing powerpointNew editing powerpoint
New editing powerpointalicewiggins
 
Constructing our product
Constructing our productConstructing our product
Constructing our productemily whiting
 
WCC COMM 106 APE EXERCISE PART #1
WCC COMM 106 APE EXERCISE PART #1WCC COMM 106 APE EXERCISE PART #1
WCC COMM 106 APE EXERCISE PART #1profluther
 
6. production reflection
6. production reflection6. production reflection
6. production reflectionJack Bevens
 
Sound Sync Annotations
Sound Sync AnnotationsSound Sync Annotations
Sound Sync Annotationssamgh1995
 
Equipment List
Equipment ListEquipment List
Equipment ListJay Minii
 
Screenshot's of documentary
Screenshot's of documentaryScreenshot's of documentary
Screenshot's of documentaryRay Anjum
 
6. production reflection(2)
6. production reflection(2)6. production reflection(2)
6. production reflection(2)AmyWatson69
 
Evaluation Question 6
Evaluation Question 6Evaluation Question 6
Evaluation Question 6gq34khan
 
Creating My Trailer
Creating My TrailerCreating My Trailer
Creating My TrailerMeganReanne
 
screencasting and video conferencing at no cost - Region IV
screencasting and video conferencing at no cost - Region IVscreencasting and video conferencing at no cost - Region IV
screencasting and video conferencing at no cost - Region IVRichard Smith
 
How did you use new media technologies in the construction and research, plan...
How did you use new media technologies in the construction and research, plan...How did you use new media technologies in the construction and research, plan...
How did you use new media technologies in the construction and research, plan...guested647b
 

Was ist angesagt? (19)

Premiere Pro Step by Step Guide
Premiere Pro Step by Step GuidePremiere Pro Step by Step Guide
Premiere Pro Step by Step Guide
 
How to edit using premiere pro
How to edit using premiere proHow to edit using premiere pro
How to edit using premiere pro
 
My Use Of Adobe Pro CS6
My Use Of Adobe Pro CS6My Use Of Adobe Pro CS6
My Use Of Adobe Pro CS6
 
Editing process
Editing processEditing process
Editing process
 
Getting Started with Adobe Premiere Pro
Getting Started with Adobe Premiere ProGetting Started with Adobe Premiere Pro
Getting Started with Adobe Premiere Pro
 
New editing powerpoint
New editing powerpointNew editing powerpoint
New editing powerpoint
 
By teddy boateng q4
By teddy boateng q4By teddy boateng q4
By teddy boateng q4
 
Constructing our product
Constructing our productConstructing our product
Constructing our product
 
WCC COMM 106 APE EXERCISE PART #1
WCC COMM 106 APE EXERCISE PART #1WCC COMM 106 APE EXERCISE PART #1
WCC COMM 106 APE EXERCISE PART #1
 
6. production reflection
6. production reflection6. production reflection
6. production reflection
 
Sound Sync Annotations
Sound Sync AnnotationsSound Sync Annotations
Sound Sync Annotations
 
Equipment List
Equipment ListEquipment List
Equipment List
 
Screenshot's of documentary
Screenshot's of documentaryScreenshot's of documentary
Screenshot's of documentary
 
6. production reflection(2)
6. production reflection(2)6. production reflection(2)
6. production reflection(2)
 
Question 4
Question 4 Question 4
Question 4
 
Evaluation Question 6
Evaluation Question 6Evaluation Question 6
Evaluation Question 6
 
Creating My Trailer
Creating My TrailerCreating My Trailer
Creating My Trailer
 
screencasting and video conferencing at no cost - Region IV
screencasting and video conferencing at no cost - Region IVscreencasting and video conferencing at no cost - Region IV
screencasting and video conferencing at no cost - Region IV
 
How did you use new media technologies in the construction and research, plan...
How did you use new media technologies in the construction and research, plan...How did you use new media technologies in the construction and research, plan...
How did you use new media technologies in the construction and research, plan...
 

Andere mochten auch

Parts Of Speech Ef
Parts Of Speech   EfParts Of Speech   Ef
Parts Of Speech Efprincessaye
 
Evaluation
EvaluationEvaluation
Evaluationlucyluu
 
Personal Branding Workshop
Personal Branding WorkshopPersonal Branding Workshop
Personal Branding WorkshopKristen Byers
 
Step By Step Webpage Guide
Step By Step Webpage GuideStep By Step Webpage Guide
Step By Step Webpage Guidelucyluu
 
Are ski helmets really necessary for skier?
Are ski helmets really necessary for skier?Are ski helmets really necessary for skier?
Are ski helmets really necessary for skier?OutdoorThing
 
Catalogo animal planet publico
Catalogo animal planet publicoCatalogo animal planet publico
Catalogo animal planet publicomasque4patas
 
Perubahan zat(tesis)
Perubahan zat(tesis)Perubahan zat(tesis)
Perubahan zat(tesis)guest5d9f05f6
 

Andere mochten auch (12)

Parts Of Speech Ef
Parts Of Speech   EfParts Of Speech   Ef
Parts Of Speech Ef
 
Globalvillage12 1
Globalvillage12 1Globalvillage12 1
Globalvillage12 1
 
Zu Zu’s Petals
Zu Zu’s PetalsZu Zu’s Petals
Zu Zu’s Petals
 
Evaluation
EvaluationEvaluation
Evaluation
 
Kyle Cooper
Kyle CooperKyle Cooper
Kyle Cooper
 
Nouns
NounsNouns
Nouns
 
Personal Branding Workshop
Personal Branding WorkshopPersonal Branding Workshop
Personal Branding Workshop
 
Step By Step Webpage Guide
Step By Step Webpage GuideStep By Step Webpage Guide
Step By Step Webpage Guide
 
Present continuous
Present continuousPresent continuous
Present continuous
 
Are ski helmets really necessary for skier?
Are ski helmets really necessary for skier?Are ski helmets really necessary for skier?
Are ski helmets really necessary for skier?
 
Catalogo animal planet publico
Catalogo animal planet publicoCatalogo animal planet publico
Catalogo animal planet publico
 
Perubahan zat(tesis)
Perubahan zat(tesis)Perubahan zat(tesis)
Perubahan zat(tesis)
 

Ähnlich wie Print Screens Of Editing

Mv process log form 2019 (done)
Mv process log form 2019 (done)Mv process log form 2019 (done)
Mv process log form 2019 (done)Jake-Whattam-Smith
 
Adobe premiere pro
Adobe premiere pro Adobe premiere pro
Adobe premiere pro SofiaNisco
 
Mv process log form 2019
Mv process log form 2019Mv process log form 2019
Mv process log form 2019bronparsons
 
Mv production log
Mv production logMv production log
Mv production logEPAYNE52
 
By george parkin
By george parkinBy george parkin
By george parkinParkin6
 
Visual effects guide
Visual effects guideVisual effects guide
Visual effects guideBongoBen
 
Understanding Our Editing Software
Understanding Our Editing SoftwareUnderstanding Our Editing Software
Understanding Our Editing Softwarejamsjamsjams
 
Mv production log
Mv production logMv production log
Mv production logEthanPayne
 
How to use windows movie maker
How to use windows movie makerHow to use windows movie maker
How to use windows movie makerconsuelo5011
 
In what ways does your media product use
In what ways does your media product useIn what ways does your media product use
In what ways does your media product useoliviakellyasmedia
 

Ähnlich wie Print Screens Of Editing (20)

Mv process log form 2019 (done)
Mv process log form 2019 (done)Mv process log form 2019 (done)
Mv process log form 2019 (done)
 
Adobe premiere pro
Adobe premiere pro Adobe premiere pro
Adobe premiere pro
 
Production diary
Production diaryProduction diary
Production diary
 
Production diary
Production diaryProduction diary
Production diary
 
Production diary
Production diaryProduction diary
Production diary
 
Mv process log form 2019
Mv process log form 2019Mv process log form 2019
Mv process log form 2019
 
Moviemaker report
Moviemaker reportMoviemaker report
Moviemaker report
 
Mv production log
Mv production logMv production log
Mv production log
 
Question 4
Question 4 Question 4
Question 4
 
By george parkin
By george parkinBy george parkin
By george parkin
 
Pod handler
Pod handlerPod handler
Pod handler
 
Kdenlive
KdenliveKdenlive
Kdenlive
 
Visual effects guide
Visual effects guideVisual effects guide
Visual effects guide
 
Presentation1
Presentation1Presentation1
Presentation1
 
Understanding Our Editing Software
Understanding Our Editing SoftwareUnderstanding Our Editing Software
Understanding Our Editing Software
 
Video editing 01
Video editing 01Video editing 01
Video editing 01
 
Mv production log
Mv production logMv production log
Mv production log
 
Video editing 1
Video editing  1Video editing  1
Video editing 1
 
How to use windows movie maker
How to use windows movie makerHow to use windows movie maker
How to use windows movie maker
 
In what ways does your media product use
In what ways does your media product useIn what ways does your media product use
In what ways does your media product use
 

Print Screens Of Editing

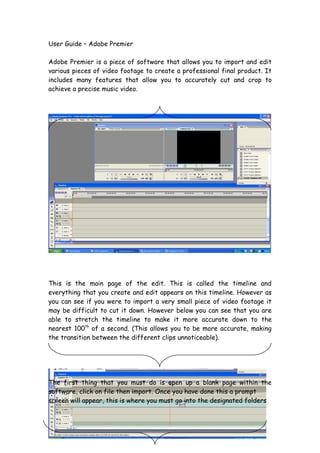
  • 1. User Guide – Adobe Premier Adobe Premier is a piece of software that allows you to import and edit various pieces of video footage to create a professional final product. It includes many features that allow you to accurately cut and crop to achieve a precise music video. This is the main page of the edit. This is called the timeline and everything that you create and edit appears on this timeline. However as you can see if you were to import a very small piece of video footage it may be difficult to cut it down. However below you can see that you are able to stretch the timeline to make it more accurate down to the nearest 100th of a second. (This allows you to be more accurate, making the transition between the different clips unnoticeable). The first thing that you must do is open up a blank page within the software, click on file then import. Once you have done this a prompt screen will appear, this is where you must go into the designated folders
  • 2. to find the video clip that you wish to import. (If you need to import any other video clips then just follow the same process). Here, in the project box, shows everything you have imported so if you make a mistake you can drag a new copy onto the timeline and re-edit. This is very helpful as otherwise you have to keep going through the import process which would be very time consuming and you will end up spending more time on importing and less on tweaking the video to get a more professional final product.
  • 3. One of the main tools that you will come across is the razor tool. To use this you simply mark and cut up various segments of a video clip to narrow it down to the footage that you require. (This is very helpful if the footage is very long as you can cut that particular piece into many segments saving time from importing each individual clip). After the cutting has been done, you simply just have to drag it onto the timeline into its desired place. This will form the basis of the creation of the music video.
  • 4. Once the various segments have been cut up they all appear on the timeline and you can see that it shows the clips individually so if you did not like the affects or the speed of the one segment then you can easily remove them individually instead of the whole timeline. As I was creating a music video to go along with the video I needed to add the soundtrack in as well. This was done by using the same process as importing the video clips; however, instead of dragging it into the video section of the timeline you drag it into the audio section so that they play simultaneously. You can also edit the sound in more depth, especially the sound of the video clips as they must be muted so that it does not interfere with music in the background. To make the final product more visually exciting and interesting for the viewer various effects can be inputted by clicking on the project screen and then video transitions. (This means the way in which the video transfers from one clip to another). For the music video we decided to use the dissolve transition as this gave off smooth transition between clips.
  • 5. Once you have chosen and edited to desired effect you can then drag it to wherever you want. As this is a transition effect you must place it directly between the two of the individual clips. In more depth you can then edit the amount of time the effect has over the two clips so for example you can have it 2 seconds before and 2 seconds after the clips to show a smooth transition.
  • 6. A simple but very affective feature of the software is that it allows you to preview the work that you have done as you go along, so that any mistakes or changes you wish to make can be indentified immediately after some editing has been taken place. It also gives you an idea of what the final product is going to look like.