SlideShare ist ein Scribd-Unternehmen logo
1 von 11
Downloaden Sie, um offline zu lesen
Back/front focus test chart
                                        by Tim Jackson
                                    tim@FocusTestChart.com

                                              Version 1.0
                (This version was previously known as “Version: Sunday 6 June 2004”)
             There is NO change to this version other than the version numbering scheme.

                 The latest version is always available at http://md.co.za/d70/focus.pdf


What is back focus?
Back focus is when you shoot a pic like this one, expecting to get the result shown on the
left but, instead, you get the one on the right.


That’s back focus. Your focus is set to a distance further back than your subject. You’re
focused behind, or to the back of, your subject. (Front focus is simply where everything’s
the other way around.)

It’s VERY annoying to shoot your pic of the day of your wife/husband/child/friend and then
find out that their face is out of focus but their ears are tack sharp. Not nice.

There are many things that can cause this problem and almost all of them can be chalked
up to operator error. Occasionally though, the camera and/or lens is to blame.


                                                                                           Page 1 of 11
The D70
Human nature is such that when we’re happy with a new toy we tend to simply enjoy it
quietly but, if our new toy gives us grief, we want to tell everyone who’ll listen. And some
who won’t.

So, in evaluating Internet discussions on the back focus issue, one has to be careful not to
be misled into believing that every D70 suffers from back focus just because it’s a hot
topic.

The truth is that only a minority of D70s have been faulty in this regard. The majority work
just fine.

Why this test?
Well, if you’re a new D70 owner and have read all about the trials and tribulations of other
D70 owners who have the dreaded back focus then you probably want to know if YOUR
new baby suffers from it or not.

Most people who think their D70 has back focus are mistaken. (Please note that I said
“most”, not “all”.)

In other words, they’re in a tizz for no reason. If they’re having problems then, usually, it’s
operator error.

This test is intended to help any curious D70 owners to check their own cameras in order
to either heave a sigh of relief that their D70 is fine or to arm themselves with the info
needed to return their D70 for exchange or recalibration.

Interpreting your results
Once you’ve read this all through, assembled your test chart, and have taken a bunch of
pics you’ll want to know what they mean.

When you view your test pic/s, you should be able to clearly see that the centre part, or a
part close to the centre, is in focus, while the chart gets obviously and progressively more
out of focus as you move away from the centre, to the left and right, as in this example:


                                                                                   Page 2 of 11
If the area that’s in focus is more or less centred around the focal plane of the chart then
all is well.

If you get something like this next pic, then you have back focus:


If you get what you see in this next pic, you have front focus.


Ok, now you need to get on with the assembly of the test chart and take some test pics.
Read on.


                                                                                 Page 3 of 11
Instructions

WARNING!
There are many factors that can lead to erroneous and misleading results when doing this
test. Make sure you read the instructions carefully and thoroughly and follow them in
detail.

Please follow these instructions carefully, paying particular attention to the points dealing
with the setup and positioning of the chart and camera. Failure to do this will render the
test useless.

1.   Print out this document.


2.   You should then have:
     a. These instructions.
     b. The test chart.
     c. The cut-out focus box.


3.   Additionally, you will need:
     a. A pair of scissors.
     b. Glue / paste.
     c. An old magazine or other source from which to cut out a picture.


4.   Cut out the focus box (the last page of this document), and snip off the corners of the
     fold-down flaps, as in the following picture:


                                                                                 Page 4 of 11
5.   Crease all the fold lines. First fold over the side flaps:


6.   Then fold over the back panel
     and the base panel.


7.   Now you can open it all up, apply glue to
     the end flap and finish off your focus box:


                                                                  Page 5 of 11
8.   Now you need to apply glue to the area on the chart where the focus box will be
     attached and then fit the focus box in position. Pay special attention to lining up the
     front edge of the focus box against the edge of the focal plane line. The edge of the
     box just touches the edge of the line. Do not cover the line. It should look like this:


9.   Your test chart is ready to go!
     Attach it to a vertical surface. A
     door is good and provides an easy
     way to adjust the angle by simply
     opening or closing the door a small
     amount.


                                                                                  Page 6 of 11
10. Position your camera on a tripod so that the lens is at exactly the same height as the
     focus box. I suggest moving the camera as close as you can get it to the focus box
     and adjusting the height of the tripod until your lens is at the same height as the focus
     box. Now move your tripod back a bit, to where you expect to shoot from.


11. In order to ensure that your camera is
     positioned square on to the focus
     panel of the focus box, the focus panel
     and the test chart behind it are
     equipped with alignment lines. The
     picture on the right shows where they
     are and what they look like when not
     aligned.


     You need to shift your camera to the
     left or right or swing the door a little
     until these lines are all in a row, as in
     the picture on the far right.


     This will ensure that you are square on
     to the focus panel and that the chart is
     at 45 degrees to your camera.


     Left pic: Out of alignment.
     Right pic: Alignment set correctly.


                                                                                Page 7 of 11
12. When shooting your test pics, you need to be close enough that the test chart slightly
     more than fills the frame, if your lens will allow that. Something like this or even a bit
     closer if you can:


     N.B. Ensure that you are not so close that the auto focus system is unable to focus
     due to you being at the limit of the range of focus of your lens.


     You can check this by moving your camera closer and closer to the image and testing
     when it is no longer able to focus and then making sure that you are set up at least a
     few inches back from this point.


13. Set your camera to aperture priority mode (“A” on the rotary dial) and adjust the
     aperture setting as wide as it will go (lowest f-stop number) for the lens you have on
     the camera.


14. Set the Autofocus system to “AF-S” mode (CSM Menu item 2).


15. Set the AF-area mode to “Single area” (CSM Menu item 3).


16. Ensure that you have the centre focus area selected. If not then adjust this using the
     multi selector button (up/down/left/right). The focus selector lock switch (just below
     the multi selector button) must be unlocked in order to change/select the appropriate

                                                                                   Page 8 of 11
focus area.


17. If you have extra lighting available, use it to light up the test chart. Do NOT use the
      flash. The chart must be lit from the front. Avoid backlighting.


18. Use either the remote control (if you have one) or the camera’s self timer to trigger
      the shutter release in order to avoid any camera shake.


19. Test away! If you need more info on the whole subject and how to interpret the
      results then trawl the D70 forum at DP Review, searching for “back focus” or
      “backfocus” and you’ll be deluged with info.


You’re also welcome to email me at: tim@FocusTestChart.com.
I’m happy to look at your test pics and to offer an opinion.


By the way: If you happen to measure the spacing of the lines on the chart you’ll notice
that they are further apart than the markings suggest. This is deliberate. When the chart is
at 45 degrees to your camera, the spacing becomes correct. This is done so that when
you see those markings in the resultant image you can read them as-is without having to
make extra calculations. They’re pre-compensated.


Tim


                                                                                Page 9 of 11
Back focus zone


Alignment line below must be in line with the one on                                                    Alignment line below must be in line with the one on
   the focus box when viewed through your camera.                                                       the focus box when viewed through your camera.
                          ê ê Alignment line ê ê                                                        ê ê Alignment line ê ê
2” [50mm]                                                                                                                           [50mm] 2”
                                                           é é Rear panel of focus box é é
                                                                     goes here

                        15/8" [40mm]                                                                    [40mm] 15/8"


                        11/8” [30mm]                                                                    [30mm] 11/8”
                                                       Paste triangular focus box here

                           3                                                                                              3
                            /4” [20mm]                                                                  [20mm]              /4”
                                                       The focal plane is the solid black line below
                                                       this text. Position the thin end of the wedge
                           3                            of your triangular focus box up against the                       3
                            /8” [10mm]                  edge of this line. Do not cover the line with   [10mm]              /8”
                                                                    the edge of the box!

                                                            êêêêêêêêêê

                                                             © Tim Jackson 2004
                                                       Email: tim@FocusTestChart.com
                           3                                                                                              3
                            /8” [10mm]                                                                  [10mm]              /8”

                           3                                                                                              3
                            /4” [20mm]                                                                  [20mm]              /4”


                        11/8” [30mm]                            Front focus zone                        [30mm] 11/8”


                        15/8" [40mm]                                                                    [40mm] 15/8"


                               2” [50mm]                                                                [50mm] 2”


                                                                                                                                    Page 10 of 11
Cut out around the outside, following the dotted                                         Paste this flap to the end of the
                                                                                           base panel to create a box
lines.

The flaps down the sides should be folded at
ninety degrees to the panels to give the box


                                                                                                                                           Fold this flap at 90 degrees
                                                       Fold this flap at 90 degrees
extra rigidity. Alternatively you can paste the
whole thing onto a piece of card before cutting it
out and folding it.                                                                                Rear panel
A little snipping of the corners at each end of                                              © Tim Jackson 2004
each flap will be required to prevent them                                            E mail: tim@FocusTestChart.com
snagging on each other when you fold the box.

Take special care when making the folds. They
need to be straight and sharp. The final box
should have perfectly straight edges and flat
surfaces. A sloppily made, wonky box is not
good.                                                                                             Focus panel
                                                                                      Paste a photo or an image from a magazine
When you attach the focus box to the chart,                                           on this panel to focus on or simply focus on
make sure you have glue all around the edges                                                             the text.
to ensure that the box doesn’t pull away from                                         When positioning your camera, move around


                                                                                                                                           Fold this flap at 90 degrees
the chart.
                                                       Fold this flap at 90 degrees


                                                                                        until you’ve lined up the square alignment
                                                                                      line below with the ones on the main chart to
                                                                                      ensure you’re set up square-on to this panel.
The fit and finish is all important. Remember
that we’re measuring millimetres here and the
details matter!                                                                                      Square alignment line

                                                                                       The lined chart will then automatically be at
                                                                                               45 degrees to your camera.
When you attach the completed chart to a
vertical surface, such as a door, you need to                                          It’s important to get this right in order for the
                                                                                                  test to be of any value.
“stretch” the chart and put adhesive tape around
all sides to make sure it sits flat against the door                                  This edge of the box must be lined up exactly
                                                                                      against the edge of the focal plane line on the
with no bumps or bulges.                                                               main chart. Do not cover the focal plane line
                                                                                                 with the edge of the box!
Everything must be smooth, sharp, even, flat,
square etc.                                                                                êêêêêêêêêêê
                                                                                                                                           Fold this flap at 90 degrees
                                                       Fold this flap at 90 degrees


                                                                                                   Base panel
                                                                                        Paste this surface onto the main
                                                                                         sheet in the designated space.


                                                                                                                             Page 11 of 11

Weitere ähnliche Inhalte

Was ist angesagt?

Photography for the Beginner
Photography for the BeginnerPhotography for the Beginner
Photography for the Beginnerbpennphoto
 
7 Smartphone Photography Tips & Tricks that We Don’t Use Often
7 Smartphone Photography Tips & Tricks that We Don’t Use Often7 Smartphone Photography Tips & Tricks that We Don’t Use Often
7 Smartphone Photography Tips & Tricks that We Don’t Use OftenMetrodesk
 
Top 5 photography_tips_for_beginners
Top 5 photography_tips_for_beginnersTop 5 photography_tips_for_beginners
Top 5 photography_tips_for_beginnersSharon
 
Photography lesson
Photography lessonPhotography lesson
Photography lessonVicky Casson
 
Creative Lens Techniques
Creative Lens TechniquesCreative Lens Techniques
Creative Lens TechniquesSalomo Sibarani
 
Camera Composition and Framing
Camera Composition and FramingCamera Composition and Framing
Camera Composition and Framingsarahpurnell
 
Camera Controls And Photoshop
Camera Controls And PhotoshopCamera Controls And Photoshop
Camera Controls And Photoshopguest1794ecc
 
Basics Of Making a Video
Basics Of  Making a VideoBasics Of  Making a Video
Basics Of Making a VideoLenneke Knoop
 
Smartphone Photography
Smartphone PhotographySmartphone Photography
Smartphone PhotographyVinay Desai
 
Smartphone Photography Guide
Smartphone Photography GuideSmartphone Photography Guide
Smartphone Photography GuideJoseph Demme
 
Materi Presentasi Intro Photograpy
Materi Presentasi Intro PhotograpyMateri Presentasi Intro Photograpy
Materi Presentasi Intro Photograpyiqronaldo
 
How To Master Mobile Photography
How To Master Mobile PhotographyHow To Master Mobile Photography
How To Master Mobile PhotographyApril Rose Semogan
 
Team Red, White & Blue Smartphone Photography Workshop
Team Red, White & Blue Smartphone Photography WorkshopTeam Red, White & Blue Smartphone Photography Workshop
Team Red, White & Blue Smartphone Photography WorkshopSteve Lewis
 
How to make a video look more like a film.
How to make a video look more like a film.How to make a video look more like a film.
How to make a video look more like a film.Pheewright
 
Tech Bits: Taking your mobile photography to the next level
Tech Bits: Taking your mobile photography to the next levelTech Bits: Taking your mobile photography to the next level
Tech Bits: Taking your mobile photography to the next levelrobin fay
 
Click! How to use smartphone photography to engage, empower and connect with ...
Click! How to use smartphone photography to engage, empower and connect with ...Click! How to use smartphone photography to engage, empower and connect with ...
Click! How to use smartphone photography to engage, empower and connect with ...Else Kramer - Photosopher
 

Was ist angesagt? (20)

Composition
CompositionComposition
Composition
 
Edtech photography
Edtech photographyEdtech photography
Edtech photography
 
Photography for the Beginner
Photography for the BeginnerPhotography for the Beginner
Photography for the Beginner
 
7 Smartphone Photography Tips & Tricks that We Don’t Use Often
7 Smartphone Photography Tips & Tricks that We Don’t Use Often7 Smartphone Photography Tips & Tricks that We Don’t Use Often
7 Smartphone Photography Tips & Tricks that We Don’t Use Often
 
DSLR video
DSLR videoDSLR video
DSLR video
 
Top 5 photography_tips_for_beginners
Top 5 photography_tips_for_beginnersTop 5 photography_tips_for_beginners
Top 5 photography_tips_for_beginners
 
Photography lesson
Photography lessonPhotography lesson
Photography lesson
 
Creative Lens Techniques
Creative Lens TechniquesCreative Lens Techniques
Creative Lens Techniques
 
Camera Composition and Framing
Camera Composition and FramingCamera Composition and Framing
Camera Composition and Framing
 
Camera Controls And Photoshop
Camera Controls And PhotoshopCamera Controls And Photoshop
Camera Controls And Photoshop
 
Basics Of Making a Video
Basics Of  Making a VideoBasics Of  Making a Video
Basics Of Making a Video
 
Smartphone Photography
Smartphone PhotographySmartphone Photography
Smartphone Photography
 
Smartphone Photography Guide
Smartphone Photography GuideSmartphone Photography Guide
Smartphone Photography Guide
 
Materi Presentasi Intro Photograpy
Materi Presentasi Intro PhotograpyMateri Presentasi Intro Photograpy
Materi Presentasi Intro Photograpy
 
How To Master Mobile Photography
How To Master Mobile PhotographyHow To Master Mobile Photography
How To Master Mobile Photography
 
Team Red, White & Blue Smartphone Photography Workshop
Team Red, White & Blue Smartphone Photography WorkshopTeam Red, White & Blue Smartphone Photography Workshop
Team Red, White & Blue Smartphone Photography Workshop
 
Task 2 v2
Task 2 v2Task 2 v2
Task 2 v2
 
How to make a video look more like a film.
How to make a video look more like a film.How to make a video look more like a film.
How to make a video look more like a film.
 
Tech Bits: Taking your mobile photography to the next level
Tech Bits: Taking your mobile photography to the next levelTech Bits: Taking your mobile photography to the next level
Tech Bits: Taking your mobile photography to the next level
 
Click! How to use smartphone photography to engage, empower and connect with ...
Click! How to use smartphone photography to engage, empower and connect with ...Click! How to use smartphone photography to engage, empower and connect with ...
Click! How to use smartphone photography to engage, empower and connect with ...
 

Andere mochten auch

Manual usuariophotomatixpro3.1
Manual usuariophotomatixpro3.1Manual usuariophotomatixpro3.1
Manual usuariophotomatixpro3.1Jose Martinez
 
Caborian lab curso de fotografía creativa
Caborian lab   curso de fotografía creativaCaborian lab   curso de fotografía creativa
Caborian lab curso de fotografía creativaJose Martinez
 
Tutorial nik color efex pro
Tutorial nik color efex proTutorial nik color efex pro
Tutorial nik color efex proJose Martinez
 
Fotografía digital de alta calidad método de trabajo eficaz para guiar al f...
Fotografía digital de alta calidad   método de trabajo eficaz para guiar al f...Fotografía digital de alta calidad   método de trabajo eficaz para guiar al f...
Fotografía digital de alta calidad método de trabajo eficaz para guiar al f...Jose Martinez
 
Iluminación de retrato en estudio
Iluminación de retrato en estudioIluminación de retrato en estudio
Iluminación de retrato en estudioJose Martinez
 
Fotografía digital de aproximación la guía imprescindible para el fotógrafo...
Fotografía digital de aproximación   la guía imprescindible para el fotógrafo...Fotografía digital de aproximación   la guía imprescindible para el fotógrafo...
Fotografía digital de aproximación la guía imprescindible para el fotógrafo...Jose Martinez
 
Curso de fotografía para principiantes introducción al mundo de la fotograf...
Curso de fotografía para principiantes   introducción al mundo de la fotograf...Curso de fotografía para principiantes   introducción al mundo de la fotograf...
Curso de fotografía para principiantes introducción al mundo de la fotograf...Jose Martinez
 
Alto Rango Dinámico. HDR sin estridencias
Alto Rango Dinámico. HDR sin estridenciasAlto Rango Dinámico. HDR sin estridencias
Alto Rango Dinámico. HDR sin estridenciasgluijk
 
Estilo cinematic DIAFR@Ggmondo
Estilo cinematic DIAFR@GgmondoEstilo cinematic DIAFR@Ggmondo
Estilo cinematic DIAFR@GgmondoJose Martinez
 
Thewebfoto curso de fotografia digital
Thewebfoto   curso de fotografia digitalThewebfoto   curso de fotografia digital
Thewebfoto curso de fotografia digitalJose Martinez
 
Complete guide to the nikon d700 (1st. edition)
Complete guide to the nikon d700 (1st. edition)Complete guide to the nikon d700 (1st. edition)
Complete guide to the nikon d700 (1st. edition)Jose Martinez
 
Curso de fotografia nocturna
Curso de fotografia nocturnaCurso de fotografia nocturna
Curso de fotografia nocturnaJose Martinez
 
Libro Aprender a Hacer Mejores Fotos en 31 Días
Libro Aprender a Hacer Mejores Fotos en 31 DíasLibro Aprender a Hacer Mejores Fotos en 31 Días
Libro Aprender a Hacer Mejores Fotos en 31 DíasJORGE HERNAN GUTIERREZ
 
Curso Basico Fotografia Nocturna 2011
Curso Basico Fotografia Nocturna 2011Curso Basico Fotografia Nocturna 2011
Curso Basico Fotografia Nocturna 2011Jose Martinez
 
Revelado RAW avanzado - II Curso Paisajes Nocturnos
Revelado RAW avanzado - II Curso Paisajes NocturnosRevelado RAW avanzado - II Curso Paisajes Nocturnos
Revelado RAW avanzado - II Curso Paisajes Nocturnosgluijk
 
Curso de fotografia digital nikon
Curso de fotografia digital nikonCurso de fotografia digital nikon
Curso de fotografia digital nikonJose Martinez
 
un año de fotografia.pdf
un año de fotografia.pdfun año de fotografia.pdf
un año de fotografia.pdfmagmdv
 
El gran libro de fotografia de paisaje
El gran libro de fotografia de paisajeEl gran libro de fotografia de paisaje
El gran libro de fotografia de paisajemagmdv
 

Andere mochten auch (20)

Manual usuariophotomatixpro3.1
Manual usuariophotomatixpro3.1Manual usuariophotomatixpro3.1
Manual usuariophotomatixpro3.1
 
Caborian lab curso de fotografía creativa
Caborian lab   curso de fotografía creativaCaborian lab   curso de fotografía creativa
Caborian lab curso de fotografía creativa
 
Tutorial nik color efex pro
Tutorial nik color efex proTutorial nik color efex pro
Tutorial nik color efex pro
 
Fotografía digital de alta calidad método de trabajo eficaz para guiar al f...
Fotografía digital de alta calidad   método de trabajo eficaz para guiar al f...Fotografía digital de alta calidad   método de trabajo eficaz para guiar al f...
Fotografía digital de alta calidad método de trabajo eficaz para guiar al f...
 
Iluminación de retrato en estudio
Iluminación de retrato en estudioIluminación de retrato en estudio
Iluminación de retrato en estudio
 
Fotografía digital de aproximación la guía imprescindible para el fotógrafo...
Fotografía digital de aproximación   la guía imprescindible para el fotógrafo...Fotografía digital de aproximación   la guía imprescindible para el fotógrafo...
Fotografía digital de aproximación la guía imprescindible para el fotógrafo...
 
Curso de fotografía para principiantes introducción al mundo de la fotograf...
Curso de fotografía para principiantes   introducción al mundo de la fotograf...Curso de fotografía para principiantes   introducción al mundo de la fotograf...
Curso de fotografía para principiantes introducción al mundo de la fotograf...
 
Alto Rango Dinámico. HDR sin estridencias
Alto Rango Dinámico. HDR sin estridenciasAlto Rango Dinámico. HDR sin estridencias
Alto Rango Dinámico. HDR sin estridencias
 
Estilo cinematic DIAFR@Ggmondo
Estilo cinematic DIAFR@GgmondoEstilo cinematic DIAFR@Ggmondo
Estilo cinematic DIAFR@Ggmondo
 
Thewebfoto curso de fotografia digital
Thewebfoto   curso de fotografia digitalThewebfoto   curso de fotografia digital
Thewebfoto curso de fotografia digital
 
Complete guide to the nikon d700 (1st. edition)
Complete guide to the nikon d700 (1st. edition)Complete guide to the nikon d700 (1st. edition)
Complete guide to the nikon d700 (1st. edition)
 
Curso de fotografia nocturna
Curso de fotografia nocturnaCurso de fotografia nocturna
Curso de fotografia nocturna
 
Libro Aprender a Hacer Mejores Fotos en 31 Días
Libro Aprender a Hacer Mejores Fotos en 31 DíasLibro Aprender a Hacer Mejores Fotos en 31 Días
Libro Aprender a Hacer Mejores Fotos en 31 Días
 
Curso Basico Fotografia Nocturna 2011
Curso Basico Fotografia Nocturna 2011Curso Basico Fotografia Nocturna 2011
Curso Basico Fotografia Nocturna 2011
 
Revelado RAW avanzado - II Curso Paisajes Nocturnos
Revelado RAW avanzado - II Curso Paisajes NocturnosRevelado RAW avanzado - II Curso Paisajes Nocturnos
Revelado RAW avanzado - II Curso Paisajes Nocturnos
 
Curso de fotografia digital nikon
Curso de fotografia digital nikonCurso de fotografia digital nikon
Curso de fotografia digital nikon
 
Curso foto-nocturna
Curso foto-nocturnaCurso foto-nocturna
Curso foto-nocturna
 
76234744 el-ojo-del-fotografo-michael-freeman
76234744 el-ojo-del-fotografo-michael-freeman76234744 el-ojo-del-fotografo-michael-freeman
76234744 el-ojo-del-fotografo-michael-freeman
 
un año de fotografia.pdf
un año de fotografia.pdfun año de fotografia.pdf
un año de fotografia.pdf
 
El gran libro de fotografia de paisaje
El gran libro de fotografia de paisajeEl gran libro de fotografia de paisaje
El gran libro de fotografia de paisaje
 

Ähnlich wie Back front focus test chart

Final edit 21 22 5th july year 12photo
Final edit 21 22 5th july year 12photoFinal edit 21 22 5th july year 12photo
Final edit 21 22 5th july year 12photomissfcmay
 
How to click better photos in 8 steps.
How to click better photos in 8 steps.How to click better photos in 8 steps.
How to click better photos in 8 steps.Md Sikandar
 
Instruction Manual Primary Arms SLX6 3-18x50 FFP Riflescope - Optics Trade
Instruction Manual Primary Arms SLX6 3-18x50 FFP Riflescope - Optics TradeInstruction Manual Primary Arms SLX6 3-18x50 FFP Riflescope - Optics Trade
Instruction Manual Primary Arms SLX6 3-18x50 FFP Riflescope - Optics TradeOptics-Trade
 
Primary Arms 3-18x50 FFP | Apollo HUD 6.5 Creedmoor Reticle
Primary Arms 3-18x50 FFP | Apollo HUD 6.5 Creedmoor ReticlePrimary Arms 3-18x50 FFP | Apollo HUD 6.5 Creedmoor Reticle
Primary Arms 3-18x50 FFP | Apollo HUD 6.5 Creedmoor ReticleOptics-Trade
 
Primary Arms 3-18x50 FFP | ACSS HUD DMR 308 Reticle
Primary Arms 3-18x50 FFP | ACSS HUD DMR 308 ReticlePrimary Arms 3-18x50 FFP | ACSS HUD DMR 308 Reticle
Primary Arms 3-18x50 FFP | ACSS HUD DMR 308 ReticleOptics-Trade
 
Canon ef-8-15mm-f-4-l-usm-fisheye-lens
Canon ef-8-15mm-f-4-l-usm-fisheye-lensCanon ef-8-15mm-f-4-l-usm-fisheye-lens
Canon ef-8-15mm-f-4-l-usm-fisheye-lensMarcelo Graciolli
 
Quick Tips for clicking high-quality snaps
Quick Tips for clicking high-quality snapsQuick Tips for clicking high-quality snaps
Quick Tips for clicking high-quality snapsPrasad Balgi
 
Instructions LEUPOLD HAMR Rifle Scope | Optics Trade
Instructions LEUPOLD HAMR Rifle Scope | Optics TradeInstructions LEUPOLD HAMR Rifle Scope | Optics Trade
Instructions LEUPOLD HAMR Rifle Scope | Optics TradeOptics-Trade
 
Photographing Your Art
Photographing Your ArtPhotographing Your Art
Photographing Your ArtLeah Murray
 
Cat fotografia
Cat fotografiaCat fotografia
Cat fotografialucepa
 
Landscape Focus Stacking for Photography
Landscape Focus Stacking for PhotographyLandscape Focus Stacking for Photography
Landscape Focus Stacking for PhotographyKurian Thayil
 
10 Best Macro Lens For Canon Camera in 2023
10 Best Macro Lens For Canon Camera in 202310 Best Macro Lens For Canon Camera in 2023
10 Best Macro Lens For Canon Camera in 2023Zenith Clipping
 
Task 2 research different settings
Task 2 research different settingsTask 2 research different settings
Task 2 research different settingswolllfie
 
Camera angles and photography
Camera angles and photographyCamera angles and photography
Camera angles and photographyCoombeMedia1
 

Ähnlich wie Back front focus test chart (20)

Final edit 21 22 5th july year 12photo
Final edit 21 22 5th july year 12photoFinal edit 21 22 5th july year 12photo
Final edit 21 22 5th july year 12photo
 
photography
photography photography
photography
 
New photo setup3
New photo setup3New photo setup3
New photo setup3
 
How to click better photos in 8 steps.
How to click better photos in 8 steps.How to click better photos in 8 steps.
How to click better photos in 8 steps.
 
Lens Profile Creator
Lens Profile CreatorLens Profile Creator
Lens Profile Creator
 
Instruction Manual Primary Arms SLX6 3-18x50 FFP Riflescope - Optics Trade
Instruction Manual Primary Arms SLX6 3-18x50 FFP Riflescope - Optics TradeInstruction Manual Primary Arms SLX6 3-18x50 FFP Riflescope - Optics Trade
Instruction Manual Primary Arms SLX6 3-18x50 FFP Riflescope - Optics Trade
 
Primary Arms 3-18x50 FFP | Apollo HUD 6.5 Creedmoor Reticle
Primary Arms 3-18x50 FFP | Apollo HUD 6.5 Creedmoor ReticlePrimary Arms 3-18x50 FFP | Apollo HUD 6.5 Creedmoor Reticle
Primary Arms 3-18x50 FFP | Apollo HUD 6.5 Creedmoor Reticle
 
Digital Photography Basics
Digital Photography BasicsDigital Photography Basics
Digital Photography Basics
 
Primary Arms 3-18x50 FFP | ACSS HUD DMR 308 Reticle
Primary Arms 3-18x50 FFP | ACSS HUD DMR 308 ReticlePrimary Arms 3-18x50 FFP | ACSS HUD DMR 308 Reticle
Primary Arms 3-18x50 FFP | ACSS HUD DMR 308 Reticle
 
Ricoh 500 g
Ricoh 500 gRicoh 500 g
Ricoh 500 g
 
Canon ef-8-15mm-f-4-l-usm-fisheye-lens
Canon ef-8-15mm-f-4-l-usm-fisheye-lensCanon ef-8-15mm-f-4-l-usm-fisheye-lens
Canon ef-8-15mm-f-4-l-usm-fisheye-lens
 
Quick Tips for clicking high-quality snaps
Quick Tips for clicking high-quality snapsQuick Tips for clicking high-quality snaps
Quick Tips for clicking high-quality snaps
 
Instructions LEUPOLD HAMR Rifle Scope | Optics Trade
Instructions LEUPOLD HAMR Rifle Scope | Optics TradeInstructions LEUPOLD HAMR Rifle Scope | Optics Trade
Instructions LEUPOLD HAMR Rifle Scope | Optics Trade
 
Photographing Your Art
Photographing Your ArtPhotographing Your Art
Photographing Your Art
 
Cat fotografia
Cat fotografiaCat fotografia
Cat fotografia
 
Cinematic lighting .pdf
Cinematic lighting .pdfCinematic lighting .pdf
Cinematic lighting .pdf
 
Landscape Focus Stacking for Photography
Landscape Focus Stacking for PhotographyLandscape Focus Stacking for Photography
Landscape Focus Stacking for Photography
 
10 Best Macro Lens For Canon Camera in 2023
10 Best Macro Lens For Canon Camera in 202310 Best Macro Lens For Canon Camera in 2023
10 Best Macro Lens For Canon Camera in 2023
 
Task 2 research different settings
Task 2 research different settingsTask 2 research different settings
Task 2 research different settings
 
Camera angles and photography
Camera angles and photographyCamera angles and photography
Camera angles and photography
 

Back front focus test chart

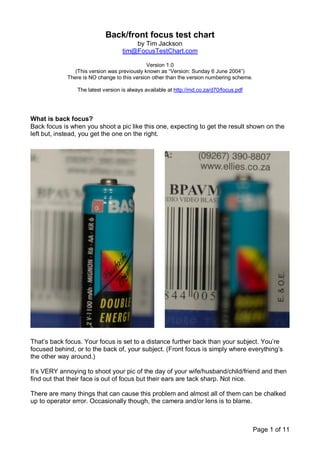
  • 1. Back/front focus test chart by Tim Jackson tim@FocusTestChart.com Version 1.0 (This version was previously known as “Version: Sunday 6 June 2004”) There is NO change to this version other than the version numbering scheme. The latest version is always available at http://md.co.za/d70/focus.pdf What is back focus? Back focus is when you shoot a pic like this one, expecting to get the result shown on the left but, instead, you get the one on the right. That’s back focus. Your focus is set to a distance further back than your subject. You’re focused behind, or to the back of, your subject. (Front focus is simply where everything’s the other way around.) It’s VERY annoying to shoot your pic of the day of your wife/husband/child/friend and then find out that their face is out of focus but their ears are tack sharp. Not nice. There are many things that can cause this problem and almost all of them can be chalked up to operator error. Occasionally though, the camera and/or lens is to blame. Page 1 of 11
  • 2. The D70 Human nature is such that when we’re happy with a new toy we tend to simply enjoy it quietly but, if our new toy gives us grief, we want to tell everyone who’ll listen. And some who won’t. So, in evaluating Internet discussions on the back focus issue, one has to be careful not to be misled into believing that every D70 suffers from back focus just because it’s a hot topic. The truth is that only a minority of D70s have been faulty in this regard. The majority work just fine. Why this test? Well, if you’re a new D70 owner and have read all about the trials and tribulations of other D70 owners who have the dreaded back focus then you probably want to know if YOUR new baby suffers from it or not. Most people who think their D70 has back focus are mistaken. (Please note that I said “most”, not “all”.) In other words, they’re in a tizz for no reason. If they’re having problems then, usually, it’s operator error. This test is intended to help any curious D70 owners to check their own cameras in order to either heave a sigh of relief that their D70 is fine or to arm themselves with the info needed to return their D70 for exchange or recalibration. Interpreting your results Once you’ve read this all through, assembled your test chart, and have taken a bunch of pics you’ll want to know what they mean. When you view your test pic/s, you should be able to clearly see that the centre part, or a part close to the centre, is in focus, while the chart gets obviously and progressively more out of focus as you move away from the centre, to the left and right, as in this example: Page 2 of 11
  • 3. If the area that’s in focus is more or less centred around the focal plane of the chart then all is well. If you get something like this next pic, then you have back focus: If you get what you see in this next pic, you have front focus. Ok, now you need to get on with the assembly of the test chart and take some test pics. Read on. Page 3 of 11
  • 4. Instructions WARNING! There are many factors that can lead to erroneous and misleading results when doing this test. Make sure you read the instructions carefully and thoroughly and follow them in detail. Please follow these instructions carefully, paying particular attention to the points dealing with the setup and positioning of the chart and camera. Failure to do this will render the test useless. 1. Print out this document. 2. You should then have: a. These instructions. b. The test chart. c. The cut-out focus box. 3. Additionally, you will need: a. A pair of scissors. b. Glue / paste. c. An old magazine or other source from which to cut out a picture. 4. Cut out the focus box (the last page of this document), and snip off the corners of the fold-down flaps, as in the following picture: Page 4 of 11
  • 5. 5. Crease all the fold lines. First fold over the side flaps: 6. Then fold over the back panel and the base panel. 7. Now you can open it all up, apply glue to the end flap and finish off your focus box: Page 5 of 11
  • 6. 8. Now you need to apply glue to the area on the chart where the focus box will be attached and then fit the focus box in position. Pay special attention to lining up the front edge of the focus box against the edge of the focal plane line. The edge of the box just touches the edge of the line. Do not cover the line. It should look like this: 9. Your test chart is ready to go! Attach it to a vertical surface. A door is good and provides an easy way to adjust the angle by simply opening or closing the door a small amount. Page 6 of 11
  • 7. 10. Position your camera on a tripod so that the lens is at exactly the same height as the focus box. I suggest moving the camera as close as you can get it to the focus box and adjusting the height of the tripod until your lens is at the same height as the focus box. Now move your tripod back a bit, to where you expect to shoot from. 11. In order to ensure that your camera is positioned square on to the focus panel of the focus box, the focus panel and the test chart behind it are equipped with alignment lines. The picture on the right shows where they are and what they look like when not aligned. You need to shift your camera to the left or right or swing the door a little until these lines are all in a row, as in the picture on the far right. This will ensure that you are square on to the focus panel and that the chart is at 45 degrees to your camera. Left pic: Out of alignment. Right pic: Alignment set correctly. Page 7 of 11
  • 8. 12. When shooting your test pics, you need to be close enough that the test chart slightly more than fills the frame, if your lens will allow that. Something like this or even a bit closer if you can: N.B. Ensure that you are not so close that the auto focus system is unable to focus due to you being at the limit of the range of focus of your lens. You can check this by moving your camera closer and closer to the image and testing when it is no longer able to focus and then making sure that you are set up at least a few inches back from this point. 13. Set your camera to aperture priority mode (“A” on the rotary dial) and adjust the aperture setting as wide as it will go (lowest f-stop number) for the lens you have on the camera. 14. Set the Autofocus system to “AF-S” mode (CSM Menu item 2). 15. Set the AF-area mode to “Single area” (CSM Menu item 3). 16. Ensure that you have the centre focus area selected. If not then adjust this using the multi selector button (up/down/left/right). The focus selector lock switch (just below the multi selector button) must be unlocked in order to change/select the appropriate Page 8 of 11
  • 9. focus area. 17. If you have extra lighting available, use it to light up the test chart. Do NOT use the flash. The chart must be lit from the front. Avoid backlighting. 18. Use either the remote control (if you have one) or the camera’s self timer to trigger the shutter release in order to avoid any camera shake. 19. Test away! If you need more info on the whole subject and how to interpret the results then trawl the D70 forum at DP Review, searching for “back focus” or “backfocus” and you’ll be deluged with info. You’re also welcome to email me at: tim@FocusTestChart.com. I’m happy to look at your test pics and to offer an opinion. By the way: If you happen to measure the spacing of the lines on the chart you’ll notice that they are further apart than the markings suggest. This is deliberate. When the chart is at 45 degrees to your camera, the spacing becomes correct. This is done so that when you see those markings in the resultant image you can read them as-is without having to make extra calculations. They’re pre-compensated. Tim Page 9 of 11
  • 10. Back focus zone Alignment line below must be in line with the one on Alignment line below must be in line with the one on the focus box when viewed through your camera. the focus box when viewed through your camera. ê ê Alignment line ê ê ê ê Alignment line ê ê 2” [50mm] [50mm] 2” é é Rear panel of focus box é é goes here 15/8" [40mm] [40mm] 15/8" 11/8” [30mm] [30mm] 11/8” Paste triangular focus box here 3 3 /4” [20mm] [20mm] /4” The focal plane is the solid black line below this text. Position the thin end of the wedge 3 of your triangular focus box up against the 3 /8” [10mm] edge of this line. Do not cover the line with [10mm] /8” the edge of the box! êêêêêêêêêê © Tim Jackson 2004 Email: tim@FocusTestChart.com 3 3 /8” [10mm] [10mm] /8” 3 3 /4” [20mm] [20mm] /4” 11/8” [30mm] Front focus zone [30mm] 11/8” 15/8" [40mm] [40mm] 15/8" 2” [50mm] [50mm] 2” Page 10 of 11
  • 11. Cut out around the outside, following the dotted Paste this flap to the end of the base panel to create a box lines. The flaps down the sides should be folded at ninety degrees to the panels to give the box Fold this flap at 90 degrees Fold this flap at 90 degrees extra rigidity. Alternatively you can paste the whole thing onto a piece of card before cutting it out and folding it. Rear panel A little snipping of the corners at each end of © Tim Jackson 2004 each flap will be required to prevent them E mail: tim@FocusTestChart.com snagging on each other when you fold the box. Take special care when making the folds. They need to be straight and sharp. The final box should have perfectly straight edges and flat surfaces. A sloppily made, wonky box is not good. Focus panel Paste a photo or an image from a magazine When you attach the focus box to the chart, on this panel to focus on or simply focus on make sure you have glue all around the edges the text. to ensure that the box doesn’t pull away from When positioning your camera, move around Fold this flap at 90 degrees the chart. Fold this flap at 90 degrees until you’ve lined up the square alignment line below with the ones on the main chart to ensure you’re set up square-on to this panel. The fit and finish is all important. Remember that we’re measuring millimetres here and the details matter! Square alignment line The lined chart will then automatically be at 45 degrees to your camera. When you attach the completed chart to a vertical surface, such as a door, you need to It’s important to get this right in order for the test to be of any value. “stretch” the chart and put adhesive tape around all sides to make sure it sits flat against the door This edge of the box must be lined up exactly against the edge of the focal plane line on the with no bumps or bulges. main chart. Do not cover the focal plane line with the edge of the box! Everything must be smooth, sharp, even, flat, square etc. êêêêêêêêêêê Fold this flap at 90 degrees Fold this flap at 90 degrees Base panel Paste this surface onto the main sheet in the designated space. Page 11 of 11