Fake Camera para Imprimir
•
1 gefällt mir•1,062 views

Se você é viciada como eu em câmera Fotográfica vai adorar se divertir montando um super Câmera Fotográfica Maneira,é só Imprimir e montar

Empfohlen
Weitere ähnliche Inhalte
Andere mochten auch
Ähnlich wie Fake Camera para Imprimir
Ähnlich wie Fake Camera para Imprimir (20)
Mehr von Casal Criginski
Mehr von Casal Criginski (20)
Kürzlich hochgeladen
Kürzlich hochgeladen (20)
Fake Camera para Imprimir
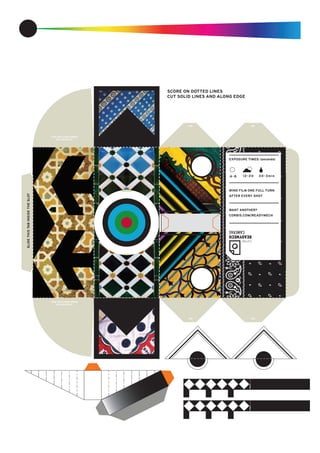
- 1. SCORE ON DOTTED LINES CUT SOLID LINES AND ALONG EDGE SLIDETHISTABINSIDETHESLOT THIS TAB SLIDES INSIDE (NO ADHESIVE) THIS TAB SLIDES INSIDE (NO ADHESIVE) TAB TAB TAB TAB EXPOSURE TIMES: (seconds) WIND FILM ONE FULL TURN AFTER EVERY SHOT WANT ANOTHER? CORBIS.COM/READYMECH 12-20 30 -3min4-8
- 5. 4 5 6 1 2 3 1 cm 1 cm 0.25 mm INSTRUCTIONS BUILDING SUPPLIES • Several sheets of good printer paper • One regular cereal-box for the light-safe interior • An pen knife or razor blade for cutting • Some double-sided tape or glue • Thin needle for making a pinhole • Small piece of aluminum foil or soda can to puncture with the needle • One new roll of film, preferably ISO200 • One film canister from which the film has been removed. You can empty a new roll, or get an empty canister from any photo developer TAKING PHOTOS • The best photos are taken on a bright day • Always wind the film one full rotation after every photo • Use a paperclip to wind the film • Remember to rewind the film before disassembling the unit for development • Hold the camera very still when shooting • Follow the chart for exposure times DEVELOPING PHOTOS • Photos can be processed normally, like any other 35mm film • If possible, ask your developer not to cut the prints • If your prints are grey or foggy, you might have a light leak. Use some extra dark tape to seal up your camera interior, and give it another try
- 6. 7 8 9 10 11 ADHESIVE ADHESIVE ADHESIVE ADHESIVE This is tricky. Pop open the empty film canister, and invert the spool so that there is a light-safe canister to recieve ex- posed film. Be sure to include a long strip of tape around the spool for feeding the new film in. Feed the film into the empty canister. Build the light tub for extra light protection. You never can be too careful. Lay the film onto the open box, and close the frame over the top. Insert the light tub it into the box.
- 7. 12 14 13 Light-safety is created by sandwiching the film between two layers of cardboard, and inserting those layers into the already light safe film canister. Carefully slide both tabs into the film canister, taking care to push the canister snugly against the frame. After sliding the cardboard tabs into the film canisters, wrap the top of the box over the back and tape it down. This should secure the entire box. Build the camera exterior, and insert the film in through the back. Be sure to feed the shutter handle through the slot near the top of the camera.