Ten Bright Ideas for Accessibility - Brightspace Connections
Pbworks setup
1. QuickTimeª and a
decompressor
are needed to see this picture.
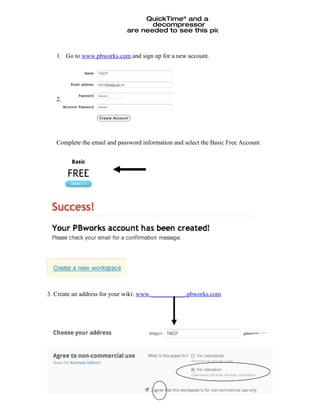
1. Go to www.pbworks.com and sign up for a new account.
2.
Complete the email and password information and select the Basic Free Account.
3. Create an address for your wiki: www.___________.pbworks.com
School Services – Program: ICT, e-Learning & Computer Studies
Spring 2010
http://tdsbweb/program/ict
2. 4. Complete the next step of the wiki process by selecting either Anyone, (open to the
Public), or only open to those who are invited or approved.
Check off the Terms of Service Agreement and then click on Take me to my Workspace.
6. This process will take you to the front page of your wiki. Click on the Edit button to
get started.
QuickTimeª and a
decompressor
are needed to see this picture.
7. Enter in your text. Whenever changes are made, click on the SAVE button in the
bottom left-hand corner!
School Services – Program: ICT, e-Learning & Computer Studies
Spring 2010
http://tdsbweb/program/ict
3. QuickTimeª and a
decompressor
are needed to see this picture.
QuickTimeª and a
decompressor
are needed to see this picture.
8. To add another page, click on Create a Page in the top right hand corner. You must be
on the View tab to have this menu available.
9. Name your new page and then press Create new page beside the title. You may choose
to use a template, or a simple blank page, no template.
QuickTimeª and a
decompressor
are needed to see this picture.
10. To link your pages together, click on the Insert
Link button and use the drop down menu to link to
the different pages within your wiki
School Services – Program: ICT, e-Learning & Computer Studies
Spring 2010
http://tdsbweb/program/ict
4. 11.Enter your information and use the
toolbar to format your entry. The toolbar works exactly like Microsoft Word, or
Appleworks. It has the most popular fonts, and the sizing is by xx-small to xx-large.
Always remember to save!
12. To insert a file or an image, (jpeg, gif etc…), click on Images and Files, Browse and
then navigate to your file or image. When you have the correct file/ image, click on the
Upload button.
Tip: To turn text into a link, highlight the text, then click on a page or file from the list
above.
13. To insert a Plugin – Click on the Insert Plugin on the Toolbar.
Follow the wizard
to insert a
calendar, or if you
School Services – Program: ICT, e-Learning & Computer Studies
want a Google
Spring 2010
Gadget make sure
http://tdsbweb/program/ict
to copy and paste
the provided code
in the HTML box!
5. Settings
1. To view your settings make sure to click on the View tab and then Settings at the top.
QuickTimeª and a
decompressor
are needed to see this picture.
2. When in the Settings, you can make changes to your wiki by clicking on the
different links in the left-hand side-bar.
Remove Format
HTML source code
To invite people into your wiki, enter their email addresses and then use the drop-down
menu to determine their level of editing. Writer is the recommended default.
School Services – Program: ICT, e-Learning & Computer Studies
Spring 2010
http://tdsbweb/program/ict
6. QuickTimeª and a
New decompressor
are needed to see this picture.
QuickTimeª and a
decompressor
are needed to see this picture.
Feature!
School Services – Program: ICT, e-Learning & Computer Studies
Spring 2010
http://tdsbweb/program/ict
7. Classroom Accounts
Students can be added to your wiki without email addresses – simply follow the 4 step
process:
1. Click on the link create accounts for your students.
2. Enter the number of accounts you need and the permission levels you would like the
students to have: Reader, Writer, or Editor. Up to 99 accounts can be created per
workspace.
QuickTimeª and a
decompressor
are needed to see this picture.
School Services – Program: ICT, e-Learning & Computer Studies
Spring 2010
http://tdsbweb/program/ict
8. 3. Fill in student names, or leave it blank and pbwiki will do it for you!
3. Confirm
your
accounts
as they cannot be changed!
4. Print out your accounts and
distribute them to your students!
School Services – Program: ICT, e-Learning & Computer Studies
Spring 2010
http://tdsbweb/program/ict
9. School Services – Program: ICT, e-Learning & Computer Studies
Spring 2010
http://tdsbweb/program/ict